- WebAssembly Tutorial
- WebAssembly - Home
- WebAssembly - Overview
- WebAssembly - Introduction
- WebAssembly - WASM
- WebAssembly - Installation
- WebAssembly - Tools to Compile to WASM
- WebAssembly - Program Structure
- WebAssembly - Javascript
- WebAssembly - Javascript API
- WebAssembly - Debugging WASM in Firefox
- WebAssembly - “Hello World”
- WebAssembly - Modules
- WebAssembly - Validation
- WebAssembly - Text Format
- WebAssembly - Convert WAT to WASM
- WebAssembly - Dynamic Linking
- WebAssembly - Security
- WebAssembly - Working with C
- WebAssembly - Working with C++
- WebAssembly - Working with Rust
- WebAssembly - Working with Go
- WebAssembly - Working with Nodejs
- WebAssembly - Examples
- WebAssembly Useful Resources
- WebAssembly - Quick Guide
- WebAssembly - Useful Resources
- WebAssembly - Discussion
WebAssembly - Quick Guide
WebAssembly - Overview
WebAssembly is a new computer programming language for the web. WebAssembly code is a low level binary format, that is compatible with the web and can easily run in modern web browsers. The file size generated is small and it loads and executes faster. You can now compile languages like C, C++, Rust, etc. to binary format and it can run on the web just like javascript.
Definition of WebAssembly
As per the official website of WebAssembly, which is available at https://webassembly.org/, it is defined as WebAssembly (abbreviated as Wasm) is a binary instruction format for a stack-based virtual machine. Wasm is designed as a portable target for compilation of high-level languages like C/C++/Rust, enabling deployment on the web for client and server applications.
Web Assembly is not something that a developer will have to write, but the code is written in languages like C, C++, Rust and can be compiled to WebAssembly (wasm). The same code can be run inside the web browsers.
Web Assembly is a new language, the code is low-level assembly language, but with its text format feature, the code is readable and debugging is possible, if necessary.
Goals of WebAssembly
The open standards for WebAssembly are developed in a W3C Community Group that includes representatives from all major browsers as well as a W3C Working Group.
The main goals of WebAssembly are mentioned below −
Faster, Efficient and Portable − WebAssembly code is meant to run faster on different platforms taking advantage of the hardware available.
Easy to read and debug − WebAssembly, being a low level assembly language, has text format support, that allows you to debug the code for any issues and also to rewrite the code, if necessary.
Security − WebAssembly is safe to run on the web browsers, as it takes care of permissions and same-origin policies.
Advantages of WebAssembly
The following are the advantages of WebAssembly −
Run is Modern Browsers − WebAssembly is able to execute without any issues on the modern web browsers which are available.
Multiple Language support − Languages like C, C++, Rust, Go can now compile the code to WebAssembly and run the same in web browsers. So, the languages which were not able to run in a browser will now be able to do so.
Faster, Efficient and Portable − Due to the small size of the code, it loads and executes faster.
Easy to understand − Developers don’t have to do much stress in understanding WebAssembly coding, as they don’t have to write the code in WebAssembly. Instead compile the code in WebAssembly and execute the same on the web.
Easy to Debug − Though the final code is in low level assembly language, you can also get it in text format, that is easy to read and debug.
Disadvantages of WebAssembly
The following are the disadvantages of WebAssembly −
WebAssembly is still being worked on and it is too early to decide the future of it.
WebAssembly is dependent on javascript to interact with the Document Object Model (DOM).
WebAssembly - Introduction
WebAssembly is also called WASM which was first introduced in the year 2017. The big technology companies behind the origin of WebAssembly are Google, Apple, Microsoft, Mozilla and W3C.
The buzz is that WebAssembly is going to replace Javascript because of its faster execution, but that is not the case. WebAssembly and Javascript are meant to work together towards solving the complex issues.
Need for WebAssembly
So far, we have only Javascript that can work successfully inside the browser. There are very heavy tasks that are difficult to carry out in the browsers using javascript.
To name a few they are Image recognition, Computer-Aided Design (CAD) applications, Live video augmentation, VR and augmented reality, Music applications, Scientific visualization and simulation, Games, Image / video editing etc.
WebAssembly is a new language with binary instruction that can load and execute faster. The task stated above, can be easily done in high level languages like C, C++, Rust etc. We need a way that, the code we have in C, C++, Rust can be compiled and can use it in web browsers. The same is achievable using WebAssembly.
When the WebAssembly code is loaded inside the browser. Then, the browser takes care of converting into machine format that can be understood by the processors.
For javascript the code has to be downloaded, parsed and converted to machine format. A lot of time goes into it and for heavy tasks like, we mentioned earlier can be very slow.
Working of WebAssembly
High level languages like C, C++ and Rust are compiled into binary format, that is, .wasm and text format .wat.

The source code written in C, C++ and Rust is compiled to .wasm using a compiler. You can make use of the Emscripten SDK for compiling C/C++ to .wasm.
The flow is as follows −

C/C++ code can be compiled to .wasm using Emscripten SDK. Later, the .wasm code can be used with the help of javascript in your html file to display the output.
Key Concepts of WebAssembly
The Key concepts are as explained below −
Module
A module is an object that is compiled by the browser to executable machine code. A module is said to be stateless and it can be shared between windows and web workers.
Memory
Memory in WebAssembly, is an arraybuffer that holds the data. You can allocate memory by using the Javascript api WebAssembly.memory().
Table
Table in WebAssembly is a typed array that is, outside WebAssembly memory and mostly has a reference to functions. It stores the memory address of the functions.
Instance
Instance is an object that will have, all the exported functions that can be called from javascript to execute inside the browser.
WebAssembly - WASM
WebAssembly is also called wasm, which is an improvement to Javascript. It is designed to run inside browsers just like javascript and also with nodejs. You happen to get wasm output, when any high level language like C, C++, Rust is compiled.
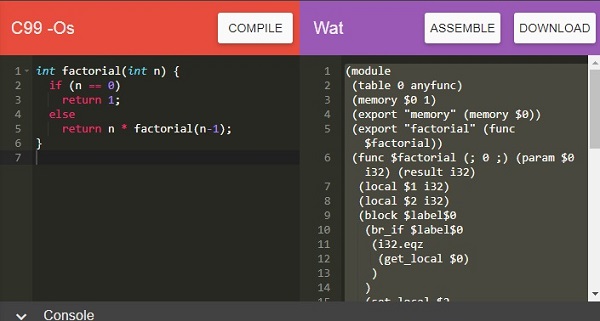
Consider the following C program −
int factorial(int n) {
   if (n == 0)
      return 1;
   else
      return n * factorial(n-1);
}
Make use of WasmExplorer, which is available at https://mbebenita.github.io/WasmExplorer/ to get the compiled code as shown below −
The WebAssembly text format for factorial program is as stated below −
(module
   (table 0 anyfunc)
   (memory $0 1)
   (export "memory" (memory $0)) (export "factorial" (func $factorial))
   (func $factorial (; 0 ;) (param $0 i32) (result i32)
      (local $1 i32)
      (local $2 i32)
      (block $label$0
         (br_if $label$0
            (i32.eqz
               (get_local $0)
            )
         )
         (set_local $2
            (i32.const 1)
         )
         (loop $label$1
            (set_local $2
               (i32.mul
                  (get_local $0) (get_local $2)
               )
            )
            (set_local $0
               (tee_local $1        (i32.add
                  (get_local $0) (i32.const -1)
               )
               )
            )
            (br_if $label$1      (get_local $1)
            )
         )
         (return
            (get_local $2)
         )
      )
      (i32.const 1)
   )
)
Using the Wat2Wasm tool, you can view the WASM code, just like how it is mentioned below −
Developers are not supposed to write code in wasm or learn to code in it, as it is mostly generated when you compile high level languages.
Stack Machine Model
In WASM, all the instructions are pushed on to the stack. The arguments are popped and the result is pushed back to the stack.
Consider the following WebAssembly Text format that adds 2 numbers −
(module
   (func $add (param $a i32) (param $b i32) (result i32)
      get_local $a
      get_local $b
      i32.add
   )
   (export "add" (func $add))
)
The name of the function is $add, it takes in 2 params $a and $b. The result is a type 32-bit integer. The local variables are accessed using get_local and the add operation is performed using i32.add.
The stack representation to add 2 numbers while execution will be as follows −

In step 1 − The execution of get_local $a instruction, the first parameters i.e., $a is pushed on the stack.
In step 2 − During execution of get_local $b instruction, the second parameters i.e., $b is pushed on the stack.
In step 3 − The execution of i32.add will pop the elements from the stack and will push the result back to the stack. The value that remains in the end inside the stack is the result of the function $add.
WebAssembly - Installation
In this chapter, will learn how to install Emscripten SDK to compile C/C++. Emscripten is a Low level virtual machine (LLVM) that takes bytecode generated from C/C++ and compiles it into JavaScript that can easily execute inside the browser.
To compile C/C++ to WebAssembly, we need to first install Emscripten sdk.
Install Emscripten sdk
The steps to install Emscripten sdk are as follows −
Step 1 − Clone the emsdk repo : git clone https://github.com/emscripten-core/emsdk.git.
E:\wa>git clone https://github.com/emscripten-core/emsdk.git
Cloning into 'emsdk'...
remote: Enumerating objects: 14, done.
remote: Counting objects: 100% (14/14), done.
remote: Compressing objects: 100% (12/12), done.
remote: Total 1823 (delta 4), reused 4 (delta 2), pack-reused 1809 receiving obje
cts: 99% (1819/1823), 924.01 KiB | 257.00 KiB/s
Receiving objects: 100% (1823/1823), 1.01 MiB | 257.00 KiB/s, done.
Resolving deltas: 100% (1152/1152), done.
Step 2 − Enter inside the directory emsdk.
cd emsdk
Step 3 − For windows: Execute following command.
emsdk install latest
For linux, this command will take some time to install the necessary tools like java, python etc. Follow the below mentioned code −
./emsdk install latest
Step 4 − To activate latest SDK execute following command in your terminal.
For windows, execute the following command −
emsdk activate latest
For linux, execute the below mentioned command −
./emsdk activate latest
Step 5 − To activate PATH and other environment variables run following command in your terminal.
For windows, execute the command −
emsdk_env.bat
For linux, execute the following command −
source ./emsdk_env.sh
We are done installing the emsdk and can now compile C or C++ code. The compiling of C/C++ will be done in the next chapters.
To compile any C or C++ code following is the command −
emcc source.c or source.cpp -s WASM=1 -o source.html
The output will give you a source.html file, source.js and source.wasm files. The js will have the api that will fetch the source.wasm and you can see the output, when you hit source.html in the browser.
To just get the wasm file you can use following command. This command will give you only source.wasm file.
emcc source.c or source.cpp -s STANDALONE_WASM
WebAssembly - Tools to Compile to WASM
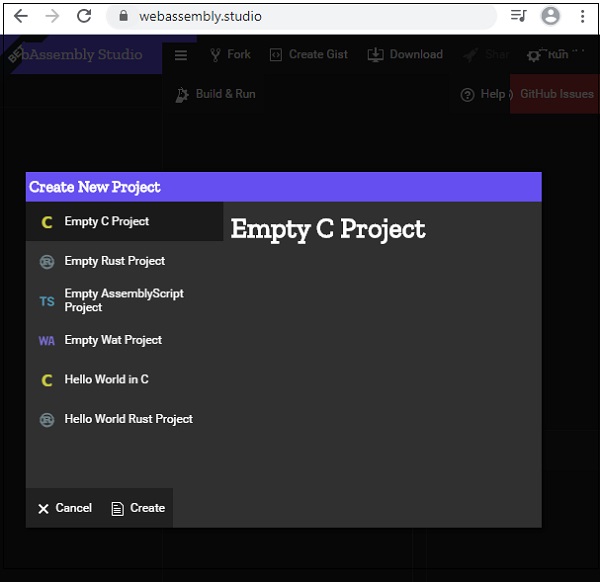
This chapter will discuss some easy to use tools that are very helpful, while working with WebAssembly. Let us begin by learning about WebAssembly.studio tool.
WebAssembly.studio
This tool allows you to compile C, Rust, Wat to Wasm etc.
To start with you can click on Empty C Project, Empty Rust Project, Empty Wat Project to compile C and Rust to WASM. 5.
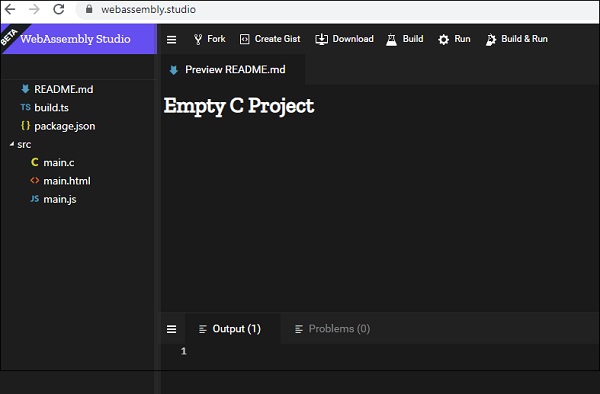
It has Build, Run to build the code and check the output. The download button allows you to download .wasm file, that can be used to test inside browser. This tool is very helpful to compile C and Rust code and check the output.
WebAssembly Explorer
WebAssembly Explorer allows you to compile C and C++ code. Refer the link https://mbebenita.github.io/WasmExplorer/ for more details. The screen that will appear after clicking the link is shown below −
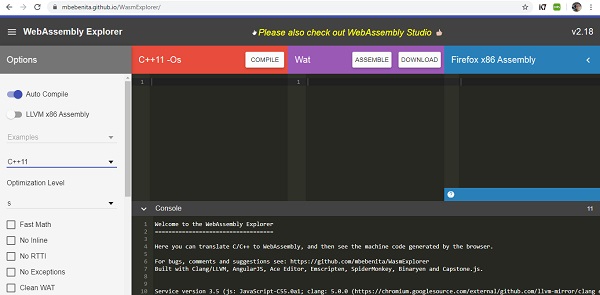
You can choose the C and C++ version. The source code of C or C++ is written here −
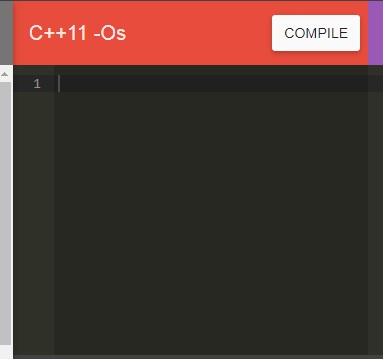
Once, you click on Compile button, it gives the WebAssembly text format (WAT) and Firefox x86 Assembly code in the blocks below −

You can download the .wasm code to test it inside the browser.
WASMFiddle
Wasmfiddle helps you to compile C code to WebAssembly and also test the output. After clicking on the link https://wasmfiddle.com/, you will see the following page −
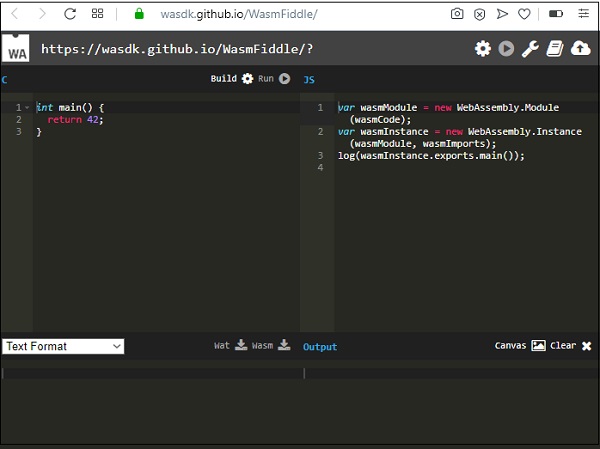
Click on Build to compile the code. You can download the Wat and Wasm code by clicking on the Wat and Wasm. To test the output click on Run button.
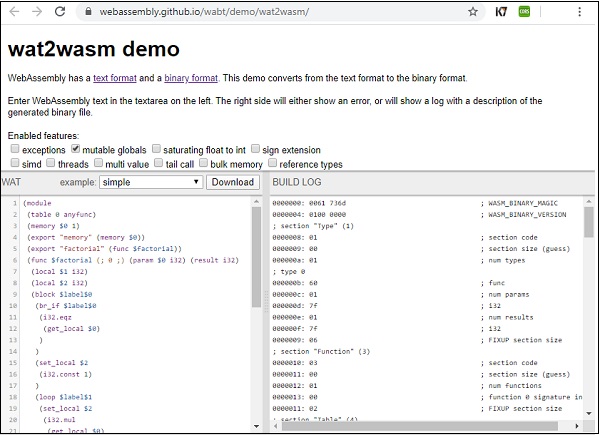
WASM to WAT
The tool wat2wasm will give you wasm code when you enter the WebAssembly text format. You can click on the link https://webassembly.github.io/wabt/demo/wat2wasm/ for demo and the screen that will appear is given below −
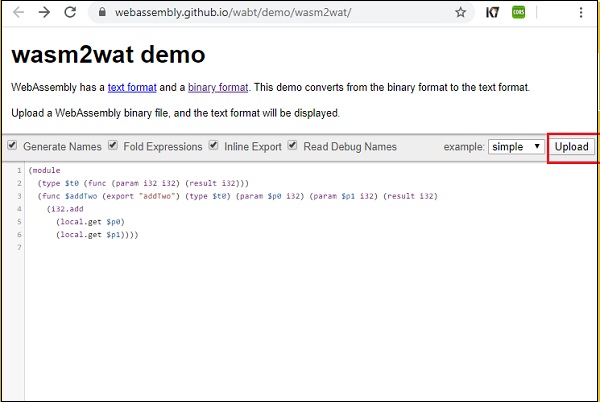
You can make use of the upload button to upload .wasm and the textarea will display the text format.
WAT to WASM
The tool wat2wasm will give you wasm code when you enter the WebAssembly text format. You can click on the link https://webassembly.github.io/wabt/demo/wat2wasm/ for demo and the screen that will appear is given below −
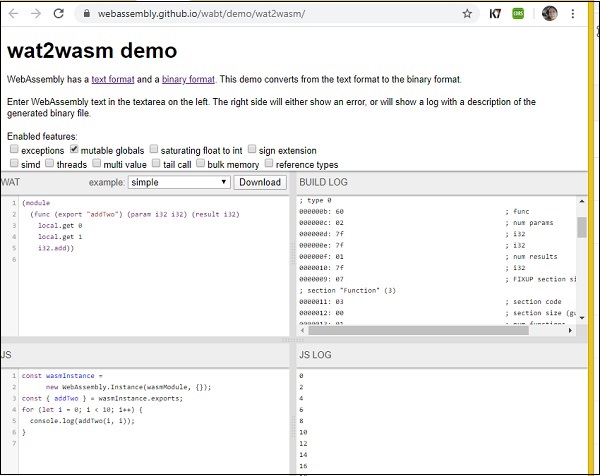
This tool is very helpful, as it helps to get the output also tested. You can enter the WAT code and take a look at the .wasm code and also execute the code to see the output.
WebAssembly - Program Structure
WebAssembly, also called WASM, is binary format low level code developed to be executed inside browsers in the most efficient way. WebAssembly code is structured with following concepts −
- Values
- Types
- Instructions
Let us learn them in detail now.
Values
Values in WebAssembly are meant to store complex data such as text, strings and vectors. WebAssembly supports the following −
- Bytes
- Integers
- Floating point
- Names
Bytes
Bytes is the simplest form of values supported in WebAssembly. The value is in hexadecimal format.
For exampleBytes represented as b, can also take natural numbers n, where n <256.
byte ::= 0x00| .... |0xFF
Integers
In WebAssembly, integers supported are as given below −
- i32: 32-bit integer
- i64: 64-bit integer
Floating Point
In WebAssembly floating point numbers supported are as follows −
- f32: 32-bit floating point
- f64: 64-bit floating point
Names
Names are sequence of character, with scalar values defined by Unicode, which is available at the link http://www.unicode.org/versions/Unicode12.1.0/ given herewith.
Types
The entities in WebAssembly are classified as types. The types supported are as stated below −
- Value Types
- Result Types
- Function Types
- Limits
- Memory Types
- Table Types
- Global Types
- External Types
Let us study them one by one.
Value Types
The values type supported by WebAssembly are as mentioned below −
- i32: 32-bit integer
- i64: 64-bit integer
- f32: 32-bit floating point
- f64: 64-bit floating point
valtype ::= i32|i64|f32|f64
Result Types
The values written inside brackets are executed and stored inside result types. The result type is the output of the execution of a block of code made up of values.
resulttype::=[valtype?]
Function Types
A function type will take in vector of parameters returns a vector of results.
functype::=[vec(valtype)]--> [vec(valtype)]
Limits
Limits are the storage range linked with memory and table types.
limits ::= {min u32, max u32}
Memory Types
Memory types deal with linear memories and the size range.
memtype ::= limits
Table Types
Table Types are classified by the element type assigned to it.
tabletype ::= limits elemtype
elemtype ::= funcref
Table type is dependent on the limit for the minimum and maximum size assigned to it.
Global Types
Global Type holds the global variables that have the value, that can change or remain the same.
globaltype ::= mut valtype
mut ::= const|var
External Types
External Types deals with imports and external values.
externtype ::= func functype | table tabletype | mem memtype | global globaltype
Instructions
WebAssembly code is a sequence of instructions that follows a stack machine model. As WebAssembly follows a stack machine model, the instructions are pushed on the stack.
The argument values for a function, for example, are popped from stack and the result is pushed back on the stack. In the end, there will be only one value in the stack and that is the result.
Some of the commonly used Instructions are as follows −
- Numeric Instructions
- Variable Instructions
Numeric Instructions
Numeric Instructions are operations, which are performed on numeric value.
For examplenn, mm ::= 32|64 ibinop ::= add|sub|mul|div_sx|rem_sx|and|or|xor irelop ::= eq | ne | lt_sx | gt_sx | le_sx | ge_sx frelop ::= eq | ne | lt | gt | le | ge
Variable Instructions
Variable instructions are about accessing the local and global variables.
For example
To access local variables −
get_local $a
get_local $b
To set local variables −
set_local $a
set_local $b
To access global variables −
get_global $a
get_global $b
To set global variables −
set_global $a
set_global $b
WebAssembly - JavaScript
This chapter will list out the comparison between WebAssembly and Javascript.
Javascript is a language, that we have used a lot inside the browser. Now, with WebAssembly release, we can also use WebAssembly inside the browser.
The reason for WebAssembly to come into existence is not to replace javascript, but to take care of certain things, that are difficult to handle with javascript.
For example
It is difficult to get the tasks such as Image recognition, CAD applications, Live video augmentation, VR and augmented reality, Music applications, Scientific visualization and simulation, Games, Image / video editing etc. to be done with javascript.
Using high level languages like C/C++, Rust, which now can be compiled to WebAssembly, it is easy to get the task mentioned above to be done. WebAssembly generates a binary code that is easy to execute inside the browser.
So here, is the list of comparison done between Javascript and WebAssembly.
| Parameters | Javascript | WebAssembly |
|---|---|---|
Coding |
You can easily write code in Javascript. The code written is human readable and saved as .js. When used inside the browser you need to use a <script> tag. |
The code can be written in text format in WebAssembly and it is saved as .wat. It is difficult to write the code in .wat format. It is best to compile the code from some other high level language instead of writing from start in .wat. You cannot execute the .wat file inside the browser and has to convert to .wasm using the compilers or online tools available. |
Execution |
The code written in javascript when used inside the browser has to be downloaded, parsed, compiled and optimized. |
We have WebAssembly code in .wasm already compiled and in binary format. |
Memory Management |
Javascript assigns memory when, variables are created and the memory is released when not used and are added to garbage collection. |
Memory in WebAssembly is an arraybuffer that holds the data. You can allocate memory by using the Javascript API WebAssembly.memory(). WebAssembly memory is stored in an array format i.e. a flat memory model that is easy to understand and perform the execution. The disadvantage of memory model in WebAssembly is −
|
Load Time & Performance |
In case of javascript, when called inside the browser, the javascript file has to be downloaded, and parsed. Later, the parser converts the source code to bytecode that the javascript engine executes the code in the browser. The Javascript engine is very powerful and hence, the load time and performance of javascript is very fast in comparison to WebAssembly. |
A most important goal of WebAssembly is to be faster than JavaScript.Wasm code generated from high-level languages is smaller in size and hence, the load time is faster. But, languages like GO, when compiled to wasm produce a big file size for a small piece of code. WebAssembly is designed in such a way that it is faster in compilation, and can run across all the major browsers. WebAssembly still has to add lots of improvements in terms of performance in comparison to javascript. |
Debugging |
Javascript is human-readable and can be debugged easily. Adding breakpoints to your javascript code inside the browser allows you to easily debug the code. |
WebAssembly provides the code in text format, that is readable but, still very difficult to debug. Firefox does allow you to view the wasm code in .wat format inside the browser. You cannot add breakpoints in .wat and that is something that will be available in the future. |
Browser Support |
Javascript works well in all browsers. |
All major web browsers have support for WebAssembly. |
WebAssembly - JavaScript API
In this chapter, we will understand how to load the wasm code and execute them in the browser using the help of javascript webassembly API.
Here are some important API's, we are going to make use throughout the tutorial to execute wasm code.
- fetch() Browser API
- WebAssembly.compile
- WebAssembly.instance
- WebAssembly.instantiate
- WebAssembly.instantiateStreaming
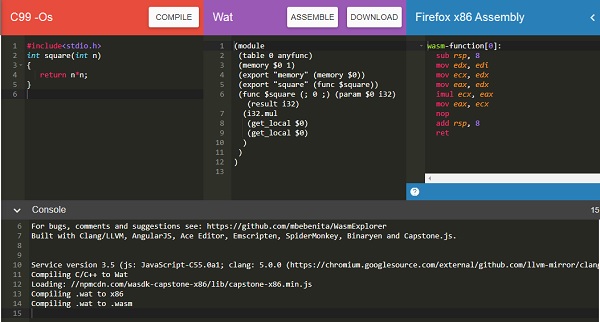
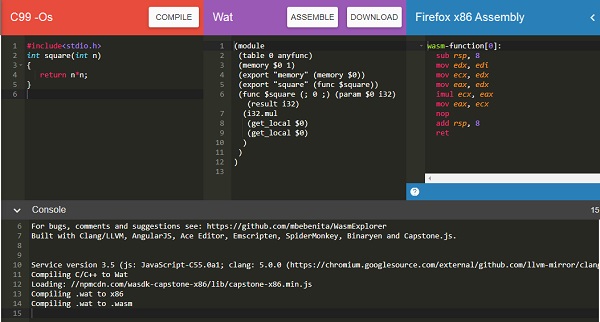
Before we discuss the WebAssembly javascript API's, to test the API and the output we are going to use the following C program and the .wasm code generated from the c program using wasm explorer.
An example for C Program is as follows −
#include<stdio.h>
int square(int n) {
   return n*n;
}
We will make use of WASM explorer, to get the wasm code −

Download WASM code and use it to test the API's.
fetch() Browser API
fetch() API is meant to load .wasm network resource.
<script>
   var result = fetch("findsquare.wasm");
   console.log(result);
</script>
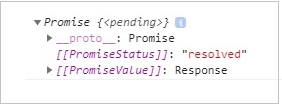
It returns a promise as shown below −
You can also make use of XMLHttpRequest method to fetch the wasm network resource.
WebAssembly.compile()
The api responsibility is to compile the module details that are fetched from .wasm.
Syntax
The syntax is as given below −
WebAssembly.compile(buffer);
Parameters
Buffer − This code from .wasm has to be converted to a typed array or arraybuffer, before giving as input to compile.
Return value
It will return a promise that will have the compiled module.
Example
Let us see one example, that gives the output as a compiled module using webAssembly.compile().
<script>
   fetch("findsquare.wasm") .then(bytes => bytes.arrayBuffer())
   .then(mod => {
      var compiledmod = WebAssembly.compile(mod);
      compiledmod.then(test=> {
         console.log(test);
      })
   })
</script>
Output
The console.log, when checked in the browser, will give you the compiled module details −
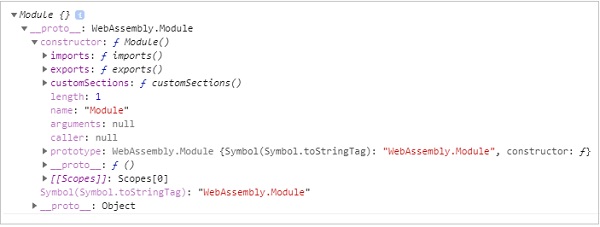
The module has a constructor object with imports, exports, and customSections. Let us see the next API, to get more details of the compiled module.
WebAssembly.instance
Using the WebAssembly.instance, API will give you the executable instance of the compiled module that can be further executed to get the output.
Syntax
The syntax is as given below −
new WebAssembly.Instance(compiled module)
Return value
The return value will be an object with the array of exports function that can be executed.
Example
<script>
   fetch("findsquare.wasm")
      .then(bytes => bytes.arrayBuffer())
      .then(mod => WebAssembly.compile(mod)).then(module => {
         let instance = new WebAssembly.Instance(module);
         console.log(instance);
      })
</script>
Output
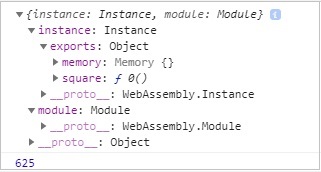
The output will give us an array of exports function as shown below −
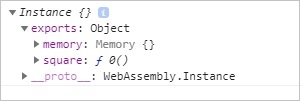
You can see the square function, that we got from the C code that is compiled.
To execute the square function, you can do the following −
<script>
   fetch("findsquare.wasm")
   .then(bytes => bytes.arrayBuffer())
   .then(mod => WebAssembly.compile(mod))
   .then(module => {
      let instance = new WebAssembly.Instance(module);
      console.log(instance.exports.square(15));
   })
</script>
The output will be −
225
WebAssembly.instantiate
This API takes care of compiling and instantiating the module together.
Syntax
The syntax is as follows −
WebAssembly.instantiate(arraybuffer, importObject)
Parameters
arraybuffer − The code from .wasm has to be converted to typed array or arraybuffer before giving as input to instantiate.
importObject − The import object has to have details of the memory, imported functions to be used inside the module. It can be an empty module object, in case, there is nothing to be shared.
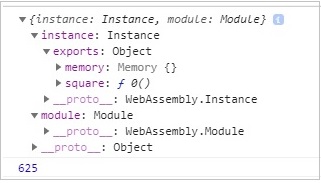
Return value
It will return a promise, that will have module and instance details.
Example
<script type="text/javascript">
   const importObj = {
      module: {}
   };
   fetch("findsquare.wasm")
      .then(bytes => bytes.arrayBuffer())
      .then(module => WebAssembly.instantiate(module, importObj))
      .then(finalcode => {
         console.log(finalcode); console.log(finalcode.instance.exports.square(25));
      });
</script>
Output
When you execute the code, you will get the below mentioned output.
WebAssembly.instantiateStreaming
This API takes care of compiling as well as instantiating the WebAssembly module from the .wasm code given.
Syntax
The syntax is as given below −
WebAssembly.instantiateStreaming(wasmcode, importObject);
Parameters
wasmcode − Response from fetch or any other API that gives the wasm code and returns a promise.
importObject − The import object has to have details of the memory, imported functions to be used inside the module. It can be an empty module object in case there is nothing to be shared.
Return Value
It will return a promise, that will have module and instance details.
Example
An example is discussed below −
<script type="text/javascript">
   const importObj = {
      module: {}
   };
   WebAssembly.instantiateStreaming(fetch("findsquare.wasm"), importObj).then(obj => {
      console.log(obj);
   });
</script>
When you test it in the browser, you will see an error −

To make it work at your server end, you will have to add the mime type application/wasm or else make use of WebAssembly.instantiate(arraybuffer, importObject).
WebAssembly - Debugging WASM in Firefox
WebAssembly support is added to all the latest browsers available with you today like Chrome, Firefox. The Firefox version 54+ onwards gives you a special feature to debug your wasm code.
To do that, execute your code inside Firefox browsers that call wasm. For example, consider following C code that finds the square of the number.
An example for the C Program is as follows −
#include<stdio.h>
int square(int n) {
   return n*n;
}
We will make use of WASM explorer to get the wasm code −
Download WASM code and use it to see the output in the browser.
The html file that loads the wasm is as follows −
!doctype html>
<html>
<head>
<meta charset="utf-8">
<title>WebAssembly Square function</title>
<style>
div {
font-size : 30px; text-align : center; color:orange;
}
</style>
</head>
<body>
<div id="textcontent"></div>
<script>
let square;
fetch("findsquare.wasm").then(bytes => bytes.arrayBuffer())
.then(mod => WebAssembly.compile(mod))
.then(module => {return new WebAssembly.Instance(module) })
.then(instance => {
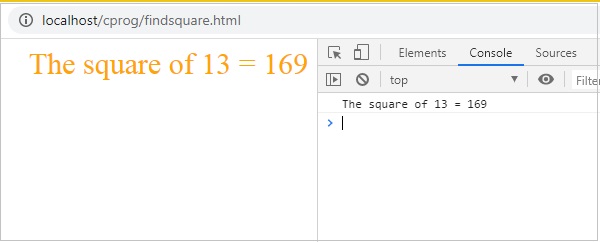
square = instance.exports.square(13);
console.log("The square of 13 = " +square);
document.getElementById("textcontent").innerHTML = "The square of 13 = " +square;
});
</script>
</body>
</html>
Open your Firefox browser and load the above html file and open the debugger tool.

You should see wasm:// entry in the debugger tool. Click on wasm:// and it shows the wasm code converted to .wat format as shown above.
You can take a look at the code of the exported function and can debug the code, if any issue comes up. Firefox also intends to add breakpoints, so that you can debug the code and check the execution flow.
WebAssembly - "Hello World"
In this chapter we are going to write a simple program in C and convert it into .wasm and execute the same in the browser to get the text "Hello World".
Will make use of wasm explorer tool that will convert the C program to .wasm and will make use of the .wasm inside our .html file.
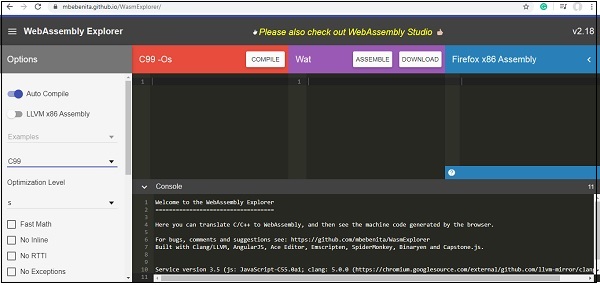
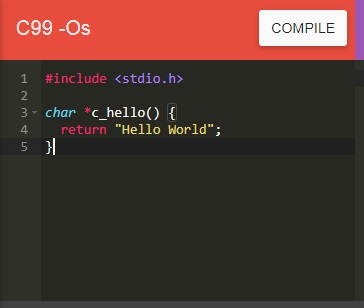
The Wasm explorer tool which is available at https://mbebenita.github.io/WasmExplorer/ looks as follows −
The C code that we are going to use is as follows −
#include <stdio.h>
char *c_hello() {
   return "Hello World";
}
Update the first block in wasm explorer with the C code as shown below −
Click on COMPILE Button to compile to WASM and WAT and Firefox x86 Web Assembly as shown below −
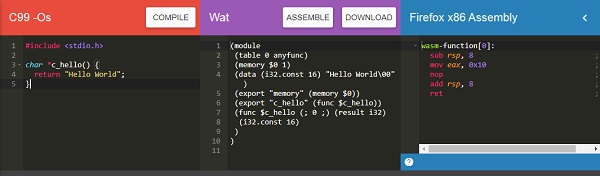
Use the DOWNLOAD to get the .wasm file and save it as firstprog.wasm.
Create a .html file called firstprog.html as shown below −
<!doctype html>
<html>
   <head>
      <meta charset="utf-8">
      <title>WebAssembly Hello World</title>
   </head>
   <body>
      <div id="textcontent"></div>
      <script type="text/javascript">
         //Your code from webassembly here
      </script>
   </body>
</html>
Let us now use firstprog.wasm to read the helloworld from the C function c_hello().
Step 1
Use fetch() api to read the firstprog.wasm code.
Step 2
The .wasm code has to be converted into arraybuffer by using ArrayBuffer. The ArrayBuffer object will return you a fixed length binary data buffer.
The code so far will be as follows −
<script type="text/javascript">
   fetch("firstprog.wasm") .then(bytes => bytes.arrayBuffer())
</script>
Step 3
The bytes from ArrayBuffer have to be compiled into a module by using WebAssembly.compile(buffer) function.
The code will look like below −
<script type="text/javascript">
   fetch("firstprog.wasm")
   .then(bytes => bytes.arrayBuffer())
   .then(mod => WebAssembly.compile(mod))
</script>
Step 4
To get the module we have to call the webassembly.instance constructor as shown below −
<script type="text/javascript">
   fetch("firstprog.wasm")
   .then(bytes => bytes.arrayBuffer())
   .then(mod => WebAssembly.compile(mod))
   .then(module => {return new WebAssembly.Instance(module) })
</script>
Step 5
Let us now console the instance to see the details in the browser.
<script type="text/javascript">
   fetch("firstprog.wasm") .then(bytes => bytes.arrayBuffer())
   .then(mod => WebAssembly.compile(mod)) .then(module => {
      return new WebAssembly.Instance(module)
   })
   .then(instance => {
      console.log(instance);
   });
</script>
The console.log details are shown below −
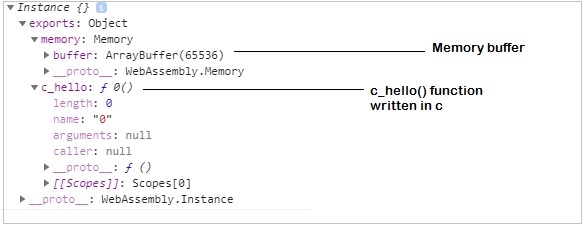
To get the string “Hello World” from the function c_hello(), we need to add some code in javascript.
First, get the memory buffer details as shown below −
let buffer = instance.exports.memory.buffer;;
The buffer value has to be converted to a typed array so that we can read the values from it. The buffer has the string Hello World in it.
To convert to typed call the constructor Uint8Array as shown below −
let buffer = new Uint8Array(instance.exports.memory.buffer);
Now, we can read the value from the buffer in a for - loop.
Let us now get the start point to read the buffer, by calling the function we wrote as shown below −
let test = instance.exports.c_hello();
Now, the test variable has the start point to read our string. WebAssembly does not have anything for string values, everything is stored as integers.
So when, we read the value from the buffer, they will be an integer value and we need to convert it into a string using fromCharCode() in javascript.
The code is as follows −
let mytext = "";
for (let i=test; buffer[i]; i++){
   mytext += String.fromCharCode(buffer[i]);
}
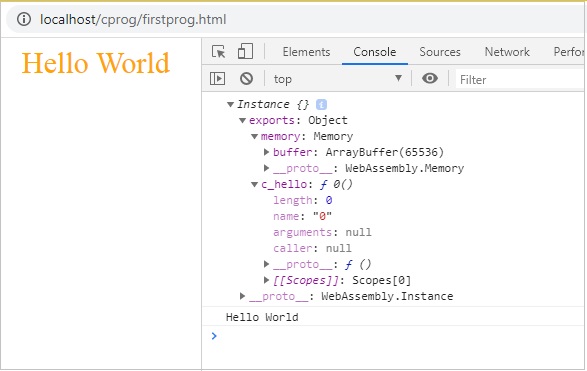
Now, when you console mytext you should see the string “Hello World”.
Example
The complete code is as follows −
<!doctype html>
<html>
   <head>
      <meta charset="utf-8">
      <title>WebAssembly Add Function</title>
      <style>
         div {
            font-size : 30px; text-align : center; color:orange;
         }
      </style>
   </head>
   <body>
      <div id="textcontent"></div>
      <script>
         fetch("firstprog.wasm")
         .then(bytes => bytes.arrayBuffer())
         .then(mod => WebAssembly.compile(mod))
         .then(module => {return new WebAssembly.Instance(module)})
         .then(instance => {
            console.log(instance);
            let buffer = new Uint8Array(instance.exports.memory.buffer);
            let test = instance.exports.c_hello();
            let mytext = "";
            for (let i=test; buffer[i]; i++) {
               mytext += String.fromCharCode(buffer[i]);
            }
            console.log(mytext); document.getElementById("textcontent").innerHTML = mytext;
         });
      </script>
   </body>
</html>
We have added a div and the content is added to the div, so the string is displayed on the browser.
Output
The output is mentioned below −
WebAssembly - Modules
We have seen how to get a .wasm file from c /c++ code. In this chapter, we will convert the wasm into a WebAssembly module and execute the same in the browser.
Let us use the C++ Factorial code as shown below −
int fact(int n) {
   if ((n==0)||(n==1))
      return 1;
   else
      return n*fact(n-1);
}
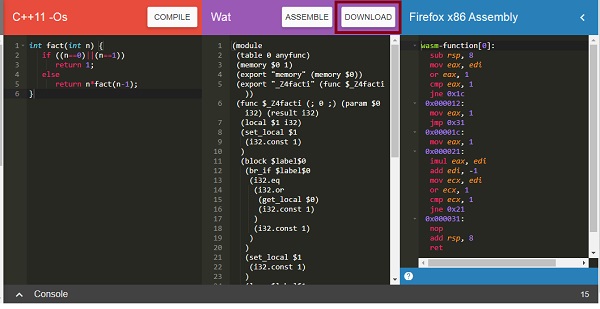
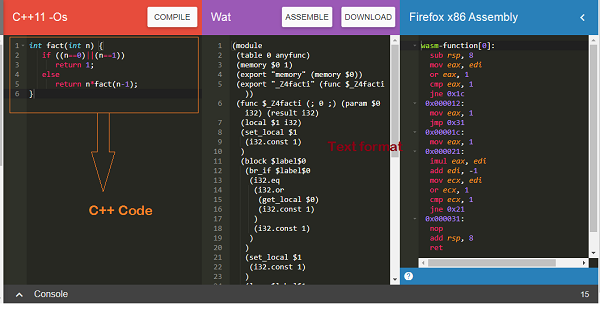
Open Wasm Explorer which is available at https://mbebenita.github.io/WasmExplorer/ as shown below −

The first column has the C++ factorial function, the 2nd column has the WebAssembly text format and the last column has x86 Assembly code.
The WebAssembly Text format −
(module
   (table 0 anyfunc)
   (memory $0 1)
   (export "memory" (memory $0))
   (export "_Z4facti" (func $_Z4facti))
   (func $_Z4facti (; 0 ;) (param $0 i32) (result i32)
      (local $1 i32)
      (set_local $1
         (i32.const 1)
      )
      (block $label$0
         (br_if $label$0
            (i32.eq
               (i32.or
                  (get_local $0)
                  (i32.const 1)
               )
               (i32.const 1)
            )
         )
         (set_local $1
            (i32.const 1)
         )
         (loop $label$1
            (set_local $1
               (i32.mul
                  (get_local $0)
                  (get_local $1)
               )
            )
            (br_if $label$1
               (i32.ne
                  (i32.or
                     (tee_local $0
                        (i32.add
                           (get_local $0)
                           (i32.const -1)
                        )
                     )
                     (i32.const 1)
                  )
                  (i32.const 1)
               )
            )
         )
      )
      (get_local $1)
   )
)
The C++ function fact has been exported as “_Z4facti” in WebAssembly Text format.
Click on the download button to download the wasm code and save the file as factorial.wasm.
Now to convert the .wasm code to the module we have to do the following −
Step 1
Convert the .wasm into arraybuffer by using ArrayBuffer. The ArrayBuffer object will return you a fixed-length binary data buffer.
Step 2
The bytes from ArrayBuffer have to be compiled into a module by using WebAssembly.compile(buffer) function.
The WebAssembly.compile() function compiles and returns a WebAssembly.Module from the bytes given.
Here, is the Javascript code that is discussed in Step 1 and 2.
<script type="text/javascript">
   let factorial;
   fetch("factorial.wasm")
      .then(bytes => bytes.arrayBuffer())
      .then(mod => WebAssembly.compile(mod))
      .then(module => {return new WebAssembly.Instance(module) })
      .then(instance => {

      factorial = instance.exports._Z4facti;
      console.log('Test the output in Brower Console by using factorial(n)');
   });
</script>
Code Explanation
Javascript browser API fetch is used to get the contents of factorial.wasm.
The content is converted to bytes using arrayBuffer().
The module is created from bytes by calling WebAssembly.compile(mod).
The instance of a module is created using new
WebAssembly.Instance(module)
The factorial function export _Z4facti is assigned to variable factorial by using WebAssembly.Module.exports().
Example
Here, is the module.html along with the javascript code −
module.html
<!doctype html>
<html>
   <head>
      <meta charset="utf-8">
      <title>WebAssembly Module</title>
   </head>
   <body>
      <script>
      let factorial;
      fetch("factorial.wasm")
      .then(bytes => bytes.arrayBuffer())
      .then(mod => WebAssembly.compile(mod))
      .then(module => {return new WebAssembly.Instance(module) })
      .then(instance => {
         factorial = instance.exports._Z4facti;
         console.log('Test the output in Browser Console by using factorial(n)');
      });
      </script>
   </body>
</html>
Output
Execute module.html in the browser to see the output −

WebAssembly - Validation
In this chapter, we are going to discuss the webassembly.validate() function that will validate the .wasm output. The .wasm is available when we compile C, C++ or rust code.
You can make use of the following tools to get the wasm code.
Wasm Fiddler,which is available at https://wasdk.github.io/WasmFiddle/
WebAssembly Explorer, which is available at https://mbebenita.github.io/WasmExplorer/.
Syntax
The syntax is as given below −
WebAssembly.validate(bufferSource);
Parameters
bufferSource − The bufferSource has the binary code that comes from either C, C++ or Rust program. It is in the form of typedarray or ArrayBuffer.
Return Value
The function will return true if the .wasm code is valid and false if not.
Let us try one example. Go to Wasm fiddler, which is available at https://wasdk.github.io/WasmFiddle/, enter C code of your choice and down the wasm code.
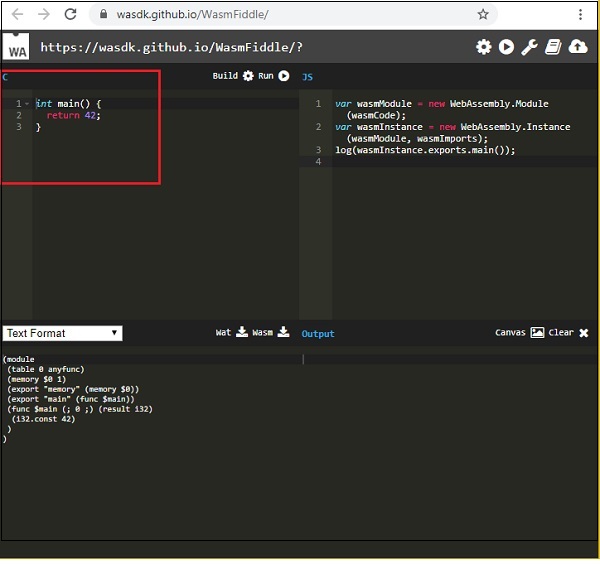
The block marked in red is the C code. Click on the Build button at the center to execute the code.
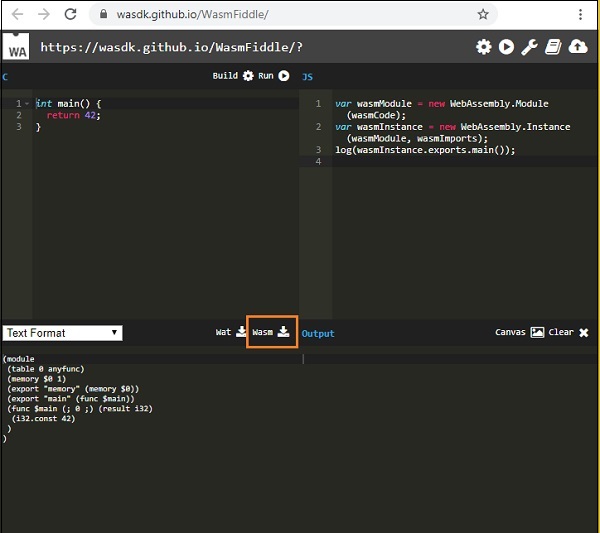
Click on the Wasm , button to download the .wasm code. Save the .wasm at your end and let us use the same for validating.
Example
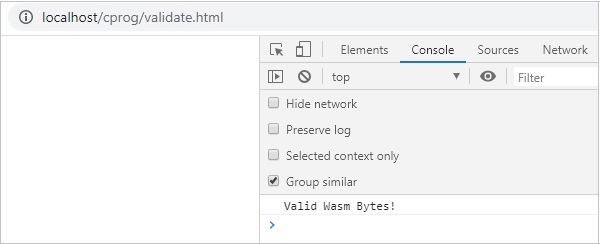
For Example: validate.html
<!doctype html>
<html>
   <head>
      <meta charset="utf-8">
      <title>Testing WASM validate()</title>
   </head>
   <body>
      <script>
         fetch('program.wasm').then(res => res.arrayBuffer() ).then(function(testbytes) {
         var valid = WebAssembly.validate(testbytes);
            if (valid) {
               console.log("Valid Wasm Bytes!");
            } else {
               console.log("Invalid Wasm Code!");
            }
         });
      </script>
   </body>
</html>
I have hosted the above .html file in wamp server along with the download .wasm file. Here, is the output when you test it in the browser.
Output
The output is the mentioned below −
WebAssembly - Text Format
WebAssembly has the code in a binary format called WASM. You can also get the text format in WebAssembly and it is called WAT (WebAssembly Text format). As a developer you are not supposed to write code in WebAssembly, instead, you have to compile high-level languages like C, C++ and Rust to WebAssembly.
WAT Code
Let us write WAT code stepwise.
Step 1 − The starting point in a WAT is to declare the module.
(module)
Step 2 − Let us now, add some functionality to it in the form of function.
The function is declared as shown below −
(func <parameters/result> <local variables> <function body>)
The function starts with func keyword which is followed by parameters or result.
Parameters/Result
The parameters and the return value as a result.
The parameters can have the following type supported by wasm −
- i32: 32-bit integer
- i64: 64-bit integer
- f32: 32-bit float
- f64: 64-bit float
The params for the functions are written as given below −
- (param i32)
- (param i64)
- (param f32)
- (param f64)
The result will be written as follows −
- (result i32)
- (result i64)
- (result f32)
- (result f64)
The function with parameters and return value will be defined as follows −
(func (param i32) (param i32) (result i64) <function body>)
Local Variables
The local variables are those that you need in your function. A local value to the function will be defined as follows −
(func (param i32) (param i32) (local i32) (result i64) <function body>)
Function Body
Function body is the logic to be performed. The final program will look like this −
(module (func (param i32) (param i32) (local i32) (result i64) <function body>) )
Step 3 − To read and set parameters and local variables.
To read the parameters and local variables, make use of get_local and set_local command.
Example
(module
   (func (param i32) (param i32) (local i32) (result i64) get_local 0
      get_local 1
      get_local 2
   )
)
As per the function signature,
get_local 0 will give the param i32
get_local 1 will give the next parameter param i32
get_local 2 will give local value i32
Instead of referring to the parameters and locals using numeric values like 0,1,2, you can also use the name before the parameters, prefixing the name with a dollar sign.
The following example shows, how to use the name with parameters and locals.
Example
(module
   (func
      (param $a i32)
      (param $b i32)
      (local $c i32)
      (result i64) get_local $a get_local $b get_local $c
   )
)
Step 4 − Instruction in Function body and execution.
The execution in wasm follows the stack strategy. The instructions executed are sent one by one on the stack. For example, the instruction get_local $a will push the value, it reads on the stack.
The instruction like i32.add that will add the will pop the elements from the stack.
(func (param $a i32) (param $b i32)
   get_local $a
   get_local $b
   i32.add
)
The instruction for i32.add is ($a+$b). The final value of i32.add, will be pushed on the stack and that will be assigned to the result.
If the function signature has a result declared, there should be one value in the stack at the end of the execution. If there is no result param, the stack has to be empty at the end.
So, the final code along with function body will be as follows −
(module
   (func (param $a i32) (param $b i32) (result i32)
      get_local $a
      get_local $b
      i32.add
   )
)
Step 5 − Making call to the function.
The final code with the function body is as shown in step 4. Now, to call the function, we need to export it.
To export the function, it can be done with index values like 0,1, but, we can also give names. The name will be prefixed by $ and it will be added after the func keyword.
Example
(module
   (func $add (param $a i32) (param $b i32) (result i32)
      get_local $a
      get_local $b i32.add
   )
)
The function $add has to be exported, using export keyword as shown below −
(module
   (func $add
      (param $a i32)
      (param $b i32)
      (result i32)
      get_local $a get_local $b i32.add
   )
   (export "add" (func $add))
)
To test the above code in the browser, you will have to convert it into binary form (.wasm). Refer to the next chapter that shows how to convert .WAT to .WASM.
WebAssembly - Convert WAT to WASM
In the previous chapter, we have seen how to write code in .wat i.e., WebAssembly text format. The WebAssembly text format will not directly work inside the browser and you need to convert it into binary format i.e., WASM to work inside browser.
WAT to WASM
Let us convert .WAT to .WASM.
The code we are going to use is as follows −
(module
   (func $add (param $a i32) (param $b i32) (result i32)
      get_local $a
      get_local $b
      i32.add
   )
   (export "add" (func $add))
)
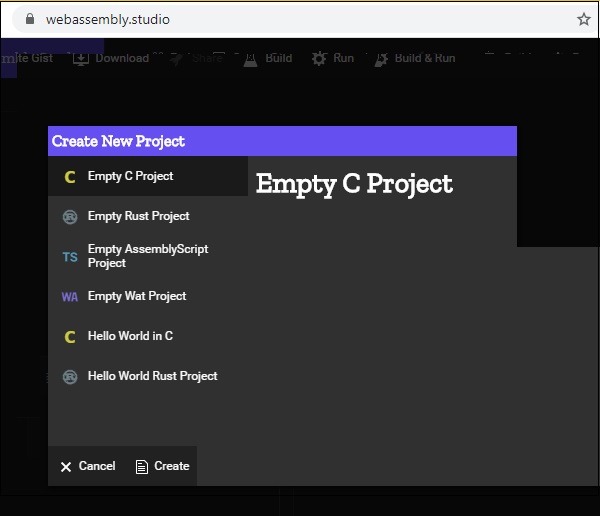
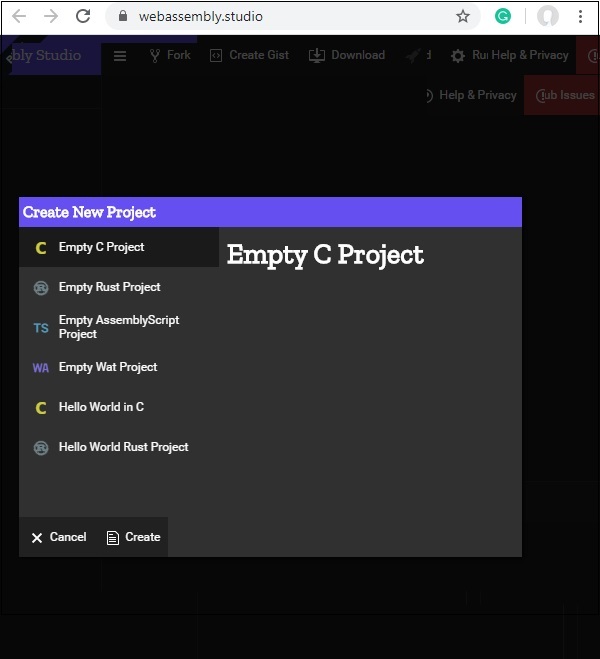
Now, go to WebAssembly Studio, which is available at https://webassembly.studio/.
You should see something like this, when you hit the link −
Click on Empty Wat project and click on Create button at the bottom.
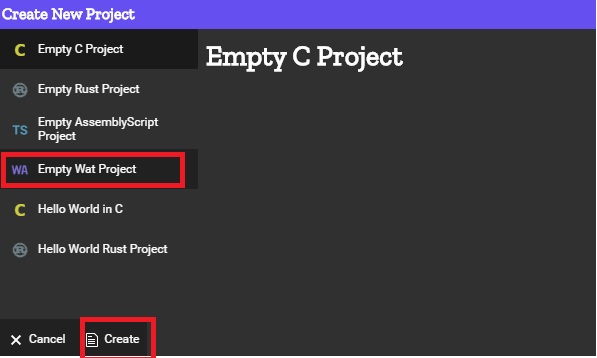
It will take you to an empty project as shown below −

Click on main.wat and replace the existing code with yours and click on the save button.
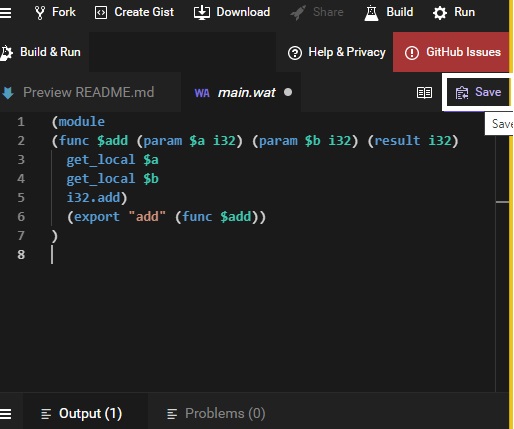
Once saved, click on the build to convert to .wasm −
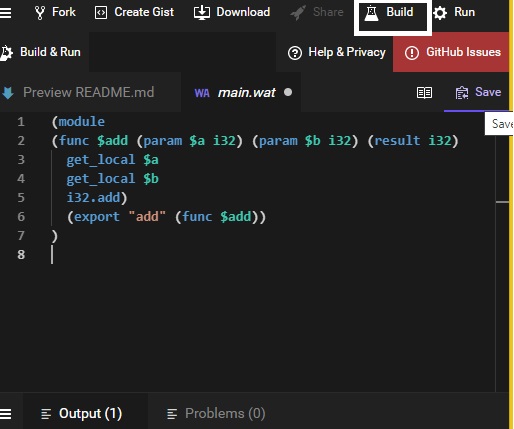
If the build is successful you should see .wasm file created as shown below −
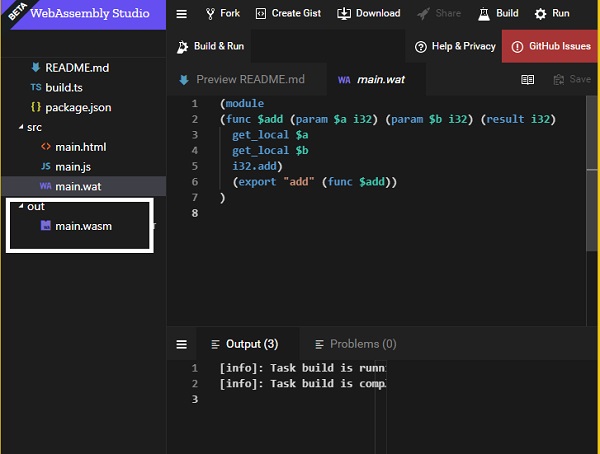
Down the main.wasm file and use it inside your .html file to see the output as shown below.
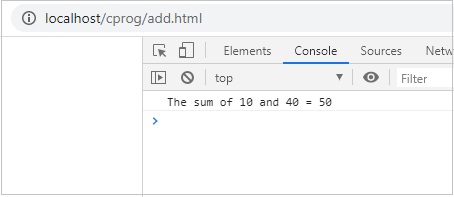
For Example − add.html
<!doctype html>
<html>
   <head>
      <meta charset="utf-8">
      <title>WebAssembly Add Function</title>
   </head>
   <body>
      <script>
         let sum;
         fetch("main.wasm")
            .then(bytes => bytes.arrayBuffer())
            .then(mod => WebAssembly.compile(mod)) .then(module => {

            return new WebAssembly.Instance(module)
         })
         .then(instance => {
            sum = instance.exports.add(10,40);
            console.log("The sum of 10 and 40 = " +sum);
         });
      </script>
   </body>
</html>
The function add is exported as shown in the code. The params passed are 2 integer values 10 and 40 and it returns the sum of it.
Output
The output is displayed in the browser.
WebAssembly - Dynamic Linking
Dynamic linking is the process in which two or more modules will be linked together during runtime.
To demonstrate how dynamic linking works, we will use C program and compile it to wasm using Ecmascript sdk.
So here we have −
test1.c
int test1(){
   return 100;
}
test2.c
int test2(){
   return 200;
}
main.c
#include <stdio.h>

int test1();
int test2();
int main() {
   int result = test1() + test2();
   return result;
}
In main.c code, it makes use of test1() and test2(), which are defined inside test1.c and test2.c. Let us check how to link these modules in WebAssembly.
The command to compile the above code is as follows: make use of SIDE_MODULE =1 for dynamic linking as shown in the command.
emcc test1.c test2.c main.c -s SIDE_MODULE=1 -o maintest.wasm
Using WasmtoWat, which is available at https://webassembly.github.io/wabt/demo/wasm2wat/, will get the WebAssembly text format of maintest.wasm.
(module
   (type $t0 (func (result i32))) (type $t1 (func))
   (type $t2 (func (param i32))) (type $t3 (func (param i32 i32) (result i32)))
   (import "env" "stackSave" (func $env.stackSave (type $t0)))
   (import "env" "stackRestore" (func $env.stackRestore (type $t2)))
   (import "env" "__memory_base" (global $env.__memory_base i32))
   (import "env" "__table_base" (global $env.__table_base i32))
   (import "env" "memory" (memory $env.memory 0))
   (import "env" "table" (table $env.table 0 funcref))
   (func $f2 (type $t1)
      (call $__wasm_apply_relocs)
   )
   (func $__wasm_apply_relocs (export "__wasm_apply_relocs") (type $t1))
   (func $test1 (export "test1") (type $t0) (result i32)
      (local $l0 i32)
      (local.set $l0
         (i32.const 100)
      )
      (return
         (local.get $l0)
      )
   )
   (func $test2 (export "test2") (type $t0) (result i32)
      (local $l0 i32)
      (local.set $l0
         (i32.const 200))
      (return
         (local.get $l0)
      )
   )
   (func $__original_main
      (export "__original_main")
      (type $t0)
      (result i32)
      (local $l0 i32)
      (local $l1 i32)
      (local $l2 i32)
      (local $l3 i32)
      (local $l4 i32)
      (local $l5 i32)
      (local $l6 i32)
      (local $l7 i32)
      (local $l8 i32)
      (local $l9 i32)
      (local.set $l0(call $env.stackSave))
      (local.set $l1 (i32.const 16))
      (local.set $l2 (i32.sub (local.get $l0) (local.get $l1)))
      (call $env.stackRestore (local.get $l2) ) (local.set $l3(i32.const 0))
      (i32.store offset=12 (local.get $l2) (local.get $l3))
      (local.set $l4 (call $test1))
      (local.set $l5 (call $test2))
      (local.set $l6 (i32.add (local.get $l4) (local.get $l5)))
      (i32.store offset=8 (local.get $l2) (local.get $l6))
      (local.set $l7 (i32.load offset=8 (local.get $l2)))
      (local.set $l8 (i32.const 16))
      (local.set $l9 (i32.add (local.get $l2) (local.get $l8)))
      (call $env.stackRestore (local.get $l9)) (return(local.get $l7))
   )
   (func $main
      (export "main")
      (type $t3)
      (param $p0 i32)
      (param $p1 i32)
      (result i32)
      (local $l2 i32)
      (local.set $l2
      (call $__original_main))
      (return (local.get $l2))
   )
   (func $__post_instantiate (export "__post_instantiate") (type $t1) (call $f2))
   (global $__dso_handle (export "__dso_handle") i32 (i32.const 0))
)
The WebAssembly text format has some imports defined as shown below −
(import "env" "stackSave" (func $env.stackSave (type $t0)))
(import "env" "stackRestore" (func $env.stackRestore (type $t2)))
(import "env" "__memory_base" (global $env.__memory_base i32))
(import "env" "__table_base" (global $env.__table_base i32))
(import "env" "memory" (memory $env.memory 0))
(import "env" "table" (table $env.table 0 funcref))
This is added while compiling code by emcc(emscripten sdk) and it deals with memory management in WebAssembly.
Working with Imports and Exports
Now to see the output, we will have to define the imports that you can see in the .wat code −
(import "env" "stackSave" (func $env.stackSave (type $t0)))
(import "env" "stackRestore" (func $env.stackRestore (type $t2)))
(import "env" "__memory_base" (global $env.__memory_base i32))
(import "env" "__table_base" (global $env.__table_base i32))
(import "env" "memory" (memory $env.memory 0))
(import "env" "table" (table $env.table 0 funcref))
The above terms are explained as follows −
env.stackSave − It is used for stack management, a functionality that is provided by the emscripten compiled code.
env.stackRestore − It is used for stack management, a functionality that is provided by the emscripten compiled code.
env.__memory_base − It is an immutable i32 global offset that is, used in env.memory and reserved for the wasm module. The module can use this global in the initializer of its data segments, so that, they are loaded at the correct address.
env.__table_base − It is an immutable i32 global offset that is, used in env.table and reserved for the wasm module. The module can use this global in the initializer of its table element segments, so that, they are loaded at the correct offset.
env.memory − This will have the memory details that are required to be shared between the wasm modules.
env.table − This will have the table details that are required to be shared between the wasm modules.
The imports have to be defined in javascript as follows −
var wasmMemory = new WebAssembly.Memory({'initial': 256,'maximum': 65536});
const importObj = {
   env: {
      stackSave: n => 2, stackRestore: n => 3, //abortStackOverflow: () => {
         throw new Error('overflow');
      },
      table: new WebAssembly.Table({
         initial: 0, maximum: 65536, element: 'anyfunc'
      }), __table_base: 0,
      memory: wasmMemory, __memory_base: 256
   }
};
Example
Following is the javascript code that makes use of the importObj inside WebAssembly.instantiate.
<!DOCTYPE html>
<html>
<head>
<meta charset="UTF-8">
</head>
<body>
<script>
var wasmMemory = new WebAssembly.Memory({'initial': 256,'maximum': 65536});
const importObj = {
env: {
stackSave: n => 2, stackRestore: n => 3, //abortStackOverflow: () => {
throw new Error('overflow');
},
table: new WebAssembly.Table({
initial: 0, maximum: 65536, element: 'anyfunc'
}), __table_base: 0,
memory: wasmMemory, __memory_base: 256
}
};
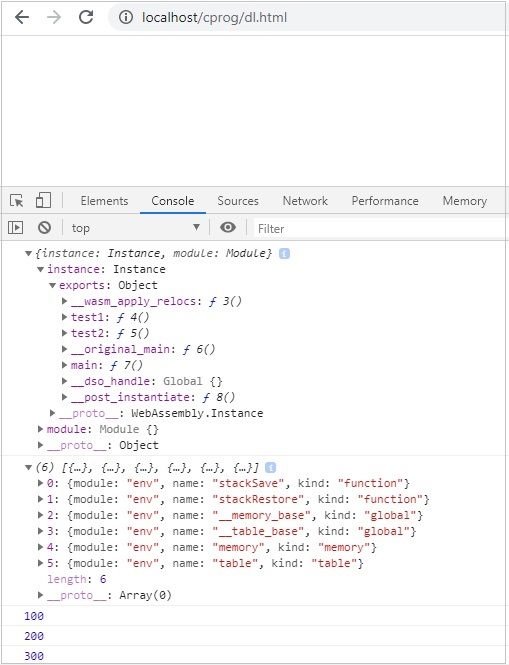
fetch("maintest.wasm") .then(bytes => bytes.arrayBuffer()) .then(
module => WebAssembly.instantiate(module, importObj)
)
.then(finalcode => {
console.log(finalcode);
console.log(WebAssembly.Module.imports(finalcode.module));
console.log(finalcode.instance.exports.test1());
console.log(finalcode.instance.exports.test2());
console.log(finalcode.instance.exports.main());
});
</script>
</body>
</html>
Output
The output is as follows −
WebAssembly - Security
As per the official website of WebAssembly.org, which is available at https://webassembly.org/docs/security/ the main goal of WebAssembly in terms of security is as follows −
The security model of WebAssembly has two important goals −
Protect users from buggy or malicious modules, and
Provide developers with useful primitives and mitigations for developing safe applications, within the constraints of (1).
The compiled code i.e. WASM from C/C++/Rust is not directly executed inside the browser and makes use of Javascript API's. The WASM code is sandboxed i.e. executed through Javascript API wrapper and the browser talks to WASM using the API.
Here, is an example of using a .wasm file inside the browser.
Example − C Program
#include<stdio.h>
int square(int n) {
   return n*n;
}
We will make use of WASM explorer to get the wasm code −
Download WASM code and use it to test the api’s.
Example
<script type="text/javascript">
   const importObj = {
      module: {}
   };
   fetch("findsquare.wasm")
      .then(bytes => bytes.arrayBuffer())
      .then(module => WebAssembly.instantiate(module,importObj))
      .then(finalcode => {

      console.log(finalcode); console.log(finalcode.instance.exports.square(25));
   });
</script>
Output
You will get the following output −
The exports objects have a reference to the function to be called. To call the function square, you will have to do it as follows −
console.log(finalcode.instance.exports.square(25));
Issues with WASM compiled code
Following are the issues with WASM compiled code −
It is difficult to check, if there is any malicious code being inserted, while compiling the code to wasm. There are no tools available at this moment to validate the code.
Wasm is difficult to analyse and the buggy/malicious code can be easily executed inside the browser.
WebAssembly - Working with C
In this chapter, we are going to compile a simple C program to javascript and execute the same in the browser.
For Example − C Program
#include<stdio.h>
int square(int n) {
   return n*n;
}
We have done the installation of emsdk in folder wa/. In same folder, create another folder cprog/ and save above code as square.c.
We have already installed emsdk in the previous chapter. Here, we are going to make use of emsdk to compile the above c code.
Compile test.c in your command prompt as shown below −
emcc square.c -s STANDALONE_WASM –o findsquare.wasm
emcc command takes care of compiling the code as well as give you the .wasm code. We have used STANDALONE_WASM option that will give only the .wasm file.
Example − findsquare.html
<!doctype html>
<html>
   <head>
      <meta charset="utf-8">
      <title>WebAssembly Square function</title>
      <style>
         div {
            font-size : 30px; text-align : center; color:orange;
         }
      </style>
   </head>
   <body>
      <div id="textcontent"></div>
      <script>
      let square; fetch("findsquare.wasm").then(bytes => bytes.arrayBuffer())
      .then(mod => WebAssembly.compile(mod)) .then(module => {
         return new WebAssembly.Instance(module)
      })
      .then(instance => {
         square = instance.exports.square(13);
         console.log("The square of 13 = " +square);
         document.getElementById("textcontent").innerHTML = "The square of 13 = " +square;
      });
      </script>
   </body>
</html>
Output
The output is as mentioned below −
WebAssembly - Working with C++
In this chapter, we are going to compile a simple C++ program to javascript and execute the same in the browser.
Example
C++ Program - Reversing a given number.
#include <iostream>
int reversenumber(int n) {
   int reverse=0, rem;
   while(n!=0) {
      rem=n%10; reverse=reverse*10+rem; n/=10;
   }
   return reverse;
}
We have done the installation of emsdk in folder wa/. In same folder, create another folder cprog/ and save above code as reverse.cpp.
We have already installed emsdk in the previous chapter. Here, we are going to make use of emsdk to compile the above c code.
Compile test.c in your command prompt as shown below −
emcc reverse.cpp -s STANDALONE_WASM –o reverse.wasm
emcc command takes care of compiling the code as well as give you the .wasm code.
Example − reversenumber.html
<!doctype html>
<html>
<head>
<meta charset="utf-8">
<title>WebAssembly Reverse Number</title>
<style>
div {
font-size : 30px; text-align : center; color:orange;
}
</style>
</head>
<body>
<div id="textcontent"></div>
<script>
let reverse;
fetch("reverse.wasm")
.then(bytes => bytes.arrayBuffer())
.then(mod => WebAssembly.compile(mod))
.then(module => {return new WebAssembly.Instance(module) })
.then(instance => {
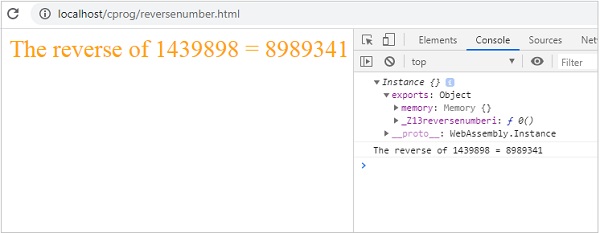
console.log(instance);
reverse = instance.exports._Z13reversenumberi(1439898);
console.log("The reverse of 1439898 = " +reverse);
document.getElementById("textcontent")
.innerHTML = "The reverse of 1439898 = " +reverse;
});
</script>
</body>
</html>
Output
The output is as follows −
WebAssembly - Working with Rust
To get RUST compile code we will make use of WebAssembly.studio tool.
Go to WebAssembly.studio which is available at Go to https://webassembly.studio/ and it will display you screen as shown below −
Click on Empty Rust Project. Once done you will get three files in src/ folder −

Open the file main.rs and change the code of your choice.
I am adding following function that will add two given numbers −
fn add_ints(lhs: i32, rhs: i32) -> i32 {
   lhs+rhs
}
The code available in main.rs is as follows −
#[no_mangle]
pub extern "C" fn add_one(x: i32) -> i32 {
   x + 1
}
Replace the fn add_one with yours as shown below −
#[no_mangle]
pub extern "C" fn add_ints(lhs: i32, rhs: i32) -> i32 {
   lhs+rhs
}
In main.js, change the function name from add_one to add_ints
fetch('../out/main.wasm').then(
   response =>
   response.arrayBuffer()
).then(bytes => WebAssembly.instantiate(bytes)).then(results => {
   instance = results.instance;
   document.getElementById("container").textContent = instance.exports.add_one(41);
}).catch(console.error);
Replace instance.exports.add_one to instance.exports.add_ints(100,100)
fetch('../out/main.wasm').then(
   response =>
   response.arrayBuffer()
).then(bytes => WebAssembly.instantiate(bytes)).then(results => {
   instance = results.instance;
   document.getElementById("container").textContent = instance.exports.add_ints(100,100)
}).catch(console.error);
Click on the build button available on webassembly.studio UI to build the code.
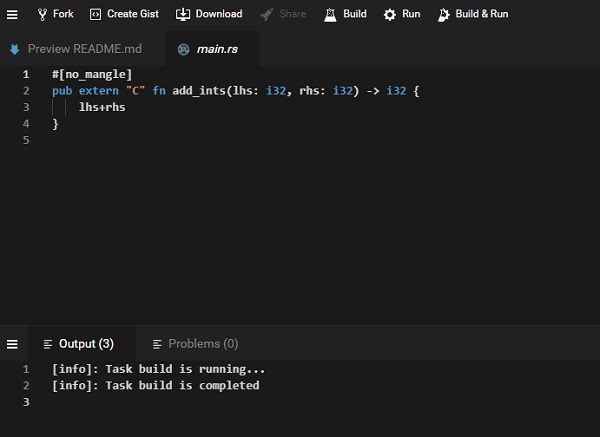
Once the build is done, click on Run button available on UI, to see the output −
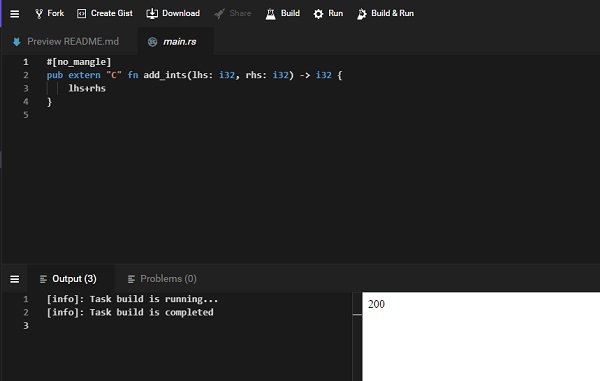
We get the output as 200, as we passed instance.exports.add_ints(100,100).
Similarly, you can write a different program for rust and get it compiled in webassembly.studio.
WebAssembly - Working with Go
Go has added support for WebAssembly from version 1.1 onwards. To test it first download, Go.
Go to the golang site, which is available at https://golang.org/dl/ and click on Download Go. As per your operating system download and install Go.
Once done, write a simple program that adds two numbers in go.
testnum.go
package main
import "fmt"
func main() {
   var a int = 100
   var b int = 200
   var ret int
   ret = sum(a, b)
   fmt.Printf( "Sum is : %d\n", ret )
}

/* function returning the max between two numbers */
func sum(num1, num2 int) int {
   return num1+num2
}
To compile above code to wasm, first set the environment variables in Go.
You will have to run following command −
Set GOOS=js
GOARCH=wasm
Once done, execute the below command −
go build -o testnum.wasm testnum.go
You should get testnum.wasm file once the command is executed.
Let us now test the code in the browser. To do that, we need to get the wasm_exec.js, that is installed with go.
The file wasm_exec.js will be available inside misc/wasm/ folder in go.
Example
Here, is the code for testgo.html that makes use of wasm_exec.js and testnum.wasm.
<html>
   <head>
      <meta charset="utf-8"/>
      <script src="wasm_exec.js"></script>
   </head>
   <body>
      <script type="text/javascript">
         const importObj = {
            module: {}
         };
         const go = new Go();
         async function fetchAndInstantiate() {
            const response = await fetch("testnum.wasm");
            const buffer = await response.arrayBuffer();
            const obj = await WebAssembly.instantiate(buffer, go.importObject);
            console.log(obj);
            go.run(obj.instance);
         }
         fetchAndInstantiate();
      </script>
   </body>
</html>
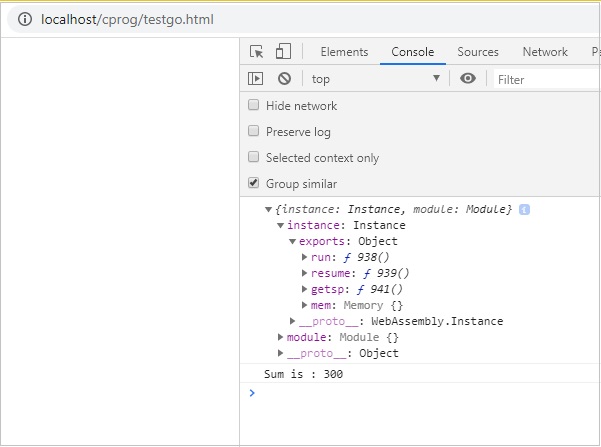
Output
The output is as follows −
WebAssembly - Working with Nodejs
Javascript has a bunch of API that can work with wasm code. The API is also supported in nodejs.
Get NODEJS installed on your system. Create a Factorialtest.js file.
Let us use the C++ Factorial code as shown below −
int fact(int n) {
   if ((n==0)||(n==1))
      return 1;
   else
      return n*fact(n-1);
}
Open Wasm Explorer, which is available at https://mbebenita.github.io/WasmExplorer/ as shown below −
The first column has the C++ factorial function, the 2nd column has the WebAssembly text format and the last column has x86 Assembly code.
The WebAssembly Text format is as follows −
(module
   (table 0 anyfunc)
   (memory $0 1)
   (export "memory" (memory $0))
   (export "_Z4facti" (func $_Z4facti))
   (func $_Z4facti (; 0 ;) (param $0 i32) (result i32)
      (local $1 i32)
      (set_local $1(i32.const 1))
      (block $label$0
         (br_if $label$0
            (i32.eq
               (i32.or
                  (get_local $0)
                  (i32.const 1)
               )
               (i32.const 1)
            )
         )
         (set_local $1
            (i32.const 1)
         )
         (loop $label$1
            (set_local $1
               (i32.mul
                  (get_local $0)
                     (get_local $1)
               )
            )
            (br_if $label$1
               (i32.ne
                  (i32.or
                     (tee_local $0
                        (i32.add
                           (get_local $0)
                           (i32.const -1)
                        )
                     )
                     (i32.const 1)
                  )
                  (i32.const 1)
               )
            )
         )
      )
      (get_local $1)
   )
)
The C++ function fact has been exported as “_Z4facti” in WebAssembly Text format.
Factorialtest.js
const fs = require('fs');
const buf = fs.readFileSync('./factorial.wasm');
const lib = WebAssembly.instantiate(new Uint8Array(buf)).
   then(res => {
      for (var i=1;i<=10;i++) {
         console.log("The factorial of "+i+" = "+res.instance.exports._Z4facti(i))
      }
   }
);
In your command line, run the command node factorialtest.js and the output is as follows −
C:\wasmnode>node factorialtest.js
The factorial of 1 = 1
The factorial of 2 = 2
The factorial of 3 = 6
The factorial of 4 = 24
The factorial of 5 = 120
The factorial of 6 = 720
The factorial of 7 = 5040
The factorial of 8 = 40320
The factorial of 9 = 362880
The factorial of 10 = 3628800
WebAssembly - Examples
The chapter discusses the examples with regards to WebAssembly.
Example 1
Following is the example of C Program to get the max Element −
void displaylog(int n);
/* function returning the max between two numbers */
int max(int num1, int num2) {
   /* local variable declaration */ int result;
   if (num1 > num2)
      result = num1;
   else result = num2;
      displaylog(result);
   return result;
}
Compile the code in wasm fiddle and download the .wasm and .wat code.
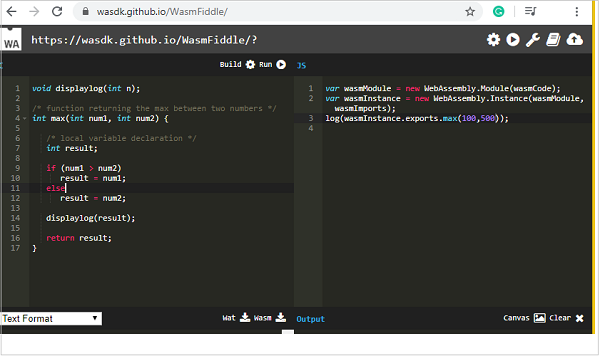
Wat code
The Wat code is as follows −
(module
   (type $FUNCSIG$vi (func (param i32)))
   (import "env" "displaylog" (func $displaylog (param i32)))
   (table 0 anyfunc)
   (memory $0 1)
   (export "memory" (memory $0))
   (export "max" (func $max))
   (func $max (; 1 ;) (param $0 i32) (param $1 i32) (result i32)
      (call $displaylog
         (tee_local $0
            (select
               (get_local $0)
               (get_local $1)
               (i32.gt_s (get_local $0) (get_local $1))
            )
         )
      )
      (get_local $0)
   )
)
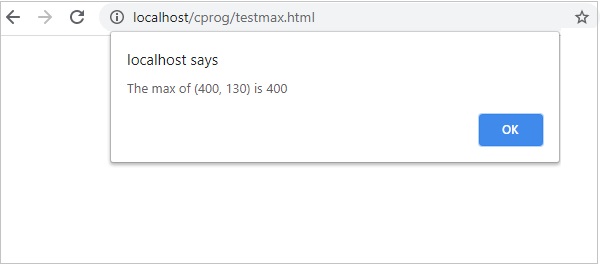
Download .wasm code and let us use in the .html file as shown below −
<!DOCTYPE html>
<html>
   <head>
      <meta charset="UTF-8">
   </head>
   <body>
      <script>
         const importObj = {
            env: {
               displaylog: n => alert("The max of (400, 130) is " +n)
            }
         };
         fetch("testmax.wasm") .then(bytes => bytes.arrayBuffer())
            .then(module => WebAssembly.instantiate(module, importObj))
            .then(finalcode => {
            console.log(finalcode);
            console.log(finalcode.instance.exports.max(400,130));
         });
      </script>
   </body>
</html>
Output
The output is as follows −
Example 2
Following is the C++ code to get the fibonacci series of given number.
#include <iostream>>
void displaylog(int n);
int fibonacciSeries(int number) {
   int n1=0,n2=1,n3,i;
   for(i=2;i<number;++i) {
      n3=n1+n2; displaylog(n); n1=n2; n2=n3;
   }
   return 0;
}
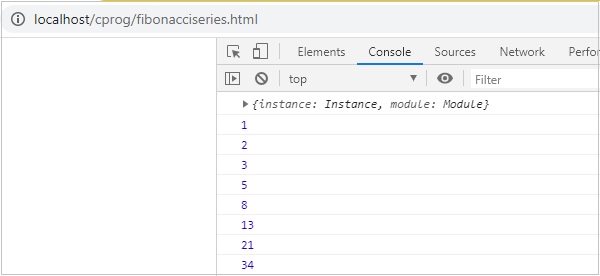
I am using wasm explorer to compile the code. Download Wat and Wasm and test the same in the browser.
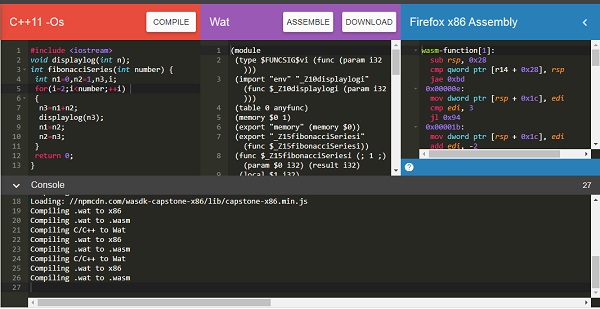
You can use the below mentioned code −
<!DOCTYPE html>
<html>
   <head>
      <meta charset="UTF-8">
   </head>
   <body>
      <script>
         const importObj = {
            env: { _Z10displaylogi: n => console.log(n) }
         };
         fetch("fib.wasm")
            .then(bytes => bytes.arrayBuffer())
            .then(module => WebAssembly.instantiate(module, importObj))
            .then(finalcode => {
            console.log(finalcode);
            console.log(finalcode.instance.exports._Z15fibonacciSeriesi(10));
         });
      </script>
   </body>
</html>
Output
The output is as follows −
Example 3
Following is the Rust code to add elements in a given array.
fn add_array(x: i32) -> i32 {
   let mut sum = 0;
   let mut numbers = [10,20,30]; for i in 0..3 {
      sum += numbers[i];
   }
   sum
}
We are going to make use of WebAssembly Studio to compile RUST to wasm.
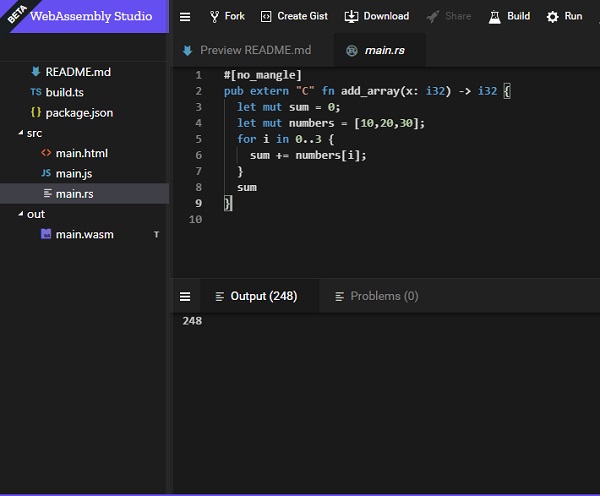
Build the code and download the wasm file and execute the same in the browser.
<!DOCTYPE html>
<html>
   <head>
      <meta charset="UTF-8">
   </head>
      <body>
      <script>
         const importObj = {
            env: {
            }
         };
         fetch("add_array.wasm") .then(bytes => bytes.arrayBuffer())
            .then(module => WebAssembly.instantiate(module, importObj))
            .then(finalcode => {
            console.log(finalcode);
            console.log(finalcode.instance.exports.add_array());
         });
      </script>
   </body>
</html>
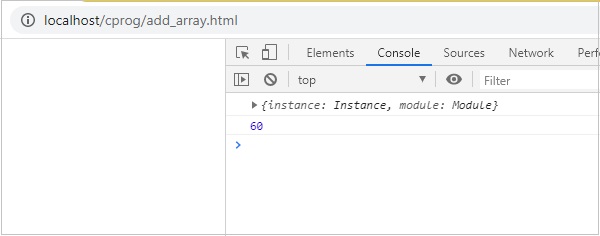
Output
The output will be as given below −