- TestLodge Tutorial
- TestLodge - Home
- TestLodge - Introduction
- TestLodge - Features
- TestLodge - Free Trial Access
- TestLodge - Login
- TestLodge - Dashboard
- TestLodge - Add Users
- TestLodge - Add a Project
- TestLodge - Test Plans
- TestLodge - Copy a Test Plan
- TestLodge - Requirements
- TestLodge - Copy Requirements
- TestLodge - Test Suites
- TestLodge - Copy Test Cases
- TestLodge - Import Test Cases
- TestLodge - Add Test Run
- TestLodge - Execute a Test Run
- TestLodge - Test Run Summary
- TestLodge - Reports
- TestLodge - Export Contents
- Issue Tracker Integration
- TestLodge - Search
- TestLodge - Logout
- TestLodge Useful Resources
- TestLodge - Quick Guide
- TestLodge - Useful Resources
- TestLodge - Discussion
TestLodge - Import Test Cases
You can create multiple test cases at a time using Excel spreadsheet or CSV file. Excel/csv files are text files represented by rows and columns as cells.
TestLodge uses Google Docs to import the spreadsheet. You have to first upload the spreadsheet to Google doc account and then authorize the account to access the file. After authorization, TestLodge automatically identifies all uploaded spreadsheets into the account.
You can select the spreadsheet and map the column name with the fields of TestLodge. Each spreadsheet is associated with a Test Suite. You have to then import the test cases into a test suite. Hence, it always better to make sure that the test suite is already present in TestLodge.
Each test case should be in its own one row only. A new test case should write into a new row. TestLodge imports the title, description, test steps, and expected result from the spreadsheet. If the test case has multiple steps, it can be written into a new line, the same row/cell using CTRL+ Enter.
You can use the first row as the column name or the first row can also be used as a test case data.
Following is a sample excel sheet.
| Title | Description | Expected Result | Test Steps | Custom Field 1 (if any) |
|---|---|---|---|---|
| Case 1 | Step 1 | Step Expected Result 1 | Step 1 Step 2 Step 3 |
|
| Case 2 | Step 1 | Step Expected Result 1 | Step 1 Step 2 Step 3 |
|
| Case n | Step 1 | Step Expected Result 1 | Step 1 Step 2 Step 3 |
Import the File
Step 1 − Make sure the csv or excel is imported as Google Spreadsheet into a Google Doc.
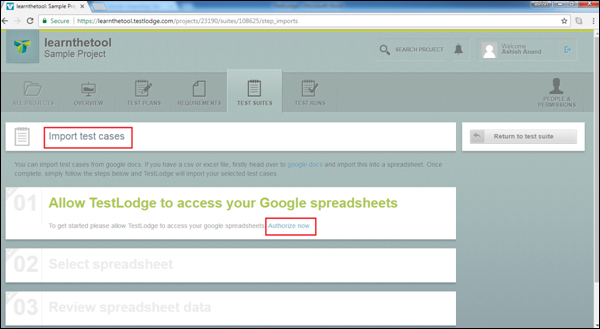
Step 2 − To copy test cases, go to Test Suites and click one of the listed test suites.
Step 3 − Click the Import test cases button present on the right side of the screen.

Now, the Import Test Case page opens.
Step 4 − Click Authorize now to allow TestLodge to access the Google spreadsheet as shown in the following screenshot.
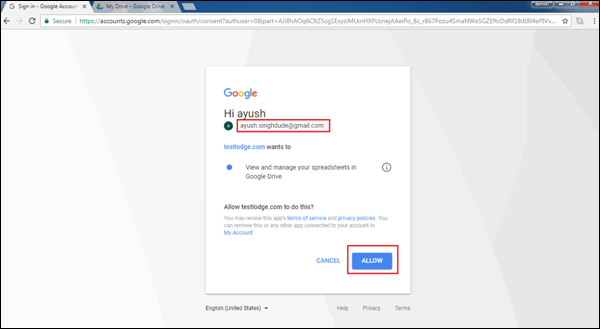
Step 5 − Login to your Google account and click Allow to authorize TestLodge to access the account.
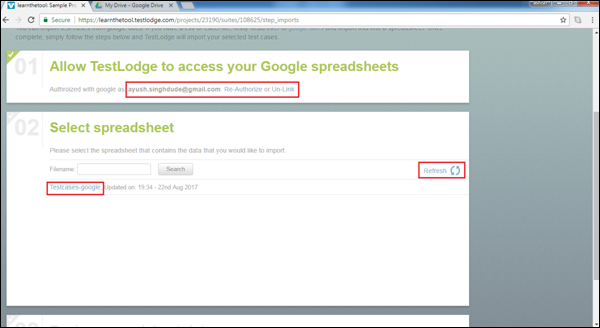
TestLodge will access and display a list of all CSV and Excel files in Google account.
Step 6 − Click the file containing the test cases to select the file as shown in the following screenshot.
Step 7 − Review the spreadsheet data and map it to the appropriate fields in TestLodge. If the first row of data in the spreadsheet is a header, select “Yes” for TestLodge to ignore the first row.
Step 8 − Select the column name for the Title, Description, Test steps, and Expected results.
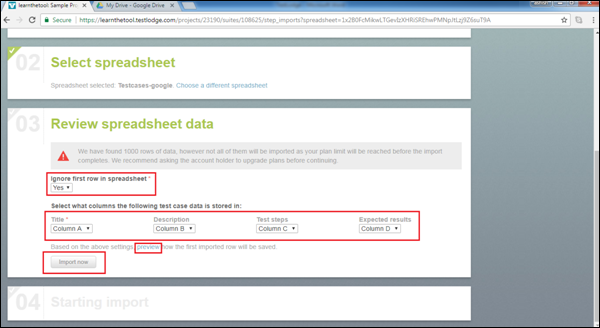
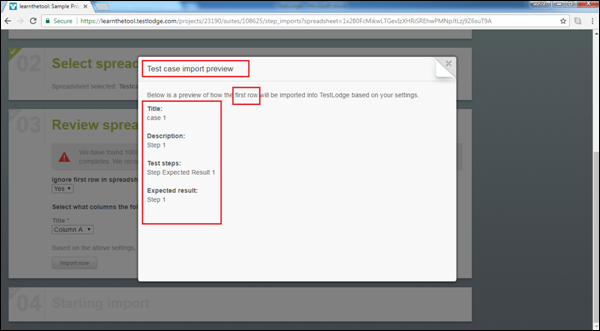
Step 9 − Click the preview button and you will be able to see which data will be imported as first case.
The following screenshot displays how the preview file looks like.
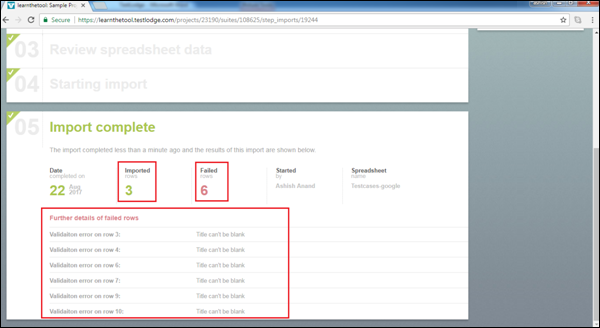
By clicking the Import now button, the import will start and display a success or failure message. You can see how many test cases are imported successfully and how many failed along with the failure messages. Note that the Title and Description are the required fields. Once the import is complete, you can go back to the Test Suite and see the imported test cases.
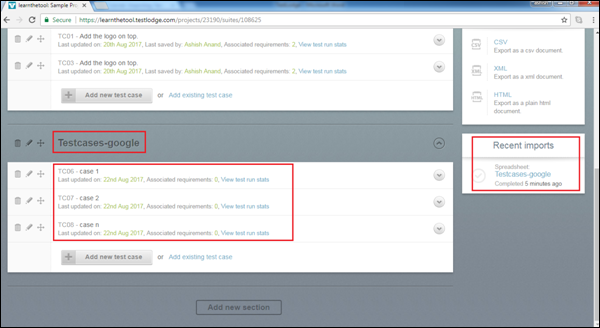
On successful import, you will get a notification and will be able to see the name of the spreadsheet on the right side of the screen in the Recent imports section as shown in the following screenshot.