- TestLodge Tutorial
- TestLodge - Home
- TestLodge - Introduction
- TestLodge - Features
- TestLodge - Free Trial Access
- TestLodge - Login
- TestLodge - Dashboard
- TestLodge - Add Users
- TestLodge - Add a Project
- TestLodge - Test Plans
- TestLodge - Copy a Test Plan
- TestLodge - Requirements
- TestLodge - Copy Requirements
- TestLodge - Test Suites
- TestLodge - Copy Test Cases
- TestLodge - Import Test Cases
- TestLodge - Add Test Run
- TestLodge - Execute a Test Run
- TestLodge - Test Run Summary
- TestLodge - Reports
- TestLodge - Export Contents
- Issue Tracker Integration
- TestLodge - Search
- TestLodge - Logout
- TestLodge Useful Resources
- TestLodge - Quick Guide
- TestLodge - Useful Resources
- TestLodge - Discussion
TestLodge - Test Suites
TestLodge has a simple and flexible interface for test suites. In TestLodge, you can maintain test suites and respective test cases, those that can be used in test execution.
A test suite must be created before the creation of test cases. Using this interface, you can create, edit, move or delete test suites/cases within the Test Suite section.
Test suites can be created and exported as CSV, XML and HTML. You can associate with requirements, test plan, and test execution.
Create a Test Suite
Following are the steps to create a Test suite.
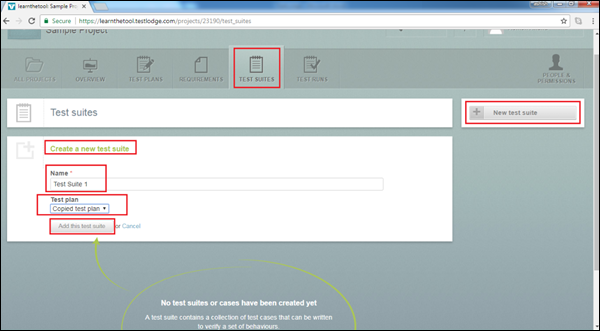
Step 1 − Go to the Test Suite section.
Step 2 − Click the New test suite button on the right side of the screen.
Step 3 − Clicking the button opens the Create a new test suite form. Enter the Test suite name in Name text box (required). Select the test plans from Test Plan list (optional) and click the Add this test suite button.
After clicking the Add this test suite button, you will receive a success message and the Requirement Name appears on the page as displayed in the following screenshot.
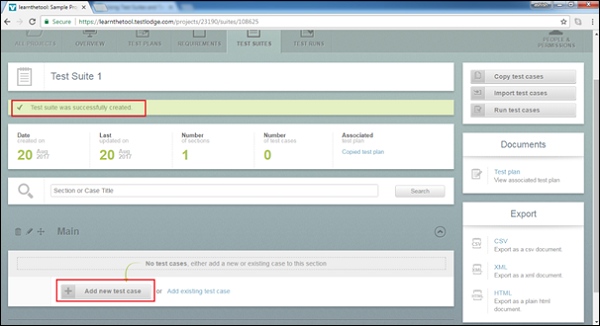
Step 4 − The added Test Suite is blank. There are no test cases for this suite. Now, you can add as many test cases inside the test suite.
Create Test Cases
Test cases are individual verifications. They are step-by-step sequential activities. These should be followed in order to execute the test.
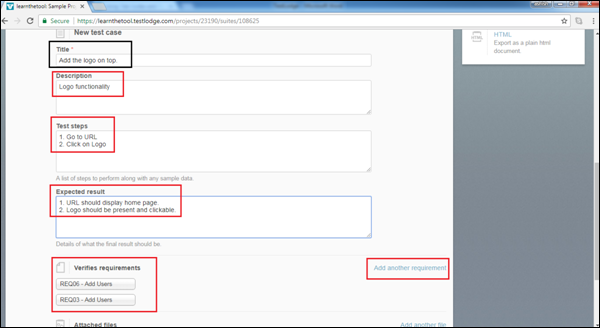
Step 1 − To add the test case in a test suite, click the Add new test case button.
Step 2 − It will open a new test case form. Enter the following details.
Title − The name of the test case
Description − Overview functionality to verify
Test steps − Detailed sequential step by step
Expected result − Detail of what the final result should be
Verifies Requirements − Associate the test case with respective one or multiple requirement
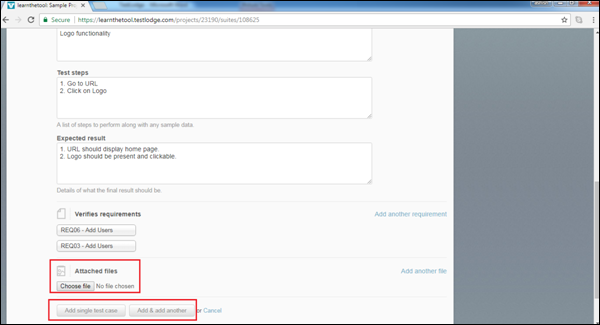
Attached files − Attach any supporting files
Step 3 − Click "Add single test case" or "Add & add another" button as shown in the following screenshot.
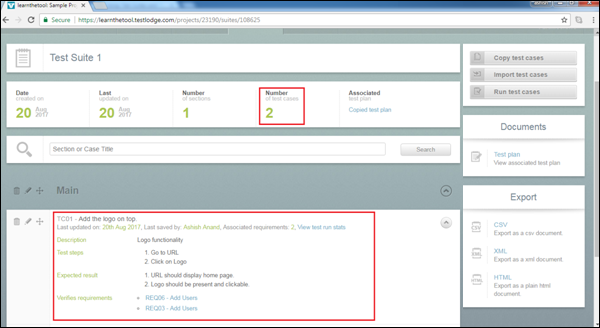
Test case will get an ID inside the test suite. You can also count the number of test cases in a test suite as shown in the following screenshot.
Edit a Test Case
Following are the steps to edit a test case in a test suite.
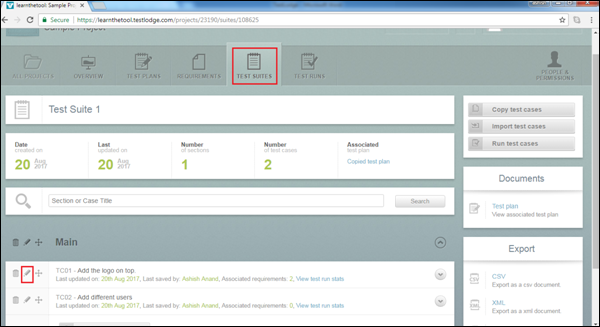
Step 1 − Go to the Test Suites section. Select a Test Suite to edit and click to open the details.
Step 2 − Click the Edit icon of the respective test case to edit as displayed in the following screenshot.
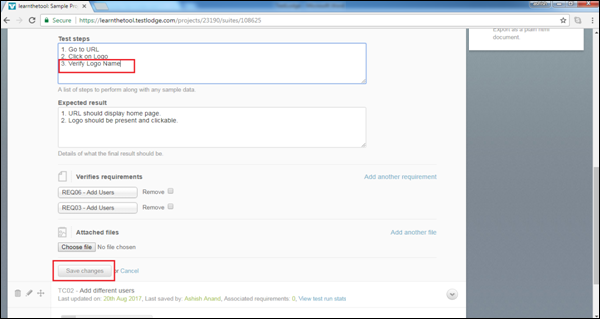
It will open the details of the test case in the edit form.
Step 3 − After making the changes, click the Save changes button.
Move a Test Case
This functionality allows re-ordering of test cases in a test suite.
Step 1 − Go to the Test Suite section. Select a Test Suite to edit and click to open the details.
Step 2 − Click the re-ordering icon and drag up or down depending on where you want to re-position it and drop at the required position.
Delete a Test Case
Following steps are the steps to delete a test case in a test suite.
Step 1 − Go to the Test Suites section. Select a test suite and click to open the details.
Step 2 − Click the Delete icon at one of test cases to delete.
Step 3 − A pop-up will be displayed for confirmation to delete. Click OK as shown in the following screenshot.
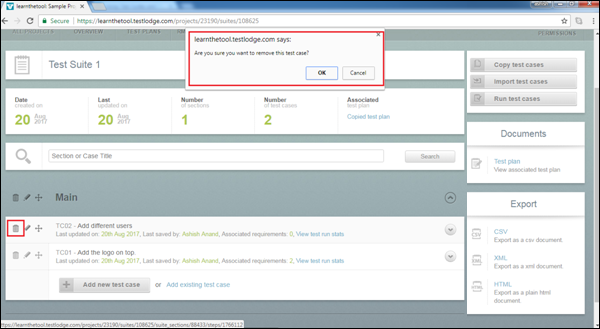
The page will be refreshed and a test case will be deleted from the test suite.
To Continue Learning Please Login