- SAP Smart Forms Tutorial
- SAP Smart Forms - Home
- SAP Smart Forms - Overview
- SAP Smart Forms - Architecture
- SAP Smart Forms - Structure
- SAP Smart Forms - Form Logic
- SAP Smart Forms - Navigation
- SAP Smart Forms - Form Builder
- SAP Smart Forms - Style Builder
- SAP Smart Forms - Output Types
- Advance Development Concepts
- SAP Smart Forms - Form Graphics
- Applications & Migration
- SAP Smart Forms Useful Resources
- SAP Smart Forms - Quick Guide
- SAP Smart Forms - Useful Resources
- SAP Smart Forms - Discussion
SAP Smart Forms - Quick Guide
SAP Smart Forms - Overview
You can design and print forms in a SAP System using the Smart Form Technology. Your ABAP program calls a smart form and then to print, spools are generated. You can embed texts, images and other elements like barcodes in smart forms. SAP Smart Forms is an advanced version of SAP Script Forms and replaces scripting in a SAP system for form printing and integrating the output in an HTML format.
You can use different output formats in a Smart Form, some of these include −
- Printing
- Fax or
- Sending it over the internet in a HTML/XML output format.
A Smart Form tool allows you to modify forms by using simple graphical tools instead of using any programming tool. This means that a user with no programming knowledge can configure these forms with data for a business process effortlessly.
In a Smart Form, data is retrieved from static and dynamic tables. The table heading and subtotal are specified by the triggered events and the data is then sorted before the final output. A Smart Form allows you to incorporate graphics that can be displayed either as a part of the form or as the background. You can also suppress a background graphic if required while taking a printout of a form.
The SAP Smart Forms have been surprised with the use of interactive forms from Adobe.
Some examples of this standard Smart Forms available in a SAP System are as follows −
SF_EXAMPLE_01 represents an invoice with a table output for flight booking for a customer.
SF_EXAMPLE_02 represents an invoice like SF_EXAMPLE_01, but with subtotals.
SF_EXAMPLE_03 specifies an invoice like SF_EXAMPLE_02, but one in which several customers can be selected in an application program.
SAP Smart Forms vs SAP Script
SAP Scripting is in use since the 1980’s. However, the Smart Form concept was started in year 2001. Smart Forms have surprised Scripting Forms in SAP.
Following are the key differences between them −
In SAP Scripting, you must write the print program. However, in a Smart Form it is not required to write a print program.
SAP Scripts are client dependent. However, Smart Forms are client independent.
You can create Smart Forms without using the main window. However, it is not possible with the use of Scripts.
In SAP Scripting, you can use up to 99 main windows. However, in a Smart Form it can have one main window.
When you activate Smart Forms in a SAP system, it generates the function module. However, it is not generated in case of Script Execution.
It is also possible to create and design web forms using Smart Forms, but you cannot design web forms using script.
The Smart Form concept is completely based on Graphical User Interface. However, scripting includes some programming.
You can create, change and display a smart form using Transaction SMARTFORMS. To style the smart forms, you can use Transaction SMARTSTYLES. To write a SAP Script, use Transaction Code: SE71 to open form painter and SE72 to add different style of texts and font in the Script Forms.
It is possible to maintain background graphics using Smart Forms, but not possible with SAP scripting.
To design a smart form layout in a SAP system, use Transaction Code: SMARTFORMS.
To Style the smart form, use Transaction: SMARTSTYLES.
SAP Smart Forms – Uses
The Smart Forms have many advantages over Scripting. These include easy to design graphical user interface, use of dynamic text frames and table structure.
Below are the benefits of using Smart Forms −
It doesn’t require any programming knowledge to design smart forms as it is based on graphical tools. This allows power users to design the smart forms in a SAP system and experts are required only in special cases.
When you activate smart forms, it automatically generates function modules at the runtime.
You can add background graphics to smart forms which can be displayed as a part of the form.
You can display table structures and dynamic text framing using smart forms. You can use SMARTSTYLES to add colored texts, images, barcodes, etc.
You can generate output in HTML format with release 6.10.
It is easy to make changes to the existing smart forms using drag/drop or cut/paste feature. This doesn’t required you to enter script coding for making changes.
You can convert SAP Script forms to smart forms but vice versa is not possible.
SAP Smart Forms – General Concept
In a SAP System, form printing means creating and designing layout of the form for mass printing. This involves form structure, design and layout and form logic for dynamic formatting. The form layout tells the structure of the form like – number of different structure pages and use of tables, paragraphs and character formats to format text in the form.
The dynamic formatting of the form depends on the form logic that allows you to add the conditional text in the form layout, which is displayed only when a certain condition is met. You can define variable fields as per the condition type – first dunning use this text and second dunning use other text and so on to process dynamic formatting.
Different form types can be created in a SAP System using smart forms and you can add conditional text and different layouts as per the requirement.
- Invoices
- Account Statements
- Salary Statement
- Quality Forms
- Checklist
- Order Processing
- Order Confirmation
- Delivery notes and many more
In the next chapter, we will discuss in detail about the architecture of SAP Smart Forms.
SAP Smart Forms - Architecture
In a SAP Smart Form, you have multiple components where application data is different from form definition. When a smart form is activated, a function module is generated and data is retrieved from the database.
In a SAP smart form, the following components are used −
Form Layout − The form layout defines the position of elements on the pages and where the objects will be displayed in the form output.
Form Logic − Form logic defines the data to be read from the database, to define the condition and to control the flow of the form output.
Individual Elements − It includes the elements to be displayed in the form output. Common element types are Text, Table, Graphics, etc.
Form Interface − A form interface in SAP smart form is used to transfer the application data to form definition.
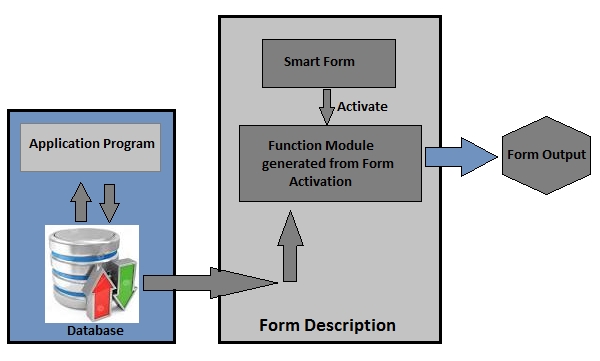
In the above image, you can see the Smart Form Architecture. When a smart form is activated, a function module is generated. When application program calls the functional module, the module interface is used to transfer the table data as per the form description and to print the form.
You can also embed statements in the form description to select the data for form processing. But, this is not recommended when you have to print the mass forms results performance degradation.
It is also possible to print the data as tables on the form and to be merged with the application data with the smart form. A single call to a smart form always generates one form for printing. A different output type can always be selected such as – Fax, Print, email or in HTML/XML format to a web browser.
SAP Smart Forms - Structure
A smart form consists of multiple pages. There are different graphics such as the header and company logo, while output areas and text to be displayed is in the output. You can use the dynamic table structure to show the data or texts in the column, cell format, etc.
A common smart form example is a customer invoice for flight booking. The price details with the flight booking is shown in the table in the main window and other windows contain different elements like the company name logo, address of the customer and other company or customer specific details.
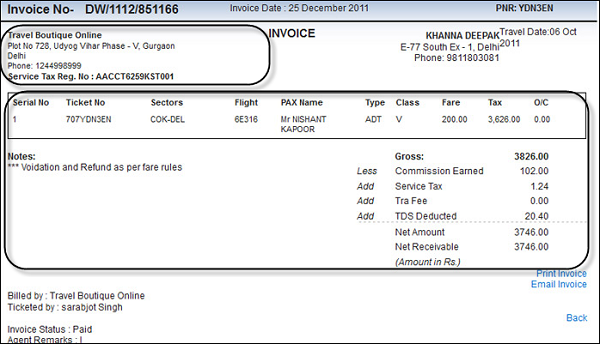
The first page of the flight booking invoice contains booking company details, customer letter if any and a table containing number of booking items. The table type is dynamic and its length depends on the number of booking items in the table. The table header includes column headings −
- Serial number
- Ticket number
- Sectors
- Flight name or number
- PAX (passenger/s) name, etc.
While the table footer contains – the amount in Rupees, Net amount, etc.
When the table continues to the second page due to more number of items, the table header and footer repeats on the next page as well. The page layout of this smart form defines the page structure as A4, while A5 is the position of windows with data to be displayed on each page.
SAP Smart Forms – Screen Navigation
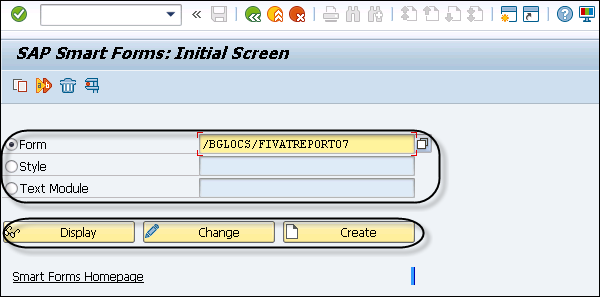
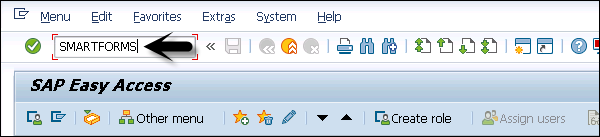
To design a new smart form or to change or display an existing smart form, you should use the Transaction: SMARTFORMS.
Enter the Transaction as shown in the screenshot below −

On the home screen, you can see three different tabs −
- Change
- Display
- Create
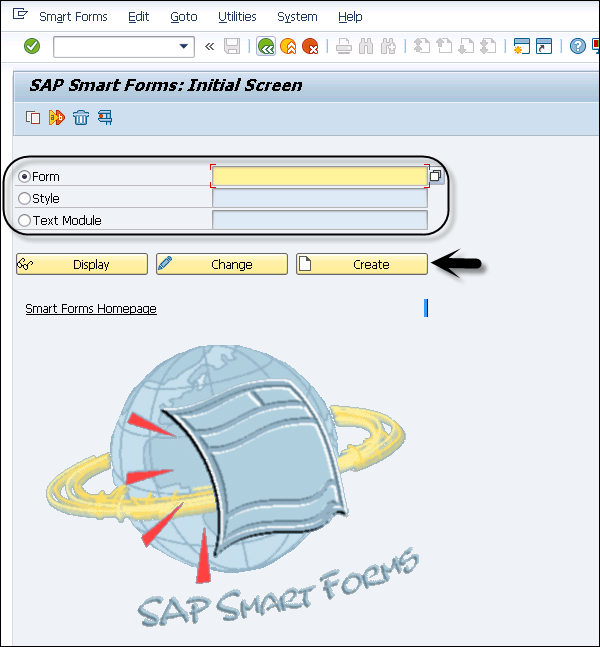
Enter the Form name and click on the Create button as shown in the following screenshot −
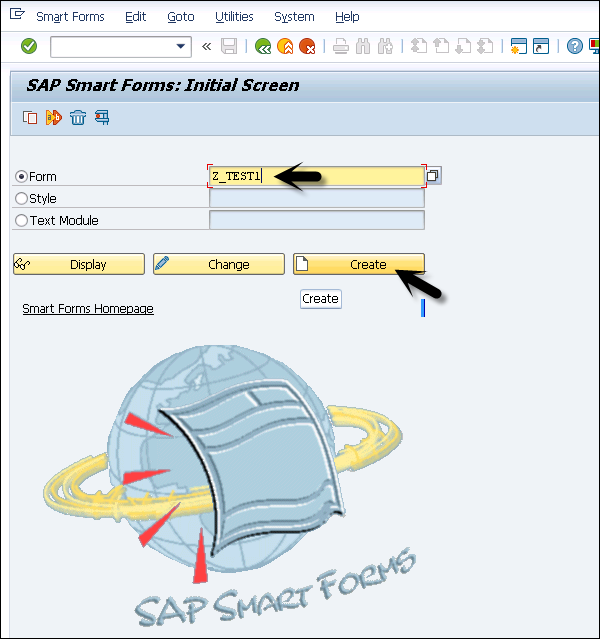
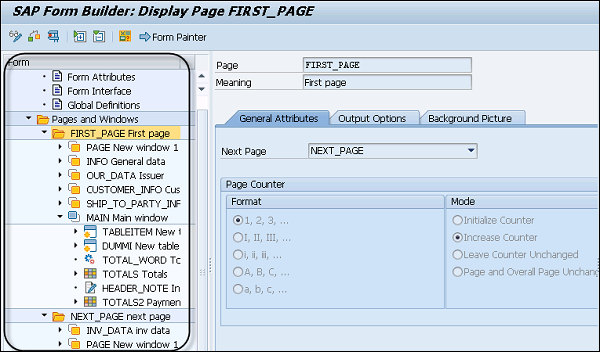
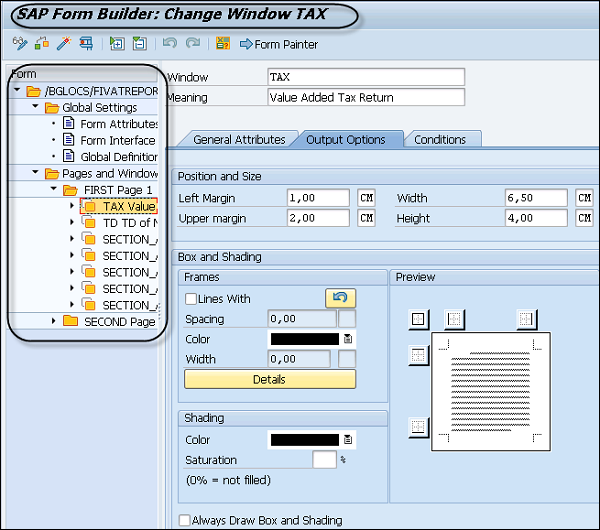
When you click on the Create button, this will open the SAP Form Builder screen which is divided into three parts
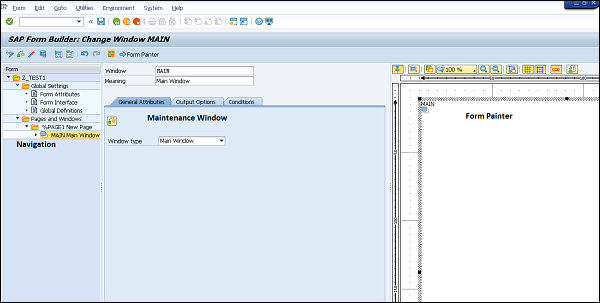
On the left side, you have a Navigation Window. This window contains all the elements such as – text and graphics, which are part of a SAP Smart Form. You can see the hierarchy of nodes and sub-nodes under the Navigation pane.
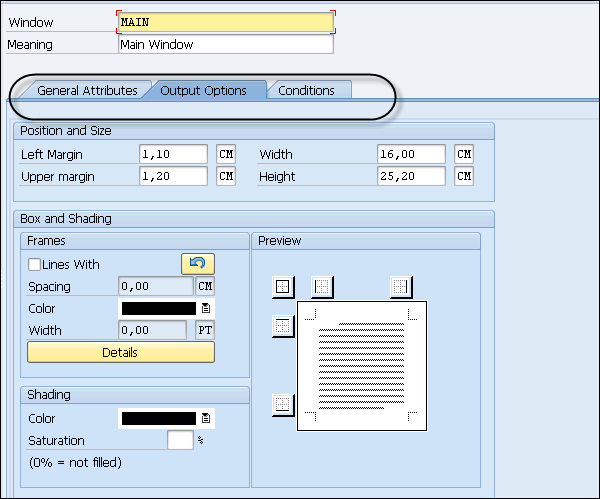
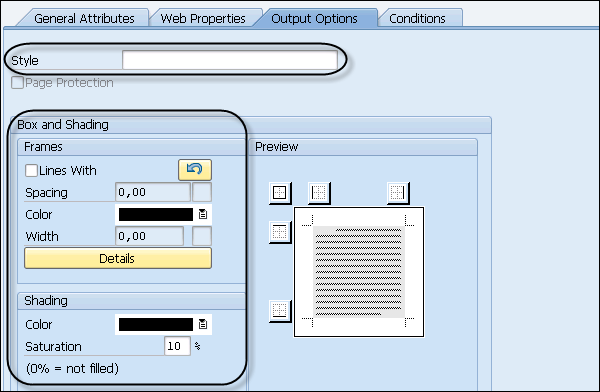
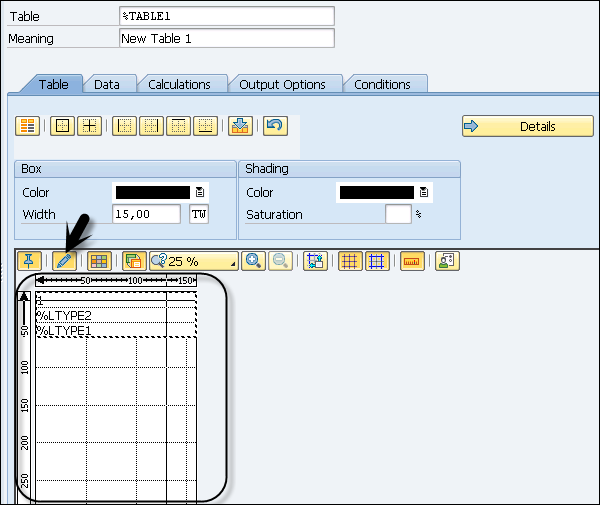
In the middle, you have a Maintenance Window. This window is used to set the attribute value of each element in a smart form. You can define Output Options such as −
- Position and Size (Left Margin, Upper Margin, Width, and Height)
- Box and Shading
- Frames
- Shading, etc.
The Preview and Conditions tab includes – Field Name and Comparison Value.
On the right side, you have the Form Painter. A Form Painter defines the layout of the page in a SAP smart form. When you create a smart form in a SAP system, a functional module is generated. Under the Navigation pane, you have to two folders by default in each form, these are −
- Global Settings
- Pages and Window
Let us now discuss both these folders in detail.
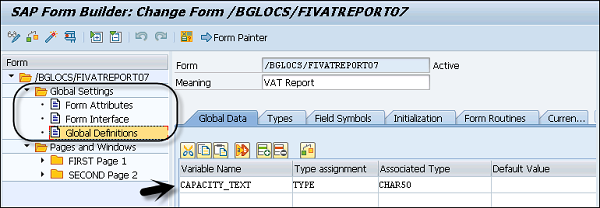
Global Setting
It contains the global settings of the smart form, such as −
- Form Attributes
- Form Interface and
- Global Definitions
In the Form Interface, you can see all the data passed to the smart form from the print program. While, the Global Definition contains the data that can be used throughout the smart form.
Pages and Window
Using Pages and Window, you can create new objects, such as −
- Page
- Window
- Graphic
- Address
The printing of a smart form takes place as per the next page field. While, the processing of a smart form depends on the sequence defined under the Navigation pane.
SAP Smart Forms – Pages of Form
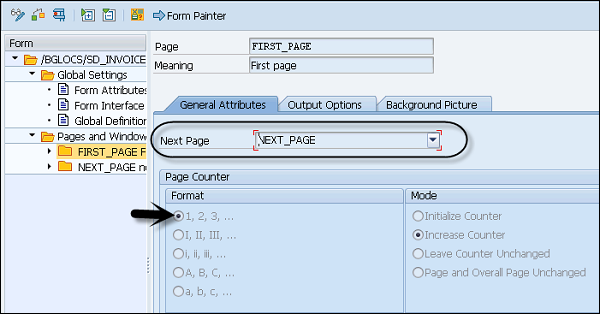
In any SAP Smart Form, you can define different page layouts for each page. A Page Layout defines the page format, some of its options are −
- Landscape
- Portrait
- A4 Size
- A5 Size, etc.
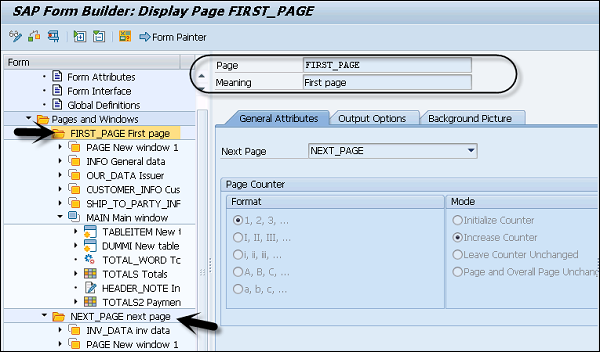
You can have a different structure for each page in a smart form. As an example, the first page can contain address, about company, logo, terms of business or any other information that should come on the first page.
In a smart form, you need to define the next page for each page and a clear page sequence. You can also call the same page multiple times to make the output recursive. The page break is defined in the form logic using manual coding or you can also define it via the main window and the sub window.
Each page contains two types of output areas, which are – Main window and Sub window. These windows can be placed anywhere on the page and you can even overlap them. A single window can be used on multiple pages.
SAP Smart Forms – Main Window and Sub Window
In this section, we will understand in detail about the Main and Sub Windows.
Main Window
In a SAP smart form, the main window is used to hold text and data. As this is the main window, it is filled with text and data system. It displays the text in the main window of the next page, while the page break is automatically triggered.
Note − Check the following key points to remember about main window and sub-window.
The main window of each page should have same width, but it can differ in height.
When you don’t have a main window that defines a page. That page will call itself and it will result in an endless loop.
Sub-Window
In a SAP smart form, the sub-windows are used to display the text and the data on the predefined areas of the output. The text and data that doesn’t fit in the sub-window is truncated and not displayed in the form output.
When a sub-window is placed on each page with the same name, the content of that sub window is displayed on each page.

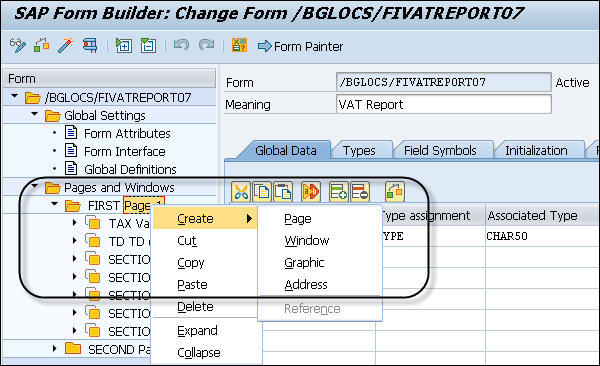
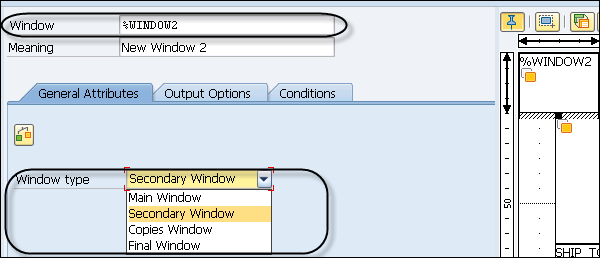
To create a window in Main window or in a page, right click on the Page or the Main window and select the window type.
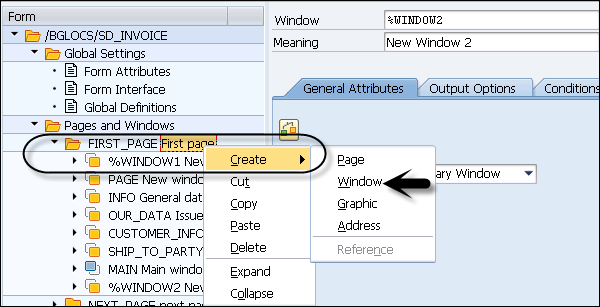
Enter the Window Name, Meaning and Window Type. The name entered for this window is shown in the navigation pane. You can drag the window and put it anywhere on the main window.
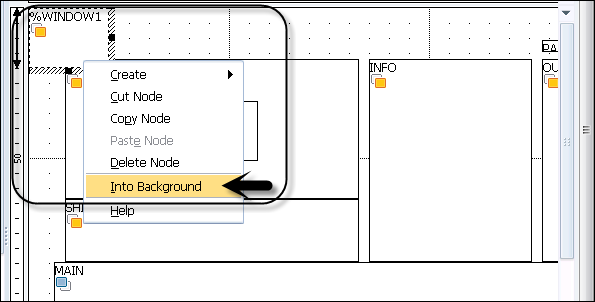
When the windows are overlapping, you can also send one window to the background, copy or delete a node by right clicking on it.
SAP Smart Forms – Text and Data
You can enter the text and the data in a smart form and place them as per the requirement. The data entered in this smart form is in a string format and can be pulled from the database. You can also enter the text and the data in a table format to display it as a table.
You can use Form Painter to position Windows, Graphics, etc. on a page in a smart form.
The PC Editor is used to write the text.
The Table Painter in a smart form window is used to format your tables.
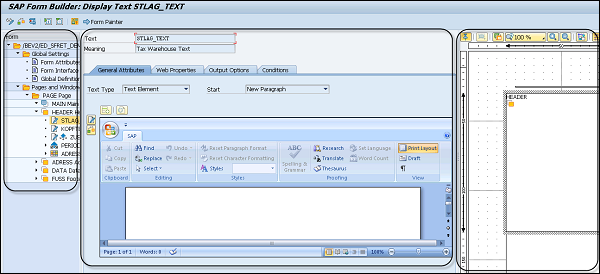
Entering Text in a Smart Form using the PC Editor
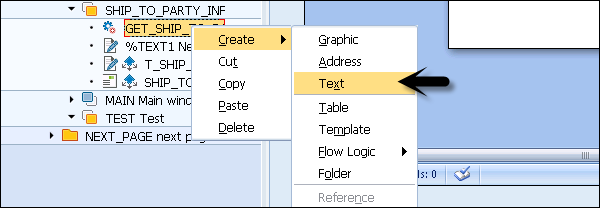
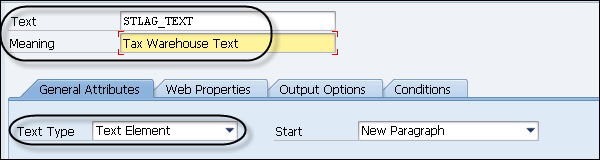
To enter text using PC Editor, you should create the text node in the navigation tree. It is also possible to include data from the system into the text using system fields and parameters in the form. While processing the smart form, the system replaces the data with values from system fields.
To create a text node in the Navigation pane, right click → Create → Text as shown in the following screenshot.
Enter the node name and the description as shown in the following screenshot −
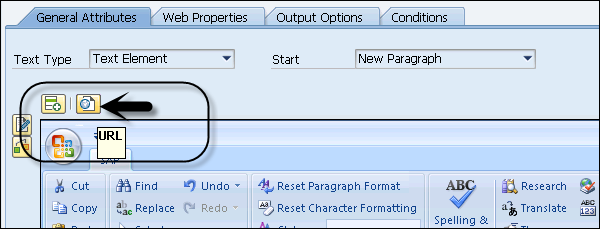
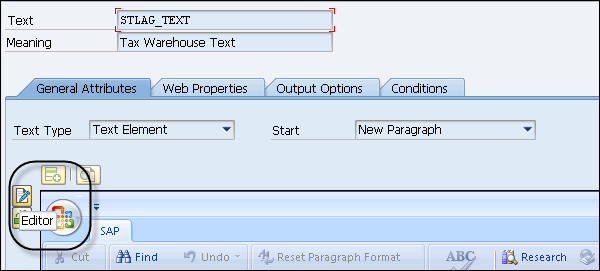
Go to General Attribute and select Text type as the Text Element. You can enter the text in PC Editor directly or you can also open the Text Editor in full screen mode.
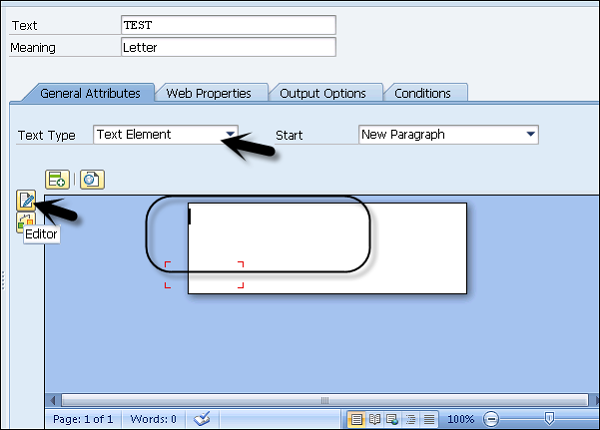
When you click on the Green Arrow Mark (F3 button), the text from the Text Editor is transferred to the Inline PC Editor.
To highlight the text as a URL, mark this text and click Insert URL at the top.
SAP Smart Forms - Form Logic
In a SAP smart form, the form logic defines the data to be read from the database, then to define the condition and lastly to control the flow of the form output. Form logic is defined in the Form Builder, where the form structure is defined on the left side of the SMART FORMS interface. When a smart form creation window is opened, on the left side you have default nodes.
The Global setting node and has the three following subfolders −
- Form Attributes
- Form Interface and
- Global Definitions
These show up when you create a new smart form.
To define form logic, you should define the hierarchical structure under the node pages in the navigation pane and this structure defines the rule for processing of the smart form. This form logic can be used to control the form output.
You should remember the following points about Form Logic −
In a tree structure, there is a tab defined for each node and each node can be linked to a condition. When the condition is met in the form, the system processes that node and if it is not met, the system doesn’t process that node.
In a general scenario, nodes in the tree structure are processed from top to bottom.
Page break on each page depends on how much space is left on the current page.
A Flow control is defined for each page; however, you can also go to any page.
SAP Smart Forms – Flow Control
You can also control the flow processing in a SAP smart form for the tree hierarchy defined in a navigation pane.
There are different options that can be used to define Flow Control, some of these are listed below −
Output Condition − To define processing of nodes/sub-nodes as per the output condition.
Alternative − It can be used to process one of two inferior nodes.
Repeated Output − You can use a loop to process the output repeatedly.
Dynamic processing − You can also process pages dynamically by defining page sequence using command line.
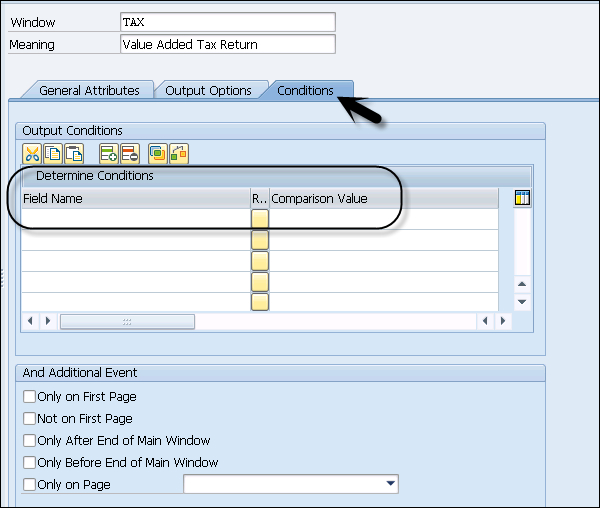
Output Condition
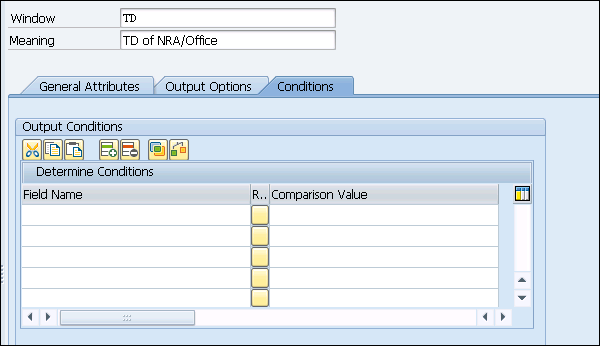
You can pass an output condition to suppress node/sub-node processing. To enter the output condition for a node, go to the Condition Tab.
In the condition tab, you can pass each line a condition with two operands. An operand can be a field or a value.
You can also pass logical operators; the most important operators are −
- AND
- OR
You can also perform a local check to validate an output condition. To perform a condition check, click on the Check Button as shown in the following screenshot.
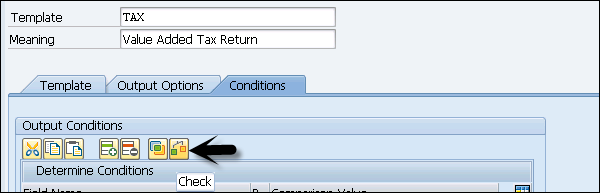
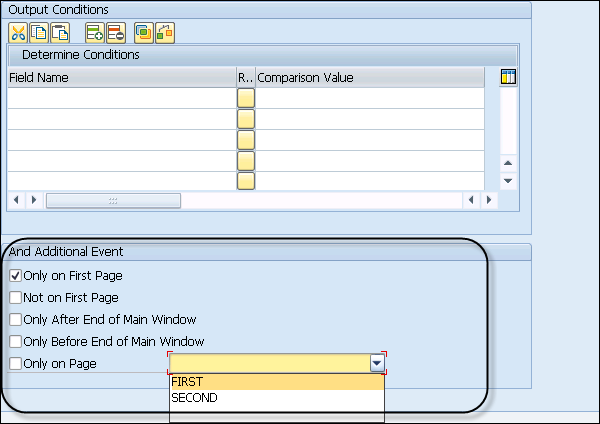
You can also link an output condition to output events of pages and windows. You can use an Additional event box and these events are linked using the AND condition.
When the condition is met, the system processes the node/sub-node as per the condition value. When the condition fails, the system ignores node and processes the next value in the flow control.
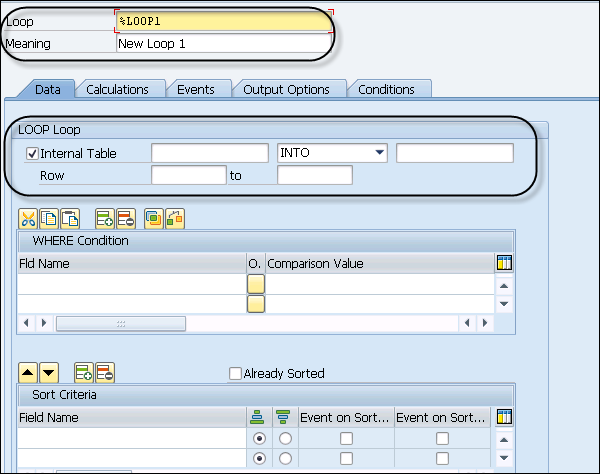
To process the output repeatedly, the loop node must be used which reads the data from an internal table. You use a loop to read customer data and display. To display repeated output, you can create a node – type loop and enter the unique name and description.
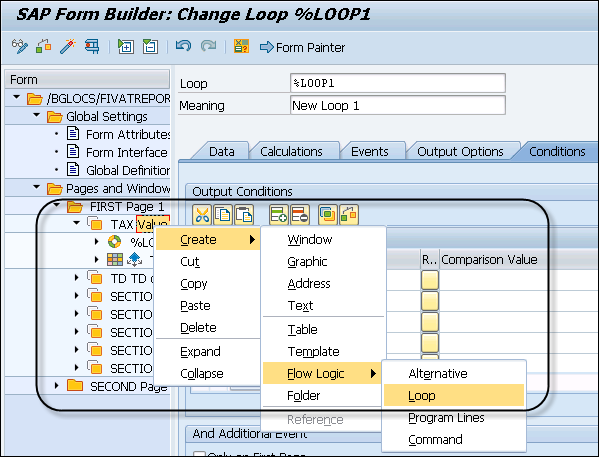
The next step is to read the data from an internal table into a work area and create inferior nodes in which you display the fields of the read table lines.
SAP Smart Forms - Navigation
In this chapter, we will discuss in detail about Navigation, the User Interface, Node Types and the Form Parameters of SAP Smart Forms.
SAP Smart Forms – User Interface
To design a form in SAP Smart Forms, you need to create and maintain a layout of the form and define the form logic. You don’t require any knowledge on programming and scripting language.
The SAP Smart Form Graphical User Interface consists of following fields −
Form Painter − To create the form layout, you use Form Painter.
PC Editor − It can be used to enter texts and fields into the output area.
Navigation Tree − On the left side, you have navigation tree that defines the hierarchy of a smart form. This defines the form logic for processing.
Table Painter − Table Painter is used to create templates and tables.
Form Check − To check the form consistency.
In a SAP smart form, you can use Transaction: SMARTFORMS. On the first page, you have an option to select the Form, Style or Text Module as per the object you want to Create, Change or Display.
Enter the name and select the type you want to create and click on the Create button and this will open SAP Form Builder.
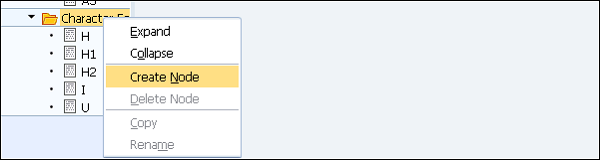
In SAP From builder, you have Tree navigation on the left side. To select a node in tree, you have to double click on the node. You can also drag and drop or copy subtrees by right clicking on it and using the Copy/Paste operation.
When you right click on any node, you can see the Context menu. As per the node type, options under the Context menu varies.
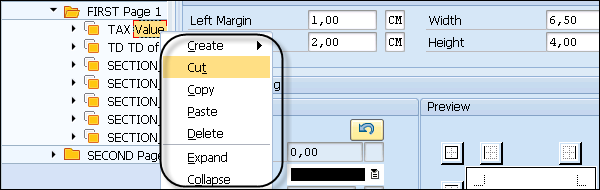
You have the following options under the Context menu −
- Creating or deleting as per the selected node type.
- Depending on the selected node type only the valid node types appear.
- Clipboard functions – Cut or Copy to clipboard, Paste to clipboard.
- Expand and Collapse.
SAP Smart Forms – Node Types
In this section, we will discuss in detail about the different types of node options, which are listed below.
Output Areas −
- Page
- Window
Elementary Nodes −
- Text
- Graphic
- Address
Table Output −
- Template
- Table
Attributes of Nodes Type
In a SAP smart form, each form contains following common attributes −
General Attribute − General attributes in a smart form define the name of the selected node and description. It can also contain a few generic properties of nodes like in case of the text node – text type, etc.
Output Options − In this tab, various output options are defined for each node you select in the Navigation pane. The Common tab includes −
- Position
- Style box
- Shading, etc.
Nodes with text output also have an attribute Style. You can use this attribute to overwrite for the current subtree, if you don’t like the style that was set in the form before.
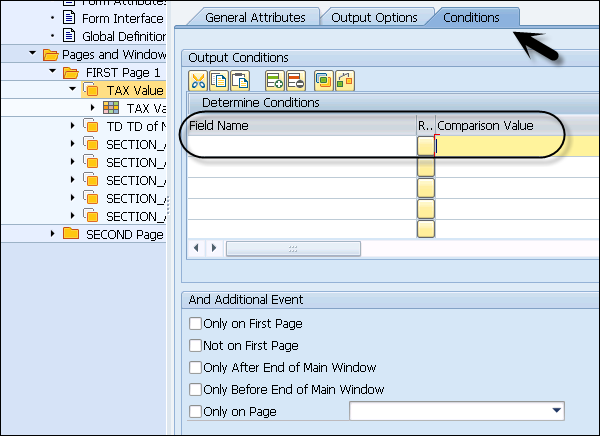
Conditions − In the condition tab, you can pass the condition which displays the node when certain conditions are met.
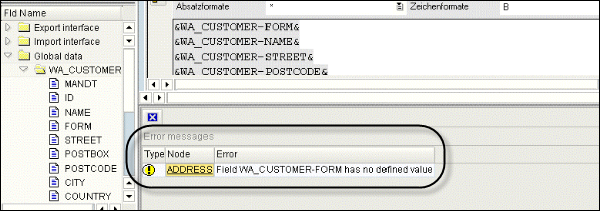
Error List − While performing a check on the smart form, in case of any inconsistencies, the system displays the list of errors and warning at the bottom of the maintenance screen window.
To find the error or warning, you should select the node and then the system will take you to the tree structure, so that you can fix the error.
SAP Smart Forms – Form Parameters
You can also pass parameters in the smart form and merge the data into the form. Data that can be merged could be from the database or a part of the standard data from a SAP system.
The following data can be merged in a smart form −
You can merge data from database tables and pass them to the form interface.
The data provided by the standard SAP system can be merged in a smart form. Example: date.
Any calculations that are performed in the form
The data you merge is displayed at run time. You use place holders to determine where to place the objects in the form to define where the data will be displayed.
When a smart form is activated, a function module is generated. You can pass different standard parameters in a smart form. When you create a form, these parameter appears in the form and can’t be changed. These are import and export parameters that can be used for different operations like – Specifying the output device type, etc.
Following are the common parameters in a Smart Form −
DOCUMENT_OUTPUT_INFO
Type: Export
Description − This is used to provide the information about the number of printed form pages.
JOB_OUTPUT_INFO
Type: Export
Description − This can be used to determine which action creates what output in a smart from.
JOB_OUTPUT_OPTIONS
Type: Export
Description − This is a subset of the field OUTPUT_OPTIONS and it determines if settings have been changed or not.
USER_SETTINGS
Type: Import
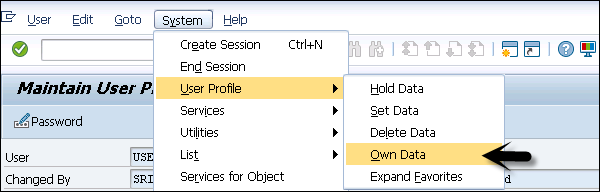
Description − When the value of this parameter is ‘X’, the smart form takes a default value of Spool Control defined under System → User Profile → Own Data.
The default value – Output Device → Print Immediately and Delete after Output.
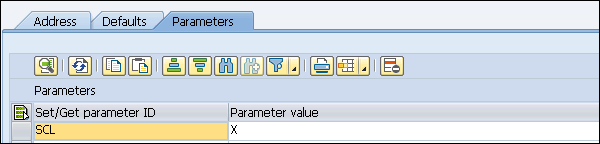
When the value is not set, Smart Forms instead evaluates the following parameters of the structure for the output options – SSFCOMOP.
- Printer settings (TDDEST, TDPRINTER , RQPOSNAME)
- TDIMMED (Print immediately)
- TDDELETE (Delete after output)
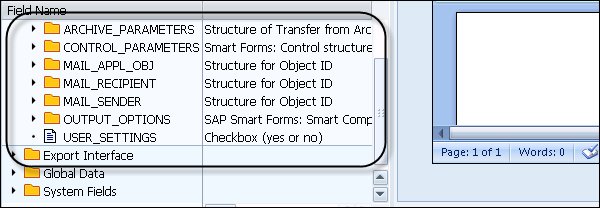
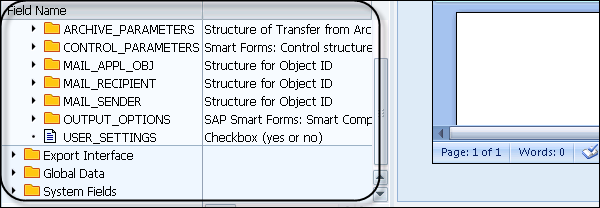
You can see different Import and Export parameters under the Field List tab of a smart form.
SAP Smart Forms - Form Builder
In this chapter, we will discuss in detail about Navigation in Form Builder, Functions of Form Builder, Usage of Table Painter and the Output Options of SAP Smart Forms.
SAP Smart Forms – Navigation in Form Builder
To design a new smart form or to change or display an existing smart form, you must use Transaction: SMARTFORMS.
Enter the Transaction as shown in the following screenshot −
On the home screen, you can see three different tabs −
- Change
- Display
- Create
Enter the Form name and click on the Create button −
When you click on the Create button, this will open a SAP Form Builder screen. The Graphical interface screen of Form Builder is used for form designing.
It consists of three work areas −
- Navigation Tree (Left Side)
- Maintenance Screen (Middle Pane)
- Form Painter (Right Side)
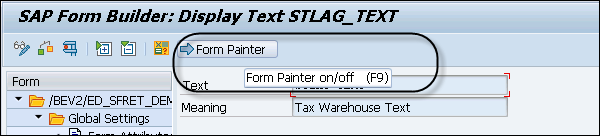
It is also possible to hide/unhide form painter from the top menu. At the top menu, you have the option to On/Off Form Painter as shown in the following screenshot.
In the Maintenance tab, you have other tools integrated with the Form Builder.
PC Editor − To manage text nodes.
Table Painter − To manage table and template nodes.
SAP Smart Forms – Functions in Form Builder
There are different set of functions that are provided in the Form Builder.
Field List
This function lists all the fields of the smart form.

When you click on the Field List (ctrl+shift+F4), it opens the Field List folder on the main screen. The following values are displayed under the Field List −
- Import Interface
- Export Interface
- Global Data
- System Fields
Undo/Redo
You can also undo changes to a form step by step. In a smart form, the Form Builder stores any changes you made to the form since last saving it, independent of whether the changes occurred in the following places
- The Navigation Tree
- The Table Painter
- The Form Painter
- The PC Editor
- The input fields of the maintenance screen.
You can undo these changes step by step. Once they are undone, you can also redo the changes.
Go to Utilities → Settings → Undo/Redo Form Changes. Under the General tab, you have the option.
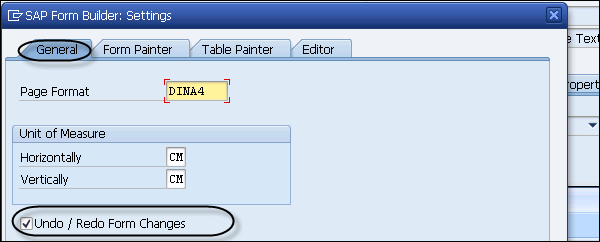
By default, these options are marked when you navigate to the General tab.
Downloading/Uploading Form
It is also possible to store a form or subtree locally. It saves as an XML file and you can upload this XML file into the same form or even in a different form.
When you upload the subtree, you need to make sure that the styles and fields of this downloaded subtree should exist in the target system.
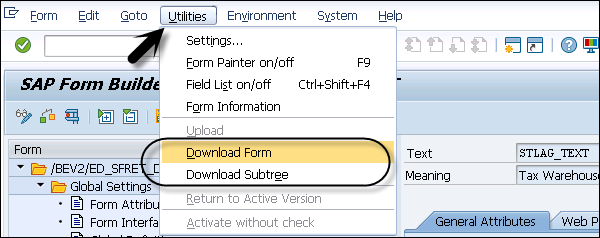
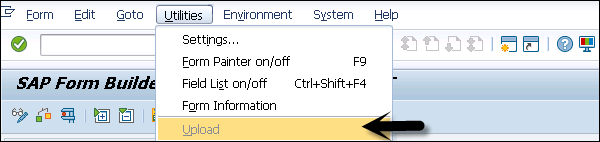
To download a Smart Form, go to Utilities → Download Form.
To download a subtree, go to navigation pane and double click on inferior node of a pages and Windows node as root node of the form. Go to Utilities → Download Subtree.
To upload the form, go to Utilities → Upload.
While uploading, it knows if there is a form/subtree to be uploaded. In case of a form, it overwrites the current form in the Form Builder. When the file contains a subtree, smart form copies this subtree to the clipboard and to paste this subtree, you can navigate to the tree structure and use the context menu to insert the subtree.
Note − Before inserting, you should ensure that all the target and styles exist for the subtree. If not, you should create them.
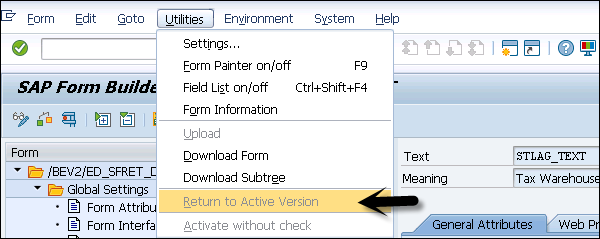
Active Version
You can also directly return to the last active version of the form. However, all the changes are lost for that form. To restore the active version, go to Utilities → Back to Active Version.
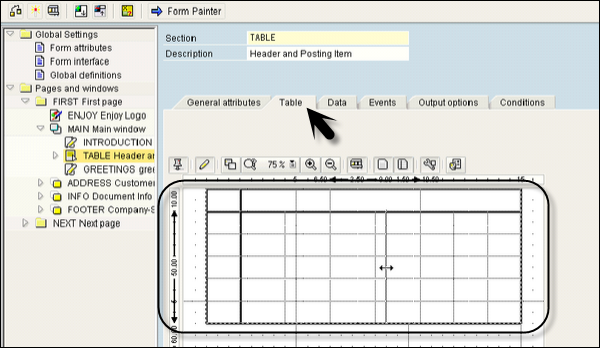
SAP Smart Forms – Using Table Painter
The Table Painter in a smart form is used to design the template and tables in a window. The layout for template and tables are done using Line types. You can On/Off Table Painter by going to the Table tab under the Maintenance window in the SMARTFORMS GUI screen.
The Table Painter provides different functions in smart forms −
- You can draw lines and columns.
- You can cut, copy, delete or insert lines.
- You can delete cells.
- You can also change the cell size.
- You can also split cells.
- Different table patterns can be used.
Note − You should check the size in scale as design area doesn’t scale as per the window size.
The following Node types can be used to present the data in a table format −
Template Node − You can use Templates which are static in nature as columns and lines are predetermined.
Tables − Tables in smart forms are dynamic in nature as size of the table in form depends on the amount of data selected at run time.

You can see the Table Painter in the lower part of the screen. Whereas, at the top you have the Table Painter functions that can be used to provide the line types.
Defining Table Layout
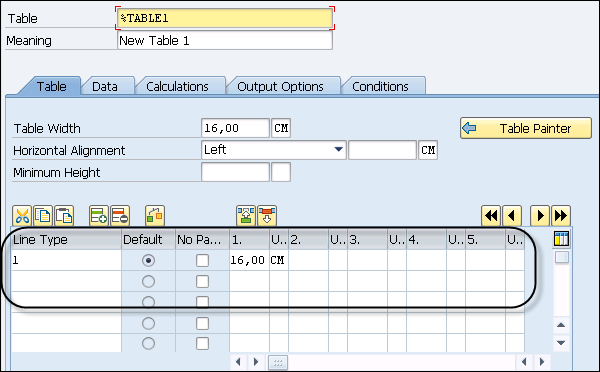
To define a table layout, you need to create a template or table under the Navigation tree structure. This Table Layout determines −
- Height and Width of each cell.
- Number of lines and cells.
- Width of each cell.
While defining a table layout, you can use columns – “From and To” to specify the lines of your template for which the definition applies.
The value of Height is applied to all the cells of a line and you can specify the width for each cell you want to display. The sum of the width values must amount to the specified Width of the template.
It is also possible to reuse the name of the template line by entering the value in the reference column of the line.
The following are the sample lines in table control.
| Name | Value From | Value To | Height | 1. | 2. |
|---|---|---|---|---|---|
| Line 1 | 1 | 1 | 1 | 1 | 1 |
| Line 2 | 2 | 2 | 2 | 2 | 2 |
| Line 3 | 3 | 3 | 1 | 1 | 2 |
Defining Line Types in a Table Painter
Line type in your template or table specify the number and size of cells of a line. You can enter the line types graphically by entering values in Details settings as shown in the following screenshot.

Using table painter to define line types, go to template or table. In the Table Painter, there exists a line whose width corresponds to the window width. The width in the design area of the Table Painter is the same as the window width.
To draw the lines, select draw lines and column pen and draw the Line types as shown below.
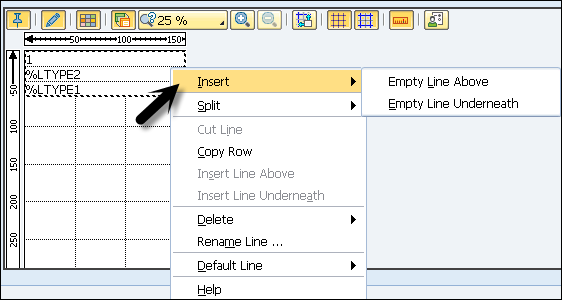
You can also insert blank lines using the context menu. Bring the mouse pointer on the line where you want to insert a blank line and right click to open the context menu.
You can select Insert → New Blank Line below or Insert → New Blank Line above. This will insert a new line with the same height as the clicked line in the table.
You can also split an existing line type. Put the pencil at a position that you want to horizontally split and pull the line towards right. The table painter will split the line automatically. You can also split the line using the Context menu.
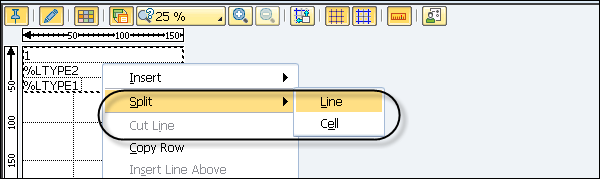
You can also use Copy or cut line to move or copy existing lines as show in context menu.
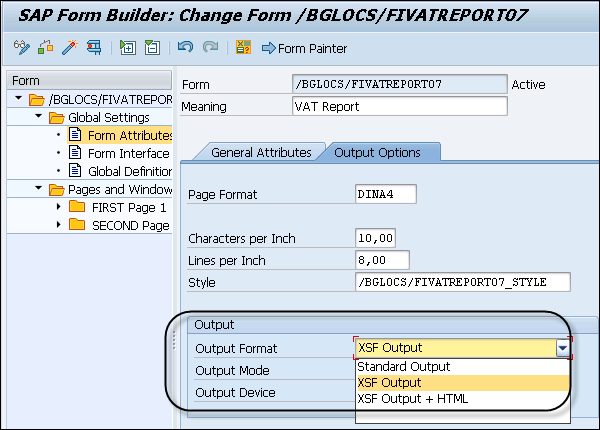
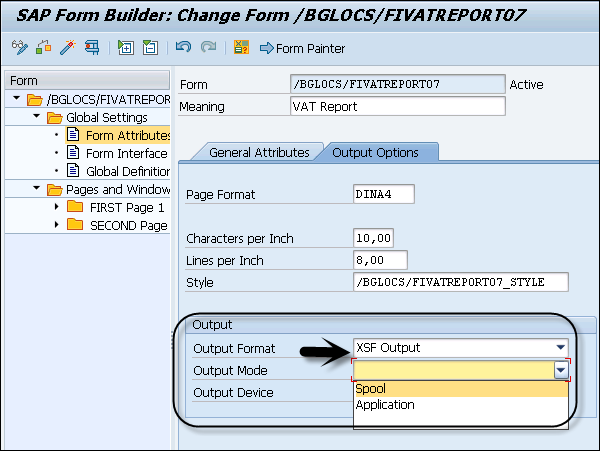
SAP Smart Forms – Output Options
You can use different output options under Form Builder. These attributes are available under the Output options tab of form attributes in a smart form.
Component type: SSFCOMPOP.

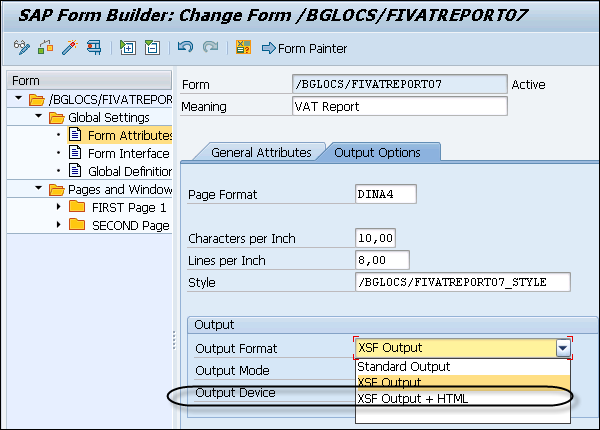
You can control the form output using the Form Attribute to define the default setting for the output format and medium. These settings can be overruled by using standard parameters when smart forms are called and are known as Dynamic Setting Options.
Note − Default option for the output format in the form is a Standard Output (OTF) and this output format as well as the medium is known as Static settings.
The following image shows the overriding setting for output options −

When you use the overriding option in the Output format, a smart form ignores all the static settings in the form.
SAP Smart Forms - Style Builder
In this chapter, we will discuss in detail about the Style Builder in SAP Smart Forms. This chapter will also cover the various Smart Styles, Style Builder Navigation along with Paragraph and Character Formats of a Style Builder.
SAP Smart Forms – Smart Styles
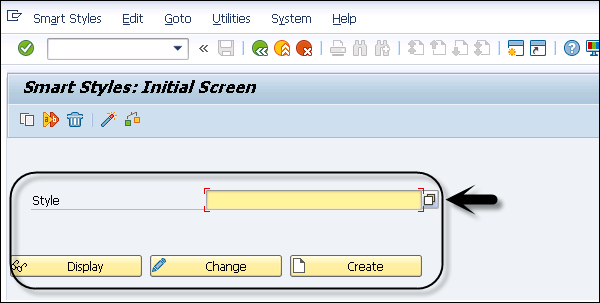
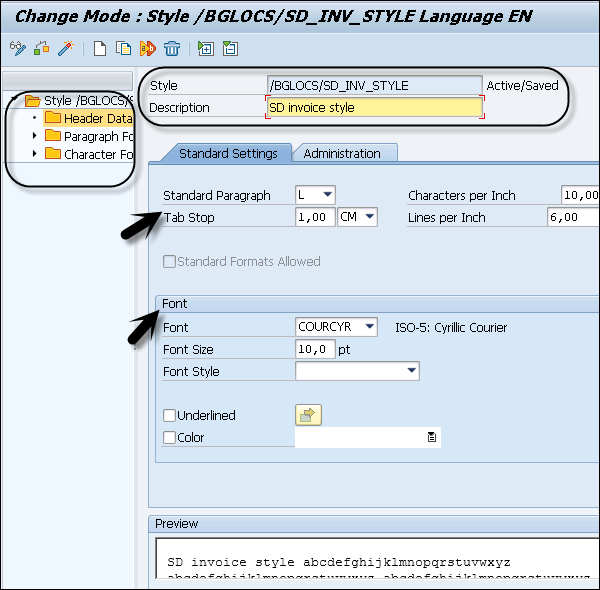
By using a Style builder, you can define smart styles in a smart form. To open style builder, Run Transaction: SMARTSTYLES. Using these smart styles, you can create paragraph, and character format that can be assigned to texts and fields in a smart form. The Smart styles are maintained in a style builder.
Run Transaction Code: SMARTSTYLES.
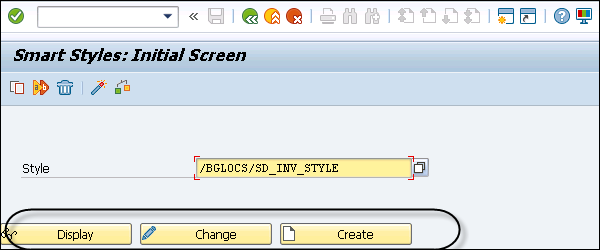
To create a new smart style, enter the style name and click on the Create button. To display/change existing style, search the style from and click on the Display/Change button.
A smart style should be assigned to each smart form and this can be done globally by going to Form Attributes. A smart style can also be assigned to a text node.
A smart style consists of the following fields −
You have Paragraph formats which contains font attributes, tabs, numbering and other formatting fields.
Smart style can contain character formats like – Superscript and Subscripts, Bar Code, etc.
In a smart style, you have a header data that contains the default values of a Smart Style.
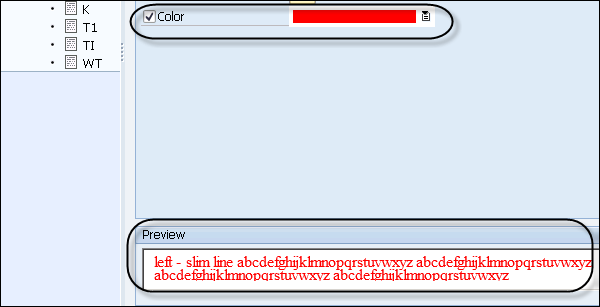
You can add a color, underline a paragraph or character format.
Preview option.
The default value of a smart style is maintained in the header data. You can also assign different values to the character and paragraph formats in a smart form, but in case it is not assigned, the system calculates the default values.
The following values can be assigned in a header data of a smart style −
Standard Paragraph − You need to assign an existing paragraph as default paragraph. This standard paragraph can be assigned using the paragraph format in the smart style header.
Default Tab Stops − These values are used in a smart style when you don’t assign any other defined tabs.
Characters per inch/Lines per inch − You can also define specific measurements- margins, etc. in smart style and measurement units are CH (Character) and Line (LN). The in Form Builder, Character and Line nodes uses this style. The following attributes are applied.
In smart form, measure Characters per Inch is used commonly with line printers.
Lines per inch defines smart style line spacing.
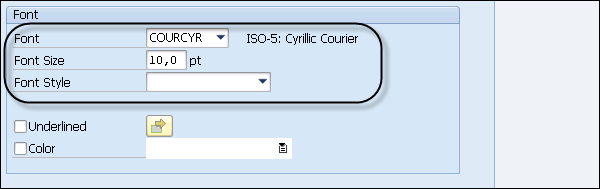
Font Family and Font Size − You can define the font size, underline and color for smart styles and this can be overridden in the Character/Paragraph format.
SAP Smart Forms – Style Builder Navigation
In the Style Builder Tool, you can create smart styles which can be assigned to smart forms. To open style builder, use Transaction Code: SMARTSTYLES.
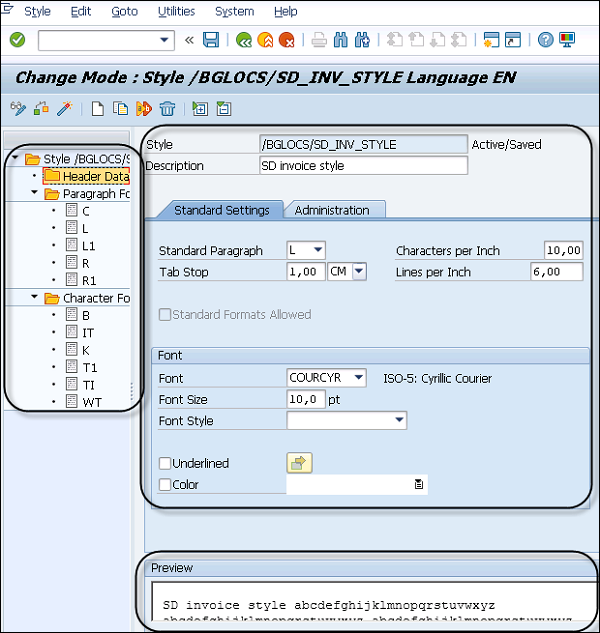
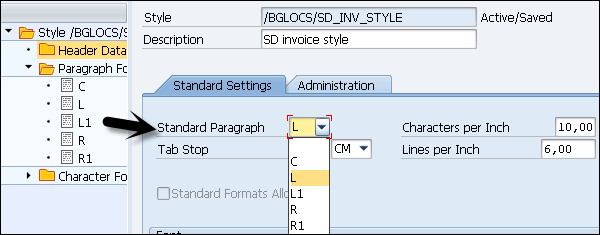
On the left side, you see the Style tree which has Header Data, Character Format and the Paragraph Format folder. You can navigate between different nodes or use the context menu to create/delete nodes.
On the right side, you have the Maintenance Screen. Each folder of this style tree contains different tabs under the Maintenance screen. A Standard Setting tab under the Header folder can be used to define font size and color.
Each Paragraph node contains different tabs under the Maintenance window and it is different for nodes under the Character folder.
At the bottom, you can check the Preview of the selected node with the font setting.
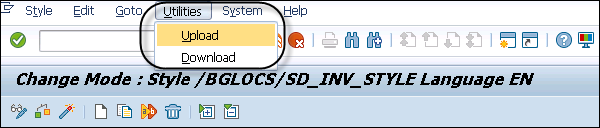
It is also possible to reuse the styles in different smart forms. To download a style, go to Utilities → Download.
To upload the style, select Utilities → Upload.
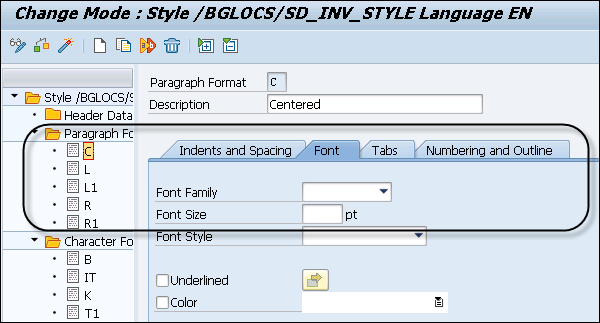
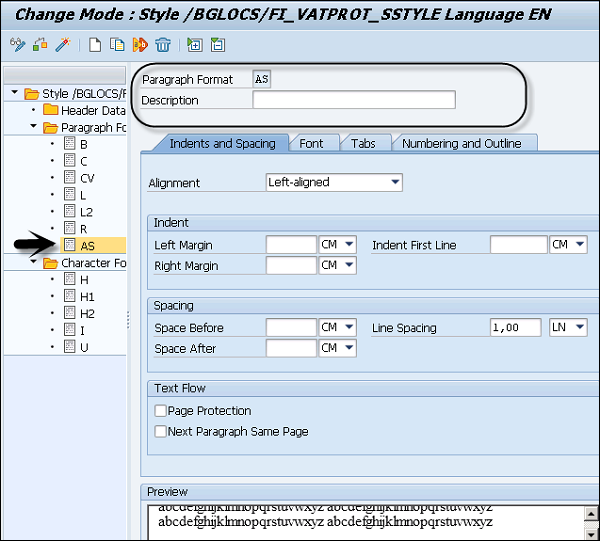
SAP Smart Forms – Paragraph Formats
A paragraph format defines the information on Spacing, Font, Text, Color and Numbering. You can assign these paragraphs to a text or a field and each paragraph has a unique name.
When you select any node under the Paragraph folder, you can define the following aspects −
- Indent and Spacing
- Font
- Tabs
- Numbering
- Outline in Maintenance Tab
To Navigate to Indent and shaping tab, you have the following tabs −
- Alignment
- Indent
- Spacing
- Text Flow
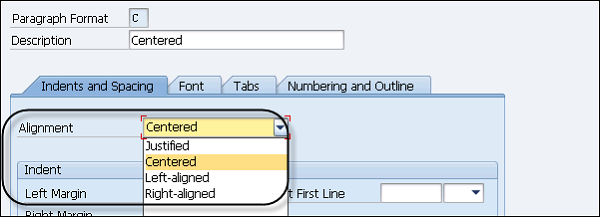
The alignment tab defines the alignment of paragraph, which can be either −
- Centered
- Justified
- Left-Aligned or
- Right-Aligned
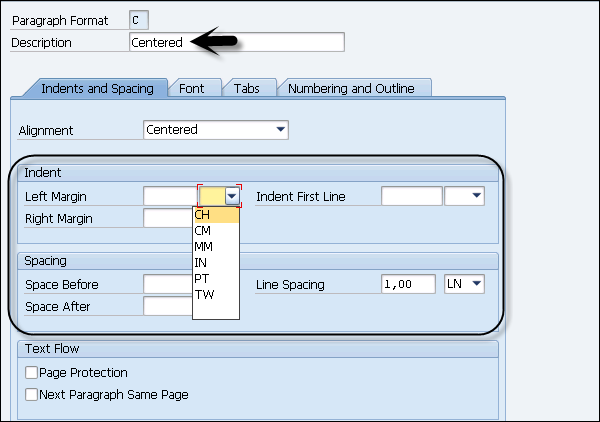
Indent tab defines the Left Margin, Right Margin of the paragraph from both the axes. Space after and Space Before defines space after/before each line in paragraph.
Page Protection
You can select this check box, if you don’t want your paragraph to be split by a page break. When this option is checked and if on one page does not have much space is left to display the full paragraph, this will make entire paragraph to come on the next page.
Next Paragraph on the Same Page
This check box can be selected if you want successive paragraphs not to be separated with a page break and that they should appear on the same page.
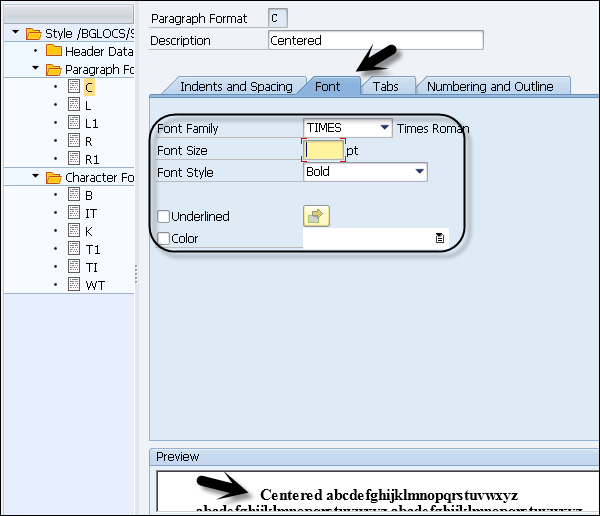
You can navigate to the Font Tab to define the following aspects −
- Font Family
- Font Size and
- Font Style
You can also select Underline and color for the paragraph.
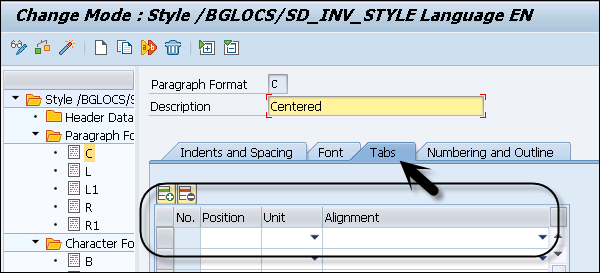
Navigate to the Tabs option to define the number of tabs in the paragraph format.
Numbering and Outline
This can be used to allow paragraph and numbering in paragraph structure. Various attributes can be set in the Numbering and Outline tab, some of these are given below −
- List
- Left Right Delimiter
- Output Length
- Character format of numerand
- Chaining outline numbers
When you activate the number chaining, you can have each paragraph preceded by the number of superior paragraph in the paragraph hierarchical structure.
Creating Paragraph Node
Click on the Paragraph folder and right click → Create.
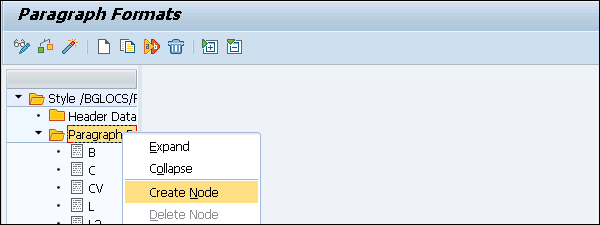
In the Paragraph format, you need to enter a 2–char key. Go to each individual tab to define different attributes. Once you define the attributes, click on Activate to activate the paragraph node.

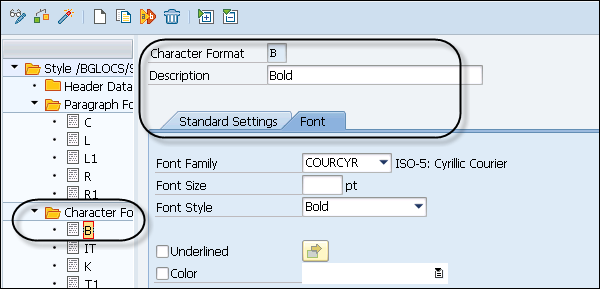
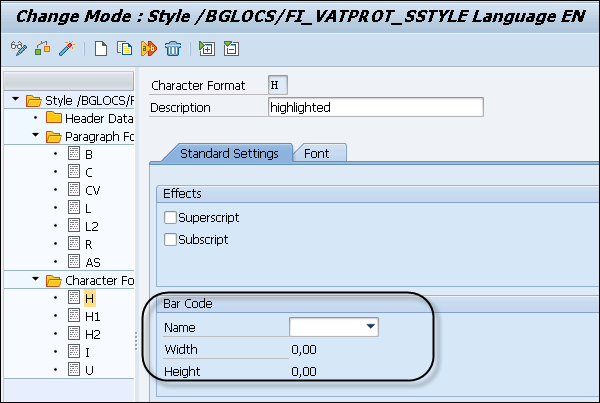
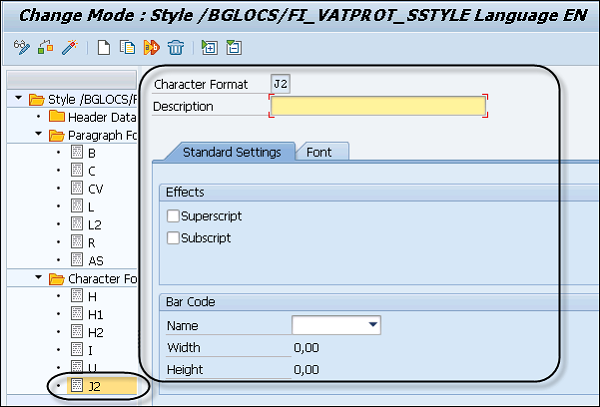
SAP Smart Forms – Character Formats
Character formats in the Style builder can be used to assign special attributes to text or strings in a paragraph. In a character format under Style tree, the following attributes can be defined −
- Font Setting
- Bar code
You can select any character node under the Character format in the Style tree. It has a different attribute selected and the description.
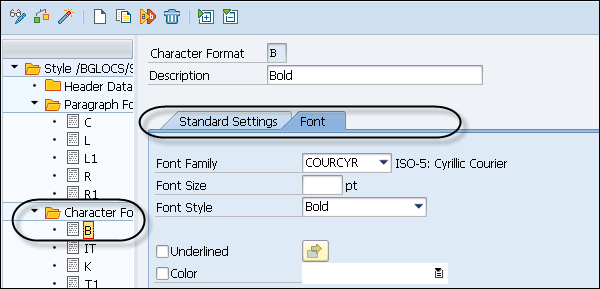
You can select a different type of Font family, font size and Font Style. You can also import your own fonts too. You can also select attributes like Underline and Font Color.
Under a Standard setting, you can define the character format for a system bar code.
Click on the Character folder and then right click on → Create Node.
In the character format, you need to enter 2–char key. Go to each individual tab to define different attributes. Once you define the attributes, click on the Activate button to activate the character node.
SAP Smart Forms - Output Types
In this chapter, we will discuss in detail about the different output types of SAP Smart Forms. This chapter will also cover the various Output Formats and Output Media along with an understanding on how to Run a Trace in SAP Smart Forms.
SAP Smart Forms – Output Formats
You can print smart forms in the Output Text format and many other output formats with different uses like – XML format for smart forms and HTML to display a form in the web browser.
The following output formats are some of the most commonly used ones −
Output Text Format − This is a standard output text format and it is an established format for printing forms in a SAP system. You can also convert it into other formats like PDF.
XSF Output − This is an XML format for smart forms. It contains the form content of a processed form without showing any layout information.
HTML Format − It is also possible to display the form in a Web browser. It is a combination of the XSF output and HTML format where content is processed without any layout information and data is displayed in the form format to a web browser.
XDF Output − It is in an XML format that doesn’t contain neither the form nor its layout and shows the data application passed at the form interface.
The output format setting is defined under Form Attributes. When you call a smart form, you can use the standard parameters to override the output settings.
SAP Smart Forms – Output Media
You can send a smart form to different output mediums. A few examples of different output mediums are −
- Printers
- Fax
- Emails or
- XML formats
Smart forms are forwarded to other interfaces to transfer the form to different output media.
Example − To take printing output on a Printer, you need to setup the Printer first.
To control the output, you need to pass different parameters at the interface of smart forms. SAP Smart Forms passes the parameter value to a different output medium.
You can set different output medium for each output format −
OTF Format
You can use different output processing methods such as −
- Spool Processing
- In E-mail
- To Fax machine
Parameters values to send the form in Email − When you want to send the smart form in email, the following email parameters should be filled for a generated function module.
MAIL_SENDER/MAIL_RECIPIENT − You should set these parameters to pass the sender and the recipient of the document. To set the parameter values, you need to create BOR objects of object type RECIPIENT and enter the parameters.
MAIL_APPL_OBJ Parameter − You can use this parameter to link the application object with the sent document. You should create a BOR object for this parameter too.
Parameters for sending form by Telefax − To send the form in a Fax format, you need to set the device parameter to TELEFAX instead of Spool mode. It opens a dialog box where the user can enter a Fax number to use the output medium as Fax.
XSF Format
You can pass this output format to different output mediums such as −
- Spool Processing
- Return as table in the Application program
To pass the output format for spool processing, you need to pass the parameter to spool dialog of a SAP System. This dialog can be used to control the form output. There are different options that can be used in a Spool Dialog −
- New Spool request
- Defining retention time of a request in queue
- To select a page
- Link an authorization to spool request
- Specify archive settings
HTML Format
You can use this output medium to return it as a table in the application program.
SAP Smart Forms – Running Trace
This function allows you to trace the printing function of a smart form. Using this, it can trace how the printing request is processed for a smart form.
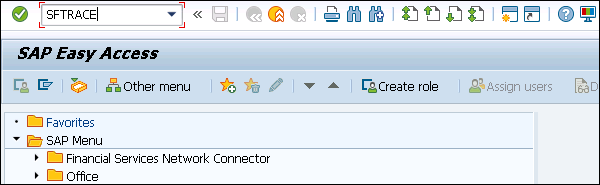
Transaction: SFTRACE
To perform a trace for the printing request, you can use Transaction: SFTRACE.
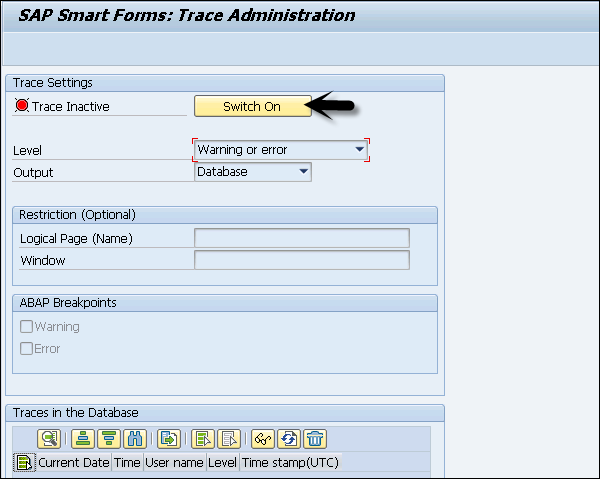
When the trace is activated using the function module generated for the smart form, it stores the trace on the database for each output.
Using this trace option, you can determine the sequence in which nodes are processed or when the processing is terminated due to an error. This option is specific to users and it is recorded only for the user who activates it.
Trace Level
Trace level is used to determine how detailed the trace is. Trace level 5 contains general information and trace level 80 determines the most detailed trace level. To activate Trace level, click on the Switch on option in the screenshot given below.
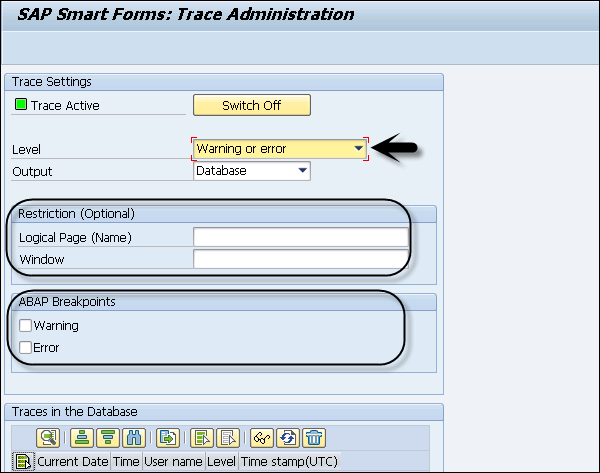
The following settings are possible when a trace is active −
Level − Detailed level in a trace output.
Logical Page − This is used to restrict the trace output to a specific page. This is useful at Trace level 30.
Window − This is used to restrict the trace output to a specific window in a smart form.
ABAP Break Point − These options are used internally while performing a trace level.
Trace Settings
Various trace levels are defined in Trace settings. Some of the most common ones are listed below −
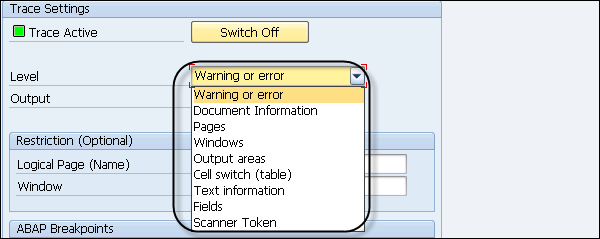
Warning or Error (Trace Level 5) − Trace level, trace version, date and time and system information.
Document Information (Trace Level 15) − This contains additional information- Output channel, form attributes, form structure and output results.
Pages (Trace Level 30) − This is used to contain name of processed pages.
Window (Trace Level 40) − This contains information about name of processed windows.
Output area (Trace Level 45) − This contains information about table output areas.
Cell change (Trace Level 47) − This trace level is used to contain outputs on line types and cells processed in tables.
Text information (Trace Level 50) − This is used to contain attribute values of processed output nodes.
Fields (Trace Level 60) − This is used to contain names and values of fields in output texts.
Scanner token (Trace Level 80) − This is maximum trace level and defines the scanner outputs while analyzing texts in text nodes.
In the next chapter, we will discuss in detail regarding the Advance Development Concepts in SAP Smart Forms.
Advance Development Concepts
In this chapter, we will discuss in detail about the advance development concepts of SAP Smart Forms. This chapter will cover aspects like Special Nodes, Form Processing and Function Modules as well.
SAP Smart Forms – Special Nodes
In a SAP Smart Form, you have different special nodes that can be used as a part of the advance development concepts. To add special nodes in a smart form, you should move it to the navigation tree.
On each page, right Click → Open Context menu → Create → Flow Logic → Command.
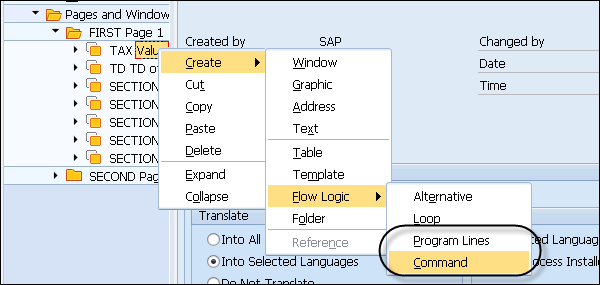
The following list of special node types can be used −
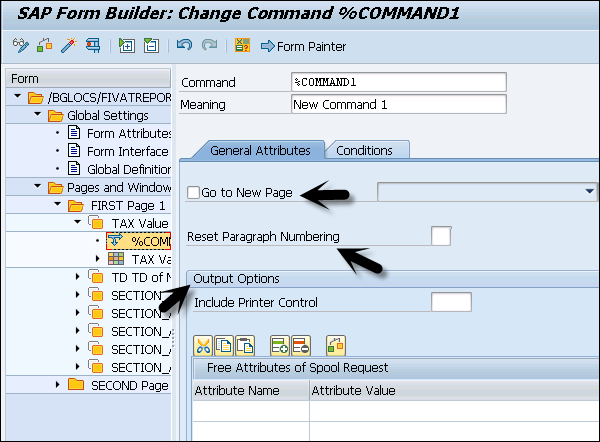
Command Node
This is commonly used to insert commands for different application purposes. You can use a command node to insert a dynamic page break in the main window. You have different options under command node to apply a dynamic page break −
Go to New Page − This command is used to provide a page break and is allowed only in the main window.
Reset Paragraph Numbering − This option can be used to set the counter for specified outline paragraphs.
Include Printer Control − This option is used to send print control to output device.
Free Attributes of Spool Request − This option can be used to define attributes for spool requests.
Program Lines
Program lines can be used to perform calculations of totals and subtotals. You can insert program lines in the tree structure.
On the General Attributes tab use the tables Input parameters and Output parameters to pass global fields. With the ABAP code, you can access the global fields entered in these tables.
Complex Section
You use this option to combine tab pages of node types, to create complex section node click Create → Complex Section.
In the General Attribute tab of the Complex Section, you can define settings for combining different tab pages such as −
- Event tab
- Table tab and
- Template tab.
SAP Smart Forms – Form Processing
In a smart form, you use the tree structure under the form builder to define form logic to print the texts, graphics and different elements in the smart form. When a smart form is activated, a function module is generated and the SAP smart form processes the tree structure of the form and uses the ABAP programing code to print the form contents.
The output of a smart form is determined by inferior nodes in a tree structure that constitutes Pages and Windows in a Form builder. For each node in a tree, you can define output options and conditions.
A node is processed in the following scenarios −
Condition −
When a condition is set for the node and system evaluates the condition. If it is found false, node and its inferior nodes in a tree structure are not processed.
Inferior nodes can be processed directly depending on the node type.
An action assigned to a node can also be processed.
When you define the output options for a node and its inferior node and individual output options are assigned to inferior nodes, then option overwrites the output option of superior node.
The following condition types can be used for processing a node.
Simple IF Condition − This is done using AND or OR option.
Complex IF condition − This is used using program lines.
Event Queries Combination
SAP Smart Forms – Function Modules
When a smart form is activated, a function module is generated. There are various standard parameters that can be applied on the function module. These parameters directly appear in the form interface and can’t be changed. To activate a smart form click on the Activate Button at the top.
When the function module is called from an application, you can use these parameters for defining the output format or spool request or various other purposes.
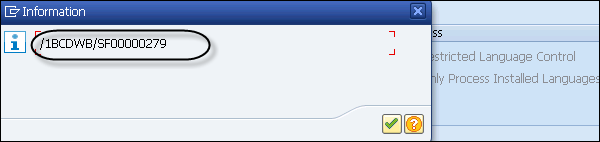
Report − zcall_smartform.
Call Function − '/1BCDWB/SF00000279'
Here SF00000279 – represents the function module.
But this is not the recommended way of calling a function module as the Function Module name is generated as per the number range in the system. When you transfer the smart form to the production system, a new function module is generated.
To handle this, it is recommended to use the function – SSF_FUNCTION_MODULE_NAME to get the function module name dynamically.
Report − zcall_smartform.
Data − fname TYPE rs38l_fnam.
Call Function − 'SSF_FUNCTION_MODULE_NAME’
How to get a Function Module Name?
To check the function module name for a smart form, navigate to Environment tab at the top → Function Module Name.
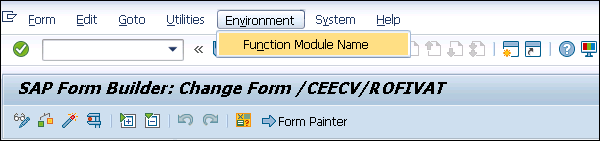
The Function Module is shown in the next window −
You can also perform vice versa using the Transaction SE 11 and go to table – STXFADMI.
SAP Smart Forms - Form Graphics
In this chapter, we will discuss in detail about the use of Form Graphics in SAP Smart Forms. This chapter will cover aspects like Previewing Graphics, Importing Graphics and Transporting Graphics.
SAP Smart Forms – Preview Graphics
You can add different graphics in a smart form like the Company Logo, Background Graphics, etc. You can use the graphic node to display graphics in a smart form and by adding node type graphics in the tree structure.
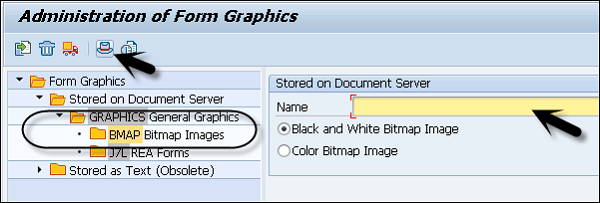
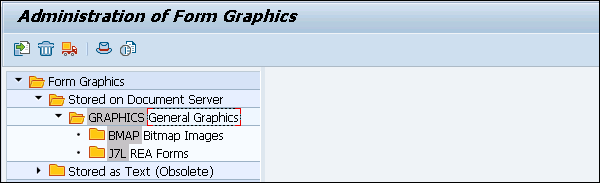
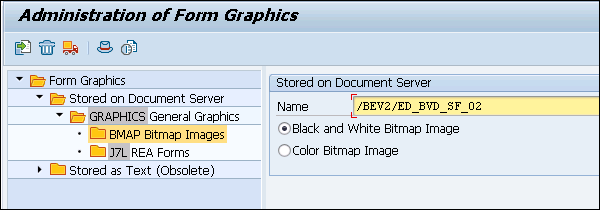
To view the graphics in a SAP System, use Transaction SE78. This will open the Administering Form Graphics dialog box. On the left side, double click on the folder Store on the Document Server → Graphics → BMAP Bitmap Image.
Select the Graphic and click on the Screen Information.
When you click on the Screen information button, it displays the technical attributes and the administrative data of the graphic in a SAP System.
SAP Smart Forms – Importing Graphics
To include background graphics, use the Background Graphic node of a page node. You can use Transaction SE78 to import the graphics into the SAP System.
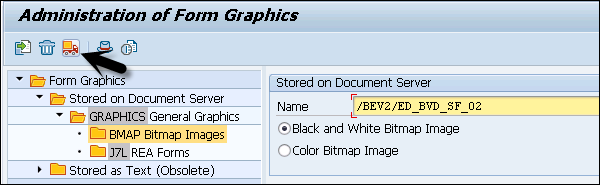
To import graphics, double-click on a graphic format in the tree structure in the folder Store on the Document server → GRAPHICS → General graphics.
To import, select Graphics → Import.
To use the graphics in a Form Builder, go to navigation tree on the left side and create a node type → Graphic.
A graphic node can be created directly under the Page node or you can use the context menu in a layout to place the graphic node.
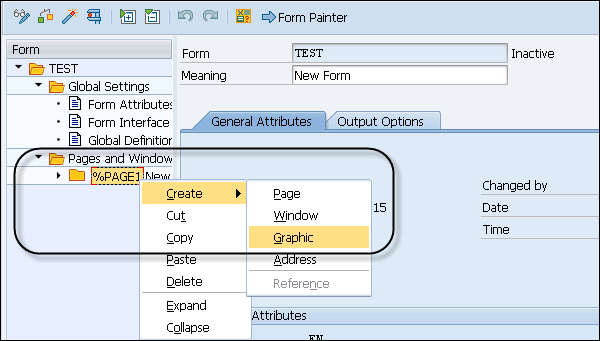
Enter the unique name for the node and description.
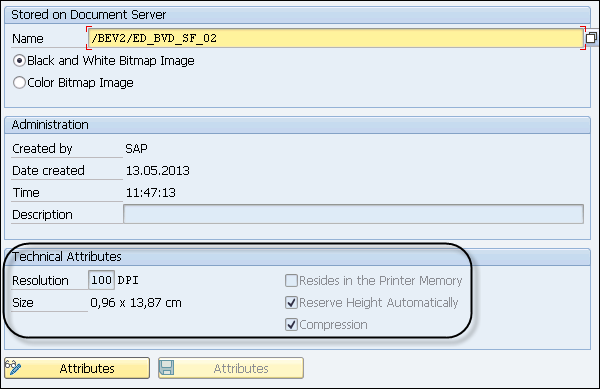
On the General Attribute tab → you can include a colored graphic or a graphic in black and white. You can enter the fields Object, ID and Name to identify the graphic.
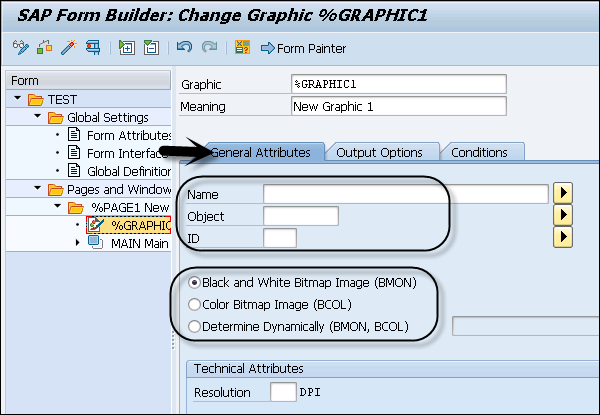
Under Technical Attributes, you can define Resolution as per the printer settings. When you use a small resolution, it increases the size of graphic on the form.
The printer drivers or printers support the following resolutions −
- 75 dpi
- 100 dpi
- 150 dpi
- 200 dpi
- 300 dpi
- 600 dpi
SAP Smart Forms – Transporting Graphics
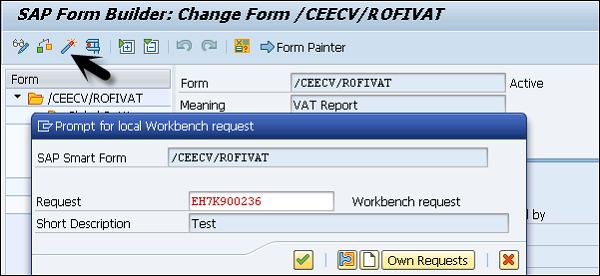
In a SAP System, it is possible to transport the graphics from one system to another system. Go to Transaction SE78 and there you can select the Transport option to move the graphics from one system to another.
Transaction: SE78 will open the Administering Form Graphics.
This will open the Administering Form Graphics and select the desired graphics in the tree.
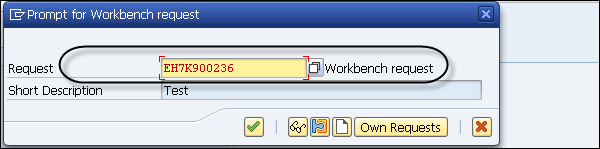
Select Graphics → Transport button and then you should enter the workbench request.
You can use an existing request or create a new request to perform the Transport and then click on Continue.
SAP Smart Forms - Applications & Migration
In this chapter, we will discuss in detail about using forms in applications in SAP Smart Forms. In addition, we will also understand how to migrate a SAP Script Form to a SAP Smart Form.
SAP Smart Forms – Using Forms in Applications
You can also use smart forms in business applications of a web browser, which are known as web forms. A web form is an HTML form with the same layout as that of a smart form and can be used for form printing in internet.
When you use smart forms as web forms, it transforms the XSF output to the HTML format. Smart styles are used for formatting of web forms.
It is also possible to get a print of the web form from the browser and to keep the quality good, it is recommended that the form should be sent to the web browser in a PDF format.
SAP Smart Forms – Migration
It is also possible to migrate a SAP script form to a smart form and SAP script style to a smart style. When the system converts a SAP script style into a smart style, the system converts all the paragraphs and character formats with their properties and attributes.
When a migration happens for a SAP script form to a smart form, the following execution takes place −
All the attributes of the Page and Windows are migrated.
Text is copied in the form.
Language attributes and output options are copied.
Conversion of SAP script command line and to display them in text format.
You can also perform mass migration of script forms.
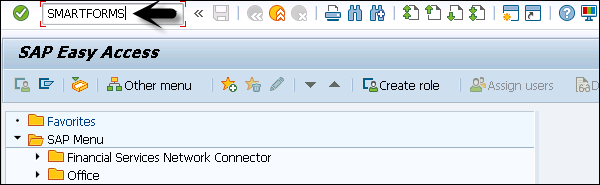
Transaction: SMARTFORMS and enter the name of the form you want to create.
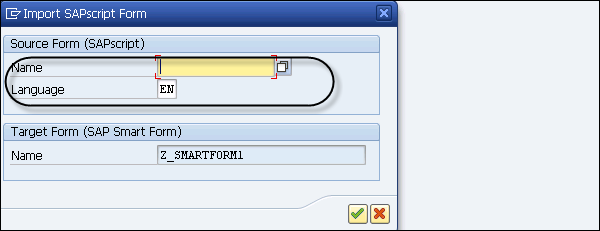
Go to Utilities → Migration → Import SAPscript form.
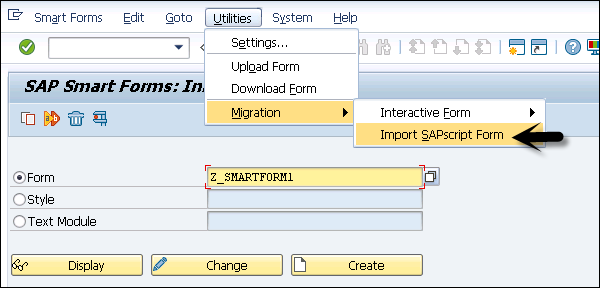
This will open the dialog migrate SAP script form window. You need to select the name and language of source form → ENTER.
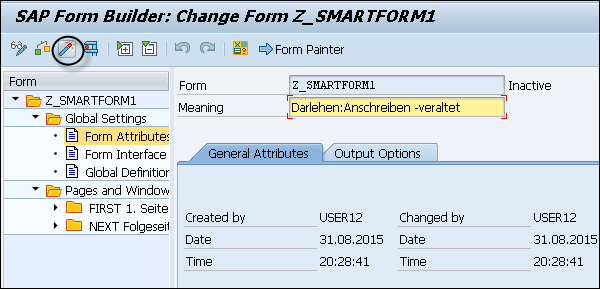
You can see the changed mode of the Form Builder. You can change the form logic and form style as well. To activate the smart form, click on the Activate button.
In the same way, you can convert a SAP script style to a SAP smart style.
SAP Smart Forms – Migrating to PDF Forms
You can migrate your existing SAP Smart Forms to interactive PDF Forms provided by Adobe. To use this, you need to perform the migration of all graphics.
To perform the migration, you should use Transaction: SMARTFORMS.
Navigate to Utilities → Migration → Interactive Form → Export.
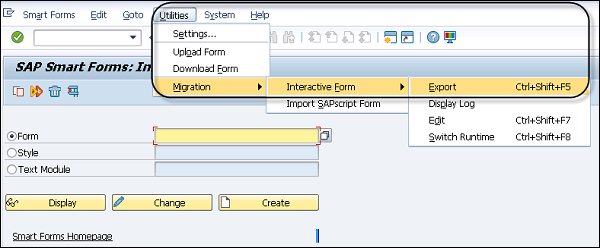
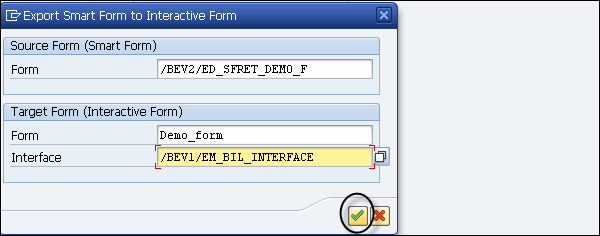
In the next dialog box, you should enter the name of the Smart Form to migrate, the PDF based target and the target interface. By default, the system suggests the same name as of the smart form for interactive PDF forms.
Click on the Continue button as shown in the following screenshot.
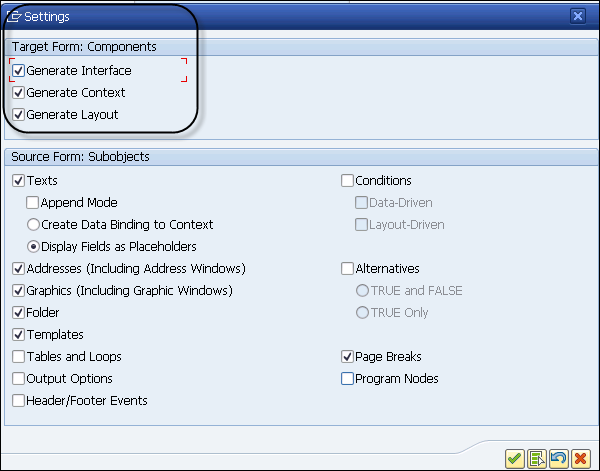
In next window, the system displays the Setting Dialog where you can check different migration options.
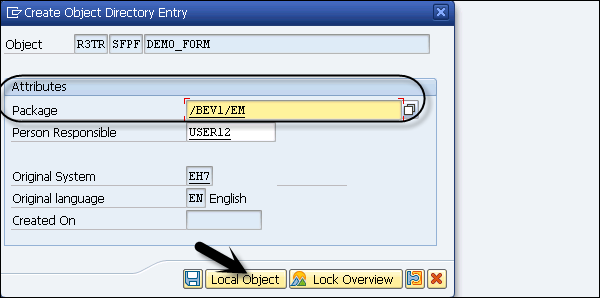
In the next window, select Create Object Directory Entry, enter a package for interface and save it as a local project.
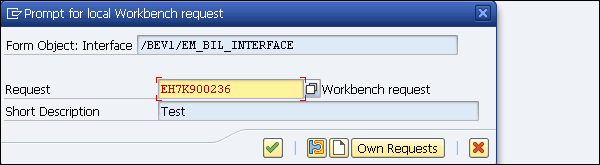
The next step is to assign the form to a package or save the form as a local object and then the migration is completed.
This is how you can perform the migration of SAP smart form to Adobe Interactive forms.