- SAP Security Tutorial
- SAP Security - Home
- SAP Security - Overview
- User Authentication & Management
- Network Communication Security
- Protecting Standard Users
- Un-authorizing Logons Protections
- System Authorization Concept
- SAP Security - Unix Platform
- SAP Security - Windows Platform
- SAP Security - Databases
- User Authentication & Single SignOn
- SAP Security - Logon Tickets
- SAP Security Useful Resources
- SAP Security - Quick Guide
- SAP Security - Useful Resources
- SAP Security - Discussion
SAP Security - System Authorization Concept
The SAP System Authorization Concept deals with protecting the SAP system from running transactions and programs from unauthorized access. You shouldn’t allow users to execute transactions and programs in SAP system until they have defined authorization for this activity.
To make your system more secure and to implement strong authorization, you need to review your authorization plan to make sure that it meets the security requirement of the company and there are no security violations.
User Types
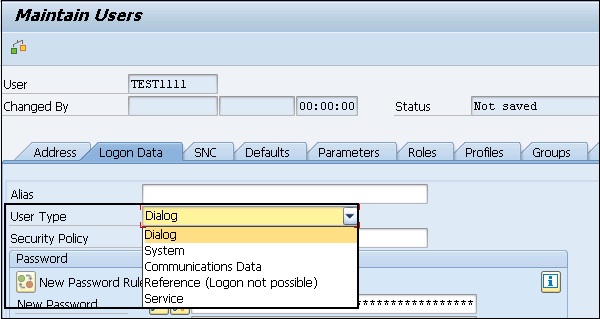
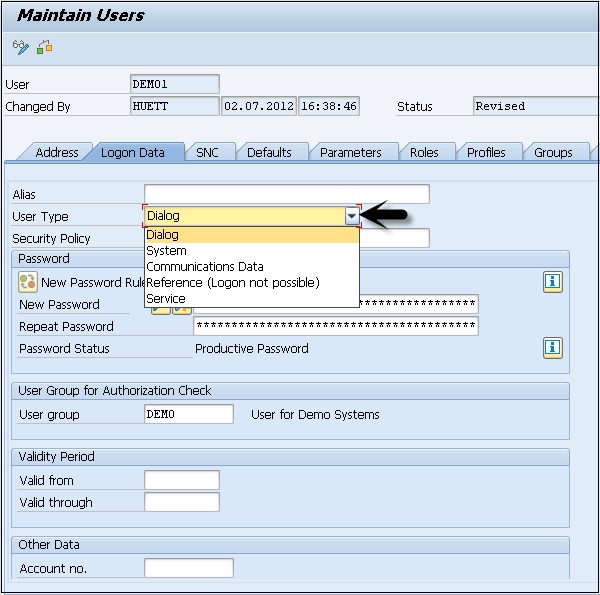
In Prior releases of the SAP System, the user types were only divided in two categories – Dialog users and Non-Dialog users and only non-dialog users were recommended for communication between two systems. With SAP 4.6C, user types have been divided into the following categories −
Dialog User − This user is used for individual interactive system access and most of the client work is performed using a dialog user. Password can be changed by the user itself. In dialog user, multiple dialog logons can be prevented.
Service User − This is used to perform interactive system access to perform some predetermined task like product catalog display. Multiple logins allowed for this user and only an Administrator can change the password for this user.
System User − This user id is used to perform most of the system related tasks – Transport Management System, Defining Workflows and ALE. It is not an interactive system dependent user and there are multiple logins allowed for this user.
Reference User − A Reference user is not used for logging into a SAP system. This user is used to provide additional authorization to internal users. In a SAP system, you can go to the Roles tab and specify a reference user for additional rights for dialog users.
Communication Users − This user type is used to maintain dialog free login between different systems like RFC connection, CPIC. The Dialog logon using SAP GUI is not possible for Communication users. A User type can change their passwords like common dialog users. RFC functional module can be used to change the password.
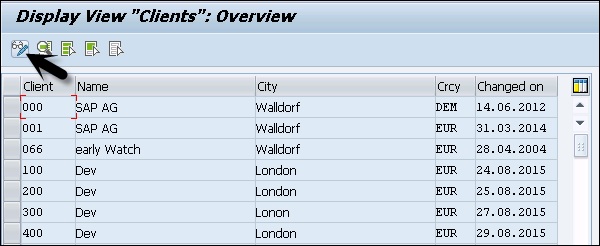
The Transaction Code: SU01 is used for user creation in a SAP system. In the following screen, you can see different User types in a SAP system under the SU01 Transaction.
Creating a User
To create a user or multiple users with different access rights in a SAP system you should follow the steps given below.
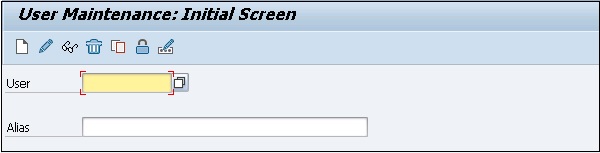
Step 1 − Use transaction code — SU01.
Step 2 − Enter the username you want to create, click on create icon as shown in the following screenshot.

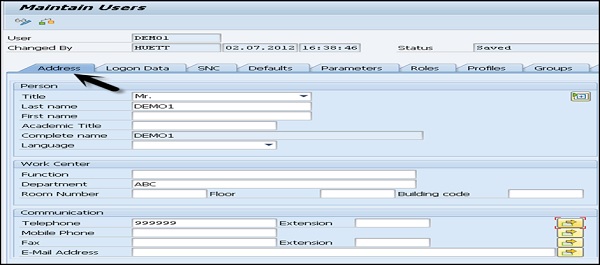
Step 3 − You will be directed to the next tab — the Address tab. Here, you need to enter the details like First Name, Last Name, Phone Number, Email Id, etc.
Step 4 − You will further be directed to the next tab — Logon Data. Enter the user type under Logon data tab. We have five different user types.
Step 5 − Type the first Login Password → New Password → Repeat Password.

Step 6 − You will be directed to the next tab — Roles −Assign the roles to the user.
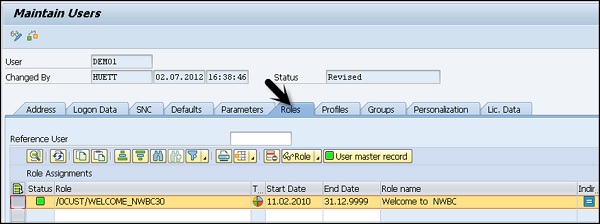
Step 7 − You will further be directed to the next tab — Profiles −Assign the Profiles to users.

Step 8 − Click on Save to receive confirmation.
Central User Administration (CUA)
The Central User Administration is one of the key concept that allows you to manage all users in a SAP system landscape using a central system. Using this tool, you can manage all user master record centrally in one system. A Central User Administrator allows you to save money and resources in managing similar users in one system landscape.
The advantages of Central User Administration are −
When you configure CUA in SAP landscape, you can create or delete users using only the central system.
All the required roles and authorization exists in a child system in active forms.
All the users are monitored and managed centrally that makes the task of administration easy and clearer view to all user management activities in a complex system landscape.
The Central User Administrator allows you to save money and resources in managing similar users in one system landscape.
The data exchanges performed using the ALE landscape called as Application Link Enabling that allows to exchange the data in controlled manner. ALE is used by the Central User Administrator for data exchange to child systems in a SAP system landscape.
In a complex landscape environment, you define one system as the Central system with ALE environment and this is linked to all the child systems using bidirectional data exchange. The child system in landscape are not connected with each other.
To implement Central User Administration, the following points should be considered −
You need a SAP environment with multiple clients in a single/distributed environment.
Administrator to manage users, need authorization on following Transaction Codes −
SU01
SCC4
SCUA
SCUM
SM59
BD54
BD64
You should create a trusting-trusted relationship between systems.
You should create system users in central and child system.
Create Logical System and assign logical system to corresponding client.
Create model view and BAPI to model view.
Create a Central User Administrator and set distribution parameters for fields.
Synchronize company addresses
Transfer Users
In a centrally managed environment, you need to create an Administrator first. Log on in all logical systems of the future CUA as user SAP* with the default password PASS.
Run the Transaction SU01 and create a user with administrator role assigned to it.
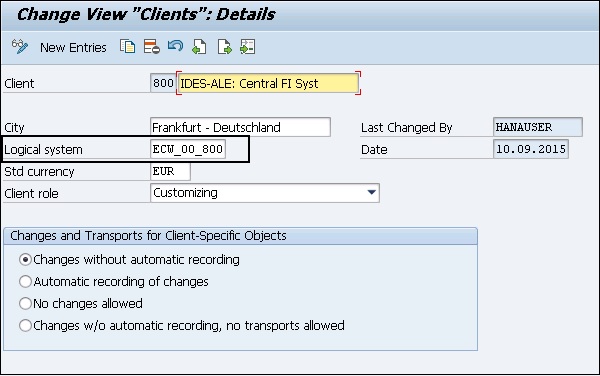
To define a Logical system use Transaction BD54. Click on New Entries to create a new logical system.
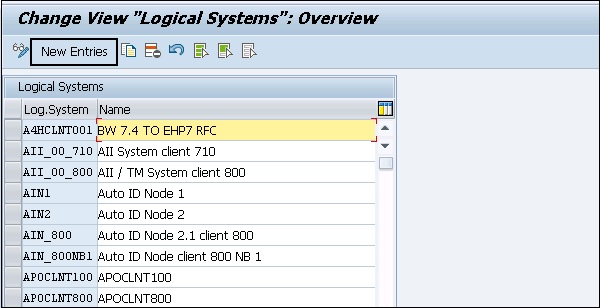
Create a new logical name in capital letters for the Central User Administration for central and all child systems including those from other SAP Systems.
To easily identify the system, you have the following naming convention that can be used to identify the Central User Administration system −
<System ID>CLNT<Client>
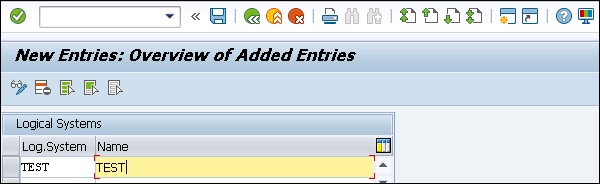
Enter some useful description of a logical system. Save your entry by clicking on the Save button. Next is to create the logical system name for the central system in all child systems.
To assign a Logical system to a client, use Transaction SCC4 and switch to Change mode.
Open the client that you want to assign to logical system by double clicking or by clicking on the Details button. A client can only be assigned to one logical system.
In a logical system field in client details, enter a logical system name to which you want to assign this client.
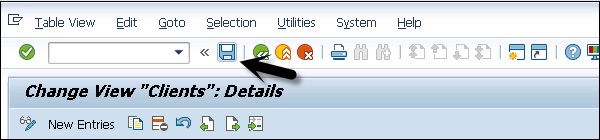
Perform the above steps for all the clients in a SAP environment that you want to include in the Central User Administrator. To save your settings, click on the Save button at the top.
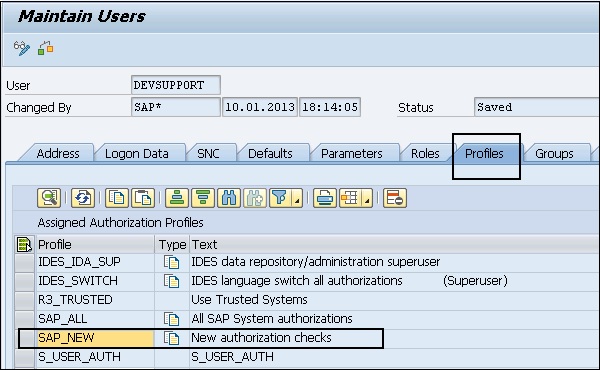
Protecting Specific Profiles in SAP
To maintain security in a SAP system, you need to maintain specific profiles that contain critical authorization. There are various SAP authorization profiles that you need to protect in a SAP system that has full authorization.
A few profiles that need to be protected in a SAP system are −
- SAP_ALL
- SAP_NEW
- P_BAS_ALL
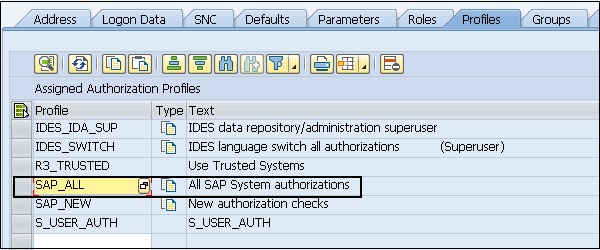
SAP_ALL Authorization Profile
A SAP_ALL authorization profile allows the user to perform all the tasks in a SAP system. This is the composite profile that contains all the authorization in a SAP system. The users with this authorization can perform all the activities in a SAP system, so this profile shouldn’t be assigned to any user in your system.
It is recommended that a single user should be maintained with a profile. While the password should be well protected for that user and it should only be used when it is required.
Instead of assigning SAP_ALL authorizations, you should assign individual authorizations to the appropriate users. Your system Superuser / System Administration, instead of assigning SAP_ALL authorization to them, you should use individual authorizations that are required.
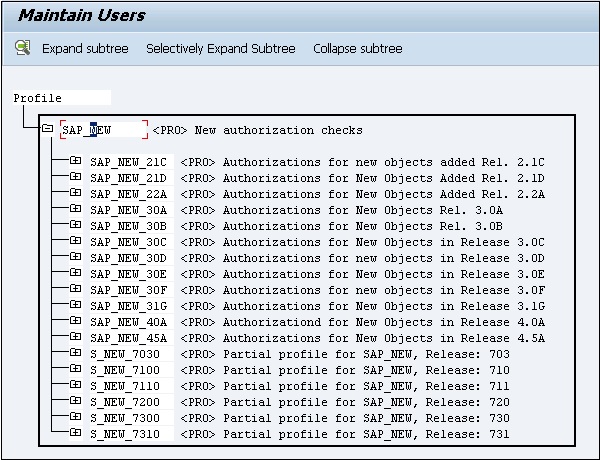
SAP_NEW Authorization
A SAP_NEW authorization contains all the authorizations that are required in a new release. When a system upgrade is done, this profile is used so that some tasks are run properly.
You should remember the following points about this authorization −
When a system upgrade is performed, you need to delete the SAP_NEW profiles for releases prior to this.
You need to assign separate authorizations under the SAP_NEW profile to different users in your environment.
This profile shouldn’t be kept active for too long.
When you have a long list of SAP_NEW profiles in the environment, it shows you need to review your authorization policy in the system.
To see the list of all the SAP_NEW profiles, you should select this profile by double clicking and then → go to Choose.
P_BAS_ALL Authorization
This authorization allows user to view the content of tables from other applications. This authorization contains P_TABU_DIS authorization. This authorization allows the PA user to see the table content that doesn’t belong to their group.
PFCG Role Maintenance
PFCG Role Maintenance can be used to manage roles and authorization in a SAP system. In PFCG, the role represents a work that a person performs related to real-life scenarios. PFCG allows you to define set of transactions that can be assigned to a person to perform their daily work.
When the roles are created in a PFCG Transaction, you can use Transaction SU01 to assign these roles to individual users. A user in a SAP system can be assigned multiple number of roles and that are related to his/her daily task in real-life.
These roles are in connection between user and authorizations in a SAP system. The actual authorizations and profiles are stored in the form of objects in a SAP system.
Using PFCG Role Maintenance, you can perform the following functions −
- Changing and Assigning Roles
- Creating Roles
- Creating Composite Roles
- Transporting and Distributing Roles
Let us now discuss these functions in detail.
Changing and Assigning Roles
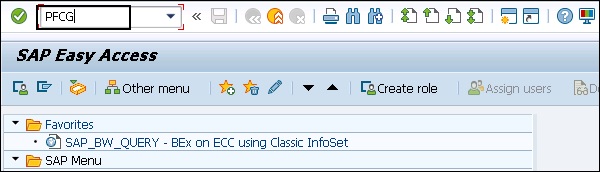
Run Transaction: PFCG
It will take you to role maintenance window. To change the existing role, enter the delivered role name in the field.
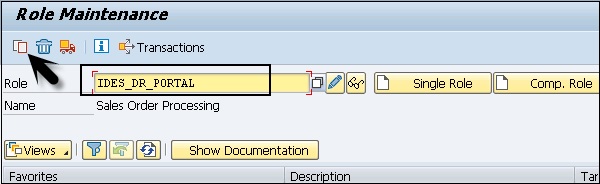
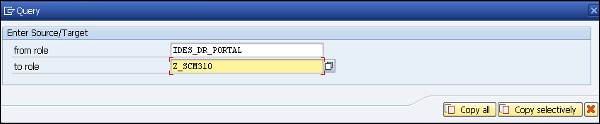
Copy the standard role by clicking on Copy role button. Enter the name from namespace. Click on value selection button and select the role to which you want to copy this.
You can also select the delivered roles by SAP starts with SAP_, but then default roles will be overwritten.
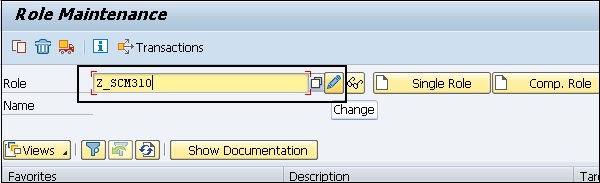
To change the role, click on the Change button in Role Maintenance.
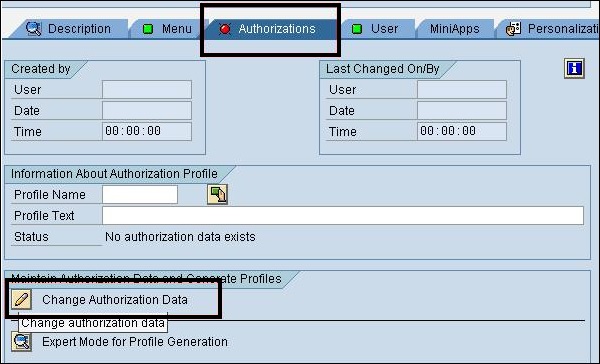
Navigate to the Menu tab to change the user menu on the Menu tab page. Go to the Authorization tab to change the Authorization data for that user.
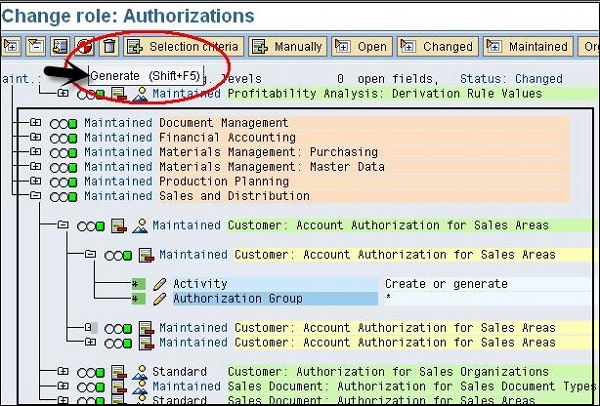
You can also use the Expert Mode to adjust the authorizations for the menu changes under Authorization. Click on Generate button to generate the profile for this role.
To assign the users to this role, go to User tab in Changes Role option. To assign a user to this role, it should exist in the system.
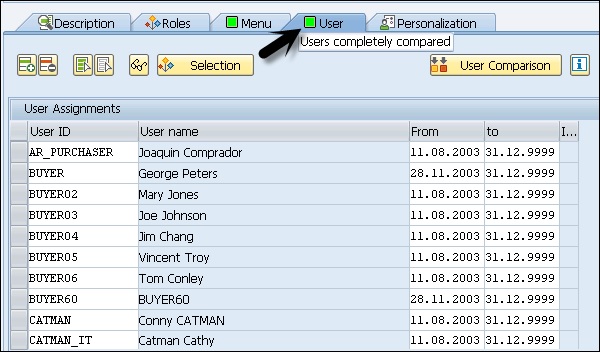
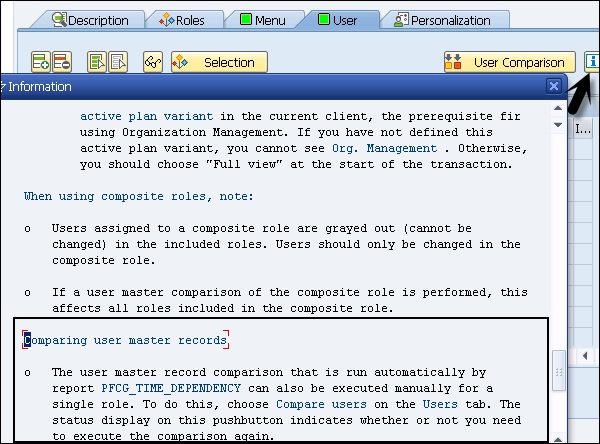
You can also perform a User Comparison if required. Click on User Comparison option. You can also click on the Information button to know more about Single and Composite roles and User Comparison option to compare the master records.
Creating Roles in PFCG
You can create both single roles and composite roles in PFCG. Enter the role name and click on Create Single or Composite Roles as shown in the screenshot below.
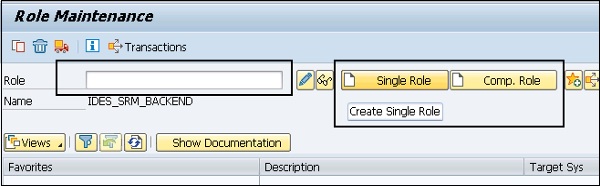
You can select from Customer namespace like Y_ or Z_. SAP delivered roles start with SAP_ and you can’t take the name from SAP delivered roles.
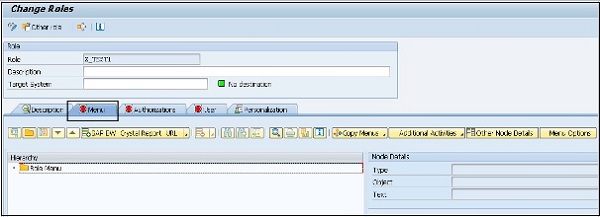
Once you click on Create role button, you should add Transactions, Reports and Web Addresses under the MENU tab in role definition.
Navigate to Authorization tab to generate the Profile, click on Change Authorization data option.
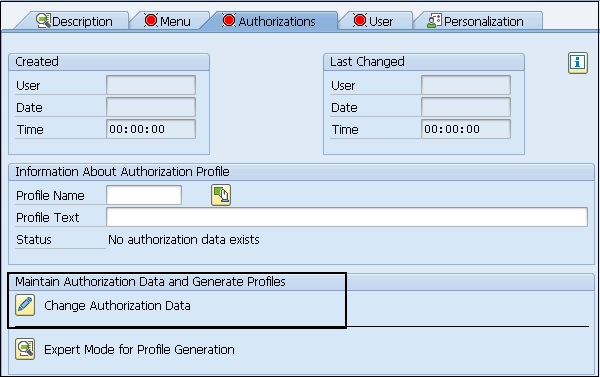
As per your activity selection, you are prompted to enter the organizational levels. When you enter a particular value in the dialog box, die authorization fields of the role are maintained automatically.
You can adapt the reference for the roles. Once a role definition is done, you need to generate the role. Click on Generate (Shift+F5).

In this structure, when you see red traffic lights, it shows the organizational levels with no values. You can enter and change organizational levels with Organization levels next to Maintained tab.
Enter the Profile name and click on the tick option to complete the Generate step.
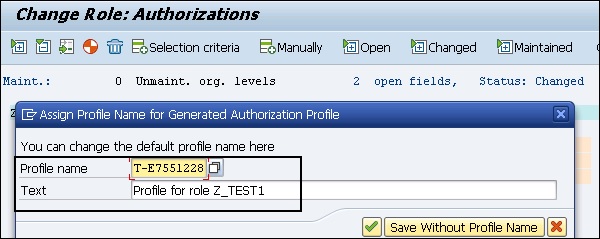
Click on Save to save the profile. You can directly assign this role to users by going to the User tabs. In a similar way, you can create Composite roles using the PFCG Role Maintenance Option.
Transporting and Distributing Roles
Run the Transaction – PFCG and enter the role name that you want to transport and click on Transport Role.
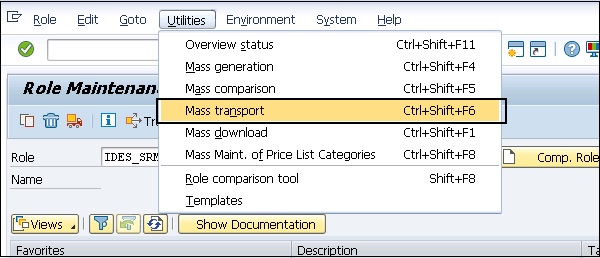
You will reach to role transport option. You have multiple options under the Transport Roles −
- Transport single roles for composite roles.
- Transport generated profiles for roles.
- Personalization Data.
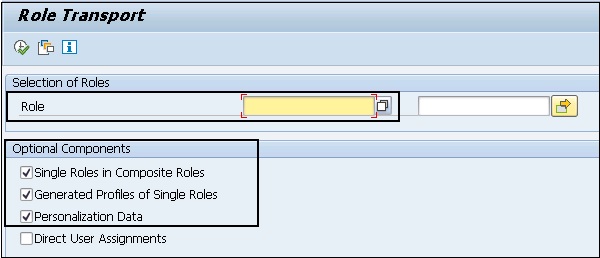
In the next dialog box, you should mention user assignment and the personalization data should also be transported. If the user assignments are also transported, they will replace the entire user assignment of roles in the target system.
To lock a system so that user assignments of roles cannot be imported, enter it in the Customizing table PRGN_CUST using transaction SM30 and select the value field USER_REL_IMPORT number.
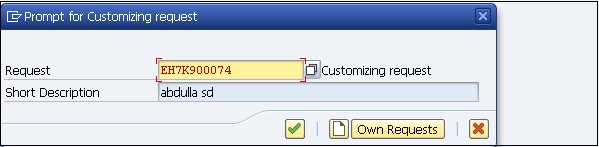
This role is entered in customizing request. You can view this using Transaction SE10.
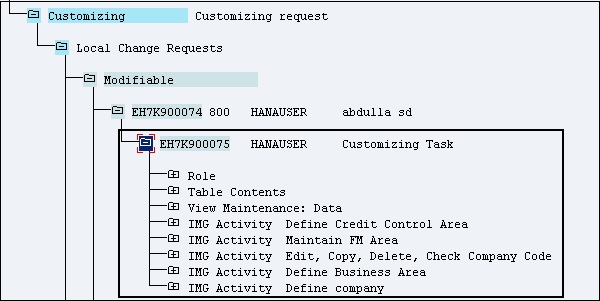
In Customizing request, authorization profiles are transported along with the roles.
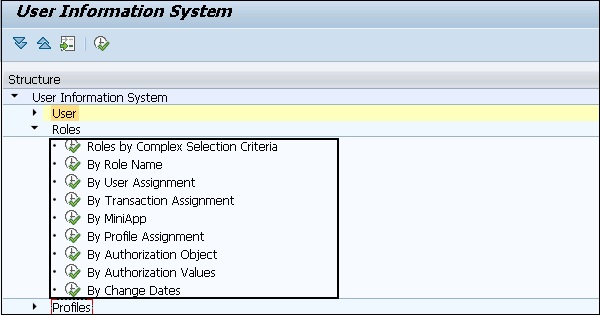
Authorization Info System Transaction – SUIM
In Authorization Management, SUIM is a key tool using which you can find the user profiles in a SAP system and can also assign those profiles to that User ID. SUIM provides an initial screen that provides options for Searching Users, Roles, Profiles, Authorizations, Transactions, and Comparison.
To open User Information System, Run Transaction: SUIM.
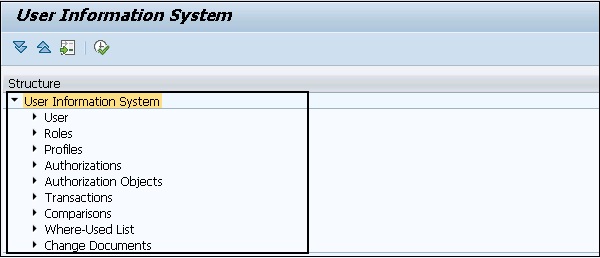
In a User Information System, you have different nodes that can be used to perform different functions in a SAP system. Like in a User node, you can perform a search on users based on selection criteria. You can get the locked list of users, users having access to a particular set of transactions, etc.
When you expand each tab, you have option to generate different reports based on different selection criteria. Like when you expand user tab, you have the following options −
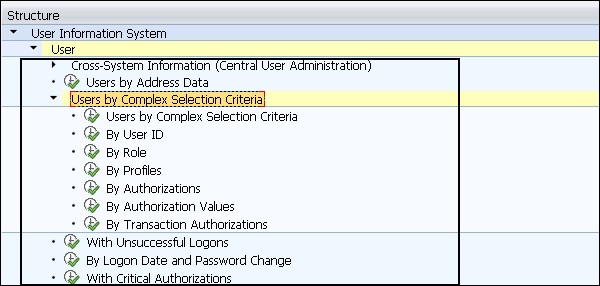
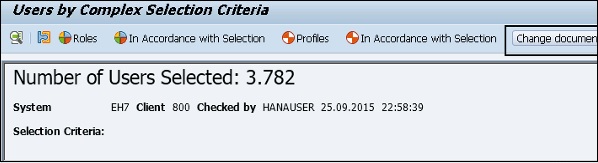
When you click on users by complex selection criteria, you can apply multiple selection conditions simultaneously. The following screenshot shows you different selection criteria’s.

Role Node
In a similar way, you can access different nodes like Roles, Profiles, Authorizations and various other options under this user information system.
You can also use SUIM tool for searching roles and profiles. You can assign a list of transactions to a particular set of user ID’s, by performing a search by transaction and assignment in SUIM and assign those roles to that user ID.
Using the User Information system, you can perform various searches in a SAP system. You can enter different selection criteria and pull the reports based on Users, Profiles, roles, Transactions and various other criteria.
RSUSR002 − Users by Complex Selection Criteria.