- SAP Security Tutorial
- SAP Security - Home
- SAP Security - Overview
- User Authentication & Management
- Network Communication Security
- Protecting Standard Users
- Un-authorizing Logons Protections
- System Authorization Concept
- SAP Security - Unix Platform
- SAP Security - Windows Platform
- SAP Security - Databases
- User Authentication & Single SignOn
- SAP Security - Logon Tickets
- SAP Security Useful Resources
- SAP Security - Quick Guide
- SAP Security - Useful Resources
- SAP Security - Discussion
SAP Security - Quick Guide
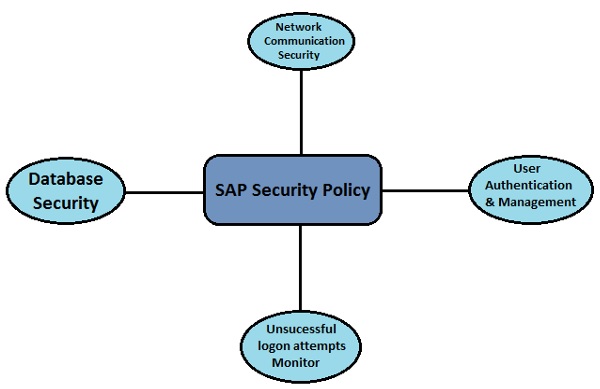
SAP Security - Overview
In a SAP Distributed Environment, there is always a need that you protect your critical information and data from unauthorized access. Human Errors, Incorrect Access Provisioning shouldn’t allow unauthorized access to any system and there is a need to maintain and review the profile policies and system security policies in your SAP Environment.
To make the system secure, you should have good understanding of user access profiles, password policies, data encryption and authorization methods to be used in the system. You should regularly check SAP System Landscape and monitor all the changes that are made in configuration and access profiles.
The standard super users should be well-protected and user profile parameters and values should be set carefully to meet the system security requirements.
While communicating over a network, you should understand the network topology and network services should be reviewed and enabled after considerable checks. Data over the network should be well protected by using private keys.
Why is Security Required?
To access the information in a distributed environment, there is a possibility that critical information and data is leaked to unauthorized access and system security is broken due to either – Lack of password policies, Standard super users are not well maintained, or any other reasons.
A few key reasons of breach of access in a SAP system are as follows −
Strong password policies are not maintained.
Standard users, super user, DB users are not properly maintained and passwords are not changed regularly.
Profile parameters are not correctly defined.
Unsuccessful logon attempts are not monitored and idle user session end policies are not defined.
Network Communication security is not considered while sending data over internet and no use of encryption keys.
Database users are not maintained properly and no security measures are considered while setting up the information database.
Single Sign-on’s are not properly configured and maintained in a SAP environment.
To overcome all the above reasons there is a need that you define security policies in your SAP environment. Security parameters should be defined and password policies should be reviewed after regular time intervals.
The Database Security is one of the critical component of securing your SAP environment. So, there is a need that you manage your database users and see to it that passwords are well protected.
The following Security mechanism should be applied in the system to protect SAP Environment from any unauthorized access −
- User Authentication and Management
- Network Communication Security
- Protecting Standard Users and Super users
- Unsuccessful Logons Protections
- Profile parameters and password policies
- SAP System Security in Unix and Windows Platform
- Single Sign-On Concept
So, the security in SAP system is required in a distributed environment and you need to be sure that your data and processes support your business needs without allowing unauthorized access to critical information. In a SAP system, human errors, negligence, or attempted manipulation on the system can result in loss of critical information.
User Authentication and Management
If an unauthorized user can access SAP system under a known authorized user and can make configuration changes and manipulate system configuration and key policies. If an authorized user has access to important data and information of a system, then that user can also access other critical information as well. This enhances the use of secure authentication to protect the Availability, Integrity and Privacy of a User System.
Authentication Mechanism in a SAP System
Authentication mechanism defines the way you access your SAP system. There are various authentication methods that are provided −
- User Id’s and user management tools
- Secure Network Communication
- SAP Logon Tickets
- X.509 Client Certificates
User ID’s and User Management Tools
Most common method of authentication in a SAP system is by using the username and password to login. The User ID’s to login are created by the SAP Administrator. To provide secure authentication mechanism via the username and password, there is a need to define password policies that doesn’t allow users to set easy predicted password.
SAP provides various default parameters that you should set to define password policies- password length, password complexity, default password change, etc
User Management Tools in a SAP System
SAP NetWeaver System provides various user management tools that can be used to effectively manage users in your environment. They provide very strong authentication method for both type of NetWeaver Application servers – Java and ABAP.
Some of the most common User Management Tools are −
User Management for ABAP Application Server (Transaction Code: SU01)
You can use user management Transaction-Code SU01 to maintain users in your ABAP based Application Servers.

SAP NetWeaver Identity Management
You can use SAP NetWeaver Identity Management for user management as well as for managing roles and role assignments in your SAP environment.

PFCG Roles
You can use profile generator PFCG to create roles and assign authorizations to users in ABAP based systems.
Transaction Code − PFCG
Central User Administration
You can use CUA to maintain users for multiple ABAP-based systems. You can also sync it with your directory servers. Using this tool, you can manage all the user master record centrally from the client of the system.
Transaction Code − SCUA and create distribution model.
User Management Engine UME
You can use UME roles to control the user authorization in the system. An administrator can use actions which represent the smallest entity of UME role that a user can use to build access rights.
You can open UME administration console using SAP NetWeaver Administrator option.
Password Policy
A password policy is defined as a set of instructions that a user must follow to improve system security by using strong passwords and by using them properly. In many organizations, password policy is shared as a part of security awareness training and it is mandatory for users to maintain the policy for security of critical systems and information in an organization.
Using password policy in a SAP system, an administrator can setup system users to deploy strong passwords that are not easy to break. This also helps to change the password at the regular time intervals for system security.
The following password policies are commonly used in a SAP System −
Default/Initial Password Change
This allows the users to change the initial password immediately when used for the first time.
Password Length
In a SAP system, the minimum length for passwords in SAP Systems is 3 by default. This value can be changed using profile parameter and maximum length that is allowed is 8.
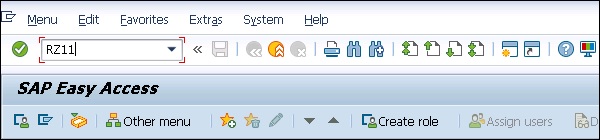
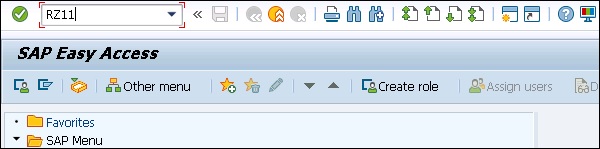
Transaction Code − RZ11
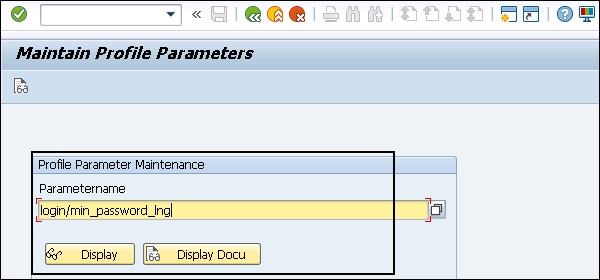
Parameter Name − login/min_password_lng
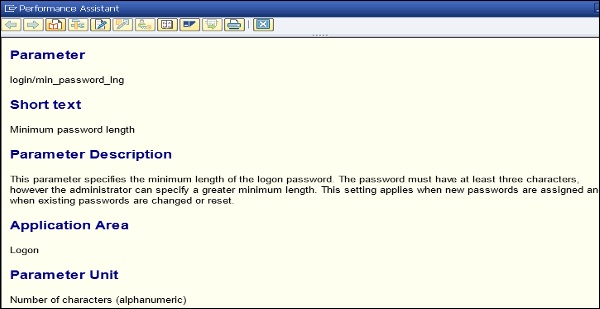
You can click on documentation of the profile parameter for this policy and you can see the detailed documentation as from SAP as follows −
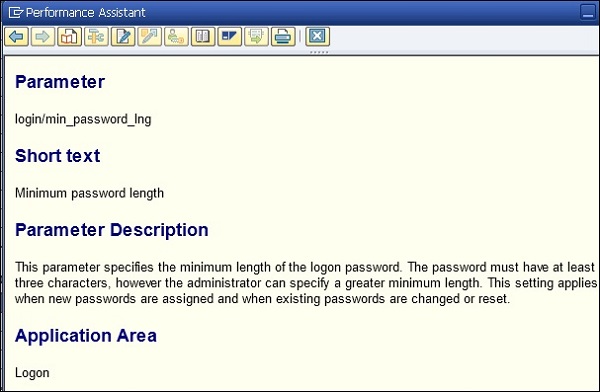
Parameter − login/min_password_lng
Short text − Minimum password length
Parameter Description − This parameter specifies the minimum length of the logon password. The password must have at least three characters. However, the administrator can specify a greater minimum length. This setting applies when new passwords are assigned and when existing passwords are changed or reset.
Application Area − Logon
Parameter Unit − Number of characters (alphanumeric)
Default Value − 6
Who is permitted to make changes? Customer
Operating System Restrictions − None
Database System Restrictions − None
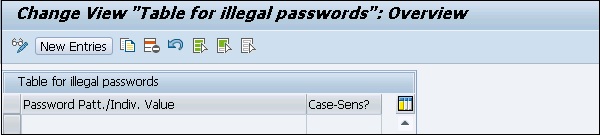
Illegal Passwords
You cannot select the first character of any password as a question mark (?) or an exclamation mark (!). You can also add the other characters that you want to restrict in the illegal password table.
Transaction Code − SM30 Table Name: USR40.
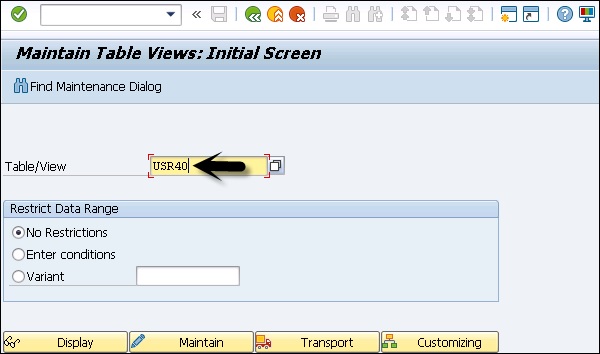
Once you enter the table − USR40 and click on Display at the top, it will show you the list of all the impermissible passwords.
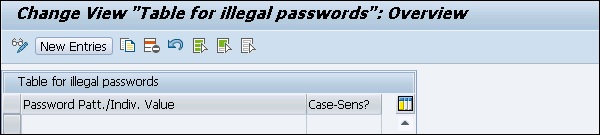
Once you click on New Entries, you can enter the new values to this table and also select the case sensitive check box.
Password Pattern
You can also set that the first three characters of the password cannot appear in the same order as part of the user name. Different password patterns that can be restricted using password policy include −
- The first three characters cannot all be the same.
- The first three characters cannot include space characters.
- The password cannot be PASS or SAP.
Password Change
In this policy, a user can be allowed to change his or her password almost once a day, but an administrator can reset a user’s password as often as necessary.
A user shouldn’t be allowed to reuse the last five passwords. However, an administrator can reset the password that is used by a user previously.
Profile Parameters
There are different profile parameters that you can define in a SAP system for user management and password policy.
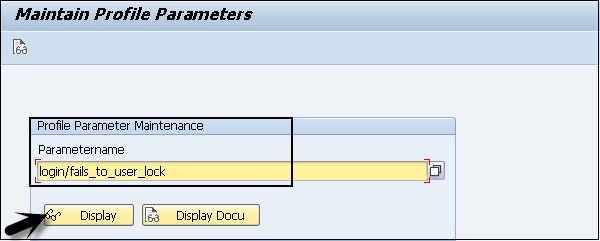
In a SAP system, you can display the documentation for each profile parameter by going to Tools → CCMS → Configuration →Profile Maintenance(Transaction: RZ11). Enter the parameter name and click on Display.
In the next window that shows up, you must enter the parameter name, you can see 2 options −
Display − To display the value of parameters in SAP system.
Display Docu − To display SAP documentation for that parameter.
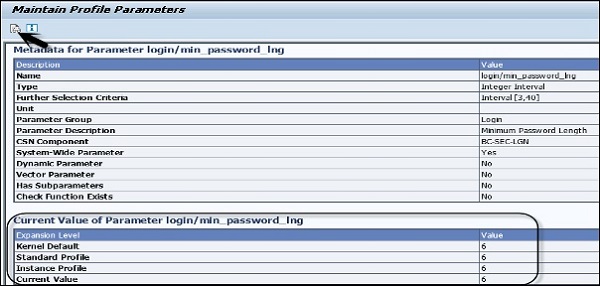
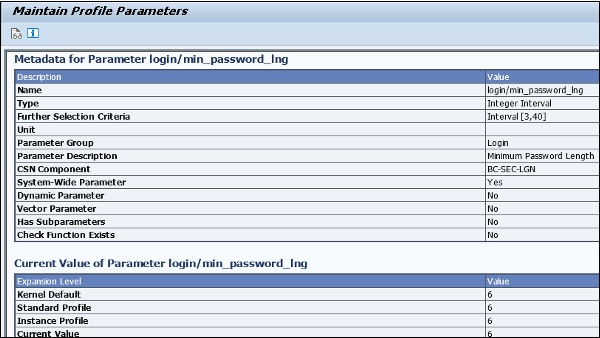
When you click on the Display button, you will be moved to Maintain Profile Parameter screen. You can see the following details −
- Name
- Type
- Selection Criteria
- Parameter Group
- Parameter Description and many more
At the bottom, you have current value of parameter login/min_password_lng
When you click on Display Doc option, it will display SAP documentation for the parameter.
Parameter Description
This parameter specifies the minimum length of the logon password. The password must have at least three characters. However, the administrator can specify a greater minimum length. This setting applies when new passwords are assigned and when existing passwords are changed or reset.
Each parameter has a default value, permitted value as below −

There are different password parameters in a SAP system. You can enter each parameter in the RZ11 transaction and can view the documentation.
- login/min_password_diff
- login/min_password_digits
- login/min_password_letters
- login/min_password_specials
- login/min_password_lowercase
- login/min_password_uppercase
- login/disable_password_logon
- login/password_charset
- login/password_downwards_compatibility
- login/password_compliance_to_current_policy
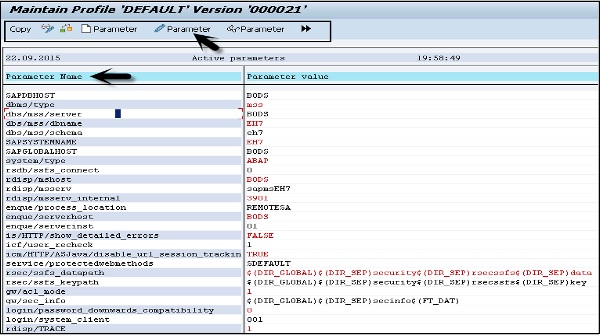
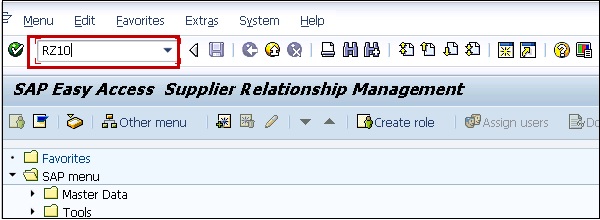
To change the Parameter value, run Transaction RZ10 and select the Profile as shown below −
Multiple application servers − Use DEFAULT profile.
Single Application servers − Use Instance Profile.
Select Extended Maintenance and click Display.

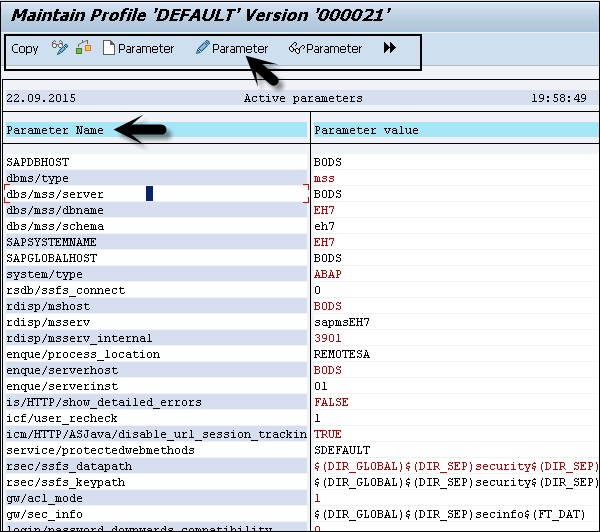
Select the parameter that you want to change and click on Parameter at the top.
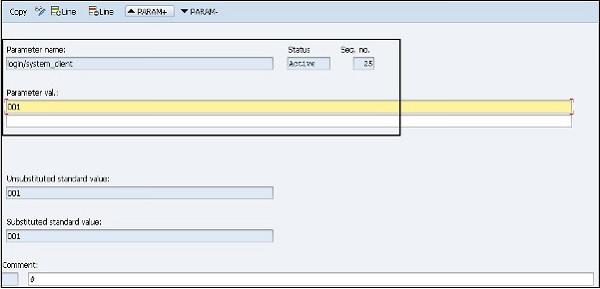
When you click on the Parameter tab, you can change the value of parameter in new window. You can also create the new parameter by clicking on Create (F5).
You can also see the status of the parameter in this window. Type the parameter value and click on Copy.
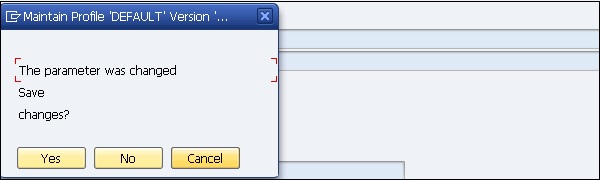
You will be prompted to save when you exit the screen. Click on Yes to save the parameter value.
SAP Security - Network Communication
Secure Network Communication (SNC) can also be used to login to an application server using secure authentication method. You can use SNC for user authentication via SAP GUI for windows or by using an RFC connection.
The SNC uses an external security product to perform the authentication between the communication partners. You can use security measures like public key infrastructure PKI, and procedures to generate and distribute key pairs.
You should define network topology that can eliminate threats and prevent network attacks. When users cannot login to the application or database layer, attackers cannot get access to the SAP system or the database system to access critical information.
A well-defined network topology doesn’t allow intruders to connect to the company’s LAN and hence no access to security loop holes on the network services or on the SAP system.
Network Topology in a SAP System
Your physical network architecture completely depends on the size of your SAP System. A SAP System is commonly implemented with a client-server architecture and each system is commonly divided into the following three layers −
- Database Layer
- Application Layer
- Presentation Layer
When your SAP system is small, it may not have a separate application and database server. However, in a large system, many application servers communicate with a database server and several frontends. This defines the network topology of a system from simple to complex and you should consider different scenarios when organizing your network topology.
In a large-scale organization, it is recommended that you install your application and database server on different machines and place in a separate LAN from the frontend system.
In the following image, you can see the preferred Network topology of a SAP system −
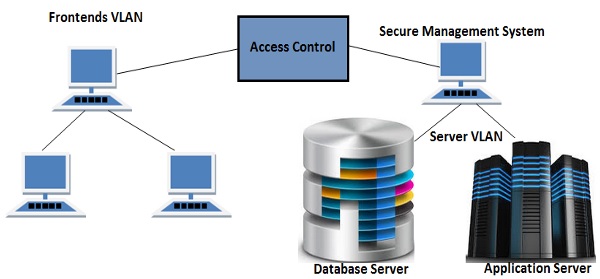
When you place your database and application server in separate VLAN from frontends VLAN, it allows you to improve the access control system and hence increases the security of your SAP system. Frontend systems are in different VLAN, so it is not easy to get into the Server VLAN and hence bypass the security of your SAP system.
SAP Network Services
In your SAP system, there are various services that are enabled however only few are required to run SAP system. In a SAP system, the Landscape, Database and Application Servers are the most common target of network attacks. Many network services are running in your landscape that allows the access to these servers and these services should be carefully monitored.
In your Window/UNIX machines, these services are maintained in /etc/services. You can open this file in Windows machine by going to the following path −
system32/drivers/etc/services
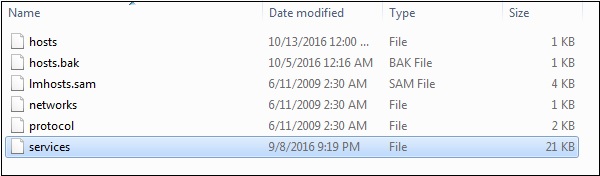
You can open this file in a Notepad and review all the activated services in your server −
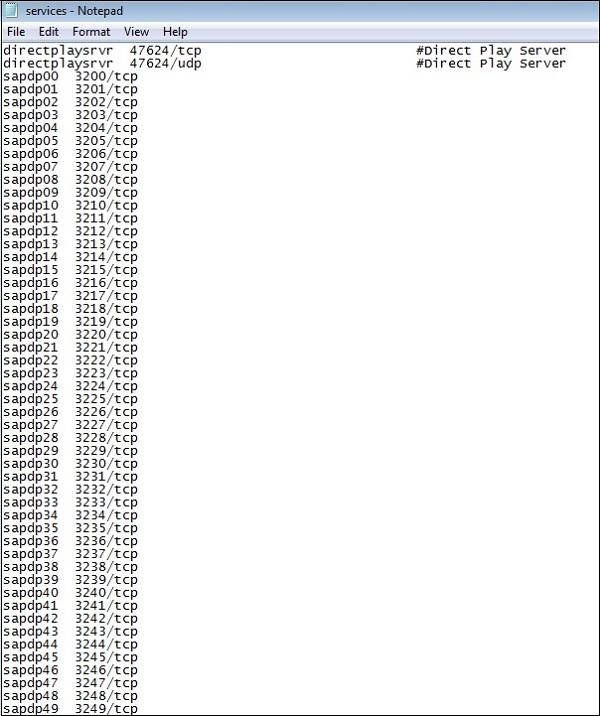
It is recommended that you disable all the unrequired services on landscape servers. Sometimes these services contain a few errors which can be used by intruders to gain unauthorized access. When you disable these services, you reduce the chances of an attack on your network.
For high level of security, it is also recommended to use static password files in your SAP environment.
Private Keys
SNC uses an external security product to perform the authentication between the communication partners. You can use security measures like Public Key Infrastructure (PKI) and other procedures to generate and distribute key pairs and to ensure that private keys for users are properly secured.
There are different ways of securing the private keys for a network authorization −
- Hardware Solution
- Software Solution
Let us now discuss them in detail.
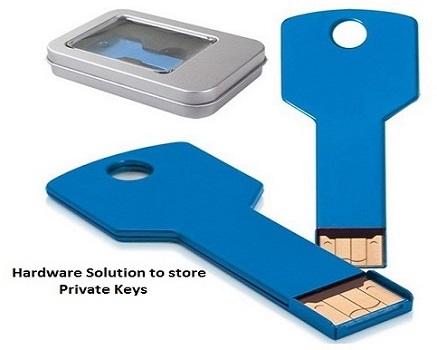
Hardware Solution
You can protect private keys for users using hardware solution where you issue smart card to individual users. All the keys are stored in a smart card and the user should authenticate to their smart cards via biometrics by using finger prints or using a PIN password.
These smart cards should be protected from theft or loss by each individual user and users can use the card to encrypt the documents.
Users are not allowed to share the smart cards or give them to other users.
Software Solution
It is also possible to use software solution to store private keys for individual users. Software solution is less expensive solution as compared to hardware solution, but they are also less secure.
When users store private keys in files and user details, there is a need to secure those files for unauthorized access.
SAP Security - Protecting Standard Users
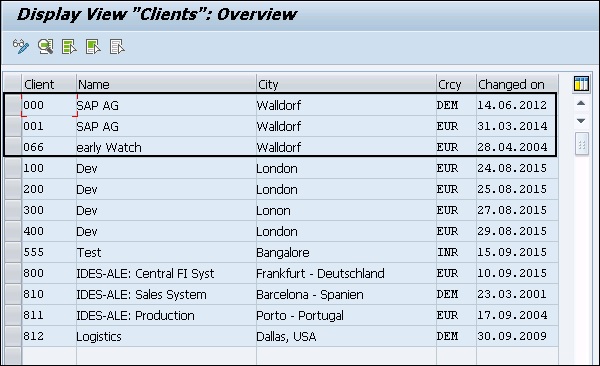
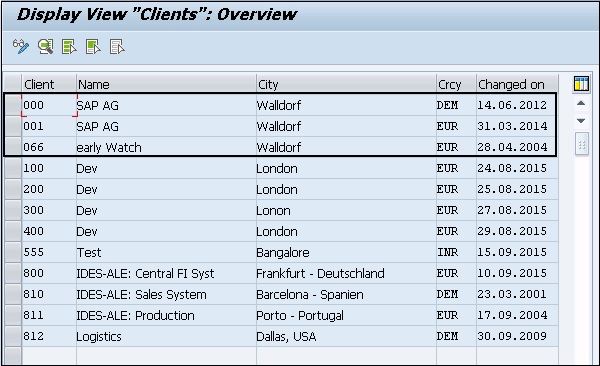
When you install the SAP system for the first time, there are a few default users that are created to perform administrative tasks. By default, it creates three clients in the SAP Environment, which are −
Client 000 − SAP Reference Client
Client 001 − Template Client from SAP
Client 066 − SAP Early Watch Client
SAP creates standard users in the above-mentioned client in the system. Each standard user has its own default password with the first installation.
Standard Users in a SAP system includes the following users under default client −
| User | Details | Client | Default Password |
|---|---|---|---|
| SAP | SAP System Super User | 000, 001, 066 | 6071992 |
| All New Clients | PASS | ||
| DDIC | ABAP Dictionary Super User | 000, 001 | 19920706 |
| SAPCPIC | CPI-C User for SAP | 000, 001 | admin |
| EARLYWATCH | Early Watch User | 66 | support |
These are the standard users under SAP Default clients to perform administrative and configuration task in SAP system. To maintain security in a SAP system, you should protect these users −
You should add these users to group SUPER, so that they are only modified by an Administrator who has the privilege to add/modify users to group SUPER.
Default password for Standard users should be changed.
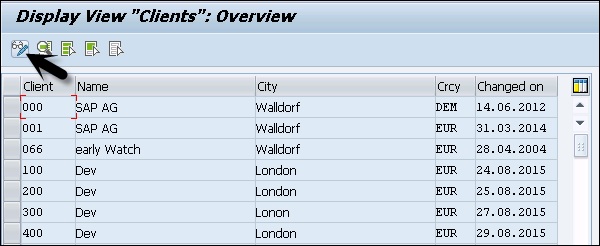
How to See the List of Clients in a SAP System?
You can see the list of all the clients in your SAP environment by using Transaction SM30, display the table T000.

When you enter the table, and click on Display, it will show you the list of all clients in your SAP system. This table includes detail of all default clients and new clients that you create in an environment for sharing of resources.
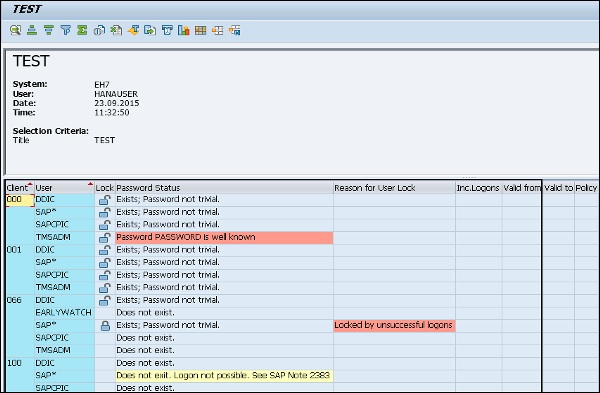
You can use report RSUSR003 to make sure that the user SAP has been created in all clients and that the standard passwords have been changed for SAP, DDIC and SAPCPIC.
Go to ABAP Editor SE38 and enter the report name and click on EXECUTE.

Enter the report title and click on Execute button. It will display all the clients and standard users in SAP System, Password Status, Reason for Use Lock, Valid From and Valid To, etc.
Protecting the SAP System Super User
To protect a SAP System Super User “SAP”, you can perform the following steps in a system −
Step 1 − You need to define the new Super User in a SAP system and deactivate the SAP user. Note that you must not delete user SAP in the system. To deactivate the hard-coded user, you can use the profile parameter: login/no_automatic_user_sapstar.
If the user master record of the user SAP* is deleted, it is possible to log on with “SAP” and the initial password PASS.
“SAP” user has the following properties −
The user has full authorizations, since no authorization checks are performed.
The default password PASS cannot be changed.
You can use the profile parameter login/no_automatic_user_sapstar to deactivate these special properties of SAP and to control of the automatic login of user SAP* .
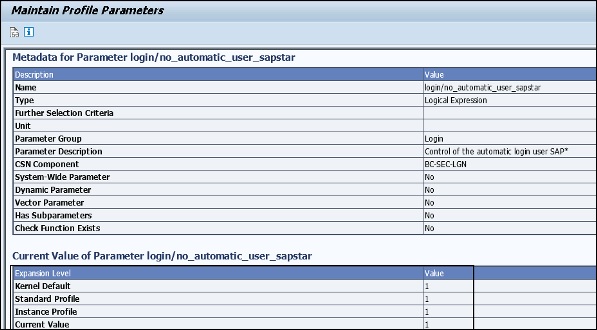
Step 2 − To check the value of this parameter, run Transaction RZ11 and enter the parameter name.
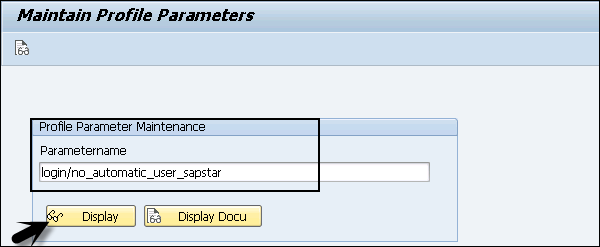
Values allowed − 0, 1, in which −
0 − Automatic user SAP* is permissible.
1 − Automatic user SAP* is deactivated.
Step 3 − In the following system, you can see the value of this parameter is set to 1. This shows that the Super user “SAP” is deactivated in the system.
Step 4 − Click on Display and you can see the current value of this parameter.
To create a new Super user in the system, define a new user master record and assign the profile SAP_ALL to this super user.
DDIC User Protection
A DDIC user is required for certain tasks related to Software Logistics, ABAP Dictionary, and Tasks related to installation and upgrade. To protect this user, it is advisable to lock this user in a SAP system. You shouldn’t delete this user to perform few functionalities for future use.
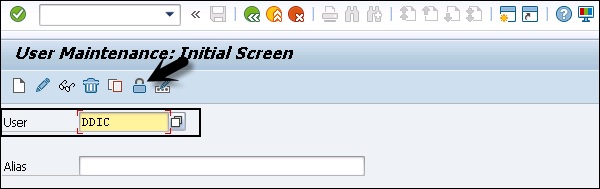
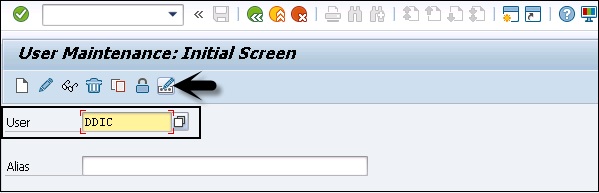
To lock the user, use Transaction code: SU01.
If you want to protect this user, you can assign the SAP_ALL authorization to this user at the time of installation and later lock it.
Protecting the SAPCPIC User
A SAPCPIC user is used for calling certain programs and function modules in a SAP system and is a non-dialog user.
You should lock this user and change the password for this user to protect it. In the previous releases, when you lock SAPCPIC user or change the password, it affects additional programs RSCOLL00, RSCOLL30, and LSYPGU01.
Protecting Early Watch
A 066 Client − This is called SAP Early watch and is used for diagnostic scans and monitoring service in SAP system and user EARLYWATCH is the interactive user for the Early Watch service in Client 066. To secure this user, you can perform the following actions −
- Lock EARLYWATCH user until it is not required in a SAP environment.
- Change the default password for this user.
Key Points
To protect SAP Standard users and to protect clients in SAP landscape, you should consider the following key points −
You should properly maintain the clients in a SAP system and ensure that there are no unknown clients that exist.
You need to ensure that SAP super user “SAP” exists and has been deactivated in all clients.
You need to ensure that default password is changed for all SAP standard users SAP, DDIC and EARLYWATCH user.
You need to ensure that all the Standard users have been added to the SUPER group in a SAP system and the only person authorized to make changes to SUPER group can only edit these users.
You need to ensure that the default password for SAPCPIC has been changed and this user is locked and it is unlocked when it is required.
All SAP standard users should be locked and can only be unlocked when it is required. Password should be well protected for all these users.
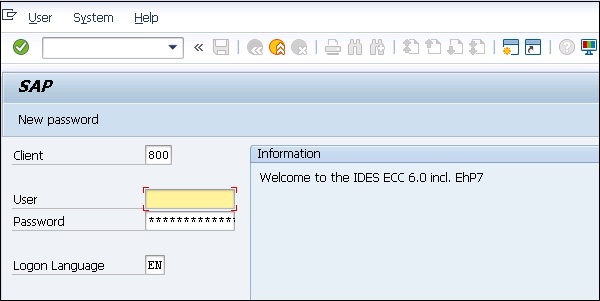
How to Change Password of a Standard User?
You should ensure that password for all SAP standard users should be changed in all the clients maintained in Table T000 and user “SAP” should exist for all clients.
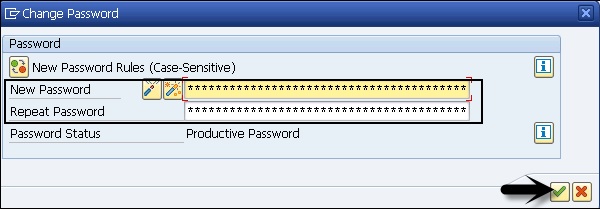
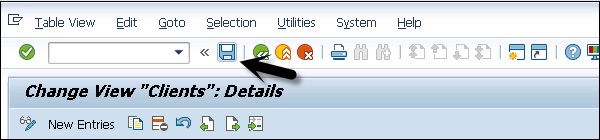
To change the password, login with Super user. Enter the user Id in Username field for which you want to change the password. Click on Change Password option as shown in the following screenshot −
Enter the new password, repeat password and click on Apply. You should repeat the same process for all the standard users.
Un-authorizing Logons Protections
To implement security in a SAP system, it is required to monitor unsuccessful login in a SAP environment. When someone tries to login to a system using an incorrect password, the system should either lock the username for some time or that session should be terminated after a defined number of attempts.
Various security parameters can be set for unauthorized logon attempts −
- Terminating a Session
- Locking User
- Activating Screen Savers
- Monitoring unsuccessful logon attempts
- Recording logon attempts
Let us now discuss each of these in detail.
Terminating a Session
When there are a multiple number of unsuccessful login attempts made on a single user id, the system ends the session for that user. This should be sent using a Profile parameter − login/fails_to_session_end.
To change the Parameter value, run Transaction RZ10 and select the Profile as shown in the following screenshot. Select Extended Maintenance and click on Display.
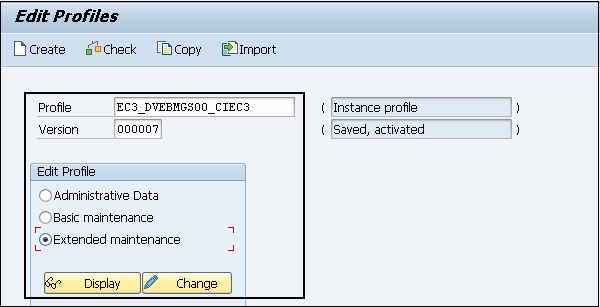
Select the parameter that you want to change and click on the Parameter button at the top as shown below.
When you click on the Parameter tab, you can change the value of the parameter in a new window. You can also create the new parameter by clicking on the Create (F5) button.
To see the details of this parameter, run Transaction Code: RZ11 and enter the profile name – login/fails_to_session_end and the click on Display Document.
Parameter − login/fails_to_session_end
Short text − Number of invalid login attempts until the session ends.
Parameter Description − Number of invalid login attempts that can be made with a user master record until the logon procedure is terminated.
Application Area − Logon
Default Value − 3
Who is permitted to make changes? − Customer
Operating System Restrictions − None
Database System Restrictions − None
Are other parameters affected or dependent? − None
Values allowed − 1 - 99
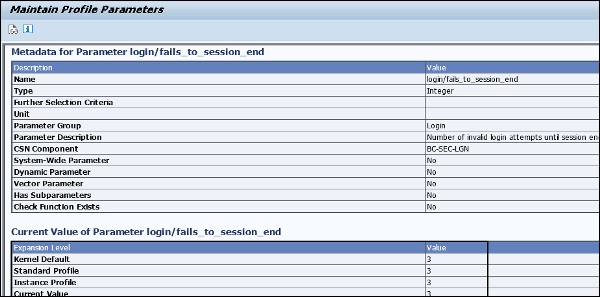
In the above screenshot, you can see value of this parameter is set to 3, i.e. the default value too. After 3 unsuccessful login attempts, session will be terminated for a single user.
Locking User
You can also put a check on a specific User Id, if a set number of consecutive unsuccessful attempts to logon is exceeded under a single User Id. Set the number of invalid logon attempts that are allowed in the profile parameter: login/fails_to_user_lock.
It is possible to set a lock on specific User ID’s.
Locks are applied on a User Id till midnight. However, it can also be removed manually at any time by a System Administrator.
In a SAP system, you can also set a parameter value that allows lock to be placed on the User Id till they are manually removed. Parameter name: login/failed_user_auto_unlock.
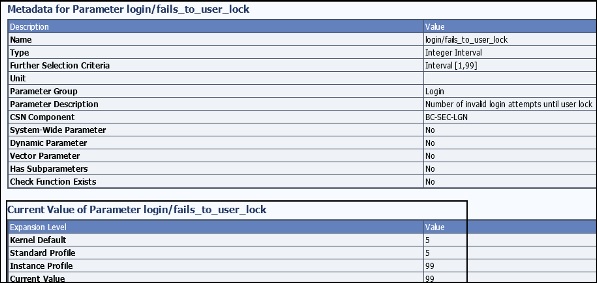
Profile parameter: login/fails_to_user_lock
Every time an incorrect logon password is entered, the failed logon counter for the relevant user master record is increased. The logon attempts can be logged in the Security Audit Log. If the limit specified by this parameter is exceeded, the relevant user is locked. This process is also logged in Syslog.
The lock is no longer valid after the current day is over. (Other Condition −login/failed_user_auto_unlock)
The failed logon counter is reset once the user logs on using the correct password. Logons that are not password-based do not have any effect on the failed logon counter. However, active logon locks are checked for every logon.
Values allowed − 1 – 99
To see the current value of this parameter, use T-Code: RZ11.
Parameter name − login/failed_user_auto_unlock
Short text − Disable automatic unlocking of locked user at midnight.
Parameter Description − Controls the unlocking of users locked by logging on incorrectly. If the parameter is set to 1, locks that were set due to failed password logon attempts only apply on the same day (as the locking). If the parameter is set to 0, the locks remain in effect.
Application Area − Logon.
Default Value − 0.
Activating Screen Savers
System administrators can also enable screen savers to protect the frontend screen from any unauthorized access. These screensavers can be password protected.
Monitoring Unsuccessful Logon Attempts and Recording Logon Attempts
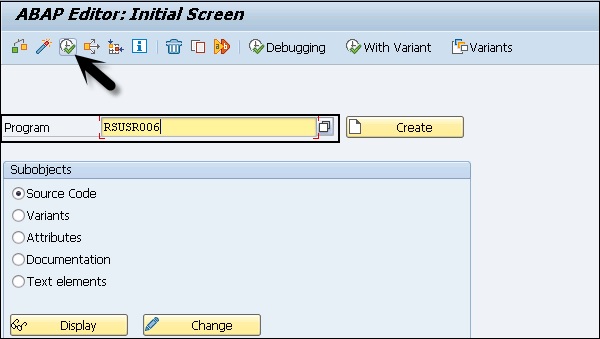
In a SAP system, you can use report RSUSR006 to check if there are users who have tried any unsuccessful logon attempts in the system. This report contains detail about the number of incorrect login attempts by a user and the user locks and you can schedule this report as per your requirement.
Go to ABAP Editor SE38 and enter the report name and then click on EXECUTE.
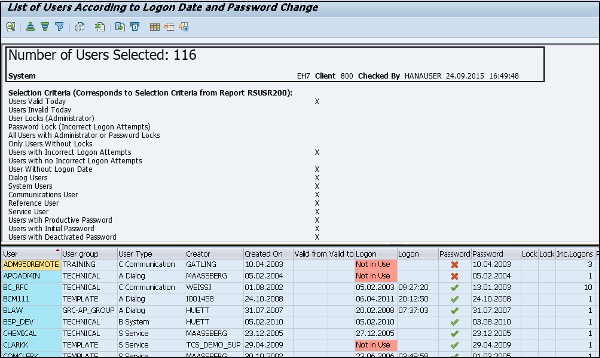
In this report, you have different details like Username, Type, Created On, Creator, Password, Lock and Incorrect Login Details.
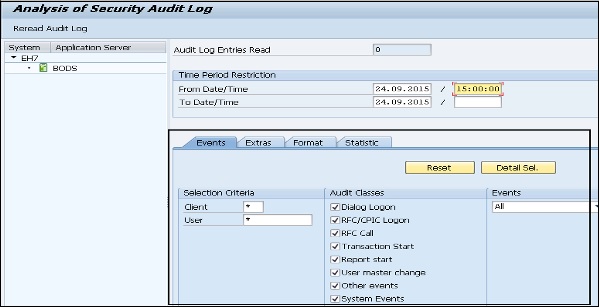
In a SAP system, it is also possible that you use Security Audit Log (transactions SM18, SM19 and SM20) to record all the successful and unsuccessful logon attempts. You can analyze the security audit logs using SM20 transaction, but security audit should be activated in the system to monitor security audit logs.
Logging off Idle Users
When a user is already logged into a SAP system and session is inactive for a specific period, you can also set them to logoff to avoid any unauthorized access.
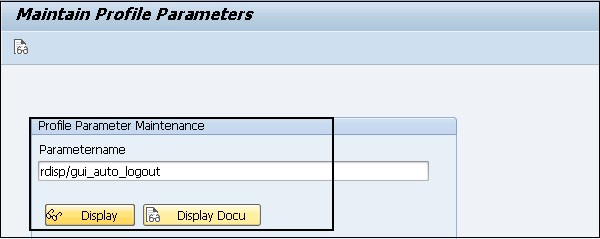
To enable this setting, you need to specify this value in the profile parameter: rdisp/gui_auto_logout.
Parameter Description − You can define that inactive SAP GUI users are automatically logged off from a SAP system after a predefined period. The parameter configures this time. Automatic logoff in the SAP system is deactivated by default (value 0), that is, the users are not logged off even if they do not execute any actions for a longer period.
Values allowed − n [unit], where n >= 0 and Unit = S | M | H | D
To see the current value of parameter, run T-Code: RZ11.
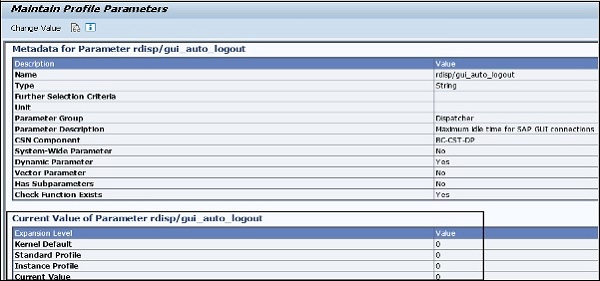
The following table shows you the list of key parameters, their default and permitted value in a SAP system −
| Parameter | Description | Default | Permitted Value |
|---|---|---|---|
| Login/fails_to_session_end | Number of invalid login attempts until session end | 3 | 1-99 |
| Login/fails_to_user_lock | Number of invalid login attempts until user lock | 12 | 1-99 |
| Login/failed_user_auto_unlock | When sets t 1: Locks apply on the day that they are set.They are removed the next day when the user logs on | 1 | 0 or 1 |
| rdisp/gui_auto_output | Maximum idle time for a user in number of seconds | 0(no limit) | unrestricted |
SAP Security - System Authorization Concept
The SAP System Authorization Concept deals with protecting the SAP system from running transactions and programs from unauthorized access. You shouldn’t allow users to execute transactions and programs in SAP system until they have defined authorization for this activity.
To make your system more secure and to implement strong authorization, you need to review your authorization plan to make sure that it meets the security requirement of the company and there are no security violations.
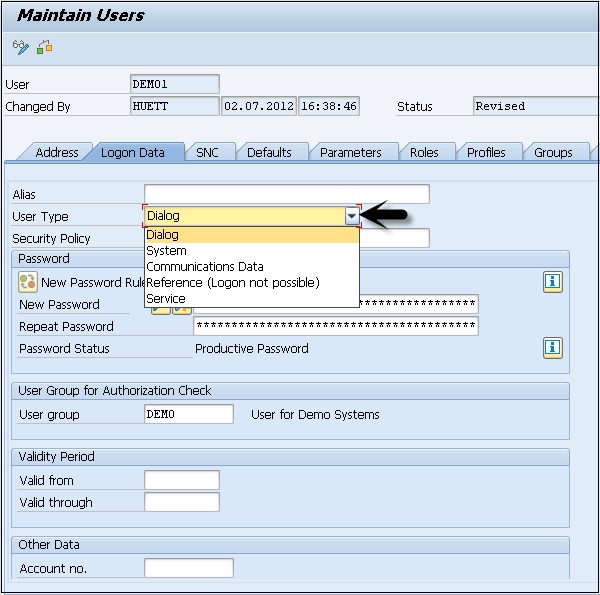
User Types
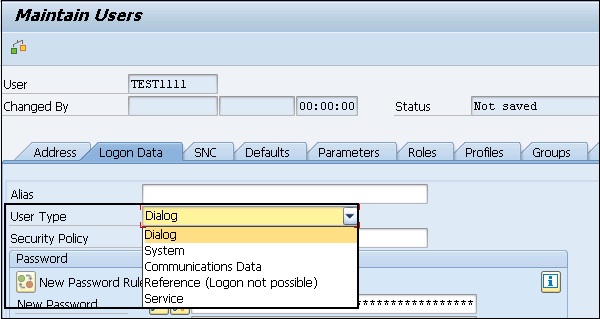
In Prior releases of the SAP System, the user types were only divided in two categories – Dialog users and Non-Dialog users and only non-dialog users were recommended for communication between two systems. With SAP 4.6C, user types have been divided into the following categories −
Dialog User − This user is used for individual interactive system access and most of the client work is performed using a dialog user. Password can be changed by the user itself. In dialog user, multiple dialog logons can be prevented.
Service User − This is used to perform interactive system access to perform some predetermined task like product catalog display. Multiple logins allowed for this user and only an Administrator can change the password for this user.
System User − This user id is used to perform most of the system related tasks – Transport Management System, Defining Workflows and ALE. It is not an interactive system dependent user and there are multiple logins allowed for this user.
Reference User − A Reference user is not used for logging into a SAP system. This user is used to provide additional authorization to internal users. In a SAP system, you can go to the Roles tab and specify a reference user for additional rights for dialog users.
Communication Users − This user type is used to maintain dialog free login between different systems like RFC connection, CPIC. The Dialog logon using SAP GUI is not possible for Communication users. A User type can change their passwords like common dialog users. RFC functional module can be used to change the password.
The Transaction Code: SU01 is used for user creation in a SAP system. In the following screen, you can see different User types in a SAP system under the SU01 Transaction.
Creating a User
To create a user or multiple users with different access rights in a SAP system you should follow the steps given below.
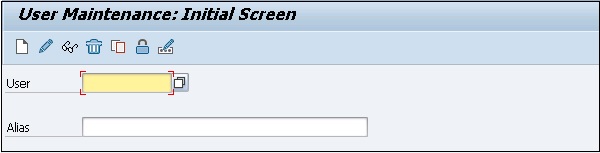
Step 1 − Use transaction code — SU01.
Step 2 − Enter the username you want to create, click on create icon as shown in the following screenshot.

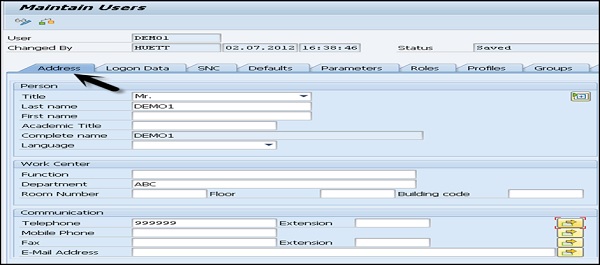
Step 3 − You will be directed to the next tab — the Address tab. Here, you need to enter the details like First Name, Last Name, Phone Number, Email Id, etc.
Step 4 − You will further be directed to the next tab — Logon Data. Enter the user type under Logon data tab. We have five different user types.
Step 5 − Type the first Login Password→ New Password → Repeat Password.

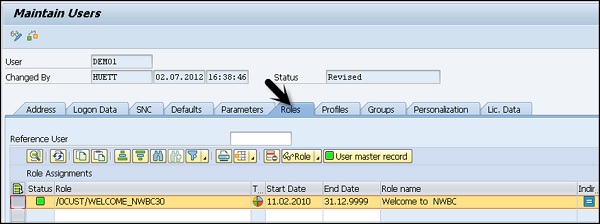
Step 6 − You will be directed to the next tab — Roles −Assign the roles to the user.
Step 7 − You will further be directed to the next tab — Profiles −Assign the Profiles to users.

Step 8 − Click on Save to receive confirmation.
Central User Administration (CUA)
The Central User Administration is one of the key concept that allows you to manage all users in a SAP system landscape using a central system. Using this tool, you can manage all user master record centrally in one system. A Central User Administrator allows you to save money and resources in managing similar users in one system landscape.
The advantages of Central User Administration are −
When you configure CUA in SAP landscape, you can create or delete users using only the central system.
All the required roles and authorization exists in a child system in active forms.
All the users are monitored and managed centrally that makes the task of administration easy and clearer view to all user management activities in a complex system landscape.
The Central User Administrator allows you to save money and resources in managing similar users in one system landscape.
The data exchanges performed using the ALE landscape called as Application Link Enabling that allows to exchange the data in controlled manner. ALE is used by the Central User Administrator for data exchange to child systems in a SAP system landscape.
In a complex landscape environment, you define one system as the Central system with ALE environment and this is linked to all the child systems using bidirectional data exchange. The child system in landscape are not connected with each other.
To implement Central User Administration, the following points should be considered −
You need a SAP environment with multiple clients in a single/distributed environment.
Administrator to manage users, need authorization on following Transaction Codes −
SU01
SCC4
SCUA
SCUM
SM59
BD54
BD64
You should create a trusting-trusted relationship between systems.
You should create system users in central and child system.
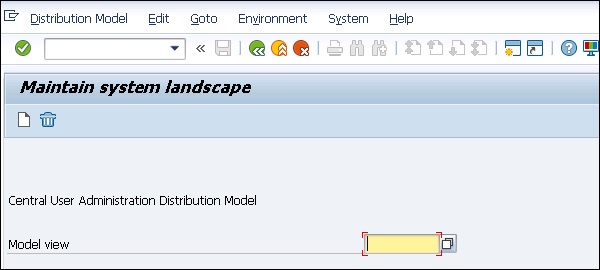
Create Logical System and assign logical system to corresponding client.
Create model view and BAPI to model view.
Create a Central User Administrator and set distribution parameters for fields.
Synchronize company addresses
Transfer Users
In a centrally managed environment, you need to create an Administrator first. Log on in all logical systems of the future CUA as user SAP* with the default password PASS.
Run the Transaction SU01 and create a user with administrator role assigned to it.
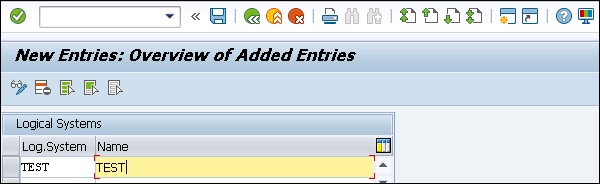
To define a Logical system use Transaction BD54. Click on New Entries to create a new logical system.
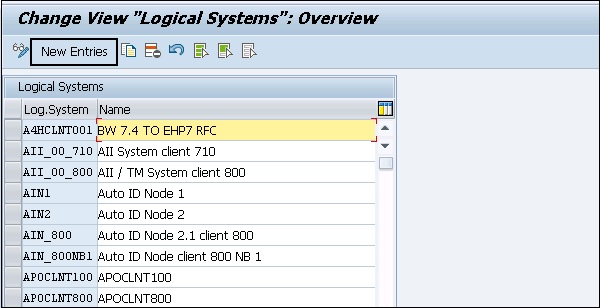
Create a new logical name in capital letters for the Central User Administration for central and all child systems including those from other SAP Systems.
To easily identify the system, you have the following naming convention that can be used to identify the Central User Administration system −
<System ID>CLNT<Client>
Enter some useful description of a logical system. Save your entry by clicking on the Save button. Next is to create the logical system name for the central system in all child systems.
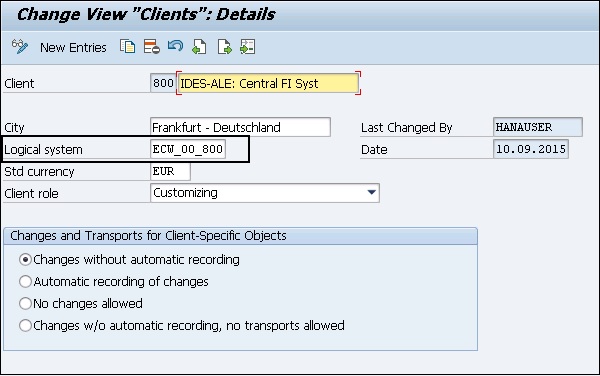
To assign a Logical system to a client, use Transaction SCC4 and switch to Change mode.
Open the client that you want to assign to logical system by double clicking or by clicking on the Details button. A client can only be assigned to one logical system.
In a logical system field in client details, enter a logical system name to which you want to assign this client.
Perform the above steps for all the clients in a SAP environment that you want to include in the Central User Administrator. To save your settings, click on the Save button at the top.
Protecting Specific Profiles in SAP
To maintain security in a SAP system, you need to maintain specific profiles that contain critical authorization. There are various SAP authorization profiles that you need to protect in a SAP system that has full authorization.
A few profiles that need to be protected in a SAP system are −
- SAP_ALL
- SAP_NEW
- P_BAS_ALL
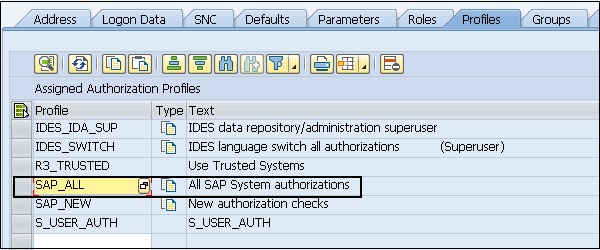
SAP_ALL Authorization Profile
A SAP_ALL authorization profile allows the user to perform all the tasks in a SAP system. This is the composite profile that contains all the authorization in a SAP system. The users with this authorization can perform all the activities in a SAP system, so this profile shouldn’t be assigned to any user in your system.
It is recommended that a single user should be maintained with a profile. While the password should be well protected for that user and it should only be used when it is required.
Instead of assigning SAP_ALL authorizations, you should assign individual authorizations to the appropriate users. Your system Superuser / System Administration, instead of assigning SAP_ALL authorization to them, you should use individual authorizations that are required.
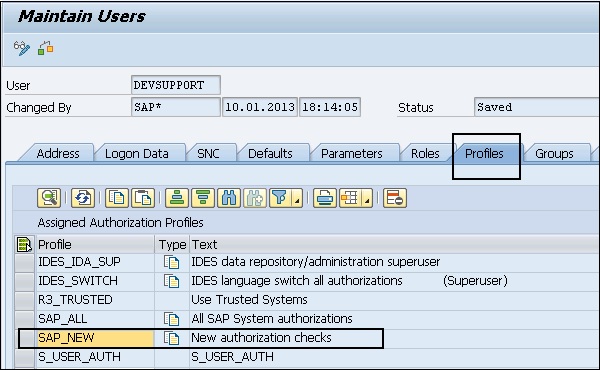
SAP_NEW Authorization
A SAP_NEW authorization contains all the authorizations that are required in a new release. When a system upgrade is done, this profile is used so that some tasks are run properly.
You should remember the following points about this authorization −
When a system upgrade is performed, you need to delete the SAP_NEW profiles for releases prior to this.
You need to assign separate authorizations under the SAP_NEW profile to different users in your environment.
This profile shouldn’t be kept active for too long.
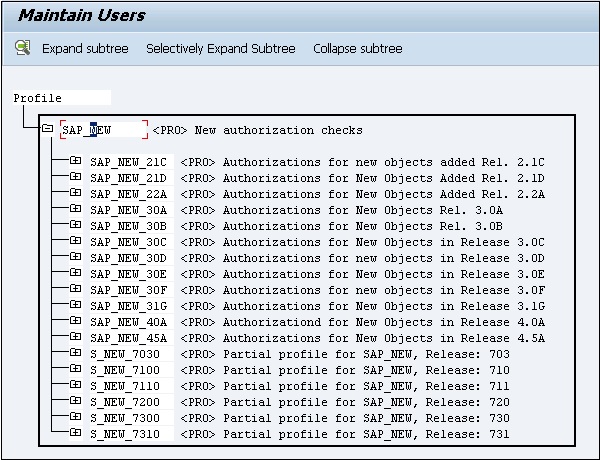
When you have a long list of SAP_NEW profiles in the environment, it shows you need to review your authorization policy in the system.
To see the list of all the SAP_NEW profiles, you should select this profile by double clicking and then → go to Choose.
P_BAS_ALL Authorization
This authorization allows user to view the content of tables from other applications. This authorization contains P_TABU_DIS authorization. This authorization allows the PA user to see the table content that doesn’t belong to their group.
PFCG Role Maintenance
PFCG Role Maintenance can be used to manage roles and authorization in a SAP system. In PFCG, the role represents a work that a person performs related to real-life scenarios. PFCG allows you to define set of transactions that can be assigned to a person to perform their daily work.
When the roles are created in a PFCG Transaction, you can use Transaction SU01 to assign these roles to individual users. A user in a SAP system can be assigned multiple number of roles and that are related to his/her daily task in real-life.
These roles are in connection between user and authorizations in a SAP system. The actual authorizations and profiles are stored in the form of objects in a SAP system.
Using PFCG Role Maintenance, you can perform the following functions −
- Changing and Assigning Roles
- Creating Roles
- Creating Composite Roles
- Transporting and Distributing Roles
Let us now discuss these functions in detail.
Changing and Assigning Roles
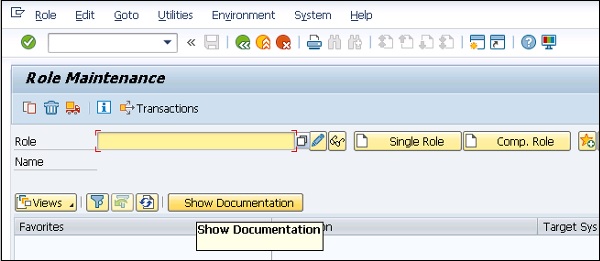
Run Transaction: PFCG
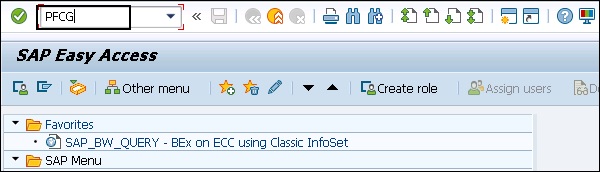
It will take you to role maintenance window. To change the existing role, enter the delivered role name in the field.
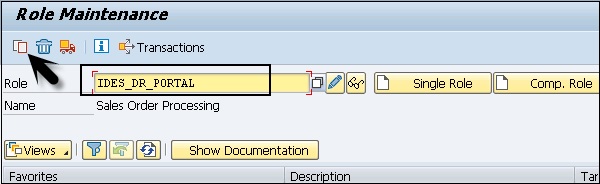
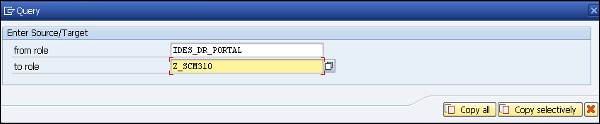
Copy the standard role by clicking on Copy role button. Enter the name from namespace. Click on value selection button and select the role to which you want to copy this.
You can also select the delivered roles by SAP starts with SAP_, but then default roles will be overwritten.
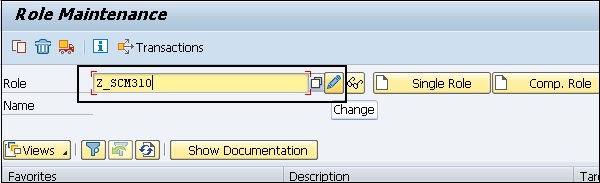
To change the role, click on the Change button in Role Maintenance.
Navigate to the Menu tab to change the user menu on the Menu tab page. Go to the Authorization tab to change the Authorization data for that user.
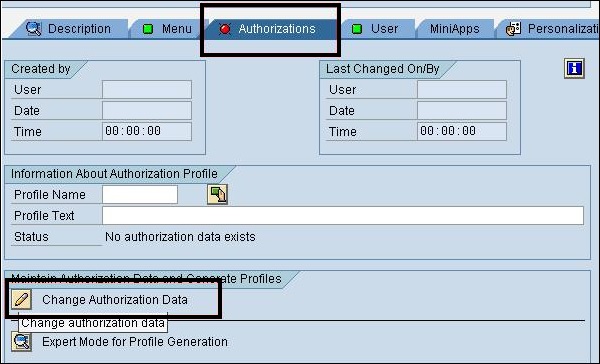
You can also use the Expert Mode to adjust the authorizations for the menu changes under Authorization. Click on Generate button to generate the profile for this role.
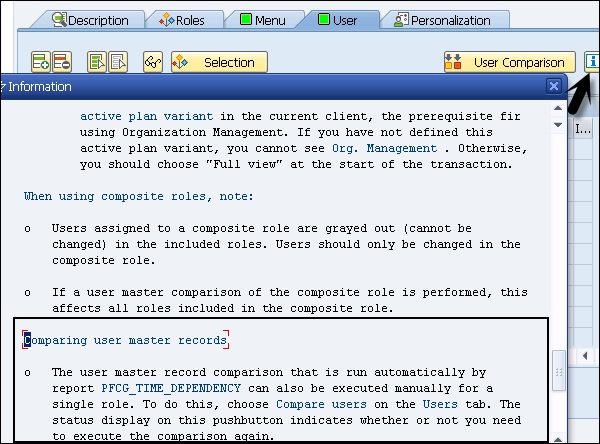
To assign the users to this role, go to User tab in Changes Role option. To assign a user to this role, it should exist in the system.
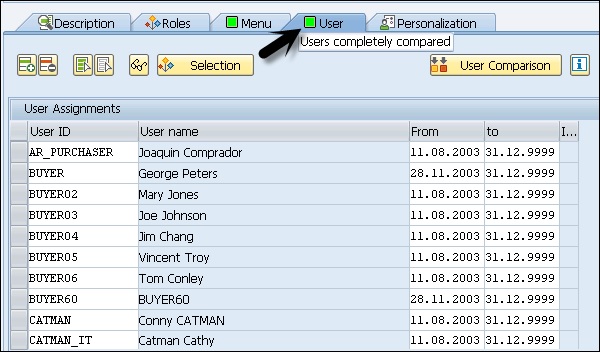
You can also perform a User Comparison if required. Click on User Comparison option. You can also click on the Information button to know more about Single and Composite roles and User Comparison option to compare the master records.
Creating Roles in PFCG
You can create both single roles and composite roles in PFCG. Enter the role name and click on Create Single or Composite Roles as shown in the screenshot below.
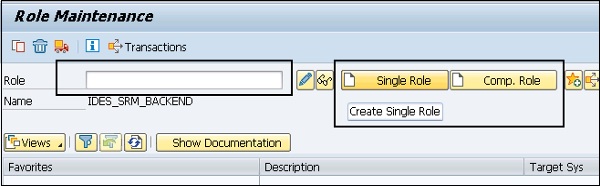
You can select from Customer namespace like Y_ or Z_. SAP delivered roles start with SAP_ and you can’t take the name from SAP delivered roles.
Once you click on Create role button, you should add Transactions, Reports and Web Addresses under the MENU tab in role definition.
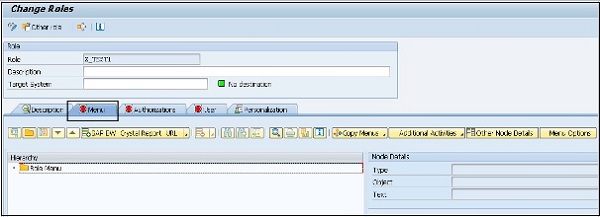
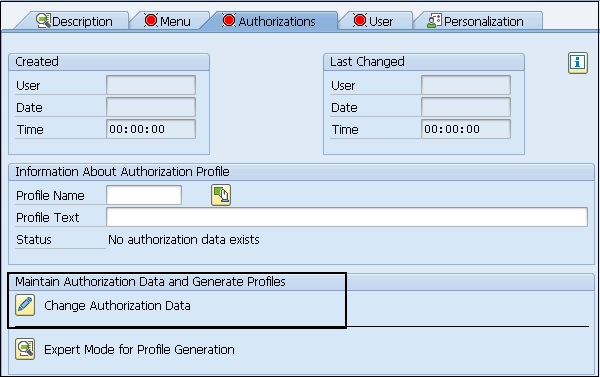
Navigate to Authorization tab to generate the Profile, click on Change Authorization data option.
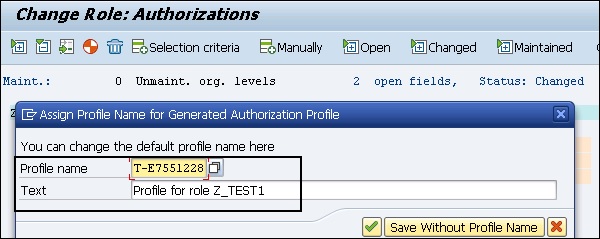
As per your activity selection, you are prompted to enter the organizational levels. When you enter a particular value in the dialog box, die authorization fields of the role are maintained automatically.
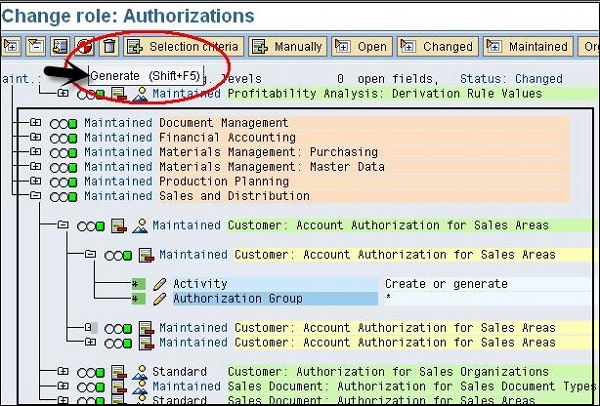
You can adapt the reference for the roles. Once a role definition is done, you need to generate the role. Click on Generate (Shift+F5).

In this structure, when you see red traffic lights, it shows the organizational levels with no values. You can enter and change organizational levels with Organization levels next to Maintained tab.
Enter the Profile name and click on the tick option to complete the Generate step.
Click on Save to save the profile. You can directly assign this role to users by going to the User tabs. In a similar way, you can create Composite roles using the PFCG Role Maintenance Option.
Transporting and Distributing Roles
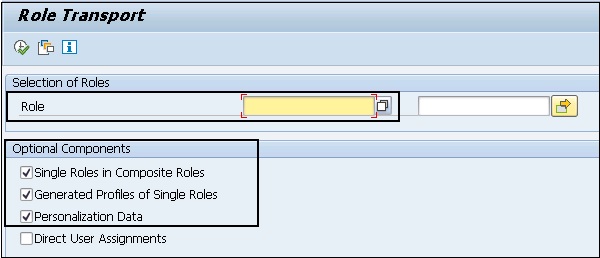
Run the Transaction – PFCG and enter the role name that you want to transport and click on Transport Role.
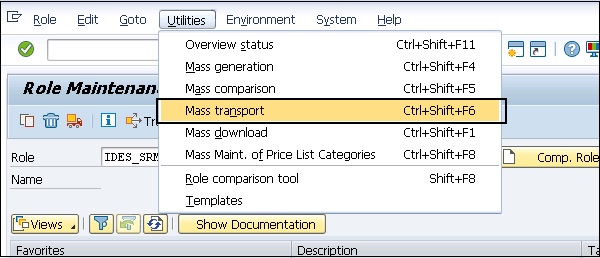
You will reach to role transport option. You have multiple options under the Transport Roles −
- Transport single roles for composite roles.
- Transport generated profiles for roles.
- Personalization Data.
In the next dialog box, you should mention user assignment and the personalization data should also be transported. If the user assignments are also transported, they will replace the entire user assignment of roles in the target system.
To lock a system so that user assignments of roles cannot be imported, enter it in the Customizing table PRGN_CUST using transaction SM30 and select the value field USER_REL_IMPORT number.
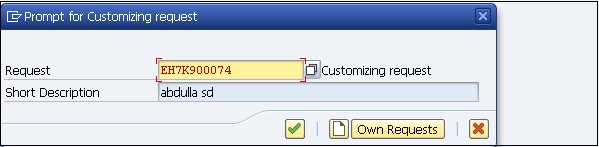
This role is entered in customizing request. You can view this using Transaction SE10.
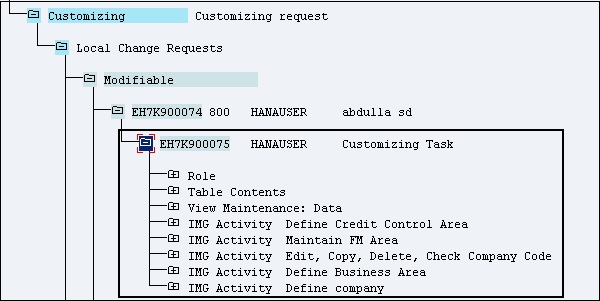
In Customizing request, authorization profiles are transported along with the roles.
Authorization Info System Transaction – SUIM
In Authorization Management, SUIM is a key tool using which you can find the user profiles in a SAP system and can also assign those profiles to that User ID. SUIM provides an initial screen that provides options for Searching Users, Roles, Profiles, Authorizations, Transactions, and Comparison.
To open User Information System, Run Transaction: SUIM.
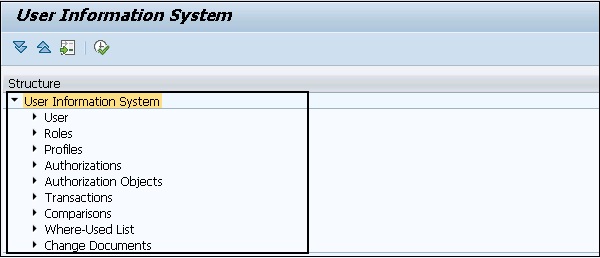
In a User Information System, you have different nodes that can be used to perform different functions in a SAP system. Like in a User node, you can perform a search on users based on selection criteria. You can get the locked list of users, users having access to a particular set of transactions, etc.
When you expand each tab, you have option to generate different reports based on different selection criteria. Like when you expand user tab, you have the following options −
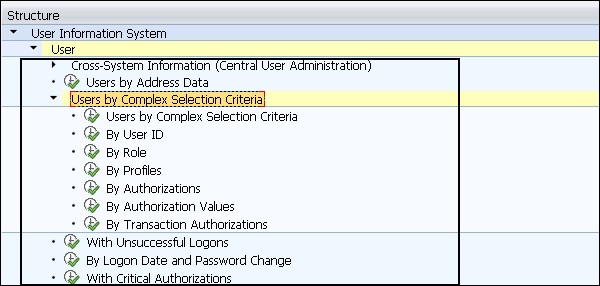
When you click on users by complex selection criteria, you can apply multiple selection conditions simultaneously. The following screenshot shows you different selection criteria’s.

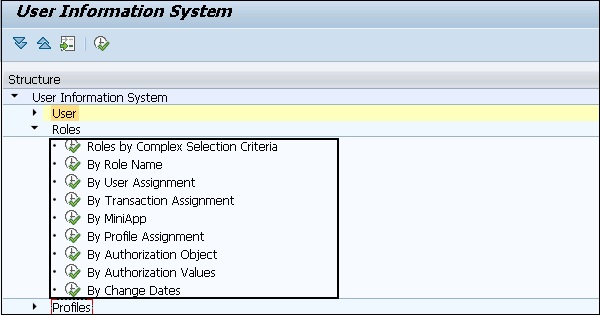
Role Node
In a similar way, you can access different nodes like Roles, Profiles, Authorizations and various other options under this user information system.
You can also use SUIM tool for searching roles and profiles. You can assign a list of transactions to a particular set of user ID’s, by performing a search by transaction and assignment in SUIM and assign those roles to that user ID.
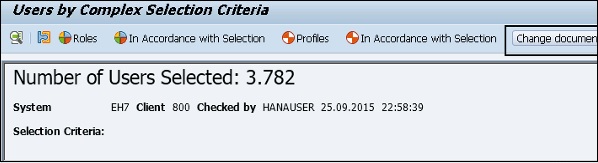
Using the User Information system, you can perform various searches in a SAP system. You can enter different selection criteria and pull the reports based on Users, Profiles, roles, Transactions and various other criteria.
RSUSR002 − Users by Complex Selection Criteria.
SAP Security - Unix Platform
You need to take various security measures while using certain Unix Properties, Files or Services, Protecting Password Files and Deactivating BSD Remote Services for rlogin and remsh.
Password Protection
In a Unix platform, an attacker can use dictionary attack program to discover password information stored in the Unix OS. You can store the passwords in a shadow password file and only a root user can have access to this file to improve the security in a system.
Deactivating Remote Services
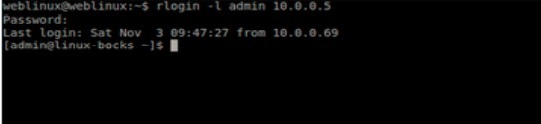
BSD Remote services allows remote access to Unix systems. When a remote connection is initiated /etc/host.equiv and $HOME/.rhosts are used and in case when these files contain information about the hostname and IP address of connection source or any wildcard characters, there is no need to enter the password while logging in.
The remote services rlogin and remsh are security threat in this scenario and you need to deactivate these services. You can deactivate these services by going to inetd.conf file in the Unix system.
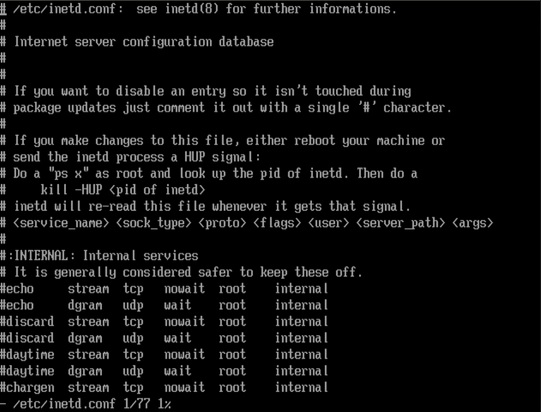
In a Unix system, rlogin is a remote shell client (like SSH), which is designed to be fast and small. It is not encrypted, which may have some small drawbacks in high security environments, but it can operate at very high speeds. Both the server and client do not use a lot of memory.
Securing Network File System in UNIX
In a UNIX platform, a Network File System is used to access transport and work directories over the network from a SAP system. To access work directories, the authentication process involves network addresses. It is possible that unauthorized access can be gained by attackers over the Network File System using IP spoofing.
To make the system secure, you shouldn’t distribute home directory over the Network File System and write authorization to these directories should be carefully assigned.
SAP System Directory Access for SAP System in UNIX
You should set the following access rights for SAP System Directories in UNIX −
| SAP Directory | Octal form Access Privilege | Owner | Group |
|---|---|---|---|
| /sapmnt/<SID>/exe | 775 | <sid>adm | sapsys |
| /sapmnt/<SID>/exe/saposcol | 4755 | root | sapsys |
| /sapmnt/<SID>/global | 700 | <sid>adm | sapsys |
| /sapmnt/<SID>/profile | 755 | <sid>adm | sapsys |
| /usr/sap/<SID> | 751 | <sid>adm | sapsys |
| /usr/sap/<SID>/<Instance ID> | 755 | <sid>adm | sapsys |
| /usr/sap/<SID>/<Instance ID>/* | 750 | <sid>adm | sapsys |
| /usr/sap/<SID>/<Instance ID>/sec | 700 | <sid>adm | sapsys |
| /usr/sap/<SID>/SYS | 755 | <sid>adm | sapsys |
| /usr/sap/<SID>/SYS/* | 755 | <sid>adm | sapsys |
| /usr/sap/trans | 775 | <sid>adm | sapsys |
| /usr/sap/trans/* | 770 | <sid>adm | sapsys |
| /usr/sap/trans/.sapconf | 775 | <sid>adm | sapsys |
| <home directory of <sid>adm> | 700 | <sid>adm | sapsys |
| <home directory of <sid>adm>/* | 700 | <sid>adm | sapsys |
SAP Security - Windows Platform
You need to create different users and groups in the Windows Platform to run your SAP system securely. To ease the user management task, it is suggested to add all WIN NT users to user group with correct access rights at OS level. In the Window Operating System, there are different group levels −
- Global Groups
- Local Groups
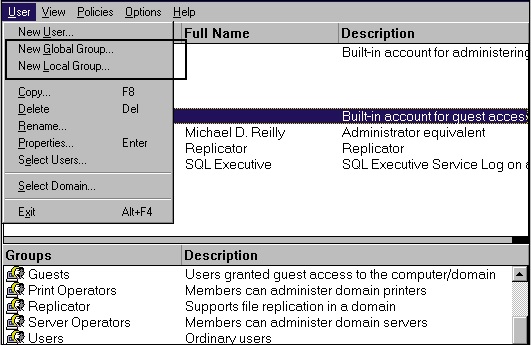
Global Groups
Global Groups in WIN are available at domain level and can be used to assign users from multiple servers. Global groups are available to all servers in one domain.
You can select the name of Global Groups as per your convenience. However, it is recommended to use naming conventions as per the SAP R/3 System Installation, which is the standard Global Group for SAP System Administrators and it is defined as SAP_<SID>_GlobalAdmin.
In the Window Platform, there are various commonly created Global Groups that can be used to run a SAP System −
SAPadmin − This group contains a list of all SAP System Administrators.
SAPusers − This group contains a list of all SAP Application Users.
SAPservices − This group contains a list of all SAP System Programs.
Domain Admin − This group contains a list of all administrators from all domains.
Local Groups
Local groups in Windows Platform are limited to one server in a domain. During the installation, rights are assigned to individual users and not groups. However, it is recommended that you assign access rights to local groups instead of single users.
Local groups are used to increase the security of the Windows environment in shared domains. You can further assign global users and global groups to a local group. You can create a local group with any name, but it is recommended that you use the local group name as: SAP_<SID>_LocalAdmin.
You can define various relations between users, local groups and global groups −
- A single user can be a part of a global group and a local group as well.
- You can also include a global group to a local group.
Standard Users in a Windows Platform
When you run SAP system on a Windows platform, there are standard users that should be carefully managed. The following are some of the standard users in Windows −
Window NT User −
Administrator − Administrator accounts with access to all the resources.
Guest − Only guest access to all the resources in system.
SAP System User −
<SID>ADM SAP − System Administrator with full access on all SAP resources.
SAPService<SID> − Special user responsible to run SAP services.
Database Users −
<DBService> − To run database specific services in Window platform.
<DBuser> − Database user to perform general DB operations.
Also, note that the Administrator and Guest users are created during the installation process and are used to perform Window specific tasks. All these users should be protected in a Window platform.
SAP Security - Databases
It is critical and essential to protect your database users in a SAP system. A database can be an Oracle database, SQL Server or a MYSQL Database. You need to protect the standard users from these databases. Password should be protected for standard users and they should be changed regularly.
Oracle Standard Users
The following table shows the list of standard users in the Windows environment. Password should be maintained for all these users.
| User Name | Type | Password Change Method |
|---|---|---|
| <SID>ADM | Operating System User | OPS$ mechanism |
| SAPServic<SID> | Operating System User | OPS$ mechanism |
| SYS (internal) | Operating System User | SAPDBA |
| SYSTEM | Operating System User | SAPDBA |
| SAPR3 | Operating System User | SAPDBA |
How to Create an OPS$ user for <SID>ADM?
To create an OPS$ user, you need to login with the <SID>ADM. You should first stop SAP System if it is running and then execute the command given below.
Create user OPS$<adm_user> default tablespace psapuserid temporary tablespace psaptemp identified externally;
Here the <adm_user> is −
<SID>ADM for older Oracle releases
<domain_name>\<SID>ADM latest releases
Then you should follow the steps given below −
Grant connect, resource to OPS$ <adm_user>l;
Connect /
Create table SAPUSER ( USERID Varchar(20), PASSWD VARCHAR2(20));
Insert into SAPUSER values (‘SAPR3’,’<password>);
Connect internal
Alter user SAPR3 identified by <password>;
In a similar way, you can create OPS$ for SAPService<SID>. In the following command, you should use SAP_service_user instead of adm_user.
Create user OPS$<SAP_service_user> default tablespace psapuserid temporary tablespace psaptemp identified externally;
Here the <SAP_service_user> is −
SAPService<SID> for older Oracle releases
<domain_name>\SAPservice<SID> for latest releases
Password Management for DB Users
It is necessary to manage passwords for standard users in your database. There are various utilities that you can use for a password change.
How to Change Password for a DBA User Using SAPDBA?
Password can be changed for a DBA user using the command line or GUI. To change the password using the command line, you should use the following command −
Sapdba [-u <user1>/<user1_password>] –user2 <user2_password>
In above command, user1 is the database user that SAPDBA uses to logon into the database.
<user1_password> is the password for user1’s password.
<user2> shows the database user for which the password should be changed.
<user2_password> is the new password for the same user.
In case you want to login using username “SYSTEM” with its default password, you can omit –u from the command.
Sapdba –u system/<system_password>] –sapr3 <sapr3_password>
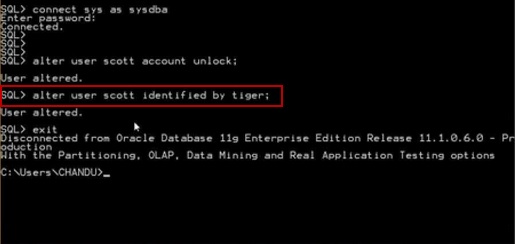
How to Change Password for SAPR3 Using SVRMGRL?
The SVRMGRL is an old utility that was shipped with prior releases of Oracle and has been used to perform database functions mentioned below. In the latest releases, the Server Manager commands are now available in SQL*Plus.
- Creating Database
- Start and Shut down Database
- Recovery of Database
- Password Management
To change the password, you should follow the steps given below −
- Start SVRMGRL.
- Connect to the database using the connect internal command.
- SVRMGR> connect internal.
- Connected.
The next step is to update the SAPUSER table by entering the command given below −
Update OPS$ <SID>ADM.SAPUSER set PASSWD = ’<new_password>’ where USERID = ’SAPR3’;
You should update the password for SAPR3 in the database using the command line.
Alter user sapr3 is identified by <new_password>
User Authentication and Single SignOn
Single Sign-On (SSO) is one of the key concept that allows you to login to one system and you can access multiple systems in the backend. SSO allows the user to access software resources across SAP systems in the back-end.
The SSO with NetWeaver platform provides user authentication and helps system administrators to manage the user loads in a complex SAP System Landscape. SSO configuration simplifies the process of how a user logs into the SAP systems and applications in landscape by enhancing the security measures and reduces the password management tasks for multiple systems.
SSO helps an organization to reduce their operation cost by decreasing the number of calls to the Service Desk related to password issues and hence increase the productivity of the business users. SAP NetWeaver integration mechanism allows you to easily integrate your SAP NetWeaver system in the SSO concept and provides easy access to backend systems in SAP System Landscape Environment.
SAP Single Sign-On Concept
The Single Sign-On can be configured with mySAP Workplace which allows a user to login to mySAP Workplace daily and they can access the applications without repeatedly entering their username and password.
You can configure SSO with mySAP Workplace using the following authentication methods −
- Username and password
- SAP Logon Tickets
- X.509 client Certificates
Integration in Single Sign-On
The SSO with NetWeaver platform provides user authentication and helps system administrators to manage the user loads in a complex SAP system landscape. SSO configuration simplifies the process how user login to SAP systems and applications in landscape by enhancing the security measures and reduces the password management tasks for multiple systems.
Using SAP NetWeaver allows you to configure different mechanisms that authorized users use to access the NetWeaver System using the SSO method. The login mechanism in system depends on the technology of SAP NetWeaver system and different communication channels used for accessing those systems.
Configuring Single Sign-On in a SAP GUI
To configure a Single Sign-On, you need to have access to the following T-codes −
- RZ10
- STRUST
Once you have these T-codes, you should follow the steps given below −
Step 1 − Login to any SAP ECC System using the SAP GUI, go to T-code RZ10.
Step 2 − Select the Default profile and Extended Maintenance after that.
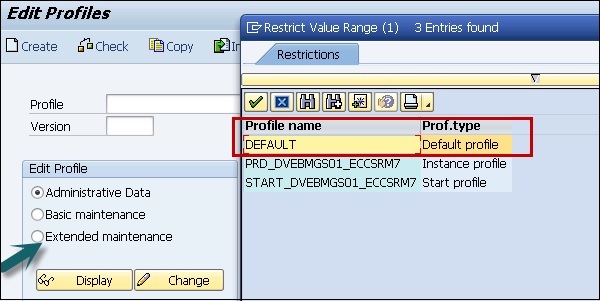
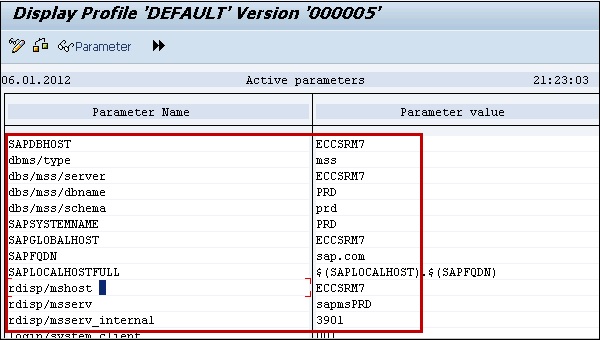
Step 3 − Click on Change and you will see the list of parameters for the profile.
Step 4 − Change the following profile parameters −
- login/create_sso2_ticket = 1
- login/accept_sso2_ticket = 1
Step 5 − Save and Activate the profile. It will generate a new profile.
Step 6 − Export the R3SSO certificate from the Trust Manager, go to transaction STRUST.
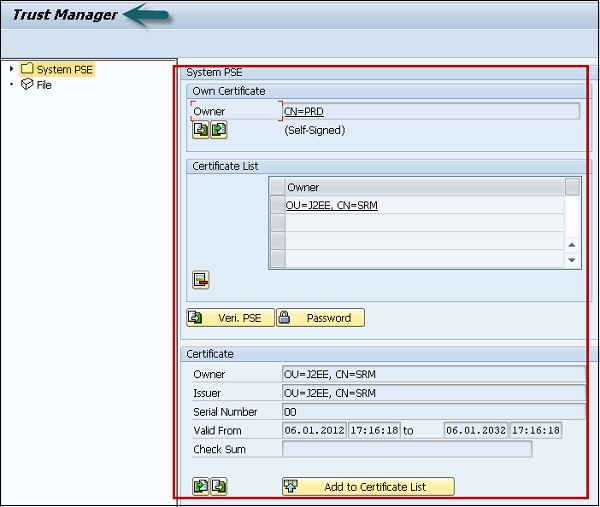
Step 7 − Double-click the text box to the right of Own Certificate. The certificate information is displayed. Note down the values of this certificate as you need to enter the values.
Step 8 − Click on Icon Export Certificate.
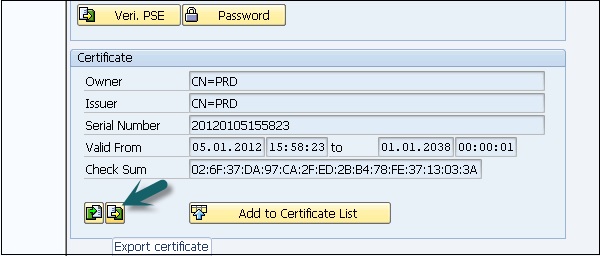
Step 9 − Save the file as <R3_Name>-<Client>.crt.
Example − EBS-300.crt
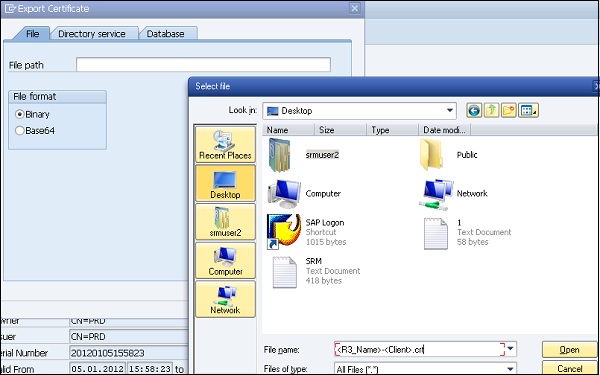
Step 10 − Click on the tick box to create the file in the parent directory.
Step 11 − Import R3 SSO certificate to the Java engine using the administrator tool.
Note − Make sure the Java engine is started.
Step 12 − Open the Java Administration tool.
Step 13 − Enter the Java Engine Administrator password and click on Connect.
Step 14 − Choose Server → Services Key → Storage.
Step 15 − Click on the Ticket Key Store in the View panel.
Step 16 − Click on Load in the Entry group box. Select the .crt file you exported in the previous step.
Step 17 − Configure the Security Provider service in the SAP Java engine using the Administrator tool.
Step 18 − Choose Server Services Security Provider.
Step 19 − Choose ticket in the Component panel and go to the Authentication tab.
Step 20 − Modify the options of Evaluate Ticket Login Module and add the following properties to each backend system on which you want to configure SSO.
Single Sign-On for Web-Based Access
You can configure several options with SSO to access SAP NetWeaver system. You can also access SAP NetWeaver System via a web browser or from some other web client. Using SSO, users can access backend systems and other secured information located in the company network.
SSO allows you to use several security authentication methods for integrating web based user access on NetWeaver Application servers. You can also implement various network communication security methods like Cryptography to send the information over network.
The Following authentication methods can be configured with SSO to access data over Application servers −
- Using User ID and Password Authentication
- Using Logon Tickets
- Using X.509 Client Certificates
- Using SAML Browser Artifacts
- Using SAML 2.0
- Using Kerberos Authentication
While accessing data over the internet, you can also use the security mechanism in the Network and Transport Layer.
SAP Security - Logon Tickets
You can configure the digitally signed SAP logon tickets to configure with a Single Sign-On to access integrated applications in a SAP environment. You can configure a portal to issue SAP logon tickets to the users and the users need to authenticate this system for initial access. When SAP logon tickets are issued to users they are saved in web browsers and allows the user to login to different systems with use of SSO.
In an ABAP application server, there are two different types of Logon ticket that can be configured −
Logon Tickets − These tickets allow web based access using SSO method.
Authentication Assertion Tickets − These tickets are used for system to system communication.
To configure SAP logon tickets, the following parameters should be set in the User profile.
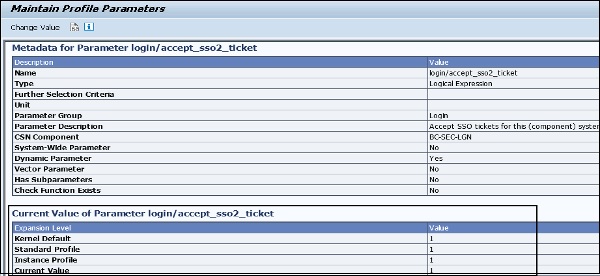
login/accept_sso2_ticket
You can use Single Sign-On (SSO) tickets to allow an SSO between SAP systems and even beyond the non-SAP systems. An SSO ticket can be a logon ticket or an assertion ticket. The logon ticket is transferred as a cookie with the name MYSAPSSO2. The assertion ticket is transferred as an HTTP header variable with the name MYSAPSSO2.
Note − This requires additional configuration steps for issuing and accepting the systems. The SSO component systems should permit logon by an SSO ticket (login/accept_sso2_ticket = 1).
If only the procedure (X.509 client certificate) is used for a Single Sign-On, or if you do not want to use the Single Sign-On for this system, you can deactivate this logon by SSO ticket (login/accept_sso2_ticket = 0).
To set the parameter, use Transaction RZ11
Values allowed − 0 / 1
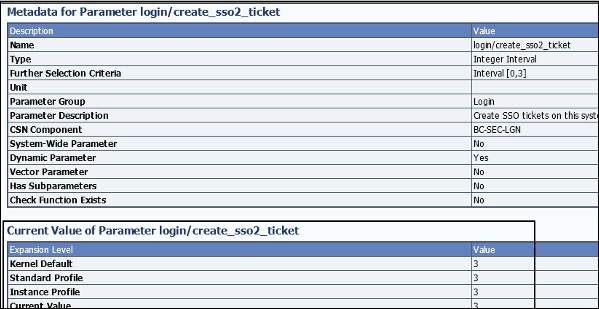
login/create_sso2_ticket
You can use the Single Sign-On (SSO) tickets to allow an SSO between SAP systems and even beyond to non-SAP systems. An SSO ticket can be a logon ticket or an assertion ticket. The logon ticket is transferred as a cookie with the name MYSAPSSO2. The assertion ticket is transferred as an HTTP header variable with the name MYSAPSSO2.
Note − This requires additional configuration steps for the issuing and accepting the systems.
The issuing system should permit the generation of an SSO ticket −
login/create_sso2_ticket = 1 : SSO ticket including certificate
login/create_sso2_ticket = 2 : SSO ticket without certificate
login/create_sso2_ticket = 3 : Generate only assertion tickets
Values allowed− 0 / 1 / 2 / 3
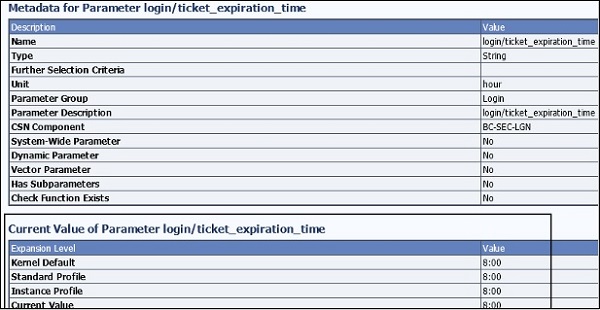
login/ticket_expiration_time
To make it possible to have a Single Sign-On (SSO) when using mySAP.com Workplace, SSO tickets can be used. When creating an SSO ticket, you can set the validity period. Once this has expired, the SSO ticket cannot be used any more to log on to workplace component systems. The user then needs to log on to the workplace server again to obtain a new SSO ticket.
Values allowed − <Hours>[:<Minutes>]
If incorrect values are entered, the default value is used (8 hours).
The correct values will be as shown below −
- 24 → 24 hours
- 1:30 → 1 hours, 30 minutes
- 0:05 → 5 minutes
The incorrect values will be as follows −
- 40 (0:40 would be correct)
- 0:60 (1 would be correct)
- 10:000 (10 would be correct)
- 24: (24 would be correct)
- 1:A3
X.509 Client Certificates
Using an SSO method, you can use X.509 client certificates to authenticate the NetWeaver Application Server. The client certificates use very strong cryptography methods to secure user access to the NetWeaver Application server, so your NetWeaver Application Server should be enabled with strong cryptography techniques.
You should have SSL configured on your SAP NetWeaver application servers as the authentication occurs using the SSL protocol without entering any username and password. To use the SSL protocol, it requires an HTTPS connection to communicate between the Web browser and the NetWeaver ABAP Application Server.
Security Assertion Markup Language (SAML2.0)
The SAML2.0 can be used as authentication with Single Sign-On SSO and it enables SSO across different domains. SAML 2.0 is developed by an organization name OASIS. It also provides a Single Log-Out option, which means that when a user logs off from all the systems, the service provider in the SAP system notifies the identity providers which in turn logs off all the sessions.
The following are the advantages of using SAML2.0 authentication −
You can decrease the overhead of maintaining authentication for the system hosting the application to other system.
You can also maintain authentication for external service providers without maintaining user identities in systems.
Single Logout option in all systems.
To map the user accounts automatically.
Kerberos Authentication
You can also user Kerberos Authentication for SAP NetWeaver Application server using access via web clients and web browsers. It uses Simple and Protected GSS API Negotiation mechanism SPNego which also requires a Single Sign-On SSO 2.0 or higher version with additional licenses to use this authentication. The SPNego doesn’t support Transport Layer security, so it is recommended to use SSL protocol to add transport layer security to communicate with NetWeaver Application Server.
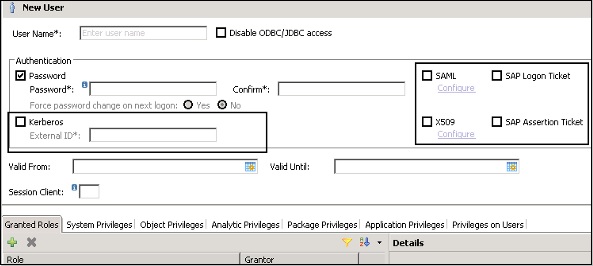
In above screenshot, you can see different authentication methods that can be configured in a user profile for authentication purposes.
Each authentication method in SAP has its own advantages and can be used in different scenarios.