- HTML Tutorial
- HTML - Home
- HTML - History and Evolution
- HTML - Overview
- HTML - Editors
- HTML - Basic Tags
- HTML - Elements
- HTML - Attributes
- HTML - Formatting
- HTML - Headings
- HTML - Paragraphs
- HTML - Quotations
- HTML - Comments
- HTML - Phrase Tags
- HTML - Meta Tags
- HTML - Style Sheet
- HTML - CSS Classes
- HTML - CSS IDs
- HTML - Images
- HTML - Image Map
- HTML Tables
- HTML - Tables
- HTML - Headers & Caption
- HTML - Table Styling
- HTML - Table Colgroup
- HTML - Nested Tables
- HTML Lists
- HTML - Lists
- HTML - Unordered Lists
- HTML - Ordered Lists
- HTML - Definition Lists
- HTML Links
- HTML - Text Links
- HTML - Image Links
- HTML - Email Links
- HTML - Iframes
- HTML - Blocks
- HTML Backgrounds
- HTML - Backgrounds
- HTML Colors
- HTML - Colors
- HTML - RGB
- HTML - HEX
- HTML - HSL
- HTML Forms
- HTML - Forms
- HTML - Form Attributes
- HTML - Form Control
- HTML - Input Attributes
- HTML Media
- HTML - Video Element
- HTML - Audio Element
- HTML - Embed Multimedia
- HTML Header
- HTML - Head Element
- HTML - Adding Favicon
- HTML - Javascript
- HTML Layouts
- HTML - Layouts
- HTML - Layout Elements
- HTML - Layout using CSS
- HTML - Responsiveness
- HTML - Symbols
- HTML - Emojis
- HTML - Style Guide
- HTML Graphics
- HTML - SVG
- HTML - Canvas
- HTML APIs
- HTML - Geolocation API
- HTML - Drag & Drop API
- HTML - Web Workers API
- HTML - WebSocket
- HTML - Web Storage
- HTML - Server Sent Events
- HTML Miscellaneous
- HTML - MathML
- HTML - Microdata
- HTML - IndexedDB
- HTML - Web Messaging
- HTML - Web CORS
- HTML - Web RTC
- HTML Demo
- HTML - Audio Player
- HTML - Video Player
- HTML - Web slide Desk
- HTML Tools
- HTML - Velocity Draw
- HTML - QR Code
- HTML - Modernizer
- HTML - Validation
- HTML - Color Code Builder
- HTML References
- HTML - Tags Reference
- HTML - Attributes Reference
- HTML - Events Reference
- HTML - Fonts Reference
- HTML - ASCII Codes
- ASCII Table Lookup
- HTML - Color Names
- HTML - Entities
- MIME Media Types
- HTML - URL Encoding
- Language ISO Codes
- HTML - Character Encodings
- HTML - Deprecated Tags
- HTML Resources
- HTML - Quick Guide
- HTML - Useful Resources
- HTML - Color Code Builder
- HTML - Online Editor
HTML - Image Links
Similar to text, images can also be used as links in HTML which means by clicking these images, we can navigate to another web pages or resources. Image links are very useful in creating websites like photo galleries, portfolio, online stores and so on. In this tutorial, we will learn how to use images to create hyperlinks.
Images as HTML links
To create an HTML image link, we need <img /> tag and an anchor element. The image element is used to display the image on the web page, and the anchor element is used to specify the destination URL of the link.
Syntax
The syntax of an HTML image link is as follows −
<a href=" destination URL">
   <img src="image URL" alt="alternative text">
</a>
Here, the href attribute of <a> element contains the destination link and src attribute of <img> tag contains the path of image.
Example
In the following example, we are using an image as hyperlink.
<!DOCTYPE html>
<html>
<head>
   <title>Image Hyperlink Example</title>
</head>
<body>
   <a href="https://www.tutorialspoint.com">
      <img src="/html/images/logo.png" alt="Tutorials Point" border="0" />
   </a>
</body>
</html>
If you execute the above example by clicking on Edit & Run, an image will be displayed and if we click on it, the page will redirect to the home page of Tutorials Point.
This was the simplest way of creating hyperlinks using images. Next we will see how we can create Mouse-Sensitive Image Links.
Mouse-Sensitive Images
The HTML and XHTML standards provides a feature that lets us embed several different links inside a single image. We can create different links on the single image based on different coordinates available on the image.
Once the links are attached to all coordinates, clicking on the different parts of the image redirect us to target documents. Such mouse-sensitive images are known as image maps.
There are two ways to create image maps −
Server-side image maps − This is enabled by the ismap attribute of the <img> tag and requires access to a server and related image-map processing applications.
Client-side image maps − This is created with the usemap attribute of the <img> tag, along with corresponding <map> and <area> tags.
Server-Side Image Maps
In the server-side image maps, we simply put the image inside a hyper link and use ismap attribute which makes it special image and when the user clicks some place within the image, the browser passes the coordinates of the mouse pointer along with the URL specified in the <a> tag to the web server. The server uses the mouse-pointer coordinates to determine which document to deliver back to the browser.
When ismap is used, the href attribute of the containing <a> tag must contain the URL of a server application like a CGI or PHP script to process the incoming request based on the passed coordinates.
The coordinates of the mouse position are screen pixels counted from the upper-left corner of the image, beginning with (0,0). The coordinates, preceded by a question mark, are added to the end of the URL.
Example
The following code snippet demonstrates the use of server-side image maps.
<!DOCTYPE html>
<html>
<head>
   <title>ISMAP Hyperlink Example</title>
</head>
<body>
   <p>Click on the Image to get its coordinates. </p>
   <a href="#" target="_self">
      <img src="https://www.tutorialspoint.com/images/logo.png" alt="Tutorials Point" ismap/>
   </a>
</body>
</html>
On executing the above code, tutorialspoint logo will be displayed. When we click on the logo, the address bar will show the respective coordinate as shown below −
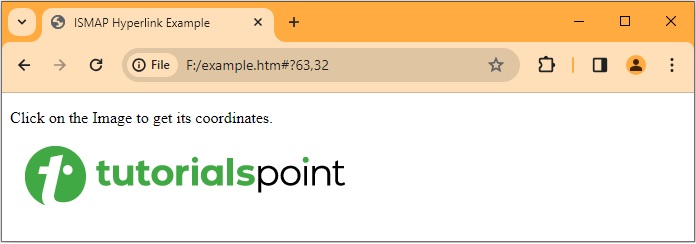
This way we can assign distinct links to different coordinates of the image and when those coordinates are clicked, we will be redirected to the linked documents. To learn more about ismap attribute, check How to use Image ismap?
Client-Side Image Maps
Client side image maps are enabled by the usemap attribute of the <img /> tag and defined by special <map> and <area> extension tags. The <map> along with <area> tags define all the image coordinates and corresponding links. The <area> tag inside the map tag, specifies the shape and the coordinates to define the boundaries of each clickable hotspot available on the image.
The image that is going to form the map is inserted into the page using the <img /> tag as a normal image, except it carries an extra attribute called usemap.
Example
The following example shows a client-side image map.
<!DOCTYPE html>
<html>
<head>
   <title>USEMAP Hyperlink Example</title>
</head>
<body>
   <p>Search and click the hotspot</p>
   <img src=/images/html.gif alt="HTML Map" border="0" usemap="#html" />
   <!-- Create  Mappings -->
   <map name="html">
      <area shape="circle" coords="80,80,20" href="/css/index.htm" alt="CSS Link" target="_self" />
      <area shape="rect" coords="5,5,40,40" alt="jQuery Link" href="/jquery/index.htm" target="_self" />
   </map>
</body>
</html>
The above HTML code will display an image with clickable coordinates. Find the coordinates and observe what is happening.
Coordinate System in HTML Images
The actual value of coordinates is totally dependent on the shape of the clickable area. Let us understand the coordinates of different shapes −
Rectangle
rect = x1 , y1 , x2 , y2
Where, x1 and y1 are the coordinates of the upper left corner of the rectangle; x2 and y2 are the coordinates of the lower right corner.
Circle
circle = xc , yc , radiusWhere,
xc and yc are the coordinates of the center of the circle, and radius is the circle's radius. A circle centred at 200,50 with a radius of 25 would have the attribute coords="200,50,25".
Polygon
poly = x1 , y1 , x2 , y2 , x3 , y3 , ... xn , yn
The various x-y pairs define vertices (points) of the polygon, with a "line" being drawn from one point to the next point. A diamond-shaped polygon with its top point at 20,20 and 40 pixels across at its widest points would have the attribute coords="20,20,40,40,20,60,0,40".
Note: All coordinates are relative to the upper-left corner of the image (0,0). Each shape has a related URL. You can use any image software to know the coordinates of different positions.