- GraphQL Tutorial
- GraphQL - Home
- GraphQL - Introduction
- GraphQL - Environment Setup
- GraphQL - Architecture
- GraphQL - Application Components
- GraphQL - Example
- GraphQL - Type System
- GraphQL - Schema
- GraphQL - Resolver
- GraphQL - Query
- GraphQL - Mutation
- GraphQL - Validation
- GraphQL - JQuery Integration
- GraphQL - React Integration
- GraphQL - Apollo Client
- GraphQL - Authenticating Client
- GraphQL - Caching
- GraphQL Useful Resources
- GraphQL - Quick Guide
- GraphQL - Useful Resources
- GraphQL - Discussion
GraphQL - Caching
Caching is the process of storing data in a temporary storage area called cache. When you return to a page you've recently visited, the browser can get those files from the cache rather than the original server. This saves your time, and network from the burden of additional traffic.
Client applications interacting with GraphQL are responsible for caching data at their end. One possible pattern for this is reserving a field, like id, to be a globally unique identifier.
InMemory Cache
InMemoryCache is a normalized data store commonly used in GraphQL client applications without use of other library like Redux.
The sample code to use InMemoryCache with ApolloClient is given below −
import {ApolloClient, HttpLink, InMemoryCache} from 'apollo-boost'
const cache = new InMemoryCache();

const client = new ApolloClient({
   link: new HttpLink(),
   cache
});
The InMemoryCache constructor takes an optional config object with properties to customize your cache.
| Sr.No. | Parameter & Description |
|---|---|
| 1 | addTypename A boolean to determine whether to add __typename to the document (default: true) |
| 2 | dataIdFromObject A function that takes a data object and returns a unique identifier to be used when normalizing the data in the store |
| 3 | fragmentMatcher By default, the InMemoryCache uses a heuristic fragment matcher |
| 4 | cacheRedirects A map of functions to redirect a query to another entry in the cache before a request takes place. |
Illustration
We will create a single page application in ReactJS with two tabs – one for the home tab and another for students. The students tab will load data from a GraphQL server API. The application will query for students data when the user navigates from the home tab to the students tab. The resulting data will be cached by the application.
We will also query the server time using getTime field to verify if the page is cached. If data is returned from the cache, the page will display the time of very first request sent to the server. If the data is a result of a fresh request made to the sever, it will always show the latest time from server.
Setting up the Server
Following are the steps for setting up the server −
Step 1 − Download and Install Required Dependencies for the Project
Create a folder cache-server-app. Change your directory to cache-server-app from the terminal. Follow steps 3 to 5 explained in the Environment Setup chapter.
Step 2 − Create a Schema
Add schema.graphql file in the project folder cache-server-app and add the following code −
type Query {
   students:[Student]
   getTime:String
}

type Student {
   id:ID!
   firstName:String
   lastName:String
   fullName:String
}
Step 3 − Add Resolvers
Create a file resolvers.js in the project folder, and add the following code −
const db = require('./db')

const Query = {
      students:() => db.students.list(),
      getTime:() => {
      const today = new Date();
      var h = today.getHours();
      var m = today.getMinutes();
      var s = today.getSeconds();
      return `${h}:${m}:${s}`;
   }
}
module.exports = {Query}
Step 4 − Run the Application
Create a server.js file. Refer step 8 in the Environment Setup Chapter. Execute the command npm start in the terminal. The server will be up and running on 9000 port. Here, we will use GraphiQL as a client to test the application.
Open browser and enter the URL http://localhost:9000/graphiql. Type the following query in the editor −
{
   getTime
   students {
      id
      firstName
   }
}
The sample response shows the students names and the server time.
{
   "data": {
      "getTime": "22:18:42",
      "students": [
         {
            "id": "S1001",
            "firstName": "Mohtashim"
         },
         {
            "id": "S1002",
            "firstName": "Kannan"
         },
         {
            "id": "S1003",
            "firstName": "Kiran"
         }
      ]
   }
}
Setting up the ReactJS Client
Open a new terminal for client. The server terminal should be kept running before executing the client application. React application will be running on port number 3000 and server application on port number 9000.
Step 1 − Create a React Application
In the client terminal, type the following command −
npx create-react-app hello-world-client
This will install everything needed for a typical react application. The npx utility and create-react-app tools create a project with name hello-world-client. Once the installation is completed, open the project in VSCode.
Install router modules for react using following command – npm install react-router-dom.
Step 2 − Start hello-world-client
Change the current folder path in the terminal to hello-world-client. Type npm start to launch the project. This will run a development server at port 3000 and will automatically open the browser and load the index page.
This is shown in the screenshot given below −
Step 3 − Install Apollo Client Libraries
To install an Apollo Client, open a new terminal and be in current project folder path. Type the following command −
npm install apollo-boost graphql
This will download the graphql libraries for client side and also the Apollo Boost package. We can cross verify this by typing npm view apollo-boost dependencies. This will have many dependencies as shown below −
{
   'apollo-cache': '^1.1.15',
   'apollo-cache-inmemory': '^1.2.8',
   'apollo-client': '^2.4.0',
   'apollo-link': '^1.0.6',
   'apollo-link-error': '^1.0.3',
   'apollo-link-http': '^1.3.1',
   'apollo-link-state': '^0.4.0',
   'graphql-tag': '^2.4.2'
}
We can clearly see that apollo-client library is installed.
Step 4 − Modify the App Component in index.js File
For a simple react application, you only need to keep the index.js in src folder and index.html in public folder; all other files that are auto generated can be removed.
The directory structure is given below −
hello-world-client /
   -->node_modules
   -->public
      index.html
   -->src
      index.js
      students.js
   -->package.json
Add an additional file students.js which will contain Students Component. Student details are fetched through the Student Component. In the App Component, we are using a HashRouter.
Following is the index.js in react application −
import React, {Component} from 'react';
import ReactDOM from 'react-dom';
import {HashRouter, Route, Link} from 'react-router-dom'

//components
import Students from './students'
class App extends Component {
   render() {
      return(
         <div><h1>Home !!</h1>
         <h2>Welcome to React Application !! </h2>
         </div>
      )
   }
}

function getTime() {
   var d = new Date();
   return d.getHours()+":"+d.getMinutes()+":"+d.getSeconds()
}

const routes = <HashRouter>
   <div>
      <h4>Time from react app:{getTime()}</h4>
      <header>
         <h1>  <Link to="/">Home</Link>
         <Link to = "/students">Students</Link>  </h1>
      </header>
      <Route exact path = "/students" component = {Students}></Route>
      <Route exact path = "/" component = {App}></Route>
   </div>
</HashRouter>

ReactDOM.render(routes, document.querySelector("#root"))
Step 5 − Edit Component Students in Students.js
In Students Component, we will use the following two approaches to load data −
Fetch API (loadStudents_noCache) − This will trigger a new request everytime the clicks the student tab.
Apollo Client (loadWithApolloclient) − This will fetch data from the cache.
Add a function loadWithApolloclient which queries for students and time from server. This function will enable caching. Here we use a gql function to parse the query.
async loadWithApolloclient() {
   const query = gql`{
      getTime
      students {
         id
         firstName
      }
   }`;

   const {data} = await  client.query({query})
   return data;
}
The Fetch API is a simple interface for fetching resources. Fetch makes it easier to make web requests and handle responses than with the older XMLHttpRequest. Following method shows loading data directly using fetch api −
async  loadStudents_noCache() {
      const response = await fetch('http://localhost:9000/graphql', {
      method:'POST',
      headers:{'content-type':'application/json'},
      body:JSON.stringify({query:`{
         getTime
         students {
            id
            firstName
         }
      }`})
   })

   const rsponseBody = await response.json();
   return rsponseBody.data;
}
In the constructor of StudentsComponent, call the loadWithApolloClient method. The complete Student.js file is below −
import React, {Component} from 'react';
import { Link} from 'react-router-dom'

//Apollo Client
import {ApolloClient, HttpLink, InMemoryCache} from 'apollo-boost'
import gql from 'graphql-tag'
const client = new ApolloClient({
   link: new HttpLink({uri:`http://localhost:9000/graphql`}),
   cache:new InMemoryCache()
})

class Students extends Component {
   constructor(props) {
      super(props);
      this.state = {
         students:[{id:1,firstName:'test'}],
         serverTime:''
      }
      this.loadWithApolloclient().then(data => {
         this.setState({
            students:data.students,
            serverTime:data.getTime
         })
      })
   }

   async  loadStudents_noCache() {
      const response = await fetch('http://localhost:9000/graphql', {
         method:'POST',
         headers:{'content-type':'application/json'},
         body:JSON.stringify({query:`{
            getTime
            students {
               id
               firstName
            }
         }`})
      })
      const rsponseBody =  await response.json();
      return rsponseBody.data;
   }

   async loadWithApolloclient() {
      console.log("inside apollo client function")
      const query = gql`{
         getTime
         students {
            id
            firstName
         }
      }`;
      const {data} = await  client.query({query})
      return data;
   }

   render() {
      return(
         <div>
            <h3>Time from GraphQL server :{this.state.serverTime}</h3>
            <p>Following Students Found </p>
            <div>
               <ul>
                  {
                     this.state.students.map(s => {
                        return(
                           <li key = {s.id}>
                              {s.firstName}
                           </li>
                        )
                     })
                  }
               </ul>
            </div>
         </div>
      )
   }
}
export default Students
Step 6 − Run the React Application with npm start
You can test the react application by switching from home tab to students tab. Once the students tab is loaded with data from server. It will cache the data. You can test it by switching from home to students tab multiple times. The output will be as shown below −
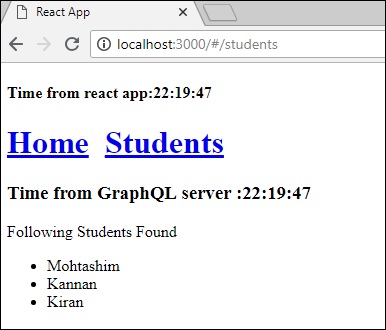
If you have loaded the students page first by typing the URL, http://localhost:3000/#/students, you can see that the load time for react app and GraphQL would be approximately same. After that if you switch to home view and return to the GraphQL server, the time will not change. This shows the data is cached.
Step 7 − Change loadWithApolloclient Call to loadStudents_noCache
If you change the load method to loadStudents_noCache in the constructor of StudentComponent, the output will not cache the data. This shows the difference between caching and non-caching.
this.loadStudents_noCache().then(data => {
   this.setState({
      students:data.students,
      serverTime:data.getTime
   })
})
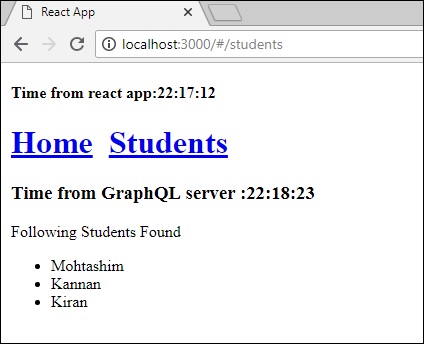
From the above output, it is clear that if you switch back and forth between the tabs, the time from graphql server will always be the latest which means the data is not cached.
To Continue Learning Please Login