- GraphQL Tutorial
- GraphQL - Home
- GraphQL - Introduction
- GraphQL - Environment Setup
- GraphQL - Architecture
- GraphQL - Application Components
- GraphQL - Example
- GraphQL - Type System
- GraphQL - Schema
- GraphQL - Resolver
- GraphQL - Query
- GraphQL - Mutation
- GraphQL - Validation
- GraphQL - JQuery Integration
- GraphQL - React Integration
- GraphQL - Apollo Client
- GraphQL - Authenticating Client
- GraphQL - Caching
- GraphQL Useful Resources
- GraphQL - Quick Guide
- GraphQL - Useful Resources
- GraphQL - Discussion
GraphQL - Authenticating Client
Authentication is the process or action of verifying the identity of a user or a process. It is important that an application authenticates a user to ensure that the data is not available to an anonymous user. In this section, we will learn how to authenticate a GraphQL client.
Express JWT
In this example, we will use jQuery to create a client application. To authenticate requests, we will use express-jwt module on the server-side.
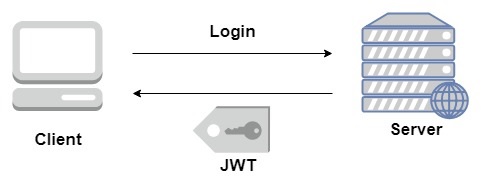
The express-jwt module is a middleware that lets you authenticate HTTP requests using JWT tokens. JSON Web Token (JWT) is a long string that identifies the logged in user.
Once the user logs in successfully, the server generates a JWT token. This token distinctly identifies a log. In other words, the token is a representation of user's identity. So next time, when the client comes to the server, it has to present this token to get the required resources. The client can be either a mobile application or a web application.
Illustration
We will follow a step-wise procedure to understand this illustration.
Setting up the Server
Following are the steps for setting up the server −
Step 1 − Download and Install Required Dependencies for the Project
Create a folder auth-server-app. Change your directory to auth-server-app from the terminal. Follow steps 3 to 5 explained in the Environment Setup chapter.
Step 2 − Create a Schema
Add schema.graphql file in the project folder auth-server-app and add the following code −
type Query
{
   greetingWithAuth:String
}
Step 3 − Add Resolvers
Create a file resolvers.js in the project folder and add the following code −
The resolver will verify if an authenticated user object is available in the context object of GraphQL. It will raise an exception if an authenticated user is not available.
const db = require('./db')

const Query = {
   greetingWithAuth:(root,args,context,info) => {

      //check if the context.user is null
      if (!context.user) {
         throw new Error('Unauthorized');
      }
      return "Hello from TutorialsPoint, welcome back : "+context.user.firstName;
   }
}

module.exports = {Query}
Step 4 − Create Server.js File
The authentication middleware authenticates callers using a JSON Web Token. The URL for authentication is http://localhost:9000/login.
This is a post operation. The user has to submit his email and password which will be validated from the backend. If a valid token is generated using jwt.sign method, the client will have to send this in header for subsequent requests.
If the token is valid, req.user will be set with the JSON object decoded to be used by later middleware for authorization and access control.
The following code uses two modules − jsonwebtoken and express-jwt to authenticate requests −
When the user clicks on the greet button, a request for the /graphql route is issued. If the user is not authenticated, he will be prompted to authenticate himself.
The user is presented with a form that accepts email id and password. In our example, the /login route is responsible for authenticating the user.
The /login route verifies if a match is found in the database for credentials provided by the user.
If the credentials are invalid, a HTTP 401 exception is returned to the user.
If the credentials are valid, a token is generated by the server. This token is sent as a part of response to the user. This is done by the jwt.sign function.
const expressJwt = require('express-jwt');
const jwt = require('jsonwebtoken');

//private key
const jwtSecret = Buffer.from('Zn8Q5tyZ/G1MHltc4F/gTkVJMlrbKiZt', 'base64');

app.post('/login', (req, res) => {
   const {email, password} = req.body;

   //check database
   const user = db.students.list().find((user) =>  user.email === email);
   if (!(user && user.password === password)) {
      res.sendStatus(401);
      return;
   }

   //generate a token based on private key, token doesn't have an expiry
   const token = jwt.sign({sub: user.id}, jwtSecret);
   res.send({token});
});
For every request, the app.use() function will be called. This in turn will invoke the expressJWT middleware. This middleware will decode the JSON Web Token. The user id stored in the token will be retrieved and stored as a property user in the request object.
//decodes the JWT and stores in request object
app.use(expressJwt({
   secret: jwtSecret,
   credentialsRequired: false
}));
To make available the user property within GraphQL context, this property is assigned to the context object as shown below −
//Make req.user available to GraphQL context
app.use('/graphql', graphqlExpress((req) => ({
   schema,
   context: {user: req.user &&apm; db.students.get(req.user.sub)}
})));
Create server.js in current folder path. The complete server.js file is as follows −
const bodyParser = require('body-parser');
const cors = require('cors');
const express = require('express');
const expressJwt = require('express-jwt'); //auth
const jwt = require('jsonwebtoken'); //auth
const db = require('./db');

var port = process.env.PORT || 9000
const jwtSecret = Buffer.from('Zn8Q5tyZ/G1MHltc4F/gTkVJMlrbKiZt', 'base64');
const app = express();

const fs = require('fs')
const typeDefs = fs.readFileSync('./schema.graphql',{encoding:'utf-8'})
const resolvers = require('./resolvers')
const {makeExecutableSchema} = require('graphql-tools')

const schema = makeExecutableSchema({typeDefs, resolvers})

app.use(cors(), bodyParser.json(), expressJwt({
   secret: jwtSecret,
   credentialsRequired: false
}));

const  {graphiqlExpress,graphqlExpress} = require('apollo-server-express')

app.use('/graphql', graphqlExpress((req) => ({
   schema,
   context: {user: req.user && db.students.get(req.user.sub)}
})));
app.use('/graphiql',graphiqlExpress({endpointURL:'/graphql'}))

//authenticate students
app.post('/login', (req, res) => {
   const email = req.body.email;
   const password = req.body.password;

   const user = db.students.list().find((user) =>  user.email === email);
   if (!(user && user.password === password)) {
      res.sendStatus(401);
      return;
   }
   const token = jwt.sign({sub: user.id}, jwtSecret);
   res.send({token});
});

app.listen(port, () => console.info(`Server started on port ${port}`));
Step 5 − Run the Application
Execute the command npm start in the terminal. The server will be up and running on 9000 port. Here, we use GraphiQL as a client to test the application.
Open browser and type the URL http://localhost:9000/graphiql. Type the following query in the editor −
{
   greetingWithAuth
}
In the below response, we got an error as we are not authenticated user.
{
   "data": {
      "greetingWithAuth": null
   },
   "errors": [
      {
         "message": "Unauthorized",
         "locations": [
            {
               "line": 2,
               "column": 3
            }
         ],
         "path": [
            "greetingWithAuth"
         ]
      }
   ]
}
In the next section, let us create a client application to authenticate.
Setting up the JQuery Client
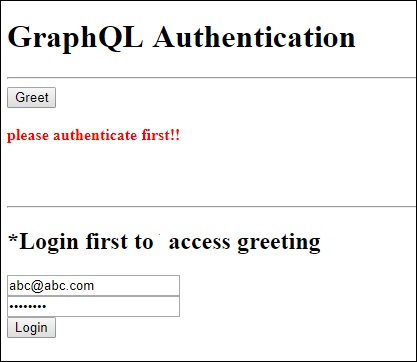
In the client application, a greet button is provided which will invoke the schema greetingWithAuth. If you click the button without login, it will give you the error message as below −
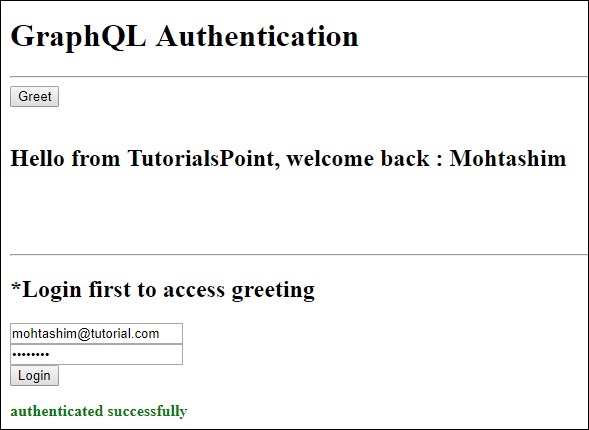
Once you log in with a user available in database, the following screen will appear −
To access greeting, we need to first access the URL http://localhost:9000/login route as below.
The response will contain the token generated from the server.
$.ajax({
   url:"http://localhost:9000/login",
   contentType:"application/json",
   type:"POST",
   data:JSON.stringify({email,password}),
   success:function(response) {
      loginToken = response.token;
      $('#authStatus')
      .html("authenticated successfully")
      .css({"color":"green",'font-weight':'bold'});
      $("#greetingDiv").html('').css({'color':''});
   },
   error:(xhr,err) =>  alert('error')
})
After a successful login, we can access greetingWithAuth schema as given below. There should be an Authorizationheader for all the subsequent requests with bearer token.
{
   url: "http://localhost:9000/graphql",
   contentType: "application/json",
   headers: {"Authorization": 'bearer '+loginToken},  type:'POST',
   data: JSON.stringify({
   query:`{greetingWithAuth}`
}
The following is the code for index.html −
<!DOCTYPE html>
<html>
   <head>
      <script src = "https://ajax.googleapis.com/ajax/libs/jquery/3.3.1/jquery.min.js"></script>
      <script>
         $(document).ready(function() {
            let loginToken = "";
            $("#btnGreet").click(function() {
                  $.ajax({url: "http://localhost:9000/graphql",
                  contentType: "application/json",
                  headers: {"Authorization": 'bearer '+loginToken},
                  type:'POST',
                  data: JSON.stringify({
                  query:`{greetingWithAuth}` }),
                  success: function(result) {
                  $("#greetingDiv").html("<h1>"+result.data.greetingWithAuth+"</h1>")
                  },
                  error:function(jQxhr,error) {
                     if(jQxhr.status == 401) {
                        $("#greetingDiv").html('please authenticate first!!')
                        .css({"color":"red",'font-weight':'bold'})
                        return;
                     }
                     $("#greetingDiv").html('error').css("color","red");
                  }
               });
            });
            $('#btnAuthenticate').click(function() {
               var email =  $("#txtEmail").val();
               var password =  $("#txtPwd").val();
               if(email && password) {
                  $.ajax({
                     url:"http://localhost:9000/login",
                     contentType:"application/json",
                     type:"POST",
                     data:JSON.stringify({email,password}),
                     success:function(response) {
                        loginToken =  response.token;
                        $('#authStatus')
                        .html("authenticated successfully")
                        .css({"color":"green",'font-weight':'bold'});
                        $("#greetingDiv").html('').css({'color':''});
                     },
                     error:(xhr,err) =>  alert('error')
                  })
               }else alert("email and pwd empty")
            })
         });
      </script>
   </head>

   <body>
      <h1> GraphQL Authentication </h1>
      <hr/>
      <section>
         <button id = "btnGreet">Greet</button>
         <br/> <br/>
         <div id = "greetingDiv"></div>
      </section>
      <br/> <br/> <br/>
      <hr/>

      <section id = "LoginSection">
         <header>
            <h2>*Login first to  access greeting </h2>
         </header>
         <input type = "text" value = "mohtashim.mohammad@tutorialpoint.org" placeholder = "enter email" id = "txtEmail"/>
         <br/>

         <input type = "password" value = "pass123" placeholder = "enter password" id = "txtPwd"/>
         <br/>

         <input type = "button" id = "btnAuthenticate"  value = "Login"/>
         <p id = "authStatus"></p>
      </section>
   </body>
</html>