- GraphQL Tutorial
- GraphQL - Home
- GraphQL - Introduction
- GraphQL - Environment Setup
- GraphQL - Architecture
- GraphQL - Application Components
- GraphQL - Example
- GraphQL - Type System
- GraphQL - Schema
- GraphQL - Resolver
- GraphQL - Query
- GraphQL - Mutation
- GraphQL - Validation
- GraphQL - JQuery Integration
- GraphQL - React Integration
- GraphQL - Apollo Client
- GraphQL - Authenticating Client
- GraphQL - Caching
- GraphQL Useful Resources
- GraphQL - Quick Guide
- GraphQL - Useful Resources
- GraphQL - Discussion
GraphQL - JQuery Integration
Web applications send and retrieve data asynchronously (in the background). AJAX allows websites to load content onto the screen without refreshing the page. jQuery provides several methods for AJAX functionality thus making it easier to use AJAX. In this chapter, we shall learn how we can integrate GraphQL with jQuery.
Consider an application using client server architecture. We can build a front end webpage that requests data from a GraphQL server. The webpage will make AJAX calls using jQuery to the GraphQL server.
To integrate GraphQL with JQuery, let us inspect the GraphiQL request headers and understand the request parameters.
Start the hello-world app (refer to chapter 6 for the relevant illustration). Type the graphql query {greeting} in the GraphiQL window. Right-click and inspect or press (ctrl + shift + I) on chrome to go to the network tab as shown below −
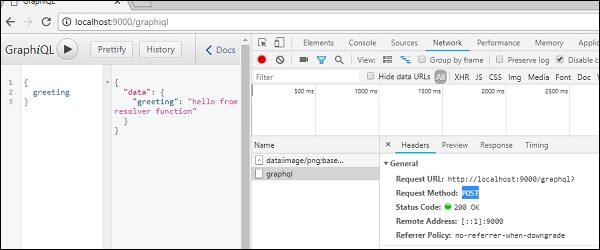
From the simple hello-world example, we can understand that http method used is POST. Now in the browser, scroll down to the header section to view the request payload.
Once you click on view code, you will see the following in the request payload section of chrome.
{"query":"{\n greeting\n}","variables":null,"operationName":null}
Also note the request URL, http://localhost:9000/graphql that should be called from client application.
Illustration
Let us understand how to integrate GraphQL with JQuery using a step-wise process.
Setting up the Server
We will learn to set up the server using the following steps −
Step 1 − Download and Install Required Dependencies for the Project
Create a folder named jquery-server-app. Change your directory to jquery-server-app from the terminal. Follow steps 3 to 5 explained in the Environment Setup chapter.
Step 2 − Create a Schema
Add schema.graphql file in the project folder jquery-server-app and add the following code −
type Query
{
   greeting: String
   sayHello(name:String!):String
}
The file has defined two queries greeting and sayHello. The sayHello query accepts a string parameter and returns another string. The parameter to the sayHello() function is not null.
Step 3 − Create Resolvers
Create a file resolvers.js in the project folder and add the following code −
const Query =
{
   greeting: () => 'Hello GraphQL  From TutorialsPoint !!' ,
   sayHello:(root,args,context,info) =>  `Hi ${args.name} GraphQL server says Hello to you!!`
}
module.exports = {Query}
Here, greeting and sayHello are two resolvers. In sayHello resolver, the value passed to the name parameter can be accessed through args. To access resolver functions outside the module, Query object has to be exported using module.exports.
Step 4 − Run the Application
Create a server.js file. Refer to step 8 in the Environment Setup Chapter. Execute the command npm start in the terminal. The server will be up and running on 9000 port. Here, we use GraphiQL as a client to test the application.
Open browser and type the URL http://localhost:9000/graphiql. Type the following query in the editor −
{
   greeting,
   sayHello(name:"Mohtashim")
}
The response from the server is as given below −
{
   "data": {
      "greeting": "Hello GraphQL From TutorialsPoint !!",
      "sayHello": "Hi Mohtashim GraphQL server says Hello to you!!"
   }
}
Setting up the Client
Since, we have already set up the server, now we will learn how to set up the client.
Step 1 − Create a new folder jquery-client-app outside the current project folder
First, we will create a folder named jquery-client-app outside the project folder.
Step 2 − Create a HTML Page index.html for jQuery Integration
We will create a client application in jquery and invoke both the methods. Following is the code for index.html file. The index.html page sends requests to the server when the buttons – Greet and SayHello are clicked. We will make asynchronous request using $.ajax() function.
<!DOCTYPE html>
<html>
<head>
<script src = "https://ajax.googleapis.com/ajax/libs/jquery/3.3.1/jquery.min.js"></script>
<script>
$(document).ready(function() {
$("#btnSayhello").click(function() {
const name = $("#txtName").val();
console.log(name);
$("#SayhelloDiv").html('loading....');
$.ajax({url: "http://localhost:9000/graphql",
contentType: "application/json",type:'POST',
data: JSON.stringify({ query:`{
sayHello(name:"${name}")}`
}),
success: function(result) {
console.log(JSON.stringify(result))
$("#SayhelloDiv").html("<h1>"+result.data.sayHello +"</h1>");
}
});
});
$("#btnGreet").click(function() {
$("#greetingDiv").html('loading....');
//https://kannan-first-graphql-app.herokuapp.com/graphql
$.ajax({url: "http://localhost:9000/graphql",
contentType: "application/json",
type:'POST',
data: JSON.stringify({
query:`{greeting}`
}),
success: function(result) {
$("#greetingDiv").html("<h1>"+result.data.greeting+"</h1>");
}
});
});
});
</script>
</head>
<body>
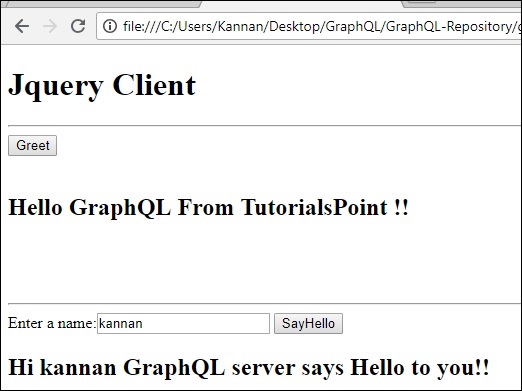
<h1>Jquery Client </h1>
<hr/>
<section>
<button id = "btnGreet">Greet</button>
<br/> <br/>
<div id = "greetingDiv"> </div>
</section>
<br/> <br/> <br/>
<hr/>
<section>
Enter a name:<input id = "txtName" type = "text" value = "kannan"/>
<button id = "btnSayhello">SayHello</button>
<div id = "SayhelloDiv"> </div>
</section>
</body>
</html>
Open this file in the browser and click on the button to see the response. The output will be as given below −