- Kivy - Home
- Kivy Basics
- Kivy - Getting Started
- Kivy - Installation
- Kivy - Architecture
- Kivy - File Syntax
- Kivy - Applications
- Kivy - Hello World
- Kivy - App Life Cycle
- Kivy - Events
- Kivy - Properties
- Kivy - Inputs
- Kivy - Behaviors
- Kivy Buttons
- Kivy - Buttons
- Kivy - Button Events
- Kivy - Button Colors
- Kivy - Button Size
- Kivy - Button Position
- Kivy - Round Buttons
- Kivy - Disabled Buttons
- Kivy - Image Button
- Kivy Widgets
- Kivy - Widgets
- Kivy - Label
- Kivy - Text Input
- Kivy - Canvas
- Kivy - Line
- Kivy - Checkbox
- Kivy - Dropdown List
- Kivy - Windows
- Kivy - ScrollView
- Kivy - Carousel
- Kivy - Slider
- Kivy - Images
- Kivy - Popup
- Kivy - Switch
- Kivy - Spinner
- Kivy - Splitter
- Kivy - Progress Bar
- Kivy - Bubble
- Kivy - Tabbed Panel
- Kivy - Scatter
- Kivy - Accordion
- Kivy - File Chooser
- Kivy - Color Picker
- Kivy - Code Input
- Kivy - Modal View
- Kivy - Toggle Button
- Kivy - Camera
- Kivy - Tree View
- Kivy - reStructuredText
- Kivy - Action Bar
- Kivy - Video Player
- Kivy - Stencil View
- Kivy - VKeyboard
- Kivy - Touch Ripple
- Kivy - Audio
- Kivy - Videos
- Kivy - Spelling
- Kivy - Effects
- Kivy - Input Recorder
- Kivy - OpenGL
- Kivy - Text
- Kivy - Text Markup
- Kivy - Settings
- Kivy Layouts
- Kivy - Layouts
- Kivy - Float Layout
- Kivy - Grid Layouts
- Kivy - Box Layouts
- Kivy - Stack Layout
- Kivy - Anchor Layout
- Kivy - Relative Layout
- Kivy - Page Layout
- Kivy - Recycle Layout
- Kivy - Layouts in Layouts
- Kivy Advanced Concepts
- Kivy - Configuration Object
- Kivy - Atlas
- Kivy - Data Loader
- Kivy - Cache Manager
- Kivy - Console
- Kivy - Animation
- Kivy - Multistroke
- Kivy - Clock
- Kivy - SVGs
- Kivy - UrlRequest
- Kivy - Clipboard
- Kivy - Factory
- Kivy - Gesture
- Kivy - Language
- Kivy - Graphics
- Kivy - Drawing
- Kivy - Packaging
- Kivy - Garden
- Kivy - Storage
- Kivy - Vector
- Kivy - Utils
- Kivy - Inspector
- Kivy - Tools
- Kivy - Logger
- Kivy - Framebuffer
- Kivy Applications and Projects
- Kivy - Drawing App
- Kivy - Calculator App
- Kivy - Stopwatch App
- Kivy - Camera Handling
- Kivy - Image Viewer
- Kivy - Bezier
- Kivy - Canvas Stress
- Kivy - Circle Drawing
- Kivy - Widget Animation
- Kivy - Miscellaneous
- Kivy Useful Resources
- Kivy - Quick Guide
- Kivy - Useful Resources
- Kivy - Discussion
Kivy - Buttons
A button is one of the most important elements in any GUI library, including Kivy. A button object consists of a label, usually to indicate its purpose (such as one with Start caption, or one with a "folder" icon to indicate "open file action"), and having the ability to respond to certain events such as touch or mouse click.
The Button class is defined in the "kivy.uix.button" module. The appearance of a Button object can be configured by the same set of properties that are defined in the Label class. The Button class also inherits from the ButtonBehavior mixin.
The Button object is instantiated with the following syntax −
b1 = Button(**kwargs)
To configure a button, you can specify its properties as keyword arguments to the constructor −
background_color − The background color of the button is a ColorProperty in the format (r, g, b, a) with default value [1,1,1,1].
background_disabled_down − The background image of the button is a StringProperty, a string containing path to an image file and is used for the default graphical representation when the button is disabled and pressed.
background_disabled_normal − Background image of the button is also an image path, used for the default graphical representation when the button is disabled and not pressed.
background_down − Background image of the button used as the default graphical representation when the button is pressed.
background_normal − Background image of the button used as the default graphical representation when the button is not pressed.
In addition to the above, the Button also inherits properties from Label class, some of them as follows −
bold − Indicates use of the bold version of your font. It is a BooleanProperty and defaults to False.
underline − Adds an underline to the text. This feature requires the SDL2 text provider, it is a BooleanProperty and defaults to False.
strikethrough − Adds a strikethrough line to the text. This feature requires the SDL2 text provider. It is a BooleanProperty and defaults to False.
text − Text of the label. For example −
widget = Button(text='Hello world')
text is a StringProperty and defaults to ''.
color − Text color, in the format (r, g, b, a). It is a ColorProperty ,defaults to [1, 1, 1, 1].
font_size − Font size of the text, in pixels. "font_size" is a NumericProperty and defaults to 15sp.
Button class also inherits state property from ButtonBehavior class.
state − The state of the button, must be one of 'normal' or 'down'. The state is 'down' only when the button is currently touched/clicked, otherwise its 'normal'. It is an OptionProperty and defaults to 'normal'.
Button class also inherits properties such as disabled, height, width and pos, etc., from the Widget class.
If you want to display a Button on a Kivy application window, then you can do it by declaring a Button object in build() method, or use the "kv" language script.
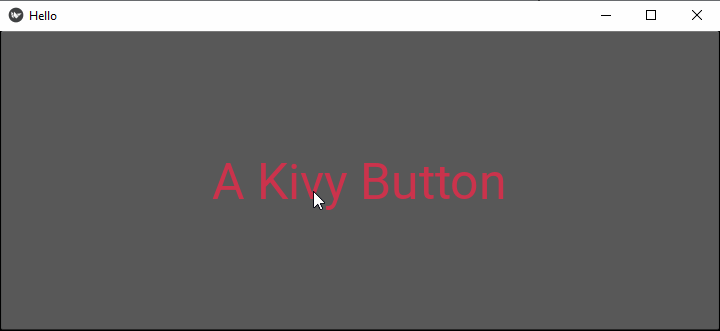
Displaying a Button Using the build() Method
Let us configure the Button with some of the properties explained above −
Example
from kivy.app import App
from kivy.uix.button import Button
from kivy.config import Config

# Configuration
Config.set('graphics', 'width', '720')
Config.set('graphics', 'height', '300')
Config.set('graphics', 'resizable', '1')

class HelloApp(App):
   def build(self):
      b1 = Button(text = "A Kivy Button",
         font_size=50,
         color = [0.8, 0.2, 0.3, 1])
      return b1

app = HelloApp()
app.run()
Output
Run this code and you will get the following output −
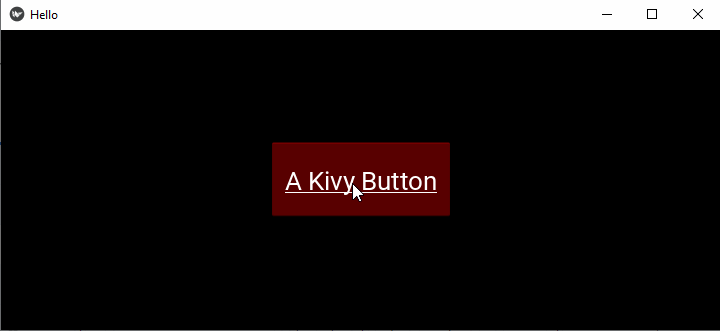
Displaying a Button Using the "kv" Language Method
Example
Save the following script as "hello.kv".
Button:
   text: 'A Kivy Button'
   font_size: '20pt'
   underline: True
   background_color: [1,0,0,1]
   size_hint: (.25, .25)
   pos_hint: {'center_x':.5, 'center_y':.5}
Output
Comment out the build() method in the App class and run the application again. You will get the following window as the output −