- Windows 10 - Home
- Windows 10 - Introduction
- Windows 10 – UWP
- Windows 10 – First App
- Windows 10 - Store
- Windows 10 - XAML Controls
- Windows 10 - Data Binding
- Windows 10 - XAML Performance
- Windows 10 - Adaptive Design
- Windows 10 - Adaptive UI
- Windows 10 - Adaptive Code
- Windows 10 - File Management
- Windows 10 - SQLite Database
- Windows 10 – Communication
- Windows 10 - App Localization
- Windows 10 - App Lifecycle
- Windows 10 - Background Execution
- Windows 10 - APP Services
- Windows 10 - Web Platform
- Windows 10 - Connected Experience
- Windows 10 - Navigation
- Windows 10 - Networking
- Windows 10 - Cloud Services
- Windows 10 - Live Tiles
- Windows 10 - Sharing Contract
- Windows 10 - Porting to Windows
Windows 10 Development - SQLite Database
In many applications, there are certain types of data, which have some sort of relationship to each other. These types of data, which are difficult to store in a file, can be stored in a database.
If you are familiar with the types of databases, such as SQL server or Oracle databases in any application, then it is very easy to understand SQLite database.
What is SQLite?
SQLite is a software library that implements a self-contained, server less, zero-configuration, transactional SQL database engine.
Important features are −
SQLite is the most widely deployed database engine in the world.
The source code for SQLite is Open source.
It has had a large impact on game and mobile application development, due to its portability and small footprint.
Advantages of SQLite
The following are the advantages of SQLite −
- It is a very lightweight database.
- It is platform independent and works on all platforms.
- It has a small memory footprint.
- It is reliable.
- No need for any setup and installation.
- It has no dependencies.
To use SQLite in your Universal Windows Platform (UWP) applications, you need to follow the steps given below.
Create a new Universal Windows blank app with the name UWPSQLiteDemo.
Go to the Tools menu and select Extensions and Updates. The following dialog will open.
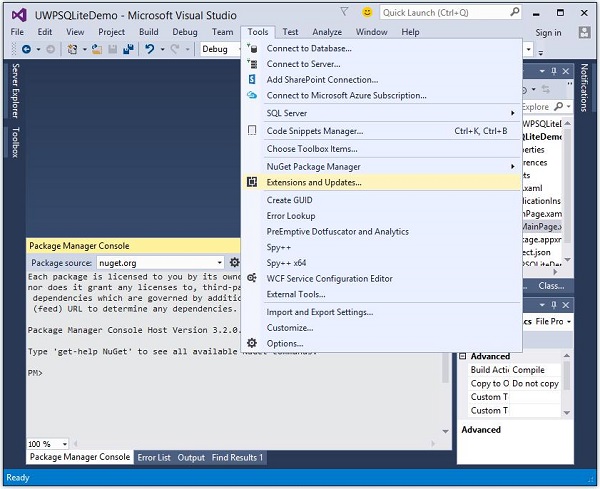
- After selecting Extensions and Updates, the following window will open.
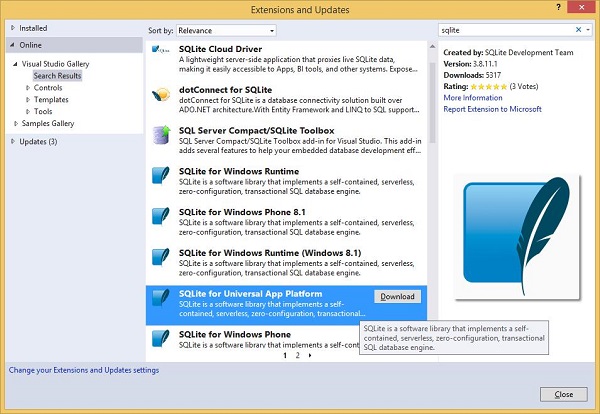
Now select the Online option and search for SQLite, from the left pane.
Download and Install SQLite for Universal App Platform.
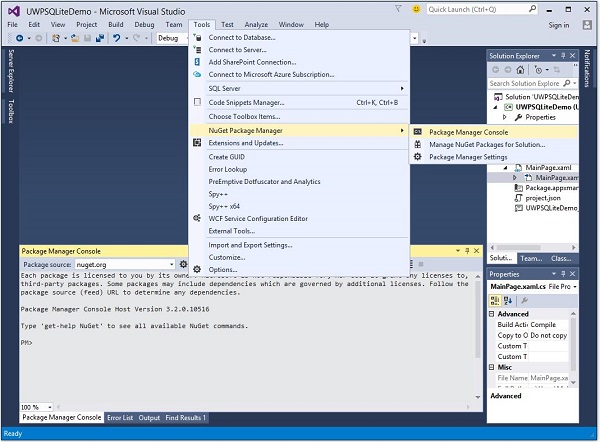
Now, go to the Tools menu again and select NuGet Package Manager > Package Manager Console menu option as shown below.
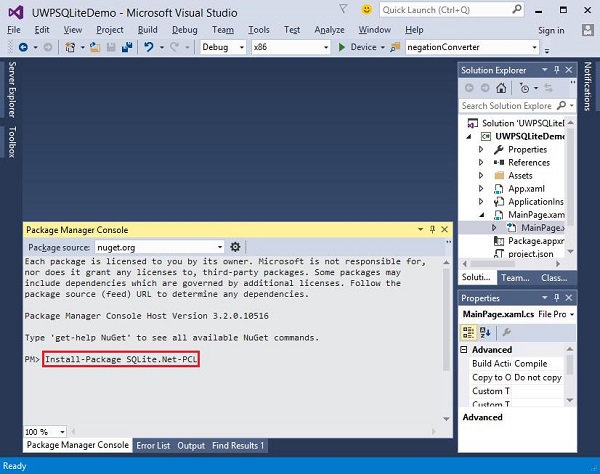
Write the following command in the Package Manager Console and press enter to execute this command −
Install-Package SQLite.Net-PCL
Now right click on References in the solution explorer and select Add References.
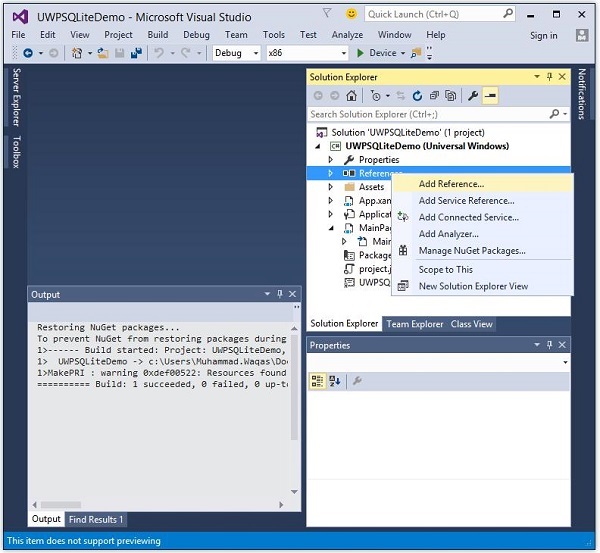
- The following dialog will open.
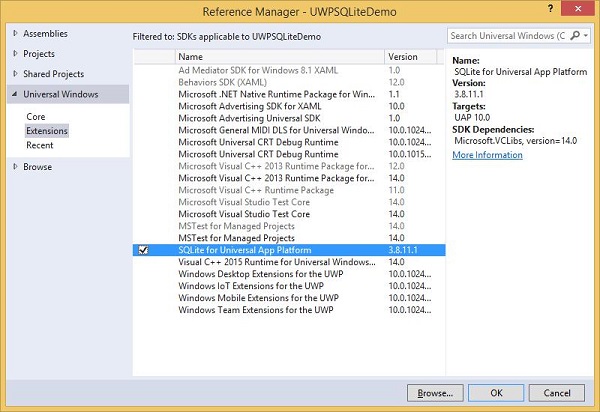
Select Extensions from the left pane under Universal Windows, check SQLite for Universal App Platform in the middle pane, and click Ok.
Now you are ready to go and use SQLite in your UWP applications.
You can create a database by using the following code.
string path = Path.Combine(Windows.Storage.ApplicationData.
   Current.LocalFolder.Path, "db.sqlite");

SQLite.Net.SQLiteConnection conn = new SQLite.Net.SQLiteConnection(new
   SQLite.Net.Platform.WinRT.SQLitePlatformWinRT(), path);
To create a table you need to call CreateTable method with table name object.
conn.CreateTable<Customer>();
You can insert the data into your table by using the following code.
conn.Insert(new Customer(){
   Name = textBox.Text,
   Age = textBox1.Text
});
Given below is the code to retrieve data from the table.
var query = conn.Table<Customer>();
string id = "";
string name = "";
string age = "";

foreach (var message in query) {
   id = id + " " + message.Id;
   name = name + " " + message.Name;
   age = age + " " + message.Age;
}
Let us understand how to create a database, a table and how to insert and retrieve the data from the database with the help of a simple example. We will be adding Name and age and then we will retrieve the same data from the table. Given below is the XAML code in which different controls are added.
<Page
   x:Class = "UWPSQLiteDemo.MainPage"
   xmlns = "http://schemas.microsoft.com/winfx/2006/xaml/presentation"
   xmlns:x = "http://schemas.microsoft.com/winfx/2006/xaml"
   xmlns:local = "using:UWPSQLiteDemo"
   xmlns:d = "http://schemas.microsoft.com/expression/blend/2008"
   xmlns:mc = "http://schemas.openxmlformats.org/markup-compatibility/2006"
   mc:Ignorable = "d">

   <Grid Background = "{ThemeResource ApplicationPageBackgroundThemeBrush}" >
      <Button x:Name = "Retrieve" Content = "Retrieve" HorizontalAlignment = "Left"
         VerticalAlignment = "Top" Margin = "384,406,0,0"
         Click = "Retrieve_Click"/>

      <Button x:Name = "Add" Content = "Add" HorizontalAlignment = "Left"
         VerticalAlignment = "Top" Margin = "291,406,0,0" Click = "Add_Click"/>

      <TextBlock x:Name = "textBlock" HorizontalAlignment = "Left"
         TextWrapping = "Wrap" Text = "Name" VerticalAlignment = "Top"
         Margin = "233,280,0,0" Width = "52"/>

      <TextBox x:Name = "textBox" HorizontalAlignment = "Left" TextWrapping = "Wrap"
         VerticalAlignment = "Top" Margin = "289,274,0,0" Width = "370"/>

      <TextBlock x:Name = "textBlock1" HorizontalAlignment = "Left"
         TextWrapping = "Wrap" Text = "Age" VerticalAlignment = "Top"
         Margin = "233,342,0,0" Width = "52"/>

      <TextBox x:Name = "textBox1" HorizontalAlignment = "Left" TextWrapping = "Wrap"
         VerticalAlignment = "Top" Margin = "289,336,0,0" Width = "191"/>

      <TextBlock x:Name = "textBlock2" HorizontalAlignment = "Left"
         Margin = "290,468,0,0" TextWrapping = "Wrap"
         VerticalAlignment = "Top" Width = "324" Height = "131"/>

   </Grid>

</Page>
Given below is the C# implementation for events and SQLite database.
using SQLite.Net.Attributes;

using System;
using System.Collections.Generic;
using System.IO;
using System.Linq;
using System.Runtime.InteropServices.WindowsRuntime;

using Windows.Foundation;
using Windows.Foundation.Collections;

using Windows.UI.Xaml;
using Windows.UI.Xaml.Controls;
using Windows.UI.Xaml.Controls.Primitives;
using Windows.UI.Xaml.Data;
using Windows.UI.Xaml.Input;
using Windows.UI.Xaml.Media;
using Windows.UI.Xaml.Navigation;

// The Blank Page item template is documented at
   http://go.microsoft.com/fwlink/?LinkId=402352&clcid=0x409

namespace UWPSQLiteDemo {

   /// <summary>
      /// An empty page that can be used on its own or navigated to within a Frame.
   /// </summary>

   public sealed partial class MainPage : Page {
      string path;
      SQLite.Net.SQLiteConnection conn;

      public MainPage(){
         this.InitializeComponent();
         path = Path.Combine(Windows.Storage.ApplicationData.Current.LocalFolder.Path,
            "db.sqlite");
         conn = new SQLite.Net.SQLiteConnection(new
            SQLite.Net.Platform.WinRT.SQLitePlatformWinRT(), path);
         conn.CreateTable<Customer>();
      }

      private void Retrieve_Click(object sender, RoutedEventArgs e) {
         var query = conn.Table<Customer>();
         string id = "";
         string name = "";
         string age = "";

         foreach (var message in query) {
            id = id + " " + message.Id;
            name = name + " " + message.Name;
            age = age + " " + message.Age;
         }

         textBlock2.Text = "ID: " + id + "\nName: " + name + "\nAge: " + age;
      }

      private void Add_Click(object sender, RoutedEventArgs e){

         var s = conn.Insert(new Customer(){
            Name = textBox.Text,
            Age = textBox1.Text
         });

      }
   }

   public class Customer {
      [PrimaryKey, AutoIncrement]
      public int Id { get; set; }
      public string Name { get; set; }
      public string Age { get; set; }
   }

}
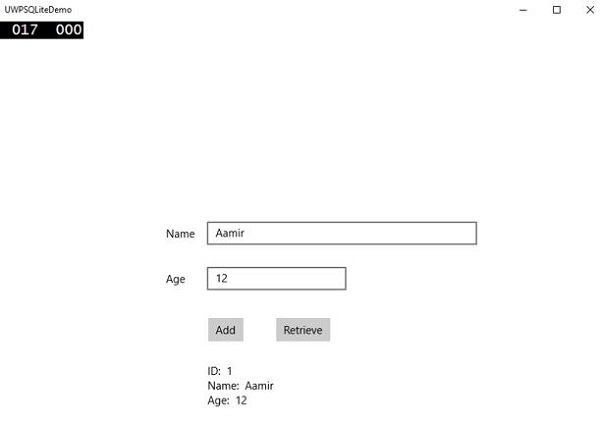
When the above code is compiled and executed, you will see the following window.
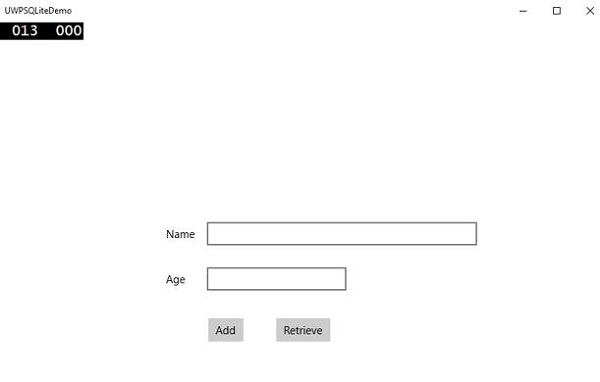
Enter the Name and Age and click the Add button.
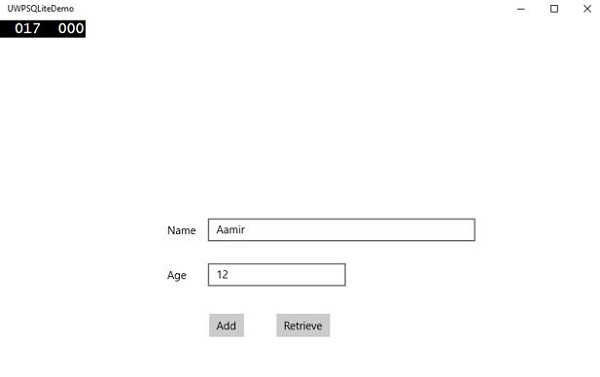
Now click on the Retrieve button. You will see the following data on the Text Block.
The ID field is a Primary Key and Auto Increment field, which is specified in the Customer class.
[PrimaryKey, AutoIncrement]
public int Id { get; set; }
