- Windows 10 - Home
- Windows 10 - Introduction
- Windows 10 – UWP
- Windows 10 – First App
- Windows 10 - Store
- Windows 10 - XAML Controls
- Windows 10 - Data Binding
- Windows 10 - XAML Performance
- Windows 10 - Adaptive Design
- Windows 10 - Adaptive UI
- Windows 10 - Adaptive Code
- Windows 10 - File Management
- Windows 10 - SQLite Database
- Windows 10 – Communication
- Windows 10 - App Localization
- Windows 10 - App Lifecycle
- Windows 10 - Background Execution
- Windows 10 - APP Services
- Windows 10 - Web Platform
- Windows 10 - Connected Experience
- Windows 10 - Navigation
- Windows 10 - Networking
- Windows 10 - Cloud Services
- Windows 10 - Live Tiles
- Windows 10 - Sharing Contract
- Windows 10 - Porting to Windows
Windows 10 Development - First App
In this chapter, we will be creating our first simple application "Hello world" in Universal Windows Platform (UWP) using XAML and C# on Windows 10. We will demonstrate how a single UWP application created in Visual Studio can be run and executed on any Windows 10 device.
Let us start creating the App by following the steps given below.
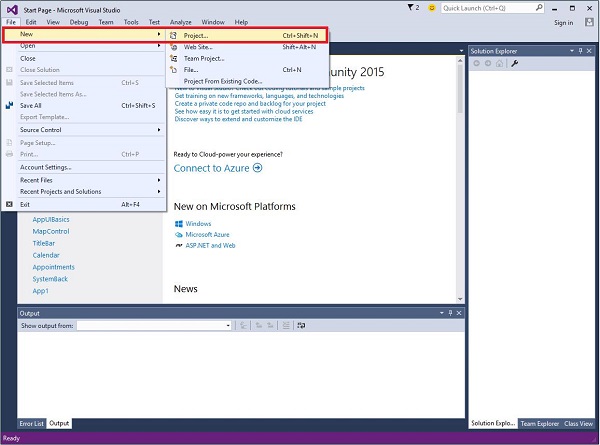
Launch Visual Studio 2015.
Click on the File menu and select New > Project.
The following New Project dialog window will be displayed. You can see the different types of templates on the left pane of the dialog box.
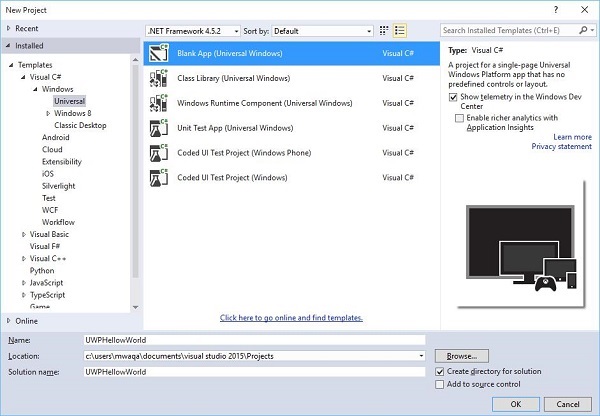
In the left pane, you can see the tree view. Select Universal template from Templates > Visual C# > Windows.
From the center pane, select the Blank App (Universal Windows) template
Give a name to the project by writing UWPHelloWorld in the Name field.
Click OK to create a new UWP project.
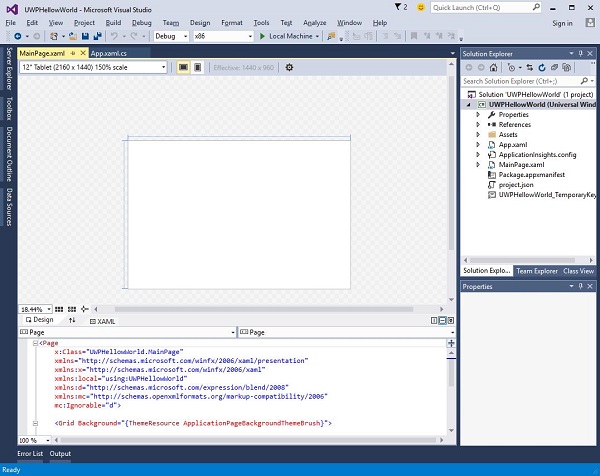
You can see the newly created project in the Solution Explorer.
This is a blank app but it contains many files, which is the minimum requirement for any UWP application.
MainPage.xaml and MainPage.xaml.cs run when you execute your application.
By default, MainPage.xaml file contains the following information.
<Page
   x:Class = UWPHellowWorld.MainPage
   xmlns = http://schemas.microsoft.com/winfx/2006/xaml/presentation
   xmlns:x = http://schemas.microsoft.com/winfx/2006/xaml
   xmlns:local = using:UWPHellowWorld
   xmlns:d = http://schemas.microsoft.com/expression/blend/2008
   xmlns:mc = http://schemas.openxmlformats.org/markup-compatibility/2006
   mc:Ignorable = d>

   <Grid Background = {ThemeResource ApplicationPageBackgroundThemeBrush}>
   </Grid>

</Page>
Given below is the default information available in MainPage.xaml.cs.
using System;
using System.Collections.Generic;
using System.IO;
using System.Linq;
using System.Runtime.InteropServices.WindowsRuntime;

using Windows.Foundation;
using Windows.Foundation.Collections;

using Windows.UI.Xaml;
using Windows.UI.Xaml.Controls;
using Windows.UI.Xaml.Controls.Primitives;
using Windows.UI.Xaml.Data;
using Windows.UI.Xaml.Input;
using Windows.UI.Xaml.Media;
using Windows.UI.Xaml.Navigation;

// The Blank Page item template is documented at
   http://go.microsoft.com/fwlink/?LinkId=402352&clcid=0x409

namespace UWPHellowWorld {

   /// <summary>
      /// An empty page that can be used on its own or navigated to within a Frame.
   /// </summary>

   public sealed partial class MainPage : Page {
      public MainPage(){
         this.InitializeComponent();
      }
   }

}
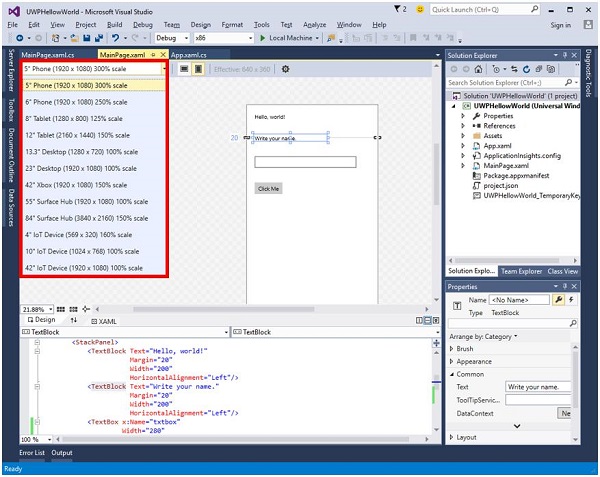
Let us add some Text Blocks, a textbox, and a button as shown in the XAML code below.
<Page
   x:Class = UWPHellowWorld.MainPage
   xmlns = http://schemas.microsoft.com/winfx/2006/xaml/presentation
   xmlns:x = http://schemas.microsoft.com/winfx/2006/xaml
   xmlns:local = using:UWPHellowWorld
   xmlns:d = http://schemas.microsoft.com/expression/blend/2008
   xmlns:mc = http://schemas.openxmlformats.org/markup-compatibility/2006
   mc:Ignorable = d>

   <Grid Background = {ThemeResource ApplicationPageBackgroundThemeBrush}>

      <StackPanel HorizontalAlignment = Center>
         <TextBlock Text = Hello, world!  Margin = 20  Width = 200
            HorizontalAlignment = Left/>

         <TextBlock Text = Write your name. Margin = 20 Width = 200
            HorizontalAlignment = Left/>

         <TextBox x:Name = txtbox  Width = 280 Margin = 20
            HorizontalAlignment = Left/>

         <Button x:Name = button Content = Click Me Margin = 20
            Click = button_Click/>

         <TextBlock x:Name = txtblock HorizontalAlignment = Left
            Margin = 20/>
      </StackPanel>

   </Grid>

</Page>
- Given below is the click-event button in C#.
using System;
using System.Collections.Generic;
using System.IO;
using System.Linq;

using System.Runtime.InteropServices.WindowsRuntime;
using Windows.Foundation;
using Windows.Foundation.Collections;

using Windows.UI.Xaml;
using Windows.UI.Xaml.Controls;
using Windows.UI.Xaml.Controls.Primitives;
using Windows.UI.Xaml.Data;
using Windows.UI.Xaml.Input;
using Windows.UI.Xaml.Media;
using Windows.UI.Xaml.Navigation;

// The Blank Page item template is documented at
   http://go.microsoft.com/fwlink/?LinkId=402352&clcid=0x409

namespace UWPHellowWorld {

   /// <summary>
      /// An empty page that can be used on its own or navigated to within a Frame.
   /// </summary>

   public sealed partial class MainPage : Page {
      public MainPage() {
         this.InitializeComponent();
      }

      private void button_Click(object sender, RoutedEventArgs e) {
         if (txtbox.Text != )
            txtblock.Text = Hello:  + txtbox.Text;
         else
            txtblock.Text = You have not write your name;
      }

   }

}
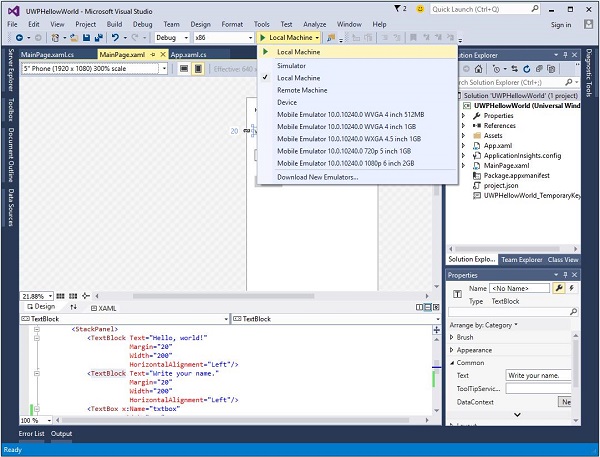
In the UWP project, device preview option is available on the Design Window, with the help of which you can change the layout easily, to fit into the screen size of all the devices in a device family you are targeting for your application.
You can run and test your app either on a local machine, a simulator or an emulator, or on a remote device. You can select the target device from the following menu as shown below −
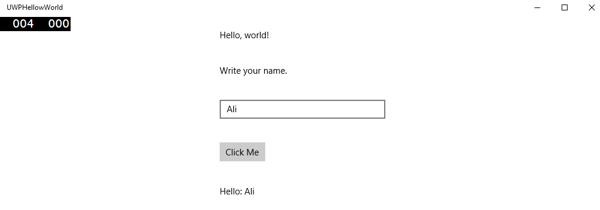
Let us run the above code on a local machine and you will see the following window. Now, write any name in the text box and click the button Click Me.
Now, if you want to test your app on an emulator, you can select a particular emulator from the menu and execute your application. You will see the following emulator −
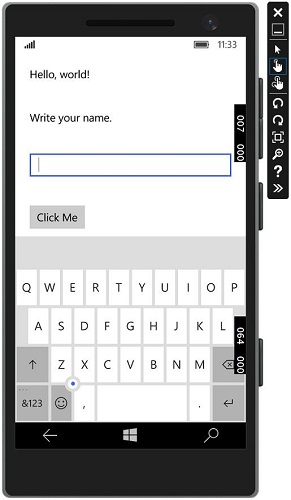
We recommend you to execute the above application with different devices.
