- Windows 10 - Home
- Windows 10 - Introduction
- Windows 10 – UWP
- Windows 10 – First App
- Windows 10 - Store
- Windows 10 - XAML Controls
- Windows 10 - Data Binding
- Windows 10 - XAML Performance
- Windows 10 - Adaptive Design
- Windows 10 - Adaptive UI
- Windows 10 - Adaptive Code
- Windows 10 - File Management
- Windows 10 - SQLite Database
- Windows 10 – Communication
- Windows 10 - App Localization
- Windows 10 - App Lifecycle
- Windows 10 - Background Execution
- Windows 10 - APP Services
- Windows 10 - Web Platform
- Windows 10 - Connected Experience
- Windows 10 - Navigation
- Windows 10 - Networking
- Windows 10 - Cloud Services
- Windows 10 - Live Tiles
- Windows 10 - Sharing Contract
- Windows 10 - Porting to Windows
Windows 10 Development - Lifecycle
Historically, Windows has environment, where users can run multiple applications simultaneously. User can switch between different applications easily. This model does not work well for phone or tablet devices where the usage is typically single-application focused.
One of the most significant challenges facing Windows 8 Store application programmers will be managing and understanding the application lifecycle. If you have been building Windows phone applications, then much of this would be familiar.
Under Windows 8, the operating system manages the lifetime of an application, and while the user can terminate an application, typically the user opens new applications without consciously terminating running applications.
The Universal Windows Platform (UWP) for Windows 10 addresses these issues, offering some cool stuff to the desktop users so that multiple applications can run with a multiple windowed experience.
Windows applications can exist in three states at the basic level as shown below.
Running
Suspended
Terminate
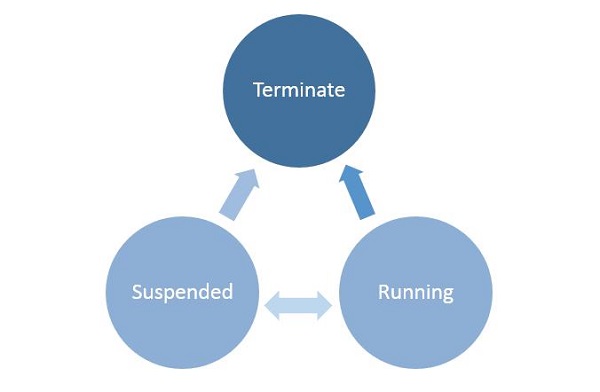
When a user launches/activates any application, then it goes in the running state.
Applications can be suspended if a user does not use it and it is no longer in the foreground.
From the Suspended state, applications can either resume that application or terminate the OS in order to reclaim system resources.
Process State Transition
It is important to understand the process state transitions in a running application. When the user first launches the application, the splash screen is shown and then the application starts running.
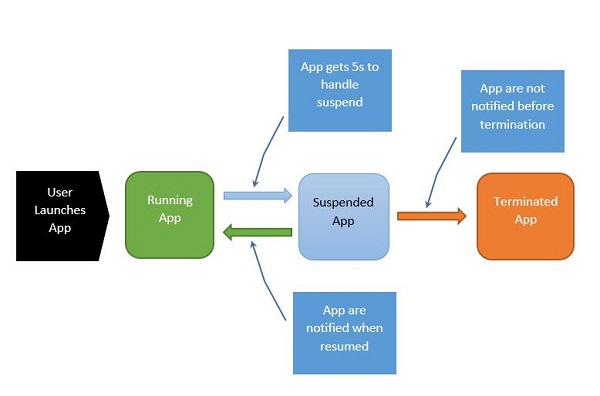
The process can be explained as follows −
When the application is suspending, your app gets five seconds to handle that suspended event.
When the application is suspended, absolutely no code runs and no resources are allocated.
When it resumes, the app is notified that it has resumed. If you are coming from a suspended state, you need to take no action.
Under memory pressure, it is possible for your application to be terminated.
Remember that you will not be notified at that point, and so any saving you do, you have to do when you enter into the suspended application state.
When the application transits back and forth between Running and Suspended states, fire suspending and resuming events respectively.
Sometimes, you need to save data. Then you have to call asynchronous methods as shown below.
Application.Current.Suspending += new SuspendingEventHandler(App_Suspending);

async void App_Suspending(Object sender, Windows.ApplicationModel.SuspendingEventArgs e){
   // Create a simple setting
   localSettings.Values["FirstName"] = fName.Text;
   localSettings.Values["LastName"] = lName.Text;
   localSettings.Values["Email"] = email.Text;
}
Application.Current.Resuming += new EventHandler<Object>(App_Resuming);

private void App_Resuming(Object sender, Object e){
   fName.Text = localSettings.Values["FirstName"];
   lName.Text = localSettings.Values["LastName"];
   email.Text = localSettings.Values["Email"];
}
Let us study an example in which controls are added as shown in the below given XAML file.
<Page
   x:Class = "UWPLifeCycleDemo.MainPage"
   xmlns = "http://schemas.microsoft.com/winfx/2006/xaml/presentation"
   xmlns:x = "http://schemas.microsoft.com/winfx/2006/xaml"
   xmlns:local = "using:UWPLifeCycleDemo"
   xmlns:d = "http://schemas.microsoft.com/expression/blend/2008"
   xmlns:mc = "http://schemas.openxmlformats.org/markup-compatibility/2006"
   mc:Ignorable = "d">

   <Grid Background = "{ThemeResource ApplicationPageBackgroundThemeBrush}">
      <Hub Header = "Details" />

      <StackPanel VerticalAlignment = "Top" HorizontalAlignment = "Left"
         Margin = "12,64,0,0">

         <TextBox Header = "First Name" Text = "{Binding FirstName,
            Mode = TwoWay, UpdateSourceTrigger = PropertyChanged}"
            Width = "200" />

         <TextBox Header = "Last Name" Text = "{Binding LastName, Mode = TwoWay,
            UpdateSourceTrigger = PropertyChanged}" Width = "200" />

         <TextBox Header = "Email" Text = "{Binding Email, Mode = TwoWay,
            UpdateSourceTrigger = PropertyChanged}" Width = "200" />

         <Button Margin = "0,12">Submit</Button>

      </StackPanel>

   </Grid>

</Page>
Given below is the C# code in which the Suspend and Resume events are implemented. The current data will be stored in the suspend event in local settings and then the data will be retrieved in the resume event from local settings as shown below.
using System;
using System.ComponentModel;
using System.Runtime.CompilerServices;

using Windows.UI.Xaml;
using Windows.UI.Xaml.Controls;

namespace UWPLifeCycleDemo {

   /// <summary>
      /// An empty page that can be used on its own or navigated to within a Frame.
   /// </summary>

   public sealed partial class MainPage : Page{
      var localSettings = Windows.Storage.ApplicationData.Current.LocalSettings;

      public MainPage() {
         this.InitializeComponent();
         Application.Current.Suspending += new SuspendingEventHandler(App_Suspending);
         Application.Current.Resuming += new EventHandler<Object>(App_Resuming);
      }

      async void App_Suspending(Object sender, Windows.ApplicationModel.SuspendingEventArgs e){

         // Create a simple setting
         localSettings.Values["FirstName"] = fName.Text;
         localSettings.Values["LastName"] = lName.Text;
         localSettings.Values["Email"] = email.Text;
      }

      private void App_Resuming(Object sender, Object e){
         fName.Text = localSettings.Values["FirstName"];
         lName.Text = localSettings.Values["LastName"];
         email.Text = localSettings.Values["Email"];
      }

   }

   public abstract class BindableBase : INotifyPropertyChanged {
      private string _FirstName = default(string);

      public string FirstName {
         get { return _FirstName; }
         set { Set(ref _FirstName, value); }
      }

      private string _LastName = default(string);

      public string LastName {
         get { return _LastName; }
         set { Set(ref _LastName, value); }
      }

      private string _Email = default(string);

      public string Email {
         get { return _Email; }
         set { Set(ref _Email, value); }
      }

      public event PropertyChangedEventHandler PropertyChanged;

      public void RaisePropertyChanged([CallerMemberName]string propertyName = null) {
         PropertyChanged?.Invoke(this, new PropertyChangedEventArgs(propertyName));
      }

      public void Set<T>(ref T storage, T value,
         [CallerMemberName()]string propertyName = null){

         if (!object.Equals(storage, value)){
            storage = value;
            RaisePropertyChanged(propertyName);
         }
      }
   }
}
When the above code is compiled and executed, you will see the following window. Now write the desired information.
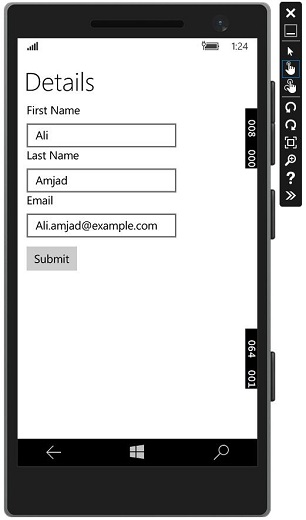
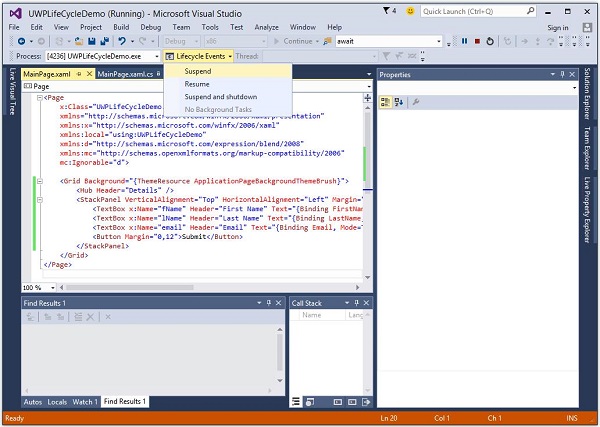
Let us go to the Lifecycle Events dropdown menu and select suspended. Now your application will be suspended and the desired information will be stored in local settings. See the screenshot given below.
Now, when you want to resume your application, select the option Resume from the Lifecycle Events menu.
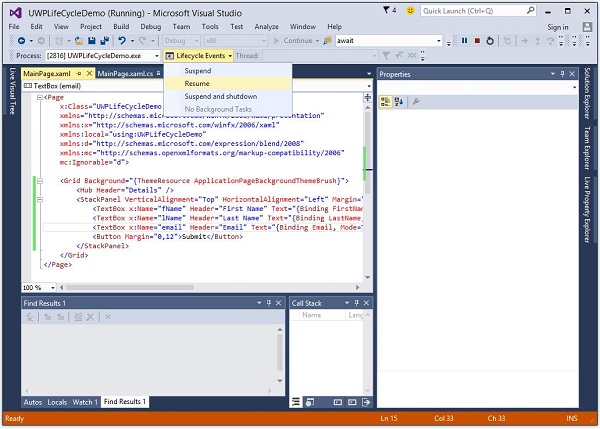
Now you will see that the stored information is retrieved from local settings and the application is resumed at the same state from which it was suspended.
