- SpecFlow - Home
- SpecFlow - Introduction
- Test Driven Development
- Behaviour Driven Development
- SpecFlow - Visual Studio Installation
- Visual Studio Extension Installation
- SpecFlow - Project Set Up
- Other Project Dependencies
- SpecFlow - Runner Activation
- SpecFlow - HTML Reports
- SpecFlow - Binding Test Steps
- SpecFlow - Creating First Test
- Configure Selenium Webdriver
- SpecFlow - Gherkin
- SpecFlow - Gherkin Keywords
- SpecFlow - Feature File
- SpecFlow - Step Definition File
- SpecFlow - Hooks
- SpecFlow - Background Illustration
- Data Driven Testing with Examples
- Data Driven Testing without Examples
- Table conversion to Data Table
- Table conversion to Dictionary
- Table with CreateInstance
- SpecFlow - Table with CreateSet
- SpecFlow Useful Resources
- SpecFlow - Quick Guide
- SpecFlow - Useful Resources
- SpecFlow - Discussion
SpecFlow - Table Conversion to Data Table
A Table is often confused with a Scenario Outline. While a Scenario Outline is applicable for the complete test, a Table is only for a single step under which it is defined.
However, a programming logic needs to be built to comprehend the data and then it can be incorporated in our test. An Examples keyword is used for a Scenario Outline, but no keywords are required for Data Table.
There are multiple methods available in Table in SpecFlow, let us see how to convert a Table to Table via Table headers.
Table is used to send a group of values in the form of a list to the Step Definition file. It is useful to deal with large data sets. SpecFlow has a rich API for table manipulation in the Step Definition File.
SpecFlow Assist Helpers packages are used to work on tables. Also, we have to add namespace TechTalk.SpecFlow.Assist to our code.
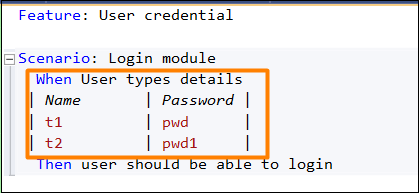
Step 1: Create a Feature File
The details of how to create a Feature File is discussed in detail in the Chapter − Feature File.
Feature: User credential

Scenario: Login module
   When User types details
   | Name | Password |
   | t1   | pwd      |
   | t2   | pwd1     |
Then user should be able to login.
Step 2: Create C# File to access Table Data
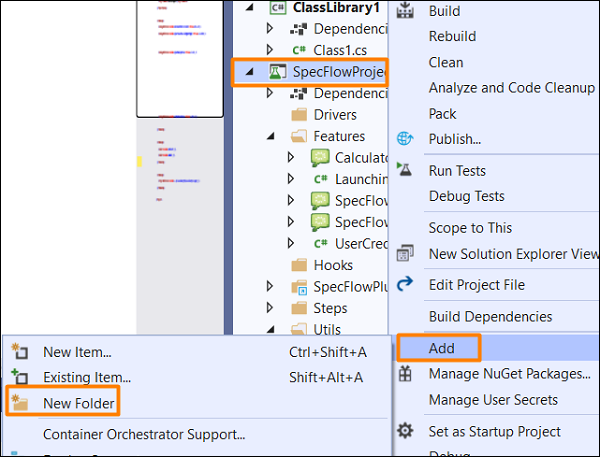
We must convert a Table to a Data Table via System.Data package. We shall create a new folder within the project and have a C# file in it. Right-click on the SpecFlow Project, then click on Add.
Select the option New Folder.
Give the name Utils to the folder.
Right-click on the new Folder created, then select the option Add. Click on Class.
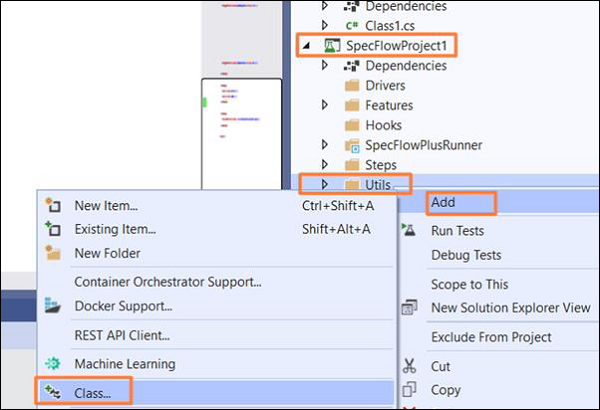
Type C# Class in the search box and search. Select the option Class from the search result and then click on Add to proceed.

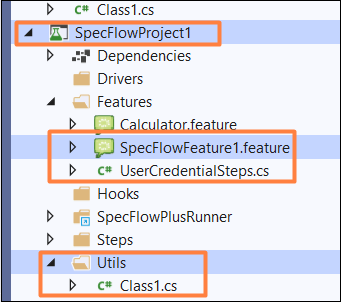
Project Folder Structure
C# Class Implementation
using System;
using System.Collections.Generic;
using System.Text;
using System.Data;
using TechTalk.SpecFlow;
namespace SpecFlowProject1.Utils {
   class Class1 {
      public static DataTable DT(Table t) {
         var dT = new DataTable();
         foreach (var h in t.Header) {
            dT.Columns.Add(h, typeof(string));
         }
         // iterating rows
         foreach (var row in t.Rows) {
            var n = dT.NewRow();
            foreach (var h in t.Header) {
               n.SetField(h, row[h]);
            }
            dT.Rows.Add(n);
         }
         return dT;
      }
   }
}
Step 3: Create a Step Definition File
The details of how to create a Step Definition File is discussed in detail in the Chapter − Step Definition File.
using System;
using System.Data;
using TechTalk.SpecFlow.Assist;
using TechTalk.SpecFlow;
namespace SpecFlowProject1.Features {
   [Binding]
   public class UserCredentialSteps {
      [When(@"User types details")]
      public void WhenUserTypesDetails(Table t) {
         //Accessing C# class method from Step Definition
         var dTable = Utils.Class1.DT(t);

         //iterating rows
         foreach (DataRow r in dTable.Rows) {
            Console.WriteLine(r.ItemArray[0].ToString());
            Console.WriteLine(r.ItemArray[1].ToString());
         }
      }
      [Then(@"user should be able to login")]
      public void ThenUserShouldBeAbleToLogin() {
         Console.WriteLine("User should be able to login");
      }
   }
}
Step 4: Execution & Results
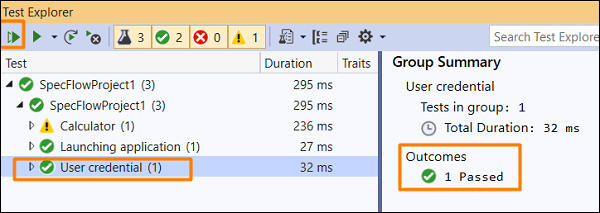
Select User credential(1) Feature, then click on Run All Tests in View.
Select Login Module Scenario, then click on Open additional output for this result link.

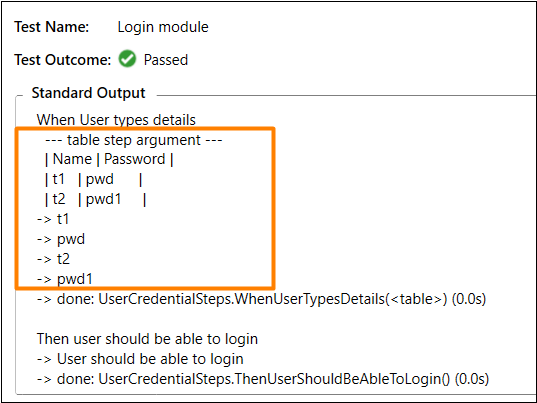
The Scenario got executed with data passed from a Table (converted to a Data Table) in the Feature File within the When step.
