- SpecFlow - Home
- SpecFlow - Introduction
- Test Driven Development
- Behaviour Driven Development
- SpecFlow - Visual Studio Installation
- Visual Studio Extension Installation
- SpecFlow - Project Set Up
- Other Project Dependencies
- SpecFlow - Runner Activation
- SpecFlow - HTML Reports
- SpecFlow - Binding Test Steps
- SpecFlow - Creating First Test
- Configure Selenium Webdriver
- SpecFlow - Gherkin
- SpecFlow - Gherkin Keywords
- SpecFlow - Feature File
- SpecFlow - Step Definition File
- SpecFlow - Hooks
- SpecFlow - Background Illustration
- Data Driven Testing with Examples
- Data Driven Testing without Examples
- Table conversion to Data Table
- Table conversion to Dictionary
- Table with CreateInstance
- SpecFlow - Table with CreateSet
- SpecFlow Useful Resources
- SpecFlow - Quick Guide
- SpecFlow - Useful Resources
- SpecFlow - Discussion
SpecFlow - Configure Selenium Webdriver
To configure Selenium Webdriver in Visual Studio, we shall take the help of NUnit framework. This framework allows to run Selenium tests in C#.
Configure NUnit Framework
We shall first create a NUnit project.
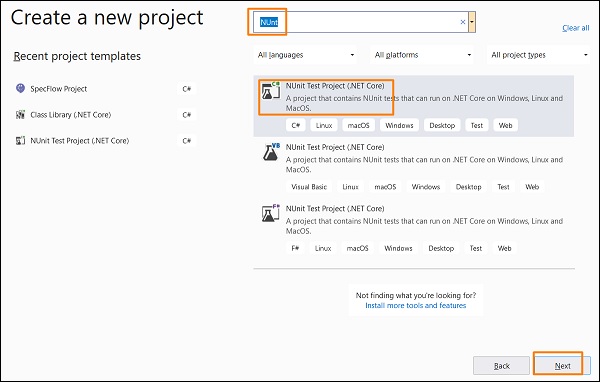
Once the Visual Studio landing page gets opened, click on Create a new project.

Type NUnit in the search box appearing in Create a new project pop-up. Select NUnit Test Project(.NET Core) from the search results. Click on Next.
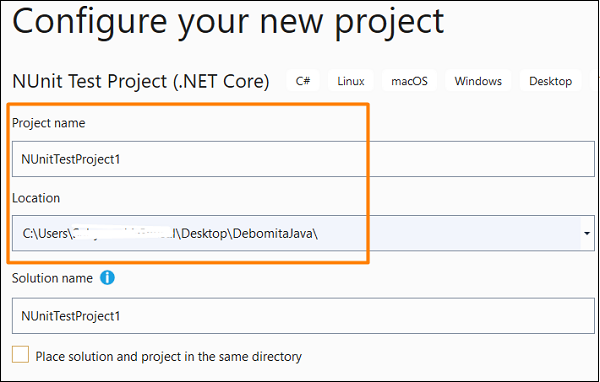
Enter project name and location. Then click on Create to proceed.
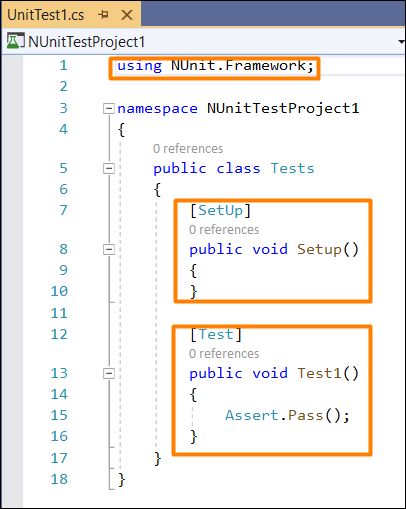
As the project is set up on NUnit(.Net Core), the Setup and Test methods shall be defined by default. Also, the statement using NUnit.Framework should reflect at the top. This shall prove that NUnit Framework has been successfully configured.
Configure Selenium WebDriver
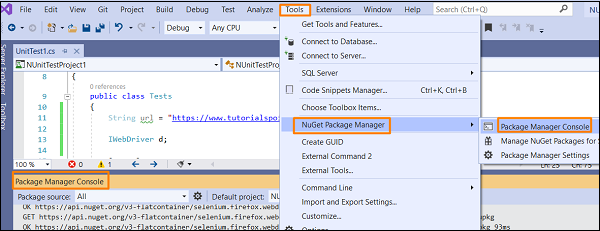
Once the NUnit framework is set, navigate to the Tools menu, select NuGet Package Manager, and then click on Package Manager Console.
We must execute the required Package Manager commands for installation of Selenium Webdriver and NUnit.
For Selenium installation, run the below commands in Package Manager Console −
Install-Package Selenium.WebDriver
Install-Package Selenium.Firefox.WebDriver
For NUnit installation, run the below commands in Package Manager Console −
Install-Package NUnit
Install-Package UUnit3TestAdapter
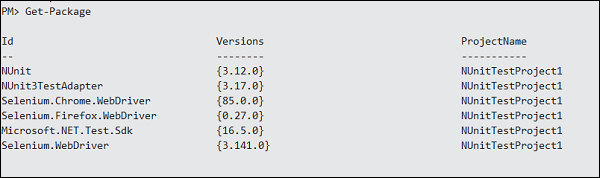
To check the installation status, run the command in Package Manager Console −
Get-Package
Implementation with Selenium WebDriver in C#
using NUnit.Framework;
using OpenQA.Selenium;
using OpenQA.Selenium.Firefox;
using System;
namespace NUnitTestProject1{
   public class Tests{
      String u = "https://www.tutorialspoint.com/index.htm";
      IWebDriver d;
      [SetUp]
      public void Setup(){
         //creating object of FirefoxDriver
         d = new FirefoxDriver();
      }
      [Test]
      public void Test1(){
         //launching URL
         d.Navigate().GoToUrl(u);
         Console.WriteLine("Url launched");
      }
      [TearDown]
      public void close_Browser(){
         d.Quit();
      }
   }
}
Execution & Output
Run the above code from Test->Test Explorer. The output in Test Explorer is −
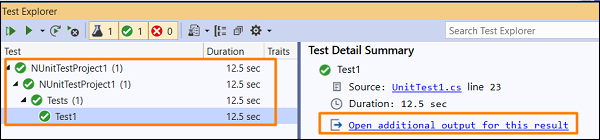
Click on Open additional output for this result link, we should get the Test Outcome and Standard Output.
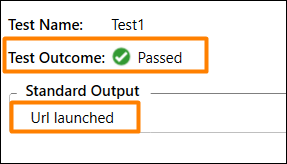
Url launched is obtained as an output as implemented with Console.WriteLine method in the code.
