- SpecFlow - Home
- SpecFlow - Introduction
- Test Driven Development
- Behaviour Driven Development
- SpecFlow - Visual Studio Installation
- Visual Studio Extension Installation
- SpecFlow - Project Set Up
- Other Project Dependencies
- SpecFlow - Runner Activation
- SpecFlow - HTML Reports
- SpecFlow - Binding Test Steps
- SpecFlow - Creating First Test
- Configure Selenium Webdriver
- SpecFlow - Gherkin
- SpecFlow - Gherkin Keywords
- SpecFlow - Feature File
- SpecFlow - Step Definition File
- SpecFlow - Hooks
- SpecFlow - Background Illustration
- Data Driven Testing with Examples
- Data Driven Testing without Examples
- Table conversion to Data Table
- Table conversion to Dictionary
- Table with CreateInstance
- SpecFlow - Table with CreateSet
- SpecFlow Useful Resources
- SpecFlow - Quick Guide
- SpecFlow - Useful Resources
- SpecFlow - Discussion
SpecFlow - Background Illustration
Background keyword is applied to replicate the same steps before all Scenarios within a Feature File. We may shift these steps to the backdrop by clubbing them under the Background segment.
It helps to add context to a scenario. It can have more than one Given step. Thus, it shall execute prior to execution of each Scenario, but post any Before hooks.
A Background is kept prior to the first Example or Scenario, at the similar indentation level. In short, it is used for declaring the common steps to all the tests.
In the above example, having two Scenarios, the Background steps shall run once before execution of each of these scenarios.
Background Rules
Let us describe some of the rules while applying Background −
It should be used for defining simple steps unless we are forced to bring the application to a state which requires complicated steps to be carried out. As requested by the stakeholders of the project.
It should be brief and realistic.
All the Scenarios should also be short and to the point.
Background Example
Let us see an example where we have used Background steps to be executed before all the tests in the Feature File. For instance, to add a normal and admin user for an application, we require the below steps to be run before the execution of the Scenario Normal user addition −
Launch the application URL.
Submit the username and password
Step 1: Create a Feature File
The details of how to create a Feature File is discussed in detail in the Chapter − Feature File.
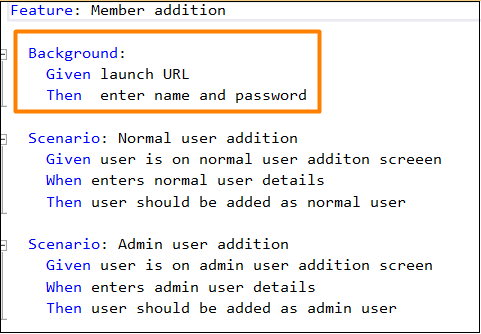
Feature: Member addition

   Background:
      Given launch URL
      Then enter name and password

   Scenario: Normal user addition
      Given user is on normal user addition screen
      When enters normal user details
      Then user should be added as normal user

   Scenario: Admin user addition
      Given user is on admin user addition screen
      When enters admin user details
      Then user should be added as admin user
Step 2: Create a Step Definition File
The details of how to create a Step Definition File is discussed in detail in the Chapter − Step Definition File.
using System;
using TechTalk.SpecFlow;
namespace SpecFlowProject1.Features{
   [Binding]
   public class MemberAdditionSteps{
      [Given(@"launch URL")]
      public void GivenLaunchURL(){
         Console.WriteLine("Url launched");
      }
      [Given(@"user is on normal user additon screeen")]
      public void GivenUserIsOnNormalUserAdditonScreeen(){
         Console.WriteLine("User is on normal user addition screen");
      }
      [Given(@"user is on admin user addition screen")]
      public void GivenUserIsOnAdminUserAdditionScreen(){
         Console.WriteLine("User is on admin user addition screen");
      }
      [When(@"enters normal user details")]
      public void WhenEntersNormalUserDetails(){
         Console.WriteLine("User enters normal user details");
      }
      [When(@"enters admin user details")]
      public void WhenEntersAdminUserDetails(){
         Console.WriteLine("User enters admin user details");
      }
      [Then(@"enter name and password")]
      public void ThenEnterNameAndPassword(){
         Console.WriteLine("User enters name and password");
      }
      [Then(@"user should be added as normal user")]
      public void ThenUserShouldBeAddedAsNormalUser(){
         Console.WriteLine("User should be added as normal user");
      }
      [Then(@"user should be added as admin user")]
      public void ThenUserShouldBeAddedAsAdminUser(){
         Console.WriteLine("User should be added as admin user");
      }
   }
}
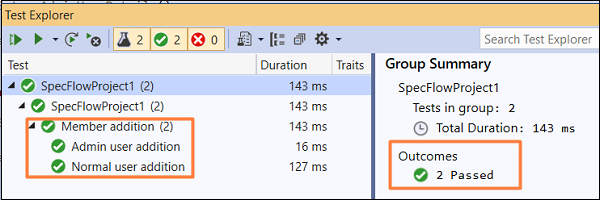
Step 3: Execution & Results
Select SpecFlowProject(2), then click on Run All Tests in View.
Select Normal user addition Scenario, then click on Open additional output for this result link.

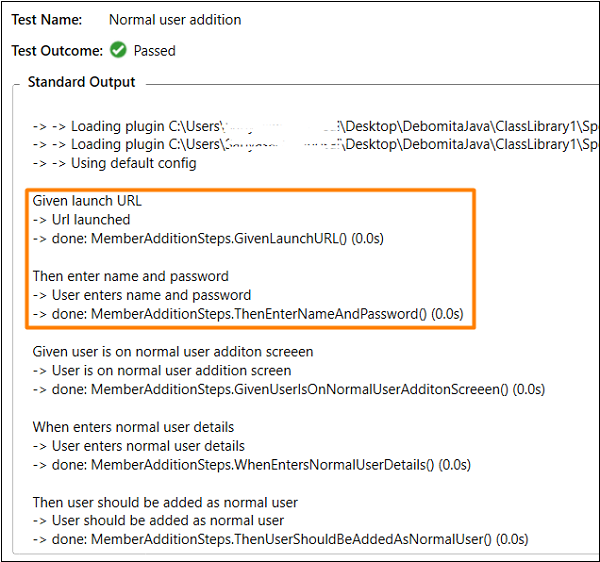
In the above output, the Background steps − Given Url launched and Then enter name and password got executed prior to the actual normal user Scenario.
Select Admin user addition Feature, then click on Open additional output for this result link.
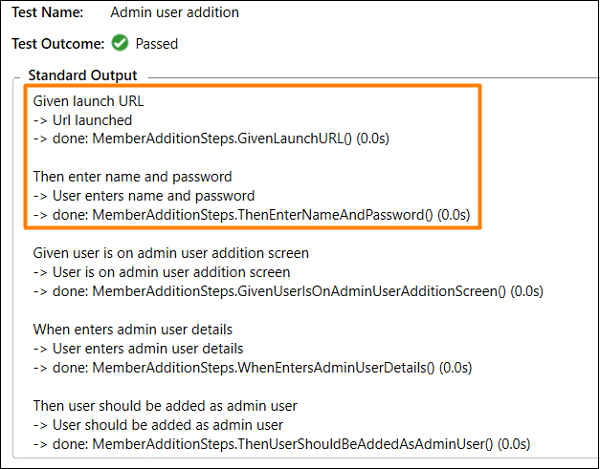
In the above output as well, the Background steps − Given Url launched and Then enter name and password got executed prior to the actual admin user Scenario.
