- Robot Framework - Home
- Robot Framework - Overview
- Environment Setup
- Unix and Linux Installation
- Introduction to Ride
- First Test Case Using Ride
- Writing and Executing Test Cases
- Keyword and Data Driven Test Cases
- Working With Browsers Using Selenium Library
- Working With Textbox
- Working With Radio Button
- Working With Checkbox
- Working With Dropdown
- Working With Keywords
- Working With Variables
- Working With Command Line
- Working With Setup And Teardown
- Working with Built-In Library
- Working With External Database libraries
- Testing Login Page Using Robot Framework
- Robot Framework Useful Resources
- Robot Framework - Quick Guide
- Robot Framework - Useful Resources
- Robot Framework - Discussion
Testing Login Page Using Robot Framework
With Robot Framework, we have learnt the following so far −
- Import Libraries
- Working with variables
- Create custom Keywords
- How to write test-cases
- How to create Setup and teardown
- How to execute test cases
- How to work with data driven test-cases
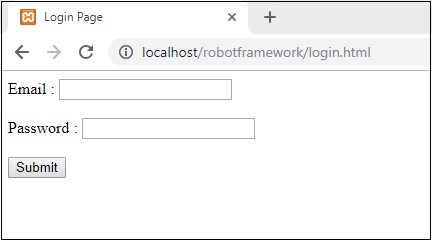
We will use all of the above features and use it to test login page in this chapter. We have a login page which takes in email-id and password. When you enter correct email id and password, you will be redirected to a welcome page. If the user enters invalid email id or password, the page will get redirected to error page.
The following screenshot shows a login page −
HTML Code
<html>
   <head>
      <title>Login Page</title>
   </head>
   <body>
      <script type="text/javascript">
         function wsSubmit() {
            if (document.getElementById("email").value == "admin@gmail.com" && document.getElementById("passwd").value == "admin") {
               location.href = "http://localhost/robotframework/success.html";
            } else {
               location.href = "http://localhost/robotframework/loginfailed.html";
            }
         }
      </script>
      <div id="formdet">
         Email : <input type="text" id="email" value="" id="email" /><br/><br/>
         Password : <input type="password" id="passwd" value="" /><br/><br/>
         <input type="submit" id="btnsubmit" value="Submit" onClick="wsSubmit();"/>
      </div>
   </body>
</html>
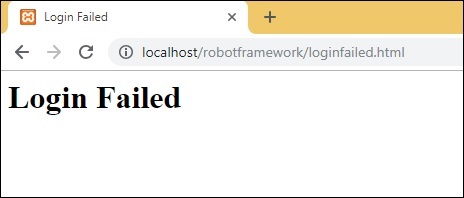
The following screen appears when either the email-id or the password is not valid −
HTML Code
<html>
   <head>
      <title>Login Failed</title>
   </head>
   <body>
      <div id="loginfailed">
         <h1>Login Failed</h1>
      </div>
   </body>
</html>
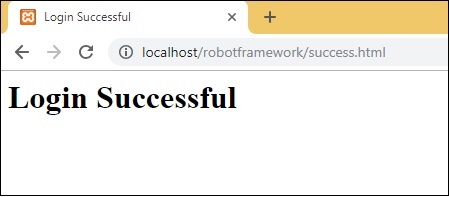
The following screen appears when both the email id and password are valid −
HTML Code
<html>
   <head>
      <title>Login Successful</title>
   </head>
   <body>
      <div id="loginfailed">
         <h1>Login Successful</h1>
      </div>
   </body>
</html>
Now we are going to write test cases for the above test page. To start with it, we will first run the command to open Ride.
Command
ride.py
Once done, we will get started with the project setup as shown below −
Click New Project and enter the name of the project.
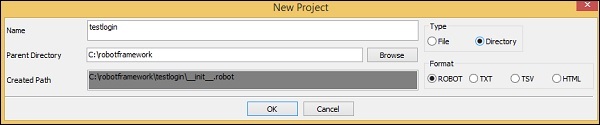
We will save the type of the project as Directory. The name given to the project is testlogin.
Click OK to save the project.
Now, we will create test suite inside the project.
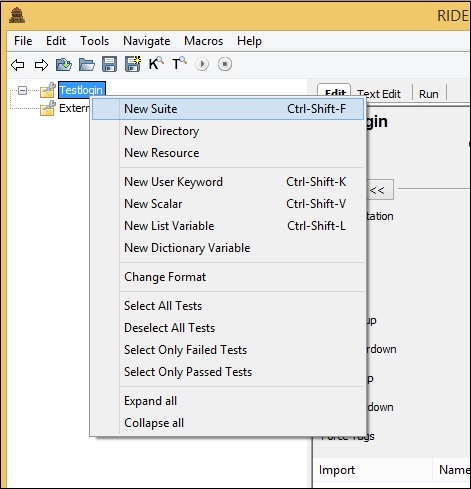
Click New Suite and it will display a screen as shown below −
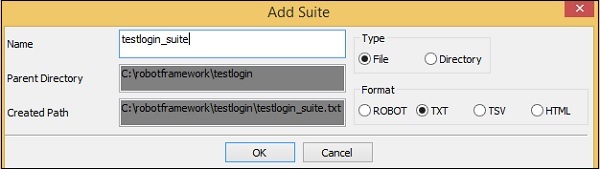
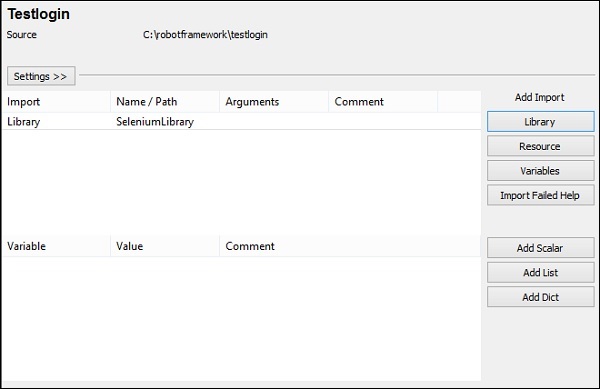
Click OK to save the test suite. We need to import the Selenium Library since we will be working with the browser.
Import Library in the main project and also to the test suite created.

Click Library as in the above screenshot. Upon clicking Library, the following screen will appear.
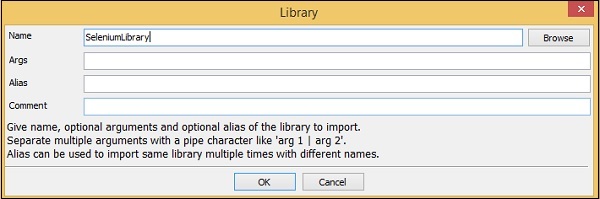
Click OK to save the library for the project.
Once the library is saved for the project, it will display the library in the settings −
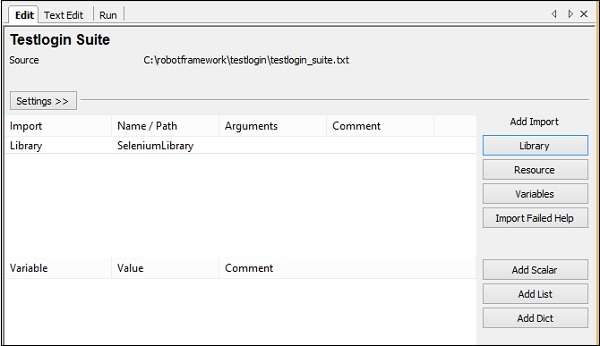
Repeat the same step for the Test suite created.
Here is the library added for Test suite −
Now in the main Project, we will create a setup and teardown. We would like to open the login page in Chrome browser and maximize the window. In teardown, we will close the browser.
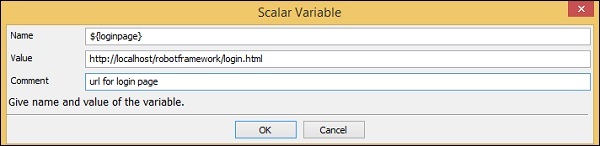
For setup, we will create a user−defined keyword called Open Login Page. This keyword will take 2 arguments, login page URL and browser name.
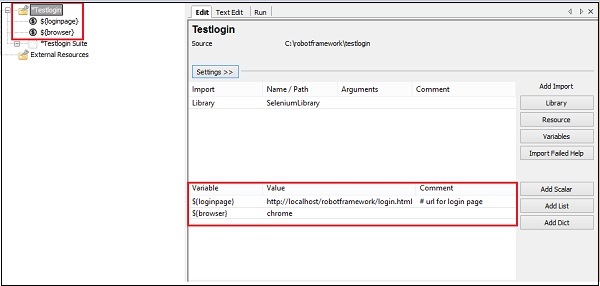
Now, we need 2 scalar variables that will help us store the values url and the browser name.
In ride, create 2 variables ${loginpage} and ${browser} as follows −
${loginpage}
${browser}
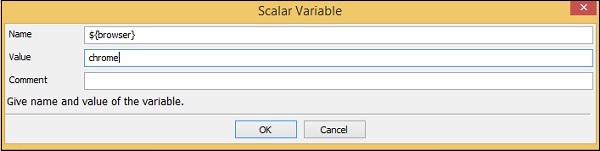
Save both variables.
The variables will be displayed under your project as follows −
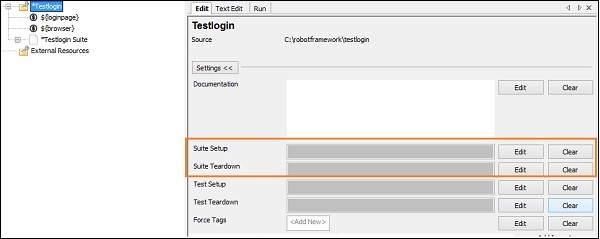
Now, we will add the setup and teardown for the main project.
Click on the project on the left side. In settings, click Suite Setup.
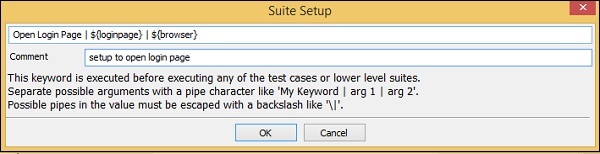
We have created setup that is using user keyword Open Login Page with arguments ${loginpage} and ${browser}.
Click OK to save the setup.
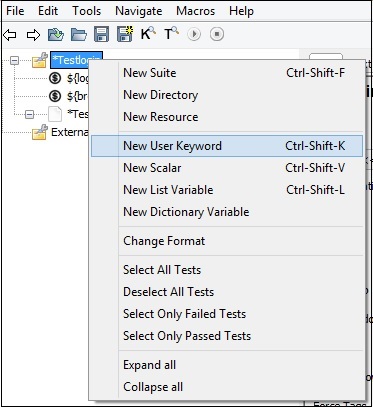
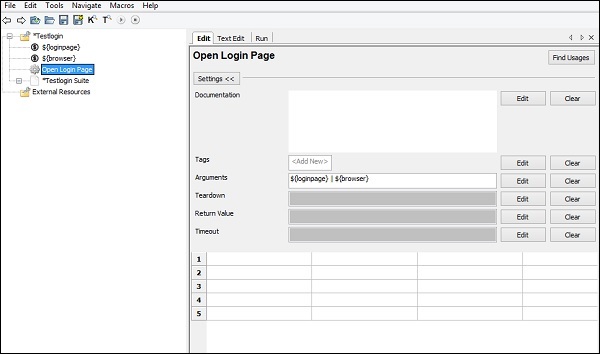
Now, we have to create the user−defined keyword Open Login Page, which is done as follows −
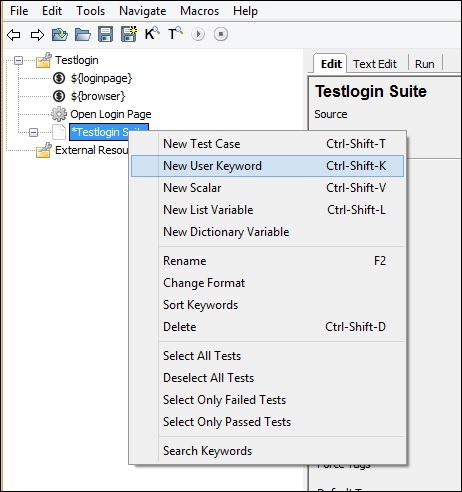
Right−click on the project and click New User Keyword −
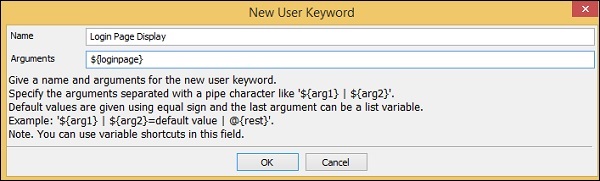
Upon clicking New User Keyword, the following screen appears −
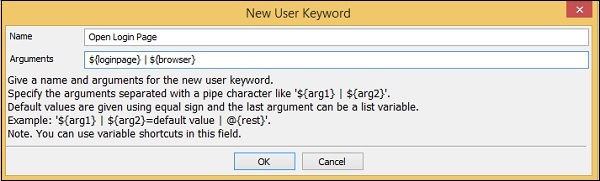
Here the Keyword is given 2 arguments − ${loginpage} and ${browser}. Click OK to save the user keyword.
Now we need to enter the library keywords, which will open the URL.
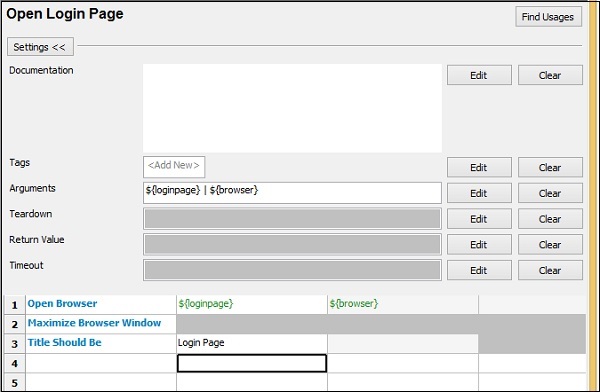
Open Login Page user−defined keyword has the following details −
*** Keywords ***
Open Login Page
   [Arguments] ${loginpage} ${browser}
   Open Browser ${loginpage} ${browser}
   Maximize Browser Window
   Title Should Be Login Page
Now, we will create Suite Teardown for the suite.
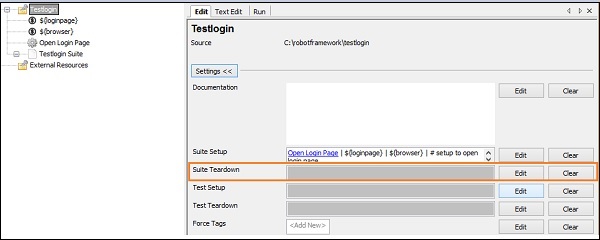
Click Edit for Suite Teardown and enter the details −
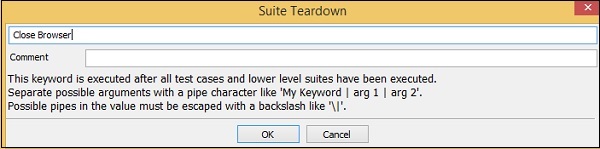
For Suite teardown, we are directly using library keyword, which will close the browser. Click OK to save the suite teardown.
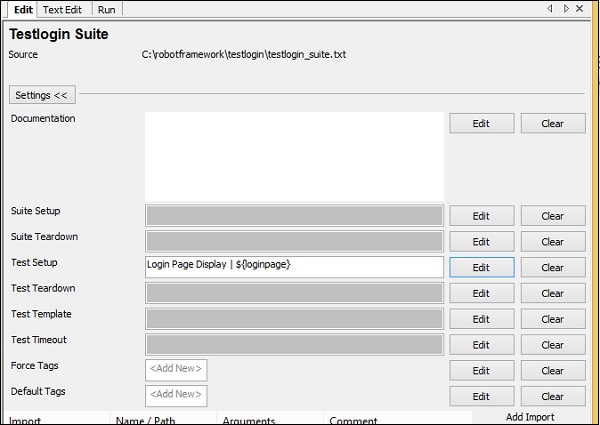
Now, click the Testlogin Suite we have created.
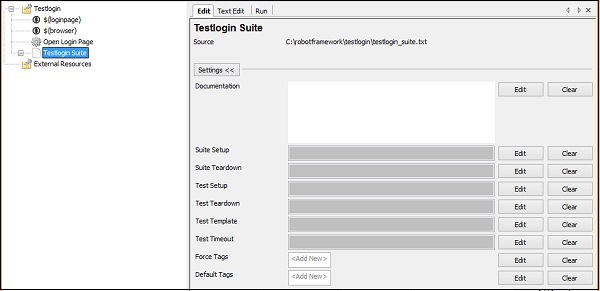
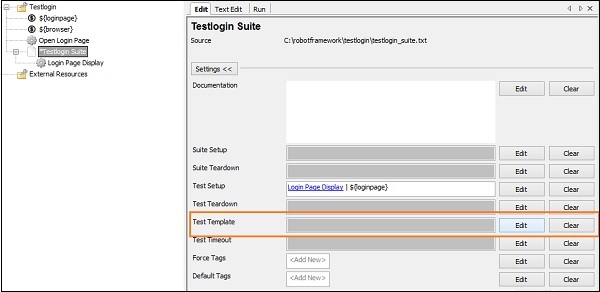
Let us now create a setup for the test suite Test Setup. This setup needs to get executed first.
Click Edit for Test Setup and enter the details.
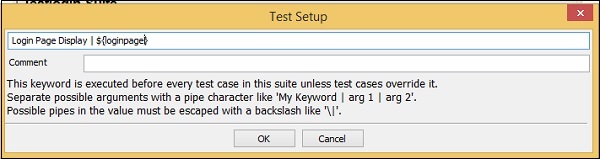
For the Test Setup, we have created User defined Keyword called Login Page Display, which will take the argument as ${loginpage} as in the above screenshot.
Click OK to save the test setup.
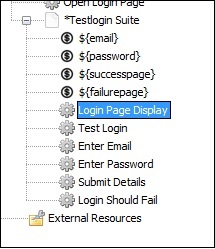
Now, we need to create the user keyword Login Page Display.
Right-click on the test suite and click New User Keyword as shown below −
New User Keyword will display the screen as shown below −
Click OK to save the keyword.
Let us now enter the keyword we need for the user keyword Login Page Display.
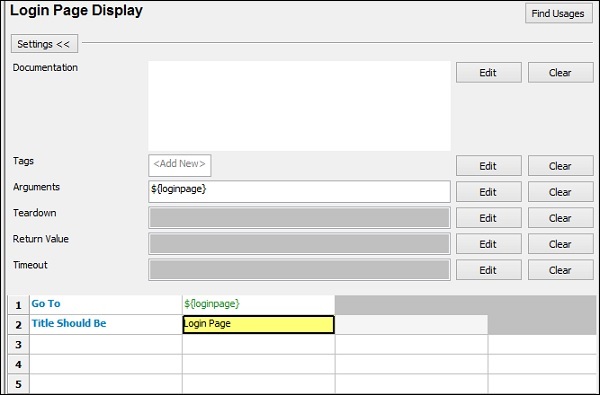
Here we want to go to the loginpage and check if the title of the page matches with the value given.
Now, we will add template to the test suite and create data driven test cases.
To create template, click on the suite and on right side click Edit for Test Template.
You will be directed to the following screen −

Test Login is again a user-defined keyword. Click OK to save the template.
Before we create the Test Login keyword, we need some scalar variables. The scalar variables will have the details of the email-id, password, successpage, failurepage, etc.
We will create scalar variables for test suite as follows −
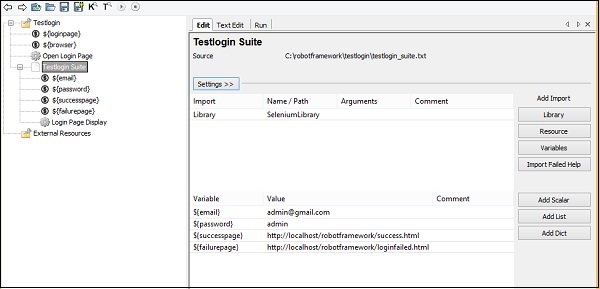
We have created email, password, successpage and failurepage scalar variables as shown in the above screenshot.
Now, we will create Test Login User defined Keyword. Right-click on the test suite and click on New User Keyword.
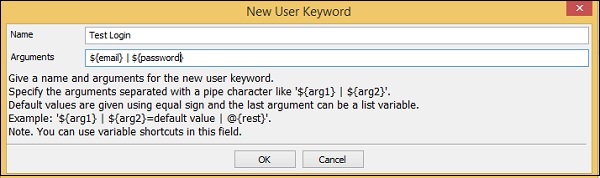
Click OK to save the keyword.
The following screenshot shows the keywords entered for Test Login −
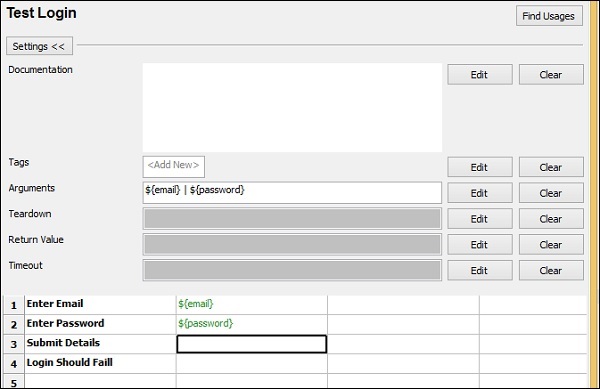
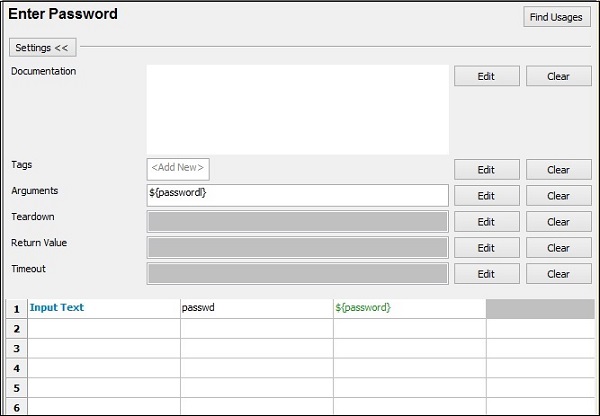
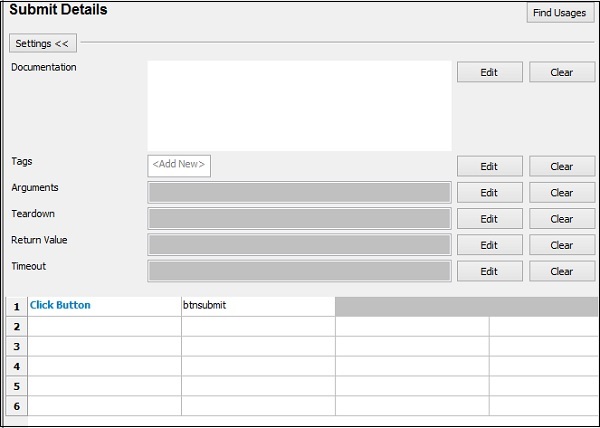
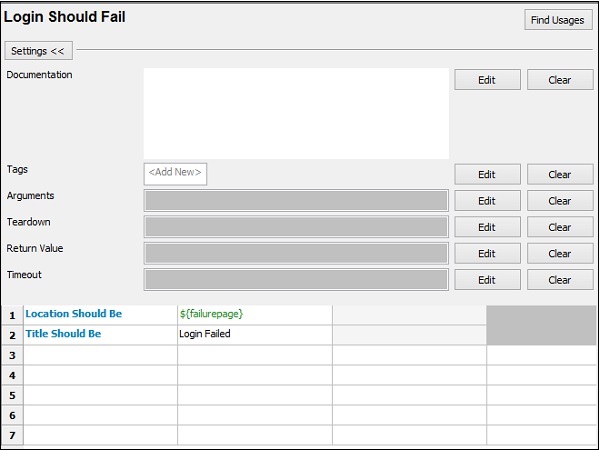
Enter Email, Enter Password, Submit Details and Login Should Fail are User Defined Keywords, which are defined as follows −
Enter Email

Enter Password
Submit Details
Login Should Fail
Now, we will write test cases, which will take different email id and password details to the template created.
The following is a list of test cases −
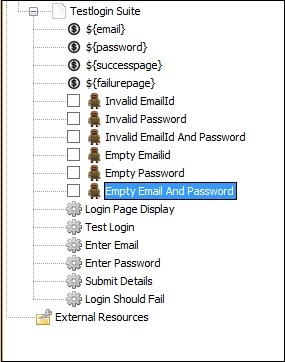
Invalid email id Test case
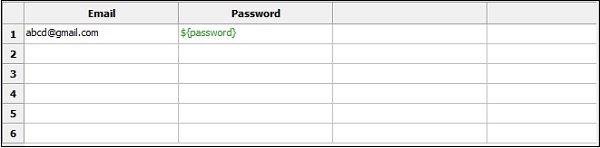
The email is passed with values abcd@gmail.com and ${password} is the password stored in the variable.
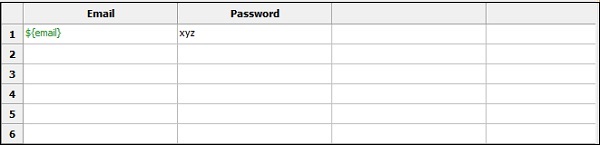
Invalid Password
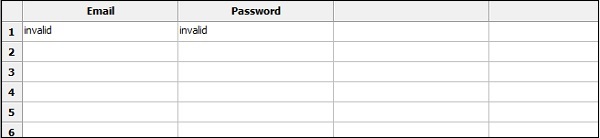
Invalid Email Id and Password
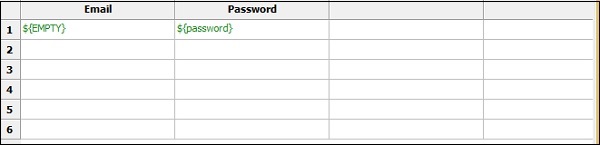
Empty Email Id
Empty Password
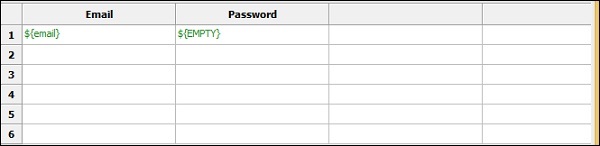
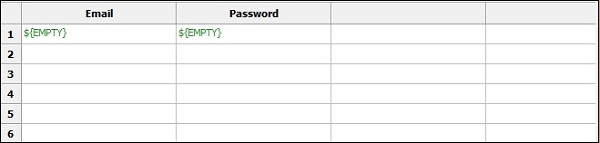
Empty Email and Password
Now, we are done with the test cases and can run the same.
Go to the Run tab and click Start to execute the test cases.
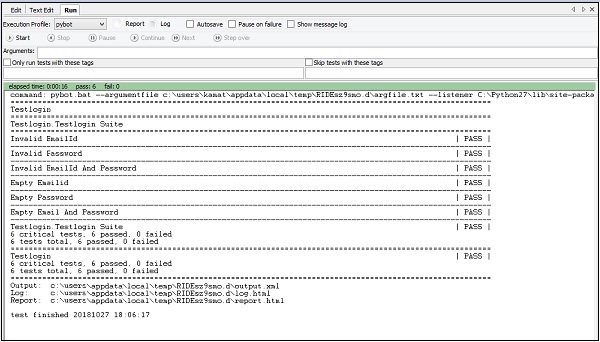
Here are the log messages for the test cases −
20181027 18:11:40.353 : INFO : Opening browser 'chrome' to base url '
http://localhost/robotframework/login.html'.
20181027 18:11:45.960 : INFO : Page title is 'Login Page'.
Starting test: Testlogin.Testlogin Suite.Invalid EmailId
20181027 18:11:45.991 : INFO : Opening url 'http://localhost/robotframework/login.html'
20181027 18:11:46.169 : INFO : Page title is 'Login Page'.
20181027 18:11:46.180 : INFO : Typing text 'abcd@gmail.com' into text field 'email'.
20181027 18:11:46.706 : INFO : Typing text 'admin' into text field 'passwd'.
20181027 18:11:47.075 : INFO : Clicking button 'btnsubmit'.
20181027 18:11:47.565 : INFO : Current location is 'http://localhost/robotframework/loginfailed.html'.
20181027 18:11:47.584 : INFO : Page title is 'Login Failed'.
Ending test: Testlogin.Testlogin Suite.Invalid EmailId

Starting test: Testlogin.Testlogin Suite.Invalid Password
20181027 18:11:47.600 : INFO : Opening url 'http://localhost/robotframework/login.html'
20181027 18:11:47.767 : INFO : Page title is 'Login Page'.
20181027 18:11:47.783 : INFO : Typing text 'admin@gmail.com' into text field 'email'.
20181027 18:11:48.342 : INFO : Typing text 'invalid' into text field 'passwd'.
20181027 18:11:48.701 : INFO : Clicking button 'btnsubmit'.
20181027 18:11:49.035 : INFO : Current location is 'http://localhost/robotframework/loginfailed.html'.
20181027 18:11:49.051 : INFO : Page title is 'Login Failed'.
Ending test: Testlogin.Testlogin Suite.Invalid Password

Starting test: Testlogin.Testlogin Suite.Invalid EmailId And Password
20181027 18:11:49.054 : INFO : Opening url 'http://localhost/robotframework/login.html'
20181027 18:11:49.213 : INFO : Page title is 'Login Page'.
20181027 18:11:49.221 : INFO : Typing text 'invalid' into text field 'email'.
20181027 18:11:49.555 : INFO : Typing text 'invalid' into text field 'passwd'.
20181027 18:11:49.883 : INFO : Clicking button 'btnsubmit'.
20181027 18:11:50.162 : INFO : Current location is 'http://localhost/robotframework/loginfailed.html'.
20181027 18:11:50.176 : INFO : Page title is 'Login Failed'.
Ending test: Testlogin.Testlogin Suite.Invalid EmailId And Password

Starting test: Testlogin.Testlogin Suite.Empty Emailid
20181027 18:11:50.188 : INFO : Opening url 'http://localhost/robotframework/login.html'
20181027 18:11:50.302 : INFO : Page title is 'Login Page'.
20181027 18:11:50.306 : INFO : Typing text '' into text field 'email'.
20181027 18:11:50.486 : INFO : Typing text 'admin' into text field 'passwd'.
20181027 18:11:50.693 : INFO : Clicking button 'btnsubmit'.
20181027 18:11:50.935 : INFO : Current location is 'http://localhost/robotframework/loginfailed.html'.
20181027 18:11:50.958 : INFO : Page title is 'Login Failed'.
Ending test: Testlogin.Testlogin Suite.Empty Emailid

Starting test: Testlogin.Testlogin Suite.Empty Password
20181027 18:11:50.958 : INFO : Opening url 'http://localhost/robotframework/login.html'
20181027 18:11:51.063 : INFO : Page title is 'Login Page'.
20181027 18:11:51.071 : INFO : Typing text 'admin@gmail.com' into text field 'email'.
20181027 18:11:51.367 : INFO : Typing text '' into text field 'passwd'.
20181027 18:11:51.561 : INFO : Clicking button 'btnsubmit'.
20181027 18:11:51.796 : INFO : Current location is 'http://localhost/robotframework/loginfailed.html'.
20181027 18:11:51.808 : INFO : Page title is 'Login Failed'.
Ending test: Testlogin.Testlogin Suite.Empty Password

Starting test: Testlogin.Testlogin Suite.Empty Email And Password
20181027 18:11:51.811 : INFO : Opening url 'http://localhost/robotframework/login.html'
20181027 18:11:51.908 : INFO : Page title is 'Login Page'.
20181027 18:11:51.916 : INFO : Typing text '' into text field 'email'.
20181027 18:11:52.049 : INFO : Typing text '' into text field 'passwd'.
20181027 18:11:52.193 : INFO : Clicking button 'btnsubmit'.
20181027 18:11:52.419 : INFO : Current location is 'http://localhost/robotframework/loginfailed.html'.
20181027 18:11:52.432 : INFO : Page title is 'Login Failed'.
Ending test: Testlogin.Testlogin Suite.Empty Email And Password
Conclusion
We have seen here how to test a login page with different inputs, which will validate if the login is working fine or not. The details of how the execution takes place is given in the log section.
