- Robot Framework - Home
- Robot Framework - Overview
- Environment Setup
- Unix and Linux Installation
- Introduction to Ride
- First Test Case Using Ride
- Writing and Executing Test Cases
- Keyword and Data Driven Test Cases
- Working With Browsers Using Selenium Library
- Working With Textbox
- Working With Radio Button
- Working With Checkbox
- Working With Dropdown
- Working With Keywords
- Working With Variables
- Working With Command Line
- Working With Setup And Teardown
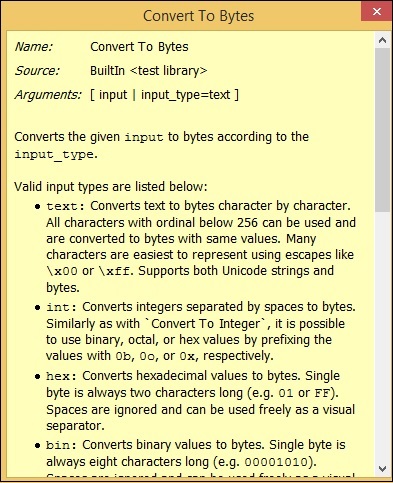
- Working with Built-In Library
- Working With External Database libraries
- Testing Login Page Using Robot Framework
- Robot Framework Useful Resources
- Robot Framework - Quick Guide
- Robot Framework - Useful Resources
- Robot Framework - Discussion
Robot Framework - Quick Guide
Robot Framework - Overview
Robot Framework is an open source test automation framework for acceptance testing and acceptance test-driven development. It follows different test case styles − keyword-driven, behaviour-driven and data-driven for writing test cases. Robot Framework provides support for external libraries, tools which are open source and can be used for automation. The most popular library used is Selenium Library used for web development & UI testing.
Test cases are written using keyword style in a tabular format. You can use any text editor or Robot Integrated Development Environment (RIDE) for writing test cases.
Robot framework works fine on all the Operating Systems available. The framework is built on Python and runs on Jython (JVM) and IronPython (.NET).
Robot Framework Features
In this section, we will look at the different features offered by Robot.
Tabular format for test cases
Robot framework comes with a simple tabular format where the test cases are written using keywords. It is easy for a new developer to understand and write test cases.
Keywords
Robot framework comes with built-in keywords available with robot framework, keywords available from the libraries like Selenium Library (open browser, close browser, maximize browser, etc.). We can also create user-defined keywords, which are a combination of other user-defined keywords or built-in or library keywords. We can also pass arguments to those keywords, which make the user-defined keywords like functions that can be reused.
Variables
Robot framework supports variables scalar, list and dict. Variables in robot framework are easy to use and are of great help while writing complex test cases.
Libraries
Robot framework has support for a lot of external libraries like SeleniumLibrary, Database Library, FTP Library and http library. SeleniumLibrary is mostly used as it helps to interact with the browsers and helps with web application and UI testing. Robot framework also has its own built-in libraries for strings, date, numbers etc.
Resources
Robot framework also allows the import of robot files with keywords externally to be used with test cases. Resources are very easy to use and are of great help when we need to use some keywords already written for other test projects.
Data driven test cases
Robot framework supports keyword driven style test cases and data driven style. Data driven works with high-level keyword used as a template to the test suite and the test cases are used to share data with the high-level keyword defined in the template. It makes the work very easy for testing UI with different inputs.
Test Case Tagging
Robot framework allows to tag test-cases so that we can either run the tags test-cases or skip the tagged testcases. Tagging helps when we want to run only a group of test cases or skip them.
Reports and Logs
Robot framework provides all the details of test suite, test case execution in the form of report and logs. All the execution details of the test case are available in the log file. The details like whether the test case has failed or passed, time taken for execution, steps followed to run the test case are provided.
RIDE
This editor available with Robot framework helps in writing and running test cases. The editor is very easy to install and use. RIDE makes life easy for writing test cases by providing framework specific code completion, syntax highlighting, etc. Creation of project, test suite, test case, keywords, variables, importing library, executing, tagging the test case is easily done in the editor. Robot framework also provides plugins for eclipse, sublime, Textmate, Pycharm that has support for robot test cases.
Robot Framework Advantages
Robot framework is open source, so anyone who wants to try out can easily do so.
It is very easy to install and helps in creating and executing test cases. Any new comer can easily understand and does not need any high level knowledge of testing to get started with robot framework.
It supports keyword-driven, behaviour-driven and data-driven style of writing test cases.
It is a good support for external libraries. Most used is Selenium Library, which is easy to install and use in robot framework.
Robot Framework Limitations
Robot lacks support for if-else, nested loops, which are required when the code gets complex.
Conclusion
Robot Framework is an open source test automation framework for acceptance testing and acceptance test-driven development. The test cases in Robot Framework are based on keywords written in tabular format, which makes it clear and readable, and conveys the right information about the intention of the test case. For example, to open browser, the keyword used is Open Browser.
Robot Framework - Environment Setup
Robot framework is built using python. In this chapter, we will learn how to set up Robot Framework. To work with Robot Framework, we need to install the following −
- Python
- pip
- Robot Framework
- wxPython for Ride IDE
- Robot Framework Ride
Install Python
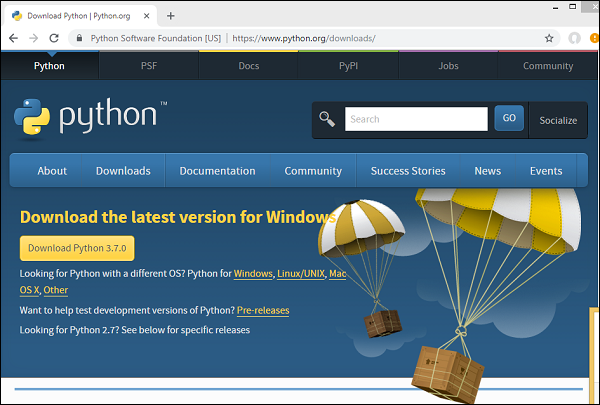
To install python, go to python official site − https://www.python.org/downloads/ and download the latest version or the prior version of python as per your operating system (Windows, Linux/Unix, Mac, and OS X) you are going to use.
Here is the screenshot of the python download site −
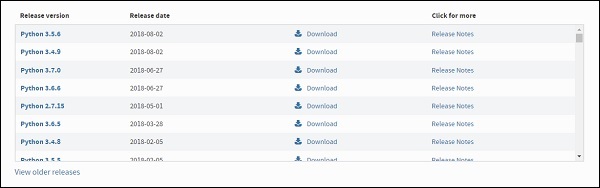
The latest version available as per release dates are as follows −
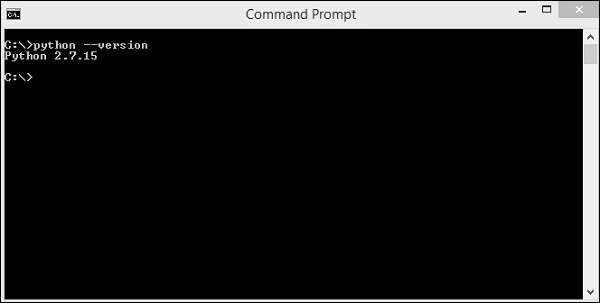
Before you download python, it is recommended you check your system if python is already present by running the following command in the command line −
Windows Installation
python --version
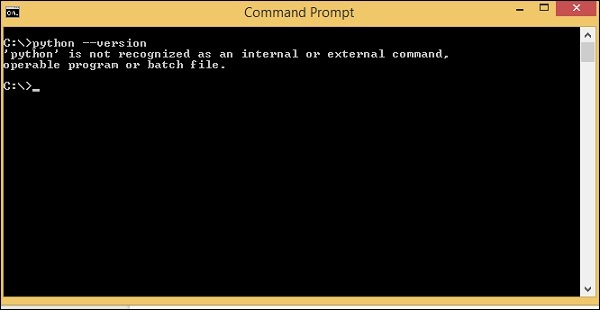
If we get the version of python as output then, we have python installed in our system. Otherwise, you will get a display as shown above.
Here, we will download python version 2.7 as it is compatible to the windows 8 we are using right now. Once downloaded, install python on your system by double-clicking on .exe python download. Follow the installation steps to install Python on your system. Once installed, to make python available globally, we need to add the path to environment variables in windows as follows −
Setting path for Windows
Right-click on My Computer icon and select properties. Click on Advanced System setting and the following screen will be displayed.
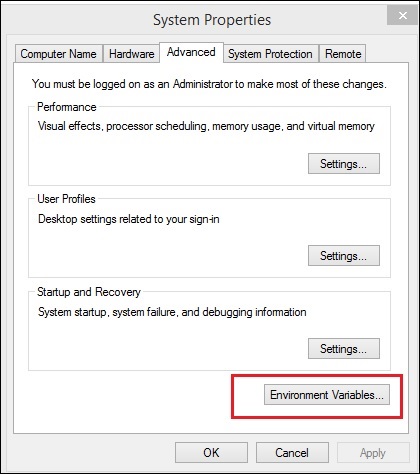
Click on Environment Variables button highlighted above and it will show you the screen as follows −
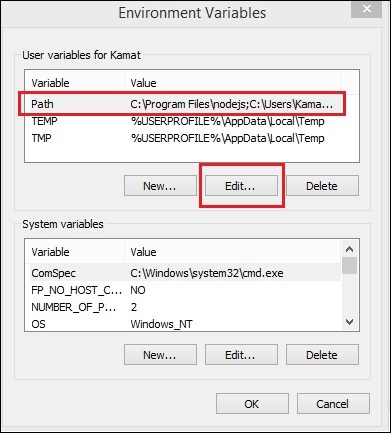
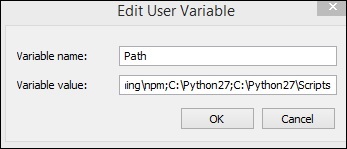
Select the Variable Path and click the Edit button.
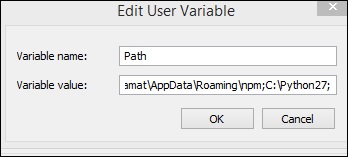
Get the path where python is installed and add the same to Variable value at the end as shown above.
Once this is done, you can check if python is installed from any path or directory as shown below −
Robot Framework - Unix and Linux Installation
Let us now see a few simple steps to install Python on Unix/Linux machine. Open a Web browser and go to https://www.python.org/downloads/.
- Follow the link to download zipped source code available for Unix/Linux.
- Download and extract files.
- Editing the Modules/Setup file if you want to customize some options.
- run ./configure script
- make
- make install
This installs Python at standard location /usr/local/bin and its libraries at /usr/local/lib/pythonXX where XX is the version of Python.
Setting Path at Unix/Linux
To add the Python directory to the path for a particular session in Unix −
In the csh shell
type setenv PATH "$PATH:/usr/local/bin/python" and press Enter.
In the bash shell (Linux)
type export ATH="$PATH:/usr/local/bin/python" and press Enter.
In the sh or ksh shell
type PATH="$PATH:/usr/local/bin/python" and press Enter.
Note − /usr/local/bin/python is the path of the Python directory
Install PIP
Now, we will check for the next step, which is pip installation for python. PIP is a package manager to install modules for python.
PIP gets installed along with python and you can check the same in command line as follows −
Command
pip --version
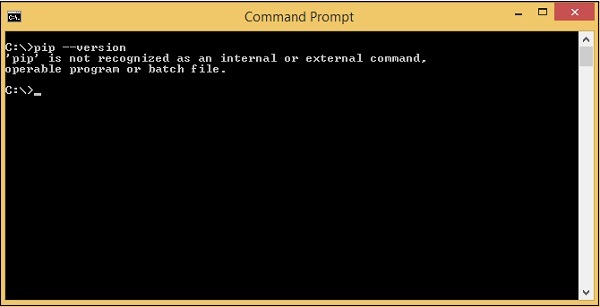
Here we are still not getting the version for pip. We need to add the pip path to Environment variables so that we can use it globally. PIP will be installed in Scripts folder of python as shown below −
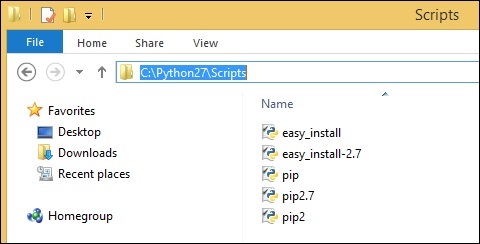
Go back to environment variables and add the path of pip to the variables list. Add C:\Python27\SCripts to environment variables as follows −
Now open your command line and check the version of pip installed −
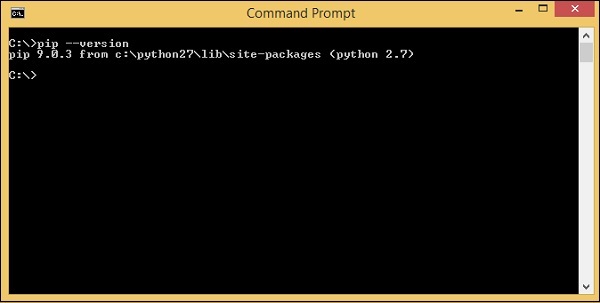
So now, we have python and pip installed.
Install Robot Framework
We will now use pip python package manager to install the robot framework and the command for it is as follows −
Command
pip install robotframework
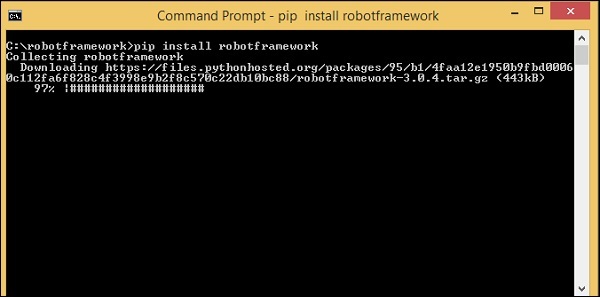
Once the installation is done, you can check the version of robot framework installed as shown below −
Command
robot --version
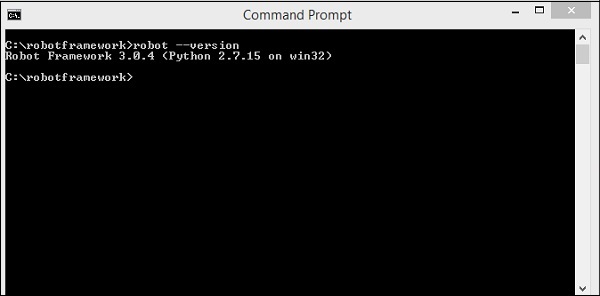
So, we can see Robot Framework 3.0.4 is installed.
Install wxPython
We need wxPython for Robot Framework Ride, which is an IDE for Robot Framework.
For windows to get the required download for wxPython, go to the following URL −
https://sourceforge.net/projects/wxpython/files/wxPython/2.8.12.1/And, download 32 or 64-bit wxpython for windows as per your Windows Operating system.
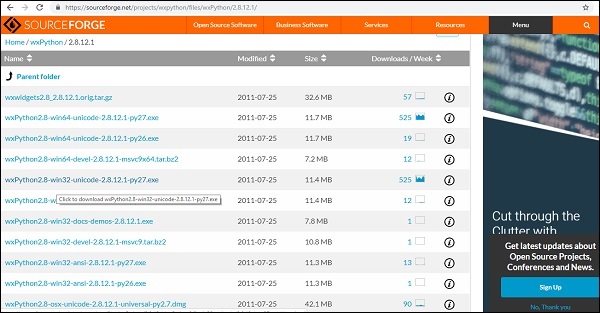
Download the 32-bit wxPython and install the same.
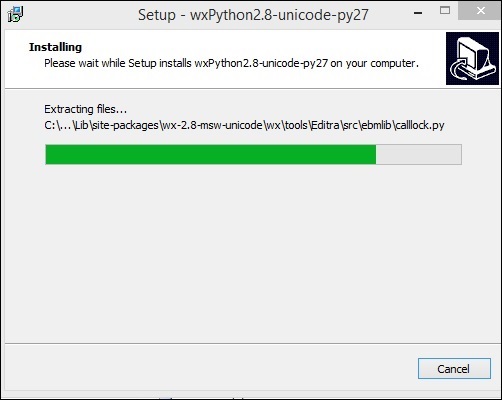
Once the installation is done, it opens the command line and auto runs some commands as shown below −
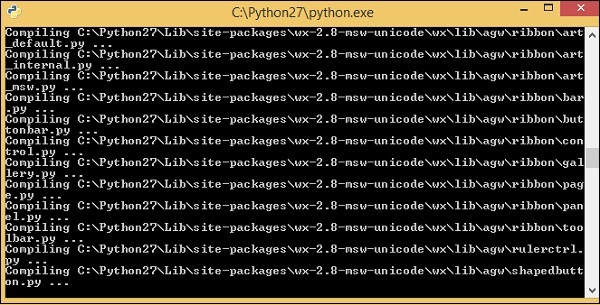
wxPython is now installed.This module is required for the RIDE Ide to be used for Robot Framework which is the next step.
On Linux, you should be able to install wxPython with your package manager. For example, on Debian based systems such as Ubuntu running sudo apt-get install pythonwxgtk2.8 ought to be enough.
On OS X
, you should use wxPython binaries found from the wxPython download page. wxPython2.8 only has 32 bit build available, so Python must be run in 32-bit mode also. This can be done globally by running> defaults write com.apple.versioner.python Prefer-32-Bit -bool yes
or, just for the RIDE execution −
> VERSIONER_PYTHON_PREFER_32_BIT=yes ride.py
Install Ride
Ride is Robot Framework IDE. We can use pip to install it as shown below.
Command
pip install robotframework-ride
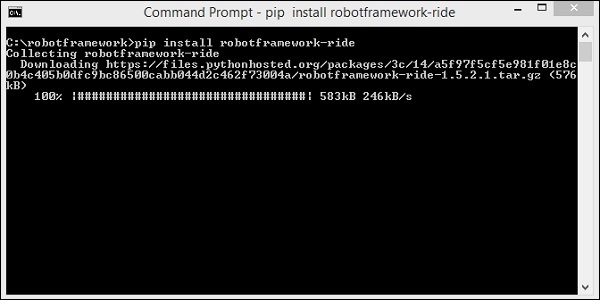
Once the installation is done, open the command prompt and type the following command to open the Ride-IDE.
Command
ride.py
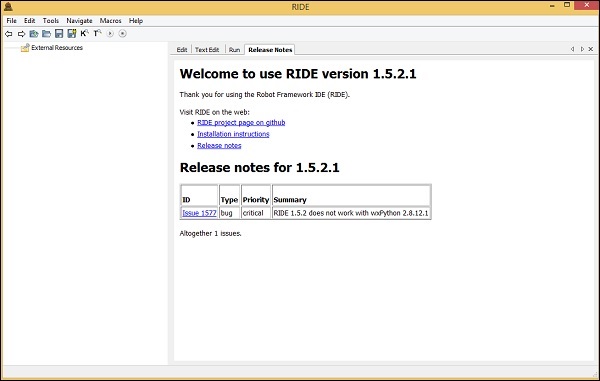
The above command opens the IDE as follows −
So we are done with the installation of Robot Framework and can get started working with it.
Conclusion
We now know how to install python, pip, robot framework and also get RIDE installed to work with test cases in robot framework.
Robot Framework - Introduction to Ride
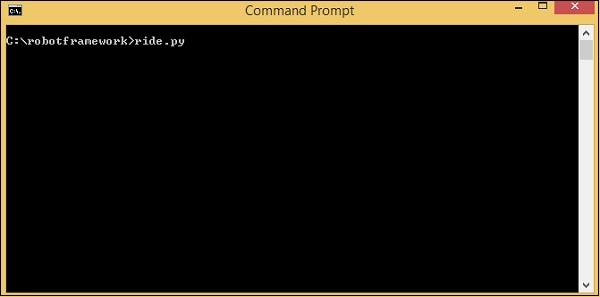
Ride is a testing editor for Robot Framework. Further, we will write test cases in Ride. To start Ride, we need to run the command shown below.
Command
ride.py
The above command will open the IDE as shown in the following screenshot −
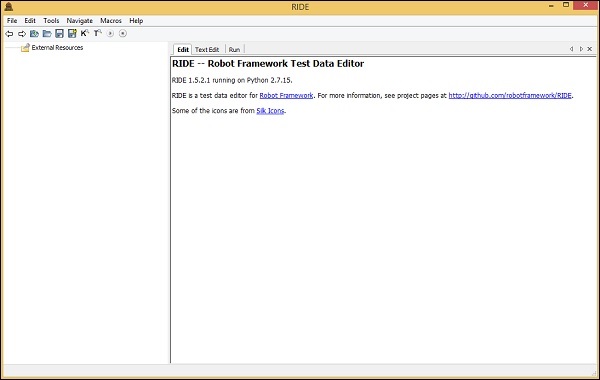
In this chapter, we will walk through the editor to see what options and features are available in the IDE. The options and features will help us in testing our project.
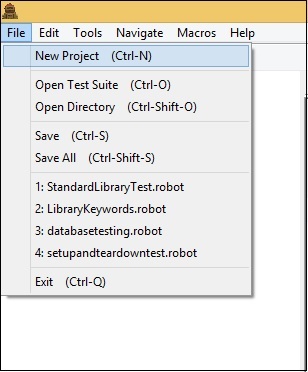
Create New Project
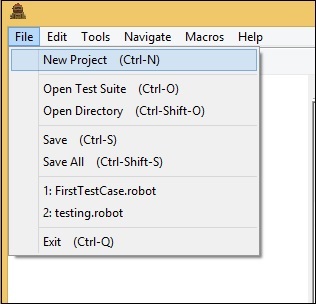
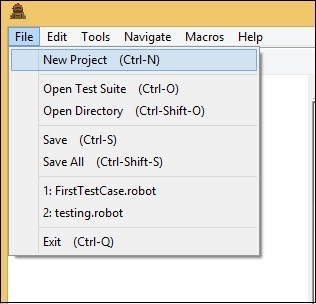
Go to File and click on New Project as shown below −
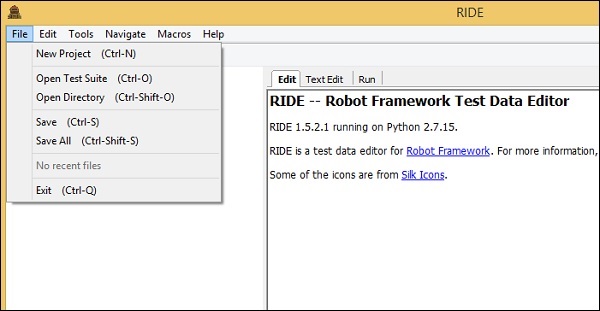
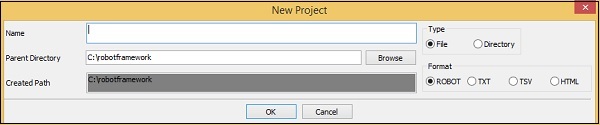
The following screen will appear when you click New Project.
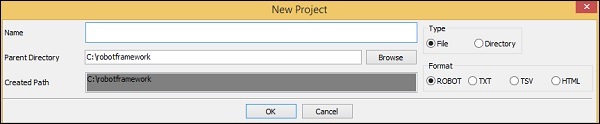
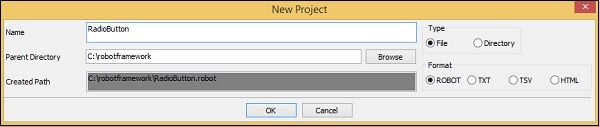
Enter the name of the project. Created Path is the path where the project will get saved. You can change the location if required. The project can be saved as File or directory. You can also save the project in format like ROBOT, TXT, TSV or HTML. In this tutorial, we are going to use the format ROBOT and how to write and execute test-cases.
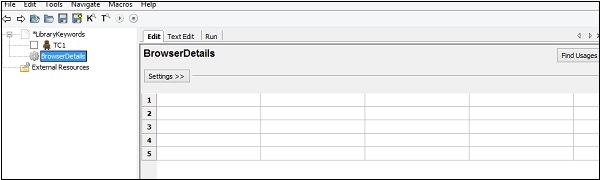
Now, we will add a project as a file the way it is shown below. The project is named Testing and the following screen sppears after the project is created.
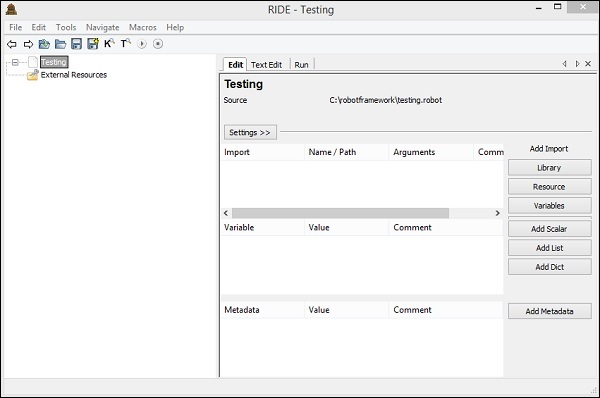
The name of the project is shown on the left side and on the right side we can see three tabs Edit, TextEdit and Run.
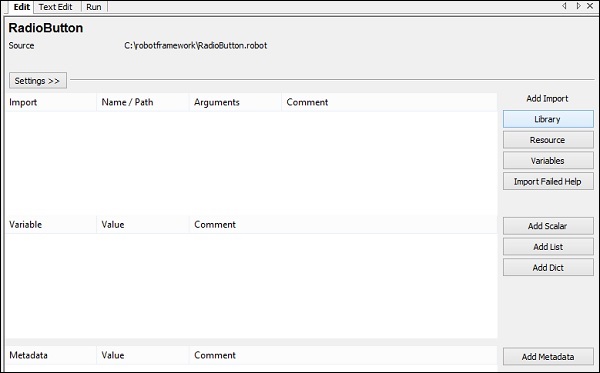
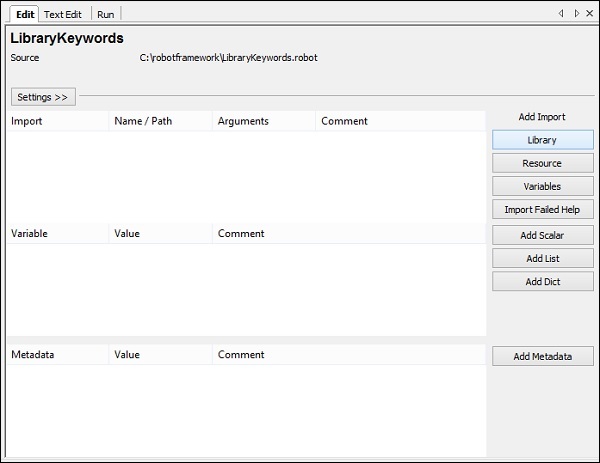
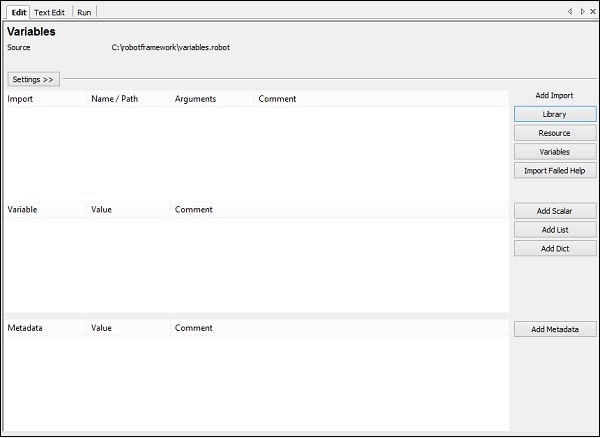
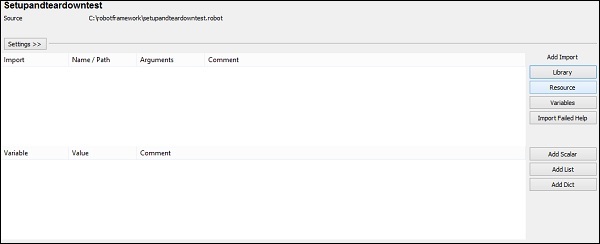
Edit has a lot of options on the UI as shown above. In this section, we can add data required to run our test cases. We can import Library, Resource, Variables, Add scalar, Add list, Add dict and Add Metadata.
The details added in the Edit section will be seen in the next tab, Text Edit. You can write the code here in text edit section.
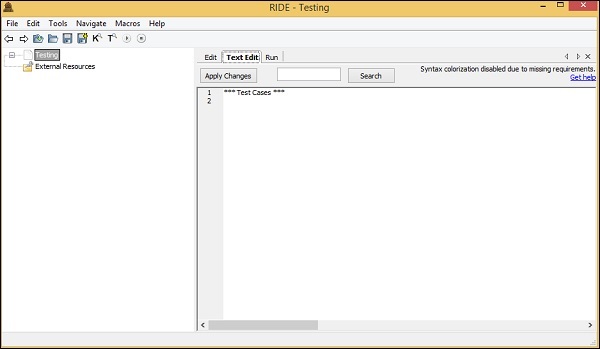
If there is any change added in Textedit, it will be seen in the Edit section. Therefore, both the tabs Edit and TextEdit are dependent on each other and the changes done will be seen on both.
Once the test cases are ready, we can we use the third tab Run to execute them.
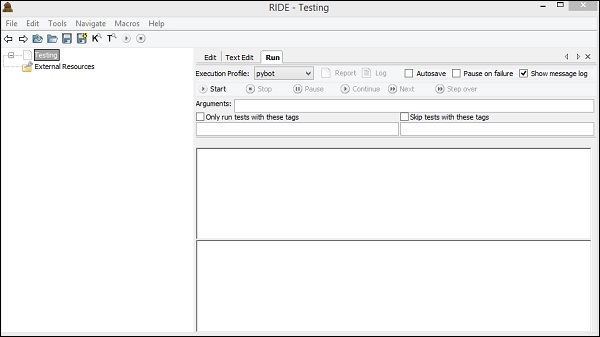
The Run UI is as shown above. It allows to run the test case and comes with options like start, stop, pause continue, next test case, step over, etc. You can also create Report, Log for the test cases you are executing.
To create a test case, we have to do the following −
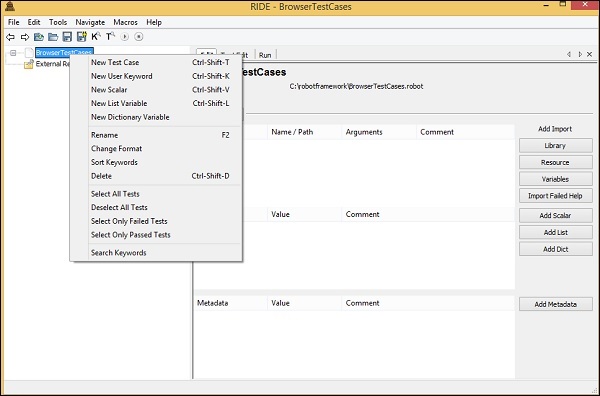
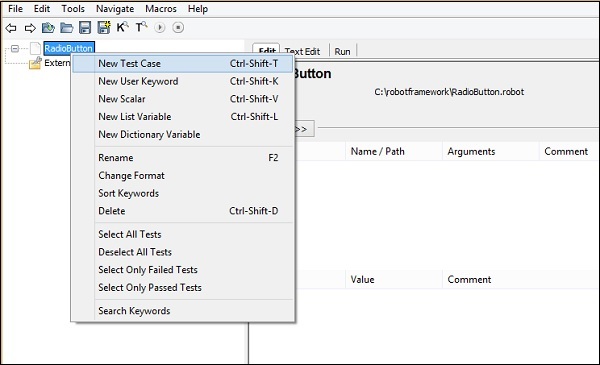
Right-click on the project created and click on new test case as shown below −

Upon clicking New Test Case, a screen appears as shown below −

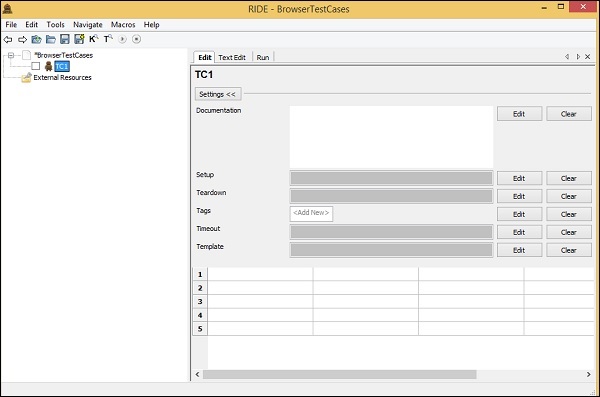
Enter the name of the test case and click OK. We have saved the test case as TC0. The following screen appears once the test case is saved.

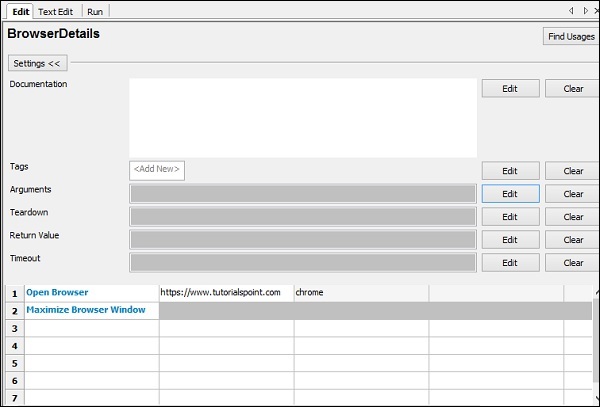
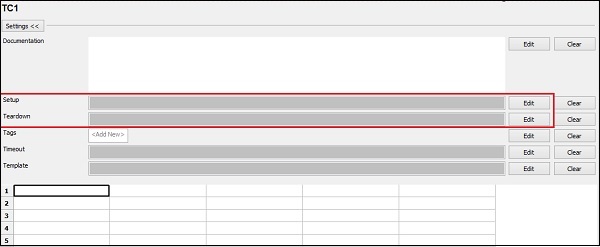
The test case has options like Documentation, setup, teardown, tags, timeout and Template. They have an edit button across it; upon clicking the button a screen appears wherein, you can enter the details for each option. We will discuss the various parameters of these details in our subsequent chapters.
The test cases can be written in tabular format as shown below. Robot framework test cases are keyword based and we can write the test-cases using built-in keywords or keywords imported from the library. We can also create user-defined keywords, variables, etc. in robot framework.
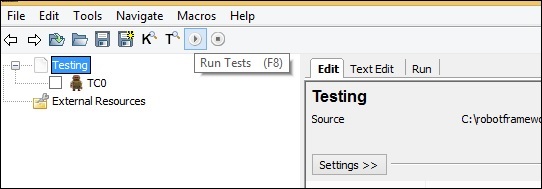
There are shortcuts available in the navigation bar to run/stop test case as shown below −
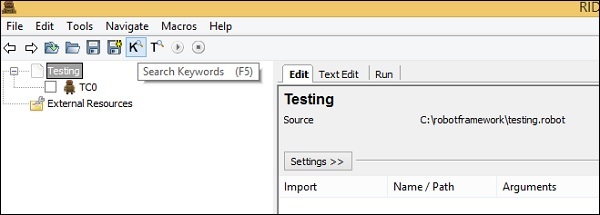
The search keyword option can be used as shown in the screenshot below −
To get the list of keywords available with robot framework, simple press ctrl+space in the tabular format as shown below and it will display all the keywords available −
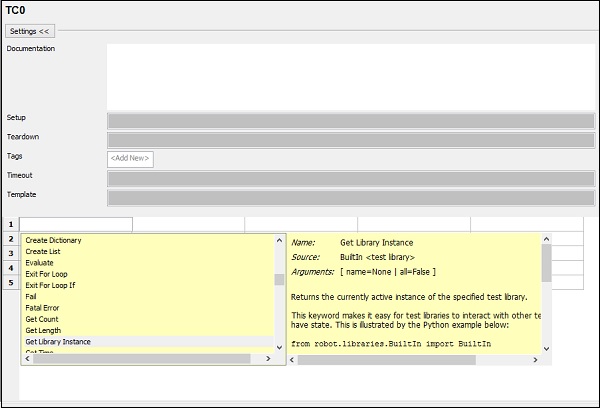
In case, you cannot remember the keyword, this will help you get the details. We have the details available across each keyword. The details also show how to use the related keyword. In our next chapter, we will learn how to create our first test case in ride.
Conclusion
In this chapter, we have seen the features available with RIDE. We also learnt how to create test cases and execute them.
Robot Framework - First Test Case Using Ride
We will explore RIDE and work on our first test case.
Open Ride from command prompt or you can create a shortcut of ride on your desktop.
From command line
ride.py
From Desktop
Go to the path where ride is installed; for windows, it is C:\Python27\Scripts.
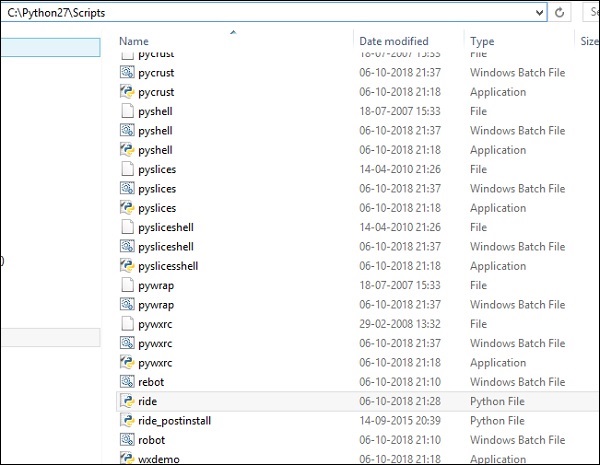
Right-click on ride.py and click Send To -> Desktop (create shortcut).
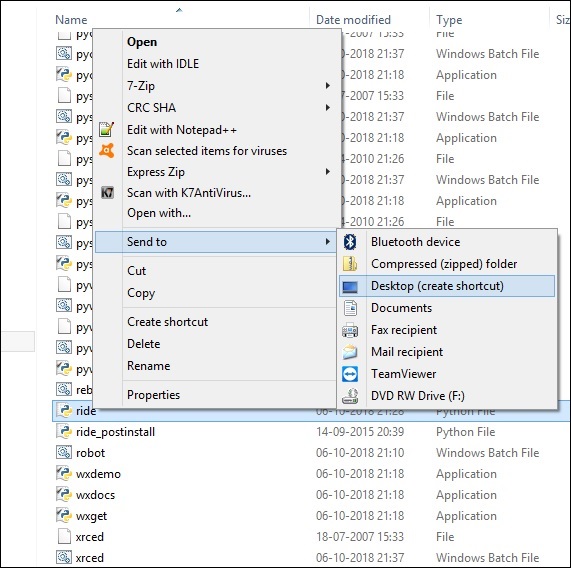
You will now see an icon of ride on your desktop. You can click on it to open the ride editor.
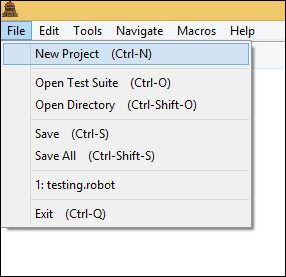
Let us start with our first test case in ride. Open the editor and click on File -> New Project.
Click on New Project and enter the name of the project.
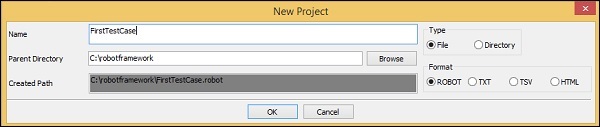
Parent Directory is the path where the project will be saved. You can change the path if required. I have created a folder called robotframework and will save all the files in that folder.
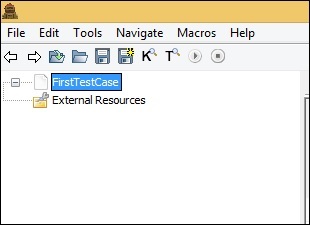
Project FirstTestCase is created.
To create test case, right-click on the project.
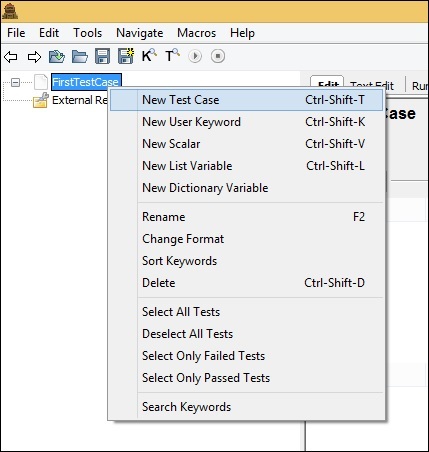
Click New Test Case.

Enter the name of the test case and click OK.
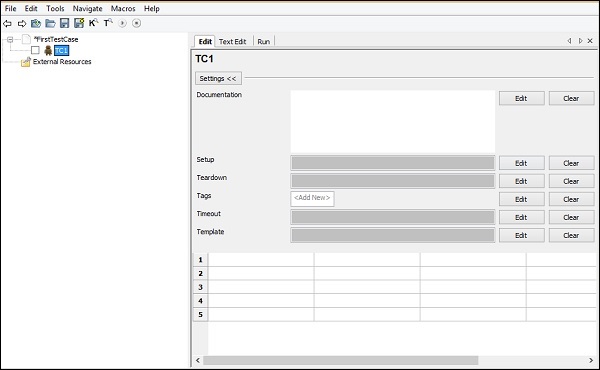
There are 3 tabs shown for the test case created − Edit, Text Edit and Run.
The Edit tab comes with two formats Settings and Tabular. We will discuss the two formats in our subsequent sections.
The Settings Format
In Settings, we have documentation, setup, teardown, tags, timeout and template.
Documentation
You can add details about your test case so that it becomes easy for future reference.
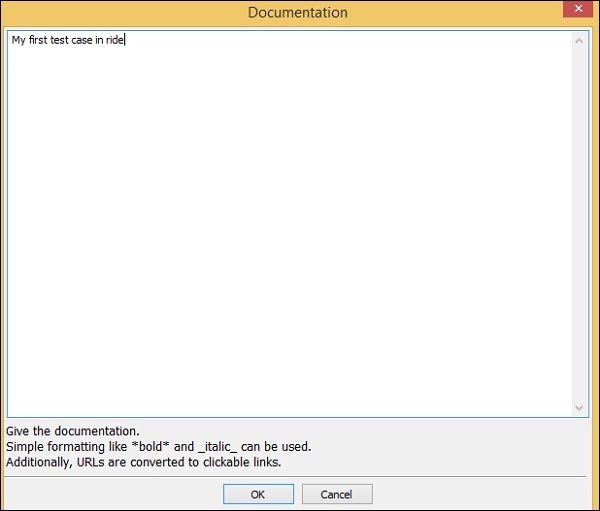
Click OK to save the documentation.
Setup and Teardown
If there is a setup assigned to a test case, it will be executed before the test case execution and the test setup that will be executed after the test case is done for teardown. We will get into the details of this in our subsequent chapters. We do not need it now for our first test case and can keep it empty.
Tags
This is used for tagging test cases to include, exclude specific test cases. You can also specify if any of the test cases is critical.
Timeout
This is used to set a timeout on the test case. We will keep it empty for now.
Template
This will have the keywords to be used for the test case. It is mostly used for data driven test case. The high-level user-defined keyword is specified in the template and test cases are used to pass data to the keyword.
In the tabular format, we will write our first test case and execute the same to see the output.
In this test case, we are just going to add some logs and see the output of it. Consider the following screenshot to understand this −
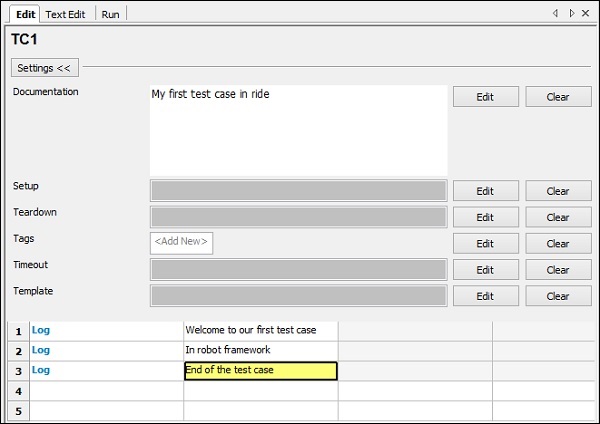
We have used the keyword Log to log messages as shown above.
Based on the keywords specified in Edit, we can get the code in Text Edit as shown below −
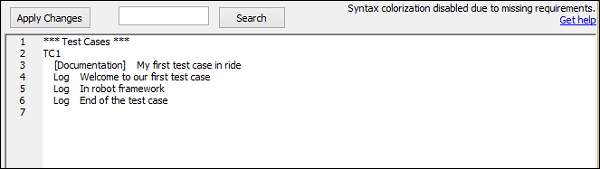
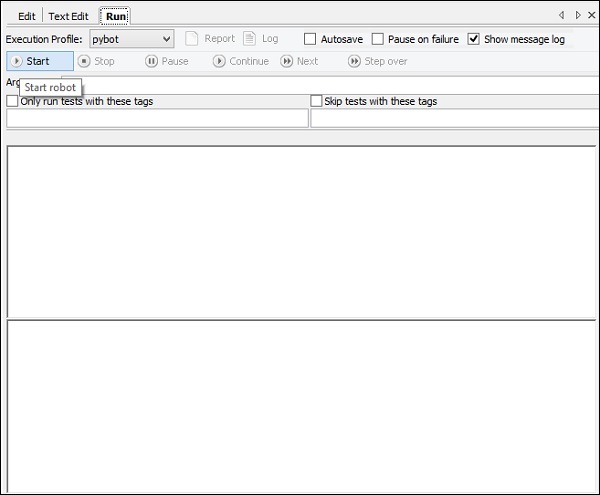
You may also write the test case in the Text Edit and the same will reflect in the tabular format. Now let us Run the test case and see the output.
To run the test case, we need to click on Start as shown below −
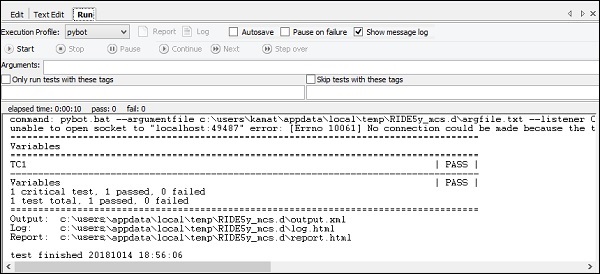
Click on start and here are is the output of the test case −
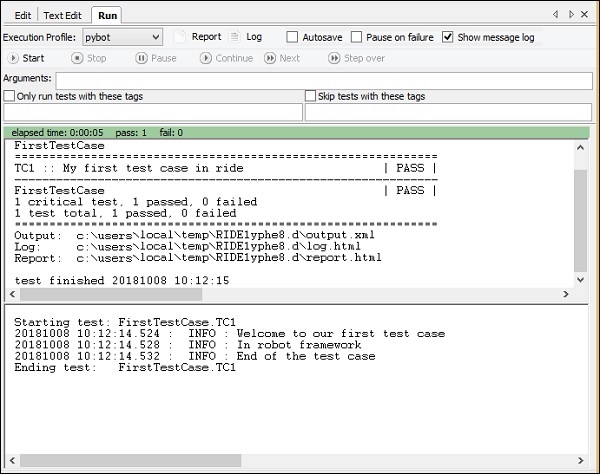
Our test case has executed successfully and the details are as shown above. It gives the status as PASS.
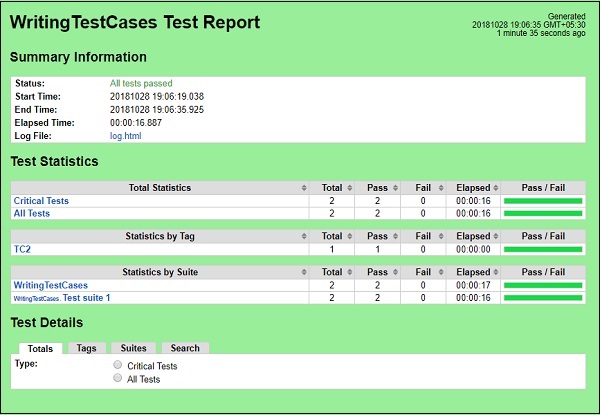
We can also see the details of the test case execution in Report and Log as highlighted below.

Click on Report and it opens the details in a new tab as follows
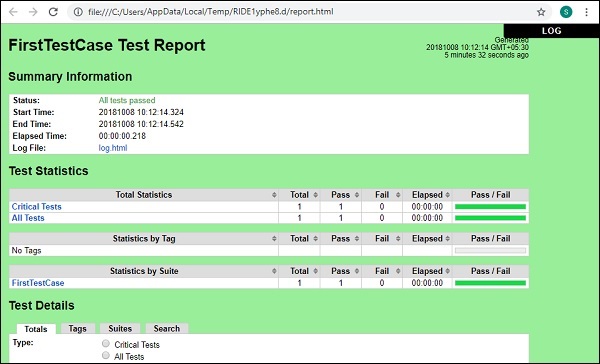
In Report, it gives the details like the start time, end time, path to the log file, status of the test case, etc.
Click on Log at the top right corner in report or from the Run screen.
Here are the details of the log file −

The Log file gives the details of the test execution and the details of keywords we gave for the test case.
In the report and the log file, we get green color for the status.
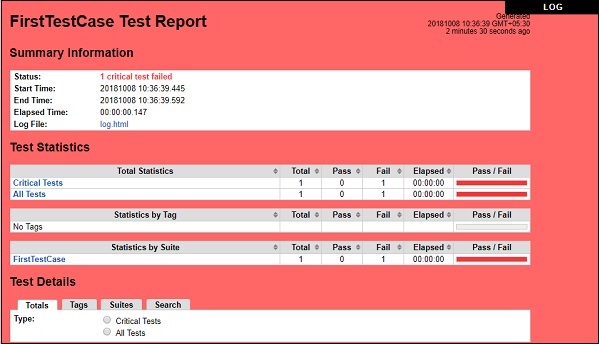
Let us now make some changes that will lead to the failure of the test case fail and see the output.
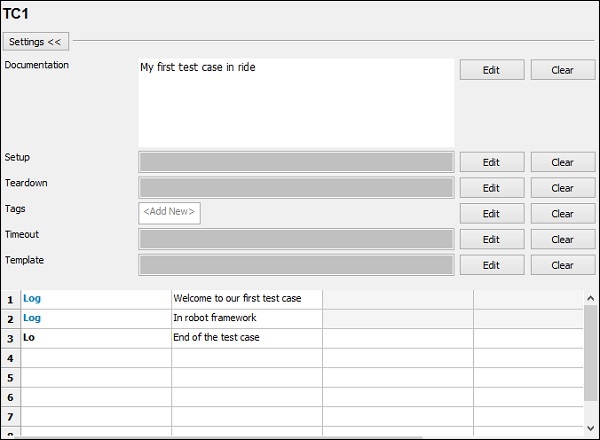
In the above test case, the Log keyword is wrong. We will run the test case and see the output −

We see that the test case has failed. I have highlighted the error that it tells about the test case.
Now will see the report and log output.From Report −
From Log
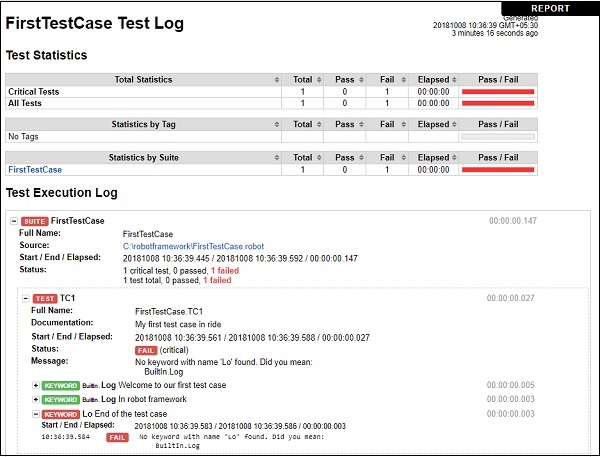
When the test case fails, the color is changed to Red as shown above.
Conclusion
In this chapter, we covered a simple test case and the results seen during execution are shown. The reports and logs show the details of test case execution.
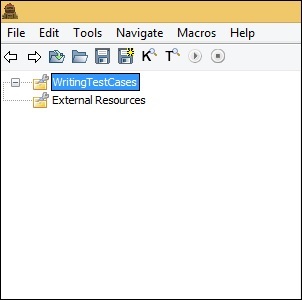
Writing and Executing Test Cases
In this chapter, we will learn how to write and execute test cases. We would cover the following areas in this chapter −
- Project Setup
- Importing Libraries
- Write test case in tabular format
- Using Tags for Executing Test Case
- Use Resource Files for Test Case
Project Setup
Run the command ride.py to start RIDE IDE.
Command
ride.py
Click on File -> New Project as shown below −
Upon clicking New Project, the screen will appear as shown below −
New Project shows the type as file or directory. By default, File is selected. We will click on Directory to create test suite, which can have many test suites in that directory. Each suite will have test−cases.
We will use the ROBOT format for now.
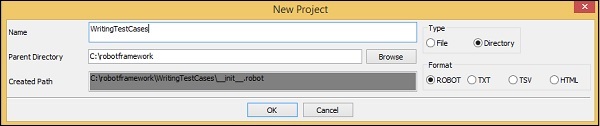
The Parent-Directory is the path where the WritingTestCases directory will be created. Click OK to save the test suite directory.
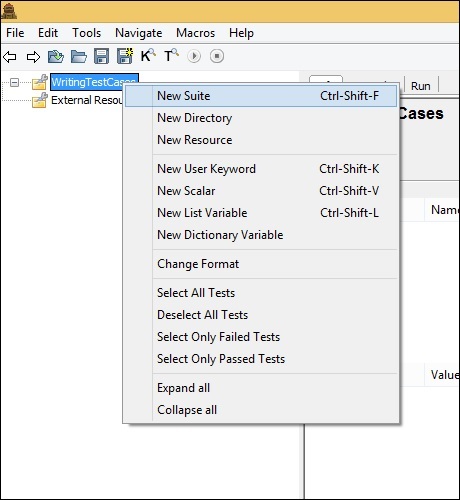
Right-click on the directory created and click on New Suite. You can also create sub directories with test suites in that.
For now, we will start with Test Suite creation as shown below −
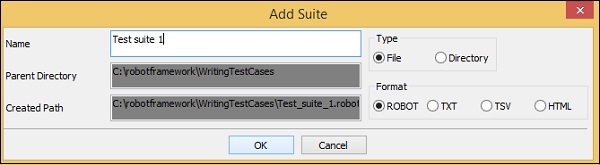
Click OK to save the Test suite.
Now you can add test case to the suite. Right-click on the Test suite created as shown below −
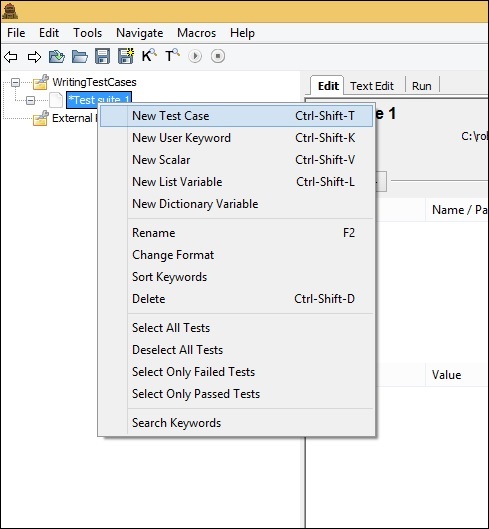
Click New Test Case. It will display the screen to add name of the test case as shown below −

Click OK to save the test case. We have the project setup ready.
Importing Libraries
Robot Framework has its own built-in library, which need not be imported. But we need to interact with the browsers, databases, etc. To interact, we need to import the libraries.
The list of external libraries supported by robot framework are listed on robot framework official site as shown below −
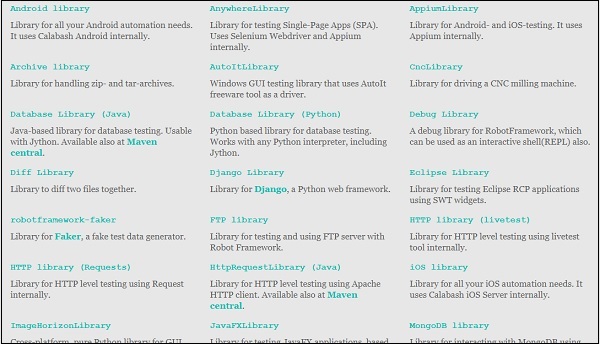
For working with browsers and web application, we are going to import Selenium Library. The installation is discussed in the chapter Working with Browsers using Selenium Library.
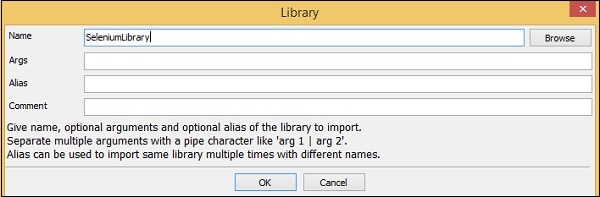
To import a library, we need to click main project. To the right, the setting will display the Add Import option as shown below −

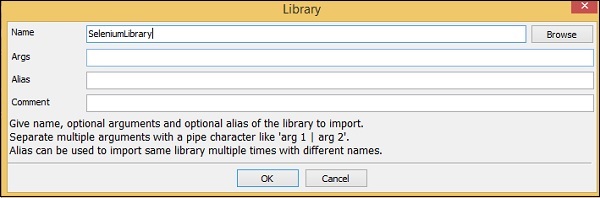
Click Library and enter the name of the library as shown below −
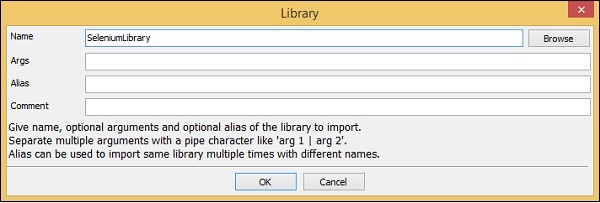
Click Ok to save the library.
The settings will be displayed in the settings as shown below −
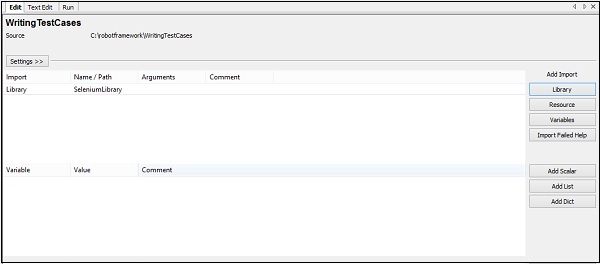
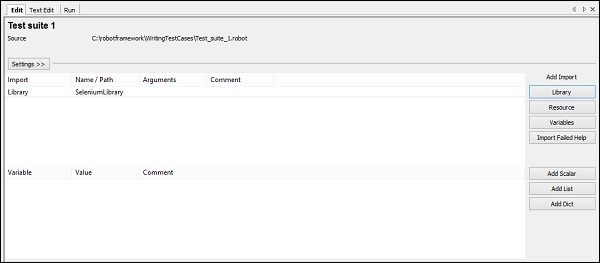
We need to repeat the same step and add library for the test suite created. Click on the test suite created and import the library as shown below −
When you click on the test case on the left side, it will display the tabular format where you can enter the keywords. Now, you can use the built-in keywords and the keywords available from the selenium library.
Write test case in tabular format
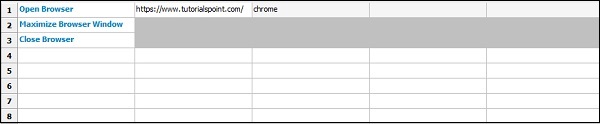
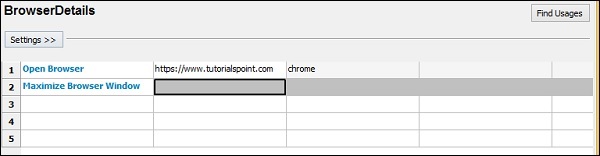
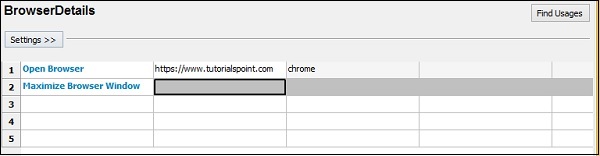
Here is a simple test case, which opens the URL in chrome browser.
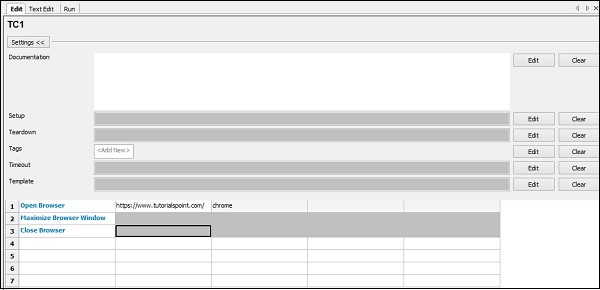
The following shows the details of the test cases −
*** Settings ***
Library SeleniumLibrary

*** Test Cases ***
TC1
   Open Browser https://www.tutorialspoint.com/ chrome
   Maximize Browser Window
   Close Browser
We will add one more test case: TC2 in the same project.
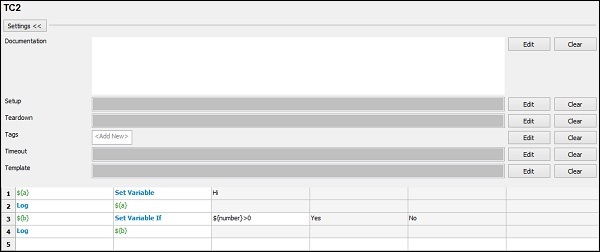
*** Settings ***
Library SeleniumLibrary

*** Variables ***
${number} 100

*** Test Cases ***
TC1
   Open Browser https://www.tutorialspoint.com/ chrome
   Maximize Browser Window
   Close Browser

TC2
   ${a} Set Variable Hi
   Log ${a}
   ${b} Set Variable If ${number}>0 Yes No
   Log ${b}
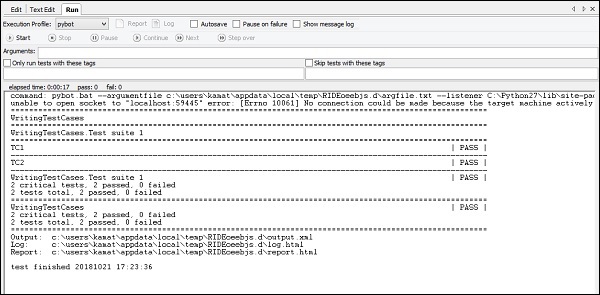
We can add multiple test cases under the test suite created. Click Run to execute the test cases. The execution will take place based on the number of test cases added −
Using Tags for Executing Test Case
In case you want to run only test case TC2, you can tag the same. Click on the test case and click Edit across Tags as shown below −
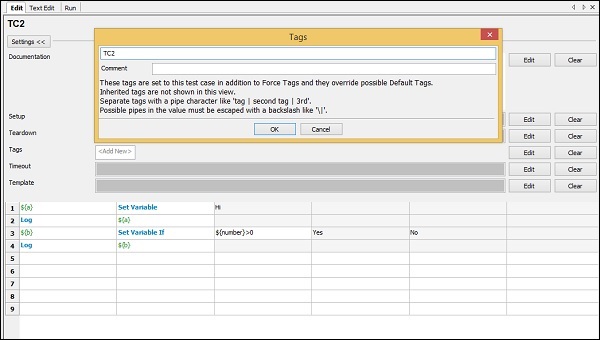
Click Ok to save the tag. Add the tag name in Run as shown below −

We have selected option -> Only run tests with these tags and added tag name in it. Now, it will run only those test cases that have tag names. You can give any name and group the test cases based on tag name and run the same. You can also use tag to skip the test case.
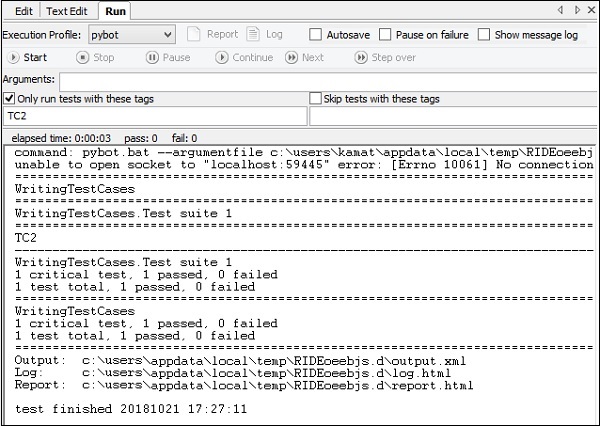
Now we can see only TC2 running when executed.
Use Resource Files for Test Case
Robot framework has option for resource, where you can import robot files to be used with the test cases.
Test case TC1 that we have created uses the following keywords −

We have used Keywords like −
- Open Browser
- Maximize Browser Window
- Close Browser
We will use a user-defined keyword for the above test case. The user-defined keyword will be available in the robot file which will be used as a resource.
We will create a file in the same directory and write our keyword as follows −
Please note details of keywords, i.e., how to create user-defined keywords are explained in Robot Framework − Working with Keywords chapter.
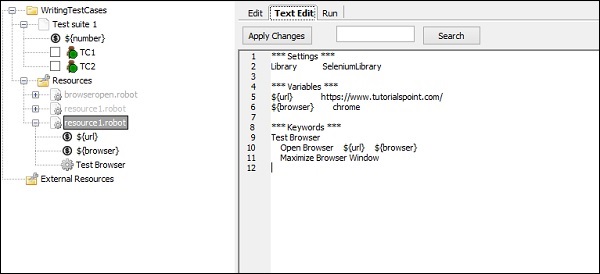
We have created a user−defined keyword called Test Browser as shown in the browseropen.robot file −
*** Settings ***
Library SeleniumLibrary

*** Variables ***
${url} https://www.tutorialspoint.com/
${browser} chrome

*** Keywords ***
Test Browser
   Open Browser ${url} ${browser}
   Maximize Browser Window
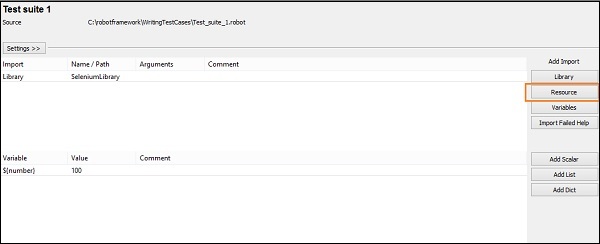
The file contains various options such as Settings, Variables, and Keywords. Please note, we cannot write test case inside the file to be used as resource. We will upload the above file as resource for the test suite as shown below.
Select the test suite. On the left side, click on resource option as shown below −
Click on Resource and it will ask the path to import robot file −
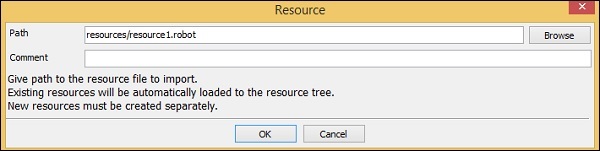
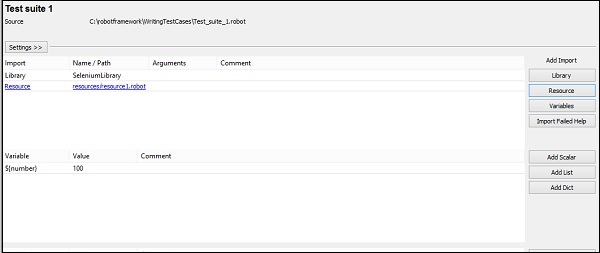
Mention the path where the file is stored as shown above and click OK to add resource. It will be displayed as shown below −
Now, we will change test case TC1 which has keywords as shown below −
We will add the user-defined keyword to TC1 from the resource file, i.e., Test Browser keyword −

The resource file uploaded is as shown below −
The user-defined Keyword is used in test case TC1.
We will now execute the test case −
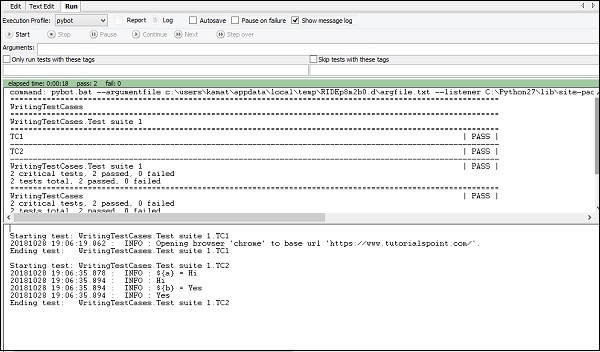
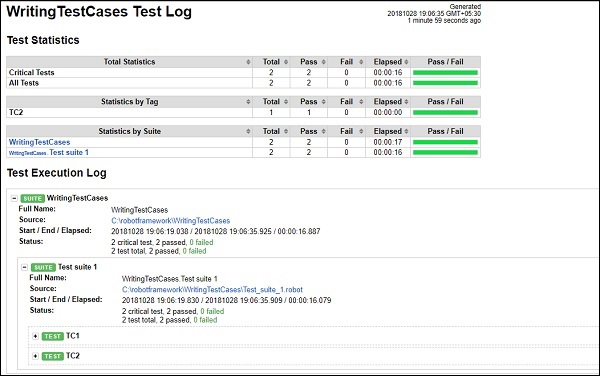
We have both test cases being passed. Let us now see the report and log details.
Report
Log
Conclusion
This chapter gives details on how to write test case, execute it, how to tag a test-case, use resources, etc.
Keyword and Data Driven Test Cases
The workflow of a test-case can be tested using keyword or data driven style. In case you want to test the workflow with different inputs, the same can be done using data driven test cases. We will work on an example to go through the following test case approaches −
- Keyword Driven style
- Data Driven style
Keyword Driven Style
We will do a project setup to show the working of Keyword driven style.
Open ride using ride.py from the command line.

Click on New Project and give a name to your project.
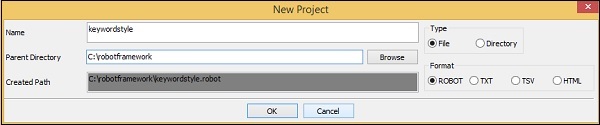
The name given to the project is keywordstyle. Click OK to save the project. In this project, we will create a user keyword as shown below.
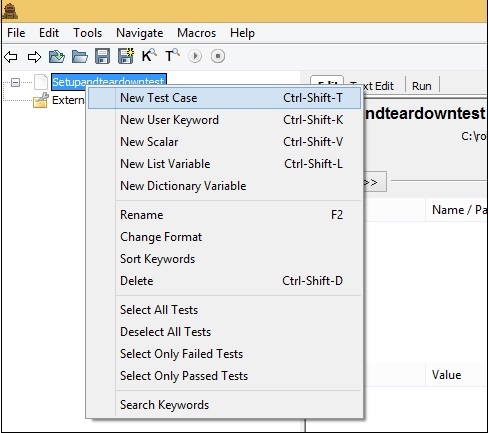
Right-click on the name of the project and click on New User Keyword as shown below
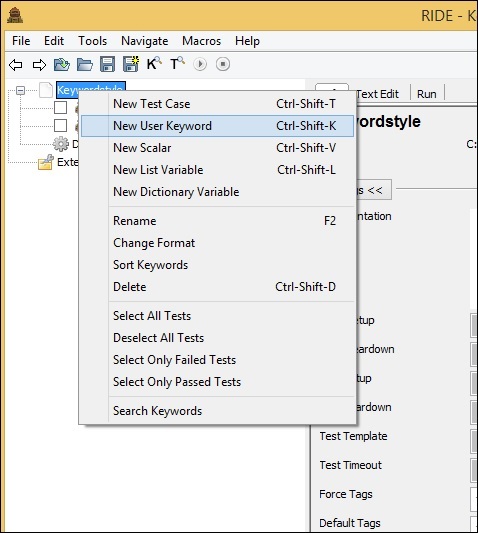
It will display screen as follows −
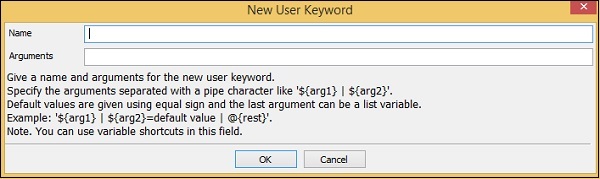
Enter the name of the keyword and the arguments it will take. Here we will give name of the keyword as Display Message. The role of Keyword Display Message is, when it is called, it will log a message. So we need to give an argument to it. Therefore, in the above example the argument will be a scalar variable ${msg}.
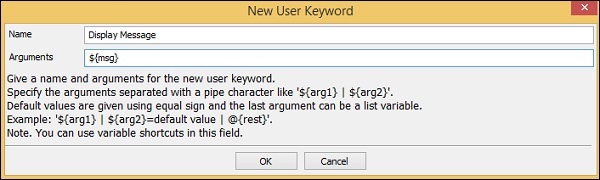
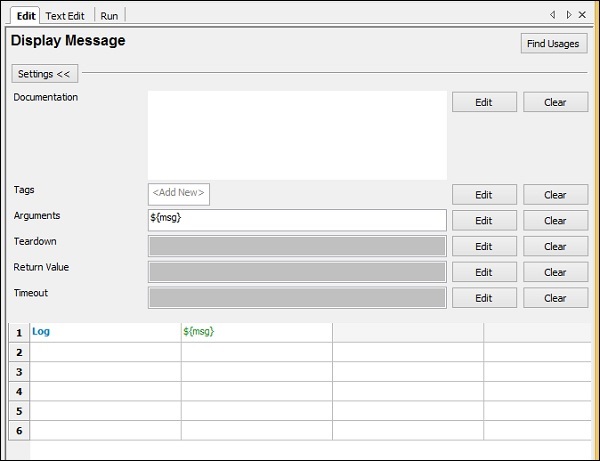
Click OK to save the user keyword. Now we need to write the action the keywords need to do. So, it will have tabular format as shown below where we can give the Library keywords or built-in keywords available with Robot Framework.
Here, we will use a simple Log keyword available with Robot Framework as shown below −
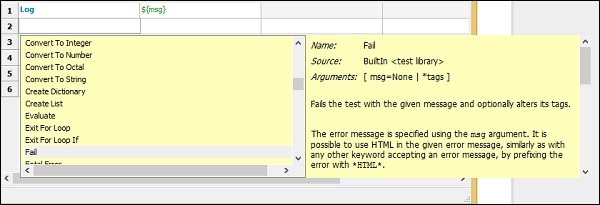
To get more keywords available with Robot framework, press ctrl + space bar in the table column as shown below −
So the keyword we want to use with our testcase is ready. The name of the user keyword is Display Message and it takes one argument called ${msg}.
Let us now use this keyword in simple keyword driven style test-case. To do that we need to create test case. Right-click on the name of the project created. Now, click New Test Case −

Give name to the test case and click OK.
We are done with the project setup and now will write test cases for the keyword driven style.
In the test case, we have used the user-defined keyword Display Message in the tabular format as shown below −
We have used the keyword we have created as shown above and passed the value Hello World.
We will execute the test case TC1 and check the output −
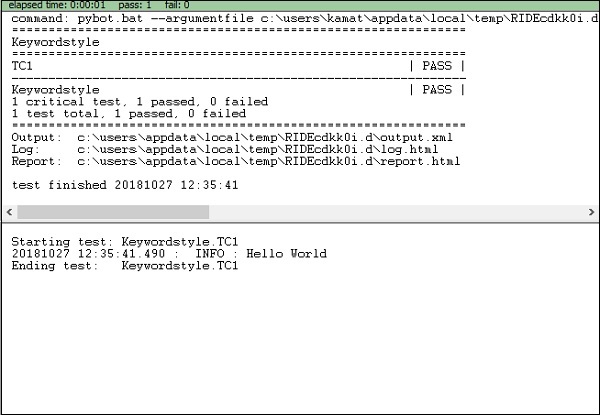
In the above example, we have written a simple test-case which logs message and the test case is executed with output Hello World. We can see the output Hello World printed in the log. The test case is also passed here.
Data Driven Style
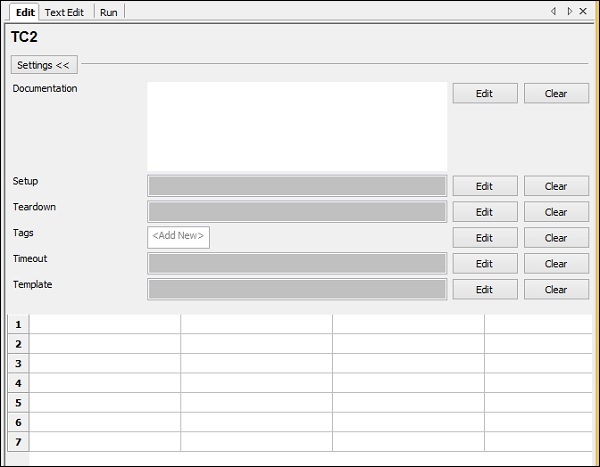
We will create one more test case in the same project. We will give the name of the test-case as TC2.

To work with data driven style, we need to create template. Template will take the name of the high level keyword, which is a user-defined keyword like the one we created at the start called Display Message. The arguments to that template will be sent in the form of test-cases. We can pass different values to that template keyword. The data driven approach is mostly used when you want to test the scenario with different data to it.
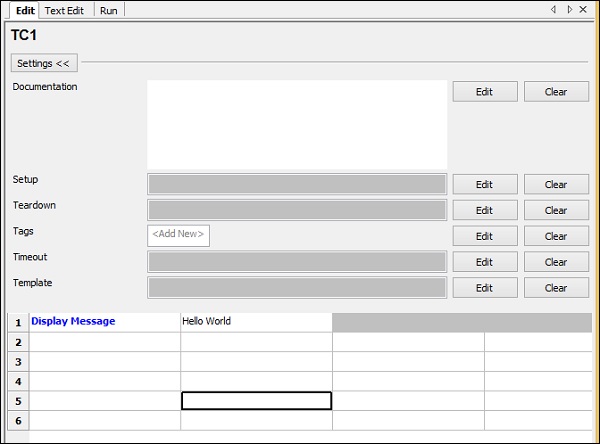
Once the test case is saved. Click on the test case and the display will be as follows −
Click on Edit button for Template and add the user-defined keyword.
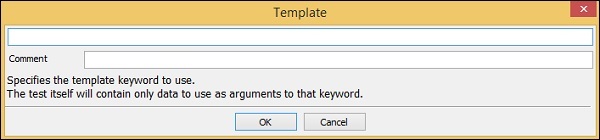
Enter the user keyword for the template and click OK to save the template.
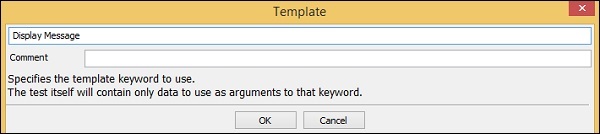
Display Message keyword takes one argument called ${msg}. This is a scalar variable. The details passed in this test case will act as arguments to the user-defined keyword Display Message.
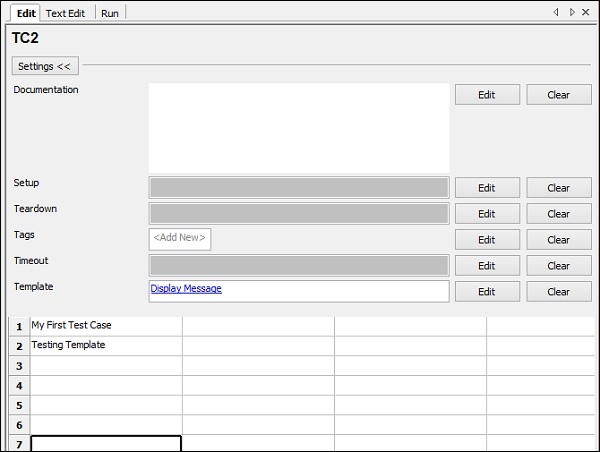
In TC2, we have added Template Display Message (user-defined keyword). We have given messages in the tabular format.
Let us now execute the test case.
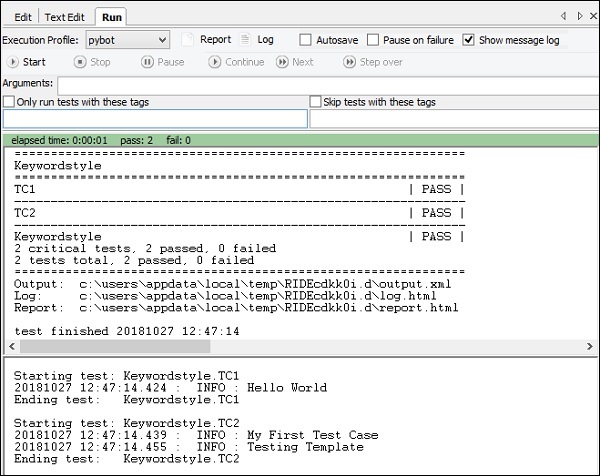
We can see Run executes both the Test Cases. The output shown for TC1 is Hello World. This was the message we had given to the User Keyword Display Message.
For TC2, we used Display Message as a Template. We passed My First Test Case and Testing Template as values in TC2. As the user keyword Display Message uses internally Log Keyword, it displays the message in the log as shown above.
Conclusion
We have used keyword style and data driven style in this chapter and seen the working of both. Data Driven style takes high-level user-defined keyword as a template and all the test cases act as values to the template.
Working With Browsers Using Selenium Library
In this chapter, we will learn how to work with browsers using Robot Framework and Selenium Library in ride.
- Project setup in Ride
- Import Selenium Library
- Test case using Chrome Browser
- Test case using Firefox Browser
Project Setup In Ride
We will first create a project in Ride to work with browsers. Open ride using ride.py from the command line.

Click on New Project and give name to your project.
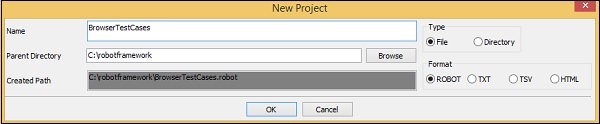
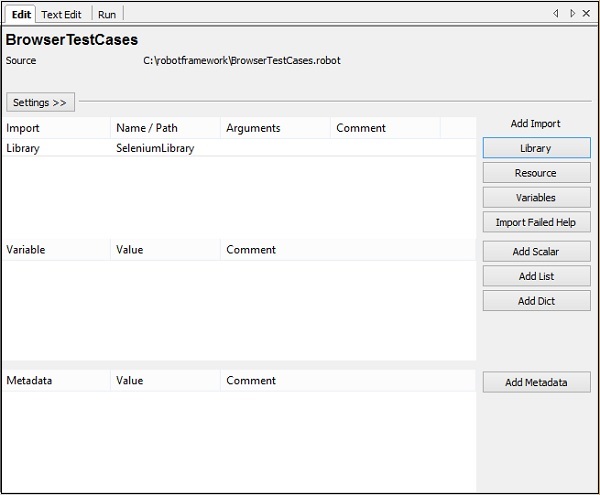
The name given is BrowserTestCases. Click OK to save the project. Right-click on the name of the project created and click on New Test Case −

Give name to the test case and click OK.
We are done with the project setup. Now, we will write test cases for the browser.
Import Selenium Library
To work with browsers, we need selenium library to be imported in robot. We can do that as follows −
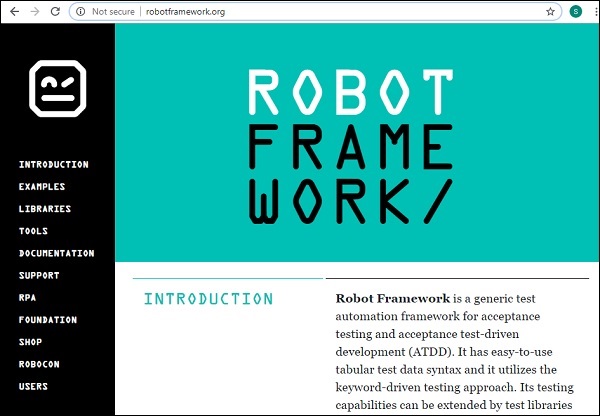
Go to https://robotframework.org/
On the left side, select the LIBRARIES option.

Select External option from above and it will list you all the libraries available to be used.
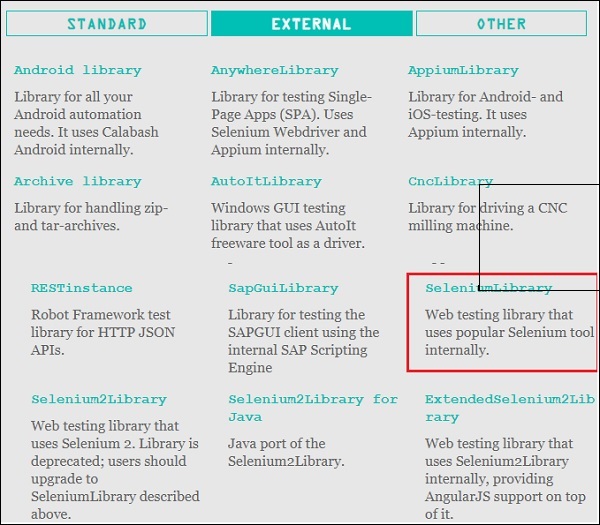
Click SeleniumLibrary.
You will be redirected to the github repo as shown below −
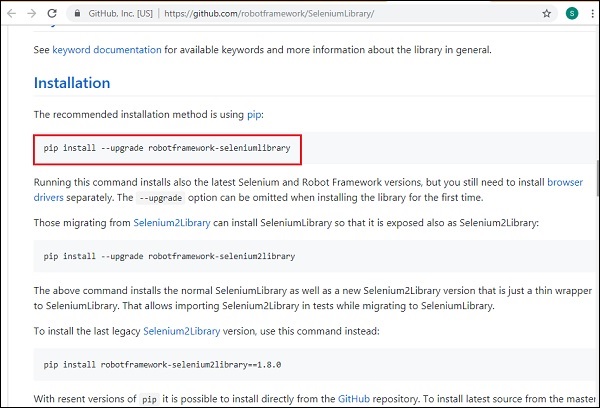
For Installation of seleniumlibrary, we can use the command from the github and install it using pip.
Command
pip install --upgrade robotframework-seleniumlibrary
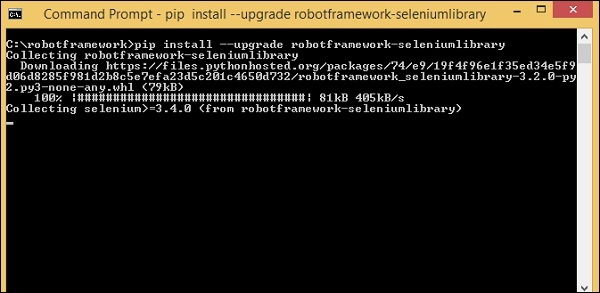
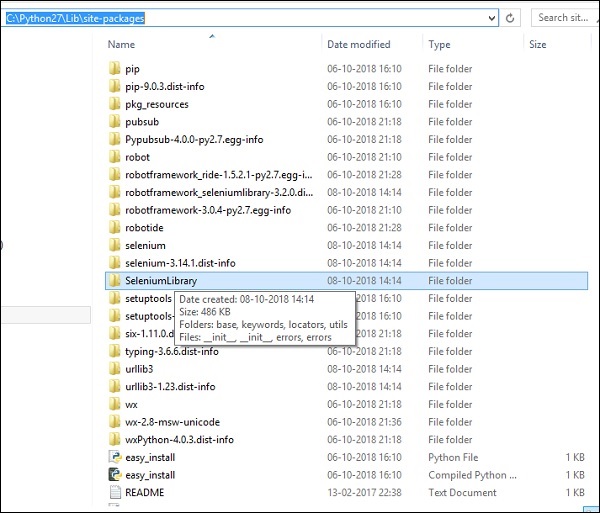
Selenium library gets installed inside the lib folder in python as follows −
Once the installation is done, we have to import the library in Ride as shown in the below steps.
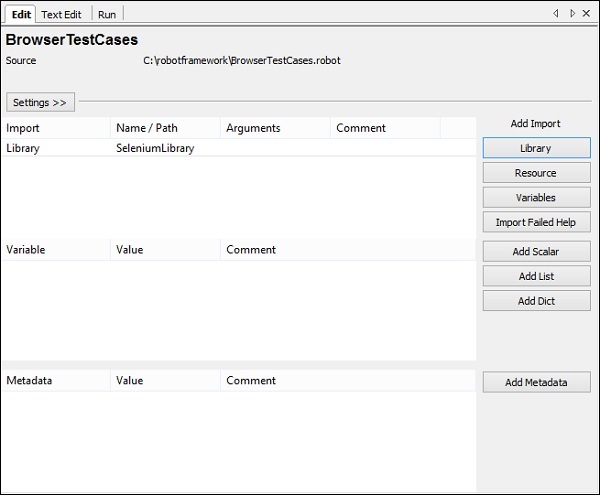
Click on your project on the left side and use Library from Add Import −
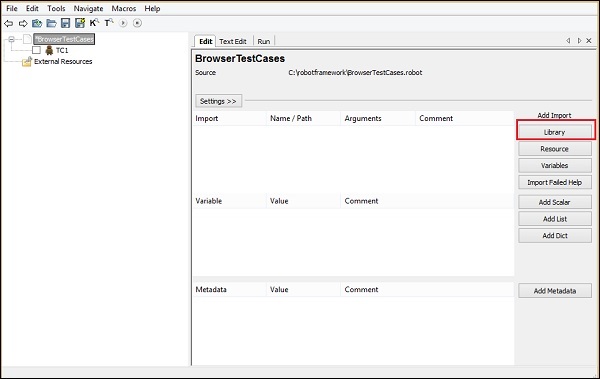
Upon clicking Library, a screen will appear wherein you need to enter the library name −

Click OK and the library will get displayed in the settings.
The name given has to match with the name of the folder installed in site-packages. In case the names do not match, the library name will be in red as shown below −
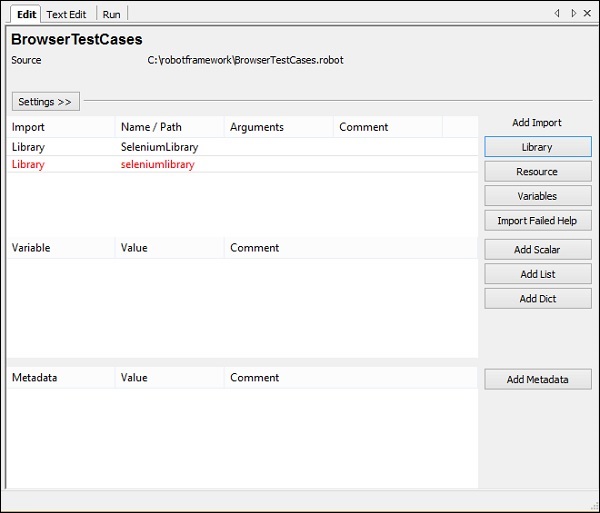
Library import in red is as good as the library does not exist inside python. Now, we have completed selenium library import.
Test Case Using Chrome Browser
To work with Chrome browser in Robot, we need to first install the drivers for chrome to work with Selenium. The drives are available on Selenium site − https://www.seleniumhq.org/.
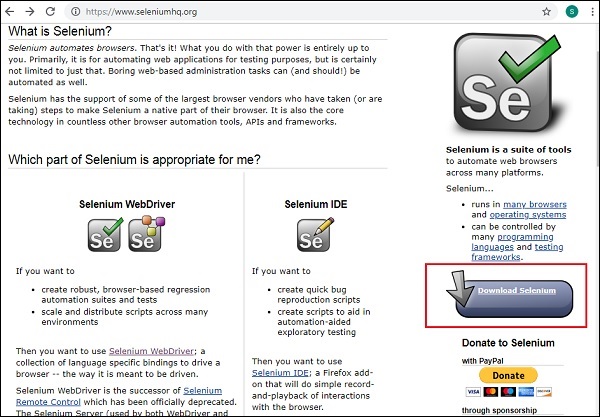
Click Download Selenium as in the above screenshot.
In download section, go to Third Party Browser Drivers NOT DEVELOPED by seleniumhq and select Google Chrome driver as shown in highlighted section below

Here we have a list of the various drivers available for browsers. For Chrome, click Google Chrome Driver and download the latest driver as per you operating system.
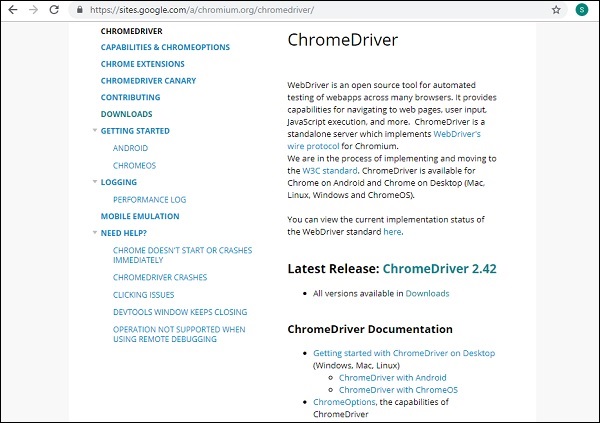
Click on the latest release. It will display the downloads as per the operating system windows, linux and mac.
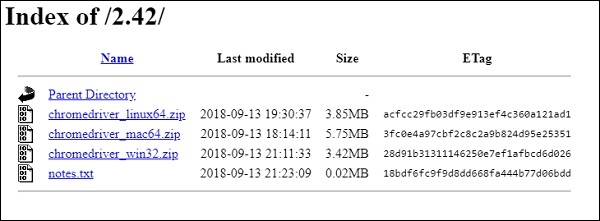
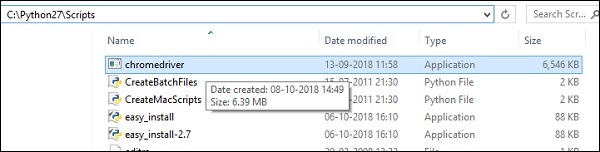
Download the version as per your operating system from the above list. It downloads the zip file. Once the file downloads, unzip it and copy the .exe driver file to python folder.
We are copying the file to C:\Python27\Scripts.
Now we are done installing the driver for chrome. We can get started with writing test case that will open browser and close browser.
Go back to ride and enter the keywords for opening the browser.
Ride helps you with keywords to be used with its built-in tool. Enter the command and press ctrl+spacebar. You will get all the details of the command as shown below
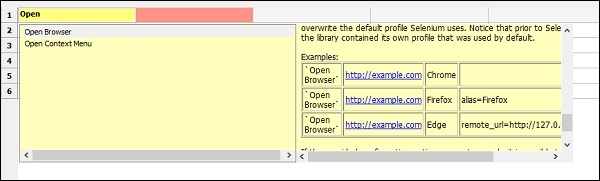
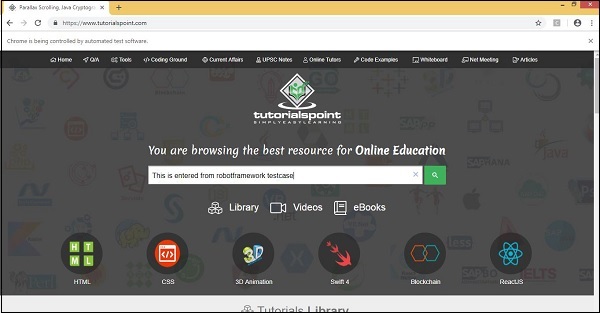
It gives the details of the command and also examples on how to use it. In the test case, we will open the site https://www.tutorialspoint.com/ in chrome and the test case details will be as follows −

Let us now run this test case to see the output −
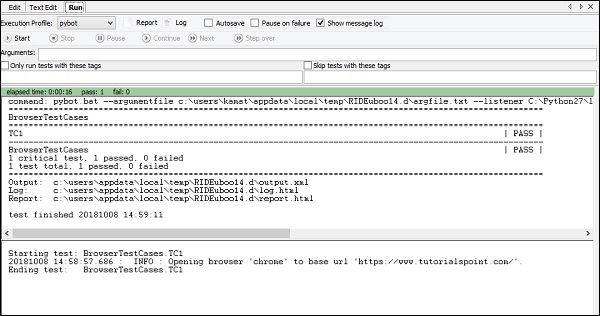

The test case has passed; we can see the site is opened in chrome browser.
We will add more test cases as follows −
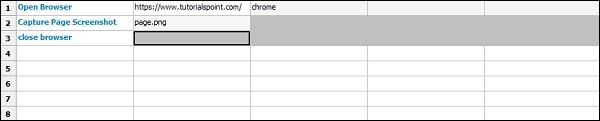
Open Browser − URL − https://www.tutorialspoint.com/ in Chrome browser
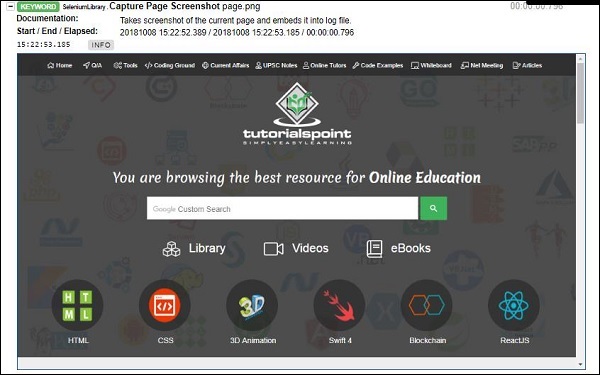
Capture Page Screenshot − name of the image is page.png
Close browser
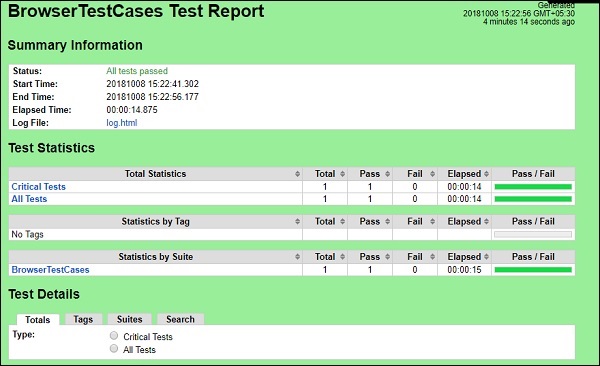
Here are the details of the report and log for above test cases executed.
Report
Log
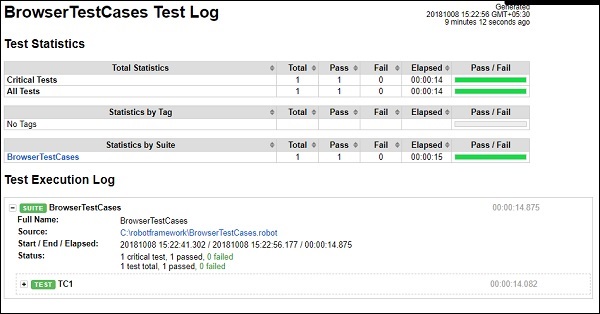
Details of test cases from log


Test Case Using Firefox Browser
Install the driver for Firefox and save it in python scripts folder.
Test case for Firefox

Conclusion
We have seen how to install Selenium library and the browser drivers to work with browsers in Robot framework. Using the selenium library keywords, we can open any given link in the browsers and interact with it. The details of the test-case execution are available in the form of reports and logs, which give the time taken for execution.
Robot Framework - Working With Textbox
For testing, it becomes important to understand how to interact with the browser and locate the html elements. It is very easy to work with input fields with robot framework. In this chapter, we will learn how to work with textbox using Selenium Library. To work with input field textbox, we need the locator, which is the main unique identifier for that textbox and it can be id, name, class, etc.
In this chapter, we will discuss the following areas −
- Project Setup for Textbox Testing
- Enter Data in Search Textbox
- Click on Search Button
Project Setup for Textbox Testing
We will first create a project in Ride to work with browsers. Open ride using ride.py from the command line.

Click New Project and enter Name of your project as shown below.
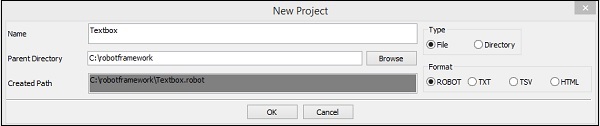
The name given for the project is Textbox. Click OK to save the project. Right-click on the name of the project created and click on New Test Case −

Name your test case and click OK to save it. We are now done with the project setup. Further, we will write test cases for the textbox. Since we need Selenium library, we need to import the same in our project.
Click on your project on the left side and use Library from Add Import.
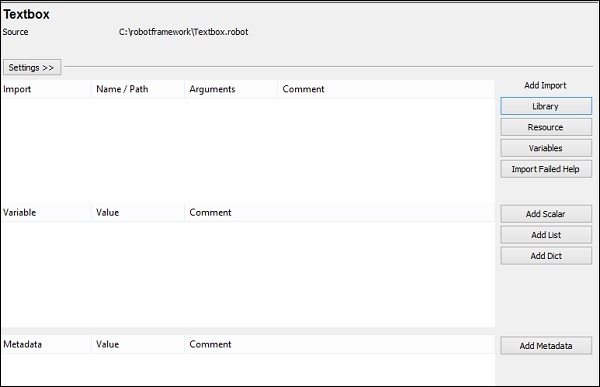
Upon clicking Library, a screen will appear where you need to enter the library name −

Click OK and the library will get displayed in the settings.
The name given has to match with the name of the folder installed in site-packages.
In case the names do not match, the library name will show in red as in the following screenshot −

Enter Data in Textbox
We are now going to write test cases. The test case details will be as follows −
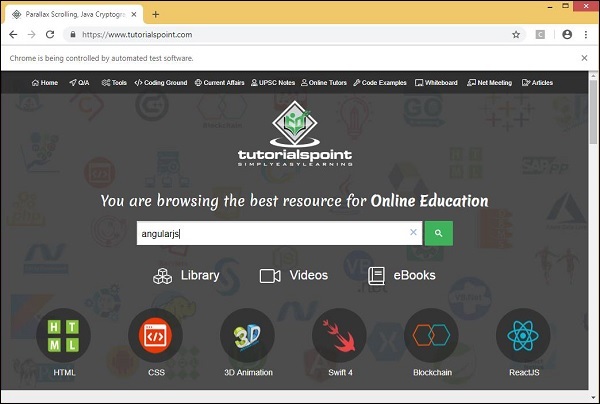
Open browser − URL − https://www.tutorialspoint.com/ in Chrome
Enter data in the search textbox in https://www.tutorialspoint.com/
Click Search
To work with textbox, we need a locator. A locator is the identifier for the textbox like id, name, class, etc. For example, if you are using the −
name attribute of the textbox, it has to be name − Nameofthetextbox or name=Nameofthetextbox
id of the textbox, it will be id:idoftextbox or id=idoftextbox
class of the textbox, it will be class − classfortextbox or class=classfortextbox
Now, we will add the details of the test case for textbox in ride. Here are the keywords entered for textbox test case −

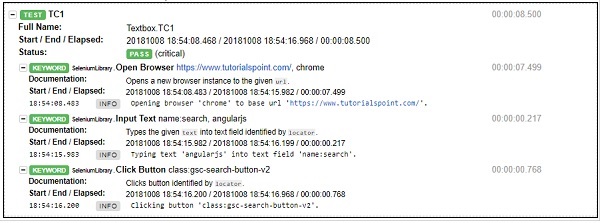
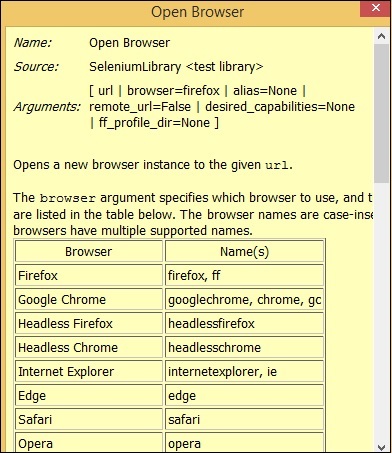
Open Browser − The keyword opens the browser for the given URL and the browser specified.
Input Text − This keyword works on the input type and will look for the locator name:search on the site https://www.tutorialspoint.com/ and angularjs is the value we want to type in the textbox.
Click button is used to click on the button with location class:gsc-search-button-v2.
We will now execute the same −
Upon clicking the Search icon, a screen will appear as shown in the following screenshot −
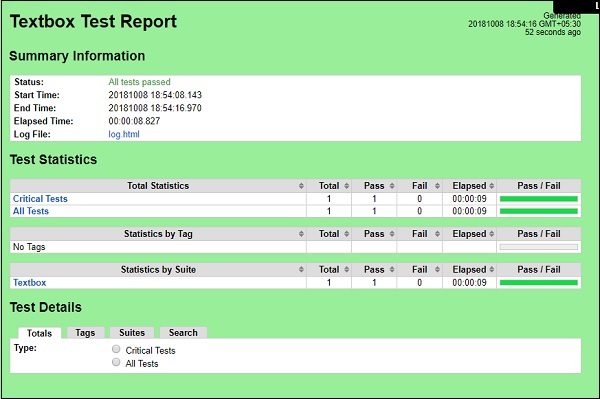
Let us now see the reports and the log details −
Report
Log
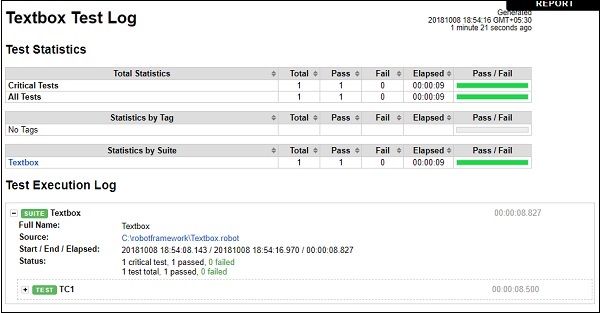
Conclusion
We have seen how to interact with the textbox using selenium library in robot framework.Using the keywords available with robot framework and the library imported we can locate the textbox and enter data and test the same.
Robot Framework - Working With Radio Button
For testing, it becomes important to understand how to interact with the browser and locate the html elements. It is very easy to work with input fields with robot framework. In this chapter, we will learn how to work with radio button using Selenium Library. To work with radio button, we need the locator − the main unique identifier for that radio button.
We are going to discuss the following over here −
- Project Setup for Radio Button Testing
- Test case for Radio Button
Project Setup For Radio Button Testing
We will first create a project in Ride to work with browsers. Open ride using ride.py from the command line.
Click New Project and enter Name of your project as shown in the screenshot below.
The name given is RadioButton. Click on OK button to save the project.
Right-click on the name of the project created and click on New Test Case −

Give name to the test case and click OK to save it. We are done with the project setup and now will write test cases for the radio button. Since we need Selenium library, we need to import the same in our project.
Click on your project on the left side and use Library from Add Import.
Upon clicking Library, a screen will appear where you need to enter the library name −

Click OK and the library will be displayed in the settings.
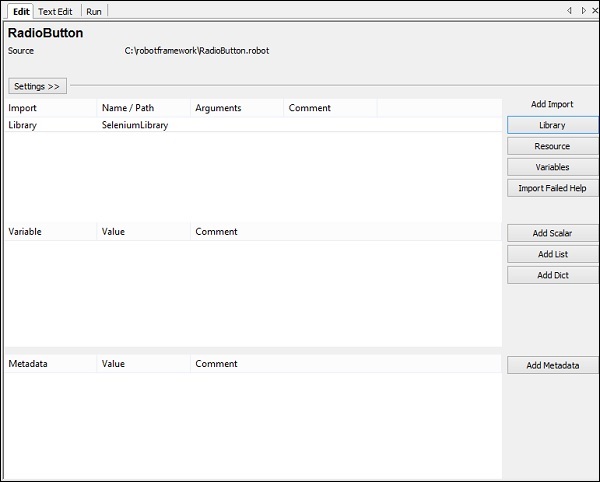
The name given has to match with the name of the folder installed in site-packages. If the name does not match, it will be in red as shown below −

Test Case for Radio Button
The radio button test case will select a radio button, with the help of a locator.
Consider the following html display for radio button −
<input type="radio" name="gender" value="male" checked> Male<br/>
<input type="radio" name="gender" value="female"> Female<br/>
For radio button, name is the locator. In the above example, the name is gender. We also need the value so that we can select the radio button we want. The values in the above example are Male and Female.
Now, we will create a test-page with radio button and open the same in the browser. Now, select the value of the radio button. The test case details will be as follows −
Open browser − URL − http://localhost/robotframework/radiobutton.html in chrome
Enter details of radio button
Execute the test case
While writing the keyword for test cases, press Ctrl + Spacebar. You will get the details of the command.Details of Radio button
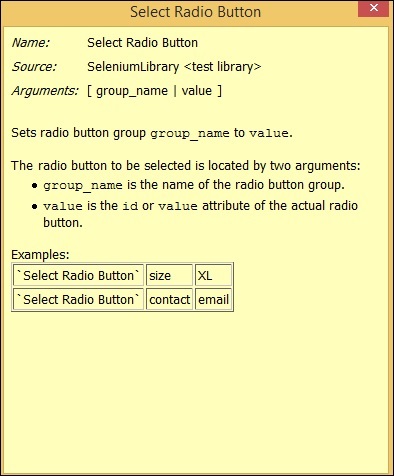
For the radio button, the arguments are group name and value. Here are the details of the test case for Radio button selection −

Following is the Test Page for radio button −
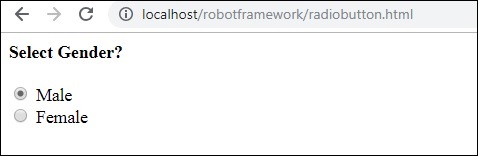
Html code for Radiobutton.html
<html>
   <head>
      <title>Radio Button</title>
   </head>
   <body>
      <form name="myform" method="POST">
         <b>Select Gender?</b>
         <div><br/>
            <input type="radio" name="gender" value="male" checked> Male<br/>
            <input type="radio" name="gender" value="female"> Female<br/>
         </div>
      </form>
   </body>
</html>
In the above form, we are planning to select female, which is a radio button. The name and value are given in the test case. Now, we will execute the test case and check the selection of the checkbox for the above form.
Let us execute the test case and see the display in the browser −
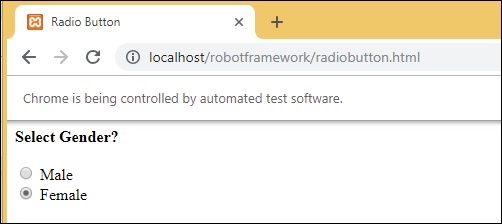
When the test case is executed, it opens the URL http://localhost/robotframework/radiobutton.html and selects the Female radio button whose name and value we have given in the test case.
Here are the execution details in Ride −
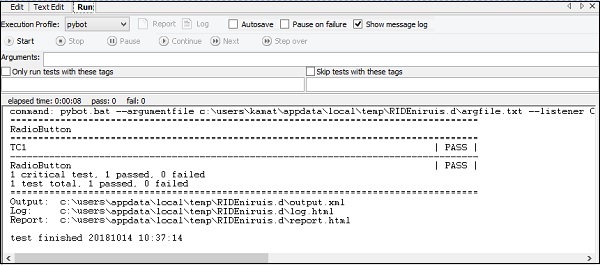
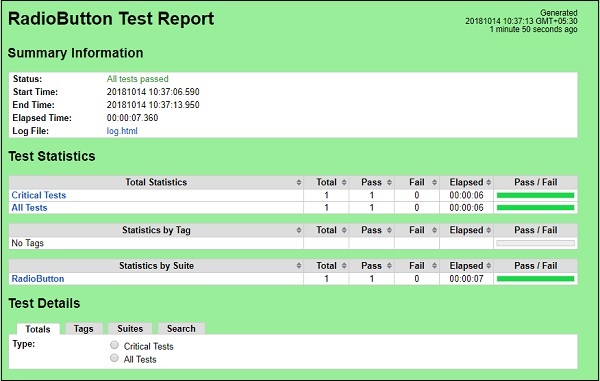
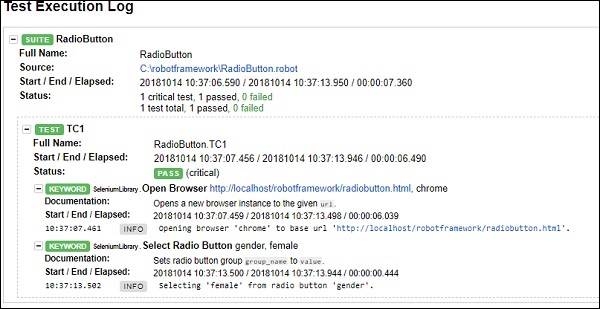
Let us now look at Report and Log for more details.
Report Details
Log Details

Details of test cases
Conclusion
We have seen how to select value of radio button by giving the group name of the radio button to the test case. Using the keywords available with robot framework and the library imported, we can locate the radio button and select the value of the radio button. We do get the details of the test-case executed using robot framework logs and report.
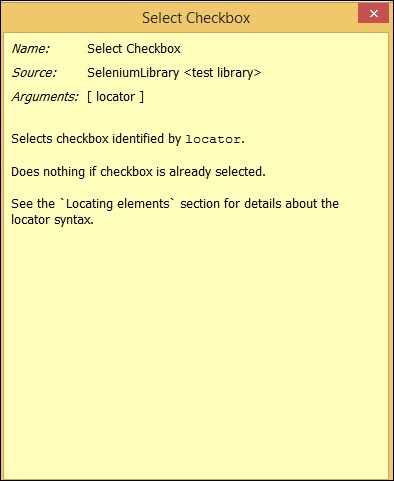
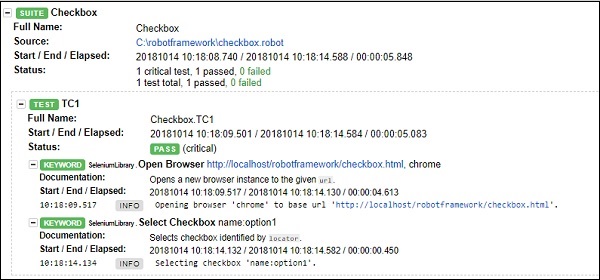
Robot Framework - Working With Checkbox
For testing, it becomes important to understand how to interact with the browser and locate the html elements. It is very easy to work with input fields with robot framework. In this chapter, we will learn how to work with checkbox using Selenium Library. To work with checkbox, we need the locator, which is the main unique identifier for that checkbox. The locator can be id, name, class, etc.
Project Setup for Checkbox Testing
We will first create a project in Ride to work with browsers. Open ride using ride.py from the command line.

Click on New Project and enter Name of your project as shown in the screenshot below.

The name given for the project is Checkbox. Click OK to save the project.
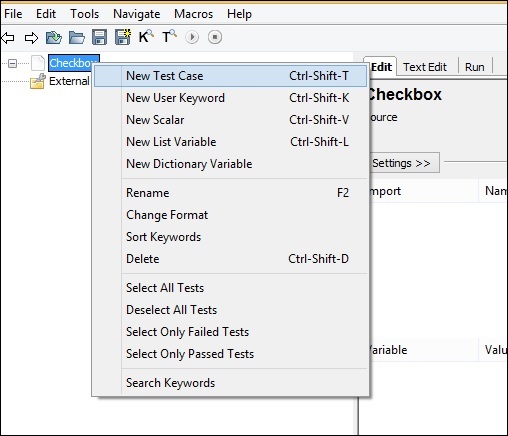
Right-click on the name of the project created and click New Test Case −

Give name to the test case and click OK. We are done with the project setup. Now we will write test cases for checkbox. Since we need Selenium library, we need to import the same in our project.
Click on your project on the left side and use Library from Add Import.
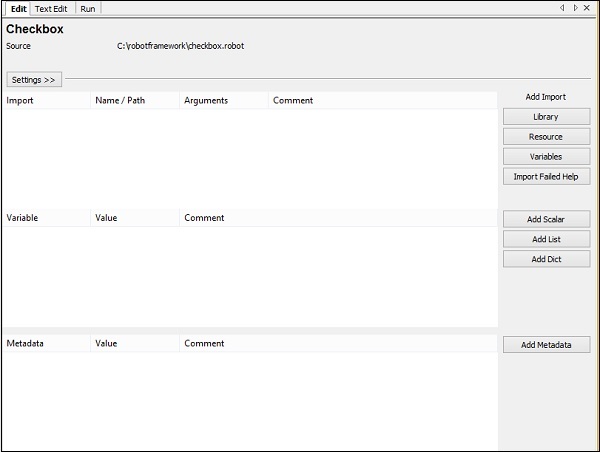
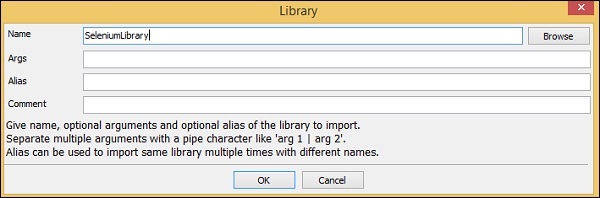
Now, click Library. A screen will appear where you need to enter the library name −
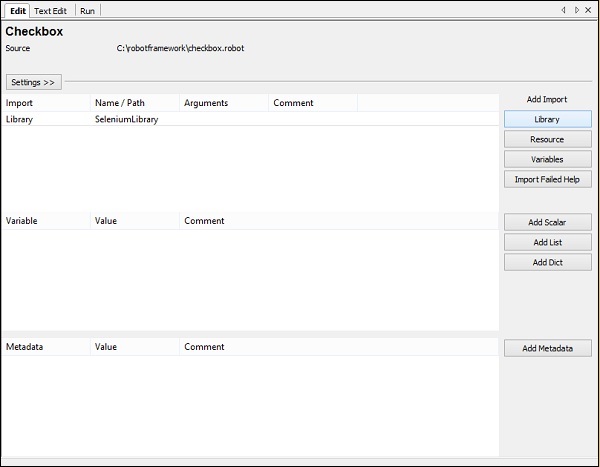
Click OK and the library will get displayed in the settings.
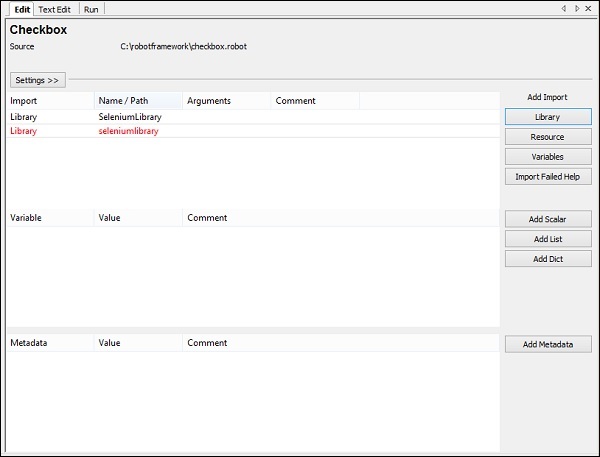
The name given has to match with the name of the folder installed in site-packages. If the names do not match, the library name will show in red −
Test Case for Checkbox
In the test case, we will select the checkbox. To select the checkbox, we need the identifier locator.
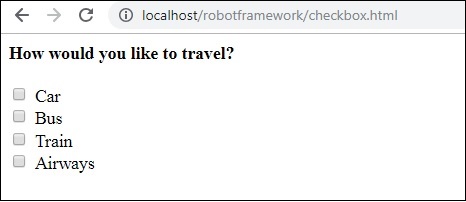
Now consider the following html display for checkbox −
<input type="checkbox" name="option1" value="Car"> Car
For checkbox, we have the name as the locator. In the above example, the name is option1. We also need the value so that we can select the same. Car holds the value in the above example.
Now, we will create a test page with checkbox. Open the checkbox in the browser and select the value.
The test case details will be as follows −
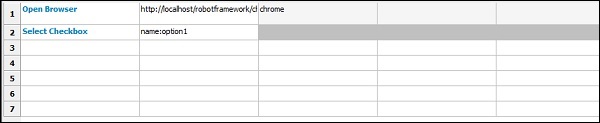
Open browser − URL http://localhost/robotframework/checkbox.html in Chrome
Enter details of checkbox.
Execute the test case.
While writing the keyword for test cases, press Ctrl + Spacebar. It gives all the details of the command.Details of checkbox.
The keywords to be used for checkbox is −
Select checkbox name:nameofcheckbox value
The command details from ride is as follows −
So, arguments is the locator for the checkbox. Here are the details of the test case for Checkbox selection −
This is how the URL is −
checkbox.html
<html>
   <head>
      <title>Checkbox Test Page>/title>
   </head>
   <body>
      <form name="myform" method="POST">
         <b>How would you like to travel?</b>
         <div><br>
            <input type="checkbox" name="option1" value="Car"> Car<br>
            <input type="checkbox" name="option2" value="Bus"> Bus<br>
            <input type="checkbox" name="option3" value="Train"> Train<br>
            <input type="checkbox" name="option4" value="Air"> Airways<br>
            <br>
         </div>
      </form>
   </body>
</html>
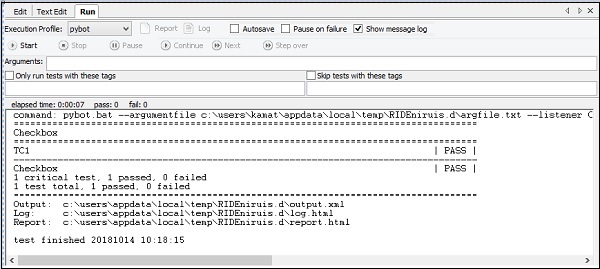
In the above form, we are planning to select Car, which is a checkbox. The details are given in the test case. Now, we will execute the test case and check the selection of the checkbox for the above form.

When the test case is executed, it opens the URL http://localhost/robotframework/checkbox.html and selects the name Car given in the test case.
Here are the execution details −
Details of Report
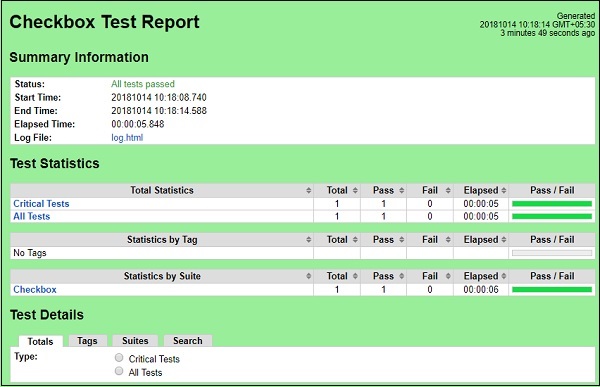

Details of Log
Conclusion
In this chapter, we learnt how we can select a checkbox by giving the locator of the checkbox. The log and Reports give the details of the execution of the test case along with the time spent for each test case.
Robot Framework - Working With Dropdown
In this chapter, we will learn how to work with dropdown using Selenium Library.
Project Setup for Dropdown Testing
We will first create a project in Ride to work with browsers. Open ride using ride.py from the command line −

Click New Project and give a name to your project.
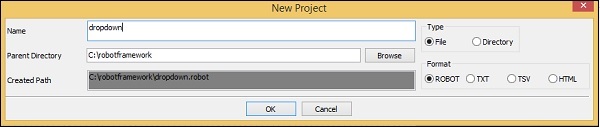
The name given is dropdown. Click OK to save the project.
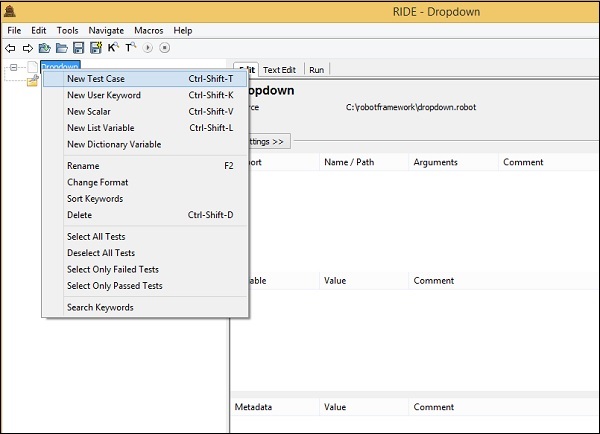
Right−click on the name of the project created and click New Test Case −

Give name to the test case and click OK to save it.
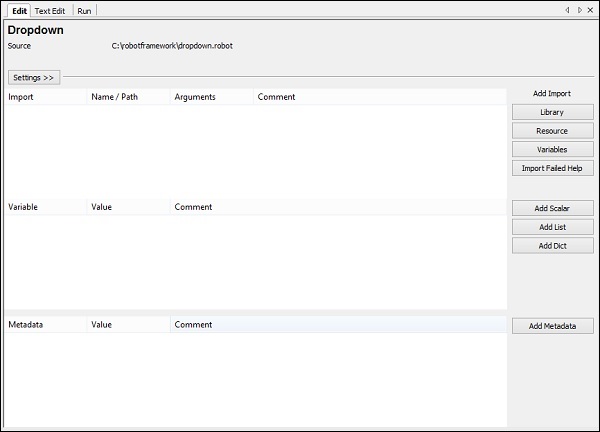
We are done with the project setup. Now, we will write test cases for the dropdown. Since we need Selenium library, we need to import the same in our project.
Click on your project on the left side and use Library from Add Import as shown below −
Now, click Library. A screen will appear where you need to enter the library name −

Click OK and the library will be displayed in the settings.
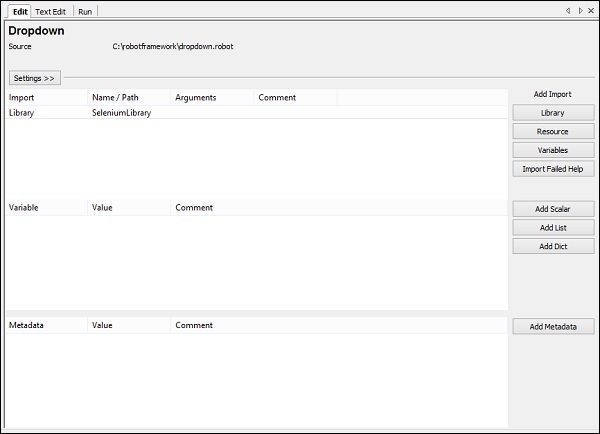
The name given has to match with the name of the folder installed in site-packages.
In case the name does not match, the library name will show in red −

Library import in red is as good as the library does not exists inside python.So now we are done with selenium library import.
Test Case for Dropdown
The test case for dropdown will select the value from the dropdown. To go about working with this, we need the locator (identifier) for that dropdown.
Consider the following html display for dropdown −
<select name = "carbrand">
   <option value = "">Select car brand..</option>
   <option value = "audi">AUDI</option>
   <option value = "bmw">BMW</option>
   <option value = "chevrolet">CHEVROLET</option>
   <option value = "datsun">DATSUN</option>
</select>
For dropdown, name is the locator. In the above example, the name is carbrand. We also need the value so that we can select the same. The values in the above example are audi, bmw, chevrolet and datsun.
Now, we will create a test page with dropdown, open the same in the browser and select the value from the dropdown.
The test case details will be as follows −
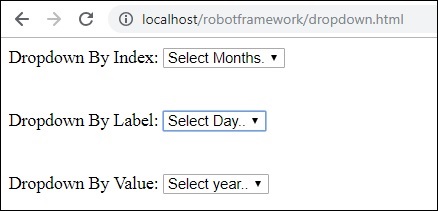
Open browser URL − http://localhost/robotframework/dropdown.html in chrome
Enter details of dropdown
Execute the test case
While writing the keyword for test cases in RIDE, press Ctrl + Spacebar. This gives all the details of the command.
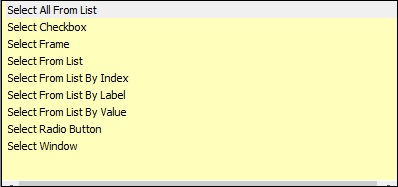
For dropdown, we have three ways of doing it −
- Select From List By Index
- Select From List By Label
- Select From List By Value
We will work on an example to show working for all the cases mentioned above.
In our test page, we will create 3 dropdowns and will use above test cases to select the dropdown by index, label and value.
dropdown.html
<html>
   <head>
      <title>Dropdown</title>
   </head>
   <body>
      <form name="myform" method="POST">
         <div>
            Dropdown By Index:
            <select name = "months">
               <option value = "">Select Months.</option>
               <option value = "Jan">January</option>
               <option value = "Feb">February</option>
               <option value = "Mar">March</option>
               <option value = "Apr">April</option>
               <option value = "May">May</option>
               <option value = "Jun">June</option>
               <option value = "Jul">July</option>
               <option value = "Aug">August</option>
               <option value = "Sept">September</option>
               <option value = "Oct">October</option>
               <option value = "Nov">November</option>
               <option value = "Dec">December</option>
            </select>
         </div>
         <br/>
         <br/>
         <div>
            Dropdown By Label:
            <select name = "days">
               <option value = "">Select Day..</option>
               <option value = "01">01</option>
               <option value = "02">02</option>
               <option value = "03">03</option>
               <option value = "04">04</option>
               <option value = "05">05</option>
               <option value = "06">06</option>
               <option value = "07">07</option>
               <option value = "08">08</option>
               <option value = "09">09</option>
               <option value = "10">10</option>
               <option value = "11">11</option>
               <option value = "12">12</option>
               <option value = "13">13</option>
               <option value = "14">14</option>
               <option value = "15">15</option>
               <option value = "16">16</option>
               <option value = "17">17</option>
               <option value = "18">18</option>
               <option value = "19">19</option>
               <option value = "20">20</option>
               <option value = "21">21</option>
               <option value = "22">22</option>
               <option value = "23">23</option>
               <option value = "24">24</option>
               <option value = "25">25</option>
               <option value = "26">26</option>
               <option value = "27">27</option>
               <option value = "28">28</option>
               <option value = "29">29</option>
               <option value = "30">30</option>
               <option value = "31">31</option>
            </select>
         </div>
         <br/>
         <br/>
         <div>
            Dropdown By Value:
            <select name = "year">
               <option value = "">Select year..</option>
               <option value = "0">2000</option>
               <option value = "1">2001</option>
               <option value = "2">2002</option>
               <option value = "3">2003</option>
               <option value = "4">2004</option>
               <option value = "5">2005</option>
               <option value = "6">2006</option>
               <option value = "7">2007</option>
               <option value = "8">2008</option>
               <option value = "9">2009</option>
               <option value = "10">2010</option>
               <option value = "11">2011</option>
               <option value = "12">2012</option>
               <option value = "13">2013</option>
               <option value = "14">2014</option>
               <option value = "15">2015</option>
               <option value = "16">2016</option>
               <option value = "17">2017</option>
               <option value = "18">2018</option>
            </select>
         </div>
      </form>
   </body>
</html>
We will add test cases for all 3 dropdown selection in Ride.
For index, we need to pass the locator of that dropdown name or id and the index of the element that needs to be selected.
Select List by Index Example
<select name = "months">
   <option value = "">Select Months.</option> // index 0
   <option value = "Jan">January</option> //index 1
   <option value = "Feb">February</option> // index 2
   <option value = "Mar">March</option> // index 3
   <option value = "Apr">April</option> // index 4
   <option value = "May">May</option> // index 5
   <option value = "Jun">June</option> // index 6
   <option value = "Jul">July</option> // index 7
   <option value = "Aug">August</option> // index 8
   <option value = "Sept">September</option> //index 9
   <option value = "Oct">October</option> //index 10
   <option value = "Nov">November</option> //index 11
   <option value = "Dec">December</option> // index 12
</select>
Now, we want to select month as May so the index to be given in the test case is 5.
Label is seen when you open the dropdown on screen.
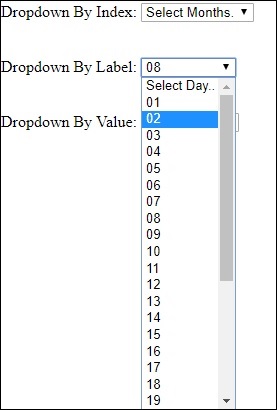
If you want to select a day, you can choose one from the dropdown.
Select From List by Value
Here is the list of the year. The list has values from 0 to 18.
<select name = "year">
   <option value = "">Select year..</option>
   <option value = "0">2000</option>
   <option value = "1">2001</option>
   <option value = "2">2002</option>
   <option value = "3">2003</option>
   <option value = "4">2004</option>
   <option value = "5">2005</option>
   <option value = "6">2006</option>
   <option value = "7">2007</option>
   <option value = "8">2008</option>
   <option value = "9">2009</option>
   <option value = "10">2010</option>
   <option value = "11">2011</option>
   <option value = "12">2012</option>
   <option value = "13">2013</option>
   <option value = "14">2014</option>
   <option value = "15">2015</option>
   <option value = "16">2016</option>
   <option value = "17">2017</option>
   <option value = "18">2018</option>
</select>
If you want to select any year, take the value corresponding to the year and add the same in test case. For example, if you want to select year 2017 the value is 17.
Here is the final list of test cases −

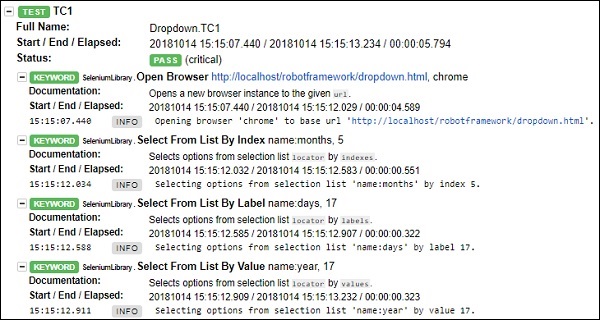
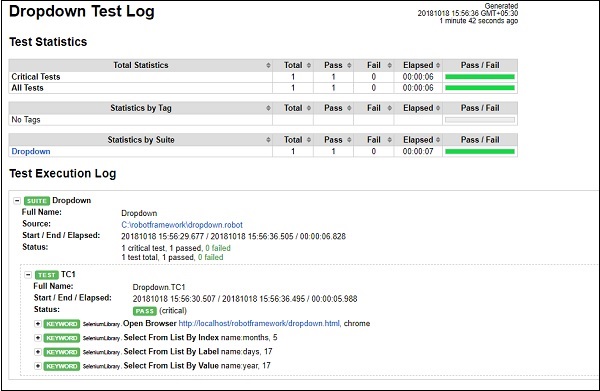
After execution, here is the selection done for dropdowns based on the test case −
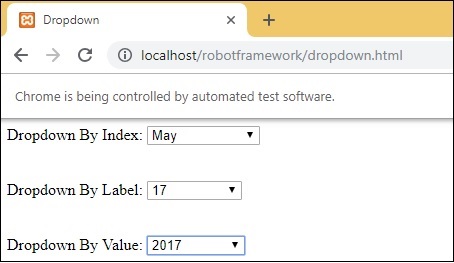
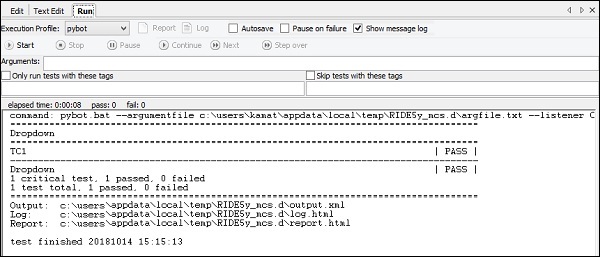
Execution Details
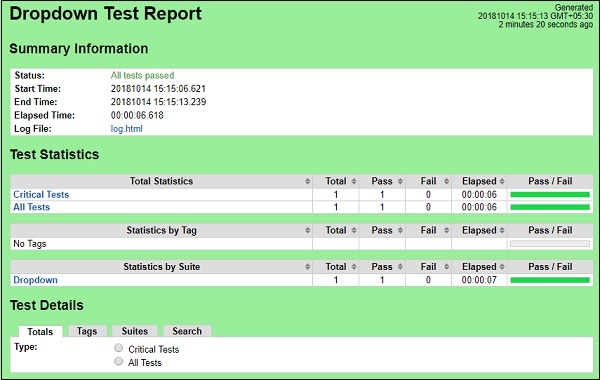
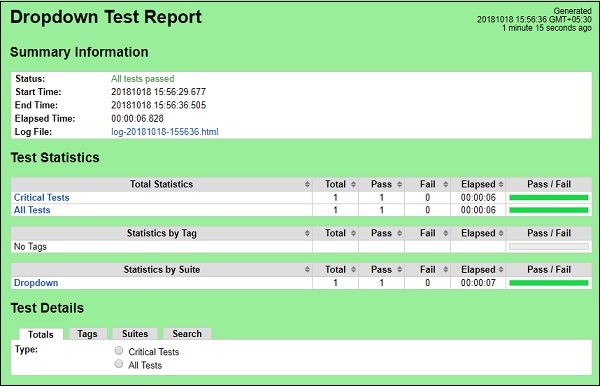
Report Details
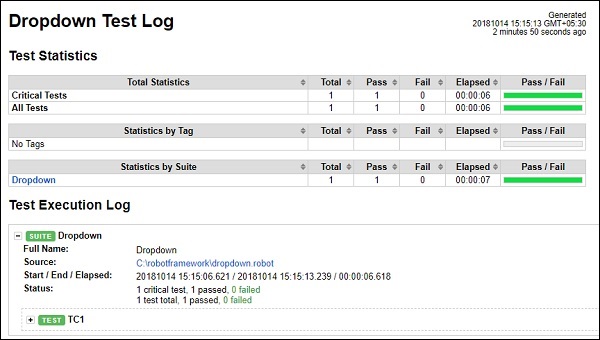
Log Details
Test case details from log
Conclusion
We have seen how to work with dropdown by value, index and label. We can refer to logs and reports to get the details of the test case executed.
Robot Framework - Working With Keywords
In Robot Framework, test cases are constructed in test case tables using keywords. In this chapter, we will cover the details on keywords used in Robot Framework. There are 2 types of keywords used in Robot −
- Library Keywords
- User Defined Keywords
Library Keywords
Library Keywords are keywords that come from the library we import in Robot Framework. We will now take a look at the Selenium library, which helps us interact with the browser. We will discuss some of the important keywords associated with selenium library.
Follow the steps shown below to import Selenium library −
The details relating to the installation of Selenium library is discussed in chapter Working with Browsers using Selenium Library . Open ride using ride.py from the command line.
Click on New Project and give name to your project. The name given to the project is LibraryKeywords.
Right-click on the name of the project created and click on New Test Case −

Give a name to the test case and click OK.
We are done with the project setup. Now, we will write test cases to show the working of library keywords. Since we need Selenium library, we need to import the same in our project.
Click on your project on the left side and click Library.
Upon clicking Library, a screen will appear where you need to enter the library name −
Click OK and the library will get displayed in the settings.

The name given has to match with the name of the folder installed in site-packages.
Now will create test case in the project created and use a few important keywords.
Click on your test case created TC1 and in the tabular form enter the keywords to open the browser and enter data inside the form opened.
Here is a simple test case using Library Keywords −

To get more details of this keyword, while typing the keyword press ctrl + spacebar. It will show the details of the library keyword entered.
Here is an example for Open Browser, and if any help required for that keyword you can make use of ctrl + spacebar while typing the keyword.
Open Browser Keyword Details
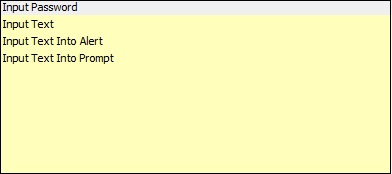
Similarly, we have Library keywords to work with Input, Radio, Text, etc
We will execute the test case we entered to open the browser with URL − https://www.tutorialspoint.com/ and enter details in the input text.
We have executed the test case. You can see the textbox has all the details we gave in the test case.
User-defined Keywords
User-defined keywords can be created to perform a particular action in the test case or it can also be created using the library keywords and built-in keywords in robot framework. We will work on an example and see how we can create keywords for our test case.
We will use the same project that we created above and create user-defined keywords in that and use in the test case.
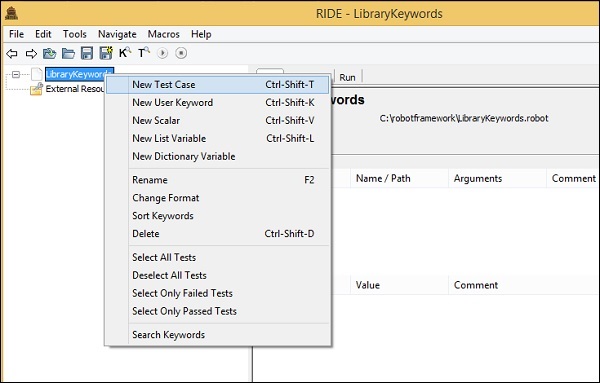
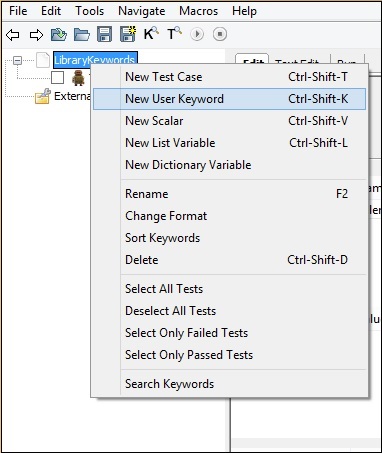
To create keyword in Ride, right-click on your project and click on New User Keyword as shown below −
Upon clicking New User Keyword, a screen appears as shown below −
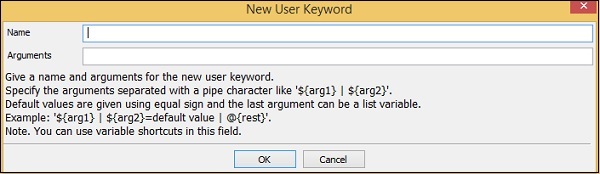
Enter the Name of the keyword and click OK. The screen also shows Arguments. We will discuss what arguments have to do with Keywords in a subsequent section.
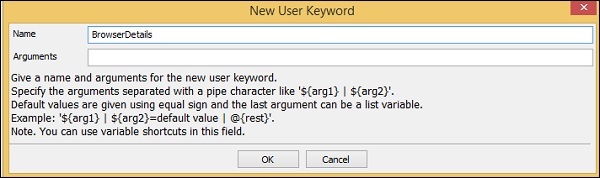
We have given the name BrowserDetails to the keyword. Click OK to save it. The keyword BrowserDetails is created.
To test the URL in the browser, we repeatedly have to enter open browser, maximize browser keywords.
Now, we will create a user-defined keyword that will have open browser and maximize browser details. The keyword created will be used in our test case.
Our BrowserDetails keyword is a combination of other keywords used repeatedly.
Now, we will use the keyword created in the test case as shown below.
Test case

Considering the above test case, we are going to use the user-defined keyword BrowserDetails.
We will now replace 1 and 2 keywords with the user-defined keyword −

Let us now run the test case to see the output −
The execution of the test case works perfectly fine.
Now, we will see the use-case of arguments in keywords.
Here is the keyword that we created −
The name of the keyword is BrowserDetails. We can use this keyword in other test cases created under the project. The keyword contains the URL of the browser hardcoded. If we want to use the keyword in another test case with a different URL, it will not be possible.
We can use arguments to help us with the hardcoded parameters. We will go back to the keyword created and make use of arguments.
Click on Edit against the Arguments.
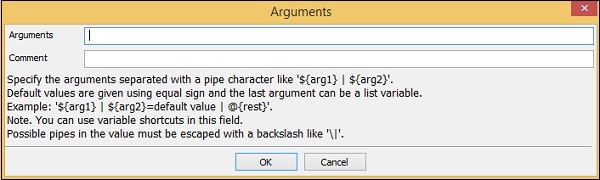
Enter the argument to be used with the keyword.
If there is more than 1 argument, you can separate them using pipe (|). We will now use the argument in the Keyword specified as follows −
Go back to your test case. Now, you need to pass the value which is the URL to be used for the test case.
In the test case, when you type the user-defined keyword and press Ctrl + Spacebar, it gives the details of the keyword along with the arguments.
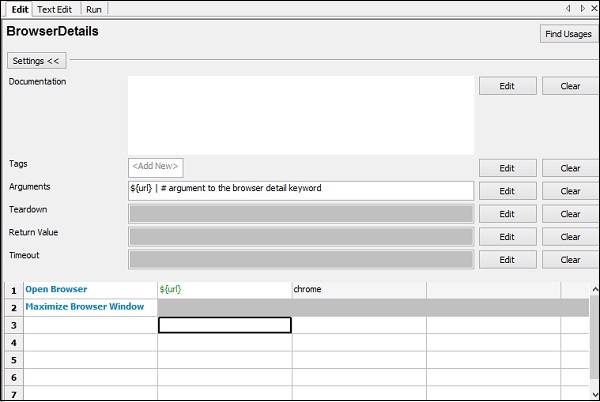
Following are the details for keyword BrowserDetails −

The test case now will have the URL to be passed as argument.

Let us now run the test case to see the output −
The Keyword and the arguments passed to the user-defined keyword are working fine.
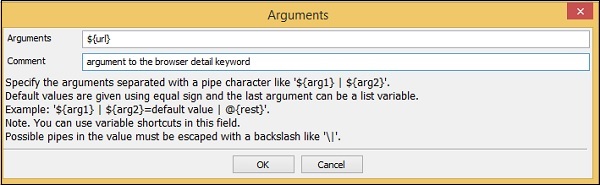
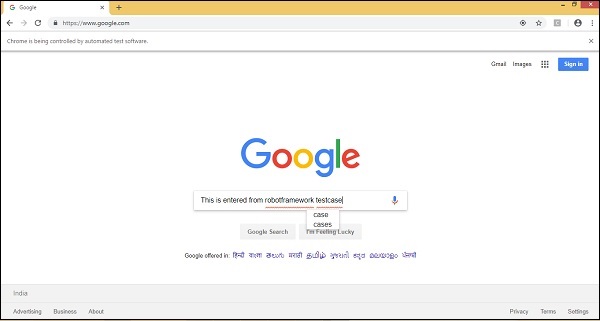
Let us now change the URL; we will use https://www.google.com/

The URL for keyword BrowserDetails is changed to https://www.google.com/
We have changed the argument to Input Text to the id available from google site. To get the id or name or class of the input field, you can inspect and check in the browser.
Let us run the above test case and see the output.
Upon successful execution, the above test case generates the following output −
Conclusion
In this chapter, we have seen how to get help for built-in keywords. We have also seen how to create user-defined keywords, which can be a combination of library keywords and built-in keywords.
Robot Framework - Working With Variables
In this chapter, we will discuss how to create and use variables in Robot Framework. Variables are used to hold a value, which can be used in test cases, user-defined keywords, etc.
We are going to discuss following variables available in Robot Framework
- Scalar Variable
- List Variable
- Dictionary Variable
We will understand the working of each of this variable with the help of test cases in Ride.
Scalar Variable
Scalar variables will be replaced with the value they are assigned. The syntax for scalar variable is as follows −
${variablename}
We can use scalar variable to store strings, objects, lists, etc. We will first create a simple test case and make use of scalar variable in it.
Open RIDE using ride.py in the command line and create a new project.

Click New Project.
Now, give a name to your project.
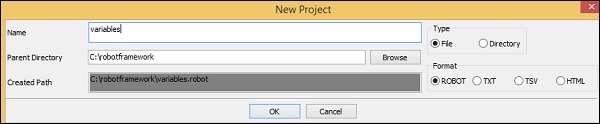
The name given is variables. Click OK to save the project.
Right-click on the name of the project created and click on New Test Case −

Give a name to the test case and click OK.
We are done with the project setup and now will write test cases for the scalar variables to be used in our test case. Since we need Selenium library, we need to import the same in our project.
Click on your project on the left side and use Library from Add Import −
Upon clicking Library, a screen will appear where you need to enter the library name −
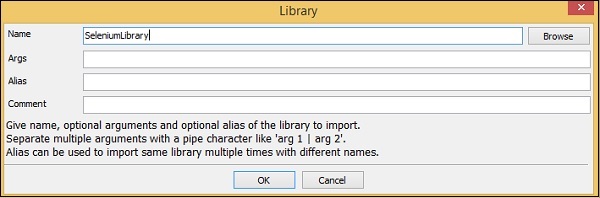
Click OK and the library will get displayed in the settings.
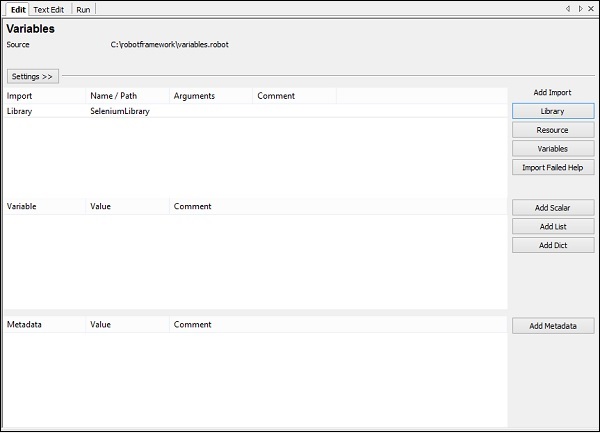
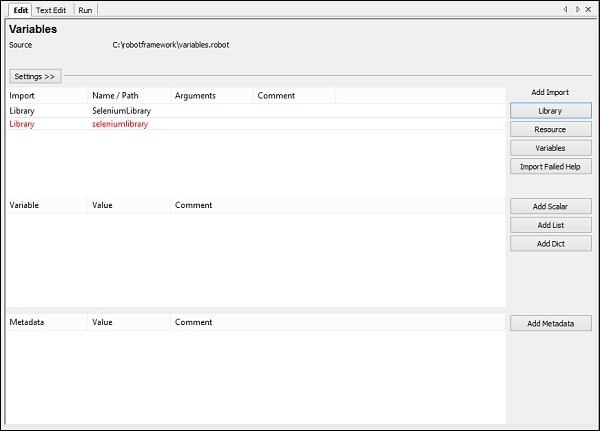
The name given has to match with the name of the folder installed in site-packages.
If the name does not match, the library name will be shown in red −
Test Case for Scalar Variable
In the above test cases we hardcoded the values like the URL, email, password, which we are giving to the test case. The values used can be stored in a variable and instead of hardcoding, we can use the variable in those places.

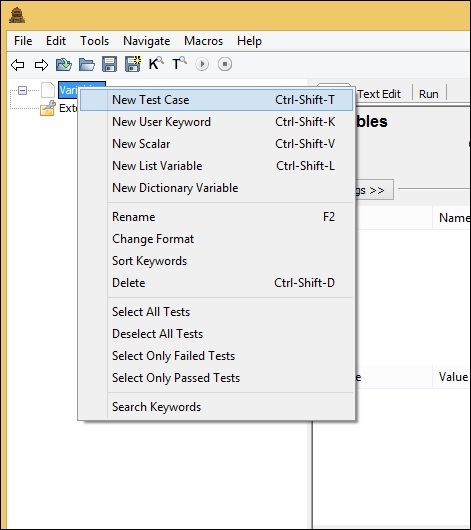
To create scalar variable, right-click on your project and click on New Scalar as shown below −

Clicking on New Scalar will open the following screen to create the variable and the value we need to replace with when the variable in used inside test cases.
We get ${} for the Name field.
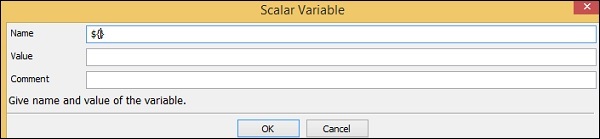
Here we need to enter the name of the variable inside the curly braces as shown in the screen below −
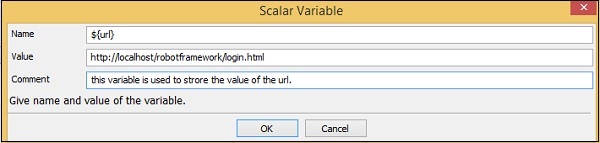
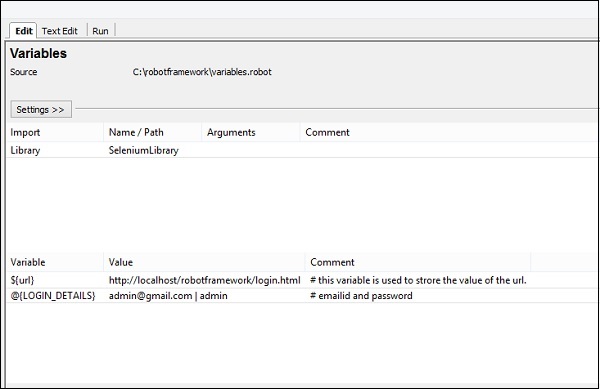
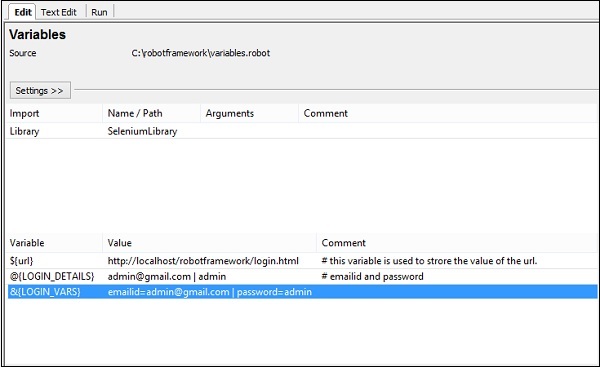
The name of the variable is ${url}. The value is − http://localhost/robotframework/login.html.
We added the comment as shown above. Click OK to save the scalar variable. The details of the variable are added as shown below −
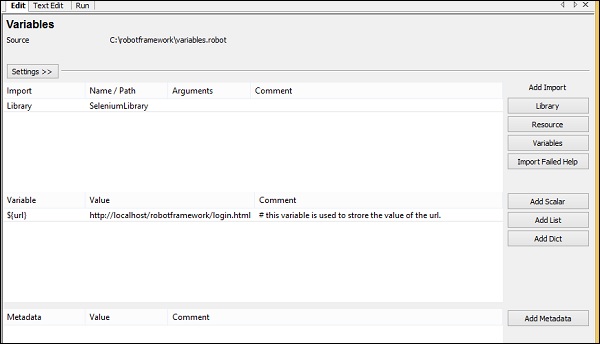
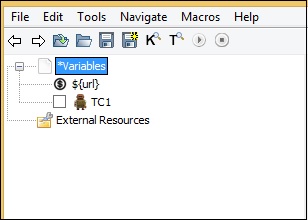
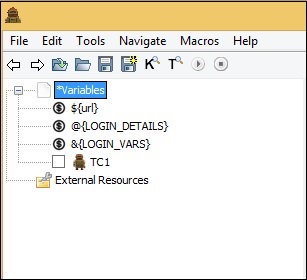
The variable name is shown under the project created as follows −
Let us now use the scalar variable created inside our test case.
Test case with URL hardcoded

In the above test case, we have to replace the URL with the variable we just created above.
Test Case with Scalar Variable for URL

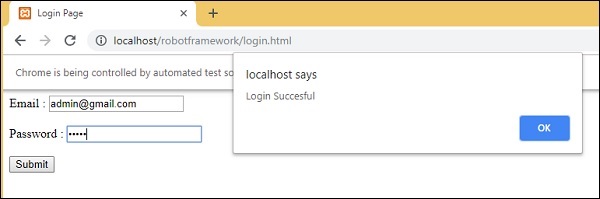
Now, we will run the test case to see if it is taking the URL from the variable. Below is the output that we get when we run it. The URL http://localhost/robotframework/login.html is picked up from the scalar variable we created.
Execution Details
The advantage of using variables is that you can change the value for that variable and it will be reflected in all test cases. You can use the variables in many test cases that you create under that project. Hardcoding of values can be a serious problem when you want to change something, you will have to go to individual test case and change the values for it. Having variables in one place gives us the flexibility to test the way we want with different values to the variables.
Now, we will look into the next type of variable called the List variable.
List Variable
List variable will have an array of values. To get the value, the list item is passed as the argument to the list variable.
Syntax
@{variablename}
Suppose we have values A, B. To refer the values, we need to pass the list item as follows −
@{variablename}[0] // A
@{variablename}[1] // B
To add list variable, right-click on the project and click New List Variable.

Upon clicking New List Variable, a screen appears where we can enter the values −
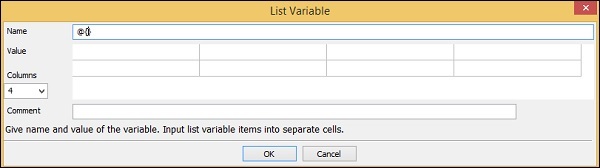
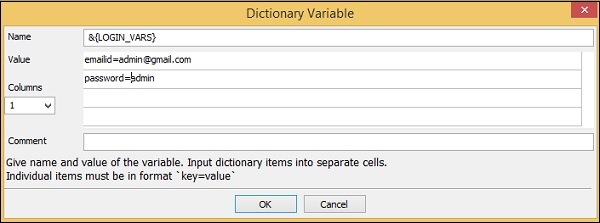
The Name is given as @{} followed by Value. It also has 4 Columns selected. Right now, we will use just Column 1 and create the list variable, which will have values, email id and password as follows −

The name of the list variable is @{LOGIN_DETAILS} and the values given are admin@gmail.com and admin, which has email id and password for the login page.
Click OK to save the list variable. The variable is listed below the project as shown here −
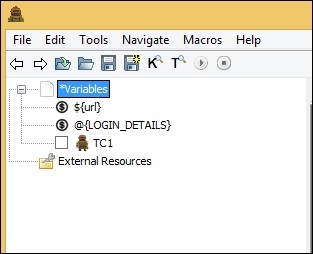
The details of variables used are listed in the settings tab −
Now, we will add the list variable inside the test cases as shown below.
Here, we have hardcoded values for the Input Text and Password. Now, we will change it to use the list variable.

Using List Variable

Now, we will execute the test case to see if it is taking the values from the list variable −
It has taken the email id and password from the list variable as shown above in the test screen.
The following screenshot shows the execution details for the same −
In our next section, we will learn about the Dictionary Variable.
Dictionary Variable
Dictionary Variable is similar to list variable wherein we pass the index as an argument; however, in case of dictionary variable, we can store the details key value form. It becomes easier to refer when used in the test case instead of using the index as 0, 1, etc.
Syntax
&{Variablename}
Suppose we are storing the values as key1=A, key2=B. It will be referred in the test case as −
&{Variablename}[key1] // A
&{Variablename}[key2] // B
Let us create dictionary variable in Ride.
Right-click on Project and click on New Dictionary Variable.
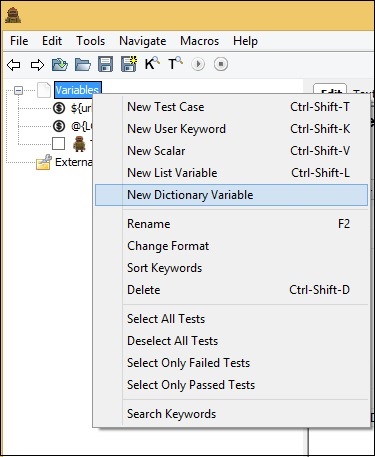
Upon clicking New Dictionary Variable, a screen will appear as shown below −
The Name by default in the screen is &{} and it has Value and Columns option.
We will enter the Name and the Values to be used in the test case.
Click OK to save the variable. The variable will be listed under the project and also in the settings as follows −
We will change the test case to take the dictionary values.

We will change to dictionary variable as shown below.
Using Dictionary Variable

Upon clicking run, we get the following −
The execution details are as follows −
We have seen the Edit and Run Tab so far. In case of TextEdit, we have the details of the test case written. We can also add variables required in TextEdit.
Test case

We have used scalar variable and dictionary variable in the above test case. Here is the code so far in TextEdit; this is based on the test case written −
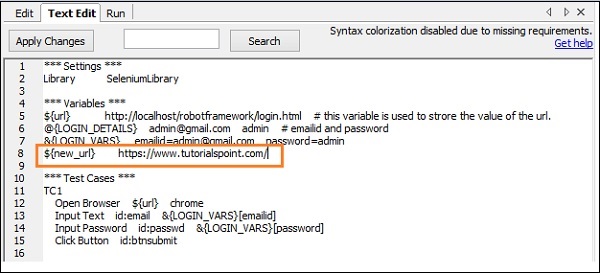
The variables used are highlighted in Red. We can also create variables we want directly in TextEdit as shown below −
We have added a scalar variable called ${new_url} and the value given is https://www.tutorialspoint.com/.
Click Apply Changes button on the top left corner and the variable will be seen under the project as shown below −

Similarly, other variables − list and dictionary variables can be created directly inside TextEdit tab whenever required.
Conclusion
We have seen how to create and use variables. There are three types of variables supported in robot framework − scalar, list and dictionary. We discussed in detail the working of all these variables.
Working With Command Line
In this chapter, we will learn how to make use of the command line to run test cases.
To begin with, let us open the command prompt and go to the folder where your test cases are saved. We have created test cases and saved in the folder robotframework in C Drive.
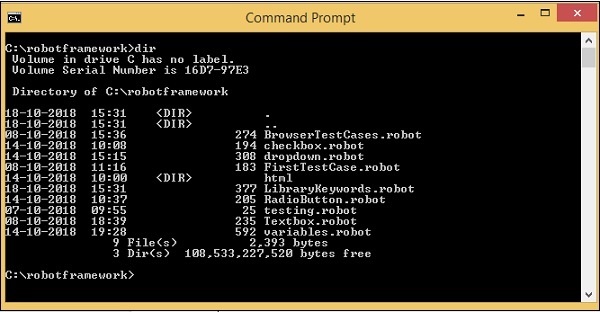
Test cases created so far are available in the folder C:\robotframework.
If you have saved your project as a file, the command is −
robot -T nameoftestcase.robot
If you have saved your project as a directory, the command is −
robot -T projectname testsuite
We will run one of the test created from the folder as shown below −
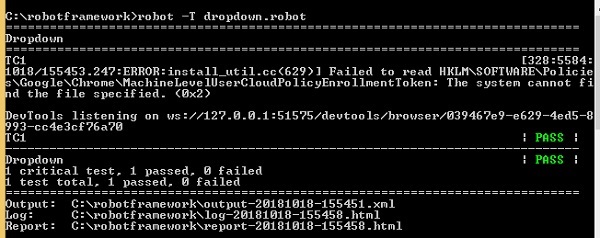
The output, log and report paths are displayed at the end as shown above.
The following screenshot shows the execution details −

Report
Log
Conclusion
We can use command line to execute robot test cases. The details of the test case pass or fail are displayed in the command line along with log and report URLs.
Working With Setup And Teardown
In this chapter, we will understand two important concepts of testing world − setup and teardown.Setup
This is a set of keywords or instruction to be executed before the start of test suite or test case execution.
Teardown
This is a set of keywords or instruction to be executed after the start of test suite or test case execution.
We will work on a project setup, where will use both setup and teardown. The opening and closing of browser are the common steps in test cases.
Now, we will add keyword open browser in the setup and close browser in teardown.
Open Ride using ride.py command from command line and create a new project.
Click New Project to create project.
Click OK to save the project.
Click New Test Case to create one.

Click OK to save the test case.
Now we need to import the SeleniumLibrary to use the keywords related to browser and interact with the pages.
To import the library, click Library −
Click OK to save the library.
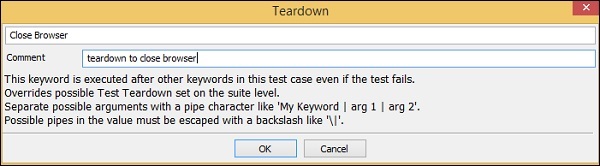
In the above screenshot, the Settings section has Setup and Teardown options. For Setup, click Edit to enter the keyword.
Now, enter the Keyword −
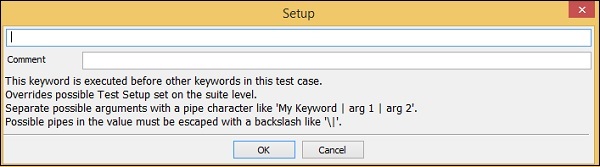
Arguments have to be separated with the pipe character (|).

Click OK to save the Setup. We have entered the Keyword Open browser and also added the arguments as shown above.
Now, we will enter the teardown case.
Click Edit for Teardown and enter the keyword.
Click OK to save the teardown.
Now, we will enter the keywords for test case.
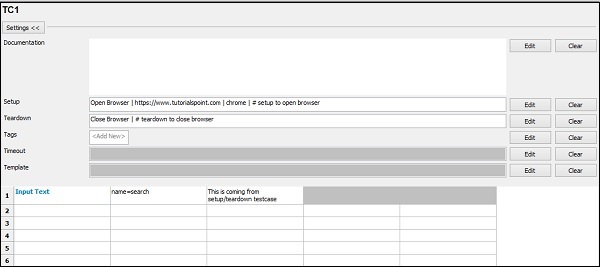
We have only Input Text in the test case. The opening and closing of the browser is done from Setup and Teardown Settings.
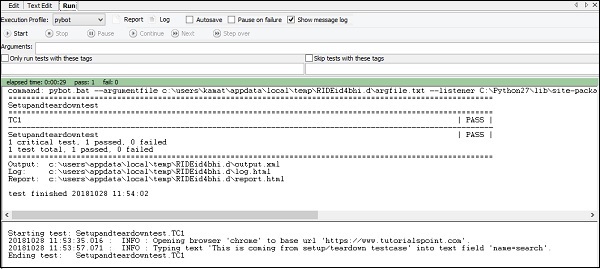
Test Execution Details
Conclusion
Setup and teardown play a crucial role in the testing world. We have seen how to use setup and teardown in our test cases and also how they are executed.
Working with Built-In Library
In this chapter, we will cover some of the important built-in keywords, which come with the Robot Framework. We can use these keywords along with External libraries for writing test case. We also have the built-in library available with Robot framework by default. It is mostly used for verifications (for example Should Be Equal, Should Contain), conversions (convert to integer, log to console, etc.).
We will work on a simple test case and will make use of built-in library in that.
We have created project in Ride and Test case as shown below −
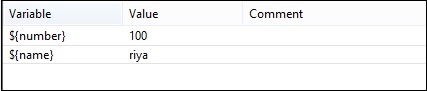
We have created 2 scalar variables number and name as shown below −
Here are the test cases used for comparing number, string, concatenate, etc. We have used simple keywords in the test cases below. The keywords are shown in tabular format here −
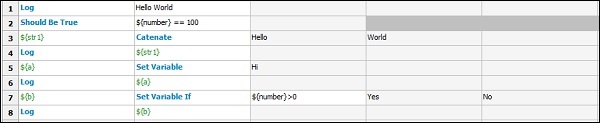
Following is the test code for above test cases from text edit −

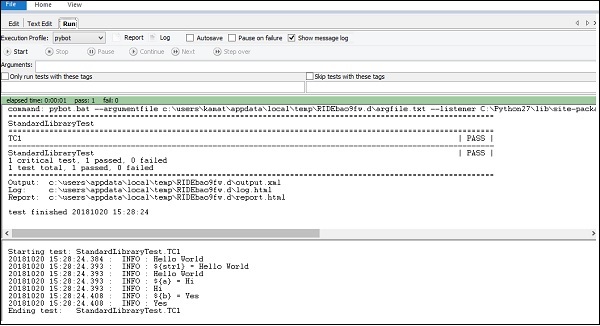
Now, we will execute the test case to see the results −
When you write your keywords in tabular format, press ctrl + spacebar. It gives the list of built-in keywords available with Robot Framework.
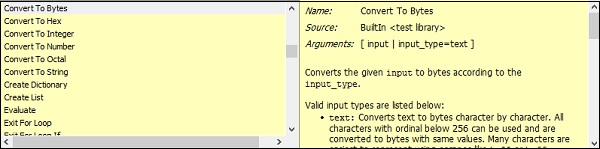
It gives the details of each keyword with example in the corresponding window. When we click on the corresponding window, it will open separately as shown below −
Conclusion
We have seen keywords related to string, numbers, log messages, which are available with robot framework by default. The same can be used along with external library and also can be used to create user-defined keyword to work with test-cases.
Working With External Database libraries
We have seen how we can work with Selenium Library. The detailed installation/importing of Selenium Library is discussed in chapter Working with Browsers using Selenium Library.
In this chapter, we will discuss database library and how to connect and test database using Robot Framework.
Go to Robot framework site https://robotframework.org/ and click Libraries as shown below −
Upon clicking Libraries, you will be redirected to a screen as shown below −
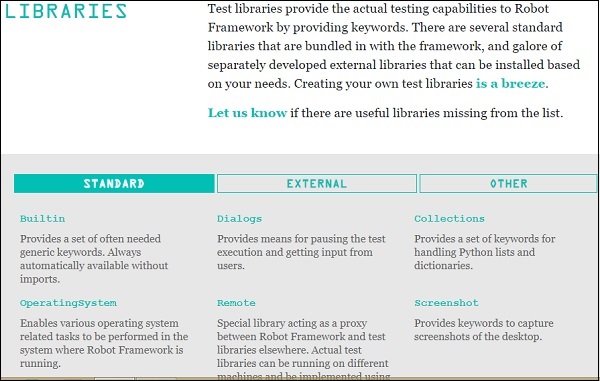
The Libraries are categorized as Standard, External and Other.
We will now take a look at the external library in this chapter. Upon clicking External, the following screen appears −
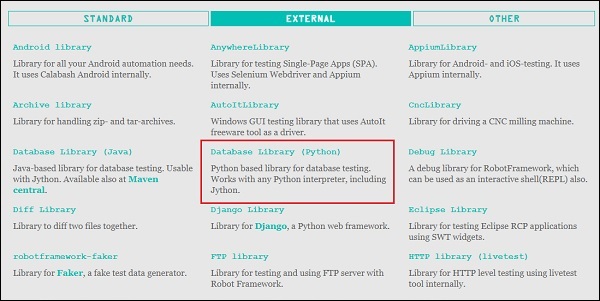
It shows the list of external libraries supported by Robot Framework. Here, we will focus more on the Database Library (Python). The same has been highlighted in the screenshot above.
Upon clicking the Database Library (Python), you will be redirected to the screen where the instruction for installation are listed as shown in the following screenshot −

We can install the database library using pip and the command is −
pip install -U robotframework-databaselibrary
Run the above command in the command line as shown below −
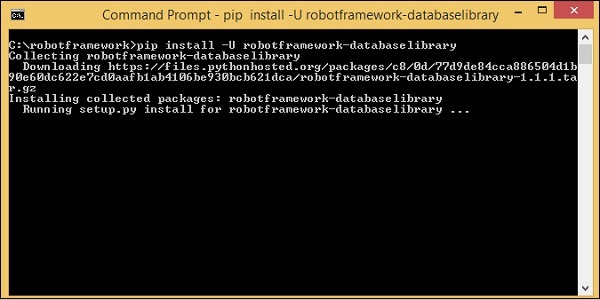
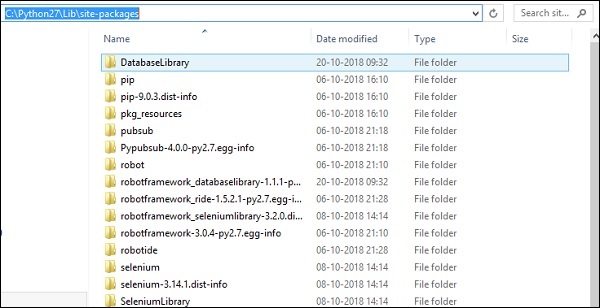
The Library is stored in python lib folder as shown below −
Once the installation is done, the next step is to import the library inside the project and use it with test cases.
Import Database Library
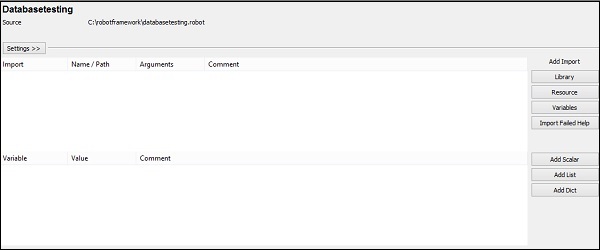
Open ride using ride.py from command line and create the project for testing database.
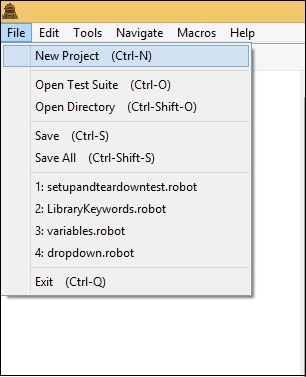
Click New Project and give a name to the project.
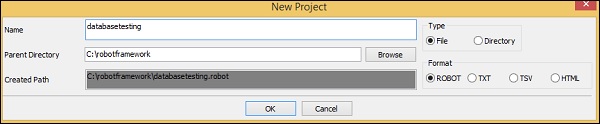
Click OK to save the project.
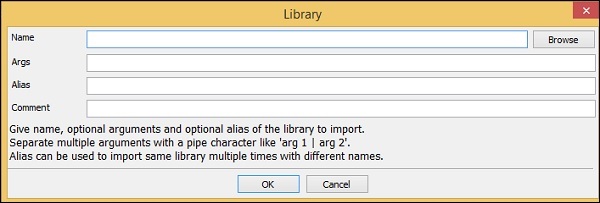
Click Library below Add Import.
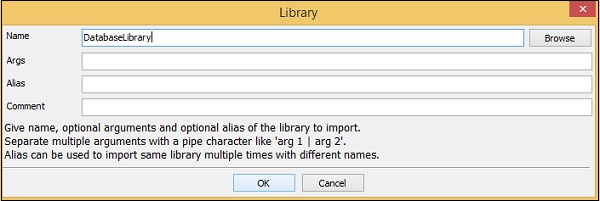
Enter the Name of the Library as DatabaseLibrary as shown below and click OK.
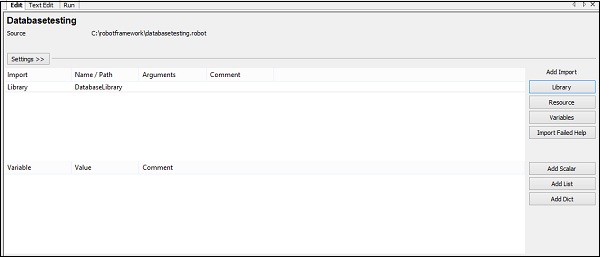
Once saved, the library is as shown below −
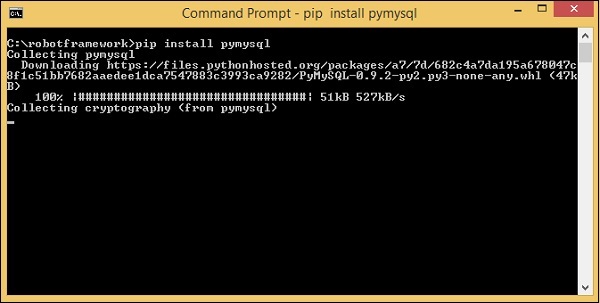
We are going to work with MySQL Database. To work with MySQL, we need to install the module.
Command
pip install pymysql
Now create test case under the project created.
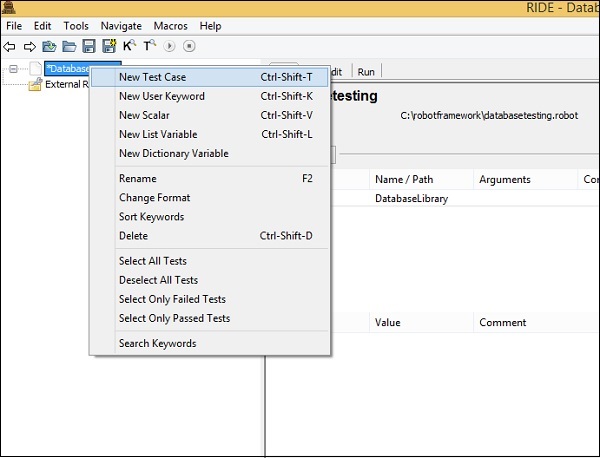
Click New Test Case −

Enter the name of the test case and click OK.
We are going to use the existing database called customers available with us.
We will use phymyadmin to show the customer database −
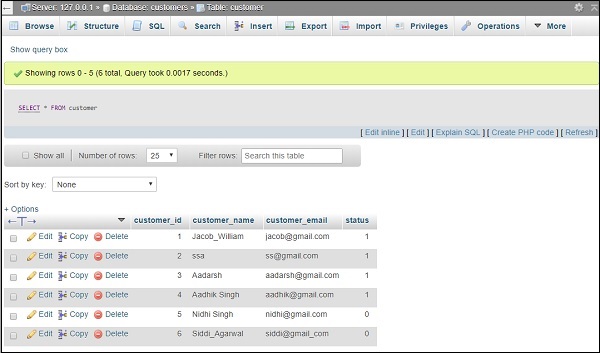
We have a table called customer, which has data distributed in 6 rows. Now will write test-case which will connect to MySQL database customers and fetch the data from customer table.
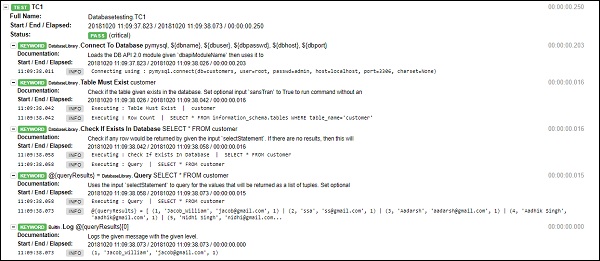
Before we start, we will create scalar variables which will hold the data for dbname, dbuser, dbpasswd, dbhost, dbport and queryresult to store data, etc. Here are the variables created with values −

The command to connect to database is −
Connect To Database pymysql ${dbname} ${dbuser}
${dbpasswd} ${dbhost} ${dbport}

We will add some more test cases as shown below −
Here are the details −
*** Settings ***
Library DatabaseLibrary
*** Variables ***
${dbname} customers
${dbuser} root
${dbpasswd} admin
${dbhost} localhost
${dbport} 3306
@{queryResults}
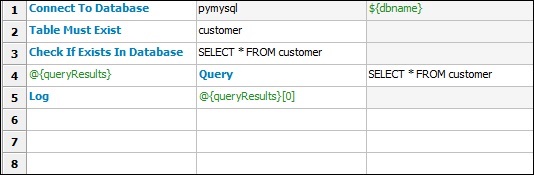
*** Test Cases ***
TC1
Connect To Database pymysql ${dbname} ${dbuser}
${dbpasswd} ${dbhost} ${dbport}
Table Must Exist customer
Check If Exists In Database SELECT * FROM customer
@{queryResults} Query SELECT * FROM customer
Log @{queryResults}[0]
We have connected to the database, checked if table customer exists in database, got the query executed and logged the details of the query.
We will execute the test case and see the output

The results from the table are shown for the queryResults.
Log Details
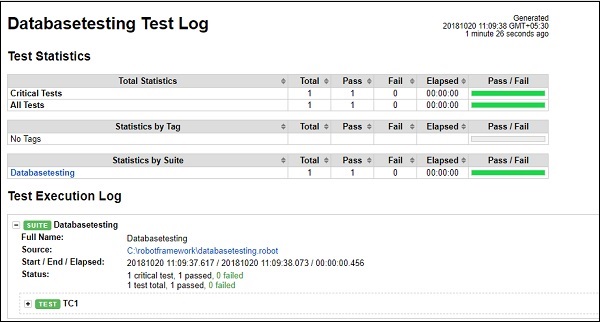
Details of TC1
Conclusion
We have seen how to import database library, and the installation of it. We now know how to connect to MySQL database in Robot Framework and test the tables.
Testing Login Page Using Robot Framework
With Robot Framework, we have learnt the following so far −
- Import Libraries
- Working with variables
- Create custom Keywords
- How to write test-cases
- How to create Setup and teardown
- How to execute test cases
- How to work with data driven test-cases
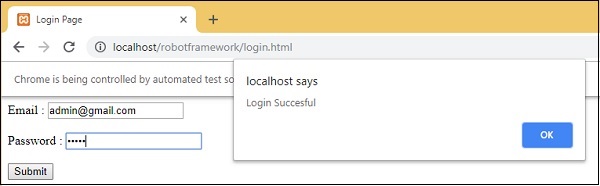
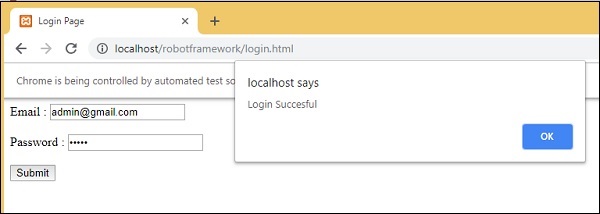
We will use all of the above features and use it to test login page in this chapter. We have a login page which takes in email-id and password. When you enter correct email id and password, you will be redirected to a welcome page. If the user enters invalid email id or password, the page will get redirected to error page.
The following screenshot shows a login page −
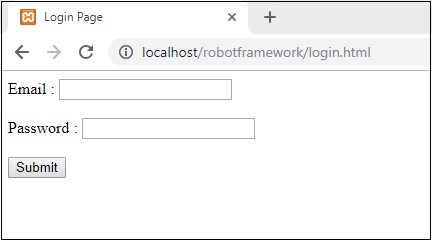
HTML Code
<html>
   <head>
      <title>Login Page</title>
   </head>
   <body>
      <script type="text/javascript">
         function wsSubmit() {
            if (document.getElementById("email").value == "admin@gmail.com" && document.getElementById("passwd").value == "admin") {
               location.href = "http://localhost/robotframework/success.html";
            } else {
               location.href = "http://localhost/robotframework/loginfailed.html";
            }
         }
      </script>
      <div id="formdet">
         Email : <input type="text" id="email" value="" id="email" /><br/><br/>
         Password : <input type="password" id="passwd" value="" /><br/><br/>
         <input type="submit" id="btnsubmit" value="Submit" onClick="wsSubmit();"/>
      </div>
   </body>
</html>
The following screen appears when either the email-id or the password is not valid −
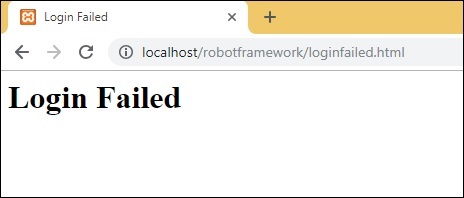
HTML Code
<html>
   <head>
      <title>Login Failed</title>
   </head>
   <body>
      <div id="loginfailed">
         <h1>Login Failed</h1>
      </div>
   </body>
</html>
The following screen appears when both the email id and password are valid −
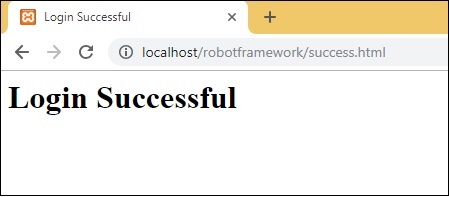
HTML Code
<html>
   <head>
      <title>Login Successful</title>
   </head>
   <body>
      <div id="loginfailed">
         <h1>Login Successful</h1>
      </div>
   </body>
</html>
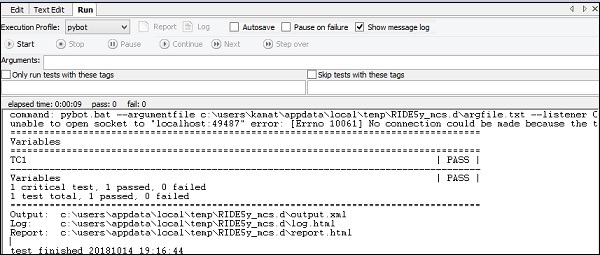
Now we are going to write test cases for the above test page. To start with it, we will first run the command to open Ride.
Command
ride.py
Once done, we will get started with the project setup as shown below −
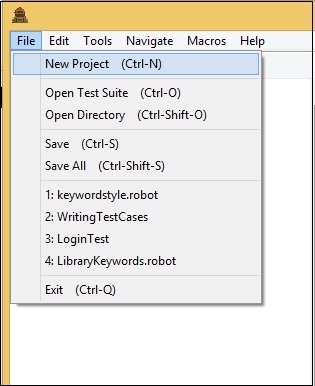
Click New Project and enter the name of the project.
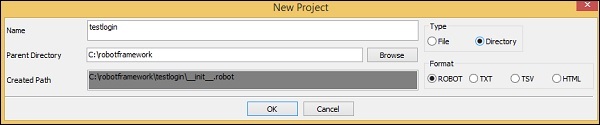
We will save the type of the project as Directory. The name given to the project is testlogin.
Click OK to save the project.
Now, we will create test suite inside the project.
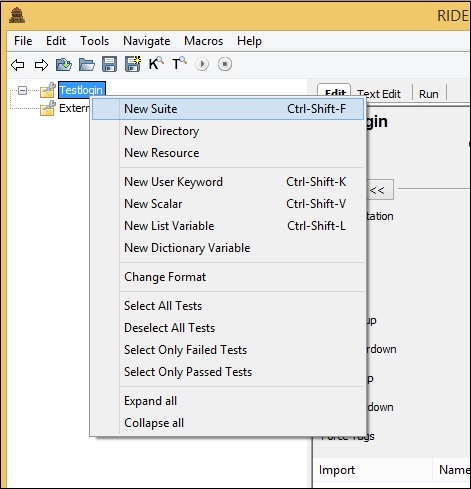
Click New Suite and it will display a screen as shown below −
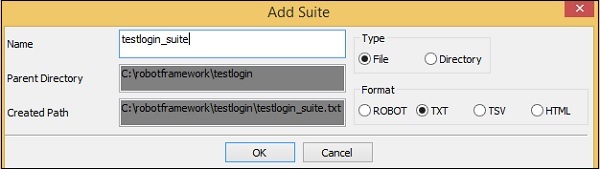
Click OK to save the test suite. We need to import the Selenium Library since we will be working with the browser.
Import Library in the main project and also to the test suite created.

Click Library as in the above screenshot. Upon clicking Library, the following screen will appear.
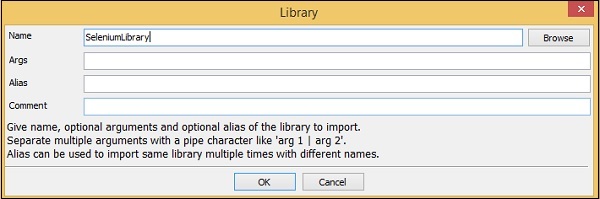
Click OK to save the library for the project.
Once the library is saved for the project, it will display the library in the settings −
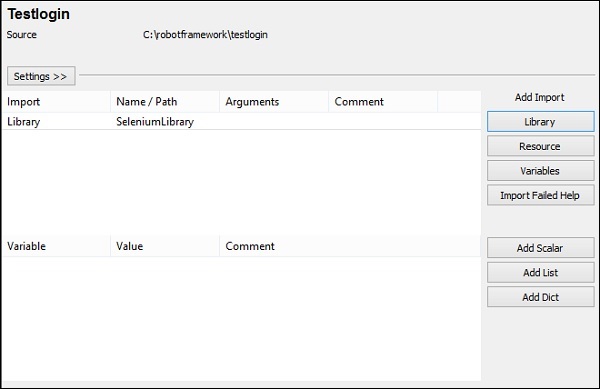
Repeat the same step for the Test suite created.
Here is the library added for Test suite −
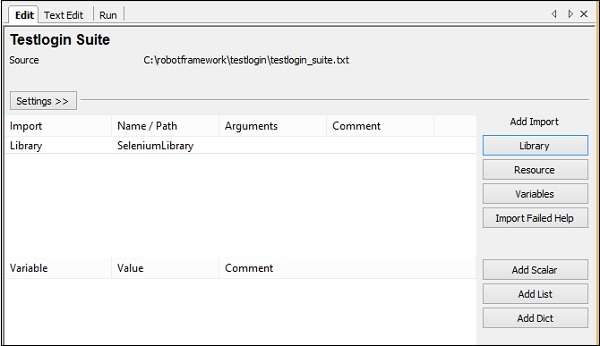
Now in the main Project, we will create a setup and teardown. We would like to open the login page in Chrome browser and maximize the window. In teardown, we will close the browser.
For setup, we will create a user−defined keyword called Open Login Page. This keyword will take 2 arguments, login page URL and browser name.
Now, we need 2 scalar variables that will help us store the values url and the browser name.
In ride, create 2 variables ${loginpage} and ${browser} as follows −
${loginpage}
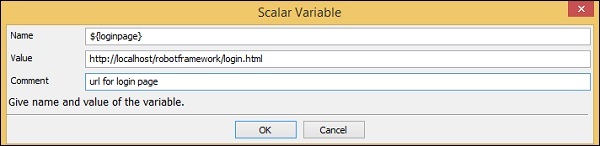
${browser}
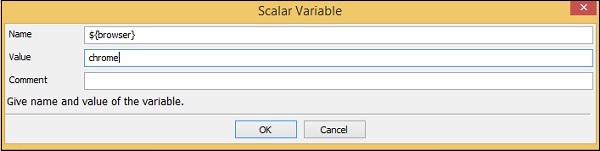
Save both variables.
The variables will be displayed under your project as follows −
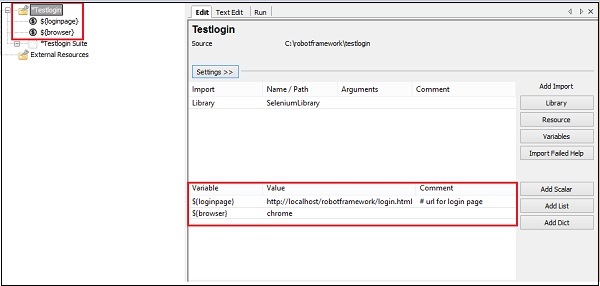
Now, we will add the setup and teardown for the main project.
Click on the project on the left side. In settings, click Suite Setup.
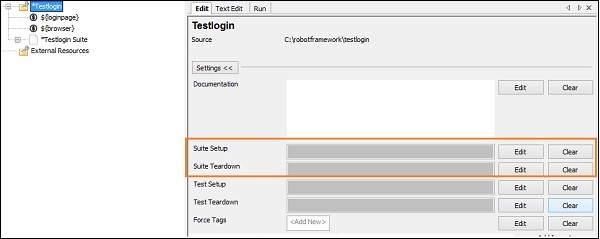
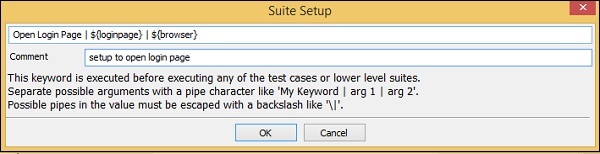
We have created setup that is using user keyword Open Login Page with arguments ${loginpage} and ${browser}.
Click OK to save the setup.
Now, we have to create the user−defined keyword Open Login Page, which is done as follows −
Right−click on the project and click New User Keyword −
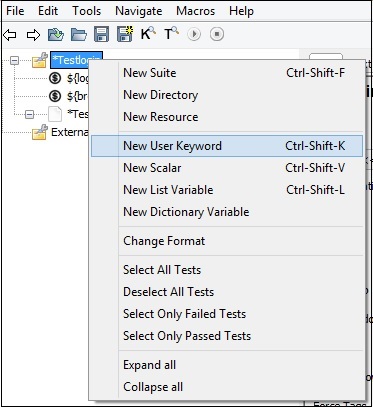
Upon clicking New User Keyword, the following screen appears −
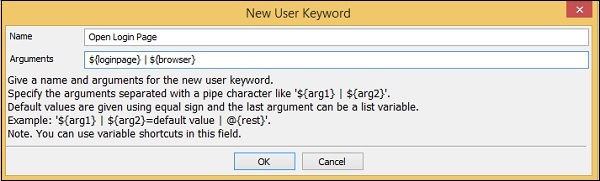
Here the Keyword is given 2 arguments − ${loginpage} and ${browser}. Click OK to save the user keyword.
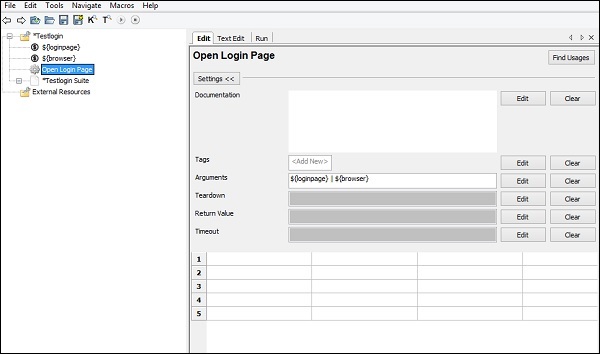
Now we need to enter the library keywords, which will open the URL.
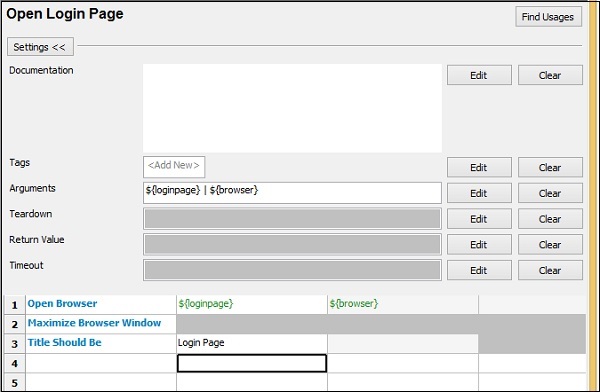
Open Login Page user−defined keyword has the following details −
*** Keywords ***
Open Login Page
   [Arguments] ${loginpage} ${browser}
   Open Browser ${loginpage} ${browser}
   Maximize Browser Window
   Title Should Be Login Page
Now, we will create Suite Teardown for the suite.
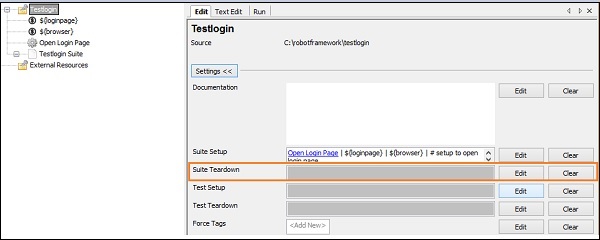
Click Edit for Suite Teardown and enter the details −
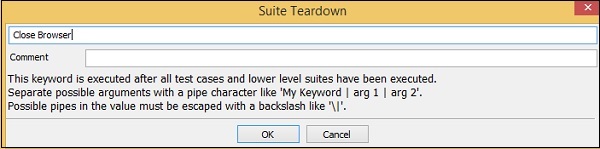
For Suite teardown, we are directly using library keyword, which will close the browser. Click OK to save the suite teardown.
Now, click the Testlogin Suite we have created.
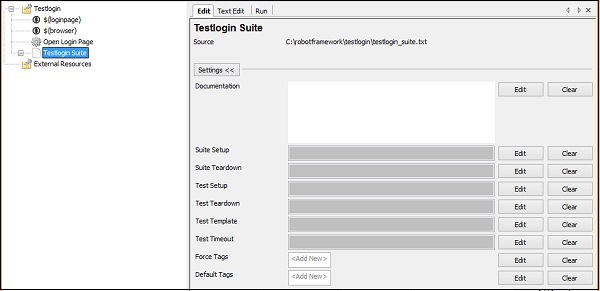
Let us now create a setup for the test suite Test Setup. This setup needs to get executed first.
Click Edit for Test Setup and enter the details.
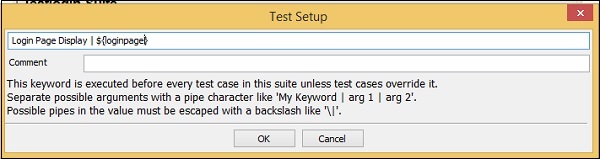
For the Test Setup, we have created User defined Keyword called Login Page Display, which will take the argument as ${loginpage} as in the above screenshot.
Click OK to save the test setup.
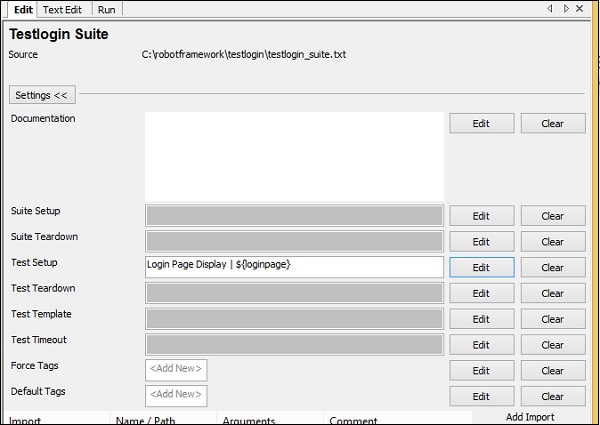
Now, we need to create the user keyword Login Page Display.
Right-click on the test suite and click New User Keyword as shown below −
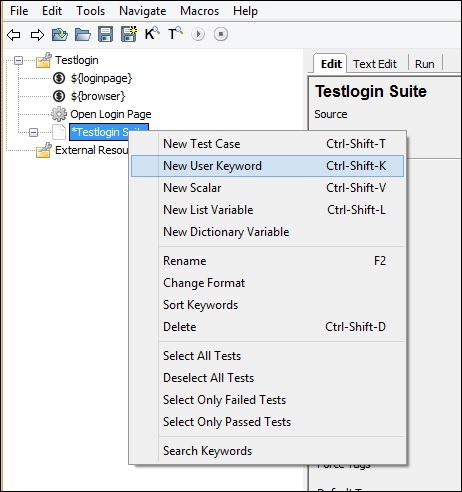
New User Keyword will display the screen as shown below −
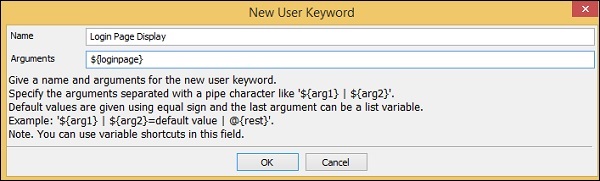
Click OK to save the keyword.
Let us now enter the keyword we need for the user keyword Login Page Display.
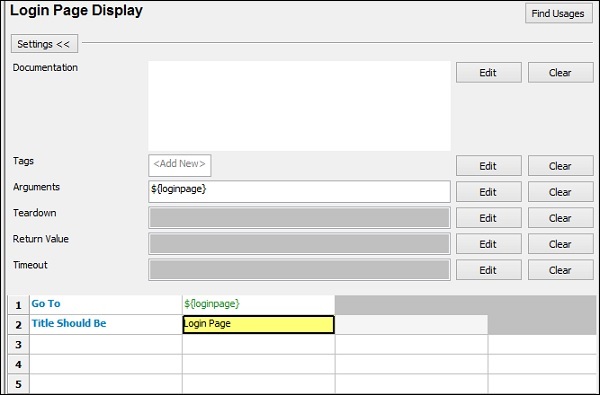
Here we want to go to the loginpage and check if the title of the page matches with the value given.
Now, we will add template to the test suite and create data driven test cases.
To create template, click on the suite and on right side click Edit for Test Template.
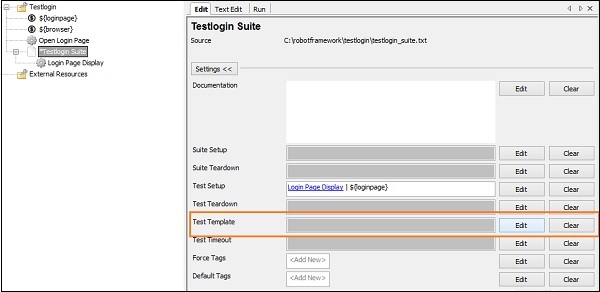
You will be directed to the following screen −

Test Login is again a user-defined keyword. Click OK to save the template.
Before we create the Test Login keyword, we need some scalar variables. The scalar variables will have the details of the email-id, password, successpage, failurepage, etc.
We will create scalar variables for test suite as follows −
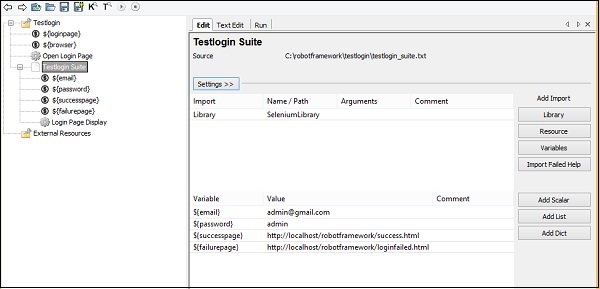
We have created email, password, successpage and failurepage scalar variables as shown in the above screenshot.
Now, we will create Test Login User defined Keyword. Right-click on the test suite and click on New User Keyword.
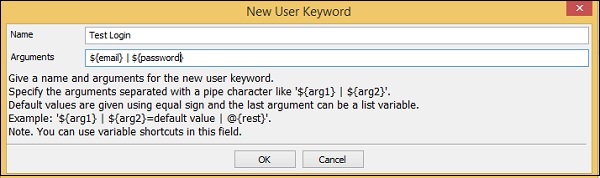
Click OK to save the keyword.
The following screenshot shows the keywords entered for Test Login −
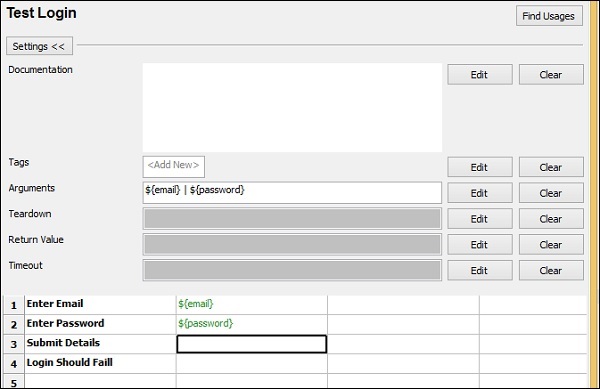
Enter Email, Enter Password, Submit Details and Login Should Fail are User Defined Keywords, which are defined as follows −
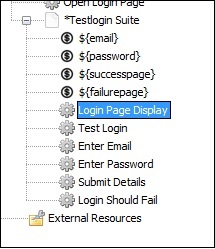
Enter Email

Enter Password
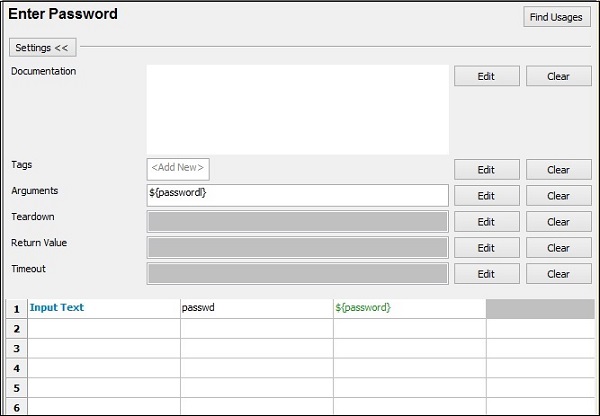
Submit Details
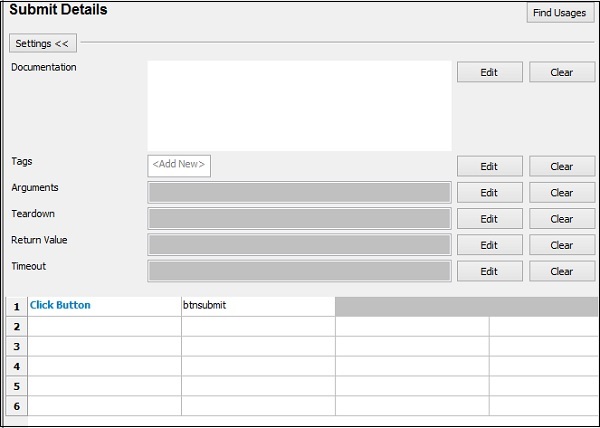
Login Should Fail
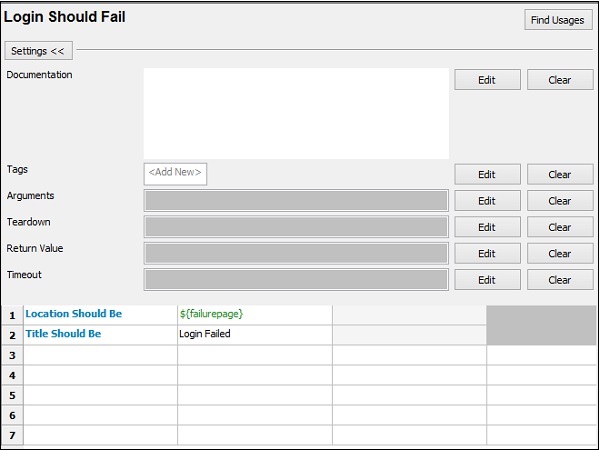
Now, we will write test cases, which will take different email id and password details to the template created.
The following is a list of test cases −
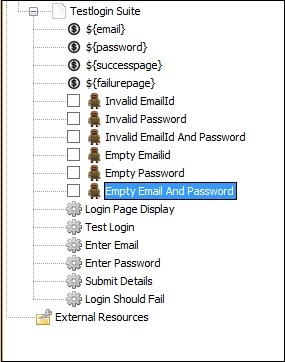
Invalid email id Test case
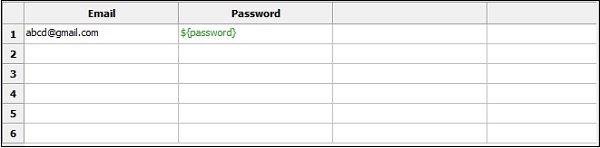
The email is passed with values abcd@gmail.com and ${password} is the password stored in the variable.
Invalid Password
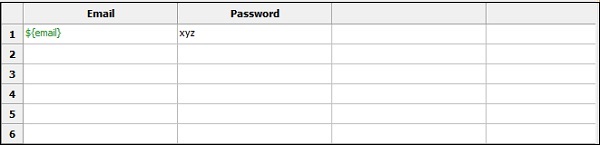
Invalid Email Id and Password
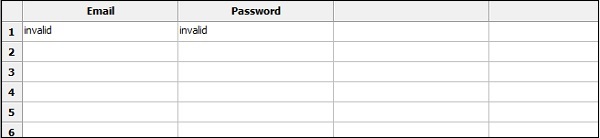
Empty Email Id
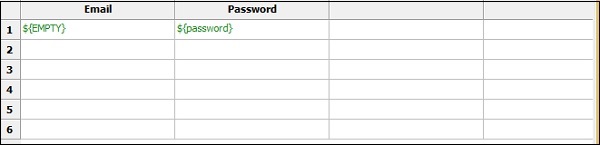
Empty Password
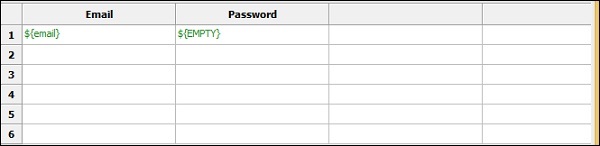
Empty Email and Password
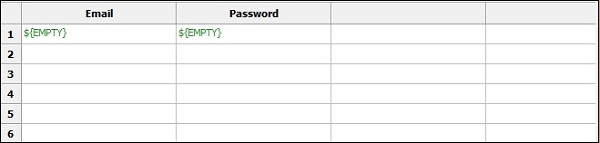
Now, we are done with the test cases and can run the same.
Go to the Run tab and click Start to execute the test cases.
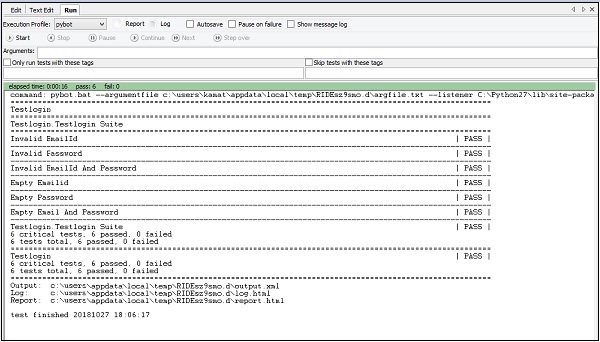
Here are the log messages for the test cases −
20181027 18:11:40.353 : INFO : Opening browser 'chrome' to base url '
http://localhost/robotframework/login.html'.
20181027 18:11:45.960 : INFO : Page title is 'Login Page'.
Starting test: Testlogin.Testlogin Suite.Invalid EmailId
20181027 18:11:45.991 : INFO : Opening url 'http://localhost/robotframework/login.html'
20181027 18:11:46.169 : INFO : Page title is 'Login Page'.
20181027 18:11:46.180 : INFO : Typing text 'abcd@gmail.com' into text field 'email'.
20181027 18:11:46.706 : INFO : Typing text 'admin' into text field 'passwd'.
20181027 18:11:47.075 : INFO : Clicking button 'btnsubmit'.
20181027 18:11:47.565 : INFO : Current location is 'http://localhost/robotframework/loginfailed.html'.
20181027 18:11:47.584 : INFO : Page title is 'Login Failed'.
Ending test: Testlogin.Testlogin Suite.Invalid EmailId

Starting test: Testlogin.Testlogin Suite.Invalid Password
20181027 18:11:47.600 : INFO : Opening url 'http://localhost/robotframework/login.html'
20181027 18:11:47.767 : INFO : Page title is 'Login Page'.
20181027 18:11:47.783 : INFO : Typing text 'admin@gmail.com' into text field 'email'.
20181027 18:11:48.342 : INFO : Typing text 'invalid' into text field 'passwd'.
20181027 18:11:48.701 : INFO : Clicking button 'btnsubmit'.
20181027 18:11:49.035 : INFO : Current location is 'http://localhost/robotframework/loginfailed.html'.
20181027 18:11:49.051 : INFO : Page title is 'Login Failed'.
Ending test: Testlogin.Testlogin Suite.Invalid Password

Starting test: Testlogin.Testlogin Suite.Invalid EmailId And Password
20181027 18:11:49.054 : INFO : Opening url 'http://localhost/robotframework/login.html'
20181027 18:11:49.213 : INFO : Page title is 'Login Page'.
20181027 18:11:49.221 : INFO : Typing text 'invalid' into text field 'email'.
20181027 18:11:49.555 : INFO : Typing text 'invalid' into text field 'passwd'.
20181027 18:11:49.883 : INFO : Clicking button 'btnsubmit'.
20181027 18:11:50.162 : INFO : Current location is 'http://localhost/robotframework/loginfailed.html'.
20181027 18:11:50.176 : INFO : Page title is 'Login Failed'.
Ending test: Testlogin.Testlogin Suite.Invalid EmailId And Password

Starting test: Testlogin.Testlogin Suite.Empty Emailid
20181027 18:11:50.188 : INFO : Opening url 'http://localhost/robotframework/login.html'
20181027 18:11:50.302 : INFO : Page title is 'Login Page'.
20181027 18:11:50.306 : INFO : Typing text '' into text field 'email'.
20181027 18:11:50.486 : INFO : Typing text 'admin' into text field 'passwd'.
20181027 18:11:50.693 : INFO : Clicking button 'btnsubmit'.
20181027 18:11:50.935 : INFO : Current location is 'http://localhost/robotframework/loginfailed.html'.
20181027 18:11:50.958 : INFO : Page title is 'Login Failed'.
Ending test: Testlogin.Testlogin Suite.Empty Emailid

Starting test: Testlogin.Testlogin Suite.Empty Password
20181027 18:11:50.958 : INFO : Opening url 'http://localhost/robotframework/login.html'
20181027 18:11:51.063 : INFO : Page title is 'Login Page'.
20181027 18:11:51.071 : INFO : Typing text 'admin@gmail.com' into text field 'email'.
20181027 18:11:51.367 : INFO : Typing text '' into text field 'passwd'.
20181027 18:11:51.561 : INFO : Clicking button 'btnsubmit'.
20181027 18:11:51.796 : INFO : Current location is 'http://localhost/robotframework/loginfailed.html'.
20181027 18:11:51.808 : INFO : Page title is 'Login Failed'.
Ending test: Testlogin.Testlogin Suite.Empty Password

Starting test: Testlogin.Testlogin Suite.Empty Email And Password
20181027 18:11:51.811 : INFO : Opening url 'http://localhost/robotframework/login.html'
20181027 18:11:51.908 : INFO : Page title is 'Login Page'.
20181027 18:11:51.916 : INFO : Typing text '' into text field 'email'.
20181027 18:11:52.049 : INFO : Typing text '' into text field 'passwd'.
20181027 18:11:52.193 : INFO : Clicking button 'btnsubmit'.
20181027 18:11:52.419 : INFO : Current location is 'http://localhost/robotframework/loginfailed.html'.
20181027 18:11:52.432 : INFO : Page title is 'Login Failed'.
Ending test: Testlogin.Testlogin Suite.Empty Email And Password
Conclusion
We have seen here how to test a login page with different inputs, which will validate if the login is working fine or not. The details of how the execution takes place is given in the log section.
