- Python - Home
- Python - Overview
- Python - History
- Python - Features
- Python vs C++
- Python - Hello World Program
- Python - Application Areas
- Python - Interpreter
- Python - Environment Setup
- Python - Virtual Environment
- Python - Basic Syntax
- Python - Variables
- Python - Private Variables
- Python - Data Types
- Python - Type Casting
- Python - Unicode System
- Python - Literals
- Python - Operators
- Python - Arithmetic Operators
- Python - Comparison Operators
- Python - Assignment Operators
- Python - Logical Operators
- Python - Bitwise Operators
- Python - Membership Operators
- Python - Identity Operators
- Python - Walrus Operator
- Python - Operator Precedence
- Python - Comments
- Python - User Input
- Python - Numbers
- Python - Booleans
- Python - Floating Points
- Python - Control Flow
- Python - Decision Making
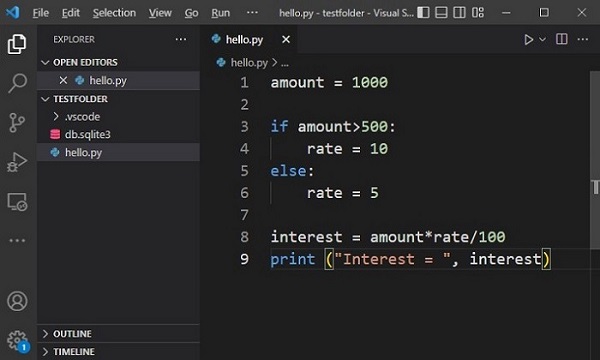
- Python - If Statement
- Python - If else
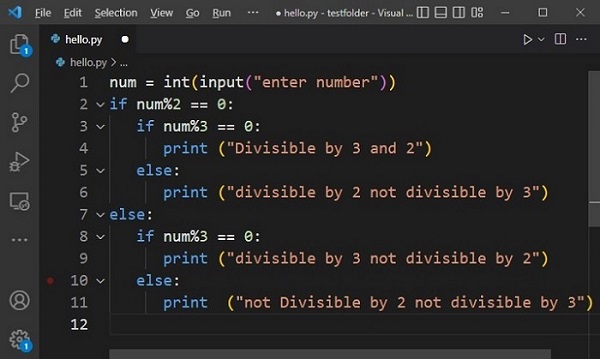
- Python - Nested If
- Python - Conditional User Inputs
- Python - Match-Case Statement
- Python - Loops
- Python - for Loops
- Python - for-else Loops
- Python - While Loops
- Python - break Statement
- Python - continue Statement
- Python - pass Statement
- Python - Nested Loops
- Python Functions & Modules
- Python - Functions
- Python - Default Arguments
- Python - Keyword Arguments
- Python - Keyword-Only Arguments
- Python - Positional Arguments
- Python - Positional-Only Arguments
- Python - Arbitrary Arguments
- Python - Variables Scope
- Python - Function Annotations
- Python - Modules
- Python - Packing and Unpacking
- Python - Built in Functions
- Python Strings
- Python - Strings
- Python - Slicing Strings
- Python - Modify Strings
- Python - String Concatenation
- Python - String Formatting
- Python - Escape Characters
- Python - String Methods
- Python - String Exercises
- Python Lists
- Python - Lists
- Python - Access List Items
- Python - Change List Items
- Python - Add List Items
- Python - Remove List Items
- Python - Loop Lists
- Python - List Comprehension
- Python - Sort Lists
- Python - Copy Lists
- Python - Join Lists
- Python - List Methods
- Python - List Exercises
- Python Tuples
- Python - Tuples
- Python - Access Tuple Items
- Python - Update Tuples
- Python - Unpack Tuples
- Python - Loop Tuples
- Python - Join Tuples
- Python - Tuple Methods
- Python - Namedtuple
- Python - Tuple Exercises
- Python Sets
- Python - Sets
- Python - Access Set Items
- Python - Add Set Items
- Python - Remove Set Items
- Python - Loop Sets
- Python - Join Sets
- Python - Copy Sets
- Python - Set Operators
- Python - Set Methods
- Python - Set Exercises
- Python Dictionaries
- Python - Dictionaries
- Python - Access Dictionary Items
- Python - Change Dictionary Items
- Python - Add Dictionary Items
- Python - Remove Dictionary Items
- Python - Dictionary View Objects
- Python - Loop Dictionaries
- Python - Copy Dictionaries
- Python - Nested Dictionaries
- Python - Dictionary Methods
- Python - Dictionary Exercises
- Python Arrays
- Python - Arrays
- Python - Access Array Items
- Python - Add Array Items
- Python - Remove Array Items
- Python - Loop Arrays
- Python - Copy Arrays
- Python - Reverse Arrays
- Python - Sort Arrays
- Python - Join Arrays
- Python - Array Methods
- Python - Array Exercises
- Python File Handling
- Python - File Handling
- Python - Write to File
- Python - Read Files
- Python - Renaming and Deleting Files
- Python - Directories
- Python - File Methods
- Python - OS File/Directory Methods
- Python - OS Path Methods
- Object Oriented Programming
- Python - OOPs Concepts
- Python - Classes & Objects
- Python - Class Attributes
- Python - Class Methods
- Python - Static Methods
- Python - Constructors
- Python - Access Modifiers
- Python - Inheritance
- Python - Multiple Inheritance
- Python - Multilevel Inheritance
- Python - Polymorphism
- Python - Method Overriding
- Python - Method Overloading
- Python - Dynamic Binding
- Python - Dynamic Typing
- Python - Abstraction
- Python - Encapsulation
- Python - Interfaces
- Python - Packages
- Python - Inner Classes
- Python - Anonymous Class and Objects
- Python - Singleton Class
- Python - Wrapper Classes
- Python - Enums
- Python - Reflection
- Python - Data Classes
- Python Errors & Exceptions
- Python - Syntax Errors
- Python - Exceptions
- Python - try-except Block
- Python - try-finally Block
- Python - Raising Exceptions
- Python - Exception Chaining
- Python - Nested try Block
- Python - User-defined Exception
- Python - Logging
- Python - Assertions
- Python - Warnings
- Python - Built-in Exceptions
- Python - Debugger (PDB)
- Python Multithreading
- Python - Multithreading
- Python - Thread Life Cycle
- Python - Creating a Thread
- Python - Starting a Thread
- Python - Joining Threads
- Python - Naming Thread
- Python - Thread Scheduling
- Python - Thread Pools
- Python - Main Thread
- Python - Thread Priority
- Python - Daemon Threads
- Python - Synchronizing Threads
- Python Synchronization
- Python - Inter-thread Communication
- Python - Thread Deadlock
- Python - Interrupting a Thread
- Python Networking
- Python - Networking
- Python - Socket Programming
- Python - URL Processing
- Python - Generics
- Python Libraries
- NumPy Tutorial
- Pandas Tutorial
- SciPy Tutorial
- Matplotlib Tutorial
- Django Tutorial
- OpenCV Tutorial
- Python Miscellenous
- Python - Date & Time
- Python - Maths
- Python - Iterators
- Python - Generators
- Python - Generator Expressions
- Python - Lambda Expressions
- Python - Closures
- Python - Decorators
- Python - Recursion
- Python - Reg Expressions
- Python - PIP
- Python - Database Access
- Python - Weak References
- Python - Serialization
- Python - Templating
- Python - Output Formatting
- Python - Performance Measurement
- Python - Data Compression
- Python - CGI Programming
- Python - XML Processing
- Python - GUI Programming
- Python - Command-Line Arguments
- Python - Docstrings
- Python - JSON
- Python - Sending Email
- Python - Further Extensions
- Python - Tools/Utilities
- Python - Odds and Ends
- Python - GUIs
- Python Advanced Concepts
- Python - Abstract Base Classes
- Python - Custom Exceptions
- Python - Higher Order Functions
- Python - Object Internals
- Python - Memory Management
- Python - Metaclasses
- Python - Metaprogramming with Metaclasses
- Python - Mocking and Stubbing
- Python - Monkey Patching
- Python - Signal Handling
- Python - Type Hints
- Python - Automation Tutorial
- Python - Humanize Package
- Python - Context Managers
- Python - Coroutines
- Python - Descriptors
- Python - Diagnosing and Fixing Memory Leaks
- Python - Immutable Data Structures
- Python - Domain Specific Language (DSL)
- Python - Data Model
- Python Useful Resources
- Python - Questions & Answers
- Python - Interview Questions & Answers
- Python - Online Quiz
- Python - Quick Guide
- Python - Reference
- Python - Cheatsheet
- Python - Projects
- Python - Useful Resources
- Python - Discussion
- Python Compiler
- NumPy Compiler
- Matplotlib Compiler
- SciPy Compiler
Python - Quick Guide
Python - Overview
Python is a high-level, multi-paradigm programming language. As Python is an interpreter-based language, it is easier to learn compared to some of the other mainstream languages. Python is a dynamically typed language with very intuitive data types.
Python is an open-source and cross-platform programming language. It is available for use under Python Software Foundation License (compatible to GNU General Public License) on all the major operating system platforms Linux, Windows and Mac OS.
The design philosophy of Python emphasizes on simplicity, readability and unambiguity. Python is known for its batteries included approach as Python software is distributed with a comprehensive standard library of functions and modules.
Python's design philosophy is documented in the Zen of Python. It consists of nineteen aphorisms such as −
- Beautiful is better than ugly
- Explicit is better than implicit
- Simple is better than complex
- Complex is better than complicated
To obtain the complete Zen of Python document, type import this in the Python shell −
>>> import this
The Zen of Python, by Tim Peters
Beautiful is better than ugly.
Explicit is better than implicit.
Simple is better than complex.
Complex is better than complicated.
Flat is better than nested.
Sparse is better than dense.
Readability counts.
Special cases aren't special enough to break the rules.
Although practicality beats purity.
Errors should never pass silently.
Unless explicitly silenced.
In the face of ambiguity, refuse the temptation to guess.
There should be one-- and preferably only one --obvious way to do it.
Although that way may not be obvious at first unless you're Dutch.
Now is better than never.
Although never is often better than *right* now.
If the implementation is hard to explain, it's a bad idea.
If the implementation is easy to explain, it may be a good idea.
Namespaces are one honking great idea -- let's do more of those!
Python supports imperative, structured as well as object-oriented programming methodology. It provides features of functional programming as well.
Python - History
Guido Van Rossum, a Dutch programmer, created Python programming language. In the late 80's, he had been working on the development of ABC language in a computer science research institute named Centrum Wiskunde & Informatica (CWI) in the Netherlands. In 1991, Van Rossum conceived and published Python as a successor of ABC language.
For many uninitiated people, the word Python is related to a species of snake. Rossum though attributes the choice of the name Python to a popular comedy series "Monty Python's Flying Circus" on BBC.
Being the principal architect of Python, the developer community conferred upon him the title of "Benevolent Dictator for Life (BDFL). However, in 2018, Rossum relinquished the title. Thereafter, the development and distribution of the reference implementation of Python is handled by a nonprofit organization Python Software Foundation.
Important stages in the history of Python −
Python 0.9.0
Python's first published version is 0.9. It was released in February 1991. It consisted of support for core object-oriented programming principles.
Python 1.0
In January 1994, version 1.0 was released, armed with functional programming tools, features like support for complex numbers etc.
Python 2.0
Next major version − Python 2.0 was launched in October 2000. Many new features such as list comprehension, garbage collection and Unicode support were included with it.
Python 3.0
Python 3.0, a completely revamped version of Python was released in December 2008. The primary objective of this revamp was to remove a lot of discrepancies that had crept in Python 2.x versions. Python 3 was backported to Python 2.6. It also included a utility named as python2to3 to facilitate automatic translation of Python 2 code to Python 3.
EOL for Python 2.x
Even after the release of Python 3, Python Software Foundation continued to support the Python 2 branch with incremental micro versions till 2019. However, it decided to discontinue the support by the end of year 2020, at which time Python 2.7.17 was the last version in the branch.
Current Version
Meanwhile, more and more features have been incorporated into Python's 3.x branch. As of date, Python 3.11.2 is the current stable version, released in February 2023.
What's New in Python 3.11?
One of the most important features of Python's version 3.11 is the significant improvement in speed. According to Python's official documentation, this version is faster than the previous version (3.10) by up to 60%. It also states that the standard benchmark suite shows a 25% faster execution rate.
Python 3.11 has a better exception messaging. Instead of generating a long traceback on the occurrence of an exception, we now get the exact expression causing the error.
As per the recommendations of PEP 678, the add_note() method is added to the BaseException class. You can call this method inside the except clause and pass a custom error message.
It also adds the cbroot() function in the maths module. It returns the cube root of a given number.
A new module tomllib is added in the standard library. TOML (Tom's Obvious Minimal Language) can be parsed with tomlib module function.
Python - Features
In this chapter, let's highlight some of the important features of Python that make it widely popular.
Python is Easy to Learn
This is one of the most important reasons for the popularity of Python. Python has a limited set of keywords. Its features such as simple syntax, usage of indentation to avoid clutter of curly brackets and dynamic typing that doesn't necessitate prior declaration of variable help a beginner to learn Python quickly and easily.
Python is Interpreter Based
Instructions in any programming languages must be translated into machine code for the processor to execute them. Programming languages are either compiler based or interpreter based.
In case of a compiler, a machine language version of the entire source program is generated. The conversion fails even if there is a single erroneous statement. Hence, the development process is tedious for the beginners. The C family languages (including C, C++, Java, C Sharp etc) are compiler based.
Python is an interpreter based language. The interpreter takes one instruction from the source code at a time, translates it into machine code and executes it. Instructions before the first occurrence of error are executed. With this feature, it is easier to debug the program and thus proves useful for the beginner level programmer to gain confidence gradually. Python therefore is a beginner-friendly language.
Python is Interactive
Standard Python distribution comes with an interactive shell that works on the principle of REPL (Read − Evaluate − Print − Loop). The shell presents a Python prompt >>>. You can type any valid Python expression and press Enter. Python interpreter immediately returns the response and the prompt comes back to read the next expression.
>>> 2*3+1
7
>>> print ("Hello World")
Hello World
The interactive mode is especially useful to get familiar with a library and test out its functionality. You can try out small code snippets in interactive mode before writing a program.
Python is MultiParadigm
Python is a completely object-oriented language. Everything in a Python program is an object. However, Python conveniently encapsulates its object orientation to be used as an imperative or procedural language − such as C. Python also provides certain functionality that resembles functional programming. Moreover, certain third-party tools have been developed to support other programming paradigms such as aspect-oriented and logic programming.
Python's Standard Library
Even though it has a very few keywords (only Thirty Five), Python software is distributed with a standard library made of large number of modules and packages. Thus Python has out of box support for programming needs such as serialization, data compression, internet data handling, and many more. Python is known for its batteries included approach.
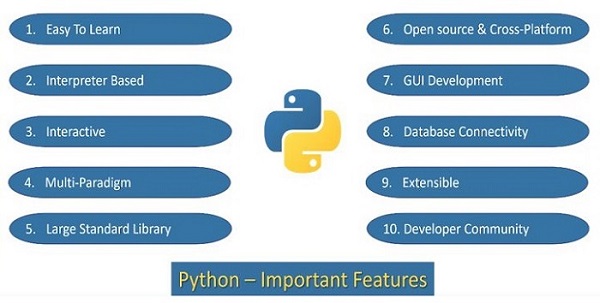
Python is Open Source and Cross Platform
Python's standard distribution can be downloaded from https://www.python.org/downloads/ without any restrictions. You can download pre-compiled binaries for various operating system platforms. In addition, the source code is also freely available, which is why it comes under open source category.
Python software (along with the documentation) is distributed under Python Software Foundation License. It is a BSD style permissive software license and compatible to GNU GPL (General Public License).
Python is a cross-platform language. Pre-compiled binaries are available for use on various operating system platforms such as Windows, Linux, Mac OS, Android OS. The reference implementation of Python is called CPython and is written in C. You can download the source code and compile it for your OS platform.
A Python program is first compiled to an intermediate platform independent byte code. The virtual machine inside the interpreter then executes the byte code. This behaviour makes Python a cross-platform language, and thus a Python program can be easily ported from one OS platform to other.
Python for GUI Applications
Python's standard distribution has an excellent graphics library called TKinter. It is a Python port for the vastly popular GUI toolkit called TCL/Tk. You can build attractive user-friendly GUI applications in Python. GUI toolkits are generally written in C/C++. Many of them have been ported to Python. Examples are PyQt, WxWidgets, PySimpleGUI etc.
Python's Database Connectivity
Almost any type of database can be used as a backend with the Python application. DB-API is a set of specifications for database driver software to let Python communicate with a relational database. With many third party libraries, Python can also work with NoSQL databases such as MongoDB.
Python is Extensible
The term extensibility implies the ability to add new features or modify existing features. As stated earlier, CPython (which is Python's reference implementation) is written in C. Hence one can easily write modules/libraries in C and incorporate them in the standard library. There are other implementations of Python such as Jython (written in Java) and IPython (written in C#). Hence, it is possible to write and merge new functionality in these implementations with Java and C# respectively.
Python's Active Developer Community
As a result of Python's popularity and open-source nature, a large number of Python developers often interact with online forums and conferences. Python Software Foundation also has a significant member base, involved in the organization's mission to "promote, protect, and advance the Python programming language"
Python also enjoys a significant institutional support. Major IT companies Google, Microsoft, and Meta contribute immensely by preparing documentation and other resources.
Python vs C++
Both Python and C++ are among the most popular programming languages. Both of them have their advantages and disadvantages. In this chapter, we shall take a look at their characteristic features.
Compiled vs Interpreted
Like C, C++ is also a compiler-based language. A compiler translates the entire code in a machine language code specific to the operating system in use and processor architecture.
Python is interpreter-based language. The interpreter executes the source code line by line.
Cross platform
When a C++ source code such as hello.cpp is compiled on Linux, it can be only run on any other computer with Linux operating system. If required to run on other OS, it needs to be compiled.
Python interpreter doesn't produce compiled code. Source code is converted to byte code every time it is run on any operating system without any changes or additional steps.
Portability
Python code is easily portable from one OS to other. C++ code is not portable as it must be recompiled if the OS changes.
Speed of Development
C++ program is compiled to the machine code. Hence, its execution is faster than interpreter based language.
Python interpreter doesn't generate the machine code. Conversion of intermediate byte code to machine language is done on each execution of program.
If a program is to be used frequently, C++ is more efficient than Python.
Easy to Learn
Compared to C++, Python has a simpler syntax. Its code is more readable. Writing C++ code seems daunting in the beginning because of complicated syntax rule such as use of curly braces and semicolon for sentence termination.
Python doesn't use curly brackets for marking a block of statements. Instead, it uses indents. Statements of similar indent level mark a block. This makes a Python program more readable.
Static vs Dynamic Typing
C++ is a statically typed language. The type of variables for storing data need to be declared in the beginning. Undeclared variables can't be used. Once a variable is declared to be of a certain type, value of only that type can be stored in it.
Python is a dynamically typed language. It doesn't require a variable to be declared before assigning it a value. Since, a variable may store any type of data, it is called dynamically typed.
OOP Concepts
Both C++ and Python implement object oriented programming concepts. C++ is closer to the theory of OOP than Python. C++ supports the concept of data encapsulation as the visibility of the variables can be defined as public, private and protected.
Python doesn't have the provision of defining the visibility. Unlike C++, Python doesn't support method overloading. Because it is dynamically typed, all the methods are polymorphic in nature by default.
C++ is in fact an extension of C. One can say that additional keywords are added in C so that it supports OOP. Hence, we can write a C type procedure oriented program in C++.
Python is completely object oriented language. Python's data model is such that, even if you can adapt a procedure oriented approach, Python internally uses object-oriented methodology.
Garbage Collection
C++ uses the concept of pointers. Unused memory in a C++ program is not cleared automatically. In C++, the process of garbage collection is manual. Hence, a C++ program is likely to face memory related exceptional behavior.
Python has a mechanism of automatic garbage collection. Hence, Python program is more robust and less prone to memory related issues.
Application Areas
Because C++ program compiles directly to machine code, it is more suitable for systems programming, writing device drivers, embedded systems and operating system utilities.
Python program is suitable for application programming. Its main area of application today is data science, machine learning, API development etc.
The following table summarizes the comparison between C++ and Python −
| Criteria | C++ | Python |
|---|---|---|
| Execution | Compiler based | Interpreter based |
| Typing | Static typing | Dynamic typing |
| Portability | Not portable | Highly portable |
| Garbage collection | Manual | Automatic |
| Syntax | Tedious | Simple |
| Performance | Faster execution | Slower execution |
| Application areas | Embedded systems, device drivers | Machine learning, web applications |
Python - Hello World Program
Hello World program is a basic computer code written in a general purpose programming language, used as a test program. It doesn't ask for any input and displays a Hello World message on the output console. It is used to test if the software needed to compile and run the program has been installed correctly.
It is very easy to display the Hello World message using the Python interpreter. Launch the interpreter from a command terminal of your operating system and issue the print statement from the Python prompt as follows −
PS C:\Users\mlath> python
Python 3.11.2 (tags/v3.11.2:878ead1, Feb 7 2023, 16:38:35) [MSC v.1934 64 bit (AMD64)] on win32
Type "help", "copyright", "credits" or "license" for more information.
>>> print ("Hello World")
Hello World
Similarly, Hello World message is printed in Linux.
mvl@GNVBGL3:~$ python3
Python 3.10.6 (main, Mar 10 2023, 10:55:28) [GCC 11.3.0] on linux
Type "help", "copyright", "credits" or "license" for more information.
>>> print ("Hello World")
Hello World
Python interpreter also works in scripted mode. Open any text editor, enter the following text and save as Hello.py
print ("Hello World")
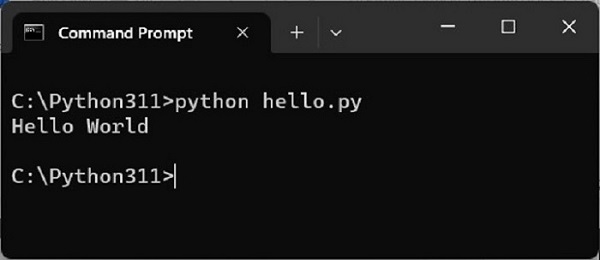
For Windows OS, open the command prompt terminal (CMD) and run the program as shown below −
C:\Python311>python hello.py
Hello World
The terminal shows the Hello World message.
While working on Ubuntu Linux, you have to follow the same steps, save the code and run from Linux terminal. We use vi editor for saving the program.
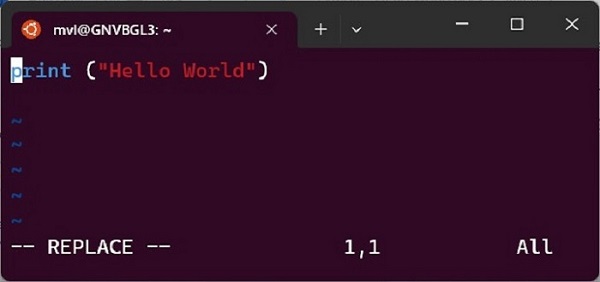
To run the program from Linux terminal
mvl@GNVBGL3:~$ python3 hello.py
Hello World
In Linux, you can convert a Python program into a self executable script. The first statement in the code should be a shebang. It must contain the path to Python executable. In Linux, Python is installed in /usr/bin directory, and the name of the executable is python3. Hence, we add this statement to hello.py file
#!/usr/bin/python3
print ("Hello World")
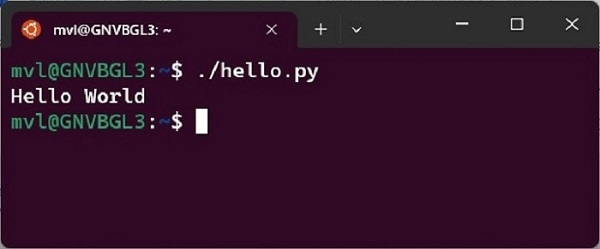
You also need to give the file executable permission by using the chmod +x command
mvl@GNVBGL3:~$ chmod +x hello.py
Then, you can run the program with following command line −
mvl@GNVBGL3:~$ ./hello.py
The output is shown below −
Thus, we can write and run Hello World program in Python using the interpreter mode and script mode.
Python - Application Areas
Python is a general-purpose programming language. It is suitable for development of wide range of software applications. Over last few years Python is the preferred language of choice for developers in following application areas −
Python for Data Science
Python's recent meteoric rise in the popularity charts is largely due its Data science libraries. Python has become an essential skill for data scientists. Today, real time web applications, mobile applications and other devices generate huge amount of data. Python's data science libraries help companies generate business insights from this data.
Libraries like NumPy, Pandas and Matplotlib are extensively used to apply mathematical algorithms to the data and generate visualizations. Commercial and community Python distributions like Anaconda and ActiveState bundle all the essential libraries required for data science.
Python for Machine Learning
Python libraries such as Scikit-learn and TensorFlow help in building models for prediction of trends like customer satisfaction, projected values of stocks etc. based upon the past data. Machine learning applications include (but not restricted to) medical diagnosis, statistical arbitrage, basket analysis, sales prediction etc.
Python for Web Development
Python's web frameworks facilitate rapid web application development. Django, Pyramid, Flask are very popular among the web developer community. etc. make it very easy to develop and deploy simple as well as complex web applications.
Latest versions of Python provide asynchronous programming support. Modern web frameworks leverage this feature to develop fast and high performance web apps and APIs.
Python for Computer Vision and Image processing
OpenCV is a widely popular library for capturing and processing images. Image processing algorithms extract information from images, reconstruct image and video data. Computer Vision uses image processing for face detection and pattern recognition. OpenCV is a C++ library. Its Python port is extensively used because of its rapid development feature.
Some of the application areas of computer vision are robotics, industrial surveillance and automation, biometrics etc.
Python for Embedded Systems and IoT
Micropython (https://micropython.org/), a lightweight version especially for microcontrollers like Arduino. Many automation products, robotics, IoT, and kiosk applications are built around Arduino and programmed with Micropython. Raspberry Pi is also very popular alow cost single board computer used for these type of applications.
Python for Job Scheduling and Automation
Python found one of its first applications in automating CRON (Command Run ON) jobs. Certain tasks like periodic data backups, can be written in Python scripts scheduled to be invoked automatically by operating system scheduler.
Many software products like Maya embed Python API for writing automation scripts (something similar to Excel micros).
Try Python Online
If you are new to Python, it is a good idea to get yourself familiar with the language syntax and features by trying out one of the many online resources, before you proceed to install Python software on your computer.
You can launch Python interactive shell from the home page of Python's official website https://www.python.org/.
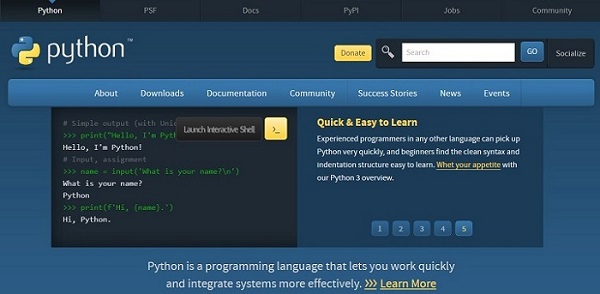
In front of the Python prompt (>>>), any valid Python expression can be entered and evaluated.
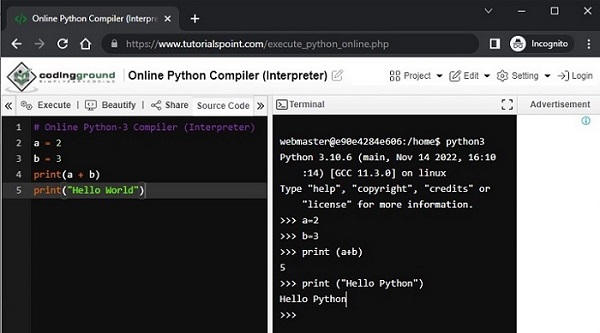
The Tutorialspoint website also has a Coding Ground section −
(https://www.tutorialspoint.com/codingground.htm)
Here you can find online compilers for various languages including Python. Visit https://www.tutorialspoint.com/execute_python_online.php. You can experiment with the interactive mode and the scripted mode of Python interpreter.
Python - Interpreter
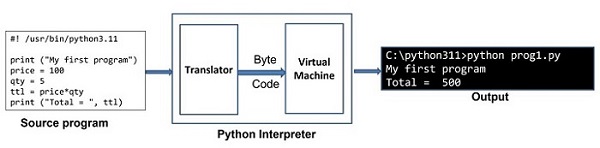
Python is an interpreter-based language. In a Linux system, Python's executable is installed in /usr/bin/ directory. For Windows, the executable (python.exe) is found in the installation folder (for example C:\python311). In this chapter, you will how Python interpreter works, its interactive and scripted mode.
Python code is executed by one statement at a time method. Python interpreter has two components. The translator checks the statement for syntax. If found correct, it generates an intermediate byte code. There is a Python virtual machine which then converts the byte code in native binary and executes it. The following diagram illustrates the mechanism:
Python interpreter has an interactive mode and a scripted mode.
Interactive Mode
When launched from a command line terminal without any additional options, a Python prompt >>> appears and the Python interpreter works on the principle of REPL (Read, Evaluate, Print, Loop). Each command entered in front of the Python prompt is read, translated and executed. A typical interactive session is as follows.
>>> price = 100
>>> qty = 5
>>> ttl = price*qty
>>> ttl
500
>>> print ("Total = ", ttl)
Total = 500
To close the interactive session, enter the end-of-line character (ctrl+D for Linux and ctrl+Z for Windows). You may also type quit() in front of the Python prompt and press Enter to return to the OS prompt.
The interactive shell available with standard Python distribution is not equipped with features like line editing, history search, auto-completion etc. You can use other advanced interactive interpreter software such as IPython and bpython.
Scripting Mode
Instead of entering and obtaining the result of one instruction at a time − as in the interactive environment, it is possible to save a set of instructions in a text file, make sure that it has .py extension, and use the name as the command line parameter for Python command.
Save the following lines as prog1.py, with the use of any text editor such as vim on Linux or Notepad on Windows.
print ("My first program")
price = 100
qty = 5
ttl = price*qty
print ("Total = ", ttl)
Launch Python with this name as command line argument.
C:\Users\Acer>python prog1.py
My first program
Total = 500
Note that even though Python executes the entire script, it is still executed in one-by-one fashion.
In case of any compiler-based language such as Java, the source code is not converted in byte code unless the entire code is error-free. In Python, on the other hand, statements are executed until first occurrence of error is encountered.
Let us introduce an error purposefully in the above code.
print ("My first program")
price = 100
qty = 5
ttl = prive*qty #Error in this statement
print ("Total = ", ttl)
Note the misspelt variable prive instead of price. Try to execute the script again as before −
C:\Users\Acer>python prog1.py
My first program
Traceback (most recent call last):
  File "C:\Python311\prog1.py", line 4, in <module>
   ttl = prive*qty
   ^^^^^
NameError: name 'prive' is not defined. Did you mean: 'price'?
Note that the statements before the erroneous statement are executed and then the error message appears. Thus it is now clear that Python script is executed in interpreted manner.
In addition to executing the Python script as above, the script itself can be a selfexecutable in Linux, like a shell script. You have to add a shebang line on top of the script. The shebang indicates which executable is used to interpret Python statements in the script. Very first line of the script starts with #! And followed by the path to Python executable.
Modify the prog1.py script as follows −
#! /usr/bin/python3.11
print ("My first program")
price = 100
qty = 5
ttl = price*qty
print ("Total = ", ttl)
To mark the script as self-executable, use the chmod command
user@ubuntu20:~$ chmod +x prog1.py
You can now execute the script directly, without using it as a command-line argument.
user@ubuntu20:~$ ./hello.py
IPython
IPython (stands for Interactive Python) is an enhanced and powerful interactive environment for Python with many functionalities compared to the standard Python shell. IPython was originally developed by Fernando Perez in 2001.
IPython has the following important features −
IPython's object introspection ability to check properties of an object during runtime.
Its syntax highlighting proves to be useful in identifying the language elements such as keywords, variables etc.
The history of interactions is internally stored and can be reproduced.
Tab completion of keywords, variables and function names is one of the most important features.
IPython's Magic command system is useful for controlling Python environment and performing OS tasks.
It is the main kernel for Jupyter notebook and other front-end tools of Project Jupyter.
Install IPython with PIP installer utility.
pip3 install ipython
Launch IPython from command-line
C:\Users\Acer>ipython
Python 3.11.2 (tags/v3.11.2:878ead1, Feb 7 2023, 16:38:35) [MSC v.1934
64 bit (AMD64)] on win32
Type 'copyright', 'credits' or 'license' for more information
IPython 8.4.0 -- An enhanced Interactive Python. Type '?' for help.
In [1]:
Instead of the regular >>> prompt as in standard interpreter, you will notice two major IPython prompts as explained below −
In[1] appears before any input expression.
Out[1]appears before the Output appears.
In [1]: price = 100
In [2]: quantity = 5
In [3]: ttl = price*quantity
In [4]: ttl
Out[4]: 500
In [5]:
Tab completion is one of the most useful enhancements provided by IPython. IPython pops up appropriate list of methods as you press tab key after dot in front of object.
In the following example, a string is defined. Press tab key after the "." symbol and as a response, the attributes of string class are shown. You can navigate to the required one.

IPython provides information (introspection) of any object by putting '?' in front of it. It includes docstring, function definitions and constructor details of class. For example to explore the string object var defined above, in the input prompt enter var?.
In [5]: var = "Hello World"
In [6]: var?
Type: str
String form: Hello World
Length: 11
Docstring:
str(object='') -> str
str(bytes_or_buffer[, encoding[, errors]]) -> str
Create a new string object from the given object. If encoding or
errors is specified, then the object must expose a data buffer
that will be decoded using the given encoding and error handler.
Otherwise, returns the result of object.__str__() (if defined)
or repr(object).
encoding defaults to sys.getdefaultencoding().
errors defaults to 'strict'.
IPython's magic functions are extremely powerful. Line magics let you run DOS commands inside IPython. Let us run the dir command from within IPython console
In [8]: !dir *.exe
 Volume in drive F has no label.
 Volume Serial Number is E20D-C4B9

 Directory of F:\Python311

07-02-2023 16:55            103,192 python.exe
07-02-2023 16:55            101,656 pythonw.exe
                2 File(s)    204,848 bytes
                0 Dir(s)  105,260,306,432 bytes free
Jupyter notebook is a web-based interface to programming environments of Python, Julia, R and many others. For Python, it uses IPython as its main kernel.
Python - Environment Setup
First step in the journey of learning Python is to install it on your machine. Today most computer machines, especially having Linux OS, have Python pre-installed. However, it may not be the latest version.
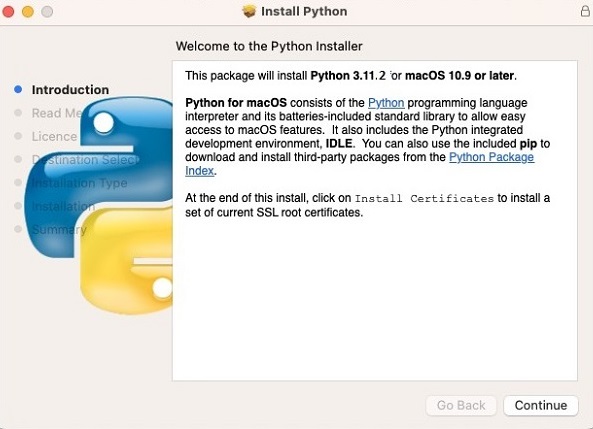
In this section, we shall learn to install the latest version of Python, Python 3.11.2, on Linux, Windows and Mac OS.
Latest version of Python for all the operating system environments can be downloaded from PSF's official website.
Install Python on Ubuntu Linux
To check whether Python is already installed, open the Linux terminal and enter the following command −
user@ubuntu20:~$ python3 --version
In Ubuntu Linux, the easiest way to install Python is to use apt − Advanced Packaging Tool. It is always recommended to update the list of packages in all the configured repositories.
user@ubuntu20:~$ sudo apt update
Even after the update, the latest version of Python may not be available for install, depending upon the version of Ubuntu you are using. To overcome this, add the deadsnakes repository.
user@ubuntu20:~$ sudo apt-get install software-properties-common
user@ubuntu20:~$ sudo add-apt-repository ppa:deadsnakes/ppa
Update the package list again.
user@ubuntu20:~$ sudo apt update
To install the latest Python 3.11 version, enter the following command in the terminal −
user@ubuntu20:~$ sudo apt-get install python3.11
Check whether it has been properly installed.
user@ubuntu20:~$ python3.11
Python 3.11.2 (main, Feb 8 2023, 14:49:24) [GCC 9.4.0] on linux
Type "help", "copyright", "credits" or "license" for more information.
>>> print ("Hello World")
Hello World
>>>
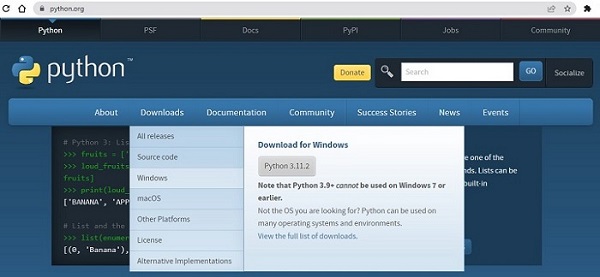
Install Python on Windows
It may be noted that Python's version 3.10 onwards cannot be installed on Windows 7 or earlier operating systems.
The recommended way to install Python is to use the official installer. Linn to the latest stable version is given on the home page itself. It is also found at https://www.python.org/downloads/windows/.
You can find embeddable packages and installers for 32 as well as 64-bit architecture.
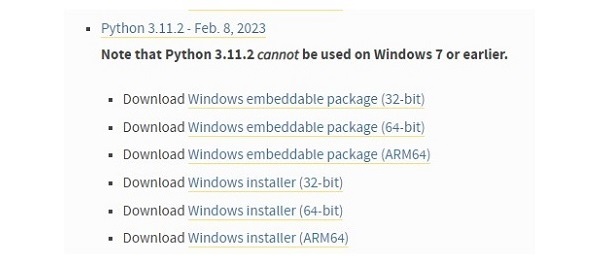
Let us download 64-bit Windows installer −
(https://www.python.org/ftp/python/3.11.2/python-3.11.2-amd64.exe)
Double click on the file where it has been downloaded to start the installation.
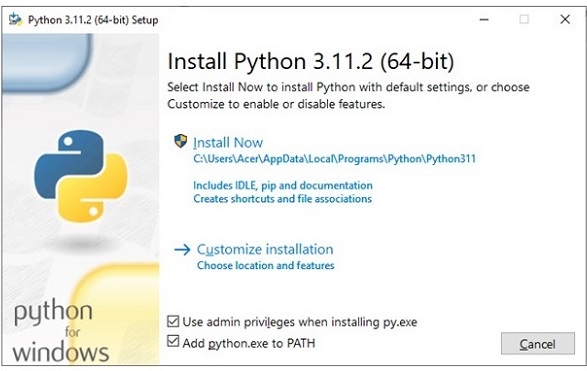
Although you can straight away proceed by clicking the Install Now button, it is advised to choose the installation folder with a relatively shorter path, and tick the second check box to update the PATH variable.
Accept defaults for rest of the steps in this installation wizard to complete the installation.
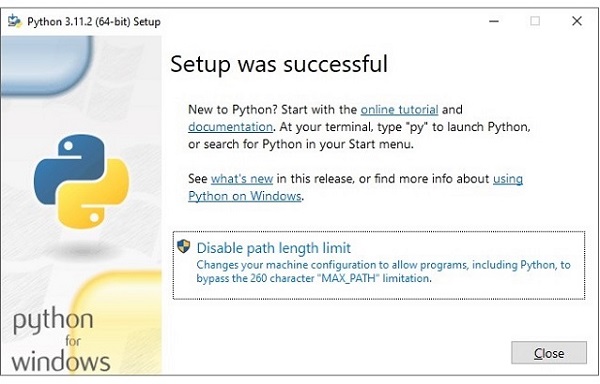
Open the Window Command Prompt terminal and run Python to check the success of installation.
C:\Users\Acer>python
Python 3.11.2 (tags/v3.11.2:878ead1, Feb 7 2023, 16:38:35) [MSC v.1934
64 bit (AMD64)] on win32
Type "help", "copyright", "credits" or "license" for more information.
>>>
Python's standard library has an executable module called IDLE − short for Integrated Development and Learning Environment. Find it from Window start menu and launch.

IDLE contains Python shell (interactive interpreter) and a customizable multi-window text editor with features such as syntax highlighting, smart indent, auto completion etc. It is cross-platform so works the same on Windows, MacOS and Linux. It also has a debugger with provision to set breakpoints, stepping, and viewing of global and local namespaces.
Install Python on MacOS
Earlier versions of MacOS used to have Python 2.7 pre-installed in it. However, now that the version no longer supported, it has been discontinued. Hence, you need to install Python on your own.
On a Mac computer, Python can be installed by two methods −
Using the official installer
Manual installation with homebrew
You can find macOS 64-bit universal2 installer on the downloads page of the official website −
https://www.python.org/ftp/python/3.11.2/python-3.11.2-macos11.pkg
The installation process is more or less similar to that on Windows. Usually, accepting the default options during the wizard steps should do the work.
The frequently required utilities such as PIP and IDLE are also installed by this installation wizard.
Alternately, you can opt for the installation from command line. You need to install Homebrew, Mac's package manager, if it is not already available. You can follow the instructions for installation at https://docs.brew.sh/Installation.
After that, open the terminal and enter the following commands −
brew update && brew upgrade
brew install python3
Latest version of Python will now be installed.
Install Python from Source Code
If you are an experienced developer, with good knowledge of C++ and Git tool, you can follow the instructions in this section to build Python executable along with the modules in the standard library.
You must have the C compiler for the OS that you are on. In Ubuntu and MacOS, gcc compiler is available. For Windows, you should install Visual Studio 2017 or later.
Steps to Build Python on Linux/Mac
Download the source code of Python's latest version either from Python's official website or its GitHub repository.
Extract the files with the command −
tar -xvzf /home/python/Python-3.11.2.tgz
Alternately, clone the main branch of Python's GitHub repository. (You should have git installed)
git clone -b main https://github.com/python/cpython
A configure script comes in the source code. Running this script will create the makefile.
./configure --enable-optimizations
Followed by this, use the make tool to build the files and then make install to put the final files in /usr/bin/ directory.
make
make install
Python has been successfully built from the source code.
If you use Windows, make sure you have Visual Studio 2017 and Git for Windows installed. Clone the Python source code repository by the same command as above.
Open the windows command prompt in the folder where the source code is placed. Run the following batch file
PCbuild\get_externals.bat
This downloads the source code dependencies (OpenSSL, Tk etc.)
Open Visual Studio and PCbuild/sbuild.sln solution, and build (press F10) the debug folder shows python_d.exe which is the debug version of Python executable.
To build from command prompt, use the following command −
PCbuild\build.bat -e -d -p x64
Thus, in this chapter, you learned how to install Python from the pre-built binaries as well as from the source code.
Setting Up the PATH
When the Python software is installed, it should be accessible from anywhere in the file system. For this purpose, the PATH environment variable needs to be updated. A system PATH is a string consisting of folder names separated by semicolon (;). Whenever an executable program is invoked from the command line, the operating system searches for it in the folders listed in the PATH variable. We need to append Python's installation folder to the PATH string.
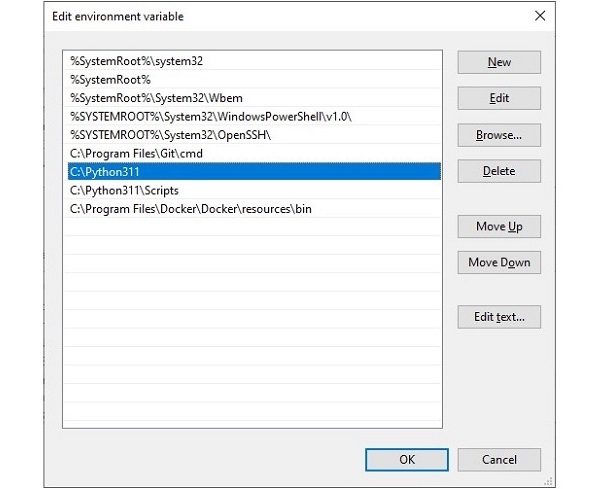
In case of Windows operating system, if you have enabled "add python.exe to system path" option on the first screen of the installation wizard, the path will be automatically updated. To do it manually, open Environment Variables section from Advanced System Settings.
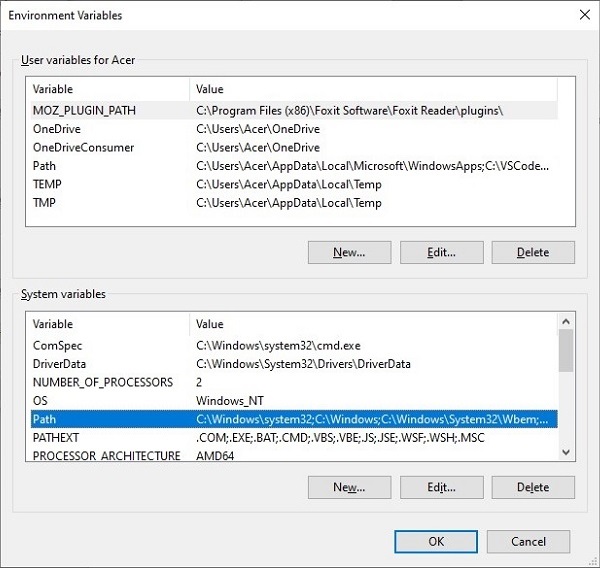
Edit the Path variable, and add a new entry. Enter the name of the installation folder in which Python has been installed, and press OK.
To add the Python directory to the path for a particular session in Linux −
In the bash shell (Linux) − type export PATH="$PATH:/usr/bin/python3.11" and press Enter.
Python Command Line Options
We know that interactive Python interpreter can be invoked from the terminal simply by calling Python executable. Note that no additional parameters or options are needed to start the interactive session.
user@ubuntu20:~$ python3.11
Python 3.11.2 (main, Feb 8 2023, 14:49:24) [GCC 9.4.0] on linux
Type "help", "copyright", "credits" or "license" for more information.
>>> print ("Hello World")
Hello World
>>>
Python interpreter also responds to the following command line options −
-c <command>
Interpreters execute one or more statements in a string, separated by newlines (;) symbol.
user@ubuntu20:~$ python3 -c "a=2;b=3;print(a+b)"
5
-m <module-name>
Interpreter executes the contents of named module as the __main__ module. Since the argument is a module name, you must not give a file extension (.py).
Consider the following example. Here, the timeit module in standard library has a command line interface. The -s option sets up the arguments for the module.
C:\Users\Acer>python -m timeit -s "text = 'sample string'; char = 'g'
'char in text'"
5000000 loops, best of 5: 49.4 nsec per loop
<script>
Interpreter executes the Python code contained in script with .py extension, which must be a filesystem path (absolute or relative).
Assuming that a text file with the name hello.py contains print ("Hello World") statement is present in the current directory. The following command line usage of script option.
C:\Users\Acer>python hello.py
Hello World
? Or -h or −help
This command line option prints a short description of all command line options and corresponding environment variables and exit.
-V or --version
This command line option prints the Python version number
C:\Users\Acer>python -V
Python 3.11.2
C:\Users\Acer>python --version
Python 3.11.2
Python Environment Variables
The operating system uses path environment variable to search for any executable (not only Python executable). Python specific environment variables allow you to configure the behaviour of Python. For example, which folder locations to check to import a module. Normally Python interpreter searches for the module in the current folder. You can set one or more alternate folder locations.
Python environment variables may be set temporarily for the current session or may be persistently added in the System Properties as in case of path variable.
PYTHONPATH
As mentioned above, if you want the interpreter should search for a module in other folders in addition to the current, one or more such folder locations are stored as PYTHONPATH variable.
First, save hello.py script in a folder different from Python's installation folder, let us say c:\modulepath\hello.py
To make the module available to the interpreter globally, set PYTHONPATH
C:\Users\Acer>set PYTHONPATH= c:\modulepath
C:\Users\Acer>echo %PYTHONPATH%
c:\modulepath
Now you can import the module even from any directory other than c:\modulepath directory.
>>> import hello
Hello World
>>>
PYTHONHOME
Set this variable to change the location of the standard Python libraries. By default, the libraries are searched in /usr/local/pythonversion in case of Linux and instalfolder\lib in Windows. For example, c:\python311\lib.
PYTHONSTARTUP
Usually, this variable is set to a Python script, which you intend to get automatically executed every time Python interpreter starts.
Let us create a simple script as follows and save it as startup.py in the Python installation folder −
print ("Example of Start up file")
print ("Hello World")
Now set the PYTHONSTARTUP variable and assign name of this file to it. After that start the Python interpreter. It shows the output of this script before you get the prompt.
F:\311_2>set PYTHONSTARTUP=startup.py
F:\311_2>echo %PYTHONSTARTUP%
startup.py
F:\311_2>python
Python 3.11.2 (tags/v3.11.2:878ead1, Feb 7 2023, 16:38:35) [MSC v.1934
64 bit (AMD64)] on win32
Type "help", "copyright", "credits" or "license" for more information.
Example of Start up file
Hello World
>>>
PYTHONCASEOK
This environment is available for use only on Windows and MacOSX, not on Linux. It causes Python to ignore the cases in import statement.
PYTHONVERBOSE
If this variable is set to a non-empty string it is equivalent to specifying python -v command. It results in printing a message, showing the place (filename or built-in module) each time a module is initialized. If set to an integer − say 2, it is equivalent to specifying -v two times. (python --v).
PYTHONDONTWRITEBYTECODE
Normally, the imported modules are compiled to .pyc file. If this variable is set to a not null string,the .pyc files on the import of source modules are not created.
PYTHONWARNINGS
Python's warning messages are redirected to the standard error stream, sys.stderr. This environment variable is equivalent to the python -W option. The following are allowed values of this variable −
PYTHONWARNINGS=default # Warn once per call location
PYTHONWARNINGS=error # Convert to exceptions
PYTHONWARNINGS=always # Warn every time
PYTHONWARNINGS=module # Warn once per calling module
PYTHONWARNINGS=once # Warn once per Python process
PYTHONWARNINGS=ignore # Never warn
Python - Virtual Environment
In this chapter, you will get to know what a virtual environment in Python is, how to create and use a virtual environment for building a Python application.
When you install Python software on your computer, it is available for use from anywhere in the filesystem. This is a system-wide installation.
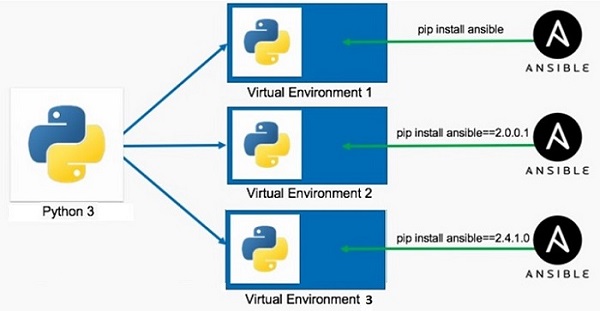
While developing an application in Python, one or more libraries may be required to be installed using the pip utility (e.g., pip3 install somelib). Moreover, an application (let us say App1) may require a particular version of the library − say somelib 1.0. At the same time another Python application (for example App2) may require newer version of same library say somelib 2.0. Hence by installing a new version, the functionality of App1 may be compromised because of conflict between two different versions of same library.
This conflict can be avoided by providing two isolated environments of Python in the samemachine. These are called virtual environment. A virtual environment is a separatedirectory structure containing isolated installation having a local copy of Python interpreter, standard library and other modules.
The following figure shows the purpose of advantage of using virtual environment. Using the global Python installation, more than one virtual environments are created, each having different version of the same library, so that conflict is avoided.
This functionality is supported by venv module in standard Python distribution. Use following commands to create a new virtual environment.
C:\Users\Acer>md\pythonapp
C:\Users\Acer>cd\pythonapp
C:\pythonapp>python -m venv myvenv
Here, myvenv is the folder in which a new Python virtual environment will be created showing following directory structure −
Directory of C:\pythonapp\myvenv
22-02-2023 09:53 <DIR> .
22-02-2023 09:53 <DIR> ..
22-02-2023 09:53 <DIR> Include
22-02-2023 09:53 <DIR> Lib
22-02-2023 09:53 77 pyvenv.cfg
22-02-2023 09:53 <DIR> Scripts
The utilities for activating and deactivating the virtual environment as well as the local copy of Python interpreter will be placed in the scripts folder.
Directory of C:\pythonapp\myvenv\scripts
22-02-2023 09:53 <DIR> .
22-02-2023 09:53 <DIR> ..
22-02-2023 09:53 2,063 activate
22-02-2023 09:53 992 activate.bat
22-02-2023 09:53 19,611 Activate.ps1
22-02-2023 09:53 393 deactivate.bat
22-02-2023 09:53 106,349 pip.exe
22-02-2023 09:53 106,349 pip3.10.exe
22-02-2023 09:53 106,349 pip3.exe
22-02-2023 09:53 242,408 python.exe
22-02-2023 09:53 232,688 pythonw.exe
To enable this new virtual environment, execute activate.bat in Scripts folder.
C:\pythonapp>myvenv\scripts\activate
(myvenv) C:\pythonapp>
Note the name of the virtual environment in the parentheses. The Scripts folder contains a local copy of Python interpreter. You can start a Python session in this virtual environment.
To confirm whether this Python session is in virtual environment check the sys.path.
(myvenv) C:\pythonapp>python
Python 3.10.1 (tags/v3.10.1:2cd268a, Dec 6 2021, 19:10:37) [MSC v.1929
64 bit (AMD64)] on win32
Type "help", "copyright", "credits" or "license" for more information.
>>> import sys
>>> sys.path
['', 'C:\\Python310\\python310.zip', 'C:\\Python310\\DLLs',
'C:\\Python310\\lib', 'C:\\Python310', 'C:\\pythonapp\\myvenv',
'C:\\pythonapp\\myvenv\\lib\\site-packages']
>>>
The scripts folder of this virtual environment also contains pip utilities. If you install a package from PyPI, that package will be active only in current virtual environment. To deactivate this environment, run deactivate.bat.
Python - Basic Syntax
In Python, the term syntax refers to the rules of forming a statement or expression. Python language is known for its clean and simple syntax. It also has a limited set of keywords and simpler punctuation rules as compared to other languages. In this chapter, let us understand about basic syntax of Python.
A Python program comprises of predefined keywords and identifiers representing functions, classes, modules etc. Python has clearly defined rules for forming identifiers, writing statements and comments in Python source code.
Python Keywords
A predefined set of keywords is the most important aspect of any programming language. These keywords are reserved words. They have a predefined meaning, they must be used only for its predefined purpose and as per the predefined rules of syntax. Programming logic is encoded with these keywords.
As of Python 3.11 version, there are 35 (Thirty Five) keywords in Python. To obtain the list of Python keywords, enter the following help command in Python shell.
>>> help("keywords")

Here is a list of the Python keywords. Enter any keyword to get more
help.
| 1. False | 10. class | 19. from | 28. or |
| 2. None | 11. continue | 20. global | 29. pass |
| 3. True | 12. def | 21. if | 30. raise |
| 4. and | 13. del | 22. import | 31. return |
| 5. as | 14. elif | 23. in | 32. try |
| 6. assert | 15. else | 24. is | 33. while |
| 7. async | 16. except | 25. lambda | 34. with |
| 8. await | 17. finally | 26. nonlocal | 35. yield |
| 9. break | 18. for | 27. not |
| Value Keywords | True, False, None |
| Operator Keywords | and, or, not, in, is |
| Conditional Flow Keywords | if, elif, else |
| Keywords for loop control | for, while, break, continue |
| Structure Keywords | def, class, with, pass, lambda |
| Keywords for returning | return, yield |
| Import Keywords | import, from, as |
| Keywords about ExceptionHandling | try, except, raise, finally, assert |
| Keywords for Asynchronous Programming | async, await |
| Variable Scope Keywords | del, global, nonlocal |
We shall learn about the usage of each of these keywords as we go along in this tutorial.
Python Identifiers
Various elements in a Python program, other than keywords, are called identifiers. An identifier is a user-given name to variables, functions, classes, modules, packages etc. in the source code. Python has laid down certain rules to form an identifier. These rules are −
An identifier should start with either an alphabet (lower or upper case) or underscore (_). More than one alpha-numeric characters or underscores may follow.
Use of any keyword as n identifier is not allowed, as keywords have a predefined meaning.
Conventionally, name of class begins with uppercase alphabet. Other elements like variable or function start with lowercase alphabet.
As per another Python convention, single underscore in the beginning of a variable name is used to indicate a private variable.
Use two underscores in beginning of identifier indicates that the variable is strongly private.
Two leading and trailing underscores are used in language itself for special purpose. For example, __add__, __init__
According to the above rules, here are some valid identifiers −
- Student
- score
- aTotal
- sum_age
- __count
- TotalValue
- price1
- cost_of_item
- __init__
Some invalid formations of identifiers are also given below −
- 1001
- Name of student
- price-1
- ft.in
It may be noted that identifiers are case sensitive. As a result, Name and name are two different identifiers.
Python Indents
Use of indents in code is one of the important features of Python's syntax. Often in a program, you might require grouping more than one statements together as a block. For example, in case of more than one statements if a condition is true/false. Different programming languages have different methods to mark the scope and extent of group of statements in constructs like class, function, conditional and loop. C, C++, Java etc. make use of curly brackets to mark the block. Python uses uniform indentation to mark block of statements, thereby it increases the readability of the code.
To mark the beginning of a block, type the ":" symbol and press Enter. Any Python-aware editor (like IDLE, or VS Code) goes to the next line leaving additional whitespace (called indent). Subsequent statements in the block follow same level of indent. To signal end of the block, the whitespace is dedented by pressing the backspace key. The following example illustrates the use of indents in Python:
At this juncture, you may not understand how the code works. But don't worry. Just see how indent level increases after colon symbol.
Python Statements
A statement in Python is any instruction that the Python interpreter can execute. A statement comprises of one or more keywords, operators, identifiers, a : symbol to mark beginning of block, or backslash \ as continuation character.
The statement may be a simple assignment statement such as amount = 1000 or it may be a compound statement with multiple statements grouped together in uniformly indented block, as in conditional or looping constructs.
You can enter a statement in front of the Python prompt of the interactive shell, or in the editor window. Usually, text terminated by Enter key (called newline character) is recognized as a statement by Python interpreter. Hence, each line in the editor is a statement, unless it starts with the comment character (#).
print ("My first program")
price = 100
qty = 5
ttl = price*qty
print ("Total = ", ttl)
Each line in the above code is a statement. Occasionally, a Python statement may spill over multiple lines. To do so, use backslash (\) as continuation character. A long string can be conveniently broken in multiple lines as shown below −
name = "Ravi"
string = "Hello {} \
Welcome to Python Tutorial \
from TutorialsPoint".format(name)
print (string)
The string (with an embedded string variable name) spreads over multiple lines for better readability. The output will be −
Hello Ravi Welcome to Python Tutorial from TutorialsPoint
The continuation character also helps in writing a long arithmetic expression in a more readable manner.
For example, the equation $\frac{(a+b)\times (c−d)}{(a−b)\times (c+d)}$ is coded in Python as follows −
a=10
b=5
c=5
d=10
expr = (a+b)*(c-d)/ \
   (a-b)*(c+d)
print (expr)
The use of back-slash symbol (\) is not necessary if items in a list, tuple or dictionary object spill over multiple lines.
Subjects = ["English", "French", "Sanskrit",
   "Physics", "Maths",
   "Computer Sci", "History"]
Python also allows use of semicolon to put more than one statements in a single line in the editor. Look at the following examples −
a=10; b=5; c=5; d=10
if a>10: b=20; c=50
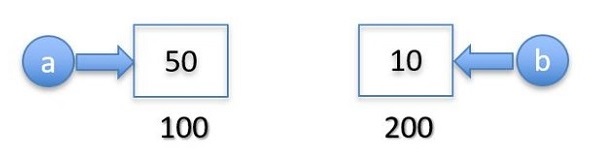
Python - Variables
In this chapter, you will learn what are variables in Python and how to use them.
Data items belonging to different data types are stored in computer's memory. Computer's memory locations are having a number or address, internally represented in binary form. Data is also stored in binary form as the computer works on the principle of binary representation. In the following diagram, a string May and a number 18 is shown as stored in memory locations.
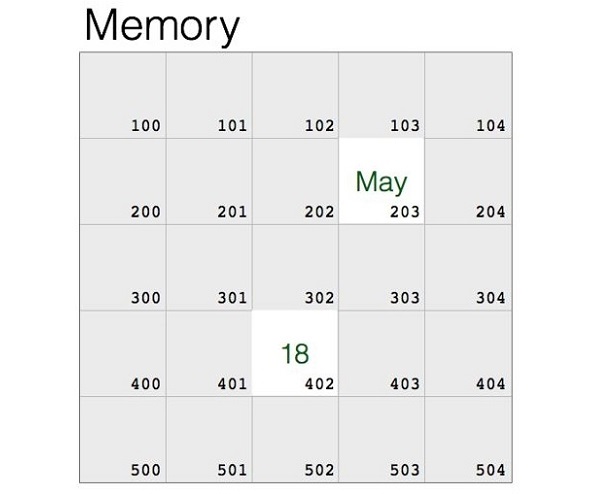
If you know the assembly language, you will covert these data items and the memory address, and give a machine language instruction. However, it is not easy for everybody. Language translator such as Python interpreter performs this type of conversion. It stores the object in a randomly chosen memory location. Python's built-in id() function returns the address where the object is stored.
>>> "May"
>>> id("May")
2167264641264
>>> 18
18
>>> id(18)
140714055169352
Once the data is stored in the memory, it should be accessed repeatedly for performing a certain process. Obviously, fetching the data from its ID is cumbersome. High level languages like Python make it possible to give a suitable alias or a label to refer to the memory location.
In the above example, let us label the location of May as month, and location in which 18 is stored as age. Python uses the assignment operator (=) to bind an object with the label.
>>> month="May"
>>> age=18
The data object (May) and its name (month) have the same id(). The id() of 18 and age are also same.
>>> id(month)
2167264641264
>>> id(age)
140714055169352
The label is an identifier. It is usually called as a variable. A Python variable is a symbolic name that is a reference or pointer to an object.
Naming Convention
Name of the variable is user specified, and is formed by following the rules of forming an identifier.
Name of Python variable should start with either an alphabet (lower or upper case) or underscore (_). More than one alpha-numeric characters or underscores may follow.
Use of any keyword as Python variable is not allowed, as keywords have a predefined meaning.
Name of a variable in Python is case sensitive. As a result, age and Age cannot be used interchangeably.
You should choose the name of variable that is mnemonic, such that it indicates the purpose. It should not be very short, but not vary lengthy either.
If the name of variable contains multiple words, we should use these naming patterns −
Camel case − First letter is a lowercase, but first letter of each subsequent word is in uppercase. For example: kmPerHour, pricePerLitre
Pascal case − First letter of each word is in uppercase. For example: KmPerHour, PricePerLitre
Snake case − Use single underscore (_) character to separate words. For example: km_per_hour, price_per_litre
Once you use a variable to identify a data object, it can be used repeatedly without its id() value. Here, we have a variables height and width of a rectangle. We can compute the area and perimeter with these variables.
>>> width=10
>>> height=20
>>> area=width*height
>>> area
200
>>> perimeter=2*(width+height)
>>> perimeter
60
Use of variables is especially advantageous when writing scripts or programs. Following script also uses the above variables.
#! /usr/bin/python3.11
width = 10
height = 20
area = width*height
perimeter = 2*(width+height)
print ("Area = ", area)
print ("Perimeter = ", perimeter)
Save the above script with .py extension and execute from command-line. The result would be −
Area = 200
Perimeter = 60
Assignment Statement
In languages such as C/C++ and Java, one needs to declare the variable and its type before assigning it any value. Such prior declaration of variable is not required in Python.
Python uses = symbol as the assignment operator. Name of the variable identifier appears on the left of = symbol. The expression on its right id evaluated and the value is assigned to the variable. Following are the examples of assignment statements
>>> counter = 10
>>> counter = 10 # integer assignment
>>> price = 25.50 # float assignment
>>> city = "Hyderabad" # String assignment
>>> subjects = ["Physics", "Maths", "English"] # List assignment
>>> mark_list = {"Rohit":50, "Kiran":60, "Lata":70} # dictionary
assignment
Python's built-in print() function displays the value of one or more variables.
>>> print (counter, price, city)
10 25.5 Hyderabad
>>> print (subjects)
['Physics', 'Maths', 'English']
>>> print (mark_list)
{'Rohit': 50, 'Kiran': 60, 'Lata': 70}
Value of any expression on the right of = symbol is assigned to the variable on left.
>>> x = 5
>>> y = 10
>>> z = x+y
However, the expression on the left and variable on the right of = operator is not allowed.
>>> x = 5
>>> y = 10
>>> x+y=z
   File "<stdin>", line 1
   x+y=z
   ^^^
SyntaxError: cannot assign to expression here. Maybe you meant '=='
instead of '='?
Though z=x+y and x+y=z are equivalent in Mathematics, it is not so here. It's because = is an equation symbol, while in Python it is an assignment operator.
Multiple Assignments
In Python, you can initialize more than one variables in a single statement. In the following case, three variables have same value.
>>> a=10
>>> b=10
>>> c=10
Instead of separate assignments, you can do it in a single assignment statement as follows −
>>> a=b=c=10
>>> print (a,b,c)
10 10 10
In the following case, we have three variables with different values.
>>> a=10
>>> b=20
>>> c=30
These separate assignment statements can be combined in one. You need to give comma separated variable names on left, and comma separated values on the right of = operator.
>>> a,b,c = 10,20,30
>>> print (a,b,c)
10 20 30
The concept of variable works differently in Python than in C/C++.
In C/C++, a variable is a named memory location. If a=10 and also b=10, both are two different memory locations. Let us assume their memory address is 100 and 200 respectively.
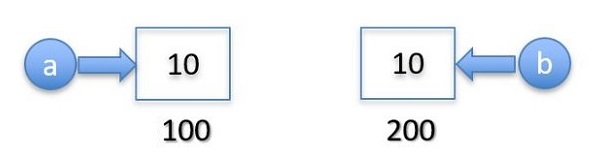
If a different value is assigned to "a" − say 50, 10 in the address 100 is overwritten.
A Python variable refers to the object and not the memory location. An object is stored in memory only once. Multiple variables are really the multiple labels to the same object.
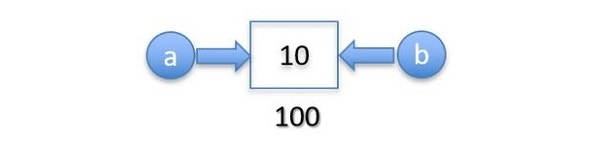
The statement a=50 creates a new int object 50 in the memory at some other location, leaving the object 10 referred by "b".
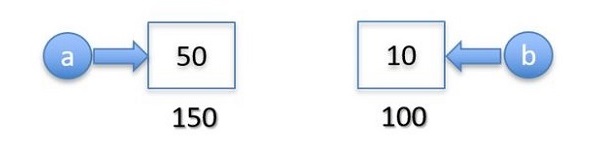
Further, if you assign some other value to b, the object 10 remains unreferred.
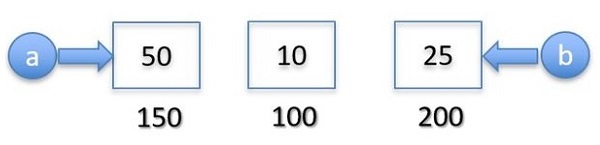
Python's garbage collector mechanism releases the memory occupied by any unreferred object.
Python's identity operator is returns True if both the operands have same id() value.
>>> a=b=10
>>> a is b
True
>>> id(a), id(b)
(140731955278920, 140731955278920)
Python - Data Types
Computer is a data processing device. Computer stores the data in its memory and processes it as per the given program. Data is a representation of facts about a certain object.
Some examples of data −
Data of students − name, gender, class, marks, age, fee etc.
Data of books in library − title, author, publisher, price, pages, year of publication etc.
Data of employees in an office − name, designation, salary, department, branch, etc.
Data type represents a kind of value and determines what operations can be done on it. Numeric, non-numeric and Boolean (true/false) data are the most obvious data types. However, each programming language has its own classification largely reflecting its programming philosophy.
Python identifies the data by different data types as per the following diagram −
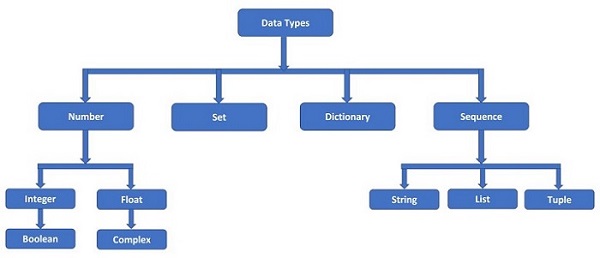
Python's data model defines four main data types. They are Number, Sequence, Set and Dictionary (also called Mapping)
Number Type
Any data item having a numeric value is a number. There are Four standard number data types in Python. They are integer, floating point, Boolean and Complex. Each of them have built-in classes in Python library, called int, float, bool and complex respectively.
In Python, a number is an object of its corresponding class. For example, an integer number 123 is an object of int class. Similarly, 9.99 is a floating point number, which is an object of float class.
Python's standard library has a built-in function type(), which returns the class of the given object. Here, it is used to check the type of an integer and floating point number.
>>> type(123)
<class 'int'>
>>> type(9.99)
<class 'float'>
The fractional component of a float number can also be represented in scientific format. A number -0.000123 is equivalent to its scientific notation 1.23E-4 (or 1.23e-4).
A complex number is made up of two parts − real and imaginary. They are separated by '+' or '-' signs. The imaginary part is suffixed by 'j' which is the imaginary number. The square root of -1 ($\sqrt{−1}$), is defined as imaginary number. Complex number in Python is represented as x+yj, where x is the real part, and y is the imaginary part. So, 5+6j is a complex number.
>>> type(5+6j)
<class 'complex'>
A Boolean number has only two possible values, as represented by the keywords, True and False. They correspond to integer 1 and 0 respectively.
>>> type (True)
<class 'bool'>
>>> type(False)
<class 'bool'>
With Python's arithmetic operators you can perform operations such as addition, subtraction etc.
Sequence Types
Sequence is a collection data type. It is an ordered collection of items. Items in the sequence have a positional index starting with 0. It is conceptually similar to an array in C or C++. There are three sequence types defined in Python. String, List and Tuple.
Strings in Python
A string is a sequence of one or more Unicode characters, enclosed in single, double or triple quotation marks (also called inverted commas). As long as the same sequence of characters is enclosed, single or double or triple quotes don't matter. Hence, following string representations are equivalent.
>>> 'Welcome To TutorialsPoint'
'Welcome To TutorialsPoint'
>>> "Welcome To TutorialsPoint"
'Welcome To TutorialsPoint'
>>> '''Welcome To TutorialsPoint'''
'Welcome To TutorialsPoint'
A string in Python is an object of str class. It can be verified with type() function.
>>> type("Welcome To TutorialsPoint")
<class 'str'>
You want to embed some text in double quotes as a part of string, the string itself should be put in single quotes. To embed a single quoted text, string should be written in double quotes.
>>> 'Welcome to "Python Tutorial" from TutorialsPoint'
'Welcome to "Python Tutorial" from TutorialsPoint'
>>> "Welcome to 'Python Tutorial' from TutorialsPoint"
"Welcome to 'Python Tutorial' from TutorialsPoint"
Since a string is a sequence, each character in it is having a positional index starting from 0. To form a string with triple quotes, you may use triple single quotes, or triple double quotes − both versions are similar.
>>> '''Welcome To TutorialsPoint'''
'Welcome To TutorialsPoint'
>>> """Welcome To TutorialsPoint"""
'Welcome To TutorialsPoint'
Triple quoted string is useful to form a multi-line string.
>>> '''
... Welcome To
... Python Tutorial
... from TutorialsPoint
... '''
'\nWelcome To\nPython Tutorial \nfrom TutorialsPoint\n'
A string is a non-numeric data type. Obviously, we cannot perform arithmetic operations on it. However, operations such as slicing and concatenation can be done. Python's str class defines a number of useful methods for string processing. We shall learn these methods in the subsequent chapter on Strings.
List in Python
In Python, List is an ordered collection of any type of data items. Data items are separated by comma (,) symbol and enclosed in square brackets ([]). A list is also a sequence, hence.
each item in the list has an index referring to its position in the collection. The index starts from 0.
The list in Python appears to be similar to array in C or C++. However, there is an important difference between the two. In C/C++, array is a homogenous collection of data of similar types. Items in the Python list may be of different types.
>>> [2023, "Python", 3.11, 5+6j, 1.23E-4]
A list in Python is an object of list class. We can check it with type() function.
>>> type([2023, "Python", 3.11, 5+6j, 1.23E-4])
<class 'list'>
As mentioned, an item in the list may be of any data type. It means that a list object can also be an item in another list. In that case, it becomes a nested list.
>>> [['One', 'Two', 'Three'], [1,2,3], [1.0, 2.0, 3.0]]
A list item may be a tuple, dictionary, set or object of user defined class also.
List being a sequence, it supports slicing and concatenation operations as in case of string. With the methods/functions available in Python's built-in list class, we can add, delete or update items, and sort or rearrange the items in the desired order. We shall study these aspects in a subsequent chapter.
Tuples in Python
In Python, a Tuple is an ordered collection of any type of data items. Data items are separated by comma (,) symbol and enclosed in parentheses or round brackets (). A tuple is also a sequence, hence each item in the tuple has an index referring to its position in the collection. The index starts from 0.
>>> (2023, "Python", 3.11, 5+6j, 1.23E-4)
In Python, a tuple is an object of tuple class. We can check it with the type() function.
>>> type((2023, "Python", 3.11, 5+6j, 1.23E-4))
<class 'tuple'>
As in case of a list, an item in the tuple may also be a list, a tuple itself or an object of any other Python class.
>>> (['One', 'Two', 'Three'], 1,2.0,3, (1.0, 2.0, 3.0))
To form a tuple, use of parentheses is optional. Data items separated by comma without any enclosing symbols are treated as a tuple by default.
>>> 2023, "Python", 3.11, 5+6j, 1.23E-4
(2023, 'Python', 3.11, (5+6j), 0.000123)
The two sequence types list and tuple appear to be similar except the use of delimiters, list uses square brackets ([]) while tuple uses parentheses. However, there is one major
difference between list and tuple. List is mutable object, whereas tuple is immutable. An object is immutable means once it is stored in the memory, it cannot be changed.
Let us try to understand the mutability concept. We have a list and tuple object with same data items.
>>> l1=[1,2,3]
>>> t1=(1,2,3)
Both are sequences, hence each item in both has an index. Item at index number 1 in both is 2.
>>> l1[1]
2
>>> t1[1]
2
Let us try to change the value of item index number 1 from 2 to 20 in list as well as tuple.
>>> l1[1]
2
>>> t1[1]
2
>>> l1[1]=20
>>> l1
[1, 20, 3]
>>> t1[1]=20
Traceback (most recent call last):
 File "<stdin>", line 1, in <module>
TypeError: 'tuple' object does not support item assignment
The error message 'tuple' object does not support item assignment tells you that a tuple object cannot be modified once it is formed. This is called an immutable object.
Immutability of tuple also means that Python's tuple class doesn't have the functionality to add, delete or sort items in a tuple. However, since it is a sequence, we can perform slicing and concatenation.
Dictionary Type
Python's dictionary is example of mapping type. A mapping object 'maps' value of one object with another. In a language dictionary we have pairs of word and corresponding meaning. Two parts of pair are key (word) and value (meaning). Similarly, Python dictionary is also a collection of key:value pairs. The pairs are separated by comma and put inside curly brackets {}. To establish mapping between key and value, the semicolon':' symbol is put between the two.
>>> {1:'one', 2:'two', 3:'three'}
Each key in a dictionary must be unique, and should be a number, string or tuple. The value object may be of any type, and may be mapped with more than one keys (they need not be unique)
In Python, dictionary is an object of the built-in dict class. We can check it with the type() function.
>>> type({1:'one', 2:'two', 3:'three'})
<class 'dict'>
Python's dictionary is not a sequence. It is a collection of items but each item (key:value pair) is not identified by positional index as in string, list or tuple. Hence, slicing operation cannot be done on a dictionary. Dictionary is a mutable object, so it is possible to perform add, modify or delete actions with corresponding functionality defined in dict class. These operations will be explained in a subsequent chapter.
Set Type
Set is a Python implementation of set as defined in Mathematics. A set in Python is a collection, but is not an indexed or ordered collection as string, list or tuple. An object cannot appear more than once in a set, whereas in List and Tuple, same object can appear more than once.
Comma separated items in a set are put inside curly brackets or braces. Items in the set collection may be of different data types.
>>> {2023, "Python", 3.11, 5+6j, 1.23E-4}
{(5+6j), 3.11, 0.000123, 'Python', 2023}
Note that items in the set collection may not follow the same order in which they are entered. The position of items is optimized by Python to perform operations over set as defined in mathematics.
Python's Set is an object of built-in set class, as can be checked with the type() function.
>>> type({2023, "Python", 3.11, 5+6j, 1.23E-4})
<class 'set'>
A set can store only immutable objects such as number (int, float, complex or bool), string or tuple. If you try to put a list or a dictionary in the set collection, Python raises a TypeError.
>>> {['One', 'Two', 'Three'], 1,2,3, (1.0, 2.0, 3.0)}
Traceback (most recent call last):
   File "<stdin>", line 1, in <module>
TypeError: unhashable type: 'list'
Hashing is a mechanism in computer science which enables quicker searching of objects in computer's memory. Only immutable objects are hashable.
Even if a set doesn't allow mutable items, the set itself is mutable. Hence, add/delete/update operations are permitted on a set object, using the methods in built-in set class. Python also has a set of operators to perform set manipulation. The methods and operators are explained in a latter chapter
Python - Type Casting
In manufacturing, casting is the process of pouring a liquefied or molten metal into a mold, and letting it cool to obtain the desired shape. In programming, casting refers to converting an object of one type into another. Here, we shall learn about type casting in Python.
In Python there are different data types, such as numbers, sequences, mappings etc. There may be a situation where, you have the available data of one type but you want to use it in another form. For example, the user has input a string but you want to use it as a number. Python's type casting mechanism let you do that.
Implicit Casting in Python
Casting is of two types − implicit and explicit.
When any language compiler/interpreter automatically converts object of one type into other, it is called implicit casting. Python is a strongly typed language. It doesn't allow automatic type conversion between unrelated data types. For example, a string cannot be converted to any number type. However, an integer can be cast into a float. Other languages such as JavaScript is a weakly typed language, where an integer is coerced into a string for concatenation.
Note that memory requirement of each type is different. For example, an integer object in Python occupies 4 bytes of memory, while a float object needs 8 bytes because of its fractional part. Hence, Python interpreter doesn't automatically convert a float to int, because it will result in loss of data. On the other hand, int can be easily converted into float by setting its fractional part to 0.
Implicit int to float casting takes place when any arithmetic operation one int and float operands is done.
We have an integer and one float variable
>>> a=10 # int object
>>> b=10.5 # float object
To perform their addition, 10 − the integer object is upgraded to 10.0. It is a float, but equivalent to its earlier numeric value. Now we can perform addition of two floats.
>>> c=a+b
>>> print (c)
20.5
In implicit type casting, the object with lesser byte size is upgraded to match the byte size of other object in the operation. For example, a Boolean object is first upgraded to int and then to float, before the addition with a floating point object. In the following example, we try to add a Boolean object in a float.
>>> a=True
>>> b=10.5
>>> c=a+b
>>> print (c)
11.5
Note that True is equal to 1, and False is equal to 0.
Although automatic or implicit casting is limited to int to float conversion, you can use Python's built-in functions to perform the explicit conversions such as string to integer.
int() Function
Python's built-in int() function converts an integer literal to an integer object, a float to integer, and a string to integer if the string itself has a valid integer literal representation.
Using int() with an int object as argument is equivalent to declaring an int object directly.
>>> a = int(10)
>>> a
10
is same as −
>>> a = 10
>>> a
10
>>> type(a)
<class 'int>
If the argument to int() function is a float object or floating point expression, it returns an int object. For example −
>>> a = int(10.5) #converts a float object to int
>>> a
10
>>> a = int(2*3.14) #expression results float, is converted to int
>>> a
6
>>> type(a)
<class 'int'>
The int() function also returns integer 1 if a Boolean object is given as argument.
>>> a=int(True)
>>> a
1
>>> type(a)
<class 'int'>
String to Integer
The int() function returns an integer from a string object, only if it contains a valid integer representation.
>>> a = int("100")
>>> a
100
>>> type(a)
<class 'int'>
>>> a = ("10"+"01")
>>> a = int("10"+"01")
>>> a
1001
>>> type(a)
<class 'int'>
However, if the string contains a non-integer representation, Python raises ValueError.
>>> a = int("10.5")
Traceback (most recent call last):
   File "<stdin>", line 1, in <module>
ValueError: invalid literal for int() with base 10: '10.5'
>>> a = int("Hello World")
Traceback (most recent call last):
   File "<stdin>", line 1, in <module>
ValueError: invalid literal for int() with base 10: 'Hello World'
The int() function also returns integer from binary, octal and hexa-decimal string. For this, the function needs a base parameter which must be 2, 8 or 16 respectively. The string should have a valid binary/octal/Hexa-decimal representation.
Binary String to Integer
The string should be made up of 1 and 0 only, and the base should be 2.
>>> a = int("110011", 2)
>>> a
51
The Decimal equivalent of binary number 110011 is 51.
Octal String to Integer
The string should only contain 0 to 7 digits, and the base should be 8.
>>> a = int("20", 8)
>>> a
16
The Decimal equivalent of octal 20 is 16.
Hexa-Decimal String to Integer
The string should contain only the Hexadecimal symbols i.e., 0-9 and A, B, C, D, E or F. Base should be 16.
>>> a = int("2A9", 16)
>>> a
681
Decimal equivalent of Hexadecimal 2A9 is 681.
You can easily verify these conversions with calculator app in Windows, Ubuntu or Smartphones.
float() Function
float() is a built-in function in Python. It returns a float object if the argument is a float literal, integer or a string with valid floating point representation.
Using float() with an float object as argument is equivalent to declaring a float object directly
>>> a = float(9.99)
>>> a
9.99
>>> type(a)
<class 'float'>
is same as −
>>> a = 9.99
>>> a
9.99
>>> type(a)
<class 'float'>
If the argument to float() function is an integer, the returned value is a floating point with fractional part set to 0.
>>> a = float(100)
>>> a
100.0
>>> type(a)
<class 'float'>
The float() function returns float object from a string, if the string contains a valid floating point number, otherwise ValueError is raised.
>>> a = float("9.99")
>>> a
9.99
>>> type(a)
<class 'float'>
>>> a = float("1,234.50")
Traceback (most recent call last):
   File "<stdin>", line 1, in <module>
ValueError: could not convert string to float: '1,234.50'
The reason of ValueError here is the presence of comma in the string.
For the purpose of string to float conversion, the sceientific notation of floating point is also considered valid.
>>> a = float("1.00E4")
>>> a
10000.0
>>> type(a)
<class 'float'>
>>> a = float("1.00E-4")
>>> a
0.0001
>>> type(a)
<class 'float'>
str() Function
We saw how a Python obtains integer or float number from corresponding string representation. The str() function works the opposite. It surrounds an integer or a float object with quotes (') to return a str object. The str() function returns the string.
representation of any Python object. In this section, we shall see different examples of str() function in Python.
The str() function has three parameters. First required parameter (or argument) is the object whose string representation we want. Other two operators, encoding and errors, are optional.
We shall execute str() function in Python console to easily verify that the returned object is a string, with the enclosing quotation marks (').
Integer to string
>>> a = str(10)
>>> a
'10'
>>> type(a)
<class 'str'>
Float to String
str() function converts floating point objects with both the notations of floating point, standard notation with a decimal point separating integer and fractional part, and the scientific notation to string object.
>>> a=str(11.10)
>>> a
'11.1'
>>> type(a)
<class 'str'>
>>> a = str(2/5)
>>> a
'0.4'
>>> type(a)
<class 'str'>
In the second case, a division expression is given as argument to str() function. Note that the expression is evaluated first and then result is converted to string.
Floating points in scientific notations using E or e and with positive or negative power are converted to string with str() function.
>>> a=str(10E4)
>>> a
'100000.0'
>>> type(a)
<class 'str'>
>>> a=str(1.23e-4)
>>> a
'0.000123'
>>> type(a)
<class 'str'>
When Boolean constant is entered as argument, it is surrounded by (') so that True becomes 'True'. List and Tuple objects can also be given argument to str() function. The resultant string is the list/tuple surrounded by (').
>>> a=str('True')
>>> a
'True'
>>> a=str([1,2,3])
>>> a
'[1, 2, 3]'
>>> a=str((1,2,3))
>>> a
'(1, 2, 3)'
>>> a=str({1:100, 2:200, 3:300})
>>> a
'{1: 100, 2: 200, 3: 300}'
Conversion of Sequence Types
List, Tuple and String are Python's sequence types. They are ordered or indexed collection of items.
A string and tuple can be converted into a list object by using the list() function. Similarly, the tuple() function converts a string or list to a tuple.
We shall an object each of these three sequence types and study their inter-conversion.
>>> a=[1,2,3,4,5]
>>> b=(1,2,3,4,5)
>>> c="Hello"
### list() separates each character in the string and builds the list
>>> obj=list(c)
>>> obj
['H', 'e', 'l', 'l', 'o']
### The parentheses of tuple are replaced by square brackets
>>> obj=list(b)
>>> obj
[1, 2, 3, 4, 5]
### tuple() separates each character from string and builds a tuple of
characters
>>> obj=tuple(c)
>>> obj
('H', 'e', 'l', 'l', 'o')
### square brackets of list are replaced by parentheses.
>>> obj=tuple(a)
>>> obj
(1, 2, 3, 4, 5)
### str() function puts the list and tuple inside the quote symbols.
>>> obj=str(a)
>>> obj
'[1, 2, 3, 4, 5]'
>>> obj=str(b)
>>> obj
'(1, 2, 3, 4, 5)'
Thus Python's explicit type casting feature allows conversion of one data type to other with the help of its built-in functions.
Python - Unicode System
Software applications often require to display messages output in a variety in different languages such as in English, French, Japanese, Hebrew, or Hindi. Python's string type uses the Unicode Standard for representing characters. It makes the program possible to work with all these different possible characters.
A character is the smallest possible component of a text. 'A', 'B', 'C', etc., are all different characters. So are '' and ''.
According to The Unicode standard, characters are represented by code points. A code point value is an integer in the range 0 to 0x10FFFF.
A sequence of code points is represented in memory as a set of code units, mapped to 8-bit bytes. The rules for translating a Unicode string into a sequence of bytes are called a character encoding.
Three types of encodings are present, UTF-8, UTF-16 and UTF-32. UTF stands for Unicode Transformation Format.
Python 3.0 onwards has built-in support for Unicode. The str type contains Unicode characters, hence any string created using single, double or the triple-quoted string syntax is stored as Unicode. The default encoding for Python source code is UTF-8.
Hence, string may contain literal representation of a Unicode character (3/4) or its Unicode value (\u00BE).
var = "3/4"
print (var)
var = "\u00BE"
print (var)
This above code will produce the following output −
'3/4'
3/4
In the following example, a string '10' is stored using the Unicode values of 1 and 0 which are \u0031 and u0030 respectively.
var = "\u0031\u0030"
print (var)
It will produce the following output −
10
Strings display the text in a human-readable format, and bytes store the characters as binary data. Encoding converts data from a character string to a series of bytes. Decoding translates the bytes back to human-readable characters and symbols. It is important not
to confuse these two methods. encode is a string method, while decode is a method of the Python byte object.
In the following example, we have a string variable that consists of ASCII characters. ASCII is a subset of Unicode character set. The encode() method is used to convert it into a bytes object.
string = "Hello"
tobytes = string.encode('utf-8')
print (tobytes)
string = tobytes.decode('utf-8')
print (string)
The decode() method converts byte object back to the str object. The encodeing method used is utf-8.
b'Hello'
Hello
In the following example, the Rupee symbol (₹) is stored in the variable using its Unicode value. We convert the string to bytes and back to str.
string = "\u20B9"
print (string)
tobytes = string.encode('utf-8')
print (tobytes)
string = tobytes.decode('utf-8')
print (string)
When you execute the above code, it will produce the following output −
₹
b'\xe2\x82\xb9'
₹
Python - Literals
In computer science, a literal is a notation for representing a fixed value in source code. For example, in the assignment statement.
x = 10
Here 10 is a literal as numeric value representing 10 is directly stored in memory. However,
y = x*2
Here, even if the expression evaluates to 20, it is not literally included in source code. You can also declare an int object with built-in int() function −
x = int(10)
However, this is also an indirect way of instantiation and not with literal.
You can create use literal representation for creating object of any built-in data type.
Integer Literal
Any representation involving only the digit symbols (0 to 9) creates an object of int type. The object so declared may be referred by a variable using an assignment operator.
Take a look at the following example −
x = 10
y = -25
z = 0
Python allows an integer to be represented as an octal number or a hexadecimal number. A numeric representation with only eight digit symbols (0 to 7) but prefixed by 0o or 0O is an octal number.
x = 0O34
Similarly, a series of hexadecimal symbols (0 to 9 and a to f), prefixed by 0x or 0X represents an integer in Hexedecimal form.
x = 0X1C
However, it may be noted that, even if you use octal or hexadecimal literal notation, Python internally treats it as of int type.
# Using Octal notation
x = 0O34
print ("0O34 in octal is", x, type(x))
# Using Hexadecimal notation
x = 0X1c
print ("0X1c in Hexadecimal is", x, type(x))
When you run this code, it will produce the following output −
0O34 in octal is 28 <class 'int'>
0X1c in Hexadecimal is 28 <class 'int'>
Float Literal
A floating point number consists of an integral part and a fractional part. Conventionally, a decimal point symbol (.) separates these two parts in a literal representation of a float. For example,
x = 25.55
y = 0.05
z = -12.2345
For a floating point number which is too large or too small, where number of digits before or after decimal point is more, a scientific notation is used for a compact literal representation. The symbol E or e followed by positive or negative integer, follows after the integer part.
For example, a number 1.23E05 is equivalent to 123000.00. Similarly, 1.23e-2 is equivalent to 0.0123
# Using normal floating point notation
x = 1.23
print ("1.23 in normal float literal is", x, type(x))
# Using Scientific notation
x = 1.23E5
print ("1.23E5 in scientific notation is", x, type(x))
x = 1.23E-2
print ("1.23E-2 in scientific notation is", x, type(x))
Here, you will get the following output −
1.23 in normal float literal is 1.23 <class 'float'>
1.23E5 in scientific notation is 123000.0 <class 'float''>
1.23E-2 in scientific notation is 0.0123 <class 'float''>
Complex Literal
A complex number comprises of a real and imaginary component. The imaginary component is any number (integer or floating point) multiplied by square root of "-1"
($\sqrt{−1}$). In literal representation ($\sqrt{−1}$) is representation by "j" or "J". Hence, a literal representation of a complex number takes a form x+yj.
#Using literal notation of complex number
x = 2+3j
print ("2+3j complex literal is", x, type(x))
y = 2.5+4.6j
print ("2.5+4.6j complex literal is", x, type(x))
This code will produce the following output −
2+3j complex literal is (2+3j) <class 'complex'>
2.5+4.6j complex literal is (2+3j) <class 'complex'>
String Literal
A string object is one of the sequence data types in Python. It is an immutable sequence of Unicode code points. Code point is a number corresponding to a character according to Unicode standard. Strings are objects of Python's built-in class 'str'.
String literals are written by enclosing a sequence of characters in single quotes ('hello'), double quotes ("hello") or triple quotes ('''hello''' or """hello""").
var1='hello'
print ("'hello' in single quotes is:", var1, type(var1))
var2="hello"
print ('"hello" in double quotes is:', var1, type(var1))
var3='''hello'''
print ("''''hello'''' in triple quotes is:", var1, type(var1))
var4="""hello"""
print ('"""hello""" in triple quotes is:', var1, type(var1))
Here, you will get the following output −
'hello' in single quotes is: hello <class 'str'>
"hello" in double quotes is: hello <class 'str'>
''''hello'''' in triple quotes is: hello <class 'str'>
"""hello""" in triple quotes is: hello <class 'str'>
If it is required to embed double quotes as a part of string, the string itself should be put in single quotes. On the other hand, if single quoted text is to be embedded, string should be written in double quotes.
var1='Welcome to "Python Tutorial" from TutorialsPoint'
print (var1)
var2="Welcome to 'Python Tutorial' from TutorialsPoint"
print (var2)
It will produce the following output −
Welcome to "Python Tutorial" from TutorialsPoint
Welcome to 'Python Tutorial' from TutorialsPoint
List Literal
List object in Python is a collection of objects of other data type. List is an ordered collection of items not necessarily of same type. Individual object in the collection is accessed by index starting with zero.
Literal representation of a list object is done with one or more items which are separated by comma and enclosed in square brackets [].
L1=[1,"Ravi",75.50, True]
print (L1, type(L1))
It will produce the following output −
[1, 'Ravi', 75.5, True] <class 'list'>
Tuple Literal
Tuple object in Python is a collection of objects of other data type. Tuple is an ordered collection of items not necessarily of same type. Individual object in the collection is accessed by index starting with zero.
Literal representation of a tuple object is done with one or more items which are separated by comma and enclosed in parentheses ().
T1=(1,"Ravi",75.50, True)
print (T1, type(T1))
It will produce the following output −
[1, 'Ravi', 75.5, True] <class tuple>
Default delimiter for Python sequence is parentheses, which means a comma separated sequence without parentheses also amounts to declaration of a tuple.
T1=1,"Ravi",75.50, True
print (T1, type(T1))
Here too, you will get the same output −
[1, 'Ravi', 75.5, True] <class tuple>
Dictionary Literal
Like list or tuple, dictionary is also a collection data type. However, it is not a sequence. It is an unordered collection of items, each of which is a key-value pair. Value is bound to key by the ":" symbol. One or more key:value pairs separated by comma are put inside curly brackets to form a dictionary object.
capitals={"USA":"New York", "France":"Paris", "Japan":"Tokyo",
"India":"New Delhi"}
numbers={1:"one", 2:"Two", 3:"three",4:"four"}
points={"p1":(10,10), "p2":(20,20)}
Key should be an immutable object. Number, string or tuple can be used as key. Key cannot appear more than once in one collection. If a key appears more than once, only the last one will be retained. Values can be of any data type. One value can be assigned to more than one keys. For example,
staff={"Krishna":"Officer", "Rajesh":"Manager", "Ragini":"officer", "Anil":"Clerk", "Kavita":"Manager"}
Python - Operators
In Python as well as any programming language, Operators are symbols (sometimes keywords) that are predefined to perform a certain most commonly required operations on one or more operands.
Types of Operators
Python language supports the following types of operators −
Arithmetic Operators
Comparison (Relational) Operators
Assignment Operators
Logical Operators
Bitwise Operators
Membership Operators
Identity Operators
Let us have a look at all the operators one by one.
Python - Arithmetic Operators
In Python, numbers are the most frequently used data type. Python uses the same symbols for basic arithmetic operations Everybody is familiar with, i.e., "+" for addition, "-" for subtraction, "*" for multiplication (most programming languages use "*" instead of the "x" as used in maths/algebra), and "/" for division (again for the "" used in Mathematics).
In addition, Python defines few more arithmetic operators. They are "%" (Modulus), "**" (Exponent) and "//" (Floor division).
Arithmetic operators are binary operators in the sense they operate on two operands. Python fully supports mixed arithmetic. That is, the two operands can be of two different number types. In such a situation, Python widens the narrower of the operands. An integer object is narrower than float object, and float is narrower than complex object. Hence, the result of arithmetic operation of int and a float is a float. Result of float and a complex is a complex number, similarly, operation on an integer and a complex object results in a complex object.
Let us study these operators with examples.
Python − Addition Operator (+)
This operator pronounced as plus, is a basic arithmetic operator. It adds the two numeric operands on the either side and returns the addition result.
In the following example, the two integer variables are the operands for the "+" operator.
a=10
b=20
print ("Addition of two integers")
print ("a =",a,"b =",b,"addition =",a+b)
It will produce the following output −
Addition of two integers
a = 10 b = 20 addition = 30
Addition of integer and float results in a float.
a=10
b=20.5
print ("Addition of integer and float")
print ("a =",a,"b =",b,"addition =",a+b)
It will produce the following output −
Addition of integer and float
a = 10 b = 20.5 addition = 30.5
The result of adding float to complex is a complex number.
a=10+5j
b=20.5
print ("Addition of complex and float")
print ("a=",a,"b=",b,"addition=",a+b)
It will produce the following output −
Addition of complex and float
a= (10+5j) b= 20.5 addition= (30.5+5j)
Python − Subtraction Operator (-)
This operator, known as minus, subtracts the second operand from the first. The resultant number is negative if the second operand is larger.
First example shows subtraction of two integers.
a=10
b=20
print ("Subtraction of two integers:")
print ("a =",a,"b =",b,"a-b =",a-b)
print ("a =",a,"b =",b,"b-a =",b-a)
Result −
Subtraction of two integers
a = 10 b = 20 a-b = -10
a = 10 b = 20 b-a = 10
Subtraction of an integer and a float follows the same principle.
a=10
b=20.5
print ("subtraction of integer and float")
print ("a=",a,"b=",b,"a-b=",a-b)
print ("a=",a,"b=",b,"b-a=",b-a)
It will produce the following output −
subtraction of integer and float
a= 10 b= 20.5 a-b= -10.5
a= 10 b= 20.5 b-a= 10.5
In the subtraction involving a complex and a float, real component is involved in the operation.
a=10+5j
b=20.5
print ("subtraction of complex and float")
print ("a=",a,"b=",b,"a-b=",a-b)
print ("a=",a,"b=",b,"b-a=",b-a)
It will produce the following output −
subtraction of complex and float
a= (10+5j) b= 20.5 a-b= (-10.5+5j)
a= (10+5j) b= 20.5 b-a= (10.5-5j)
Python − Multiplication Operator (*)
The * (asterisk) symbol is defined as a multiplication operator in Python (as in many languages). It returns the product of the two operands on its either side. If any of the operands negative, the result is also negative. If both are negative, the result is positive. Changing the order of operands doesn't change the result
a=10
b=20
print ("Multiplication of two integers")
print ("a =",a,"b =",b,"a*b =",a*b)
It will produce the following output −
Multiplication of two integers
a = 10 b = 20 a*b = 200
In multiplication, a float operand may have a standard decimal point notation, or a scientific notation.
a=10
b=20.5
print ("Multiplication of integer and float")
print ("a=",a,"b=",b,"a*b=",a*b)
a=-5.55
b=6.75E-3
print ("Multiplication of float and float")
print ("a =",a,"b =",b,"a*b =",a*b)
It will produce the following output −
Multiplication of integer and float
a = 10 b = 20.5 a-b = -10.5
Multiplication of float and float
a = -5.55 b = 0.00675 a*b = -0.037462499999999996
For the multiplication operation involving one complex operand, the other operand multiplies both the real part and imaginary part.
a=10+5j
b=20.5
print ("Multiplication of complex and float")
print ("a =",a,"b =",b,"a*b =",a*b)
It will produce the following output −
Multiplication of complex and float
a = (10+5j) b = 20.5 a*b = (205+102.5j)
Python − Division Operator (/)
The "/" symbol is usually called as forward slash. The result of division operator is numerator (left operand) divided by denominator (right operand). The resultant number is negative if any of the operands is negative. Since infinity cannot be stored in the memory, Python raises ZeroDivisionError if the denominator is 0.
The result of division operator in Python is always a float, even if both operands are integers.
a=10
b=20
print ("Division of two integers")
print ("a=",a,"b=",b,"a/b=",a/b)
print ("a=",a,"b=",b,"b/a=",b/a)
It will produce the following output −
Division of two integers
a= 10 b= 20 a/b= 0.5
a= 10 b= 20 b/a= 2.0
In Division, a float operand may have a standard decimal point notation, or a scientific notation.
a=10
b=-20.5
print ("Division of integer and float")
print ("a=",a,"b=",b,"a/b=",a/b)
a=-2.50
b=1.25E2
print ("Division of float and float")
print ("a=",a,"b=",b,"a/b=",a/b)
It will produce the following output −
Division of integer and float
a= 10 b= -20.5 a/b= -0.4878048780487805
Division of float and float
a= -2.5 b= 125.0 a/b= -0.02
When one of the operands is a complex number, division between the other operand and both parts of complex number (real and imaginary) object takes place.
a=7.5+7.5j
b=2.5
print ("Division of complex and float")
print ("a =",a,"b =",b,"a/b =",a/b)
print ("a =",a,"b =",b,"b/a =",b/a)
It will produce the following output −
Division of complex and float
a = (7.5+7.5j) b = 2.5 a/b = (3+3j)
a = (7.5+7.5j) b = 2.5 b/a = (0.16666666666666666-0.16666666666666666j)
If the numerator is 0, the result of division is always 0 except when denominator is 0, in which case, Python raises ZeroDivisionError wirh Division by Zero error message.
a=0
b=2.5
print ("a=",a,"b=",b,"a/b=",a/b)
print ("a=",a,"b=",b,"b/a=",b/a)
It will produce the following output −
a= 0 b= 2.5 a/b= 0.0
Traceback (most recent call last):
  File "C:\Users\mlath\examples\example.py", line 20, in <module>
     print ("a=",a,"b=",b,"b/a=",b/a)
                                 ~^~
ZeroDivisionError: float division by zero
Python − Modulus Operator (%)
Python defines the "%" symbol, which is known aa Percent symbol, as Modulus (or modulo) operator. It returns the remainder after the denominator divides the numerator. It can also be called Remainder operator. The result of the modulus operator is the number that remains after the integer quotient. To give an example, when 10 is divided by 3, the quotient is 3 and remainder is 1. Hence, 10%3 (normally pronounced as 10 mod 3) results in 1.
If both the operands are integer, the modulus value is an integer. If numerator is completely divisible, remainder is 0. If numerator is smaller than denominator, modulus is equal to the numerator. If denominator is 0, Python raises ZeroDivisionError.
a=10
b=2
print ("a=",a, "b=",b, "a%b=", a%b)
a=10
b=4
print ("a=",a, "b=",b, "a%b=", a%b)
print ("a=",a, "b=",b, "b%a=", b%a)
a=0
b=10
print ("a=",a, "b=",b, "a%b=", a%b)
print ("a=", a, "b=", b, "b%a=",b%a)
It will produce the following output −
a= 10 b= 2 a%b= 0
a= 10 b= 4 a%b= 2
a= 10 b= 4 b%a= 4
a= 0 b= 10 a%b= 0
Traceback (most recent call last):
  File "C:\Users\mlath\examples\example.py", line 13, in <module>
    print ("a=", a, "b=", b, "b%a=",b%a)
                                    ~^~
ZeroDivisionError: integer modulo by zero
If any of the operands is a float, the mod value is always float.
a=10
b=2.5
print ("a=",a, "b=",b, "a%b=", a%b)
a=10
b=1.5
print ("a=",a, "b=",b, "a%b=", a%b)
a=7.7
b=2.5
print ("a=",a, "b=",b, "a%b=", a%b)
a=12.4
b=3
print ("a=",a, "b=",b, "a%b=", a%b)
It will produce the following output −
a= 10 b= 2.5 a%b= 0.0
a= 10 b= 1.5 a%b= 1.0
a= 7.7 b= 2.5 a%b= 0.20000000000000018
a= 12.4 b= 3 a%b= 0.40000000000000036
Python doesn't accept complex numbers to be used as operand in modulus operation. It throws TypeError: unsupported operand type(s) for %.
Python − Exponent Operator (**)
Python uses ** (double asterisk) as the exponent operator (sometimes called raised to operator). So, for a**b, you say a raised to b, or even bth power of a.
If in the exponentiation expression, both operands are integer, result is also an integer. In case either one is a float, the result is float. Similarly, if either one operand is complex number, exponent operator returns a complex number.
If the base is 0, the result is 0, and if the index is 0 then the result is always 1.
a=10
b=2
print ("a=",a, "b=",b, "a**b=", a**b)
a=10
b=1.5
print ("a=",a, "b=",b, "a**b=", a**b)
a=7.7
b=2
print ("a=",a, "b=",b, "a**b=", a**b)
a=1+2j
b=4
print ("a=",a, "b=",b, "a**b=", a**b)
a=12.4
b=0
print ("a=",a, "b=",b, "a**b=", a**b)
print ("a=",a, "b=",b, "b**a=", b**a)
It will produce the following output −
a= 10 b= 2 a**b= 100
a= 10 b= 1.5 a**b= 31.622776601683793
a= 7.7 b= 2 a**b= 59.290000000000006
a= (1+2j) b= 4 a**b= (-7-24j)
a= 12.4 b= 0 a**b= 1.0
a= 12.4 b= 0 b**a= 0.0
Python − Floor Division Operator (//)
Floor division is also called as integer division. Python uses // (double forward slash) symbol for the purpose. Unlike the modulus or modulo which returns the remainder, the floor division gives the quotient of the division of operands involved.
If both operands are positive, floor operator returns a number with fractional part removed from it. For example, the floor division of 9.8 by 2 returns 4 (pure division is 4.9, strip the fractional part, result is 4).
But if one of the operands is negative, the result is rounded away from zero (towards negative infinity). Floor division of -9.8 by 2 returns 5 (pure division is -4.9, rounded away from 0).
a=9
b=2
print ("a=",a, "b=",b, "a//b=", a//b)
a=9
b=-2
print ("a=",a, "b=",b, "a//b=", a//b)
a=10
b=1.5
print ("a=",a, "b=",b, "a//b=", a//b)
a=-10
b=1.5
print ("a=",a, "b=",b, "a//b=", a//b)
It will produce the following output −
a= 9 b= 2 a//b= 4
a= 9 b= -2 a//b= -5
a= 10 b= 1.5 a//b= 6.0
a= -10 b= 1.5 a//b= -7.0
Python − Complex Number Arithmetic
Arithmetic operators behave slightly differently when the both operands are complex number objects.
Addition and subtraction of complex numbers is a simple addition/subtraction of respective real and imaginary components.
a=2.5+3.4j
b=-3+1.0j
print ("Addition of complex numbers - a=",a, "b=",b, "a+b=", a+b)
print ("Subtraction of complex numbers - a=",a, "b=",b, "a-b=", a-b)
It will produce the following output −
Addition of complex numbers - a= (2.5+3.4j) b= (-3+1j) a+b= (-0.5+4.4j)
Subtraction of complex numbers - a= (2.5+3.4j) b= (-3+1j) a-b=
(5.5+2.4j)
Multiplication of complex numbers is similar to multiplication of two binomials in algebra. If "a+bj" and "x+yj" are two complex numbers, then their multiplication is given by this formula −
(a+bj)*(x+yj) = ax+ayj+xbj+byj2 = (ax-by)+(ay+xb)j
For example,
a=6+4j
b=3+2j
c=a*b
c=(18-8)+(12+12)j
c=10+24j
The following program confirms the result −
a=6+4j
b=3+2j
print ("Multplication of complex numbers - a=",a, "b=",b, "a*b=", a*b)
To understand the how the division of two complex numbers takes place, we should use the conjugate of a complex number. Python's complex object has a conjugate() method that returns a complex number with the sign of imaginary part reversed.
>>> a=5+6j
>>> a.conjugate()
(5-6j)
To divide two complex numbers, divide and multiply the numerator as well as the denominator with the conjugate of denominator.
a=6+4j
b=3+2j
c=a/b
c=(6+4j)/(3+2j)
c=(6+4j)*(3-2j)/3+2j)*(3-2j)
c=(18-12j+12j+8)/(9-6j+6j+4)
c=26/13
c=2+0j
To verify, run the following code −
a=6+4j
b=3+2j
print ("Division of complex numbers - a=",a, "b=",b, "a/b=", a/b)
Complex class in Python doesn't support the modulus operator (%) and floor division operator (//).
Python - Assignment Operators
The = (equal to) symbol is defined as assignment operator in Python. The value of Python expression on its right is assigned to a single variable on its left. The = symbol as in programming in general (and Python in particular) should not be confused with its usage in Mathematics, where it states that the expressions on the either side of the symbol are equal.
In addition to the simple assignment operator, Python provides few more assignment operators for advanced use. They are called cumulative or augmented assignment operators. In this chapter, we shall learn to use augmented assignment operators defined in Python.
Consider following Python statements −
a=10
b=5
a=a+b
print (a)
At the first instance, at least for somebody new to programming but who knows maths, the statement "a=a+b" looks strange. How could a be equal to "a+b"? However, it needs to be reemphasized that the = symbol is an assignment operator here and not used to show the equality of LHS and RHS.
Because it is an assignment, the expression on right evaluates to 15, the value is assigned to a.
In the statement "a+=b", the two operators "+" and "=" can be combined in a "+=" operator. It is called as add and assign operator. In a single statement, it performs addition of two operands "a" and "b", and result is assigned to operand on left, i.e., "a".
The += operator is an augmented operator. It is also called cumulative addition operator, as it adds "b" in "a" and assigns the result back to a variable.
Python has the augmented assignment operators for all arithmetic and comparison operators.
Python - Augmented Addition Operator (+=)
This operator combines addition and assignment in one statement. Since Python supports mixed arithmetic, the two operands may be of different types. However, the type of left operand changes to the operand of on right, if it is wider.
Following examples will help in understanding how the "+=" operator works −
a=10
b=5
print ("Augmented addition of int and int")
a+=b #equivalent to a=a+b
print ("a=",a, "type(a):", type(a))
a=10
b=5.5
print ("Augmented addition of int and float")
a+=b #equivalent to a=a+b
print ("a=",a, "type(a):", type(a))
a=10.50
b=5+6j
print ("Augmented addition of float and complex")
a+=b #equivalent to a=a+b
print ("a=",a, "type(a):", type(a))
It will produce the following output −
Augmented addition of int and int
a= 15 type(a): <class 'int'>
Augmented addition of int and float
a= 15.5 type(a): <class 'float'>
Augmented addition of float and complex
a= (15.5+6j) type(a): <class 'complex'>
Python − Augmented Subtraction Operator (-=)
Use -= symbol to perform subtract and assign operations in a single statement. The "a-=b" statement performs "a=a-b" assignment. Operands may be of any number type. Python performs implicit type casting on the object which is narrower in size.
a=10
b=5
print ("Augmented subtraction of int and int")
a-=b #equivalent to a=a-b
print ("a=",a, "type(a):", type(a))
a=10
b=5.5
print ("Augmented subtraction of int and float")
a-=b #equivalent to a=a-b
print ("a=",a, "type(a):", type(a))
a=10.50
b=5+6j
print ("Augmented subtraction of float and complex")
a-=b #equivalent to a=a-b
print ("a=",a, "type(a):", type(a))
It will produce the following output −
Augmented subtraction of int and int
a= 5 type(a): <class 'int'>
Augmented subtraction of int and float
a= 4.5 type(a): <class 'float'>
Augmented subtraction of float and complex
a= (5.5-6j) type(a): <class 'complex'>
Python − Augmented Multiplication Operator (*=)
The "*=" operator works on similar principle. "a*=b" performs multiply and assign operations, and is equivalent to "a=a*b". In case of augmented multiplication of two complex numbers, the rule of multiplication as discussed in the previous chapter is applicable.
a=10
b=5
print ("Augmented multiplication of int and int")
a*=b #equivalent to a=a*b
print ("a=",a, "type(a):", type(a))
a=10
b=5.5
print ("Augmented multiplication of int and float")
a*=b #equivalent to a=a*b
print ("a=",a, "type(a):", type(a))
a=6+4j
b=3+2j
print ("Augmented multiplication of complex and complex")
a*=b #equivalent to a=a*b
print ("a=",a, "type(a):", type(a))
It will produce the following output −
Augmented multiplication of int and int
a= 50 type(a): <class 'int'>
Augmented multiplication of int and float
a= 55.0 type(a): <class 'float'>
Augmented multiplication of complex and complex
a= (10+24j) type(a): <class 'complex'>
Python − Augmented Division Operator (/=)
The combination symbol "/=" acts as divide and assignment operator, hence "a/=b" is equivalent to "a=a/b". The division operation of int or float operands is float. Division of two complex numbers returns a complex number. Given below are examples of augmented division operator.
a=10
b=5
print ("Augmented division of int and int")
a/=b #equivalent to a=a/b
print ("a=",a, "type(a):", type(a))
a=10
b=5.5
print ("Augmented division of int and float")
a/=b #equivalent to a=a/b
print ("a=",a, "type(a):", type(a))
a=6+4j
b=3+2j
print ("Augmented division of complex and complex")
a/=b #equivalent to a=a/b
print ("a=",a, "type(a):", type(a))
It will produce the following output −
Augmented division of int and int
a= 2.0 type(a): <class 'float'>
Augmented division of int and float
a= 1.8181818181818181 type(a): <class 'float'>
Augmented division of complex and complex
a= (2+0j) type(a): <class 'complex'>
Python − Augmented Modulus Operator (%=)
To perform modulus and assignment operation in a single statement, use the %= operator. Like the mod operator, its augmented version also is not supported for complex number.
a=10
b=5
print ("Augmented modulus operator with int and int")
a%=b #equivalent to a=a%b
print ("a=",a, "type(a):", type(a))
a=10
b=5.5
print ("Augmented modulus operator with int and float")
a%=b #equivalent to a=a%b
print ("a=",a, "type(a):", type(a))
It will produce the following output −
Augmented modulus operator with int and int
a= 0 type(a): <class 'int'>
Augmented modulus operator with int and float
a= 4.5 type(a): <class 'float'>
Python − Augmented Exponent Operator (**=)
The "**=" operator results in computation of "a" raised to "b", and assigning the value back to "a". Given below are some examples −
a=10
b=5
print ("Augmented exponent operator with int and int")
a**=b #equivalent to a=a**b
print ("a=",a, "type(a):", type(a))
a=10
b=5.5
print ("Augmented exponent operator with int and float")
a**=b #equivalent to a=a**b
print ("a=",a, "type(a):", type(a))
a=6+4j
b=3+2j
print ("Augmented exponent operator with complex and complex")
a**=b #equivalent to a=a**b
print ("a=",a, "type(a):", type(a))
It will produce the following output −
Augmented exponent operator with int and int
a= 100000 type(a): <class 'int'>
Augmented exponent operator with int and float
a= 316227.7660168379 type(a): <class 'float'>
Augmented exponent operator with complex and complex
a= (97.52306038414744-62.22529992036203j) type(a): <class 'complex'>
Python − Augmented Floor division Operator (//=)
For performing floor division and assignment in a single statement, use the "//=" operator. "a//=b" is equivalent to "a=a//b". This operator cannot be used with complex numbers.
a=10
b=5
print ("Augmented floor division operator with int and int")
a//=b #equivalent to a=a//b
print ("a=",a, "type(a):", type(a))
a=10
b=5.5
print ("Augmented floor division operator with int and float")
a//=b #equivalent to a=a//b
print ("a=",a, "type(a):", type(a))
It will produce the following output −
Augmented floor division operator with int and int
a= 2 type(a): <class 'int'>
Augmented floor division operator with int and float
a= 1.0 type(a): <class 'float'>
Python - Comparison Operators
Comparison operators in Python are very important in Python's conditional statements (if, else and elif) and looping statements (while and for loops). Like arithmetic operators, the comparison operators "-" also called relational operators, ("<" stands for less than, and">" stands for greater than) are well known.
Python uses two more operators, combining "=" symbol with these two. The "<=" symbol is for less than or equal to. The ">=" symbol is for greater than or equal to.
Python has two more comparison operators in the form of "==" and "!=". They are for is equal to and is not equal to operators. Hence, there are six comparison operators in Python.
| < | Less than | a<b |
| > | Greater than | a>b |
| <= | Less than or equal to | a<=b |
| >= | Greater than or equal to | a>=b |
| == | Is equal to | a==b |
| != | Is not equal to | a!=b |
Comparison operators are binary in nature, requiring two operands. An expression involving a comparison operator is called a Boolean expression, and always returns either True or False.
a=5
b=7
print (a>b)
print (a<b)
It will produce the following output −
False
True
Both the operands may be Python literals, variables or expressions. Since Python supports mixed arithmetic, you can have any number type operands.
The following code demonstrates the use of Python's comparison operators with integer numbers −
print ("Both operands are integer")
a=5
b=7
print ("a=",a, "b=",b, "a>b is", a>b)
print ("a=",a, "b=",b,"a<b is",a<b)
print ("a=",a, "b=",b,"a==b is",a==b)
print ("a=",a, "b=",b,"a!=b is",a!=b)
It will produce the following output −
Both operands are integer
a= 5 b= 7 a>b is False
a= 5 b= 7 a<b is True
a= 5 b= 7 a==b is False
a= 5 b= 7 a!=b is True
Comparison of Float Number
In the following example, an integer and a float operand are compared.
print ("comparison of int and float")
a=10
b=10.0
print ("a=",a, "b=",b, "a>b is", a>b)
print ("a=",a, "b=",b,"a<b is",a<b)
print ("a=",a, "b=",b,"a==b is",a==b)
print ("a=",a, "b=",b,"a!=b is",a!=b)
It will produce the following output −
comparison of int and float
a= 10 b= 10.0 a>b is False
a= 10 b= 10.0 a<b is False
a= 10 b= 10.0 a==b is True
a= 10 b= 10.0 a!=b is False
Comparison of Complex umbers
Although complex object is a number data type in Python, its behavior is different from others. Python doesn't support < and > operators, however it does support equality (==) and inequality (!=) operators.
print ("comparison of complex numbers")
a=10+1j
b=10.-1j
print ("a=",a, "b=",b,"a==b is",a==b)
print ("a=",a, "b=",b,"a!=b is",a!=b)
It will produce the following output −
comparison of complex numbers
a= (10+1j) b= (10-1j) a==b is False
a= (10+1j) b= (10-1j) a!=b is True
You get a TypeError with less than or greater than operators.
print ("comparison of complex numbers")
a=10+1j
b=10.-1j
print ("a=",a, "b=",b,"a<b is",a<b)
print ("a=",a, "b=",b,"a>b is",a>b)
It will produce the following output −
comparison of complex numbers
Traceback (most recent call last):
  File "C:\Users\mlath\examples\example.py", line 5, in <module>
    print ("a=",a, "b=",b,"a<b is",a<b)
                                      ^^^
TypeError: '<' not supported between instances of 'complex' and
'complex
Comparison of Booleans
Boolean objects in Python are really integers: True is 1 and False is 0. In fact, Python treats any non-zero number as True. In Python, comparison of Boolean objects is possible. "False < True" is True!
print ("comparison of Booleans")
a=True
b=False
print ("a=",a, "b=",b,"a<b is",a<b)
print ("a=",a, "b=",b,"a>b is",a>b)
print ("a=",a, "b=",b,"a==b is",a==b)
print ("a=",a, "b=",b,"a!=b is",a!=b)
It will produce the following output −
comparison of Booleans
a= True b= False a<b is False
a= True b= False a>b is True
a= True b= False a==b is False
a= True b= False a!=b is True
Comparison of Sequence Types
In Python, comparison of only similar sequence objects can be performed. A string object is comparable with another string only. A list cannot be compared with a tuple, even if both have same items.
print ("comparison of different sequence types")
a=(1,2,3)
b=[1,2,3]
print ("a=",a, "b=",b,"a<b is",a<b)
It will produce the following output −
comparison of different sequence types
Traceback (most recent call last):
  File "C:\Users\mlath\examples\example.py", line 5, in <module>
    print ("a=",a, "b=",b,"a<b is",a<b)
                                       ^^^
TypeError: '<' not supported between instances of 'tuple' and 'list'
Sequence objects are compared by lexicographical ordering mechanism. The comparison starts from item at 0th index. If they are equal, comparison moves to next index till the items at certain index happen to be not equal, or one of the sequences is exhausted. If one sequence is an initial sub-sequence of the other, the shorter sequence is the smaller (lesser) one.
Which of the operands is greater depends on the difference in values of items at the index where they are unequal. For example, 'BAT'>'BAR' is True, as T comes after R in Unicode order.
If all items of two sequences compare equal, the sequences are considered equal.
print ("comparison of strings")
a='BAT'
b='BALL'
print ("a=",a, "b=",b,"a<b is",a<b)
print ("a=",a, "b=",b,"a>b is",a>b)
print ("a=",a, "b=",b,"a==b is",a==b)
print ("a=",a, "b=",b,"a!=b is",a!=b)
It will produce the following output −
comparison of strings
a= BAT b= BALL a<b is False
a= BAT b= BALL a>b is True
a= BAT b= BALL a==b is False
a= BAT b= BALL a!=b is True
In the following example, two tuple objects are compared −
print ("comparison of tuples")
a=(1,2,4)
b=(1,2,3)
print ("a=",a, "b=",b,"a<b is",a<b)
print ("a=",a, "b=",b,"a>b is",a>b)
print ("a=",a, "b=",b,"a==b is",a==b)
print ("a=",a, "b=",b,"a!=b is",a!=b)
It will produce the following output −
a= (1, 2, 4) b= (1, 2, 3) a<b is False
a= (1, 2, 4) b= (1, 2, 3) a>b is True
a= (1, 2, 4) b= (1, 2, 3) a==b is False
a= (1, 2, 4) b= (1, 2, 3) a!=b is True
Comparison of Dictionary Objects
The use of "<" and ">" operators for Python's dictionary is not defined. In case of these operands, TypeError: '<' not supported between instances of 'dict' and 'dict' is reported.
Equality comparison checks if the length of both the dict items is same. Length of dictionary is the number of key-value pairs in it.
Python dictionaries are simply compared by length. The dictionary with fewer elements is considered less than a dictionary with more elements.
print ("comparison of dictionary objects")
a={1:1,2:2}
b={2:2, 1:1, 3:3}
print ("a=",a, "b=",b,"a==b is",a==b)
print ("a=",a, "b=",b,"a!=b is",a!=b)
It will produce the following output −
comparison of dictionary objects
a= {1: 1, 2: 2} b= {2: 2, 1: 1, 3: 3} a==b is False
a= {1: 1, 2: 2} b= {2: 2, 1: 1, 3: 3} a!=b is True
Python - Logical Operators
With Logical operators in Python, we can form compound Boolean expressions. Each operand for these logical operators is itself a Boolean expression. For example,
age>16 and marks>80
percentage<50 or attendance<75
Along with the keyword False, Python interprets None, numeric zero of all types, and empty sequences (strings, tuples, lists), empty dictionaries, and empty sets as False. All other values are treated as True.
There are three logical operators in Python. They are "and", "or" and "not". They must be in lowercase.
The "and" Operator
For the compound Boolean expression to be True, both the operands must be True. If any or both operands evaluate to False, the expression returns False. The following table shows the scenarios.
| a | b | a and b |
|---|---|---|
| F | F | F |
| F | T | F |
| T | F | F |
| T | T | T |
The "or" Operator
In contrast, the or operator returns True if any of the operands is True. For the compound Boolean expression to be False, both the operands have to be False, ss the following table shows −
| a | b | a or b |
|---|---|---|
| F | F | F |
| F | T | T |
| T | F | F |
| T | T | T |
The "not" Operator
This is a unary operator. The state of Boolean operand that follows, is reversed. As a result, not True becomes False and not False becomes True.
| a | not (a) |
|---|---|
| F | T |
| T | F |
How the Python interpreter evaluates the logical operators?
The expression "x and y" first evaluates "x". If "x" is false, its value is returned; otherwise, "y" is evaluated and the resulting value is returned.
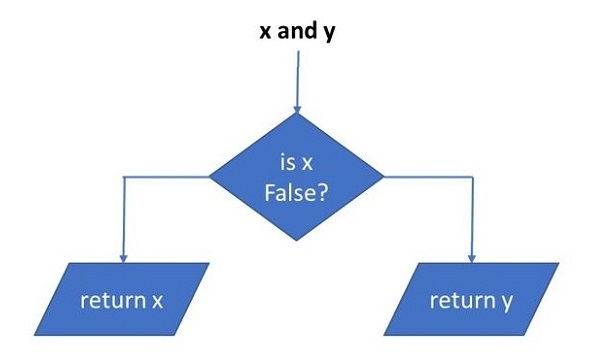
The expression "x or y" first evaluates "x"; if "x" is true, its value is returned; otherwise, "y" is evaluated and the resulting value is returned.
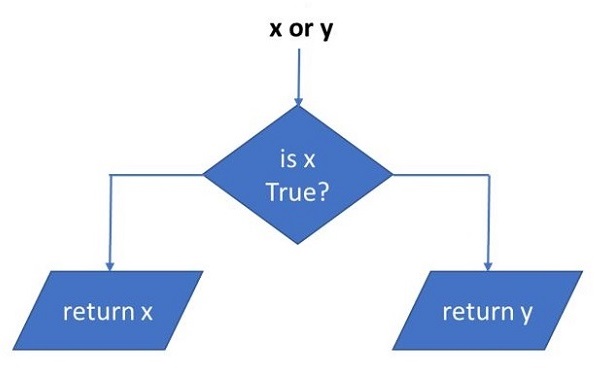
Some use cases of logical operators are given below −
x = 10
y = 20
print("x > 0 and x < 10:",x > 0 and x < 10)
print("x > 0 and y > 10:",x > 0 and y > 10)
print("x > 10 or y > 10:",x > 10 or y > 10)
print("x%2 == 0 and y%2 == 0:",x%2 == 0 and y%2 == 0)
print ("not (x+y>15):", not (x+y)>15)
It will produce the following output −
x > 0 and x < 10: False x > 0 and y > 10: True x > 10 or y > 10: True x%2 == 0 and y%2 == 0: True not (x+y>15): False
We can use non-boolean operands with logical operators. Here, we need to not that any non-zero numbers, and non-empty sequences evaluate to True. Hence, the same truth tables of logical operators apply.
In the following example, numeric operands are used for logical operators. The variables "x", "y" evaluate to True, "z" is False
x = 10
y = 20
z = 0
print("x and y:",x and y)
print("x or y:",x or y)
print("z or x:",z or x)
print("y or z:", y or z)
It will produce the following output −
x and y: 20 x or y: 10 z or x: 10 y or z: 20
The string variable is treated as True and an empty tuple as False in the following example −
a="Hello"
b=tuple()
print("a and b:",a and b)
print("b or a:",b or a)
It will produce the following output −
a and b: () b or a: Hello
Finally, two list objects below are non-empty. Hence x and y returns the latter, and x or y returns the former.
x=[1,2,3]
y=[10,20,30]
print("x and y:",x and y)
print("x or y:",x or y)
It will produce the following output −
x and y: [10, 20, 30] x or y: [1, 2, 3]
Python - Bitwise Operators
Python' bitwise operators are normally used with integer type objects. However, instead of treating the object as a whole, it is treated as a string of bits. Different operations are done on each bit in the string.
Python has six bitwise operators - &, |, ^, ~, << and >>. All these operators (except ~) are binary in nature, in the sense they operate on two operands. Each operand is a binary digit (bit) 1 or 0.
Python − Bitwise AND Operator (&)
Bitwise AND operator is somewhat similar to logical and operator. It returns True only if both the bit operands are 1 (i.e. True). All the combinations are −
0 & 0 is 0 1 & 0 is 0 0 & 1 is 0 1 & 1 is 1
When you use integers as the operands, both are converted in equivalent binary, the & operation is done on corresponding bit from each number, starting from the least significant bit and going towards most significant bit.
Let us take two integers 60 and 13, and assign them to variables a and b respectively.
a=60
b=13
print ("a:",a, "b:",b, "a&b:",a&b)
It will produce the following output −
a: 60 b: 13 a&b: 12
To understand how Python performs the operation, obtain the binary equivalent of each variable.
print ("a:", bin(a))
print ("b:", bin(b))
It will produce the following output −
a: 0b111100 b: 0b1101
For the sake of convenience, use the standard 8-bit format for each number, so that "a" is 00111100 and "b" is 00001101. Let us manually perform and operation on each corresponding bits of these two numbers.
0011 1100
&
0000 1101
-------------
0000 1100
Convert the resultant binary back to integer. You'll get 12, which was the result obtained earlier.
>>> int('00001100',2)
12
Python − Bitwise OR Operator (|)
The "|" symbol (called pipe) is the bitwise OR operator. If any bit operand is 1, the result is 1 otherwise it is 0.
0 | 0 is 0 0 | 1 is 1 1 | 0 is 1 1 | 1 is 1
Take the same values of a=60, b=13. The "|" operation results in 61. Obtain their binary equivalents.
a=60
b=13
print ("a:",a, "b:",b, "a|b:",a|b)
print ("a:", bin(a))
print ("b:", bin(b))
It will produce the following output −
a: 60 b: 13 a|b: 61 a: 0b111100 b: 0b1101
To perform the "|" operation manually, use the 8-bit format.
0011 1100
|
0000 1101
-------------
0011 1101
Convert the binary number back to integer to tally the result −
>>> int('00111101',2)
61
Python − Binary XOR Operator (^)
The term XOR stands for exclusive OR. It means that the result of OR operation on two bits will be 1 if only one of the bits is 1.
0 ^ 0 is 0 0 ^ 1 is 1 1 ^ 0 is 1 1 ^ 1 is 0
Let us perform XOR operation on a=60 and b=13.
a=60
b=13
print ("a:",a, "b:",b, "a^b:",a^b)
It will produce the following output −
a: 60 b: 13 a^b: 49
We now perform the bitwise XOR manually.
0011 1100
^
0000 1101
-------------
0011 0001
The int() function shows 00110001 to be 49.
>>> int('00110001',2)
49
Python − Binary NOT Operator (~)
This operator is the binary equivalent of logical NOT operator. It flips each bit so that 1 is replaced by 0, and 0 by 1, and returns the complement of the original number. Python uses 2's complement method. For positive integers, it is obtained simply by reversing the bits. For negative number, -x, it is written using the bit pattern for (x-1) with all of the bits complemented (switched from 1 to 0 or 0 to 1). Hence: (for 8 bit representation)
-1 is complement(1 - 1) = complement(0) = "11111111"
-10 is complement(10 - 1) = complement(9) = complement("00001001") = "11110110".
For a=60, its complement is −
a=60
print ("a:",a, "~a:", ~a)
It will produce the following output −
a: 60 ~a: -61
Python − Left Shift Operator (<<)
Left shift operator shifts most significant bits to right by the number on the right side of the "<<" symbol. Hence, "x << 2" causes two bits of the binary representation of to right. Let us perform left shift on 60.
a=60
print ("a:",a, "a<<2:", a<<2)
It will produce the following output −
a: 60 a<<2: 240
How does this take place? Let us use the binary equivalent of 60, and perform the left shift by 2.
0011 1100
<<
2
-------------
1111 0000
Convert the binary to integer. It is 240.
>>> int('11110000',2)
240
Python − Right Shift Operator (>>)
Right shift operator shifts least significant bits to left by the number on the right side of the ">>" symbol. Hence, "x >> 2" causes two bits of the binary representation of to left. Let us perform right shift on 60.
a=60
print ("a:",a, "a>>2:", a>>2)
It will produce the following output −
a: 60 a>>2: 15
Manual right shift operation on 60 is shown below −
0011 1100
>>
2
-------------
0000 1111
Use int() function to covert the above binary number to integer. It is 15.
>>> int('00001111',2)
15
Python - Membership Operators
The membership operators in Python help us determine whether an item is present in a given container type object, or in other words, whether an item is a member of the given container type object.
Python has two membership operators: "in" and "not in". Both return a Boolean result. The result of "in" operator is opposite to that of "not in" operator.
You can use in operator to check whether a substring is present in a bigger string, any item is present in a list or tuple, or a sub-list or sub-tuple is included in a list or tuple.
In the following example, different substrings are checked whether they belong to the string var="TutorialsPoint". Python differentiates characters on the basis of their Unicode value. Hence "To" is not the same as "to". Also note that if the "in" operator returns True, the "not in" operator evaluates to False.
var = "TutorialsPoint" a = "P" b = "tor" c = "in" d = "To" print (a, "in", var, ":", a in var) print (b, "not in", var, ":", b not in var) print (c, "in", var, ":", c in var) print (d, "not in", var, ":", d not in var)
It will produce the following output −
P in TutorialsPoint : True tor not in TutorialsPoint : False in in TutorialsPoint : True To not in TutorialsPoint : True
You can use the "in/not in" operator to check the membership of an item in the list or tuple.
var = [10,20,30,40] a = 20 b = 10 c = a-b d = a/2 print (a, "in", var, ":", a in var) print (b, "not in", var, ":", b not in var) print (c, "in", var, ":", c in var) print (d, "not in", var, ":", d not in var)
It will produce the following output −
20 in [10, 20, 30, 40] : True 10 not in [10, 20, 30, 40] : False 10 in [10, 20, 30, 40] : True 10.0 not in [10, 20, 30, 40] : False
In the last case, "d" is a float but still it compares to True with 10 (an int) in the list. Even if a number expressed in other formats like binary, octal or hexadecimal are given the membership operators tell if it is inside the sequence.
>>> 0x14 in [10, 20, 30, 40] True
However, if you try to check if two successive numbers are present in a list or tuple, the in operator returns False. If the list/tuple contains the successive numbers as a sequence itself, then it returns True.
var = (10,20,30,40) a = 10 b = 20 print ((a,b), "in", var, ":", (a,b) in var) var = ((10,20),30,40) a = 10 b = 20 print ((a,b), "in", var, ":", (a,b) in var)
It will produce the following output −
(10, 20) in (10, 20, 30, 40) : False (10, 20) in ((10, 20), 30, 40) : True
Python's membership operators also work well with the set objects.
var = {10,20,30,40}
a = 10
b = 20
print (b, "in", var, ":", b in var)
var = {(10,20),30,40}
a = 10
b = 20
print ((a,b), "in", var, ":", (a,b) in var)
It will produce the following output −
20 in {40, 10, 20, 30} : True
(10, 20) in {40, 30, (10, 20)} : True
Use of in as well as not in operators with dictionary object is allowed. However, Python checks the membership only with the collection of keys and not values.
var = {1:10, 2:20, 3:30}
a = 2
b = 20
print (a, "in", var, ":", a in var)
print (b, "in", var, ":", b in var)
It will produce the following output −
2 in {1: 10, 2: 20, 3: 30} : True
20 in {1: 10, 2: 20, 3: 30} : False
Python - Identity Operators
Python has two identity operators is and is not. Both return opposite Boolean values. The "in" operator evaluates to True if both the operand objects share the same memory location. The memory location of the object can be obtained by the "id()" function. If the id() of both variables is same, the "in" operator returns True (as a consequence, is not returns False).
a="TutorialsPoint"
b=a
print ("id(a), id(b):", id(a), id(b))
print ("a is b:", a is b)
print ("b is not a:", b is not a)
It will produce the following output −
id(a), id(b): 2739311598832 2739311598832 a is b: True b is not a: False
The list and tuple objects differently, which might look strange in the first instance. In the following example, two lists "a" and "b" contain same items. But their id() differs.
a=[1,2,3]
b=[1,2,3]
print ("id(a), id(b):", id(a), id(b))
print ("a is b:", a is b)
print ("b is not a:", b is not a)
It will produce the following output −
id(a), id(b): 1552612704640 1552567805568 a is b: False b is not a: True
The list or tuple contains the memory locations of individual items only and not the items itself. Hence "a" contains the addresses of 10,20 and 30 integer objects in a certain location which may be different from that of "b".
print (id(a[0]), id(a[1]), id(a[2])) print (id(b[0]), id(b[1]), id(b[2]))
It will produce the following output −
140734682034984 140734682035016 140734682035048 140734682034984 140734682035016 140734682035048
Because of two different locations of "a" and "b", the "is" operator returns False even if the two lists contain same numbers.
Python - Comments
A comment in a computer program is a piece of text that is meant to be an explanatory or descriptive annotation in the source code and is not to be considered by compiler/interpreter while generating machine language code. Ample use of comments in source program makes it easier for everybody concerned to understand more about syntax, usage and logic of the algorithm etc.
In a Python script, the symbol # marks the beginning of comment line. It is effective till the end of line in the editor. If # is the first character of line, then entire line is a comment. If used in the middle of a line, text before it is a valid Python expression, while text following it is treated as comment.
# this is a comment
print ("Hello World")
print ("How are you?") #also a comment but after a statement.
In Python, there is no provision to write multi-line comment, or a block comment. (As in C/C++, where multiple lines inside /* .. */ are treated as multi-line comment).
Each line should have the "#" symbol at the start to be marked as comment. Many Python IDEs have shortcuts to mark a block of statements as comment.
A triple quoted multi-line string is also treated as comment if it is not a docstring of a function or class.
'''
First line in the comment
Second line in the comment
Third line in the comment
'''
print ("Hello World")
Python - User Input
Every computer application should have a provision to accept data from the user when it is running. This makes the application interactive. Depending on how it is developed, an application may accept the user input in the form of text entered in the console (sys.stdin), a graphical layout, or a web-based interface. In this chapter, we shall learn how Python accepts the user input from the console, and displays the output also on the console.
Python interpreter works in interactive and scripted mode. While the interactive mode is good for quick evaluations, it is less productive. For repeated execution of same set of instructions, scripted mode should be used.
Let us write a simple Python script to start with.
#! /usr/bin/python3.11
name = "Kiran"
city = "Hyderabad"
print ("Hello My name is", name)
print ("I am from", city)
Save the above code as hello.py and run it from the command-line. Here's the output
C:\python311> python var1.py Hello My name is Kiran I am from Hyderabad
The program simply prints the values of the two variables in it. If you run the program repeatedly, the same output will be displayed every time. To use the program for another name and city, you can edit the code, change name to say "Ravi" and city to "Chennai". Every time you need to assign different value, you will have to edit the program, save and run, which is not the ideal way.
input() Function
Obviously, you need some mechanism to assign different value to the variable in the runtime − while the program is running. Python's input() function does the same job.
Python's standard library has the input() function.
>>> var = input()
When the interpreter encounters it, it waits for the user to enter data from the standard input stream (keyboard) till the Enter key is pressed. The sequence of characters may be stored in a string variable for further use.
On reading the Enter key, the program proceeds to the next statement. Let use change our program to store the user input in name and city variables.
#! /usr/bin/python3.11
name = input()
city = input()
print ("Hello My name is", name)
print ("I am from ", city)
When you run, you will find the cursor waiting for user's input. Enter values for name and city. Using the entered data, the output will be displayed.
Ravi Chennai Hello My name is Ravi I am from Chennai
Now, the variables are not assigned any specific value in the program. Every time you run, different values can be input. So, your program has become truly interactive.
Inside the input() function, you may give a prompt text, which will appear before the cursor when you run the code.
#! /usr/bin/python3.11
name = input("Enter your name : ")
city = input("enter your city : ")
print ("Hello My name is", name)
print ("I am from ", city)
When you run the program displays the prompt message, basically helping the user what to enter.
Enter your name: Praveen Rao enter your city: Bengaluru Hello My name is Praveen Rao I am from Bengaluru
Numeric Input
Let us write a Python code that accepts width and height of a rectangle from the user and computes the area.
#! /usr/bin/python3.11
width = input("Enter width : ")
height = input("Enter height : ")
area = width*height
print ("Area of rectangle = ", area)
Run the program, and enter width and height.
Enter width: 20 Enter height: 30 Traceback (most recent call last): File "C:\Python311\var1.py", line 5, in <module> area = width*height TypeError: can't multiply sequence by non-int of type 'str'
Why do you get a TypeError here? The reason is, Python always read the user input as a string. Hence, width="20" and height="30" are the strings and obviously you cannot perform multiplication of two strings.
To overcome this problem, we shall use int(), another built-in function from Python's standard library. It converts a string object to an integer.
To accept an integer input from the user, read the input in a string, and type cast it to integer with int() function −
w= input("Enter width : ")
width=int(w)
h= input("Enter height : ")
height=int(h)
You can combine the input and type cast statements in one −
#! /usr/bin/python3.11
width = int(input("Enter width : "))
height = int(input("Enter height : "))
area = width*height
print ("Area of rectangle = ", area)
Now you can input any integer value to the two variables in the program −
Enter width: 20 Enter height: 30 Area of rectangle = 600
Python's float() function converts a string into a float object. The following program accepts the user input and parses it to a float variable − rate, and computes the interest on an amount which is also input by the user.
#! /usr/bin/python3.11
amount = float(input("Enter Amount : "))
rate = float(input("Enter rate of interest : "))
interest = amount*rate/100
print ("Amount: ", amount, "Interest: ", interest)
The program ask user to enter amount and rate; and displays the result as follows −
Enter Amount: 12500 Enter rate of interest: 6.5 Amount: 12500.0 Interest: 812.5
print() Function
Python's print() function is a built-in function. It is the most frequently used function, that displays value of Python expression given in parenthesis, on Python's console, or standard output (sys.stdout).
print ("Hello World ")
Any number of Python expressions can be there inside the parenthesis. They must be separated by comma symbol. Each item in the list may be any Python object, or a valid Python expression.
#! /usr/bin/python3.11
a = "Hello World"
b = 100
c = 25.50
d = 5+6j
print ("Message: a)
print (b, c, b-c)
print(pow(100, 0.5), pow(c,2))
The first call to print() displays a string literal and a string variable. The second prints value of two variables and their subtraction. The pow() function computes the square root of a number and square value of a variable.
Message Hello World 100 25.5 74.5 10.0 650.25
If there are multiple comma separated objects in the print() function's parenthesis, the values are separated by a white space " ". To use any other character as a separator, define a sep parameter for the print() function. This parameter should follow the list of expressions to be printed.
In the following output of print() function, the variables are separated by comma.
#! /usr/bin/python3.11 city="Hyderabad" state="Telangana" country="India" print(city, state, country, sep=',')
The effect of sep=',' can be seen in the result −
Hyderabad,Telangana,India
The print() function issues a newline character ('\n') at the end, by default. As a result, the output of the next print() statement appears in the next line of the console.
city="Hyderabad"
state="Telangana"
print("City:", city)
print("State:", state)
Two lines are displayed as the output −
City: Hyderabad State: Telangana
To make these two lines appear in the same line, define end parameter in the first print() function and set it to a whitespace string " ".
city="Hyderabad"
state="Telangana"
country="India"
print("City:", city, end=" ")
print("State:", state)
Output of both the print() functions appear in continuation.
City: Hyderabad State: Telangana
Python - Numbers
Most of the times you work with numbers in whatever you do. Obviously, any computer application deals with numbers. Hence, programming languages, Python included, have built-in support to store and process numeric data.
In this chapter, we shall learn about properties of Python number types in detail.
Three number types, integers (int), floating point numbers (float) and complex numbers, are built into the Python interpreter. Python also has a bult-in Boolean data type called bool. It can be treated as a sub-type of int type, since its two possible values True and False represent the integers 1 and 0 respectively.
Python − Integers
In Python, any number without the provision to store a fractional part is an integer. (Note that if the fractional part in a number is 0, it doesn't mean that it is an integer. For example a number 10.0 is not an integer, it is a float with 0 fractional part whose numeric value is 10.) An integer can be zero, positive or a negative whole number. For example, 1234, 0, -55.
There are three ways to form an integer object. With literal representation, any expression evaluating to an integer, and using int() function.
Literal is a notation used to represent a constant directly in the source code. For example −
>>> a =10
However, look at the following assignment of the integer variable c.
a=10
b=20
c=a+b
print ("a:", a, "type:", type(a))
It will produce the following output −
a: 10 type: <class 'int'>
Here, c is indeed an integer variable, but the expression a+b is evaluated first, and its value is indirectly assigned to c.
The third method of forming an integer object is with the return value of int() function. It converts a floating point number or a string in an integer.
>>> a=int(10.5)
>>> b=int("100")
You can represent an integer as a binary, octal or Hexa-decimal number. However, internally the object is stored as an integer.
Binary Numbers
A number consisting of only the binary digits (1 and 0) and prefixed with 0b is a binary number. If you assign a binary number to a variable, it still is an int variable.
A represent an integer in binary form, store it directly as a literal, or use int() function, in which the base is set to 2
a=0b101
print ("a:",a, "type:",type(a))
b=int("0b101011",2)
print ("b:",b, "type:",type(b))
It will produce the following output −
a: 5 type: <class 'int'> b: 43 type: <class 'int'>
There is also a bin() function in Python. It returns a binary string equivalent of an integer.
a=43
b=bin(a)
print ("Integer:",a, "Binary equivalent:",b)
It will produce the following output −
Integer: 43 Binary equivalent: 0b101011
Octal Numbers
An octal number is made up of digits 0 to 7 only. In order to specify that the integer uses octal notation, it needs to be prefixed by 0o (lowercase O) or 0O (uppercase O). A literal representation of octal number is as follows −
a=0O107 print (a, type(a))
It will produce the following output −
71 <class 'int'>
Note that the object is internally stored as integer. Decimal equivalent of octal number 107 is 71.
Since octal number system has 8 symbols (0 to 7), its base is 7. Hence, while using int() function to covert an octal string to integer, you need to set the base argument to 8.
a=int('20',8)
print (a, type(a))
It will produce the following output −
16 <class 'int'>
Decimal equivalent of octal 30 is 16.
In the following code, two int objects are obtained from octal notations and their addition is performed.
a=0O56
print ("a:",a, "type:",type(a))
b=int("0O31",8)
print ("b:",b, "type:",type(b))
c=a+b
print ("addition:", c)
It will produce the following output −
a: 46 type: <class 'int'> b: 25 type: <class 'int'> addition: 71
To obtain the octal string for an integer, use oct() function.
a=oct(71) print (a, type(a))
Hexa-decimal Numbers
As the name suggests, there are 16 symbols in the Hexadecimal number system. They are 0-9 and A to F. The first 10 digits are same as decimal digits. The alphabets A, B, C, D, E and F are equivalents of 11, 12, 13, 14, 15, and 16 respectively. Upper or lower cases may be used for these letter symbols.
For the literal representation of an integer in Hexadecimal notation, prefix it by 0x or 0X.
a=0XA2 print (a, type(a))
It will produce the following output −
162 <class 'int'>
To convert a Hexadecimal string to integer, set the base to 16 in the int() function.
a=int('0X1e', 16)
print (a, type(a))
Try out the following code snippet. It takes a Hexadecimal string, and returns the integer.
num_string = "A1"
number = int(num_string, 16)
print ("Hexadecimal:", num_string, "Integer:",number)
It will produce the following output −
Hexadecimal: A1 Integer: 161
However, if the string contains any symbol apart from the Hexadecimal symbol chart (for example X001), it raises following error −
Traceback (most recent call last):
File "C:\Python311\var1.py", line 4, in <module>
number = int(num_string, 16)
ValueError: invalid literal for int() with base 16: 'X001'
Python's standard library has hex() function, with which you can obtain a hexadecimal equivalent of an integer.
a=hex(161) print (a, type(a))
It will produce the following output −
0xa1 <class 'str'>
Though an integer can be represented as binary or octal or hexadecimal, internally it is still integer. So, when performing arithmetic operation, the representation doesn't matter.
a=10 #decimal
b=0b10 #binary
c=0O10 #octal
d=0XA #Hexadecimal
e=a+b+c+d
print ("addition:", e)
It will produce the following output −
addition: 30
Python − Floating Point Numbers
A floating point number has an integer part and a fractional part, separated by a decimal point symbol (.). By default, the number is positive, prefix a dash (-) symbol for a negative number.
A floating point number is an object of Python's float class. To store a float object, you may use a literal notation, use the value of an arithmetic expression, or use the return value of float() function.
Using literal is the most direct way. Just assign a number with fractional part to a variable. Each of the following statements declares a float object.
>>> a=9.99 >>> b=0.999 >>> c=-9.99 >>> d=-0.999
In Python, there is no restriction on how many digits after the decimal point can a floating point number have. However, to shorten the representation, the E or e symbol is used. E stands for Ten raised to. For example, E4 is 10 raised to 4 (or 4th power of 10), e-3 is 10 raised to -3.
In scientific notation, number has a coefficient and exponent part. The coefficient should be a float greater than or equal to 1 but less than 10. Hence, 1.23E+3, 9.9E-5, and 1E10 are the examples of floats with scientific notation.
>>> a=1E10 >>> a 10000000000.0 >>> b=9.90E-5 >>> b 9.9e-05 >>> 1.23E3 1230.0
The second approach of forming a float object is indirect, using the result of an expression. Here, the quotient of two floats is assigned to a variable, which refers to a float object.
a=10.33
b=2.66
c=a/b
print ("c:", c, "type", type(c))
It will produce the following output −
c: 3.8834586466165413 type <class 'float'>
Python's float() function returns a float object, parsing a number or a string if it has the appropriate contents. If no arguments are given in the parenthesis, it returns 0.0, and for an int argument, fractional part with 0 is added.
>>> a=float() >>> a 0.0 >>> a=float(10) >>> a 10.0
Even if the integer is expressed in binary, octal or hexadecimal, the float() function returns a float with fractional part as 0.
a=float(0b10) b=float(0O10) c=float(0xA) print (a,b,c, sep=",")
It will produce the following output −
2.0,8.0,10.0
The float() function retrieves a floating point number out of a string that encloses a float, either in standard decimal point format, or having scientific notation.
a=float("-123.54")
b=float("1.23E04")
print ("a=",a,"b=",b)
It will produce the following output −
a= -123.54 b= 12300.0
In mathematics, infinity is an abstract concept. Physically, infinitely large number can never be stored in any amount of memory. For most of the computer hardware configurations, however, a very large number with 400th power of 10 is represented by Inf. If you use "Infinity" as argument for float() function, it returns Inf.
a=1.00E400
print (a, type(a))
a=float("Infinity")
print (a, type(a))
It will produce the following output −
inf <class 'float'> inf <class 'float'>
One more such entity is Nan (stands for Not a Number). It represents any value that is undefined or not representable.
>>> a=float('Nan')
>>> a
Nan
Python − Complex Numbers
In this section, we shall know in detail about Complex data type in Python. Complex numbers find their applications in mathematical equations and laws in electromagnetism, electronics, optics, and quantum theory. Fourier transforms use complex numbers. They are Used in calculations with wavefunctions, designing filters, signal integrity in digital electronics, radio astronomy, etc.
A complex number consists of a real part and an imaginary part, separated by either "+" or "−". The real part can be any floating point (or itself a complex number) number. The imaginary part is also a float/complex, but multiplied by an imaginary number.
In mathematics, an imaginary number "i" is defined as the square root of -1 ($\sqrt{−1}$). Therefore, a complex number is represented as "x+yi", where x is the real part, and "y" is the coefficient of imaginary part.
Quite often, the symbol "j" is used instead of "I" for the imaginary number, to avoid confusion with its usage as current in theory of electricity. Python also uses "j" as the imaginary number. Hence, "x+yj" is the representation of complex number in Python.
Like int or float data type, a complex object can be formed with literal representation or using complex() function. All the following statements form a complex object.
>>> a=5+6j >>> a (5+6j) >>> type(a) <class 'complex'> >>> a=2.25-1.2J >>> a (2.25-1.2j) >>> type(a) <class 'complex'> >>> a=1.01E-2+2.2e3j >>> a (0.0101+2200j) >>> type(a) <class 'complex'>
Note that the real part as well as the coefficient of imaginary part have to be floats, and they may be expressed in standard decimal point notation or scientific notation.
Python's complex() function helps in forming an object of complex type. The function receives arguments for real and imaginary part, and returns the complex number.
There are two versions of complex() function, with two arguments and with one argument. Use of complex() with two arguments is straightforward. It uses first argument as real part and second as coefficient of imaginary part.
a=complex(5.3,6)
b=complex(1.01E-2, 2.2E3)
print ("a:", a, "type:", type(a))
print ("b:", b, "type:", type(b))
It will produce the following output −
a: (5.3+6j) type: <class 'complex'> b: (0.0101+2200j) type: <class 'complex'>
In the above example, we have used x and y as float parameters. They can even be of complex data type.
a=complex(1+2j, 2-3j) print (a, type(a))
It will produce the following output −
(4+4j) <class 'complex'>
Surprised by the above example? Put "x" as 1+2j and "y" as 2-3j. Try to perform manual computation of "x+yj" and you'll come to know.
complex(1+2j, 2-3j) =(1+2j)+(2-3j)*j =1+2j +2j+3 =4+4j
If you use only one numeric argument for complex() function, it treats it as the value of real part; and imaginary part is set to 0.
a=complex(5.3)
print ("a:", a, "type:", type(a))
It will produce the following output −
a: (5.3+0j) type: <class 'complex'>
The complex() function can also parse a string into a complex number if its only argument is a string having complex number representation.
In the following snippet, user is asked to input a complex number. It is used as argument. Since Python reads the input as a string, the function extracts the complex object from it.
a= "5.5+2.3j"
b=complex(a)
print ("Complex number:", b)
It will produce the following output −
Complex number: (5.5+2.3j)
Python's built-in complex class has two attributes real and imag − they return the real and coefficient of imaginary part from the object.
a=5+6j
print ("Real part:", a.real, "Coefficient of Imaginary part:", a.imag)
It will produce the following output −
Real part: 5.0 Coefficient of Imaginary part: 6.0
The complex class also defines a conjugate() method. It returns another complex number with the sign of imaginary component reversed. For example, conjugate of x+yj is x-yj.
>>> a=5-2.2j >>> a.conjugate() (5+2.2j)
Python - Booleans
In Python, bool is a sub-type of int type. A bool object has two possible values, and it is initialized with Python keywords, True and False.
>>> a=True >>> b=False >>> type(a), type(b) (<class 'bool'>, <class 'bool'>)
A bool object is accepted as argument to type conversion functions. With True as argument, the int() function returns 1, float() returns 1.0; whereas for False, they return 0 and 0.0 respectively. We have a one argument version of complex() function.
If the argument is a complex object, it is taken as real part, setting the imaginary coefficient to 0.
a=int(True)
print ("bool to int:", a)
a=float(False)
print ("bool to float:", a)
a=complex(True)
print ("bool to complex:", a)
On running this code, you will get the following output −
bool to int: 1 bool to float: 0.0 bool to complex: (1+0j)
Python - Control Flow
By default, the instructions in a computer program are executed in a sequential manner, from top to bottom, or from start to end. However, such sequentially executing programs can perform only simplistic tasks. We would like the program to have a decision-making ability, so that it performs different steps depending on different conditions.
Most programming languages including Python provide functionality to control the flow of execution of instructions. Normally, there are two type of control flow statements.
Decision-making − The program is able to decide which of the alternative group of instructions to be executed, depending on value of a certain Boolean expression.
The following diagram illustrates how decision-making statements work −
Looping or Iteration − Most of the processes require a group of instructions to be repeatedly executed. In programming terminology, it is called a loop. Instead of the next step, if the flow is redirected towards any earlier step, it constitutes a loop.
The following diagram illustrates how the looping works −
If the control goes back unconditionally, it forms an infinite loop which is not desired as the rest of the code would never get executed.
In a conditional loop, the repeated iteration of block of statements goes on till a certain condition is met.
Python - Decision Making
Python's decision making functionality is in its keywords − if, else and elif. The if keyword requires a boolean expression, followed by colon symbol.
The colon (:) symbol starts an indented block. The statements with the same level of indentation are executed if the boolean expression in if statement is True. If the expression is not True (False), the interpreter bypasses the indented block and proceeds to execute statements at earlier indentation level.
Python − The if Statement
The following flowchart illustrates how Python if statement works −
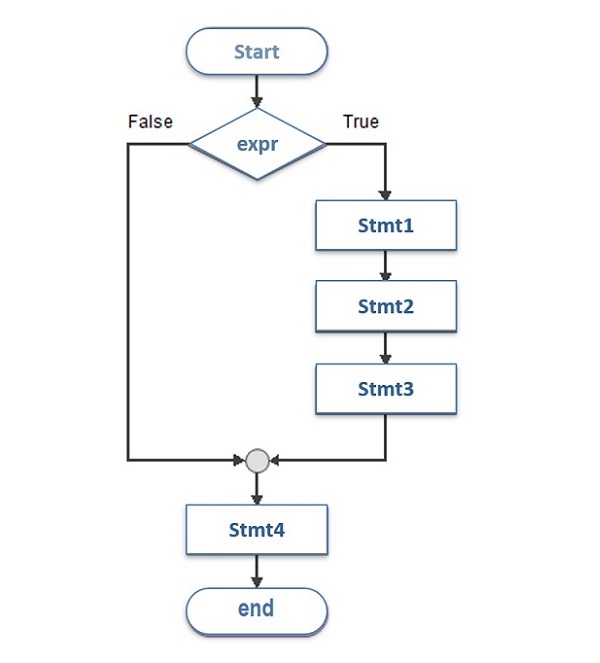
Syntax
The logic in the above flowchart is expressed by the following syntax −
if expr==True: stmt1 stmt2 stmt3 .. .. Stmt4
The if statement is similar to that of other languages. The if statement contains a boolean expression using which the data is compared and a decision is made based on the result of the comparison.
If the boolean expression evaluates to True, then the block of statement(s) inside the if statement is executed. In Python, statements in a block are uniformly indented after the ":" symbol. If boolean expression evaluates to False, then the first set of code after the end of block is executed.
Example
Let us consider an example of a customer entitiled to 10% discount if his purchase amount is >1000; if not, no discount applicable. This flowchart shows the process.
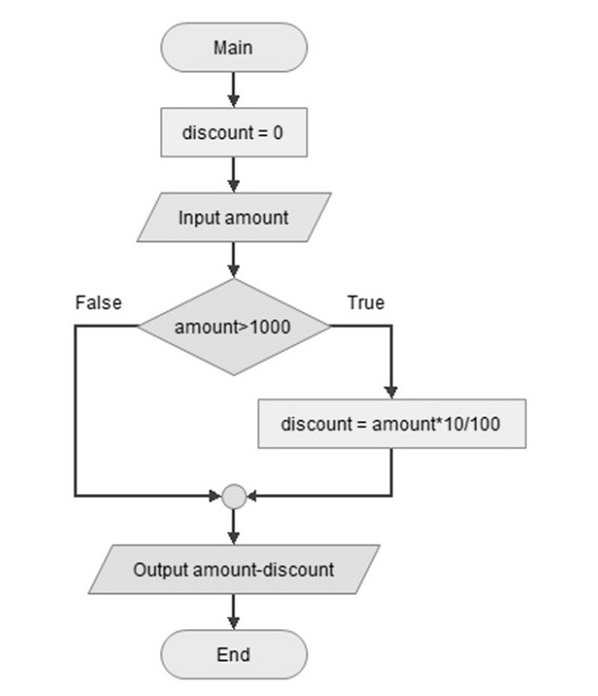
In Python, we first set a discount variable to 0 and accept the amount as input from user.
Then comes the conditional statement if amt>1000. Put : symbol that starts conditional block wherein discount applicable is calculated. Obviously, discount or not, next statement by default prints amount-discount. If applied, it will be subtracted, if not it is 0.
discount = 0
amount = 1200
if amount > 1000:
discount = amount * 10 / 100
print("amount = ",amount - discount)
Here the amout is 1200, hence discount 120 is deducted. On executing the code, you will get the following output −
amount = 1080.0
Change the variable amount to 800, and run the code again. This time, no discount is applicable. And, you will get the following output −
amount = 800
Python - The if-else Statement
Along with the if statement, else keyword can also be optionally used. It provides an alternate block of statements to be executed if the Boolean expression (in if statement) is not true. this flowchart shows how else block is used.
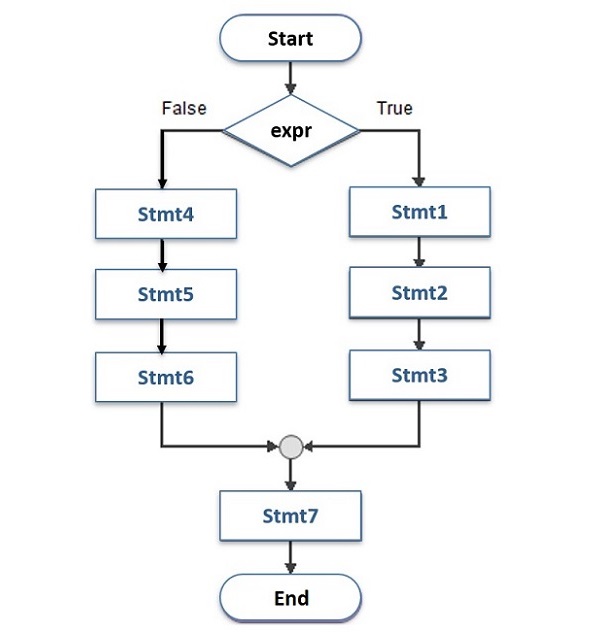
If the expr is True, block of stmt1,2,3 is executed then the default flow continues with stmt7. However, the If expr is False, block stmt4,5,6 runs then the default flow continues.
Syntax
Python implementation of the above flowchart is as follows −
if expr==True: stmt1 stmt2 stmt3 else: stmt4 stmt5 stmt6 Stmt7
Example
Let us understand the use of else clause with following example. The variable age can take different values. If the expression "age > 18" is true, message you are eligible to vote is displayed otherwise not eligible message should be displayed. Following flowchart illustrates this logic.
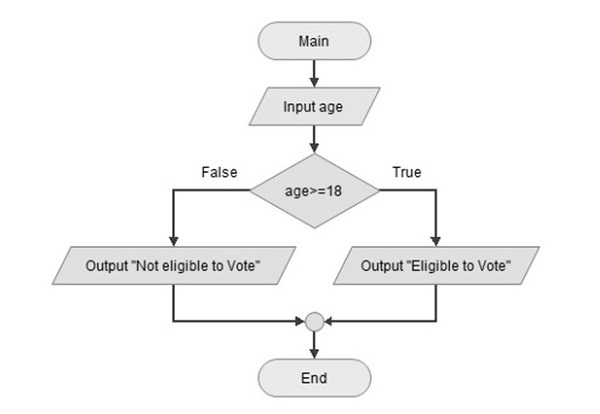
Its Python implementation is simple.
age=25
print ("age: ", age)
if age>=18:
print ("eligible to vote")
else:
print ("not eligible to vote")
To begin, set the integer variable "age" to 25.
Then use the if statement with "age>18" expression followed by ":" which starts a block; this will come in action if "age>=18" is true.
To provide else block, use "else:" the ensuing indented block containing message not eligible will be in action when "age>=18" is false.
On executing this code, you will get the following ouput −
age: 25 eligible to vote
To test the the else block, change the age to 12, and run the code again.
age: 12 not eligible to vote
Python − elif Statement
The elif statement allows you to check multiple expressions for TRUE and execute a block of code as soon as one of the conditions evaluates to TRUE.
Similar to the else statement, the elif statement is optional. However, unlike else, for which there can be at the most one statement; there can be an arbitrary number of elif statements following an if.
Syntax
if expression1: statement(s) elif expression2: statement(s) elif expression3: statement(s) else: statement(s)
Example
Let us understand how elif works, with the help of following example.
The discount structure used in an earlier example is modified to different slabs of discount −
20% on amount exceeding 10000,
10% for amount between 5-10000,
5% if it is between 1 to 5000.
no discount if amount<1000
The following flowchart illustrates these conditions −
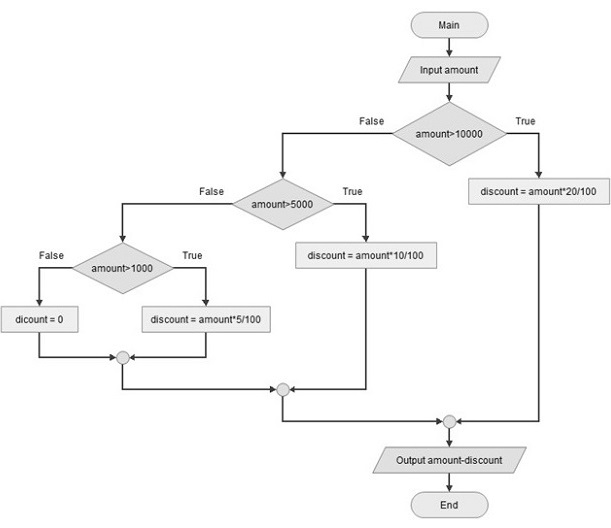
Example
We can write a Python code for the above logic with if-else statements −
amount = int(input('Enter amount: '))
if amount > 10000:
discount = amount * 20 / 100
else:
if amount > 5000:
discount = amount * 10 / 100
else:
if amount > 1000:
discount = amount * 5 / 100
else:
dicount = 0
print('amount: ',amount - discount)
While the code will work perfectly ok, if you look at the increasing level of indentation at each if and else statement, it will become difficult to manage if there are still more conditions.
The elif statement makes the code easy to read and comprehend.
Elif is short for "else if". It allows the logic to be arranged in a cascade of elif statements after the first if statement. If the first if statement evaluates to false, subsequent elif statements are evaluated one by one and comes out of the cascade if any one is satisfied.
Last in the cascade is the else block which will come in picture when all preceding if/elif conditions fail.
amount = 800
print('amount = ',amount)
if amount > 10000:
discount = amount * 20 / 100
elif amount > 5000:
discount = amount * 10 / 100
elif amount > 1000:
discount = amount * 5 / 100
else:
discount=0
print('payable amount = ',amount - discount)
Set amount to test all possible conditions: 800, 2500, 7500 and 15000. The outputs will vary accordingly −
amount: 800 payable amount = 800 amount: 2500 payable amount = 2375.0 amount: 7500 payable amount = 6750.0 amount: 15000 payable amount = 12000.0
Nested If Statements
There may be a situation when you want to check for another condition after a condition resolves to true. In such a situation, you can use the nested if construct.
In a nested if construct, you can have an if...elif...else construct inside another if...elif...else construct.
Syntax
The syntax of the nested if...elif...else construct will be like this −
if expression1:
statement(s)
if expression2:
statement(s)
elif expression3:
statement(s)3
else
statement(s)
elif expression4:
statement(s)
else:
statement(s)
Example
Now let's take a Python code to understand how it works −
# !/usr/bin/python3
num=8
print ("num = ",num)
if num%2==0:
if num%3==0:
print ("Divisible by 3 and 2")
else:
print ("divisible by 2 not divisible by 3")
else:
if num%3==0:
print ("divisible by 3 not divisible by 2")
else:
print ("not Divisible by 2 not divisible by 3")
When the above code is executed, it produces the following output −
num = 8 divisible by 2 not divisible by 3 num = 15 divisible by 3 not divisible by 2 num = 12 Divisible by 3 and 2 num = 5 not Divisible by 2 not divisible by 3
Python - MatchCase Statement
Before its 3.10 version, Python lacked a feature similar to switch-case in C or C++. In Python 3.10, a pattern matching technique called match-case has been introduced, which is similar to the "switch case" construct.
A match statement takes an expression and compares its value to successive patterns given as one or more case blocks. The usage is more similar to pattern matching in languages like Rust or Haskell than a switch statement in C or C++. Only the first pattern that matches gets executed. It is also possible to extract components (sequence elements or object attributes) from the value into variables.
Syntax
The basic usage of match-case is to compare a variable against one or more values.
match variable_name: case 'pattern 1' : statement 1 case 'pattern 2' : statement 2 ... case 'pattern n' : statement n
Example
The following code has a function named weekday(). It receives an integer argument, matches it with all possible weekday number values, and returns the corresponding name of day.
def weekday(n):
match n:
case 0: return "Monday"
case 1: return "Tuesday"
case 2: return "Wednesday"
case 3: return "Thursday"
case 4: return "Friday"
case 5: return "Saturday"
case 6: return "Sunday"
case _: return "Invalid day number"
print (weekday(3))
print (weekday(6))
print (weekday(7))
Output
On executing, this code will produce the following output −
Thursday Sunday Invalid day number
The last case statement in the function has "_" as the value to compare. It serves as the wildcard case, and will be executed if all other cases are not true.
Combined Cases
Sometimes, there may be a situation where for more thanone cases, a similar action has to be taken. For this, you can combine cases with the OR operator represented by "|" symbol.
Example
def access(user):
match user:
case "admin" | "manager": return "Full access"
case "Guest": return "Limited access"
case _: return "No access"
print (access("manager"))
print (access("Guest"))
print (access("Ravi"))
Output
The above code defines a function named access() and has one string argument, representing the name of the user. For admin or manager user, the system grants full access; for Guest, the access is limited; and for the rest, there's no access.
Full access Limited access No access
List as the Argument
Since Python can match the expression against any literal, you can use a list as a case value. Moreover, for variable number of items in the list, they can be parsed to a sequence with "*" operator.
Example
def greeting(details):
match details:
case [time, name]:
return f'Good {time} {name}!'
case [time, *names]:
msg=''
for name in names:
msg+=f'Good {time} {name}!\n'
return msg
print (greeting(["Morning", "Ravi"]))
print (greeting(["Afternoon","Guest"]))
print (greeting(["Evening", "Kajal", "Praveen", "Lata"]))
Output
On executing, this code will produce the following output −
Good Morning Ravi! Good Afternoon Guest! Good Evening Kajal! Good Evening Praveen! Good Evening Lata!
Using "if" in "Case" Clause
Normally Python matches an expression against literal cases. However, it allows you to include if statement in the case clause for conditional computation of match variable.
In the following example, the function argument is a list of amount and duration, and the intereset is to be calculated for amount less than or more than 10000. The condition is included in the case clause.
Example
def intr(details):
match details:
case [amt, duration] if amt<10000:
return amt*10*duration/100
case [amt, duration] if amt>=10000:
return amt*15*duration/100
print ("Interest = ", intr([5000,5]))
print ("Interest = ", intr([15000,3]))
Output
On executing, this code will produce the following output −
Interest = 2500.0 Interest = 6750.0
Python - The for Loop
The for loop in Python has the ability to iterate over the items of any sequence, such as a list or a string.
Syntax
for iterating_var in sequence: statements(s)
If a sequence contains an expression list, it is evaluated first. Then, the first item (at 0th index) in the sequence is assigned to the iterating variable iterating_var.
Next, the statements block is executed. Each item in the list is assigned to iterating_var, and the statement(s) block is executed until the entire sequence is exhausted.
The following flow diagram illustrates the working of for loop −
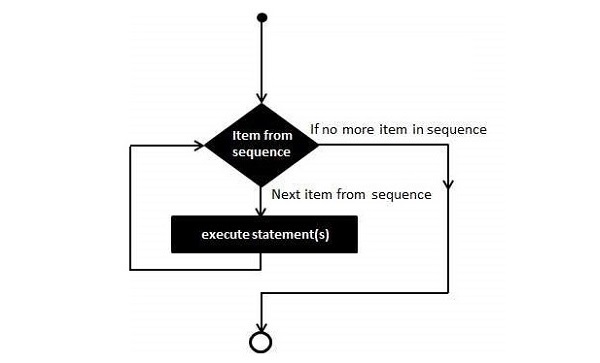
Since the loop is executed for each member element in a sequence, there is no need for explicit verification of Boolean expression controlling the loop (as in while loop).
The sequence objects such as list, tuple or string are called iterables, as the for loop iterates through the collection. Any iterator object can be iterated by the for loop.
The view objects returned by items(), keys() and values() methods of dictionary are also iterables, hence we can run a for loop with them.
Python's built-in range() function returns an iterator object that streams a sequence of numbers. We can run a for loop with range.
Using "for" with a String
A string is a sequence of Unicode letters, each having a positional index. The following example compares each character and displays if it is not a vowel ('a', 'e', 'I', 'o' or 'u')
Example
zen = '''
Beautiful is better than ugly.
Explicit is better than implicit.
Simple is better than complex.
Complex is better than complicated.
'''
for char in zen:
if char not in 'aeiou':
print (char, end='')
Output
On executing, this code will produce the following output −
Btfl s bttr thn gly. Explct s bttr thn mplct. Smpl s bttr thn cmplx. Cmplx s bttr thn cmplctd.
Using "for" with a Tuple
Python's tuple object is also an indexed sequence, and hence we can traverse its items with a for loop.
Example
In the following example, the for loop traverses a tuple containing integers and returns the total of all numbers.
numbers = (34,54,67,21,78,97,45,44,80,19)
total = 0
for num in numbers:
total+=num
print ("Total =", total)
Output
On executing, this code will produce the following output −
Total = 539
Using "for" with a List
Python's list object is also an indexed sequence, and hence we can traverse its items with a for loop.
Example
In the following example, the for loop traverses a list containing integers and prints only those which are divisible by 2.
numbers = [34,54,67,21,78,97,45,44,80,19]
total = 0
for num in numbers:
if num%2 == 0:
print (num)
Output
On executing, this code will produce the following output −
34 54 78 44 80
Using "for" with a Range Object
Python's buil-in range() function returns a range object. Python's range object is an iterator which generates an integer with each iteration. The object contains integrrs from start to stop, separated by step parameter.
Syntax
The range() function has the following syntax −
range(start, stop, step)
Parameters
Start − Starting value of the range. Optional. Default is 0
Stop − The range goes upto stop-1
Step − Integers in the range increment by the step value. Option, default is 1.
Return Value
The range() function returns a range object. It can be parsed to a list sequence.
Example
numbers = range(5) ''' start is 0 by default, step is 1 by default, range generated from 0 to 4 ''' print (list(numbers)) # step is 1 by default, range generated from 10 to 19 numbers = range(10,20) print (list(numbers)) # range generated from 1 to 10 increment by step of 2 numbers = range(1, 10, 2) print (list(numbers))
Output
On executing, this code will produce the following output −
[0, 1, 2, 3, 4] [10, 11, 12, 13, 14, 15, 16, 17, 18, 19] [1, 3, 5, 7, 9]
Example
Once we obtain the range, we can use the for loop with it.
for num in range(5): print (num, end=' ') print() for num in range(10,20): print (num, end=' ') print() for num in range(1, 10, 2): print (num, end=' ')
Output
On executing, this code will produce the following output −
0 1 2 3 4 10 11 12 13 14 15 16 17 18 19 1 3 5 7 9
Example: Factorial of a Number
Factorial is a product of all numbers from 1 to that number say n. It can also be defined as product of 1, 2, up to n.
Factorial of a number n! = 1 * 2 * . . . . . * n
We use the range() function to get the sequence of numbers from 1 to n-1 and perform cumumulative multplication to get the factorial value.
fact=1
N = 5
for x in range(1, N+1):
fact=fact*x
print ("factorial of {} is {}".format(N, fact))
Output
On executing, this code will produce the following output −
factorial of 5 is 120
In the above program, change the value of N to obtain factorial value of different numbers.
Using "for" Loop with Sequence Index
To iterate over a sequence, we can obtain the list of indices using the range() function
Indices = range(len(sequence))
We can then form a for loop as follows:
numbers = [34,54,67,21,78]
indices = range(len(numbers))
for index in indices:
print ("index:",index, "number:",numbers[index])
On executing, this code will produce the following output −
index: 0 number: 34 index: 1 number: 54 index: 2 number: 67 index: 3 number: 21 index: 4 number: 78
Using "for" with Dictionaries
Unlike a list, tuple or a string, dictionary data type in Python is not a sequence, as the items do not have a positional index. However, traversing a dictionary is still possible with different techniques.
Running a simple for loop over the dictionary object traverses the keys used in it.
numbers = {10:"Ten", 20:"Twenty", 30:"Thirty",40:"Forty"}
for x in numbers:
print (x)
On executing, this code will produce the following output −
10 20 30 40
Once we are able to get the key, its associated value can be easily accessed either by using square brackets operator or with the get() method. Take a look at the following example −
numbers = {10:"Ten", 20:"Twenty", 30:"Thirty",40:"Forty"}
for x in numbers:
print (x,":",numbers[x])
It will produce the following output −
10 : Ten 20 : Twenty 30 : Thirty 40 : Forty
The items(), keys() and values() methods of dict class return the view objects dict_items, dict_keys and dict_values respectively. These objects are iterators, and hence we can run a for loop over them.
The dict_items object is a list of key-value tuples over which a for loop can be run as follows −
numbers = {10:"Ten", 20:"Twenty", 30:"Thirty",40:"Forty"}
for x in numbers.items():
print (x)
It will produce the following output −
(10, 'Ten') (20, 'Twenty') (30, 'Thirty') (40, 'Forty')
Here, "x" is the tuple element from the dict_items iterator. We can further unpack this tuple in two different variables. Check the following code −
numbers = {10:"Ten", 20:"Twenty", 30:"Thirty",40:"Forty"}
for x,y in numbers.items():
print (x,":", y)
It will produce the following output −
10 : Ten 20 : Twenty 30 : Thirty 40 : Forty
Similarly, the collection of keys in dict_keys object can be iterated over. Take a look at the following example −
numbers = {10:"Ten", 20:"Twenty", 30:"Thirty",40:"Forty"}
for x in numbers.keys():
print (x, ":", numbers[x])
It will produce the same output −
10 : Ten 20 : Twenty 30 : Thirty 40 : Forty
Python - The forelse Loop
Python supports having an "else" statement associated with a "for" loop statement. If the "else" statement is used with a "for" loop, the "else" statement is executed when the sequence is exhausted before the control shifts to the main line of execution.
The following flow diagram illustrates how to use else statement with for loop −

Example
The following example illustrates the combination of an else statement with a for statement. Till the count is less than 5, the iteration count is printed. As it becomes 5, the print statement in else block is executed, before the control is passed to the next statement in the main program.
for count in range(6):
print ("Iteration no. {}".format(count))
else:
print ("for loop over. Now in else block")
print ("End of for loop")
On executing, this code will produce the following output −
Iteration no. 1 Iteration no. 2 Iteration no. 3 Iteration no. 4 Iteration no. 5 for loop over. Now in else block End of for loop
Nested Loops
Python programming language allows the use of one loop inside another loop. The following section shows a few examples to illustrate the concept.
Syntax
for iterating_var in sequence:
for iterating_var in sequence:
statements(s)
statements(s)
The syntax for a nested while loop statement in Python programming language is as follows −
while expression:
while expression:
statement(s)
statement(s)
A final note on loop nesting is that you can put any type of loop inside any other type of loop. For example a for loop can be inside a while loop or vice versa.
Example
The following program uses a nested-for loop to display multiplication tables from 1-10.
#!/usr/bin/python3
for i in range(1,11):
for j in range(1,11):
k=i*j
print ("{:3d}".format(k), end=' ')
print()
The print() function inner loop has end=' ' which appends a space instead of default newline. Hence, the numbers will appear in one row.
The last print() will be executed at the end of inner for loop.
When the above code is executed, it produces the following output −
1 2 3 4 5 6 7 8 9 10 2 4 6 8 10 12 14 16 18 20 3 6 9 12 15 18 21 24 27 30 4 8 12 16 20 24 28 32 36 40 5 10 15 20 25 30 35 40 45 50 6 12 18 24 30 36 42 48 54 60 7 14 21 28 35 42 49 56 63 70 8 16 24 32 40 48 56 64 72 80 9 18 27 36 45 54 63 72 81 90 10 20 30 40 50 60 70 80 90 100
Python - The while Loop
Normally, flow of execution of steps in a computer program goe from start to end. However, instead of the next step, if the flow is redirected towards any earlier step, it constitutes a loop.
A while loop statement in Python programming language repeatedly executes a target statement as long as a given boolean expression is true.
Syntax
The syntax of a while loop in Python programming language is −
while expression: statement(s)
The while keyword is followed by a boolean expression, and then by colon symbol, to start an indented block of statements. Here, statement(s) may be a single statement or a block of statements with uniform indent. The condition may be any expression, and true is any non-zero value. The loop iterates while the boolean expression is true.
As soon as the expression becomes false, the program control passes to the line immediately following the loop.
If it fails to turn false, the loop continues to run, and doesn't stop unless forcefully stopped. Such a loop is called infinite loop, which is undesired in a computer program.
The following flow diagram illustrates the while loop −
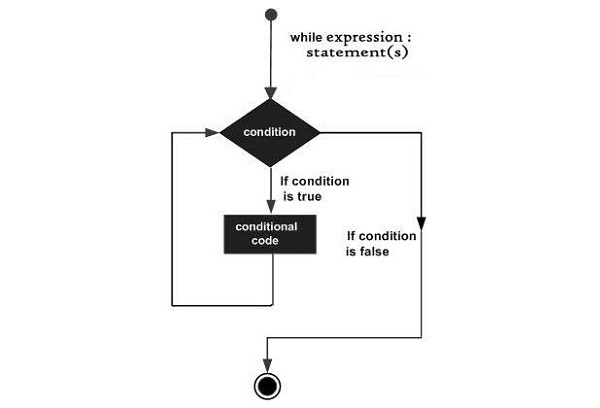
Example 1
In Python, all the statements indented by the same number of character spaces after a programming construct are considered to be part of a single block of code. Python uses indentation as its method of grouping statements.
count=0
while count<5:
count+=1
print ("Iteration no. {}".format(count))
print ("End of while loop")
We initialize count variable to 0, and the loop runs till "count<5". In each iteration, count is incremented and checked. If it's not 5 next repetion takes place. Inside the looping block, instantenous value of count is printed. When the while condition becomes false, the loop terminates, and next statement is executed, here it is End of while loop message.
Output
On executing, this code will produce the following output −
Iteration no. 1 Iteration no. 2 Iteration no. 3 Iteration no. 4 Iteration no. 5 End of while loop
Example 2
Here is another example of using the while loop. For each iteration, the program asks for user input and keeps repeating till the user inputs a non-numeric string. The isnumeric() function that returns true if input is an integer, false otherwise.
var='0'
while var.isnumeric()==True:
var=input('enter a number..')
if var.isnumeric()==True:
print ("Your input", var)
print ("End of while loop")
Output
On executing, this code will produce the following output −
enter a number..10 Your input 10 enter a number..100 Your input 100 enter a number..543 Your input 543 enter a number..qwer End of while loop
The Infinite Loop
A loop becomes infinite loop if a condition never becomes FALSE. You must be cautious when using while loops because of the possibility that this condition never resolves to a FALSE value. This results in a loop that never ends. Such a loop is called an infinite loop.
An infinite loop might be useful in client/server programming where the server needs to run continuously so that client programs can communicate with it as and when required.
Example 3
Let's take an example to understand how the infinite loop works in Python −
#!/usr/bin/python3
var = 1
while var == 1 : # This constructs an infinite loop
num = int(input("Enter a number :"))
print ("You entered: ", num)
print ("Good bye!")
Output
On executing, this code will produce the following output −
Enter a number :20
You entered: 20
Enter a number :29
You entered: 29
Enter a number :3
You entered: 3
Enter a number :11
You entered: 11
Enter a number :22
You entered: 22
Enter a number :Traceback (most recent call last):
File "examples\test.py", line 5, in
num = int(input("Enter a number :"))
KeyboardInterrupt
The above example goes in an infinite loop and you need to use CTRL+C to exit the program.
The while-else Loop
Python supports having an else statement associated with a while loop statement.
If the else statement is used with a while loop, the else statement is executed when the condition becomes false before the control shifts to the main line of execution.
The following flow diagram shows how to use else with while statement −
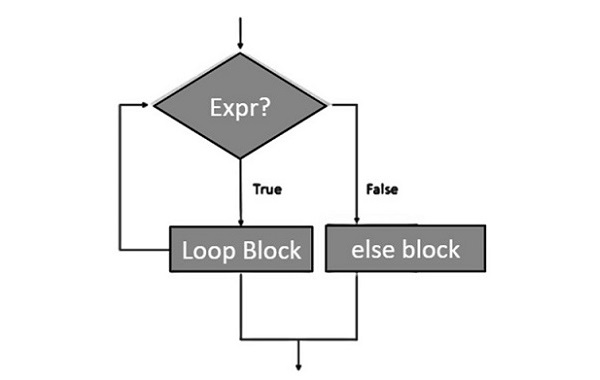
Example
The following example illustrates the combination of an else statement with a while statement. Till the count is less than 5, the iteration count is printed. As it becomes 5, the print statement in else block is executed, before the control is passed to the next statement in the main program.
count=0
while count<5:
count+=1
print ("Iteration no. {}".format(count))
else:
print ("While loop over. Now in else block")
print ("End of while loop")
Output
On executing, this code will produce the following output −
Iteration no. 1 Iteration no. 2 Iteration no. 3 Iteration no. 4 Iteration no. 5 While loop over. Now in else block End of while loop
Python - The break Statement
Loop Control Statements
The Loop control statements change the execution from its normal sequence. When the execution leaves a scope, all automatic objects that were created in that scope are destroyed.
Python supports the following control statements −
| Sr.No. | Control Statement & Description |
|---|---|
| 1 | break statement Terminates the loop statement and transfers execution to the statement immediately following the loop. |
| 2 | continue statement Causes the loop to skip the remainder of its body and immediately retest its condition prior to reiterating. |
| 3 | pass statement The pass statement in Python is used when a statement is required syntactically but you do not want any command or code to execute. |
Let us go through the loop control statements briefly.
Python − The break Statement
The break statement is used for premature termination of the current loop. After abandoning the loop, execution at the next statement is resumed, just like the traditional break statement in C.
The most common use of break is when some external condition is triggered requiring a hasty exit from a loop. The break statement can be used in both while and for loops.
If you are using nested loops, the break statement stops the execution of the innermost loop and starts executing the next line of the code after the block.
Syntax
The syntax for a break statement in Python is as follows −
break
Flow Diagram
Its flow diagram looks like this −
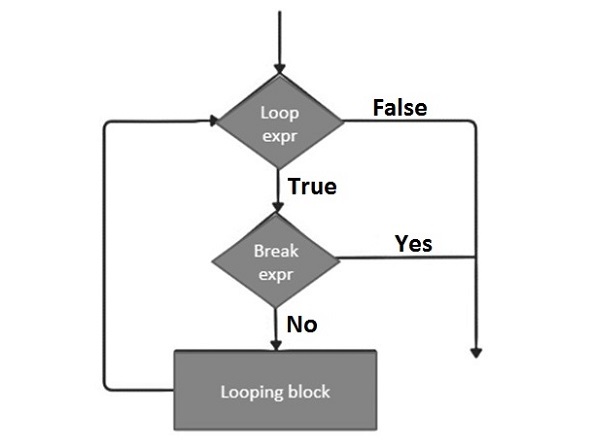
Example 1
Now let's take an example to understand how the "break" statement works in Python −
#!/usr/bin/python3
print ('First example')
for letter in 'Python': # First Example
if letter == 'h':
break
print ('Current Letter :', letter)
print ('Second example')
var = 10 # Second Example
while var > 0:
print ('Current variable value :', var)
var = var -1
if var == 5:
break
print ("Good bye!")
When the above code is executed, it produces the following output −
First example Current Letter : P Current Letter : y Current Letter : t Second example Current variable value : 10 Current variable value : 9 Current variable value : 8 Current variable value : 7 Current variable value : 6 Good bye!
Example 2
The following program demonstrates the use of break in a for loop iterating over a list. User inputs a number, which is searched in the list. If it is found, then the loop terminates with the 'found' message.
#!/usr/bin/python3
no=int(input('any number: '))
numbers=[11,33,55,39,55,75,37,21,23,41,13]
for num in numbers:
if num==no:
print ('number found in list')
break
else:
print ('number not found in list')
The above program will produce the following output −
any number: 33 number found in list any number: 5 number not found in list
Example 3: Checking for Prime Number
Note that when the break statement is encountered, Python abandons the remaining statements in the loop, including the else block.
The following example takes advantage of this behaviour to find whether a number is prime or not. By definition, a number is prime if it is not divisible by any other number except 1 and itself.
The following code runs a for loop over numbers from 2 to the desired number-1. If it divisible by any value of looping variable, the number is not prime, hence the program breaks from the loop. If the number is not divisible by any number between 2 and x-1, the else block prints the message that the given number is prime.
num = 37
print ("Number: ", num)
for x in range(2,num):
if num%x==0:
print ("{} is not prime".format(num))
break
else:
print ("{} is prime".format(num))
Output
Assign different values to num to check if it is a prime number or not.
Number: 37 37 is prime Number: 49 49 is not prime
Python - The Continue Statement
The continue statement in Python returns the control to the beginning of the current loop. When encountered, the loop starts next iteration without executing the remaining statements in the current iteration.
The continue statement can be used in both while and for loops.
Syntax
continue
Flow Diagram
The flow diagram of the continue statement looks like this −
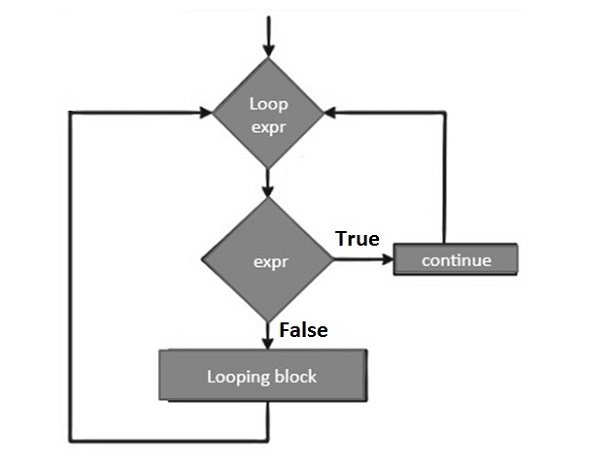
The continue statement is just the opposite to that of break. It skips the remaining statements in the current loop and starts the next iteration.
Example 1
Now let's take an example to understand how the continue statement works in Python −
for letter in 'Python': # First Example
if letter == 'h':
continue
print ('Current Letter :', letter)
var = 10 # Second Example
while var > 0:
var = var -1
if var == 5:
continue
print ('Current variable value :', var)
print ("Good bye!")
When the above code is executed, it produces the following output −
Current Letter : P Current Letter : y Current Letter : t Current Letter : o Current Letter : n Current variable value : 9 Current variable value : 8 Current variable value : 7 Current variable value : 6 Current variable value : 4 Current variable value : 3 Current variable value : 2 Current variable value : 1 Current variable value : 0 Good bye!
Example 2: Checking Prime Factors
Following code uses continue to find the prime factors of a given number. To find prime factors, we need to successively divide the given number starting with 2, increment the divisior and continue the same process till the input reduces to 1.
The algorithm for finding prime factors is as follows −
Accept input from user (n)
Set divisor (d) to 2
Perform following till n>1
Check if given number (n) is divisible by divisor (d).
If n%d==0
a. Print d as a factor
Set new value of n as n/d
Repeat from 4
If not
Increment d by 1
Repeat from 3
Given below is the Python code for the purpose −
num = 60
print ("Prime factors for: ", num)
d=2
while num>1:
if num%d==0:
print (d)
num=num/d
continue
d=d+1
On executing, this code will produce the following output −
Prime factors for: 60 2 2 3 5
Assign different value (say 75) to num in the above program and test the result for its prime factors.
Prime factors for: 75 3 5 5
Python - The pass Statement
The pass statement is used when a statement is required syntactically but you do not want any command or code to execute.
The pass statement is a null operation; nothing happens when it executes. The pass statement is also useful in places where your code will eventually go, but has not been written yet, i.e., in stubs).
Syntax
pass
Example
The following code shows how you can use the pass statement in Python −
for letter in 'Python':
if letter == 'h':
pass
print ('This is pass block')
print ('Current Letter :', letter)
print ("Good bye!")
When the above code is executed, it produces the following output −
Current Letter : P Current Letter : y Current Letter : t This is pass block Current Letter : h Current Letter : o Current Letter : n Good bye!
Python - Functions
A function is a block of organized, reusable code that is used to perform a single, related action. Functions provide better modularity for your application and a high degree of code reusing.
A top-to-down approach towards building the processing logic involves defining blocks of independent reusable functions. A function may be invoked from any other function by passing required data (called parameters or arguments). The called function returns its result back to the calling environment.
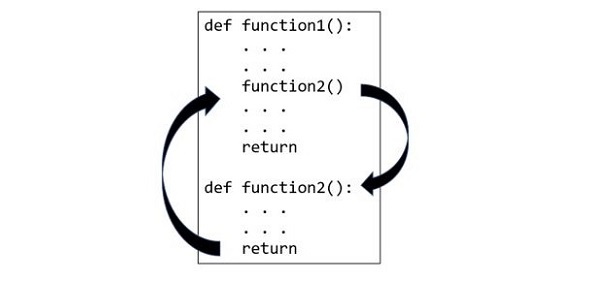
Types of Python Functions
Python provides the following types of functions −
Built-in functions
Functions defined in built-in modules
User-defined functions
Python's standard library includes number of built-in functions. Some of Python's built-in functions are print(), int(), len(), sum(), etc. These functions are always available, as they are loaded into computer's memory as soon as you start Python interpreter.
The standard library also bundles a number of modules. Each module defines a group of functions. These functions are not readily available. You need to import them into the memory from their respective modules.
In addition to the built-in functions and functions in the built-in modules, you can also create your own functions. These functions are called user-defined functions.
Python Defining a Function
You can define custom functions to provide the required functionality. Here are simple rules to define a function in Python.
Function blocks begin with the keyword def followed by the function name and parentheses ( ( ) ).
Any input parameters or arguments should be placed within these parentheses. You can also define parameters inside these parentheses.
The first statement of a function can be an optional statement; the documentation string of the function or docstring.
The code block within every function starts with a colon (:) and is indented.
The statement return [expression] exits a function, optionally passing back an expression to the caller. A return statement with no arguments is the same as return None.
Syntax
def functionname( parameters ): "function_docstring" function_suite return [expression]
By default, parameters have a positional behavior and you need to inform them in the same order that they were defined.
Once the function is defined, you can execute it by calling it from another function or directly from the Python prompt.
Example
The following example shows how to define a function greetings(). The bracket is empty so there aren't any parameters.
The first line is the docstring. Function block ends with return statement. when this function is called, Hello world message will be printed.
def greetings():
"This is docstring of greetings function"
print ("Hello World")
return
greetings()
Calling a Function
Defining a function only gives it a name, specifies the parameters that are to be included in the function and structures the blocks of code.
Once the basic structure of a function is finalized, you can execute it by calling it from another function or directly from the Python prompt. Following is the example to call printme() function −
# Function definition is here
def printme( str ):
"This prints a passed string into this function"
print str
return;
# Now you can call printme function
printme("I'm first call to user defined function!")
printme("Again second call to the same function")
When the above code is executed, it produces the following output −
I'm first call to user defined function! Again second call to the same function
Pass by Reference vs Value
The function calling mechanism of Python differs from that of C and C++. There are two main function calling mechanisms: Call by Value and Call by Reference.
When a variable is passed to a function, what does the function do to it? If any changes to its variable doesnot get reflected in the actual argument, then it uses call by value mechanism. On the other hand, if the change is reflected, then it becomes call by reference mechanism.
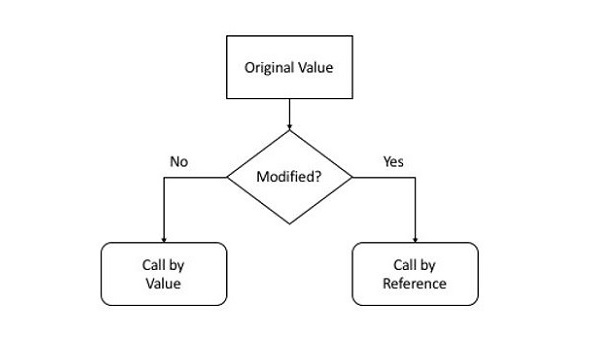
C/C++ functions are said to be called by value. When a function in C/C++ is called, the value of actual arguments is copied to the variables representing the formal arguments. If the function modifies the value of formal aergument, it doesn't reflect the variable that was passed to it.
Python uses pass by reference mechanism. As variable in Python is a label or reference to the object in the memory, the both the variables used as actual argument as well as formal arguments really refer to the same object in the memory. We can verify this fact by checking the id() of the passed variable before and after passing.
def testfunction(arg):
print ("ID inside the function:", id(arg))
var="Hello"
print ("ID before passing:", id(var))
testfunction(var)
If the above code is executed, the id() before passing and inside the function is same.
ID before passing: 1996838294128 ID inside the function: 1996838294128
The behaviour also depends on whether the passed object is mutable or immutable. Python numeric object is immutable. When a numeric object is passed, and then the function changes the value of the formal argument, it actually creates a new object in the memory, leaving the original variable unchanged.
def testfunction(arg):
print ("ID inside the function:", id(arg))
arg=arg+1
print ("new object after increment", arg, id(arg))
var=10
print ("ID before passing:", id(var))
testfunction(var)
print ("value after function call", var)
It will produce the following output −
ID before passing: 140719550297160 ID inside the function: 140719550297160 new object after increment 11 140719550297192 value after function call 10
Let us now pass a mutable object (such as a list or dictionary) to a function. It is also passed by reference, as the id() of lidt before and after passing is same. However, if we modify the list inside the function, its global representation also reflects the change.
Here we pass a list, append a new item, and see the contents of original list object, which we will find has changed.
def testfunction(arg):
print ("Inside function:",arg)
print ("ID inside the function:", id(arg))
arg=arg.append(100)
var=[10, 20, 30, 40]
print ("ID before passing:", id(var))
testfunction(var)
print ("list after function call", var)
It will produce the following output −
ID before passing: 2716006372544 Inside function: [10, 20, 30, 40] ID inside the function: 2716006372544 list after function call [10, 20, 30, 40, 100]
Function Arguments
The process of a function often depends on certain data provided to it while calling it. While defining a function, you must give a list of variables in which the data passed to it is collected. The variables in the parentheses are called formal arguments.
When the function is called, value to each of the formal arguments must be provided. Those are called actual arguments.
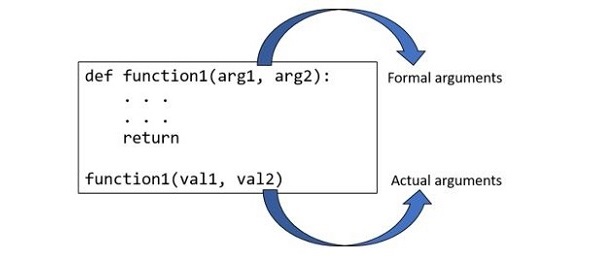
Example
Let's modify greetings function and have name an argument. A string passed to it whilcalling becomes name variable inside the function.
def greetings(name):
"This is docstring of greetings function"
print ("Hello {}".format(name))
return
greetings("Samay")
greetings("Pratima")
greetings("Steven")
It will produce the following output −
Hello Samay Hello Pratima Hello Steven
Function with Return Value
The return keyword as the last statement in function definition indicates end of function block, and the program flow goes back to the calling function. Although reduced indent after the last statement in the block also implies return but using explicit return is a good practice.
Along with the flow control, the function can also return value of an expression to the calling function. The value of returned expression can be stored in a variable for further processing.
Example
Let us define the add() function. It adds the two values passed to it and returns the addition. The returned value is stored in a variable called result.
def add(x,y):
z=x+y
return z
a=10
b=20
result = add(a,b)
print ("a = {} b = {} a+b = {}".format(a, b, result))
It will produce the following output −
a = 10 b = 20 a+b = 30
Types of Function Arguments
Based on how the arguments are declared while defining a Python function, there are classified into the following categories −
Positional or required arguments
Keyword arguments
Default arguments
Positional-only arguments
Keyword-only arguments
Arbitrary or variable-length arguments
In the next few chapters, we will discuss these function arguments at length.
Order of Arguments
A function can have arguments of any of the types defined above. However, the arguments must be declared in the following order −
The argument list begins with the positional-only args, followed by the slash (/) symbol.
It is followed by regular positional args that may or may not be called as keyword arguments.
Then there may be one or more args with default values.
Next, arbitrary positional arguments represented by a variable prefixed with single asterisk, that is treated as tuple. It is the next.
If the function has any keyword-only arguments, put an asterisk before their names start. Some of the keyword-only arguments may have a default value.
Last in the bracket is argument with two asterisks ** to accept arbitrary number of keyword arguments.
The following diagram shows the order of formal arguments −
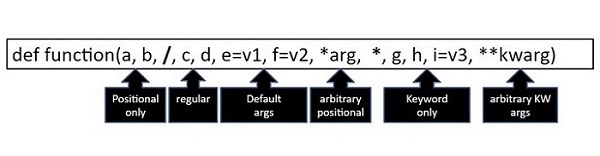
Python - Default Arguments
You can define a function with default value assigned to one or more formal arguments. Python uses the default value for such an argument if no value is passed to it. If any value is passed, the default is overridden.
Example
# Function definition is here
def printinfo( name, age = 35 ):
"This prints a passed info into this function"
print ("Name: ", name)
print ("Age ", age)
return
# Now you can call printinfo function
printinfo( age=50, name="miki" )
printinfo( name="miki" )
It will produce the following output −
Name: miki Age 50 Name: miki Age 35
In the above example, the second call to the function doesn't pass value to age argument, hence its default value 35 is used.
Let us look at another example that assigns default value to a function argument. The function percent() is defined as below −
def percent(phy, maths, maxmarks=200): val = (phy+maths)*100/maxmarks return val
Assuming that marks given for each subject are out of 100, the argument maxmarks is set to 200. Hence, we can omit the value of third argument while calling percent() function.
phy = 60 maths = 70 result = percent(phy,maths)
However, if maximum marks for each subject is not 100, then we need to put the third argument while calling the percent() function.
phy = 40 maths = 46 result = percent(phy,maths, 100)
Example
Here is the complete example −
def percent(phy, maths, maxmarks=200):
val = (phy+maths)*100/maxmarks
return val
phy = 60
maths = 70
result = percent(phy,maths)
print ("percentage:", result)
phy = 40
maths = 46
result = percent(phy,maths, 100)
print ("percentage:", result)
It will produce the following output −
percentage: 65.0 percentage: 86.0
Python - Keyword Arguments
Keyword argument are also called named arguments. Variables in the function definition are used as keywords. When the function is called, you can explicitly mention the name and its value.
Example
# Function definition is here
def printinfo( name, age ):
"This prints a passed info into this function"
print ("Name: ", name)
print ("Age ", age)
return
# Now you can call printinfo function
# by positional arguments
printinfo ("Naveen", 29)
# by keyword arguments
printinfo(name="miki", age = 30)
By default, the function assigns the values to arguments in the order of appearance. In the second function call, we have assigned the value to a specific argument
It will produce the following output −
Name: Naveen Age 29 Name: miki Age 30
Let us try to understand more about keyword argument with the help of following function definition −
def division(num, den):
quotient = num/den
print ("num:{} den:{} quotient:{}".format(num, den, quotient))
division(10,5)
division(5,10)
Since the values are assigned as per the position, the output is as follows −
num:10 den:5 quotient:2.0 num:5 den:10 quotient:0.5
Instead ofpassing the values with positional arguments, let us call the function with keyword arguments −
division(num=10, den=5) division(den=5, num=10)
It will produce the following output −
num:10 den:5 quotient:2.0 num:10 den:5 quotient:2.0
When using keyword arguments, it is not necessary to follow the order of formal arguments in function definition.
Using keyword arguments is optional. You can use mixed calling. You can pass values to some arguments without keywords, and for others with keyword.
division(10, den=5)
However, the positional arguments must be before the keyword arguments while using mixed calling.
Try to call the division() function with the following statement.
division(num=5, 10)
As the Positional argument cannot appear after keyword arguments, Python raises the following error message −
division(num=5, 10)
^
SyntaxError: positional argument follows keyword argument
Python - Keyword-Only Arguments
You can use the variables in formal argument list as keywords to pass value. Use of keyword arguments is optional. But, you can force the function be given arguments by keyword only. You should put an astreisk (*) before the keyword-only arguments list.
Let us say we have a function with three arguments, out of which we want second and third arguments to be keyword-only. For that, put * after the first argument.
The built-in print() function is an example of keyword-only arguments. You can give list of expressions to be printed in the parentheses. The printed values are separated by a white space by default. You can specify any other separation character instead with sep argument.
print ("Hello", "World", sep="-")
It will print −
Hello-World
The sep argument is keyword-only. Try using it as non-keyword argument.
print ("Hello", "World", "-")
You'll get different output − not as desired.
Hello World -
Example
In the following user defined function intr() with two arguments, amt and rate. To make the rate argument keyword-only, put "*" before it.
def intr(amt,*, rate): val = amt*rate/100 return val
To call this function, the value for rate must be passed by keyword.
interest = intr(1000, rate=10)
However, if you try to use the default positional way of calling the function, you get an error.
interest = intr(1000, 10)
^^^^^^^^^^^^^^
TypeError: intr() takes 1 positional argument but 2 were given
Python - Positional Arguments
The list of variables declared in the parentheses at the time of defining a function are the formal arguments. A function may be defined with any number of formal arguments.
While calling a function −
All the arguments are required
The number of actual arguments must be equal to the number of formal arguments.
Formal arguments are positional. They Pick up values in the order of definition.
The type of arguments must match.
Names of formal and actual arguments need not be same.
Example
def add(x,y):
z=x+y
print ("x={} y={} x+y={}".format(x,y,z))
a=10
b=20
add(a,b)
It will produce the following output −
x=10 y=20 x+y=30
Here, the add() function has two formal arguments, both are numeric. When integers 10 and 20 passed to it. The variable a takes 10 and b takes 20, in the order of declaration. The add() function displays the addition.
Python also raises error when the number of arguments don't match. Give only one argument and check the result.
add(b) TypeError: add() missing 1 required positional argument: 'y'
Pass more than number of formal arguments and check the result −
add(10, 20, 30) TypeError: add() takes 2 positional arguments but 3 were given
Data type of corresponding actual and formal arguments must match. Change a to a string value and see the result.
a="Hello" b=20 add(a,b)
It will produce the following output −
z=x+y
~^~
TypeError: can only concatenate str (not "int") to str
Python - Positional-Only Arguments
It is possible to define a function in which one or more arguments can not accept their value with keywords. Such arguments may be called positional-only arguments.
Python's built-in input() function is an example of positional-only arguments. The syntax of input function is −
input(prompt = "")
Prompt is an explanatory string for the benefit of the user. For example −
name = input("enter your name ")
However, you cannot use the prompt keyword inside the parantheses.
name = input (prompt="Enter your name ")
^^^^^^^^^^^^^^^^^^^^^^^^^^^^^^^^^
TypeError: input() takes no keyword arguments
To make an argument positional-only, use the "/" symbol. All the arguments before this symbol will be treated as position-only.
Example
We make both the arguments of intr() function as positional-only by putting "/" at the end.
def intr(amt, rate, /): val = amt*rate/100 return val
If we try to use the arguments as keywords, Python raises following error message −
interest = intr(amt=1000, rate=10)
^^^^^^^^^^^^^^^^^^^^^^^
TypeError: intr() got some positional-only arguments passed as keyword arguments: 'amt, rate'
A function may be defined in such a way that it has some keyword-only and some positional-only arguments.
def myfunction(x, /, y, *, z): print (x, y, z)
In this function, x is a required positional-only argument, y is a regular positional argument (you can use it as keyword if you want), and z is a keyword-only argument.
The following function calls are valid −
myfunction(10, y=20, z=30) myfunction(10, 20, z=30)
However, these calls raise errors −
myfunction(x=10, y=20, z=30) TypeError: myfunction() got some positional-only arguments passed as keyword arguments: 'x' myfunction(10, 20, 30) TypeError: myfunction() takes 2 positional arguments but 3 were given
Python - Arbitrary Arguments
You may want to define a function that is able to accept arbitrary or variable number of arguments. Moreover, the arbitrary number of arguments might be positional or keyword arguments.
An argument prefixed with a single asterisk * for arbitrary positional arguments.
An argument prefixed with two asterisks ** for arbitrary keyword arguments.
Example
Given below is an example of arbitrary or variable length positional arguments −
# sum of numbers
def add(*args):
s=0
for x in args:
s=s+x
return s
result = add(10,20,30,40)
print (result)
result = add(1,2,3)
print (result)
The args variable prefixed with "*" stores all the values passed to it. Here, args becomes a tuple. We can run a loop over its items to add the numbers.
It will produce the following output −
100 6
It is also possible to have a function with some required arguments before the sequence of variable number of values.
Example
The following example has avg() function. Assume that a student can take any number of tests. First test is mandatory. He can take as many tests as he likes to better his score. The function calculates the average of marks in first test and his maximum score in the rest of tests.
The function has two arguments, first is the required argument and second to hold any number of values.
#avg of first test and best of following tests def avg(first, *rest): second=max(rest) return (first+second)/2 result=avg(40,30,50,25) print (result)
Following call to avg() function passes first value to the required argument first, and the remaining values to a tuple named rest. We then find the maximum and use it to calculate the average.
It will produce the following output −
45.0
If a variable in the argument list has two asterisks prefixed to it, the function can accept arbitrary number of keyword arguments. The variable becomes a dictionary of keyword:value pairs.
Example
The following code is an example of a function with arbitrary keyword arguments. The addr() function has an argument **kwargs which is able to accept any number of address elements like name, city, phno, pin, etc. Inside the function kwargs dictionary of kw:value pairs is traversed using items() method.
def addr(**kwargs):
for k,v in kwargs.items():
print ("{}:{}".format(k,v))
print ("pass two keyword args")
addr(Name="John", City="Mumbai")
print ("pass four keyword args")
# pass four keyword args
addr(Name="Raam", City="Mumbai", ph_no="9123134567", PIN="400001")
It will produce the following output −
pass two keyword args Name:John City:Mumbai pass four keyword args Name:Raam City:Mumbai ph_no:9123134567 PIN:400001
If the function uses mixed types of arguments, the arbitrary keyword arguments should be after positional, keyword and arbitrary positional arguments in the argument list.
Example
Imagine a case where science and maths are mandatory subjects, in addition to which student may choose any number of elective subjects.
The following code defines a percent() function where marks in science and marks are stored in required arguments, and the marks in variable number of elective subjects in **optional argument.
def percent(math, sci, **optional):
print ("maths:", math)
print ("sci:", sci)
s=math+sci
for k,v in optional.items():
print ("{}:{}".format(k,v))
s=s+v
return s/(len(optional)+2)
result=percent(math=80, sci=75, Eng=70, Hist=65, Geo=72)
print ("percentage:", result)
It will produce the following output −
maths: 80 sci: 75 Eng:70 Hist:65 Geo:72 percentage: 72.4
Python - Variable Scope
A variable in Python is a symbols name to the object in computer's memory. Python works on the concept of namespaces to define the context for various identifiers such as functions, variables etc. A namespace is a collection of symbolic names defined in the current context.
Python provides the following types of namespaces −
Built-in namespace contains built-in functions and built-in exceptions. They are loaded in the memory as soon as Python interpreter is loaded and remain till the interpreter is running.
Global namespace contains any names defined in the main program. These names remain in memory till the program is running.
Local namespace contains names defined inside a function. They are available till the function is running.
These namespaces are nested one inside the other. Following diagram shows relationship between namespaces.
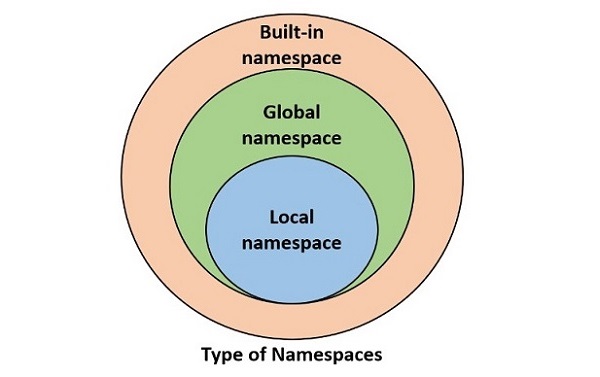
The life of a certain variable is restricted to the namespace in which it is defined. As a result, it is not possible to access a variable present in the inner namespace from any outer namespace.
globals() Function
Python's standard library includes a built-in function globals(). It returns a dictionary of symbols currently available in global namespace.
Run the globals() function directly from the Python prompt.
>>> globals()
{'__name__': '__main__', '__doc__': None, '__package__': None, '__loader__': <class '_frozen_importlib.BuiltinImporter'>, '__spec__': None, '__annotations__': {}, '__builtins__': <module 'builtins' (built-in)>}
It can be seen that the builtins module which contains definitions of all built-in functions and built-in exceptions is loaded.
Save the following code that contains few variables and a function with few more variables inside it.
name = 'TutorialsPoint' marks = 50 result = True def myfunction(): a = 10 b = 20 return a+b print (globals())
Calling globals() from inside this script returns following dictionary object −
{'__name__': '__main__', '__doc__': None, '__package__': None, '__loader__': <_frozen_importlib_external.SourceFileLoader object at 0x00000263E7255250>, '__spec__': None, '__annotations__': {}, '__builtins__': <module 'builtins' (built-in)>, '__file__': 'C:\\Users\\user\\examples\\main.py', '__cached__': None, 'name': 'TutorialsPoint', 'marks': 50, 'result': True, 'myfunction': <function myfunction at 0x00000263E72004A0>}
The global namespace now contains variables in the program and their values and the function object in it (and not the variables in the function).
locals() Function
Python's standard library includes a built-in function locals(). It returns a dictionary of symbols currently available in namespace of the function.
Modify the above script to print dictionary of global and local namespaces from within the function.
name = 'TutorialsPoint'
marks = 50
result = True
def myfunction():
a = 10
b = 20
c = a+b
print ("globals():", globals())
print ("locals():", locals())
return c
myfunction()
The output shows that locals() returns a dictionary of variables and their values currently available in the function.
globals(): {'__name__': '__main__', '__doc__': None, '__package__': None, '__loader__': <_frozen_importlib_external.SourceFileLoader object at 0x00000169AE265250>, '__spec__': None, '__annotations__': {}, '__builtins__': <module 'builtins' (built-in)>, '__file__': 'C:\\Users\\mlath\\examples\\main.py', '__cached__': None, 'name': 'TutorialsPoint', 'marks': 50, 'result': True, 'myfunction': <function myfunction at 0x00000169AE2104A0>}
locals(): {'a': 10, 'b': 20, 'c': 30}
Since both globals() and locals functions return dictionary, you can access value of a variable from respective namespace with dictionary get() method or index operator.
print (globals()['name']) #displays TutorialsPoint
print (locals().get('a')) #displays 10
Namespace Conflict
If a variable of same name is present in global as well as local scope, Python interpreter gives priority to the one in local namespace.
marks = 50 # this is a global variable def myfunction(): marks = 70 # this is a local variable print (marks) myfunction() print (marks) # prints global value
It will produce the following output −
70 50
If you try to manipulate value of a global variable from inside a function, Python raises UnboundLocalError.
marks = 50 # this is a global variable def myfunction(): marks = marks + 20 print (marks) myfunction() print (marks) # prints global value
It will produce the following output −
marks = marks + 20
^^^^^
UnboundLocalError: cannot access local variable 'marks' where it is not associated with a value
To modify a global variable, you can either update it with a dictionary syntax, or use the global keyword to refer it before modifying.
var1 = 50 # this is a global variable
var2 = 60 # this is a global variable
def myfunction():
"Change values of global variables"
globals()['var1'] = globals()['var1']+10
global var2
var2 = var2 + 20
myfunction()
print ("var1:",var1, "var2:",var2) #shows global variables with changed values
It will produce the following output −
var1: 60 var2: 80
Lastly, if you try to access a local variable in global scope, Python raises NameError as the variable in local scope can't be accessed outside it.
var1 = 50 # this is a global variable
var2 = 60 # this is a global variable
def myfunction(x, y):
total = x+y
print ("Total is a local variable: ", total)
myfunction(var1, var2)
print (total) # This gives NameError
It will produce the following output −
Total is a local variable: 110
Traceback (most recent call last):
File "C:\Users\user\examples\main.py", line 9, in <module>
print (total) # This gives NameError
^^^^^
NameError: name 'total' is not defined
Python - Function Annotations
The function annotation feature of Python enables you to add additional explanatory metada about the arguments declared in a function definition, and also the return data type.
Although you can use the docstring feature of Python for documentation of a function, it may be obsolete if certain changes in the function's prototype are made. Hence, the annotation feature was introduced in Python as a result of PEP 3107.
The annotations are not considered by Python interpreter while executing the function. They are mainly for the Python IDEs for providing a detailed documentation to the programmer.
Annotations are any valid Python expressions added to the arguments or return data type. Simplest example of annotation is to prescribe the data type of the arguments. Annotation is mentioned as an expression after putting a colon in front of the argument.
def myfunction(a: int, b: int): c = a+b return c
Remember that Python is a dynamically typed language, and doesn't enforce any type checking at runtime. Hence annotating the arguments with data types doesn't have any effect while calling the function. Even if non-integer arguments are given, Python doesn't detect any error.
def myfunction(a: int, b: int):
c = a+b
return c
print (myfunction(10,20))
print (myfunction("Hello ", "Python"))
It will produce the following output −
30 Hello Python
Annotations are ignored at runtime, but are helpful for the IDEs and static type checker libraries such as mypy.
You can give annotation for the return data type as well. After the parentheses and before the colon symbol, put an arrow (->) followed by the annotation. For example −
def myfunction(a: int, b: int) -> int: c = a+b return c
As using the data type as annotation is ignored at runtime, you can put any expression which acts as the metadata for the arguments. Hence, function may have any arbitrary expression as annotation as in following example −
def total(x : 'marks in Physics', y: 'marks in chemistry'): return x+y
If you want to specify a default argument along with the annotation, you need to put it after the annotation expression. Default arguments must come after the required arguments in the argument list.
def myfunction(a: "physics", b:"Maths" = 20) -> int: c = a+b return c print (myfunction(10))
The function in Python is also an object, and one of its attributes is __annotations__. You can check with dir() function.
print (dir(myfunction))
This will print the list of myfunction object containing __annotations__ as one of the attributes.
['__annotations__', '__builtins__', '__call__', '__class__', '__closure__', '__code__', '__defaults__', '__delattr__', '__dict__', '__dir__', '__doc__', '__eq__', '__format__', '__ge__', '__get__', '__getattribute__', '__getstate__', '__globals__', '__gt__', '__hash__', '__init__', '__init_subclass__', '__kwdefaults__', '__le__', '__lt__', '__module__', '__name__', '__ne__', '__new__', '__qualname__', '__reduce__', '__reduce_ex__', '__repr__', '__setattr__', '__sizeof__', '__str__', '__subclasshook__']
The __annotations__ attribute itself is a dictionary in which arguments are keys and anootations their values.
def myfunction(a: "physics", b:"Maths" = 20) -> int: c = a+b return c print (myfunction.__annotations__)
It will produce the following output −
{'a': 'physics', 'b': 'Maths', 'return': <class 'int'>}
You may have arbitrary positional and/or arbitrary keyword arguments for a function. Annotations can be given for them also.
def myfunction(*args: "arbitrary args", **kwargs: "arbitrary keyword args") -> int: pass print (myfunction.__annotations__)
It will produce the following output −
{'args': 'arbitrary args', 'kwargs': 'arbitrary keyword args', 'return': <class 'int'>}
In case you need to provide more than one annotation expressions to a function argument, give it in the form of a dictionary object in front of the argument itself.
def division(num: dict(type=float, msg='numerator'), den: dict(type=float, msg='denominator')) -> float: return num/den print (division.__annotations__)
It will produce the following output −
{'num': {'type': <class 'float'>, 'msg': 'numerator'}, 'den': {'type': <class 'float'>, 'msg': 'denominator'}, 'return': <class 'float'>}
Python - Modules
A function is a block of organized, reusable code that is used to perform a single, related action. Functions provide better modularity for your application and a high degree of code reusing.
The concept of module in Python further enhances the modularity. You can define more than one related functions together and load required functions. A module is a file containing definition of functions, classes, variables, constants or any other Python object. Contents of this file can be made available to any other program. Python has the import keyword for this purpose.
Example
import math
print ("Square root of 100:", math.sqrt(100))
It will produce the following output −
Square root of 100: 10.0
Built in Modules
Python's standard library comes bundled with a large number of modules. They are called built-in modules. Most of these built-in modules are written in C (as the reference implementation of Python is in C), and pre-compiled into the library. These modules pack useful functionality like system-specific OS management, disk IO, networking, etc.
Here is a select list of built-in modules −
| Sr.No. | Name & Brief Description |
|---|---|
1 |
os This module provides a unified interface to a number of operating system functions. |
2 |
string This module contains a number of functions for string processing |
3 |
re This module provides a set of powerful regular expression facilities. Regular expression (RegEx), allows powerful string search and matching for a pattern in a string |
4 |
math This module implements a number of mathematical operations for floating point numbers. These functions are generally thin wrappers around the platform C library functions. |
5 |
cmath This module contains a number of mathematical operations for complex numbers. |
6 |
datetime This module provides functions to deal with dates and the time within a day. It wraps the C runtime library. |
7 |
gc This module provides an interface to the built-in garbage collector. |
8 |
asyncio This module defines functionality required for asynchronous processing |
9 |
Collections This module provides advanced Container datatypes. |
10 |
Functools This module has Higher-order functions and operations on callable objects. Useful in functional programming |
11 |
operator Functions corresponding to the standard operators. |
12 |
pickle Convert Python objects to streams of bytes and back. |
13 |
socket Low-level networking interface. |
14 |
sqlite3 A DB-API 2.0 implementation using SQLite 3.x. |
15 |
statistics Mathematical statistics functions |
16 |
typing Support for type hints |
17 |
venv Creation of virtual environments. |
18 |
json Encode and decode the JSON format. |
19 |
wsgiref WSGI Utilities and Reference Implementation. |
20 |
unittest Unit testing framework for Python. |
21 |
random Generate pseudo-random numbers |
User Defined Modules
Any text file with .py extension and containing Python code is basically a module. It can contain definitions of one or more functions, variables, constants as well as classes. Any Python object from a module can be made available to interpreter session or another Python script by import statement. A module can also include runnable code.
Create a Module
Creating a module is nothing but saving a Python code with the help of any editor. Let us save the following code as mymodule.py
def SayHello(name):
print ("Hi {}! How are you?".format(name))
return
You can now import mymodule in the current Python terminal.
>>> import mymodule
>>> mymodule.SayHello("Harish")
Hi Harish! How are you?
You can also import one module in another Python script. Save the following code as example.py
import mymodule
mymodule.SayHello("Harish")
Run this script from command terminal
C:\Users\user\examples> python example.py Hi Harish! How are you?
The import Statement
In Python, the import keyword has been provided to load a Python object from one module. The object may be a function, class, a variable etc. If a module contains multiple definitions, all of them will be loaded in the namespace.
Let us save the following code having three functions as mymodule.py.
def sum(x,y): return x+y def average(x,y): return (x+y)/2 def power(x,y): return x**y
The import mymodule statement loads all the functions in this module in the current namespace. Each function in the imported module is an attribute of this module object.
>>> dir(mymodule) ['__builtins__', '__cached__', '__doc__', '__file__', '__loader__', '__name__', '__package__', '__spec__', 'average', 'power', 'sum']
To call any function, use the module object's reference. For example, mymodule.sum().
import mymodule
print ("sum:",mymodule.sum(10,20))
print ("average:",mymodule.average(10,20))
print ("power:",mymodule.power(10, 2))
It will produce the following output −
sum:30 average:15.0 power:100
The from ... import Statement
The import statement will load all the resources of the module in the current namespace. It is possible to import specific objects from a module by using this syntax. For example −
Out of three functions in mymodule, only two are imported in following executable script example.py
from mymodule import sum, average
print ("sum:",sum(10,20))
print ("average:",average(10,20))
It will produce the following output −
sum: 30 average: 15.0
Note that function need not be called by prefixing name of its module to it.
The from...import * Statement
It is also possible to import all the names from a module into the current namespace by using the following import statement −
from modname import *
This provides an easy way to import all the items from a module into the current namespace; however, this statement should be used sparingly.
The import ... as Statement
You can assign an alias name to the imported module.
from modulename as alias
The alias should be prefixed to the function while calling.
Take a look at the following example −
import mymodule as x
print ("sum:",x.sum(10,20))
print ("average:", x.average(10,20))
print ("power:", x.power(10, 2))
Module Attributes
In Python, a module is an object of module class, and hence it is characterized by attributes.
Following are the module attributes −
__file__ returns the physical name of the module.
__package__ returns the package to which the module belongs.
__doc__ returns the docstring at the top of the module if any
__dict__ returns the entire scope of the module
__name__ returns the name of the module
Example
Assuming that the following code is saved as mymodule.py
"The docstring of mymodule" def sum(x,y): return x+y def average(x,y): return (x+y)/2 def power(x,y): return x**y
Let us check the attributes of mymodule by importing it in the following script −
import mymodule
print ("__file__ attribute:", mymodule.__file__)
print ("__doc__ attribute:", mymodule.__doc__)
print ("__name__ attribute:", mymodule.__name__)
It will produce the following output −
__file__ attribute: C:\Users\mlath\examples\mymodule.py __doc__ attribute: The docstring of mymodule __name__ attribute: mymodule
The __name__Attribute
The __name__ attribute of a Python module has great significance. Let us explore it in more detail.
In an interactive shell, __name__ attribute returns '__main__'
>>> __name__ '__main__'
If you import any module in the interpreter session, it returns the name of the module as the __name__ attribute of that module.
>>> import math >>> math.__name__ 'math'
From inside a Python script, the __name__ attribute returns '__main__'
#example.py
print ("__name__ attribute within a script:", __name__)
Run this in the command terminal −
__name__ attribute within a script: __main__
This attribute allows a Python script to be used as executable or as a module. Unlike in C++, Java, C# etc., in Python, there is no concept of the main() function. The Python program script with .py extension can contain function definitions as well as executable statements.
Save mymodule.py and with the following code −
"The docstring of mymodule"
def sum(x,y):
return x+y
print ("sum:",sum(10,20))
You can see that sum() function is called within the same script in which it is defined.
C:\Users\user\examples> python mymodule.py sum: 30
Now let us import this function in another script example.py.
import mymodule
print ("sum:",mymodule.sum(10,20))
It will produce the following output −
C:\Users\user\examples> python example.py sum: 30 sum: 30
The output "sum:30" appears twice. Once when mymodule module is imported. The executable statements in imported module are also run. Second output is from the calling script, i.e., example.py program.
What we want to happen is that when a module is imported, only the function should be imported, its executable statements should not run. This can be done by checking the value of __name__. If it is __main__, means it is being run and not imported. Include the executable statements like function calls conditionally.
Add if statement in mymodule.py as shown −
"The docstring of mymodule"
def sum(x,y):
return x+y
if __name__ == "__main__":
print ("sum:",sum(10,20))
Now if you run example.py program, you will find that the sum:30 output appears only once.
C:\Users\user\examples> python example.py sum: 30
The reload() Function
Sometimes you may need to reload a module, especially when working with the interactive interpreter session of Python.
Assume that we have a test module (test.py) with the following function −
def SayHello(name):
print ("Hi {}! How are you?".format(name))
return
We can import the module and call its function from Python prompt as −
>>> import test
>>> test.SayHello("Deepak")
Hi Deepak! How are you?
However, suppose you need to modify the SayHello() function, such as −
def SayHello(name, course):
print ("Hi {}! How are you?".format(name))
print ("Welcome to {} Tutorial by TutorialsPoint".format(course))
return
Even if you edit the test.py file and save it, the function loaded in the memory won't update. You need to reload it, using reload() function in imp module.
>>> import imp
>>> imp.reload(test)
>>> test.SayHello("Deepak", "Python")
Hi Deepak! How are you?
Welcome to Python Tutorial by TutorialsPoint
Python - Built-in Functions
As of Python 3.11.2 version, there are 71 built-in functions in Pyhthon. The list of built-in functions is given below −
| Sr.No. | Function & Description |
|---|---|
1 |
abs() Returns absolute value of a number |
2 |
aiter() Returns an asynchronous iterator for an asynchronous iterable |
3 |
all() Returns true when all elements in iterable is true |
4 |
anext() Returns the next item from the given asynchronous iterator |
5 |
any() Checks if any Element of an Iterable is True |
6 |
ascii() Returns String Containing Printable Representation |
7 |
bin() Converts integer to binary string |
8 |
bool() Converts a Value to Boolean |
9 |
breakpoint() This function drops you into the debugger at the call site and calls sys.breakpointhook() |
10 |
bytearray() returns array of given byte size |
11 |
bytes() returns immutable bytes object |
12 |
callable() Checks if the Object is Callable |
13 |
chr() Returns a Character (a string) from an Integer |
14 |
classmethod() Returns class method for given function |
15 |
compile() Returns a code object |
16 |
complex() Creates a Complex Number |
17 |
delattr() Deletes Attribute From the Object |
18 |
dict() Creates a Dictionary |
19 |
dir() Tries to Return Attributes of Object |
20 |
divmod() Returns a Tuple of Quotient and Remainder |
21 |
enumerate() Returns an Enumerate Object |
22 |
eval() Runs Code Within Program |
23 |
exec() Executes Dynamically Created Program |
24 |
filter() Constructs iterator from elements which are true |
25 |
float() Returns floating point number from number, string |
26 |
format() Returns formatted representation of a value |
27 |
frozenset() Returns immutable frozenset object |
28 |
getattr() Returns value of named attribute of an object |
29 |
globals() Returns dictionary of current global symbol table |
30 |
hasattr() Returns whether object has named attribute |
31 |
hash() Returns hash value of an object |
32 |
help() Invokes the built-in Help System |
33 |
hex() Converts to Integer to Hexadecimal |
34 |
id() Returns Identify of an Object |
35 |
input() Reads and returns a line of string |
36 |
int() Returns integer from a number or string |
37 |
isinstance() Checks if a Object is an Instance of Class |
38 |
issubclass() Checks if a Class is Subclass of another Class |
39 |
iter() Returns an iterator |
40 |
len() Returns Length of an Object |
41 |
list() Creates a list in Python |
42 |
locals() Returns dictionary of a current local symbol table |
43 |
map() Applies Function and Returns a List |
44 |
max() Returns the largest item |
45 |
memoryview() Returns memory view of an argument |
46 |
min() Returns the smallest value |
47 |
next() Retrieves next item from the iterator |
48 |
object() Creates a featureless object |
49 |
oct() Returns the octal representation of an integer |
50 |
open() Returns a file object |
51 |
ord() Returns an integer of the Unicode character |
52 |
pow() Returns the power of a number |
53 |
print() Prints the Given Object |
54 |
property() Returns the property attribute |
55 |
range() Returns a sequence of integers |
56 |
repr() Returns a printable representation of the object |
57 |
reversed() Returns the reversed iterator of a sequence |
58 |
round() Rounds a number to specified decimals |
59 |
set() Constructs and returns a set |
60 |
setattr() Sets the value of an attribute of an object |
61 |
slice() Returns a slice object |
62 |
sorted() Returns a sorted list from the given iterable |
63 |
staticmethod() Transforms a method into a static method |
64 |
str() Returns the string version of the object |
65 |
sum() Adds items of an Iterable |
66 |
super() Returns a proxy object of the base class |
67 |
tuple() Returns a tuple |
68 |
type() Returns the type of the object |
69 |
vars() Returns the __dict__ attribute |
70 |
zip() Returns an iterator of tuples |
71 |
__import__() Function called by the import statement |
Built-in Mathematical Functions
Following mathematical functions are built into the Python interpreter, hence you don't need to import them from any module.
| Sr.No. | Function & Description |
|---|---|
1 |
The abs() function returns the absolute value of x, i.e. the positive distance between x and zero. |
2 |
The max() function returns the largest of its arguments or largest number from the iterable (list or tuple). |
3 |
The function min() returns the smallest of its arguments i.e. the value closest to negative infinity, or smallest number from the iterable (list or tuple) |
4 |
The pow() function returns x raised to y. It is equivalent to x**y. The function has third optional argument mod. If given, it returns (x**y) % mod value |
5 |
round() is a built-in function in Python. It returns x rounded to n digits from the decimal point. |
6 |
The sum() function returns the sum of all numeric items in any iterable (list or tuple). An optional start argument is 0 by default. If given, the numbers in the list are added to start value. |
Python - Strings
In Python, a string is an immutable sequence of Unicode characters. Each character has a unique numeric value as per the UNICODE standard. But, the sequence as a whole, doesn't have any numeric value even if all the characters are digits. To differentiate the string from numbers and other identifiers, the sequence of characters is included within single, double or triple quotes in its literal representation. Hence, 1234 is a number (integer) but '1234' is a string.
As long as the same sequence of characters is enclosed, single or double or triple quotes don't matter. Hence, following string representations are equivalent.
>>> 'Welcome To TutorialsPoint' 'Welcome To TutorialsPoint' >>> "Welcome To TutorialsPoint" 'Welcome To TutorialsPoint' >>> '''Welcome To TutorialsPoint''' 'Welcome To TutorialsPoint' >>> """Welcome To TutorialsPoint""" 'Welcome To TutorialsPoint'
Looking at the above statements, it is clear that, internally Python stores strings as included in single quotes.
A string in Python is an object of str class. It can be verified with type() function.
var = "Welcome To TutorialsPoint" print (type(var))
It will produce the following output −
<class 'str'>
You want to embed some text in double quotes as a part of string, the string itself should be put in single quotes. To embed a single quoted text, string should be written in double quotes.
var = 'Welcome to "Python Tutorial" from TutorialsPoint'
print ("var:", var)
var = "Welcome to 'Python Tutorial' from TutorialsPoint"
print ("var:", var)
To form a string with triple quotes, you may use triple single quotes, or triple double quotes − both versions are similar.
var = '''Welcome to TutorialsPoint'''
print ("var:", var)
var = """Welcome to TutorialsPoint"""
print ("var:", var)
Triple quoted string is useful to form a multi-line string.
var = '''
Welcome To
Python Tutorial
from TutorialsPoint
'''
print ("var:", var)
It will produce the following output −
var: Welcome To Python Tutorial from TutorialsPoint
A string is a non-numeric data type. Obviously, we cannot use arithmetic operators with string operands. Python raises TypeError in such a case.
>>> "Hello"-"World" Traceback (most recent call last): File "<stdin>", line 1, in <module> TypeError: unsupported operand type(s) for -: 'str' and 'str'
Python Slicing Strings
In Python, a string is an ordered sequence of Unicode characters. Each character in the string has a unique index in the sequence. The index starts with 0. First character in the string has its positional index 0. The index keeps incrementing towards the end of string.
If a string variable is declared as var="HELLO PYTHON", index of each character in the string is as follows −

Python allows you to access any individual character from the string by its index. In this case, 0 is the lower bound and 11 is the upper bound of the string. So, var[0] returns H, var[6] returns P. If the index in square brackets exceeds the upper bound, Python raises IndexError.
>>> var="HELLO PYTHON" >>> var[0] 'H' >>> var[7] 'Y' >>> var[11] 'N' >>> var[12] Traceback (most recent call last): File "<stdin>", line 1, in <module> IndexError: string index out of range
One of the unique features of Python sequence types (and therefore a string object) it has a negative indexing scheme also. In the example above, a positive indexing scheme is used where the index increments from left to right. In case of negative indexing, the character at the end has -1 index and the index decrements from right to left, as a result the first character H has -12 index.

Let us use negative indexing to fetch N, Y, and H characters.
>>> var[-1] 'N' >>> var[-5] 'Y' >>> var[-12] 'H' >>> var[-13] Traceback (most recent call last): File "<stdin>", line 1, in <module> IndexError: string index out of range
Once again, if the index goes beyond the range, IndexError is encountered.
We can therefore use positive or negative index to retrieve a character from the string.
>>> var[0], var[-12]
('H', 'H')
>>> var[7], var[-5]
('Y', 'Y')
>>> var[11], var[-1]
('N', 'N')
In Python, string is an immutable object. The object is immutable if it cannot be modified in-place, once stored in a certain memory location. You can retrieve any character from the string with the help of its index, but you cannot replace it with another character. In our example, character Y is at index 7 in HELLO PYTHON. Try to replace Y with y and see what happens.
var="HELLO PYTHON" var[7]="y" print (var)
It will produce the following output −
Traceback (most recent call last): File "C:\Users\users\example.py", line 2, in <module> var[7]="y" ~~~^^^ TypeError: 'str' object does not support item assignment
The TypeError is because the string is immutable.
Python defines ":" as string slicing operator. It returns a substring from the original string. Its general usage is −
substr=var[x:y]
The ":" operator needs two integer operands (both of which may be omitted, as we shall see in subsequent examples). The first operand x is the index of the first character of the desired slice. The second operand y is the index of the character next to the last in the desired string. So var(x:y] separates characters from xth position to (y-1)th position from the original string.
var="HELLO PYTHON"
print ("var:",var)
print ("var[3:8]:", var[3:8])
It will produce the following output −
var: HELLO PYTHON var[3:8]: LO PY
Negative indexes can also be used for slicing.
var="HELLO PYTHON"
print ("var:",var)
print ("var[3:8]:", var[3:8])
print ("var[-9:-4]:", var[-9:-4])
It will produce the following output −
var: HELLO PYTHON var[3:8]: LO PY var[-9:-4]: LO PY
Both the operands for Python's Slice operator are optional. The first operand defaults to zero, which means if we do not give the first operand, the slice starts of character at 0th index, i.e. the first character. It slices the leftmost substring up to "y-1" characters.
var="HELLO PYTHON"
print ("var:",var)
print ("var[0:5]:", var[0:5])
print ("var[:5]:", var[:5])
It will produce the following output −
var: HELLO PYTHON var[0:5]: HELLO var[:5]: HELLO
Similarly, y operand is also optional. By default, it is "-1", which means the string will be sliced from the xth position up to the end of string.
var="HELLO PYTHON"
print ("var:",var)
print ("var[6:12]:", var[6:12])
print ("var[6:]:", var[6:])
It will produce the following output −
var: HELLO PYTHON var[6:12]: PYTHON var[6:]: PYTHON
Naturally, if both the operands are not used, the slice will be equal to the original string. That's because "x" is 0, and "y" is the last index+1 (or -1) by default.
var="HELLO PYTHON"
print ("var:",var)
print ("var[0:12]:", var[0:12])
print ("var[:]:", var[:])
It will produce the following output −
var: HELLO PYTHON var[0:12]: HELLO PYTHON var[:]: HELLO PYTHON
The left operand must be smaller than the operand on right, for getting a substring of the original string. Python doesn't raise any error, if the left operand is greater, bu returns a null string.
var="HELLO PYTHON"
print ("var:",var)
print ("var[-1:7]:", var[-1:7])
print ("var[7:0]:", var[7:0])
It will produce the following output −
var: HELLO PYTHON var[-1:7]: var[7:0]:
Slicing returns a new string. You can very well perform string operations like concatenation, or slicing on the sliced string.
var="HELLO PYTHON"
print ("var:",var)
print ("var[:6][:2]:", var[:6][:2])
var1=var[:6]
print ("slice:", var1)
print ("var1[:2]:", var1[:2])
It will produce the following output −
var: HELLO PYTHON var[:6][:2]: HE slice: HELLO var1[:2]: HE
Python - Modify Strings
In Python, a string (object of str class) is of immutable type. An immutable object is the one which can be modified in place, one created in the memory. Hence, unlike a list, any character in the sequence cannot be overwritten, nor can we insert or append characters to it unless we use certain string method that returns a new string object.
However, we can use one of the following tricks as a workaround to modify a string.
Converting a String to a List
Since both string and list objects are sequences, they are interconvertible. Hence, if we cast a string object to a list, modify the list either by insert(), append() or remove() methods and convert the list back to a string, to get back the modified version.
We have a string variable s1 with WORD as its value. With list() built-in function, let us convert it to a l1 list object, and insert a character L at index 3. The we use the join() method in str class to concatenate all the characters.
s1="WORD"
print ("original string:", s1)
l1=list(s1)
l1.insert(3,"L")
print (l1)
s1=''.join(l1)
print ("Modified string:", s1)
It will produce the following output −
original string: WORD ['W', 'O', 'R', 'L', 'D'] Modified string: WORLD
Using the Array Module
To modify a string, construct an array object. Python standard library includes array module. We can have an array of Unicode type from a string variable.
import array as ar
s1="WORD"
sar=ar.array('u', s1)
Items in the array have a zero based index. So, we can perform array operations such as append, insert, remove etc. Let us insert L before the character D
sar.insert(3,"L")
Now, with the help of tounicode() method, get back the modified string
import array as ar
s1="WORD"
print ("original string:", s1)
sar=ar.array('u', s1)
sar.insert(3,"L")
s1=sar.tounicode()
print ("Modified string:", s1)
It will produce the following output −
original string: WORD Modified string: WORLD
Using the StringIO Class
Python's io module defines the classes to handle streams. The StringIO class represents a text stream using an in-memory text buffer. A StringIO object obtained from a string behaves like a File object. Hence we can perform read/write operations on it. The getvalue() method of StringIO class returns a string.
Let us use this principle in the following program to modify a string.
import io
s1="WORD"
print ("original string:", s1)
sio=io.StringIO(s1)
sio.seek(3)
sio.write("LD")
s1=sio.getvalue()
print ("Modified string:", s1)
It will produce the following output −
original string: WORD Modified string: WORLD
Python - String Concatenation
The "+" operator is well-known as an addition operator, returning the sum of two numbers. However, the "+" symbol acts as string concatenation operator in Python. It works with two string operands, and results in the concatenation of the two.
The characters of the string on the right of plus symbol are appended to the string on its left. Result of concatenation is a new string.
str1="Hello"
str2="World"
print ("String 1:",str1)
print ("String 2:",str2)
str3=str1+str2
print("String 3:",str3)
It will produce the following output −
String 1: Hello String 2: World String 3: HelloWorld
To insert a whitespace between the two, use a third empty string.
str1="Hello"
str2="World"
blank=" "
print ("String 1:",str1)
print ("String 2:",str2)
str3=str1+blank+str2
print("String 3:",str3)
It will produce the following output −
String 1: Hello String 2: World String 3: Hello World
Another symbol *, which we normally use for multiplication of two numbers, can also be used with string operands. Here, * acts as a repetition operator in Python. One of the operands must be an integer, and the second a string. The operator concatenates multiple copies of the string. For example −
>>> "Hello"*3 'HelloHelloHello'
The integer operand is the number of copies of the string operand to be concatenated.
Both the string operators, (*) the repetition operator and (+) the concatenation operator, can be used in a single expression. The "*" operator has a higher precedence over the "+" operator.
str1="Hello"
str2="World"
print ("String 1:",str1)
print ("String 2:",str2)
str3=str1+str2*3
print("String 3:",str3)
str4=(str1+str2)*3
print ("String 4:", str4)
To form str3 string, Python concatenates 3 copies of World first, and then appends the result to Hello
String 3: HelloWorldWorldWorld
In the second case, the strings str1 and str2 are inside parentheses, hence their concatenation takes place first. Its result is then replicated three times.
String 4: HelloWorldHelloWorldHelloWorld
Apart from + and *, no other arithmetic operator symbols can be used with string operands.
Python - String Formatting
String formatting is the process of building a string representation dynamically by inserting the value of numeric expressions in an already existing string. Python's string concatenation operator doesn't accept a non-string operand. Hence, Python offers following string formatting techniques −
Python - Escape Characters
In Python, a string becomes a raw string if it is prefixed with "r" or "R" before the quotation symbols. Hence 'Hello' is a normal string whereas r'Hello' is a raw string.
>>> normal="Hello" >>> print (normal) Hello >>> raw=r"Hello" >>> print (raw) Hello
In normal circumstances, there is no difference between the two. However, when the escape character is embedded in the string, the normal string actually interprets the escape sequence, whereas the raw string doesn't process the escape character.
>>> normal="Hello\nWorld" >>> print (normal) Hello World >>> raw=r"Hello\nWorld" >>> print (raw) Hello\nWorld
In the above example, when a normal string is printed the escape character '\n' is processed to introduce a newline. However, because of the raw string operator 'r' the effect of escape character is not translated as per its meaning.
The newline character \n is one of the escape sequences identified by Python. Escape sequence invokes an alternative implementation character subsequence to "\". In Python, "\" is used as escape character. Following table shows list of escape sequences.
Unless an 'r' or 'R' prefix is present, escape sequences in string and bytes literals are interpreted according to rules similar to those used by Standard C. The recognized escape sequences are −
| Sr.No | Escape Sequence & Meaning |
|---|---|
| 1 | \<newline> Backslash and newline ignored |
| 2 | \\ Backslash (\) |
| 3 | \' Single quote (') |
| 4 | \" Double quote (") |
| 5 | \a ASCII Bell (BEL) |
| 6 | \b ASCII Backspace (BS) |
| 7 | \f ASCII Formfeed (FF) |
| 8 | \n ASCII Linefeed (LF) |
| 9 | \r ASCII Carriage Return (CR) |
| 10 | \t ASCII Horizontal Tab (TAB) |
| 11 | \v ASCII Vertical Tab (VT) |
| 12 | \ooo Character with octal value ooo |
| 13 | \xhh Character with hex value hh |
Example
The following code shows the usage of escape sequences listed in the above table −
# ignore \ s = 'This string will not include \ backslashes or newline characters.' print (s) # escape backslash s=s = 'The \\character is called backslash' print (s) # escape single quote s='Hello \'Python\'' print (s) # escape double quote s="Hello \"Python\"" print (s) # escape \b to generate ASCII backspace s='Hel\blo' print (s) # ASCII Bell character s='Hello\a' print (s) # newline s='Hello\nPython' print (s) # Horizontal tab s='Hello\tPython' print (s) # form feed s= "hello\fworld" print (s) # Octal notation s="\101" print(s) # Hexadecimal notation s="\x41" print (s)
It will produce the following output −
This string will not include backslashes or newline characters. The \character is called backslash Hello 'Python' Hello "Python" Helo Hello Hello Python Hello Python hello world A A
Python - String Methods
Python's built-in str class defines different methods. They help in manipulating strings. Since string is an immutable object, these methods return a copy of the original string, performing the respective processing on it.
The string methods can be classified in following categories −
Python - String Exercises
Example 1
Python program to find number of vowels in a given string.
mystr = "All animals are equal. Some are more equal"
vowels = "aeiou"
count=0
for x in mystr:
if x.lower() in vowels: count+=1
print ("Number of Vowels:", count)
It will produce the following output −
Number of Vowels: 18
Example 2
Python program to convert a string with binary digits to integer.
mystr = '10101'
def strtoint(mystr):
for x in mystr:
if x not in '01': return "Error. String with non-binary characters"
num = int(mystr, 2)
return num
print ("binary:{} integer: {}".format(mystr,strtoint(mystr)))
It will produce the following output −
binary:10101 integer: 21
Change mystr to '10, 101'
binary:10,101 integer: Error. String with non-binary characters
Example 3
Python program to drop all digits from a string.
digits = [str(x) for x in range(10)]
mystr = 'He12llo, Py00th55on!'
chars = []
for x in mystr:
if x not in digits:
chars.append(x)
newstr = ''.join(chars)
print (newstr)
It will produce the following output −
Hello, Python!
Exercise Programs
Python program to sort the characters in a string
Python program to remove duplicate characters from a string
Python program to list unique characters with their count in a string
Python program to find number of words in a string
Python program to remove all non-alphabetic characters from a string
