- Postman - Home
- Postman - Introduction
- Postman - Environment Setup
- Postman - Environment Variables
- Postman - Authorization
- Postman - Workflows
- Postman - GET Requests
- Postman - POST Requests
- Postman - PUT Requests
- Postman - DELETE Requests
- Postman - Create Tests for CRUD
- Postman - Create Collections
- Postman - Parameterize Requests
- Postman - Collection Runner
- Postman - Assertion
- Postman - Mock Server
- Postman - Cookies
- Postman - Sessions
- Postman - Newman Overview
- Postman - Run Collections using Newman
- Postman - OAuth 2.0 Authorization
- Postman Useful Resources
- Postman - Quick Guide
- Postman - Useful Resources
- Postman - Discussion
Postman - Quick Guide
Postman - Introduction
Postman is an Application Programming Interface (API) testing tool. API acts like an interface between a couple of applications and establishes a connection between them.
Thus, an API is a collection of agreements, functions, and tools that an application can provide to its users for successful communication with another application. We require an API whenever we access an application like checking news over the phone, Facebook, and so on.
Postman was designed in the year 2012 by software developer and entrepreneur Abhinav Asthana to make API development and testing straightforward. It is a tool for testing the software of an API. It can be used to design, document, verify, create, and change APIs.
Postman has the feature of sending and observing the Hypertext Transfer Protocol (HTTP) requests and responses. It has a graphical user interface (GUI) and can be used in platforms like Linux, Windows and Mac. It can build multiple HTTP requests POST, PUT, GET, PATCH and translate them to code.
Need of Postman
Postman has a huge user base and has become a very popular tool because of the reasons listed below −
Postman comes without any licensing cost and is suitable for use for the teams with any capacity.
Postman can be used very easily by just downloading it.
Postman can be accessed very easily by logging into your own account after installation on the device.
Postman allows easy maintenance of test suites with the help of collections. Users can make a collection of API calls which can have varied requests and subfolders.
Postman is capable of building multiple API calls like SOAP, REST, and HTTP.
Postman can be used for test development by addition of checkpoints to HTTP response codes and other parameters.
Postman can be integrated with the continuous integration and either continuous delivery or continuous deployment (CI/CD) pipeline.
Postman can be integrated with Newman or Collection Runner which allows executing tests in much iteration. Thus we can avoid repeated tests.
Postman has big community support.
The Postman console allows debugging test steps.
With Postman, we can create more than one environment. Thus, a single collection can be used with various configurations.
Postman gives the option to import/export Environments and Collections, enabling easy sharing of files.
Working with Postman
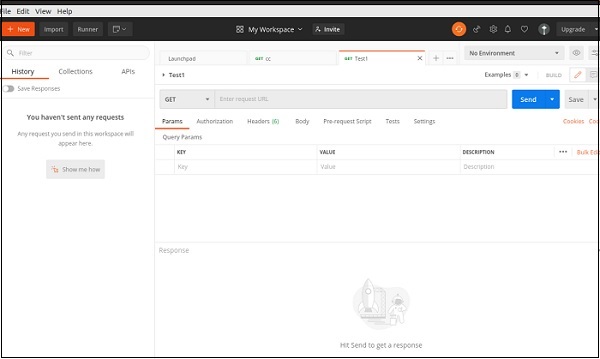
To start working with Postman, we have the navigations as shown below. It primarily consists of four sections −
- Header
- Response
- Sidebar
- Builder
Given below is the screenshot of the navigations available in Postman −
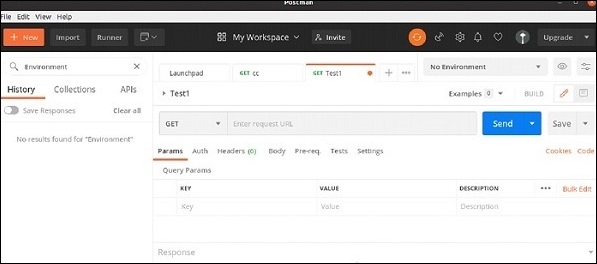
Header
Postman consists of New, Import, Runner (used to execute tests with Collection Runner), Open New, Interceptor, Sync menus, and so on. It shows the workspace name My Workspace along with the option for Invite for sharing it among teams.

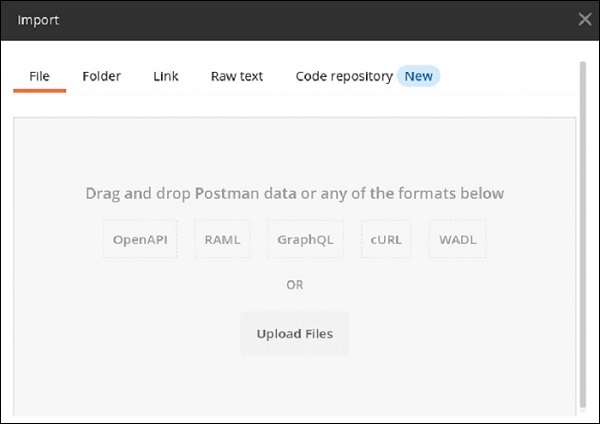
New menu is used to create a new Environment, Collection or request. The Import menu helps to import an Environment/Collection.
We can import from a File, Folder, Link, Raw text or from Code repository options which are also available under Import.
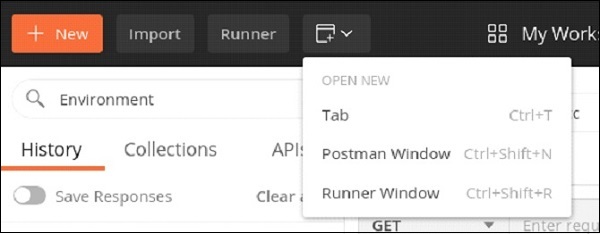
Here, Open New is used to open a new tab, Postman or a Runner Window.
Response
Response section shall have values populated only when a request is made. It generally contains the Response details.
Sidebar
Sidebar consists of Collections (used to maintain tests, containing folders, sub-folders, requests), History (records all API requests made in the past), and APIs.
Builder
Builder is the most important section of the Postman application. It has the request tab and displays the current request name. By default, Untitled Request is mentioned if no title is provided to a request.
The Builder section also contains the request type (GET, POST, PUT, and so on) and URL. A request is executed with the Send button. If there are any modifications done to a request, we can save it with the Save button.

The Builder section has the tabs like Param, Authorization, Headers, Body, Pre-req., Tests and Settings. The parameters of a request in a key-value pair are mentioned within the Params tab. The Authorization for an API with username, password, tokens, and so on are within the Authorization tab.
The request headers, body are defined within the Headers and Body tab respectively. Sometimes, there are pre-condition scripts to be executed prior to a request. These are mentioned within the Pre-req. tab.
The Tests tab contains scripts that are run when a request is triggered. This helps to validate if the API is working properly and the obtained data and Response code is correct.

Postman - Environment Setup
Postman can be installed in operating systems like Mac, Windows and Linux. It is basically an independent application which can be installed in the following ways −
Postman can be installed from the Chrome Extension (will be available only in Chrome browser).
It can be installed as a standalone application.
Standalone Application
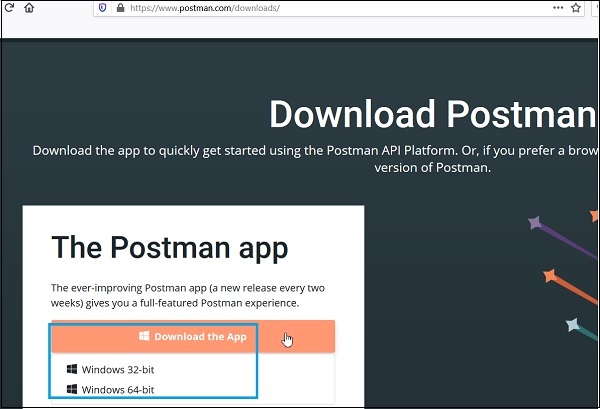
To download Postman as a standalone application in Windows, navigate to the following link https://www.postman.com/downloads/
Then, click on Download the App button. As per the configuration of the operating system, select either the Windows 32-bit or Windows 64-bit option.
The pop-up to save the executable file gets opened. Click on Save File.
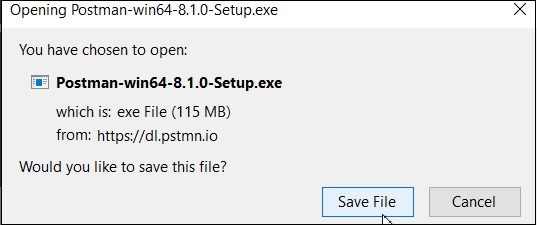
As the download is completed successfully, the executable file gets generated.

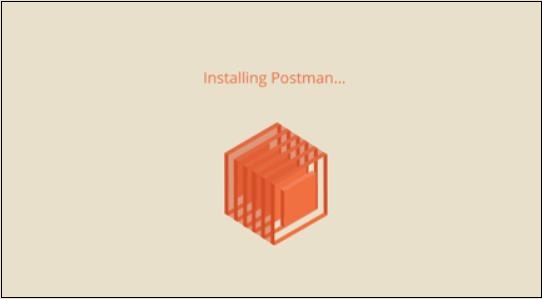
Double-click on it for installation.
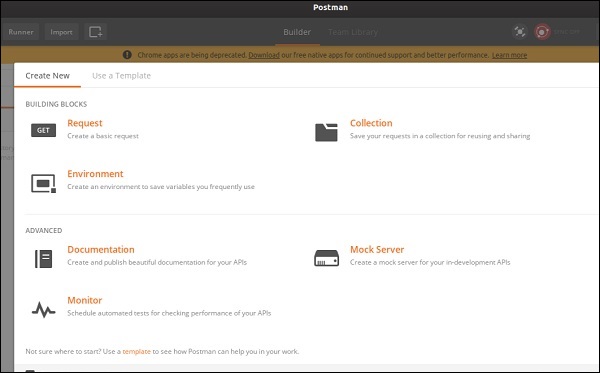
After installation, the Postman landing screen opens. Also, we have to sign up here. There are two options to create a Postman account, which are as follows −
- Click on the Create free account.
- Use the Google Account.
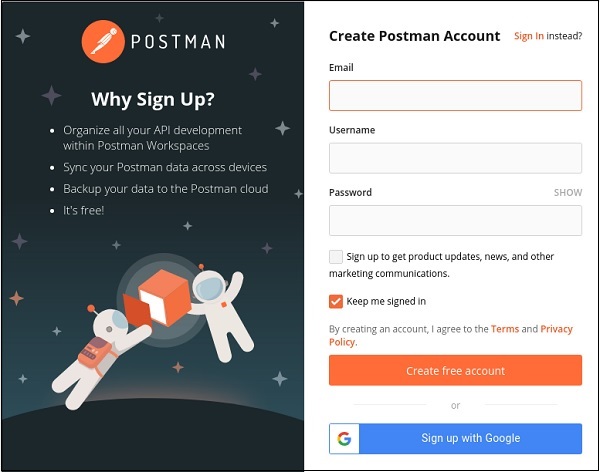
Proceed with the steps of account creation and enter relevant details like name, role, and so on.
Finally, we shall land to the Start screen of Postman. The following screen will appear on your computer −
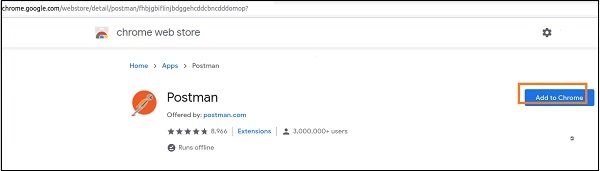
Chrome Extension
To download Postman as a Chrome browser extension, launch the below link in Chrome −
https://chrome.google.com/webstore/detail/postman/fhbjgbiflinjbdggehcddcbncdddomop?
Then, click on Add to Chrome.
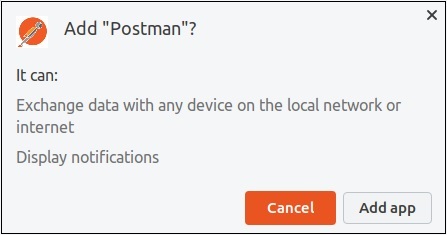
A pop-up gets displayed, click on the Add app button.
Chrome Apps page gets launched, along with the Postman icon. Next, we have to click on the Postman icon.
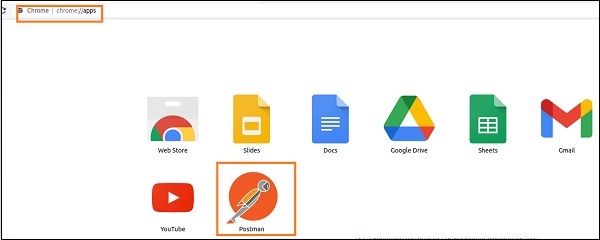
Installation of Postman kicks off.
Once the installation is completed, the Postman registration page is opened. We can either proceed with the registration as explained previously (while installing Postman as a standalone application) or skip it by clicking on the link Take me straight to the app.
We can create an account later.
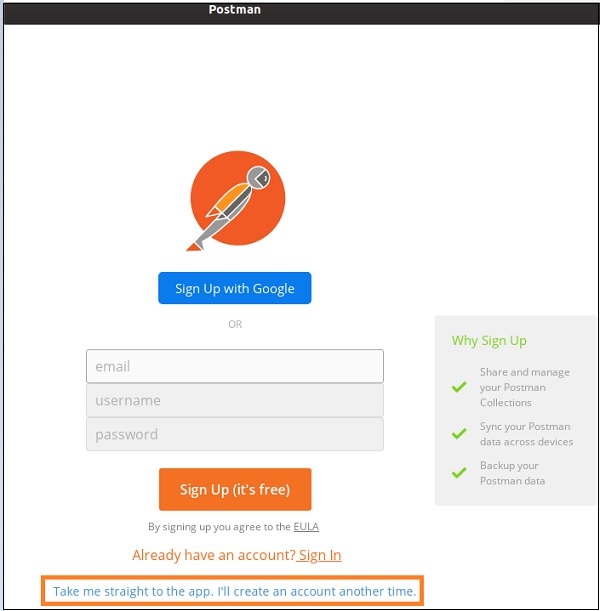
Registration is an important step as it enables access to user data from other machines. Next, the Postman welcome page opens up.
Once we close the pop-up and move to the following page, we get the message - Chrome apps are being deprecated.
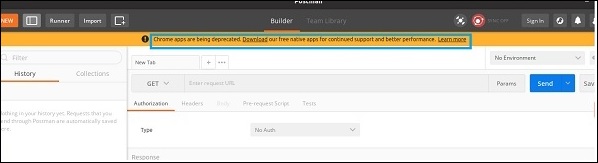
It is always recommended to install Postman as a standalone application rather than a Chrome extension.
Postman - Environment Variables
Variables give the option to hold and repeat parameters in the requests, collections, scripts and so on. If we need to modify a value, we need to do it in only one place. Thus, the variables help to minimise the chance of errors and increase efficiency.
In Postman, an environment consists of a key-value pair. It helps to identify each request separately. As we create environments, we can modify key-value pairs and that will produce varied responses from the same request.
The key in the key-value pair in the environment is known as the Environment variable. There can be multiple environments and each of them can also have multiple variables. However, we can work with a single environment at one time.
In short, an environment allows the execution of requests and collections in a varied data set. We can create environments for production, testing and development. Each of these environments will have different parameters like URL, password, and so on.
Create Environment
Follow the steps given below to create an environment in Postman −
Step 1 − Navigate to the New menu and then click on Environment.
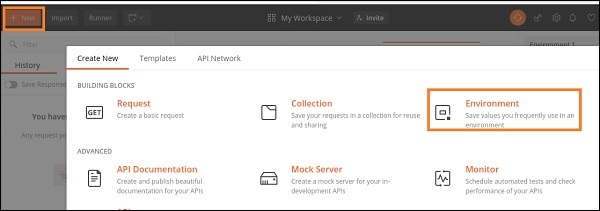
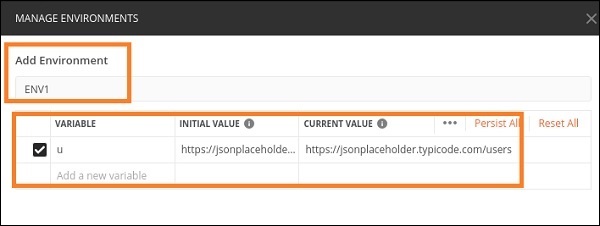
Step 2 − MANAGE ENVIRONMENTS pop-up gets opened. We have to enter the Environment name. Then, add a variable name and value.
Here, we have added the variable u and the value as https://jsonplaceholder.typicode.com/users. Close the pop-up.
Step 3 − The new Environment (ENV1) gets reflected as one of the items in the No Environment dropdown.
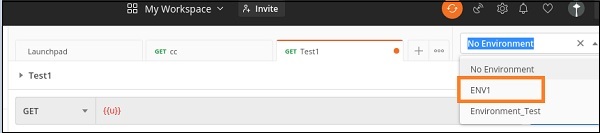
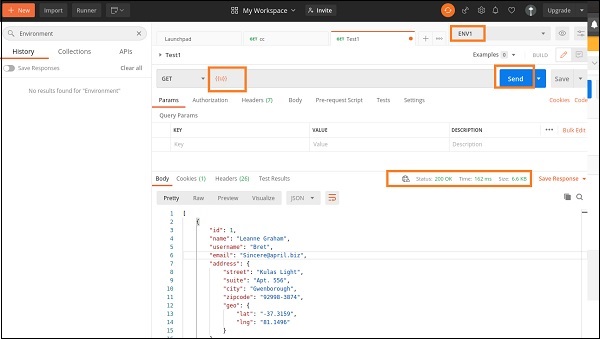
Step 4 − Select the ENV1 environment and enter {{u}} in the address bar. To utilise an Environment variable in a request, we have to enclose it with double curly braces ({{<Environment variable name>}}).
Step 5 − Then, click on Send. This variable can be used instead of the actual URL. We have received the Response code 200 0K (meaning the request is successful).
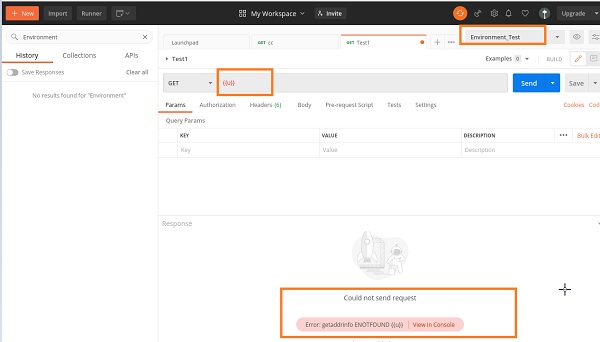
Environment Variables Scope
The scope of an Environment variable is within the environment for which it is created. This means it has a local scope confined to that environment. If we select another environment, and try to access the same Environment variable, we shall get an error.
In this chapter, we have created an Environment variable u within the ENV1 environment and on sending a GET request, we got the desired response.
However, if we try to use the same Environment variable u from another Environment, say Environment_Test, we will receive errors.
The following screen shows the error, which we may get if we use the same Environment variable u from another environment −
Postman - Authorization
In Postman, authorization is done to verify the eligibility of a user to access a resource in the server. There could be multiple APIs in a project, but their access can be restricted only for certain authorized users.
The process of authorization is applied for the APIs which are required to be secured. This authorization is done for identification and to verify, if the user is entitled to access a server resource.
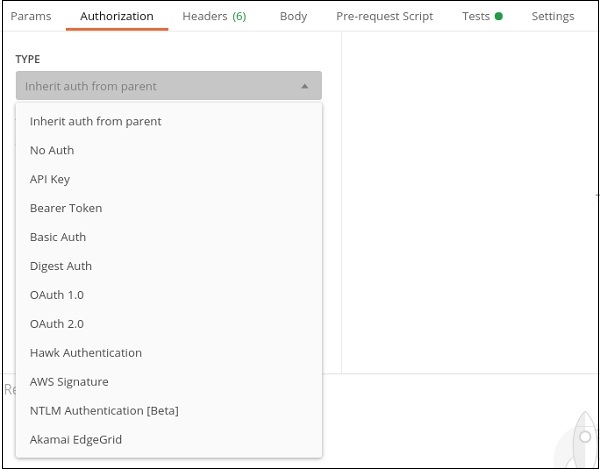
This is done within the Authorization tab in Postman, as shown below −
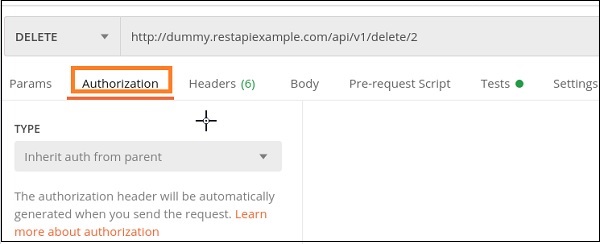
In the TYPE dropdown, there are various types of Authorization options, which are as shown below −
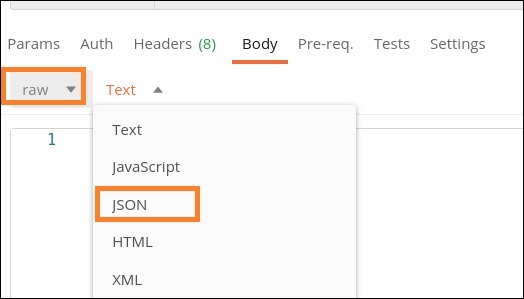
Let us now create a POST request with the APIs from GitHub Developer having an endpoint https://www.api.github.com/user/repos. In the Postman, click the Body tab and select the option raw and then choose the JSON format.
Add the below request body −
{
	"name" : "Tutorialspoint"
}
Then, click on Send.
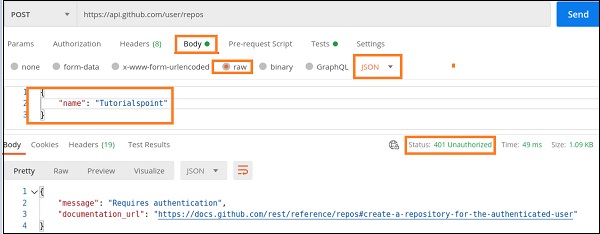
The Response code obtained is 401 Unauthorized. This means, we need to pass authorization to use this resource. To authorize, select any option from the TYPE dropdown within the Authorization tab.
Types of Authorization
Let us discuss some of the important authorization types namely Bearer Token and Basic Authentication.
Bearer Token
For Bearer Token Authorization, we have to choose the option Bearer Token from the TYPE dropdown. After this, the Token field gets displayed which needs to be provided in order to complete the Authorization.
Step 1 − To get the Token for the GitHub API, first login to the GitHub account by clicking on the link given herewith − https://github.com/login .
Step 2 − After logging in, click on the upper right corner of the screen and select the Settings option.
Now, select the option Developer settings.
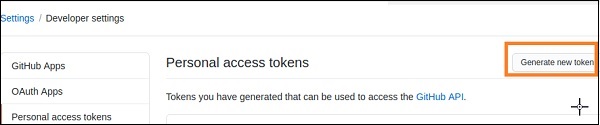
Next, click on Personal access tokens.

Now, click on the Generate new token button.
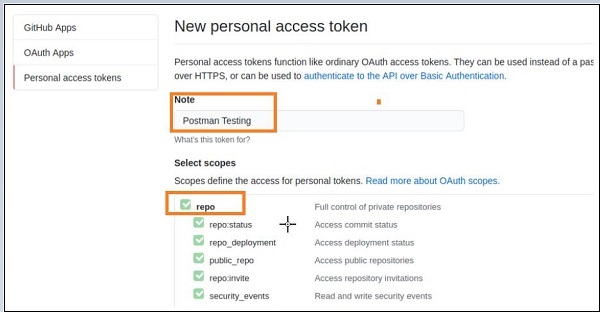
Provide a Note and select option repo. Then, click on Generate Token at the bottom of the page.
Finally, a Token gets generated.
Copy the Token and paste it within the Token field under the Authorization tab in Postman. Then, click on Send.
Please note − Here, the Token is unique to a particular GitHub account and should not be shared.
Response
The Response code is 201 Created which means that the request is successful.

Basic Authentication
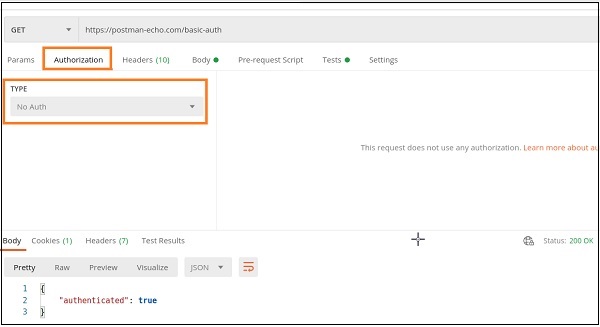
For Basic Authentication Authorization, we have to choose the option Basic Auth from the TYPE dropdown, so that the Username and Password fields get displayed.
First we shall send a GET request for an endpoint (https://postman-echo.com/basic-auth) with the option No Auth selected from the TYPE dropdown.
Please note − The username for the above endpoint is postman and password is password.
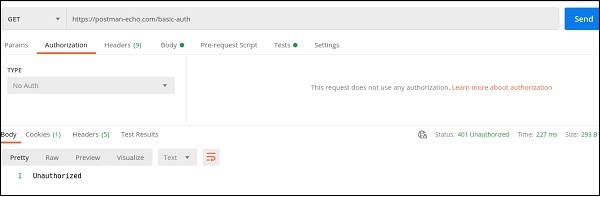
The Response Code obtained is 401 Unauthorized. This means that Authorization did not pass for this API.
Now, let us select the option Basic Auth as the Authorization type, following which the Username and Password fields get displayed.
Enter the postman for the Username and password for the Password field. Then, click on Send.
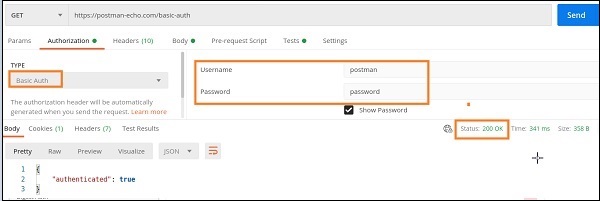
The Response code obtained is now 200 OK, which means that our request has been sent successfully.
No Auth
We can also carry out Basic Authentication using the request Header. First, we have to choose the option as No Auth from the Authorization tab. Then in the Headers tab, we have to add a key − value pair.
We shall have the key as Authorization and the value is the username and password of the user in the format as basic < encoded credential >.
The endpoint used in our example is − https://postman-echo.com/basic-auth. To encode the username and password, we shall take the help of the third party application having the URL − https://www.base64encode.org
Please note − The username for our endpoint here is postman and password is password. Enter postman − password in the edit box and click on Encode. The encoded value gets populated at the bottom.
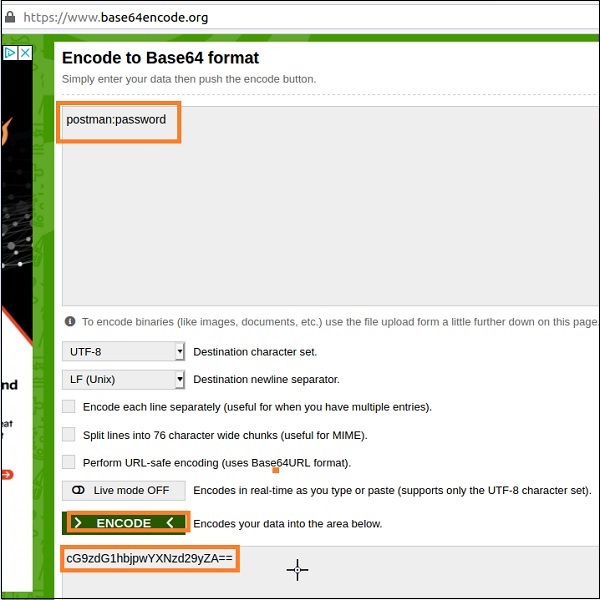
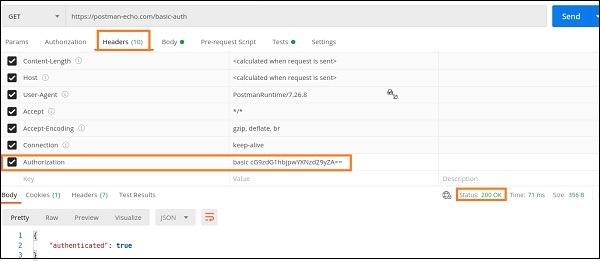
We shall add the encoded Username and Password received as cG9zdG1hbjpwYXNzd29yZA== in the Header in the format -basic cG9zdG1hbjpwYXNzd29yZA ==. Then, click on Send.
No Auth selected from the TYPE dropdown.
The Response code obtained is 200 OK, which means that our request has been sent successfully.
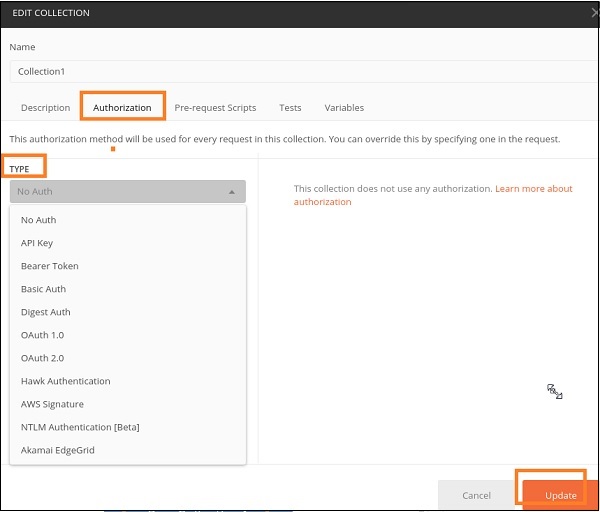
Authorization at Collections
To add Authorization for a Collection, following the steps given below −
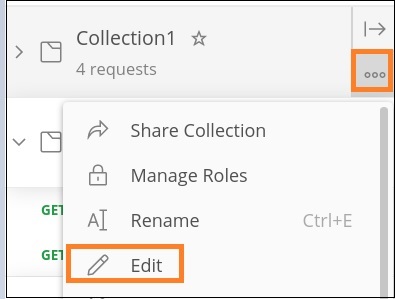
Step 1 − Click on the three dots beside the Collection name in Postman and select the option Edit.
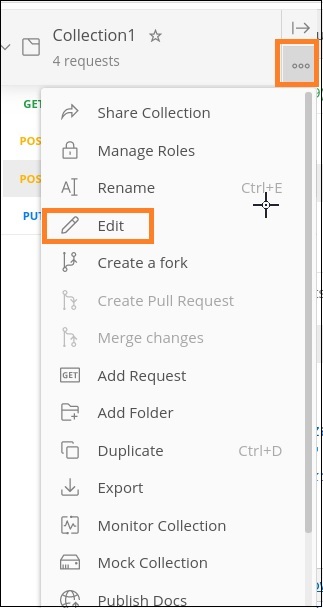
Step 2 − The EDIT COLLECTION pop-up comes up. Move to the Authorization tab and then select any option from the TYPE dropdown. Click on Update.
Postman - Workflows
In a Postman Collection, the requests are executed in the order in which they appear. Every request is run first by the order of the folder followed by any request at the Collection root.
Let us create a Collection (Collection1) with four requests. The details on how to create a Collection is discussed in detail in the Chapter about Create Collections.
Step 1 − Click on the arrow appearing to the right of the Collection name in the sidebar. Then, click on Run button to trigger execution of requests within the Collection.
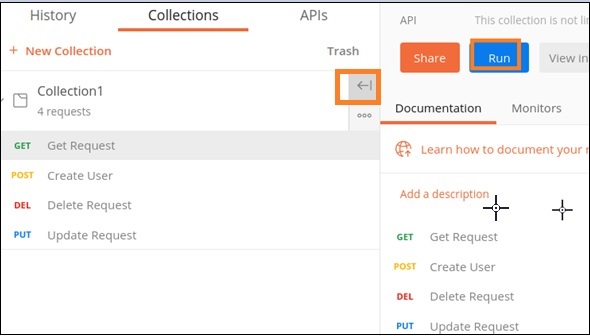
Step 2 − The Collection Runner pop-up comes up. The RUN ORDER section shows the order in which the requests shall get executed from top to the bottom. (GET->POST->DEL->PUT). Click on the Run Collection1 button.
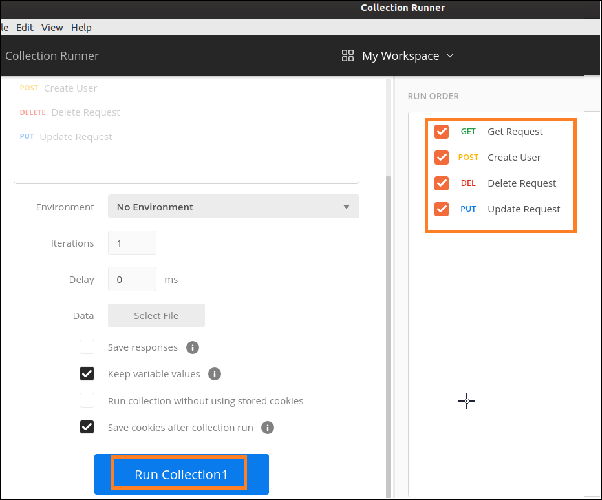
Step 3 − Execution Results show the GET request executed first, followed by POST, then DEL and finally PUT, as mentioned in the RUN ORDER section in the Step 2.
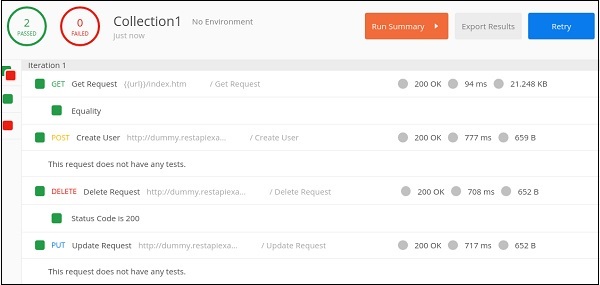
If we want to change the order of the request to be executed (for example, first the Get Request shall run, followed by Create User, then Update Request and finally the Delete Request). We have to take the help of the function postman.setNextRequest().
This function has the feature to state which request shall execute next. The request name to be executed next is passed as a parameter to this function. As per the workflow, we have to add this function either in the Tests or Pre-request Script tab under the endpoint address bar in Postman.
The syntax for execution of a request in Postman is as follows −
postman.setNextRequest("name of request")
Implementation of a Workflow
The implementation of a workflow in Postman is explained below in a step wise manner −
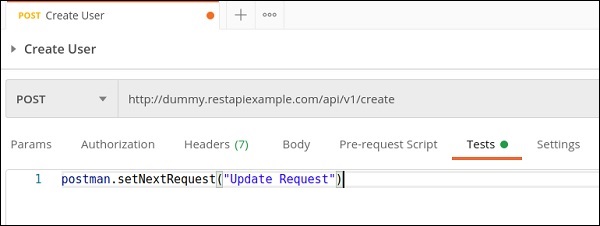
Step 1 − Add the below script under the Tests tab, for the request Create User.
postman.setNextRequest("Update Request")
The following screen will appear −
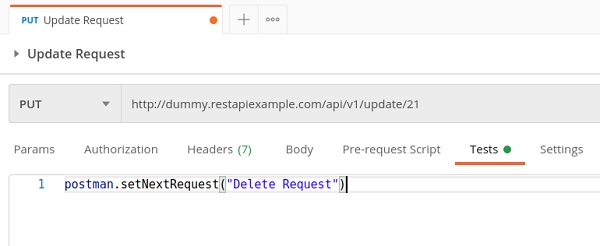
Step 2 − Add the below script under the Tests tab, for the request Update Request.
postman.setNextRequest("Delete Request")
The following screen will appear −
Output of Workflow
Given below is the output of the workflow −
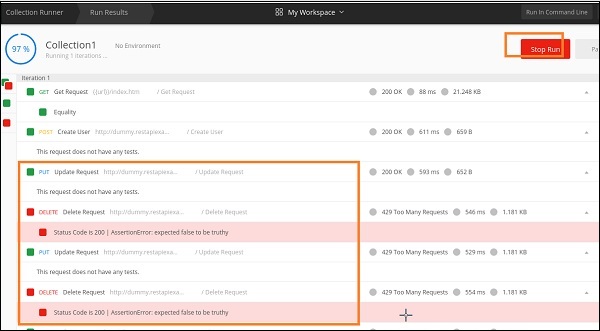
The output shows that Update Request and Delete Request are running in an infinite loop until we stop it by clicking the Stop Run button.
Infinite Workflow Loop
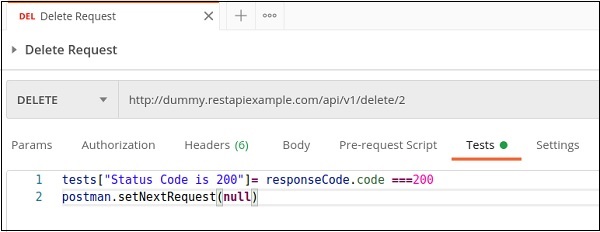
If we want to stop the infinite Workflow loop via script, we have to add the below script for the request Delete Request.
postman.setNextRequest(null)
The following screen will appear −
Again run the same Collection and output shall be as follows −
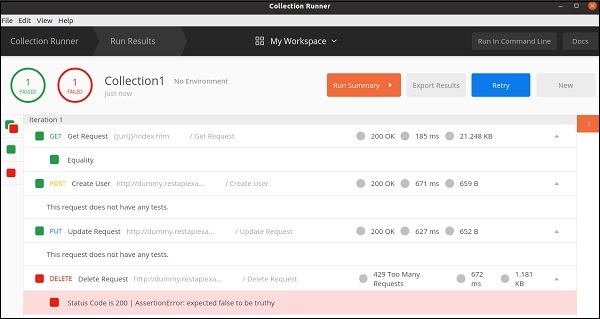
The output shows the order of execution as Get Request, Create User, Update Request and finally Delete Request.
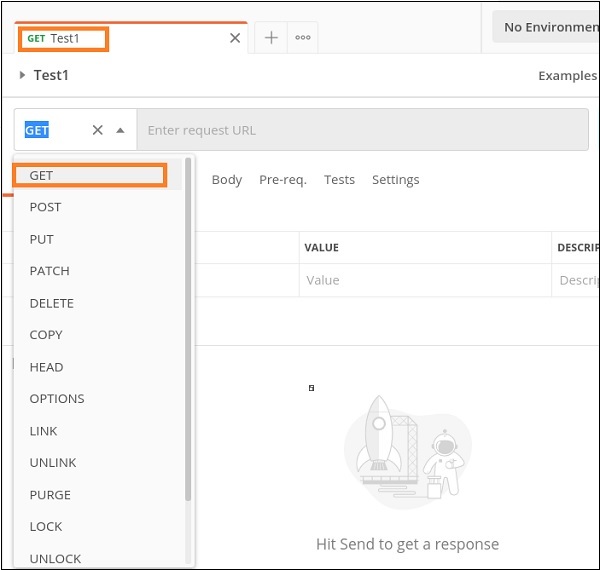
Postman - GET Requests
A GET request is used to obtain details from the server and does not have any impact on the server. The GET request does not update any server data while it is triggered. The server only sends its Response to the request.
Create a GET Request
Follow the steps given below to create a GET request successfully in Postman −
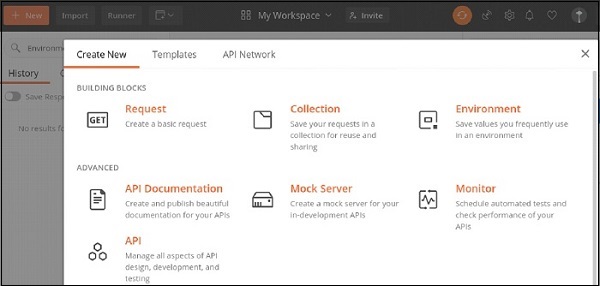
Step 1 − Click on the New menu from the Postman application. The Create New pop-up comes up. Then click on the Request link.

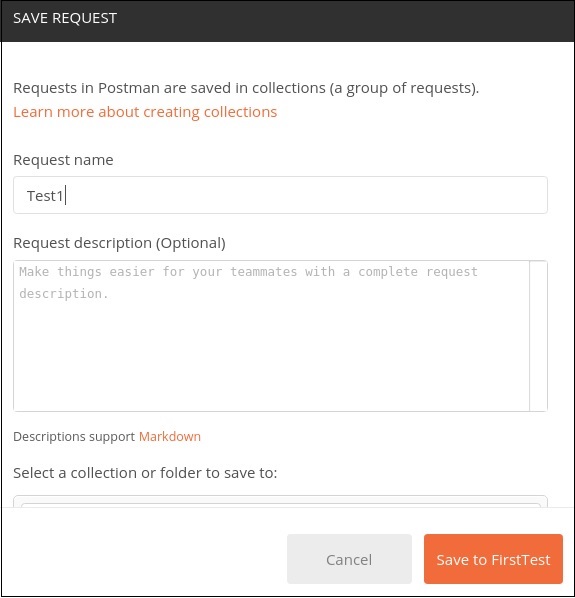
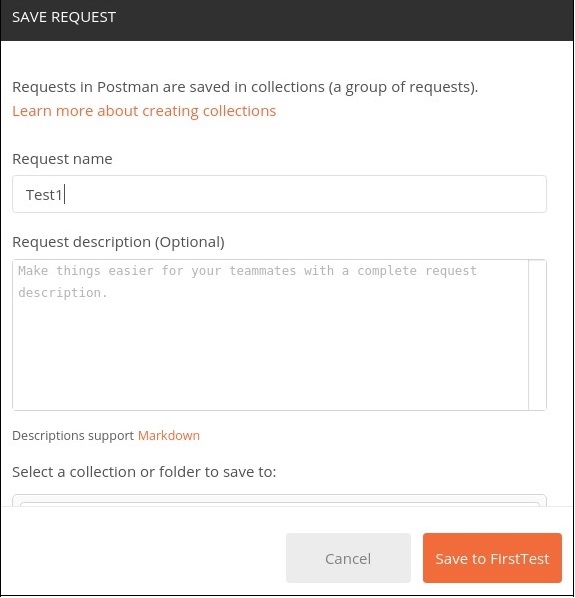
Step 2 − SAVE REQUEST pop-up comes up. Enter the Request name then click on Save.
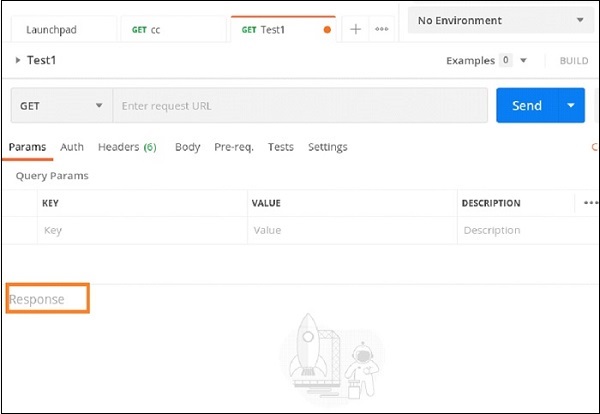
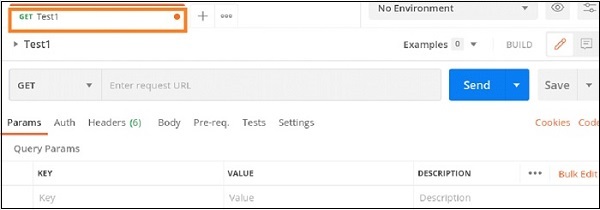
Step 3 − The Request name (Test1) gets reflected on the Request tab. We shall then select the option GET from the HTTP request dropdown.
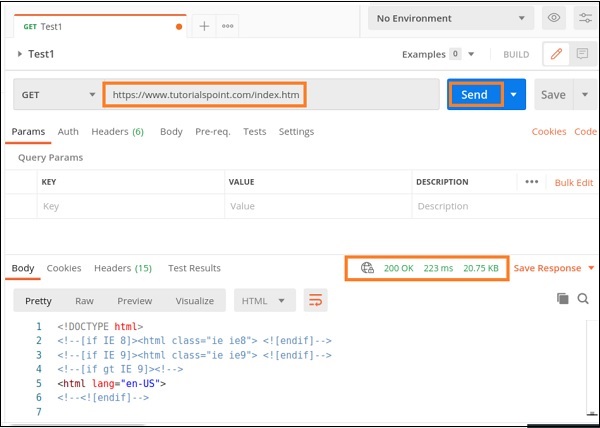
Step 4 − Enter an URL - https://www.tutorialspoint.com/index.htm in the address bar and click on Send.
Response
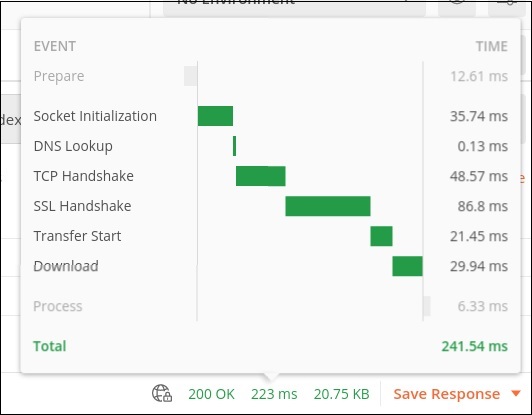
Once a request has been sent, we can see the response code 200 OK populated in the Response. This signifies a successful request and a correct endpoint. Also, information on the time consumed to complete the request (223 ms) and payload size (20.75 KB) are populated.
On hovering over the response time, we can see the time taken by different events like DNS Lookup, SSL Handshake and so on.
On hovering over the payload size, the details on the size of response, headers, Body, and so on are displayed.

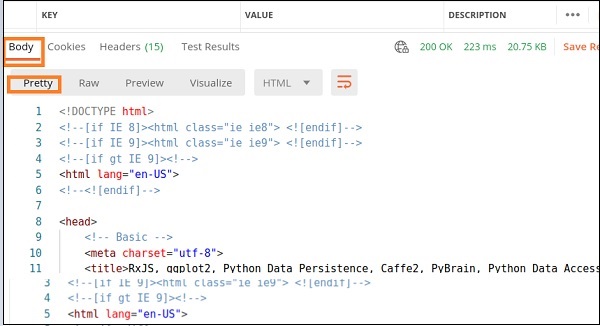
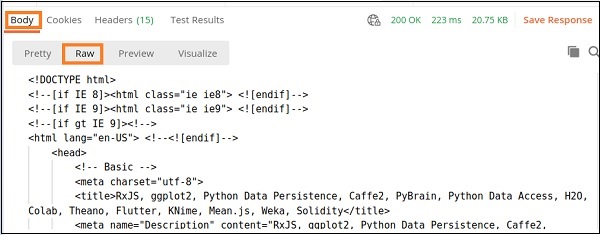
The Response Body contains the sub-tabs Pretty, Raw and Preview. The Pretty format shows color formatting for keywords and indentation for easy reading. The Raw format displays the same data displayed in the Pretty tab but without any color or indentation.
The Preview tab shows the preview of the page.
Raw tab
The following screen will appear −
Preview tab
The following screen will appear −

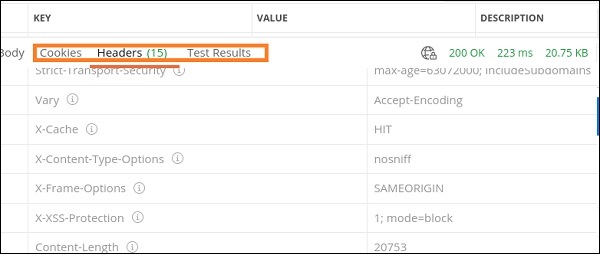
The Response also contains the Cookies, Headers and Test Results.
Postman - POST Requests
Postman POST request allows appending data to the endpoint. This is a method used to add information within the request body in the server. It is commonly used for passing delicate information.
Once we send some the request body via POST method, the API in turn yields certain information to us in Response. Thus, a POST request is always accompanied with a body in a proper format.
Create a POST Request
Follow the steps given below to create a POST request successfully in Postman −
Step 1 − Click on the New menu from the Postman application. The Create New pop-up comes up. Then, click on the Request link.

Step 2 − SAVE REQUEST pop-up comes up. Enter the Request name then click on Save.

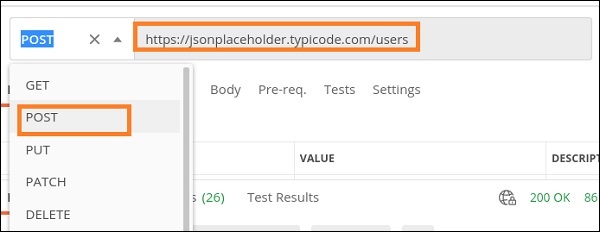
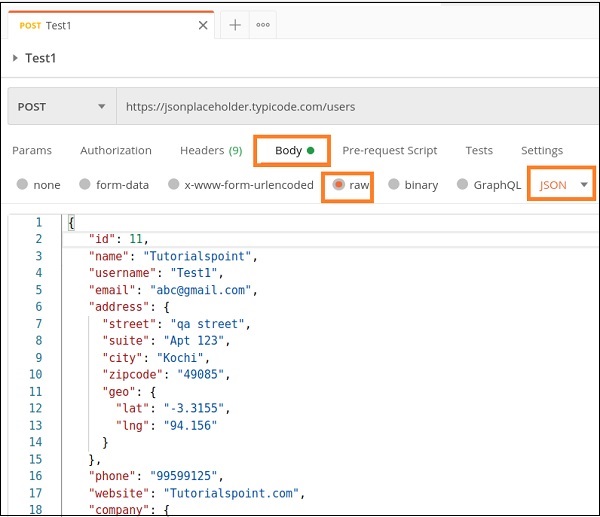
Step 3 − The Request name (Test1) gets reflected on the Request tab. Also, we shall select the option POST from the HTTP request dropdown.
Then, enter an URL https://jsonplaceholder.typicode.com/users in the address bar.
Step 4 − Move to the Body tab below the address bar and select the option raw.
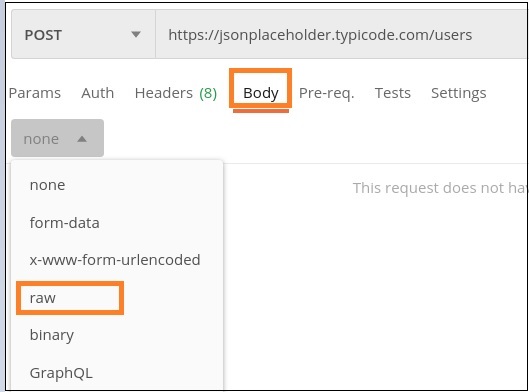
Step 5 − Then, choose JSON from the Text dropdown.
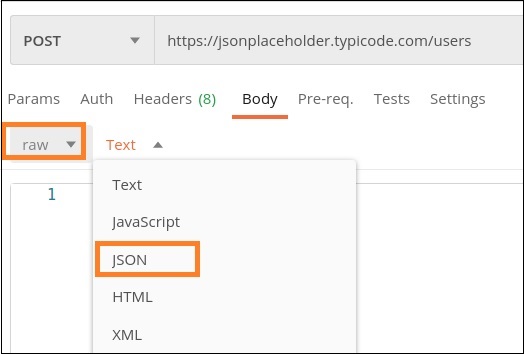
Step 6 − Copy and paste the below information in the Postman Body tab.
{
	"id": 11,
	"name": "Tutorialspoint",
	"username": "Test1",
	"email": "abc@gmail.com",
	"address": {
		"street": "qa street",
		"suite": "Apt 123",
		"city": "Kochi",
		"zipcode": "49085",
		"geo": {
			"lat": "-3.3155",
			"lng": "94.156"
		}
	},
	"phone": "99599125",
	"website": "Tutorialspoint.com",
	"company": {
		"name": "Tutorialspoint",
		"catchPhrase": "Simple Easy Learning",
		"bs": "Postman Tutorial"
	}
}
The above data that is being sent via POST method is only applicable to the endpoint: https://jsonplaceholder.typicode.com/users.
To pass the data in the correct JSON format, we can use the Jsonformatter available in the below link −
https://jsonformatter.curiousconcept.com/
Step 7 − Click on the Send button.

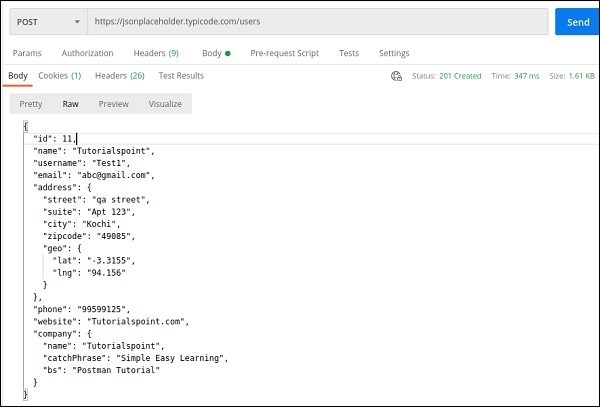
Response
Once a request has been sent, we can see the response code 201 Created populated in the Response. This signifies a successful request and the request we have sent has been accepted by the server.
Also, information on the time consumed to complete the request (347 ms) and payload size (1.61 KB) are populated.
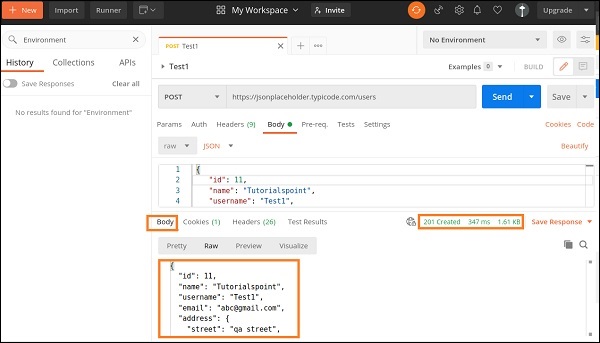
We can see that the Response body is the same as the request body which we have sent to the server.
Postman - PUT Requests
A Postman PUT request is used to pass data to the server for creation or modification of a resource. The difference between POST and PUT is that POST request is not idempotent.
This means invoking the same PUT request numerous times will always yield the same output. But invoking the same POST request numerous times will create the similar resource more than one time.
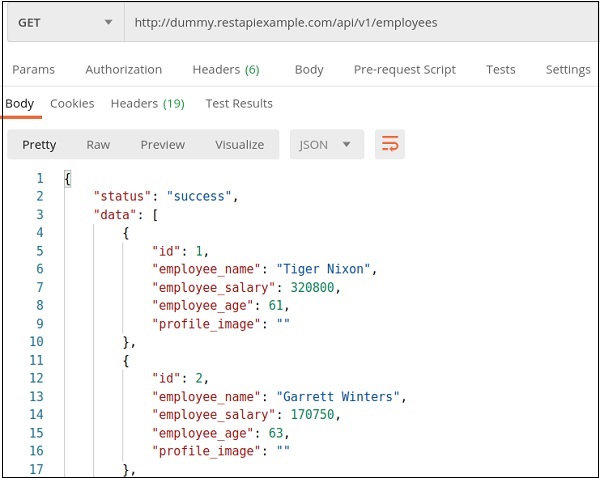
Before creating a PUT request, we shall first send a GET request to the server on an endpoint − http://dummy.restapiexample.com/api/v1/employees. The details on how to create a GET request is explained in detail in the Chapter Postman GET Requests.
On applying the GET method, the Response body obtained is as follows −
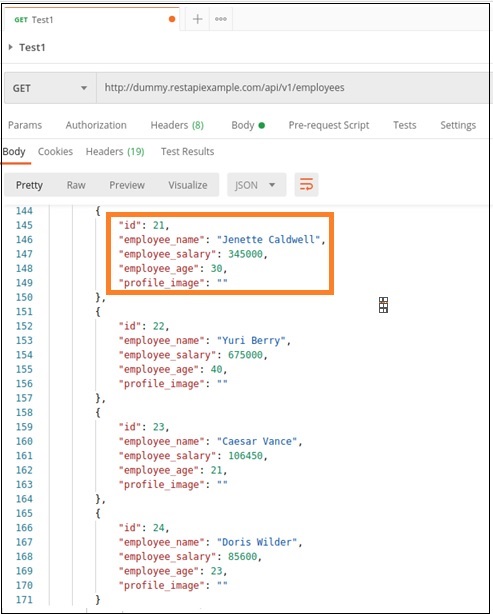
Now, let us update the employee_salary and employee_age for the id 21 with the help of the PUT request.
Create a PUT Request
Follow the steps given below to create a PUT request in Postman successfully −
Step 1 − Click on the New menu from the Postman application. The Create New pop-up comes up. Then, click on the Request link.
Step 2 − SAVE REQUEST pop-up comes up. Enter the Request name then click on Save.

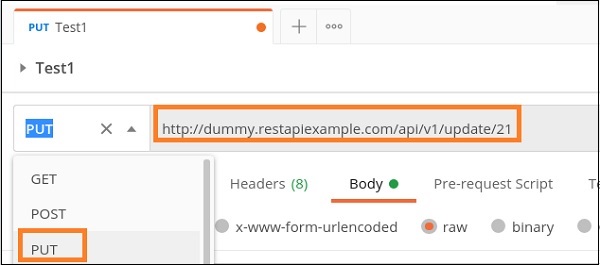
Step 3 − The Request name (Test1) gets reflected on the Request tab. We shall select the option PUT from the HTTP request dropdown..
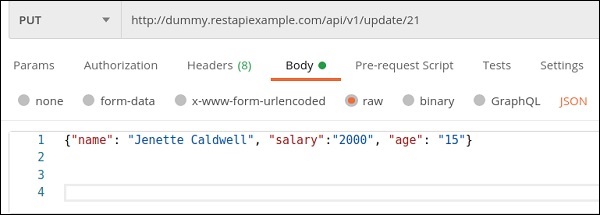
Then enter the URL - http://dummy.restapiexample.com/api/v1/update/21 (endpoint for updating the record of id 21) in the address bar.
It must be noted that in a PUT request, we have to mention the id of the resource in the server which we want to update in the URL.
For example, in the above URL we have added the id 21.
Step 4 − Move to the Body tab below the address bar and select the option raw.
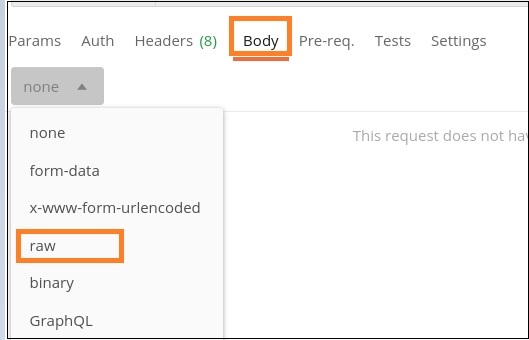
Step 5 − Then, choose JSON from the Text dropdown.
Step 6 − Copy and paste the below information in the Postman Body tab.
{ "name": "Jenette Caldwell","salary": "2000","age": "15"}
The overall parameters to be set for a PUT request are shown below −
Step 7 − Click on the Send button.
Response
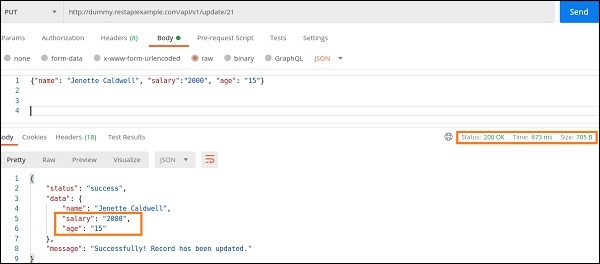
Once a request has been sent, we can see the response code 200 OK populated in the Response body. This signifies a successful request and the request we have sent has been accepted by the server.
Also, information on the time consumed to complete the request (673 ms) and payload size (705 B) are populated. The Response body shows the salary and age got updated to 2000 and 15 respectively for the employee having id 21.
Postman - DELETE Requests
Postman DELETE request deletes a resource already present in the server. The DELETE method sends a request to the server for deleting the request mentioned in the endpoint. Thus, it is capable of updating data on the server.
Before creating a DELETE request, we shall first send a GET request to the server on the endpoint: http://dummy.restapiexample.com/api/v1/employees. The details on how to create a GET request is explained in detail in the Chapter onGET Requests.
On applying the GET method, the below Response Body is obtained −
Let us delete the record of the id 2 from the server.
Create a DELETE Request
Follow the steps given below to create a DELETE request in Postman successfully −
Step 1 − Click on the New menu from the Postman application. The Create New pop-up comes up. Then, click on the Request link.

Step 2 − SAVE REQUEST pop-up comes up. Enter the Request name then click on Save.
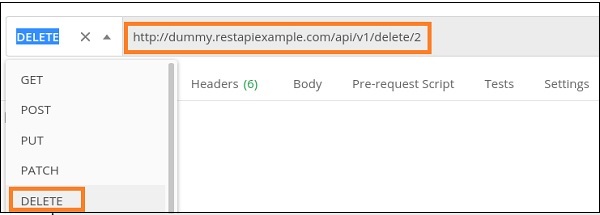
Step 3 − The Request name (Test1) gets reflected on the Request tab. We shall select the option DELETE from the HTTP request dropdown.
Then enter the URL - http://dummy.restapiexample.com/api/v1/delete/2(endpoint for deleting the record of id 2) in the address bar.
Here, in the DELETE request, we have mentioned the id of the resource in the server which we want to delete in the URL.
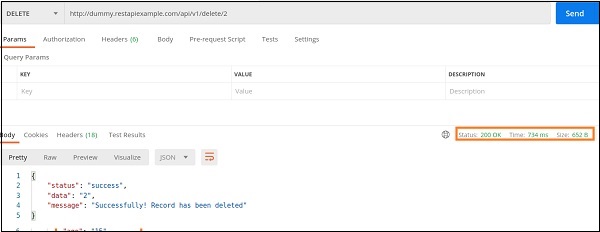
Step 4 − Click on the Send button.
Response
Once a request has been sent, we can see the Response code 200 OK populated in the Response. This signifies a successful request and the request we have sent has been accepted by the server.
Also, information on the time consumed to complete the request (734 ms) and payload size (652 B) are populated. The Response shows the status as success. The record id 2 gets deleted from the server.
After deletion of the record with id 2, if we run the GET request on the endpoint: http://dummy.restapiexample.com/api/v1/employee/2, we shall receive 401 Unauthorized status code.
Postman - Create Tests for CRUD
CRUD stands for Create, Retrieve, Update and Delete operations on any website opened in a browser. Whenever we launch an application, the retrieve operation is performed.
On creating data, for example, adding a new user for a website, the create operation is performed. If we are modifying the information, for example, changing details of an existing customer in a website, the update operation is performed.
Finally, to eliminate any information, for example, deleting a user in a website, the delete operation is carried out.
To retrieve a resource from the server, the HTTP method GET is used (discussed in details in the Chapter Postman GET Requests). To create a resource in the server, the HTTP method POST is used (discussed in details in the Chapter Postman POST Requests).
To modify a resource in the server, the HTTP method PUT is used (discussed in details in the Chapter Postman PUT Requests). To delete a resource in the server, the HTTP method DELETE is used (discussed in details in the Chapter Postman DELETE Requests).
Tests in Postman
A Postman test is executed only if a request is successful. If a Response Body is not generated, it means our request is incorrect and we will not be able to execute any test to validate a Response.
In Postman, tests are developed in JavaScript and can be developed using the JavaScript and Functional methods. Both the techniques are based on the language JavaScript.
JavaScript Method
Follow the steps given below to develop tests in Javascript −
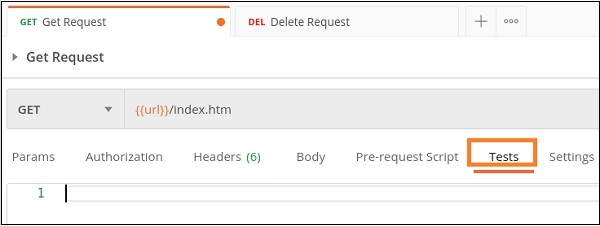
Step 1 − Tests developed in the JavaScript method are mentioned within the Tests tab under the address bar.
Step 2 − Add the below JavaScript verifications within the Tests tab −
tests["Status Code should be 200"] = responseCode.code === 200
tests["Response time lesser than 10ms"] = responseTime<10
We can add one or more than one test for a particular request.
Here, tests is a variable of type array which can hold data types- integer, string, Boolean and so on. The Status Code should be 200 and Response time lesser than 10ms are the names of the tests. It is recommended to give meaningful names to test.
The responseCode.code is the response code obtained in the Response and the responseTime is the time taken to get the Response.
Step 3 − Select the GET method and enter an endpoint then click on Send.
Response
In the Response, click on the Test Results tab −
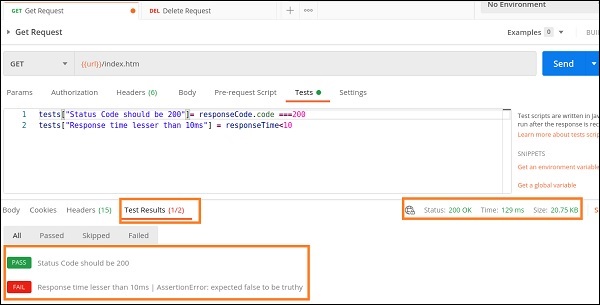
The Test Results tab shows the test which has passed in green and the test which has failed in red. The Test Results (1/2) means one out of the two tests has passed.
Response shows the status as 200 OK and Response time as 129ms (the second test checks if the Response time is less than 10ms).
Hence, the first test got passed and the second one failed along with the Assertion error.
Functional Method
Follow the steps given below to develop a test in with functional method −
Step 1 − Tests developed in the Functional method are mentioned within the Tests tab under the address bar.
Step 2 − Add the below code within the Tests tab −
pm.test["Status Code is 401"], function(){
	pm.response.to.have.status(401)
})
Here, pm.test is the function for the test being performed. Status Code is 401 and it is the name of the test which shall be visible in the Test Result after execution.
The pm.response is used for obtaining the response and adding assertions on it to verify the header, code, status, and so on.
Step 3 − Select the GET method and enter an endpoint then click on Send.
Response
In the Response, click on the Test Results tab −
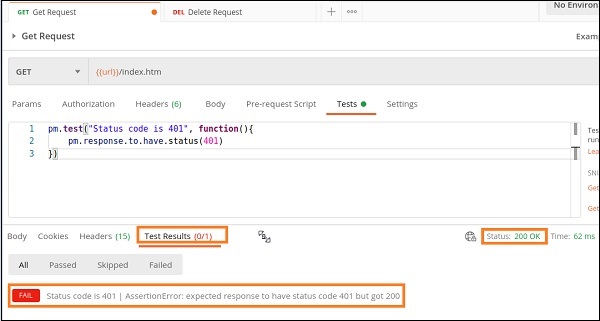
The Test Results tab shows the test in red as the test has failed. The Test Results (0/1) means zero out of the one test has passed. Response shows the status as 200 OK (the test checks if the response code is 401).
Hence the test shows failed along with the Assertion error.
Postman - Create Collections
A group of requests that have been saved and organized into folders is known as the Collections. It is similar to a repository. Thus, Collections help to maintain the API tests and also split them easily with teams.
Create a New Collection
Follow the steps given below to create a new collection in Postman −
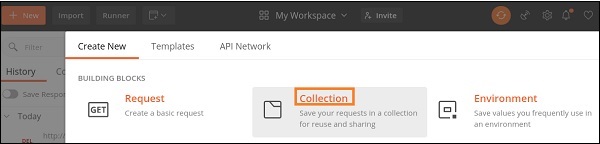
Step 1 − Click on the New icon from the Postman application. The Create New pop-up comes up. Then click on the Collection link.
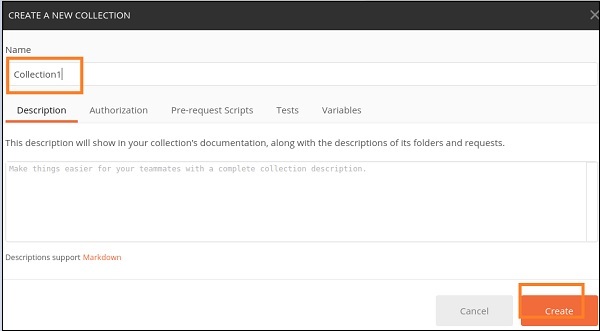
Step 2 − CREATE A NEW COLLECTION pop-up comes up. Enter a Collection Name and click on the Create button.
Step 3 − The Collection name and the number of requests it contains are displayed in the sidebar under the Collections tab.
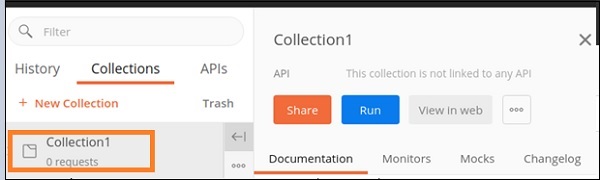
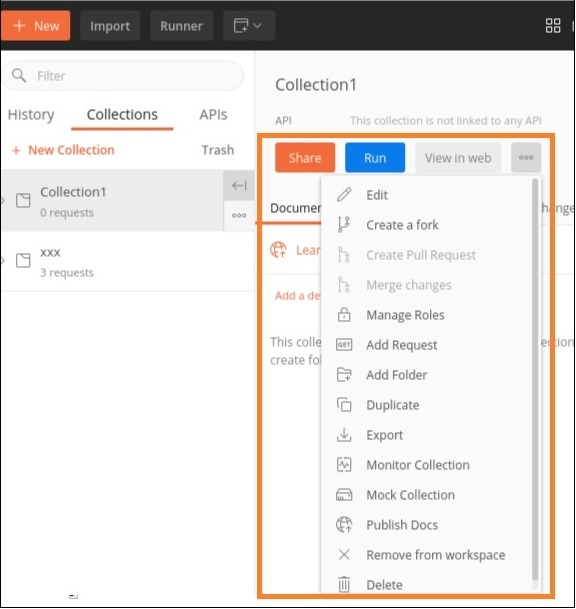
Step 4 − To the right of the Collection name, we have the options like Share, Run and so on available. Click on the three dots to get more options to select.
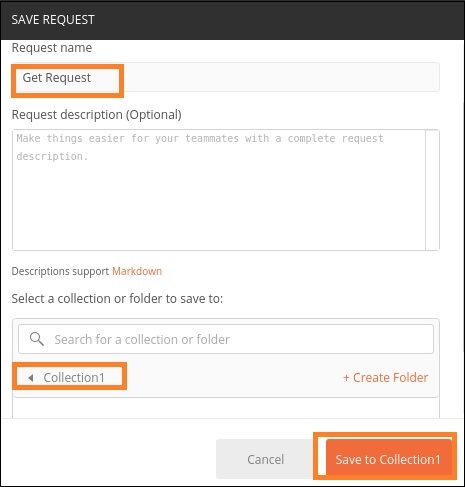
Step 5 − Click on Add Request. The SAVE REQUEST pop-up comes up. Enter Request Name and select the Collection we have created. Then, click on the Save to Collection1 button.
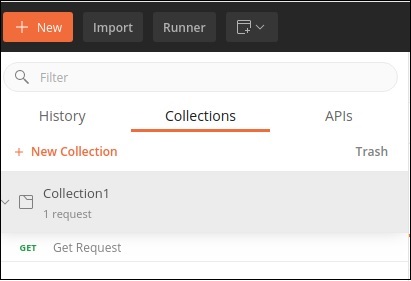
Step 6 − The Collection with its request gets displayed to the side bar under the Collections tab.
Postman - Parameterize Requests
We can parameterize Postman requests to execute the same request with various sets of data. This is done with the help of variables along with parameters. A parameter is a part of the URL used to pass more information to the server.
The data can be used in the form of a data file or an Environment variable. Parameterization is an important feature of Postman and helps to eliminate redundant tests. Parameters are enclosed in double curly braces {{parameter}}.
Example
Let us take an example of an URL − https://www.tutorialspoint.com/index.htm. We shall create a variable as url then use it for parameterization of request. We can refer to it in the format {{url}} in Postman.
A parameter is in the form of a key-value pair. So to point to the URL: https://www.tutorialspoint.com/index.htm, we can mention it as {{url}}/index.htm. So here, the url is the key and the value set is https://www.tutorialspoint.com
Create a Parameter Request
Follow the steps given below to create a parameter request in Postman −
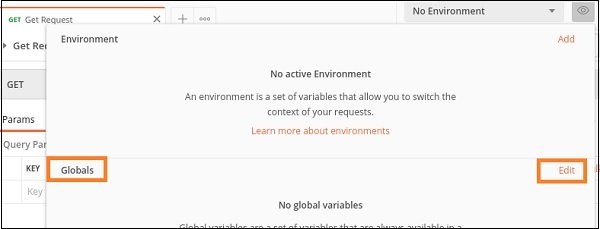
Step 1 − Click on the eye icon to the right of the Environment dropdown in the top right corner in the Postman application.

Step 2 − Click on the Edit link in the Globals section.

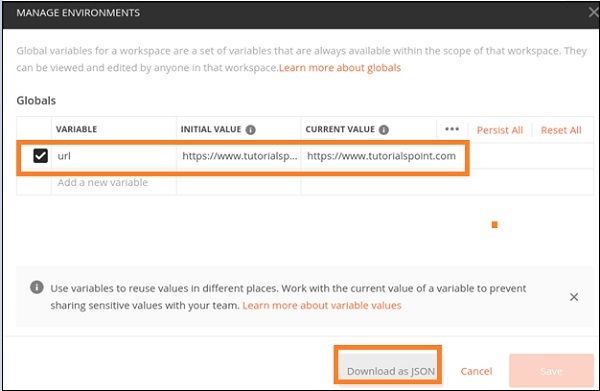
Step 3 − MANAGE ENVIRONMENTS pop-up comes up. Enter URL for the VARIABLE field and https://www.tutorialspoint.com for INITIAL VALUE. Then, click on Save.
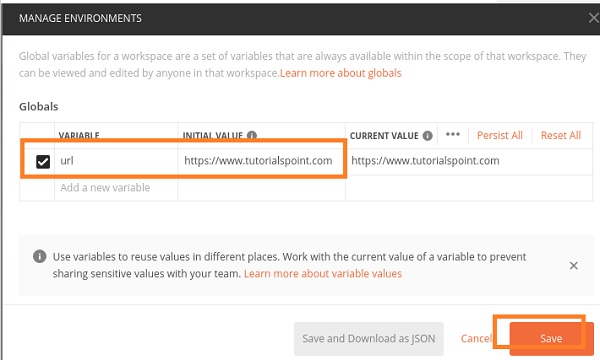
Step 4 − Click on close to move to the next screen.
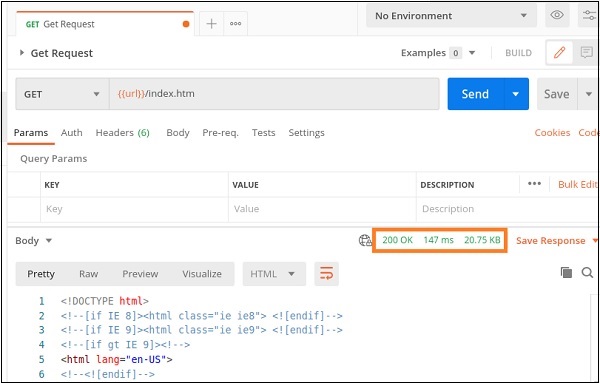
Step 5 − In the Http Request tab, enter {{url}}/index.htm in the address bar. Select the GET method and click on Send.

Response
Once a request has been sent, we can see the response code 200 OK populated in the Response. This signifies a successful request and a correct endpoint.
Postman - Collection Runner
Postman Collection Runner is used to execute a Collection having multiple requests together. All the requests within a Collection will be executed simultaneously. The Collection Runner does not produce any Response Body.
The Collection Runner console displays the test results for individual requests. It is mandatory to have more than one request within the Collection to work with Collection Runner.
The details on how to create a Collection is discussed in detail in the Chapter on Create Collections.
Execute Tests with Collection Runner
Follow the steps given below to execute the tests with Collection Runner in Postman −
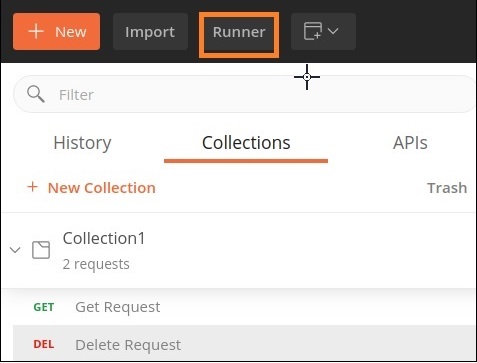
Step 1 − Click on the Runner menu present at the top of the Postman application.
Step 2 − The Collection Runner screen shall appear.
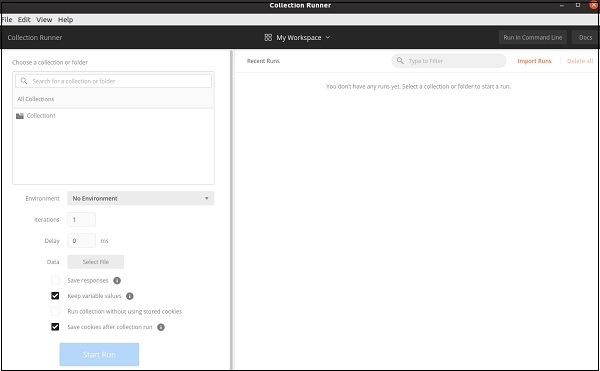
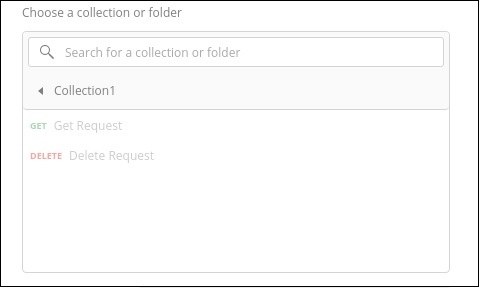
Step 3 − Select the Collection name from Choose a collection or folder.
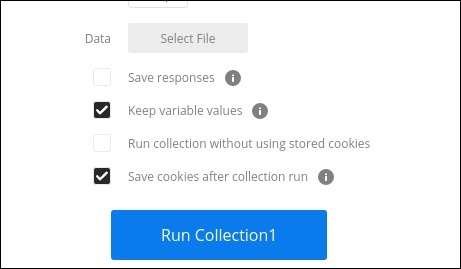
Step 4 − Select an environment from the Environment dropdown to run the requests in a particular environment. Then, specify the number of times we need to iterate the request. We can also set a delay time in milliseconds for the requests.

Step 5 − If we have data in a file, then we have to choose the file type from Data. Then, click on the Run Collection1 button.
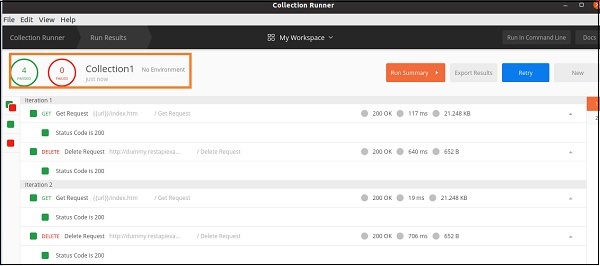
Step 6 − The Run Results page shall come up. Depending on the delay time provided, the tests should get executed.
The test results (Pass/Fail) should be displayed for each iteration. The pass status is represented in green and failed ones are represented in red. If there is no test implemented for a particular request, then it shall display the message as - This request does not have any tests.
This is the environment in which the tests are executed and the Collection names are visible at the top of the Collection Runner. For each request, the status code, time taken, payload size, and test verification are also displayed.
Postman - Assertion
Assertions are used to verify if the actual and expected values have matched after the execution of a test. If they are not matching, the test shall fail and we shall get the reason for failure from the output of the test.
An assertion returns a Boolean value of either true or false. In Postman, we can take the help of JavaScript Chai Assertion Library to add assertions in our tests. It is available in the Postman application automatically.
The Chai Assertions are easily comprehensible as they are defined in a human readable format. The Assertions in Postman are written within the Tests tab under the address bar.
The documentation for Chai is available in the following link −
https://www.chaijs.com/
Writing Assertions
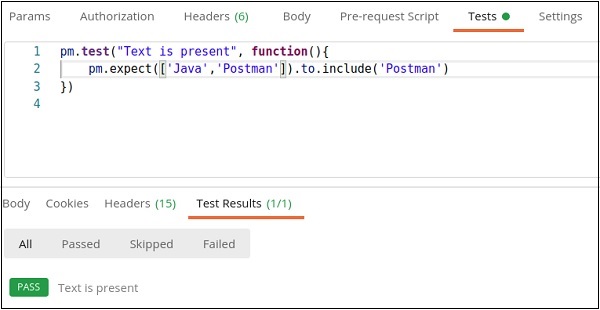
Let us write an assertion to check if a particular text - Postman is within an array of strings.
Example
pm.test["Text is present"], function(){
	pm.expect(['Java', 'Postman']).to.include('Postman')
})
Output
The output is as follows −
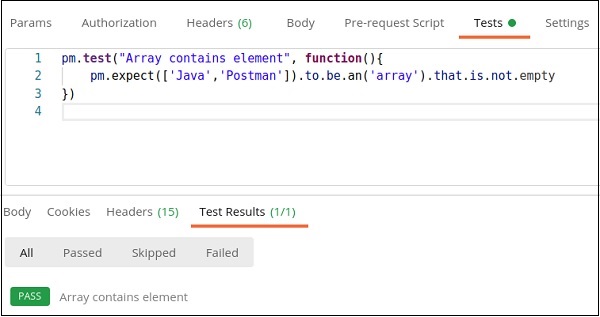
Let us write an Assertion to check if an array is empty.
Example
pm.test["Array contains element"], function(){
	pm.expect(['Java', 'Postman']).to.be.an('array').that.is.not .empty
})
Output
The output is as follows −
Assertion for Object Verification
Let us write an Assertion for object verification with eql. It is used to compare the properties of the object i and j in the below example.
Example
pm.test("Equality", function(){
let i = {
	"subject" : "Postman"
};
let j= {
	"subject" : "Cypress"
};
pm.expect(i).to.not.eql(j);
Output
The output is as follows −
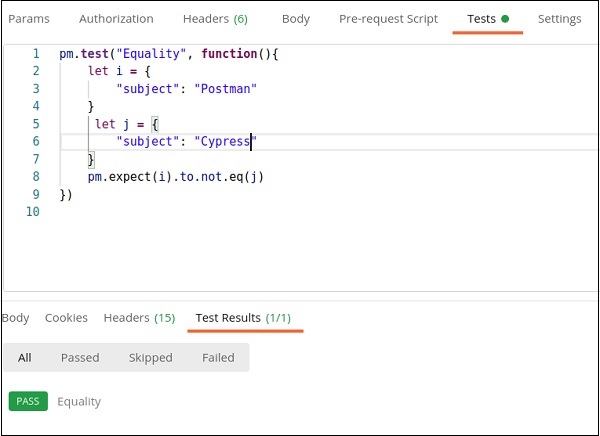
The property defined for object i is Postman while the property defined for j is Cypress. Hence, not.eql Assertion got passed.
Assertion Types
In Postman, we can apply assertions on different parts of Response. These are explained below −
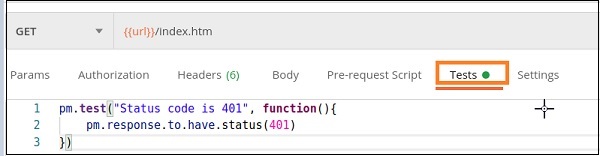
Status Code
The assertion for status code is as follows:pm.test["Status Code is 401"], function(){
	pm.response.to.have.status(401)
})
The above assertion passes if the Response status code obtained is 401.
pm.test["Status is Forbidden"], function(){
	pm.response.to.have.property('status', ' Forbidden')
})
The above assertion is applied on the Response property status having the value Forbidden.
Time taken by Response
The assertion for time taken by response is as follows −
pm.test("Response time above 500 milliseconds", function () {
	pm.expect(pm.response.responseTime).to.be.above(500)
})
The above assertion passes if the Response time is above 500ms.
Type of Response Format
The assertion for type of response format is as follows −
pm.test("Response type is JSON", function(){
	pm.response.to.be.json;
})
The above assertion passes if the Response is of JSON type.
Header of Response
The assertion for header of response is as follows −
pm.test("Header Content-Encoding is available", function () {
	pm.response.to.have.header("Content-Encoding")
})
The above assertion passes if the Response has a header Content-Encoding.
Text of Response
The assertion for text of response is as follows −
pm.test("Response Text", function () {
	pm.expect(pm.response.text()).to.include("Tutorialspoint")
})
The above assertion passes if the Response text contains the text Tutorialspoint.
Postman - Mock Server
A mock server is not a real server and it is created to simulate and function as a real server to verify APIs and their responses. These are commonly used if certain responses need to be verified but are not available on the web servers due to security concerns on the actual server.
Purpose of Mock Server
A Mock Server is created for the reasons listed below −
A Mock Server is created if the APIs to be used in Production are still in development.
A Mock Server is used if we want to avoid sending requests on real time data.
Benefits of Mock Server
The benefits of Mock Server are listed below −
Simulation of real API features with examples.
Mock server can be appended to a Collection.
Verify APIs with mocking data.
To identify errors and defects early.
To identify dependencies in API before it is released for actual usage.
It is used by engineers to build a prototype for a concept and showcase it to higher management.
While developing the front end of an application, the developer should have some idea on the response features that shall be obtained from the real server on sending a request. A Mock Server can be really helpful at this time.
Mock Server Creation
Follow the steps given below for creation of mock server in Postman −
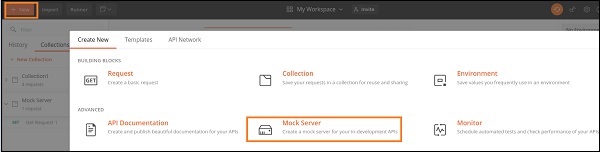
Step 1 − Click on the New icon from the Postman application. Then, click on Mock Server.
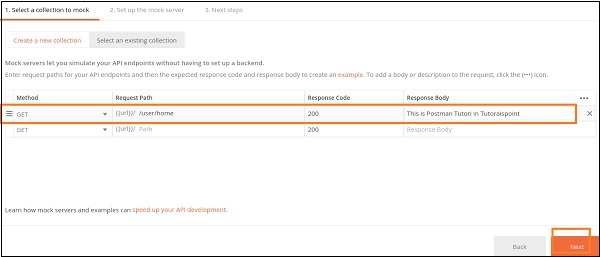
Step 2 − Select GET from the Method dropdown, enter a Request Path as /user/home, Response Code as 200, and a Response Body. Then, click on Next.
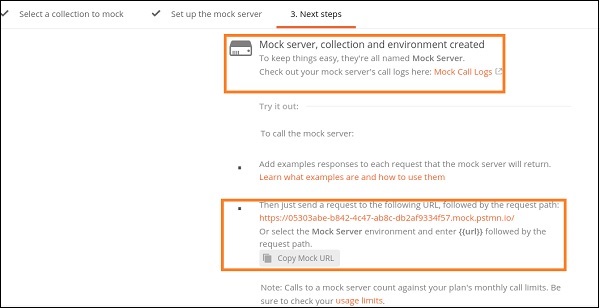
Step 3 − Enter a Mock Server name and click on the Create Mock Server button.

Step 4 − The Mock Server gets created along with the Mock URL. The Copy Mock URL button is used to copy the Mock link. Click on the Close button to proceed.
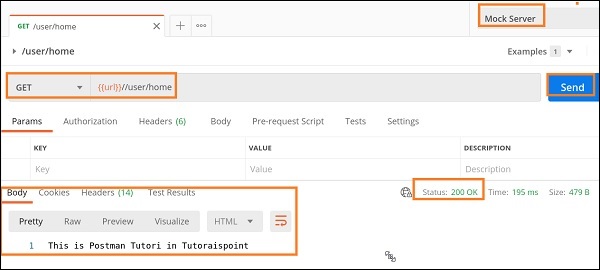
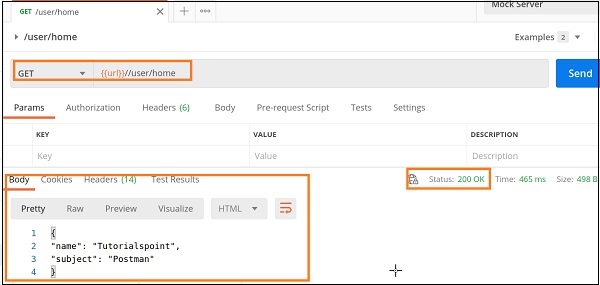
Step 5 − Select Mock Server as the Environment from the No Environment dropdown and click on Send. The Response code obtained is 200 OK which means that the request is successful.
Also the Response Body shows the message This is Postman Tutorial for Tutorialspoint which is the same as we passed as a Response Body in the Step 2.
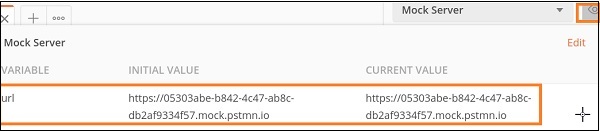
Step 6 − The value of URL can be obtained by clicking on the eye icon at the right upper corner of the screen.
So the complete request Mock URL should be − https://05303abe-b842-4c47-ab8c-db2af9334f57.mock.pstmn.io/user/home(represented by {{url}}/user/home in the address bar in Step 5). We have appended /user/home at the end of the url value since it is the Request Path we have set for the Mock Server in Step2.
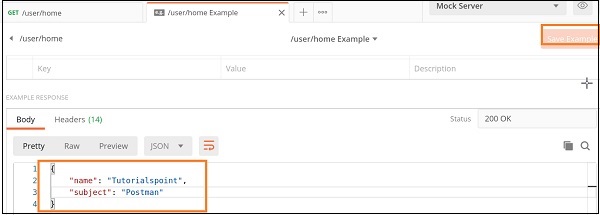
Step 7 − We have seen that the Response Body is in text format. We can get the response in JSON format as well. To achieve this select the option Save as example from the Save Response dropdown.

Step 8 − Provide an Example name and select JSON from the Response Body section.
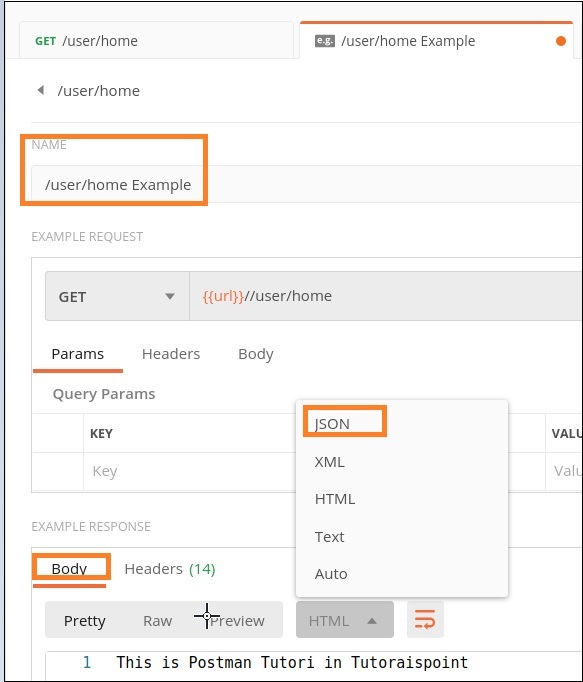
Step 9 − Add the below Response Body in JSON format. Then click on Save Example.
{
	"name": "Tutorialspoint",
	"subject": "Postman"
}
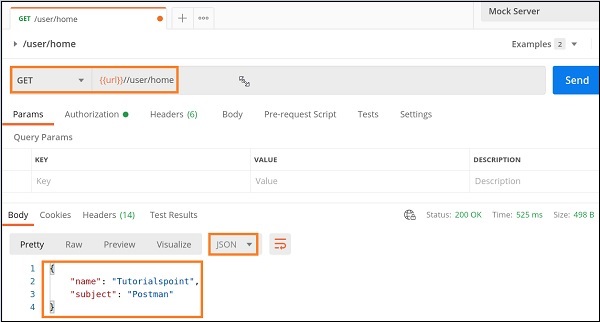
Step 10 − Finally, send the GET request on the same endpoint, and we shall receive the same Response Body as we have passed in the Example request.
The below image shows Response is in HTML format −
The below image shows Response is in JSON format −
Example Request
Follow the steps given below for Mock Server Creation by example request −
Step 1 − Create a Collection and add a request to it.
The details on how to create a Collection is discussed in detail in the Chapter Postman Create Collections.
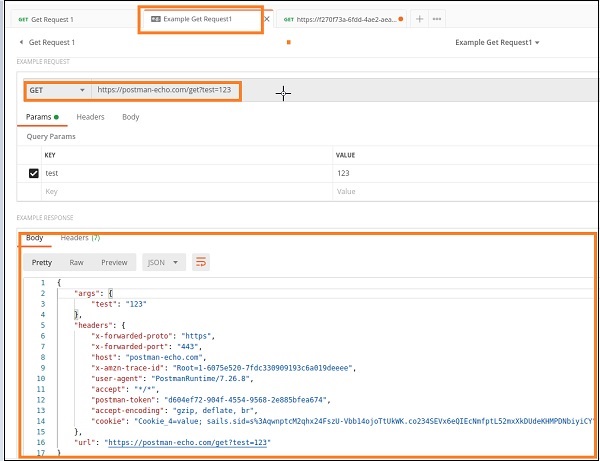
Step 2 − Add the endpoint https://postman-echo.com/get?test=123 and send a GET request.
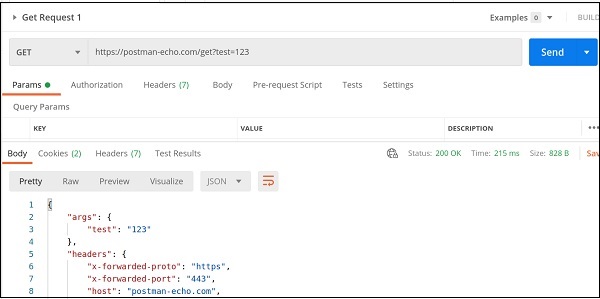
Step 3 − From Response Body, select the option Save as Example from the Save Response dropdown.
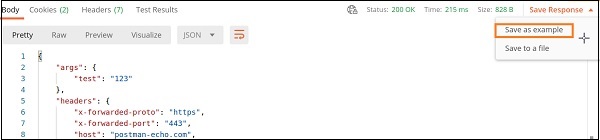
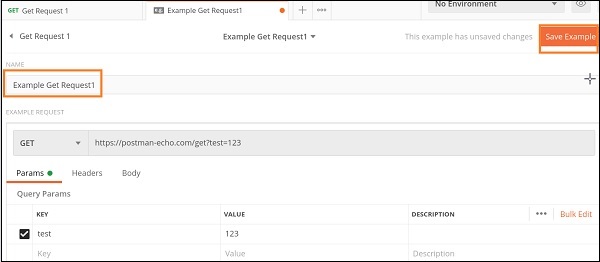
Step 4 − Give an Example name and click on the Save Example button.
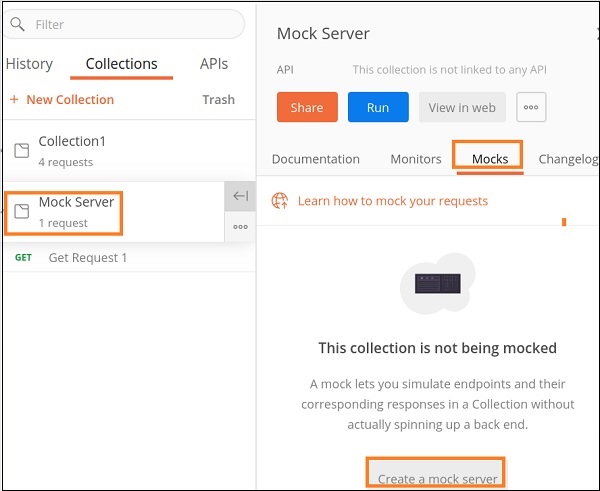
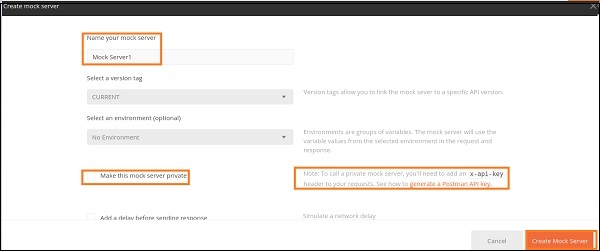
Step 5 − Click on the Collection name Mock Server (that we have created) and click on the Mock tab. Then, click on Create a mock server.
Step 6 − The Create mock server pop-up comes up. Provide a name to the Mock Server and then click on the Create Mock Server button.
Please note − We can make a Mock Server private or public. To make a Mock Server private, we have to check the checkbox Make this mock server private. Then, we need to utilise the Postman API key.
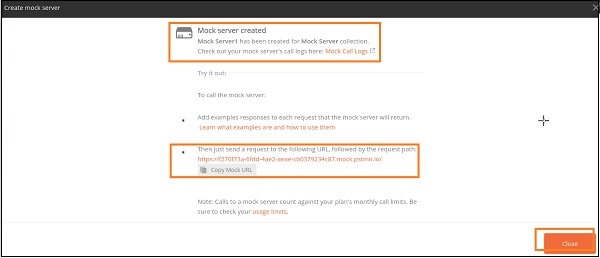
Step 7 − The message Mock server created shall come up. Also, we shall get the Mock URL. We can copy it with the Copy Mock URL button. Then, click on Close.
Step 8 − The Mock Server which we have created gets reflected under the Mock tab in the Collections sidebar. Click on the same.

Step 9 − We shall add a new request and paste the URL we have copied in Step 7. To send a GET request, we shall append the value - /get at the end of the pasted URL.
For example, here, the Mock URL generated is − https://f270f73a-6fdd-4ae2-aeae-cb0379234c87.mock.pstmn.io.
Now to send a GET request, the endpoint should be − https://f270f73a-6fdd-4ae2-aeae-cb0379234c87.mock.pstmn.io/get.
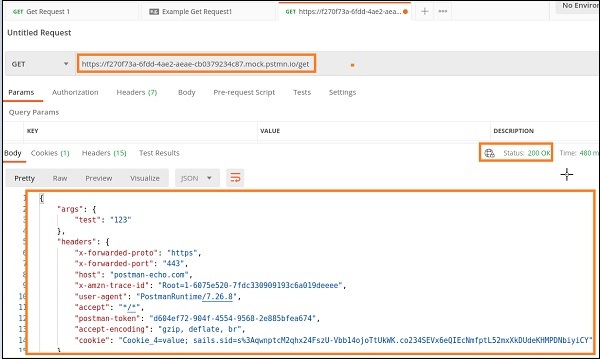
The Response Body received by mocking the server is the same as the Example request.
Response obtained in the Example request is as follows −
Postman - Cookies
The cookies are information sent by the server and stored in the browser. As soon as a request is sent, the cookies are returned by the server. In Postman, the cookies are mentioned under the Headers and Cookies tab in the Response.
Let us apply a GET request on an endpoint and find the cookies.
In the Headers tab, the cookie sent by the server is set with the key - set-cookie.
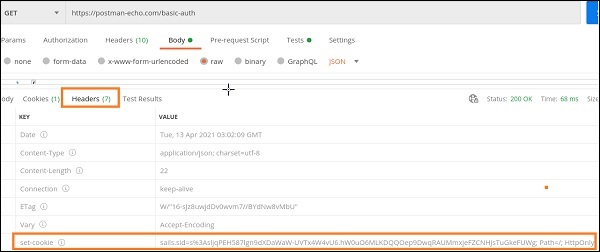
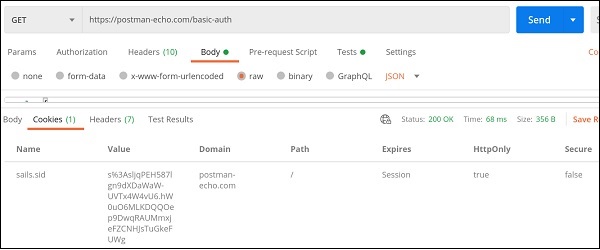
In the Cookies tab, the same cookie details will also get displayed.
Cookies Management
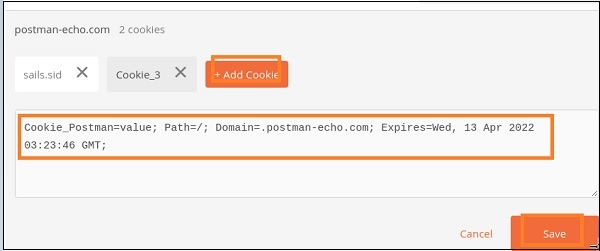
In Postman, we can manage cookies by addition, deletion, and modification of cookies. Under the Params tab, we have the Cookies link to perform operations on cookies.

Click on the Cookies link. MANAGE COOKIES pop-up shall open where all the available cookies are present with the option to add and delete a cookie.

Cookies Addition
Follow the steps given below for adding cookie in Postman −
Step 1 − Click on the Add Cookie button. A text box shall open up with pre-existing values inside it. We can modify its values and then click on Save.
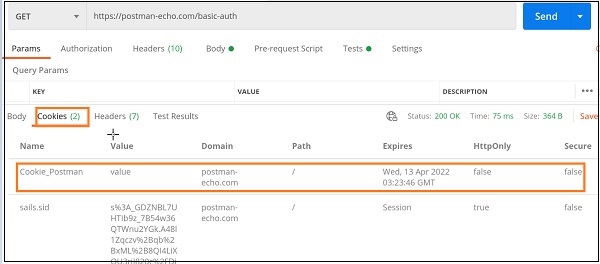
Step 2 − Send the request again to the server.
The Response code obtained is 200 OK. Also, the Cookies tab in the Response now shows the newly added cookie Cookie_Postman.
Access Cookies via Program
Cookies can be handled programmatically without using the GUI in Postman. To work with cookies, we have to first generate a Cookie jar. It is an object which has all the cookies and methods to access them.
Cookie Jar Creation
The syntax for Cookie Jar Creation is as follows −
const c = pm.cookies.jar();
Cookie Creation
We can create a cookie with the .set() function. It accepts URL, name of cookie, value of cookie as parameters.
The syntax for cookie creation is as follows −
const c = pm.cookies.jar();
c.set(URL, name of cookie, value of cookie, callback(error, cookie));
Get Cookie
We can get a cookie with the .get() function. It accepts the URL, name of cookie as parameters. It yields the cookie value.
The syntax for getting a cookie is as follows −
const c = pm.cookies.jar();
c.set(URL, name of cookie, value of cookie, callback(error, cookie));
c.get(URL, name of cookie, callback(error, cookie));
Get All Cookies
We can get all cookies of a specific URL within a Cookie jar with the .getAll() function. It accepts a URL as a parameter. It yields all the cookie values for that URL.
The syntax for getting all cookies is as follows −
const c = pm.cookies.jar();
c.set(URL, name of first cookie, value of first cookie, callback(error, cookie));
c.set(URL, name of second cookie, value of second cookie, callback(error, cookie));
c.getAll(URL, callback(error, cookie));
Delete Cookie
We can delete a cookie with the .unset() function. It accepts the URL, name of cookie to be deleted as parameters.
The syntax for deleting cookie is as follows −
const c = pm.cookies.jar();
c.set(URL, name of cookie, value of cookie, callback(error, cookie));
c.unset(URL, name of cookie, callback(error, cookie));
Delete All Cookies
We can delete all cookies of a specific URL with the .clear() function. It accepts a URL as a parameter. It removes all the cookie values for that URL.
The syntax for deleting all cookies is as follows −
const c = pm.cookies.jar();
c.set(URL, name of first cookie, value of first cookie, callback(error, cookie));
c.set(URL, name of second cookie, value of second cookie, callback(error, cookie));
c.clear(URL, callback(error, cookie));
Postman - Sessions
A session is a temporary fold that stores values of variables. They are used for the present instance and have a local scope. In Postman, we can modify the session variable value to share workspace among teams.
Postman gives the feature of local session share. Even if a Collection can be shared among teams, the sessions are never shared. Different tokens have to be generated while a task is to be carried out in a team structure.
A session has a local scope for a user within his Workspace and any modifications he makes shall not be reflected in the server. In Postman, a session can store Environment variables, global variables and so on.
We can assign current values to Collection variables and to the global and Environment variables. To assign a current value to the Collection, click on the three dots appearing beside the Collection name, then click on Edit.
In the EDIT COLLECTION pop-up, move to the Variables tab.

The CURRENT VALUE is local to the user and never in sync with the server of Postman. We can also replace or modify the INITIAL VALUE with CURRENT VALUE.
Also, it must be remembered that the INITIAL VALUE gets impacted only if we apply the option Persist on a variable. After that, it gets in sync with the server of Postman.
Postman - Newman Overview
Newman is a potential command-line runner used in Postman. We can execute and verify a Postman Collection from the command-line as well. Newman has features which are consistent with Postman.
We can run the requests within a Collection from Newman in the same way as in the Collection Runner. Newman can occupy both the NPM registry and GitHub. We can also perform Continuous Integration or Deployment with Newman.
A status code of 0 is thrown by Newman if all the execution is done without errors. The Continuous Integration tools read the status code and accordingly fail/pass a build.
We can add the flag --bail to the Newman to pause on an error encountered in a test with a status code of 1. This can be interpreted by the CI tools. Newman is based on node.js and uses npm as a package manager.
Newman Installation
The installation of Newman requires Node.js and npm. Follow the steps given below to install Newman −
Step 1: Navigate to the link − https://nodejs.org/en/download/current/ for downloading the Node.js.

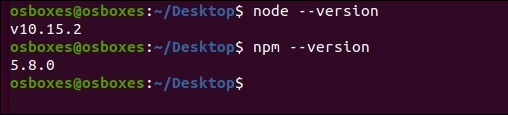
Step 2 − Once the download is completed, execute the below command to verify that the Node.js is installed properly.
The command for verifying the installation in Windows is as follows −
node --v
The command for verifying the installation in Linux is as follows −
node --version
The below image shows the version v10.15.2 of the Node.js is installed in the system.

Step 3 − The npm is allocated with Node.js so once we download the Node.js then npm gets downloaded by default. To verify if npm is available in our system, run the below command −
The command for verifying the installation in Windows is as follows −
npm --v
The command for verifying the installation in Linux is as follows −
npm --version
The below image shows the version 5.8.0 of the npm installed in the system −
Step 4 − For installation of Newman, run the below mentioned command −
npm install -g newman.
Step 5 − To verify the version of newman, run the below commands−
The command for verifying the installation in Windows is as follows −
newman --v
The command for verifying the installation in Linux is as follows −
newman --version
Postman - Run Collections using Newman
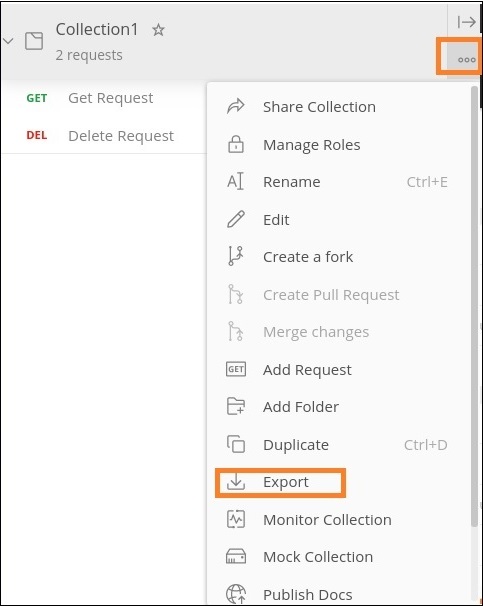
To run Collections using Newman, we have to first launch the Postman application and click on the three dots available beside the Collection name. The details on how to create a Collection are discussed in detail in the Chapter Postman Create Collections.
Run Collections
Follow the steps given below to run collections using Newman −
Step 1 − Click on Export.
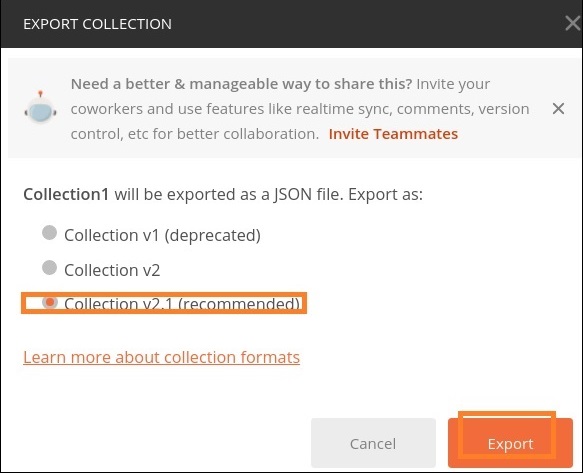
Step 2 − Select the option Collection v2.1(recommended) from the EXPORT COLLECTION pop-up. Click on Export.
Step 3 − Choose a location and then click on Save.
Step 4 − Next, we shall export the Environment. Click on the eye icon to the right of the No Environment dropdown.

Step 5 − Click on the Edit link in the Globals section.
Step 6 − MANAGE ENVIRONMENTS pop-up comes up. Enter URL for the VARIABLE field and https://www.tutorialspoint.com for INITIAL VALUE. Then, click on Download as JSON.
Finally, choose a preferred location and click on Save.
Step 7 − Export the Environment to the same location where the Collection resides.
Step 8 − From the command-line move to the directory path where the Collection and the Environment is stored. Then, execute the command given below −
newman run <"file name">.
The file name should always be in inverted quotes; else it shall be taken as a directory name.
Common commandline arguments for Newman
The common command-line arguments for Newman are given below −
To execute a Collection in an Environment, the command is as follows −
newman run <name of Collection> -e <name of Environment>
To execute a Collection for a number of iterations, the command is as follows−
newman run <name of Collection> -n <iteration count>
To execute a Collection with data file, the command is as follows −
newman run <name of Collection> --data <name of file> -n <iteration count> -e <name of Environment>
Configure delay time in between requests, the command is as follows −
newman run <name of Collection> -d <time of delay>
Postman - OAuth 2.0 Authorization
The OAuth 2.0 is an authorization technique available in Postman. Here, we first obtain a token for accessing the API and then utilise the token to authenticate a request. A token is used to ensure that a user is authorised to access a resource in the server.
If we make an attempt to access a secured URL without the token, a Response code 401 Unauthorized shall be obtained. To start with, the application passes an authorization request for the end user to access a resource.
As the application allows the user access, it asks for an access token from the server by providing user information. In turn, the server yields an access token. The client can then access the secured data via the access token.
