- Postman - Home
- Postman - Introduction
- Postman - Environment Setup
- Postman - Environment Variables
- Postman - Authorization
- Postman - Workflows
- Postman - GET Requests
- Postman - POST Requests
- Postman - PUT Requests
- Postman - DELETE Requests
- Postman - Create Tests for CRUD
- Postman - Create Collections
- Postman - Parameterize Requests
- Postman - Collection Runner
- Postman - Assertion
- Postman - Mock Server
- Postman - Cookies
- Postman - Sessions
- Postman - Newman Overview
- Postman - Run Collections using Newman
- Postman - OAuth 2.0 Authorization
- Postman Useful Resources
- Postman - Quick Guide
- Postman - Useful Resources
- Postman - Discussion
Postman - Mock Server
A mock server is not a real server and it is created to simulate and function as a real server to verify APIs and their responses. These are commonly used if certain responses need to be verified but are not available on the web servers due to security concerns on the actual server.
Purpose of Mock Server
A Mock Server is created for the reasons listed below −
A Mock Server is created if the APIs to be used in Production are still in development.
A Mock Server is used if we want to avoid sending requests on real time data.
Benefits of Mock Server
The benefits of Mock Server are listed below −
Simulation of real API features with examples.
Mock server can be appended to a Collection.
Verify APIs with mocking data.
To identify errors and defects early.
To identify dependencies in API before it is released for actual usage.
It is used by engineers to build a prototype for a concept and showcase it to higher management.
While developing the front end of an application, the developer should have some idea on the response features that shall be obtained from the real server on sending a request. A Mock Server can be really helpful at this time.
Mock Server Creation
Follow the steps given below for creation of mock server in Postman −
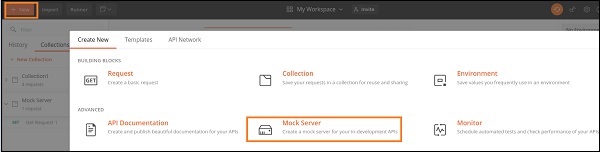
Step 1 − Click on the New icon from the Postman application. Then, click on Mock Server.
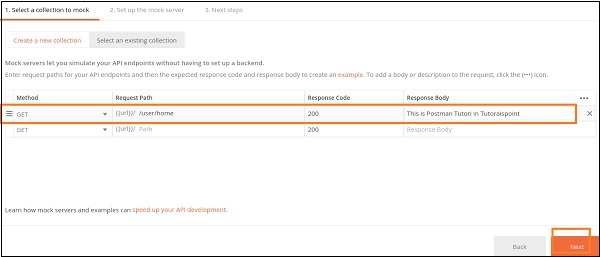
Step 2 − Select GET from the Method dropdown, enter a Request Path as /user/home, Response Code as 200, and a Response Body. Then, click on Next.
Step 3 − Enter a Mock Server name and click on the Create Mock Server button.

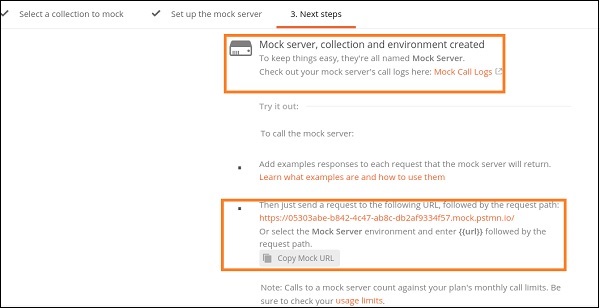
Step 4 − The Mock Server gets created along with the Mock URL. The Copy Mock URL button is used to copy the Mock link. Click on the Close button to proceed.
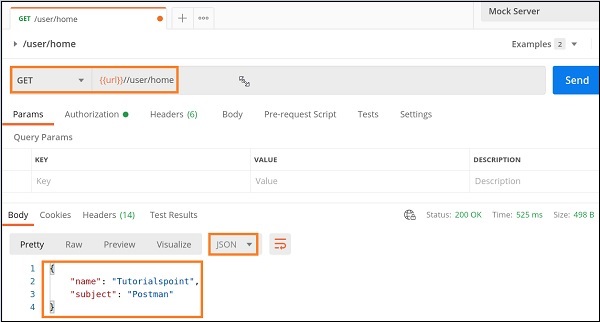
Step 5 − Select Mock Server as the Environment from the No Environment dropdown and click on Send. The Response code obtained is 200 OK which means that the request is successful.
Also the Response Body shows the message This is Postman Tutorial for Tutorialspoint which is the same as we passed as a Response Body in the Step 2.
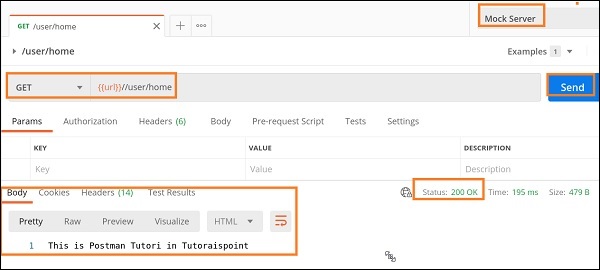
Step 6 − The value of URL can be obtained by clicking on the eye icon at the right upper corner of the screen.
So the complete request Mock URL should be − https://05303abe-b842-4c47-ab8c-db2af9334f57.mock.pstmn.io/user/home(represented by {{url}}/user/home in the address bar in Step 5). We have appended /user/home at the end of the url value since it is the Request Path we have set for the Mock Server in Step2.
Step 7 − We have seen that the Response Body is in text format. We can get the response in JSON format as well. To achieve this select the option Save as example from the Save Response dropdown.

Step 8 − Provide an Example name and select JSON from the Response Body section.
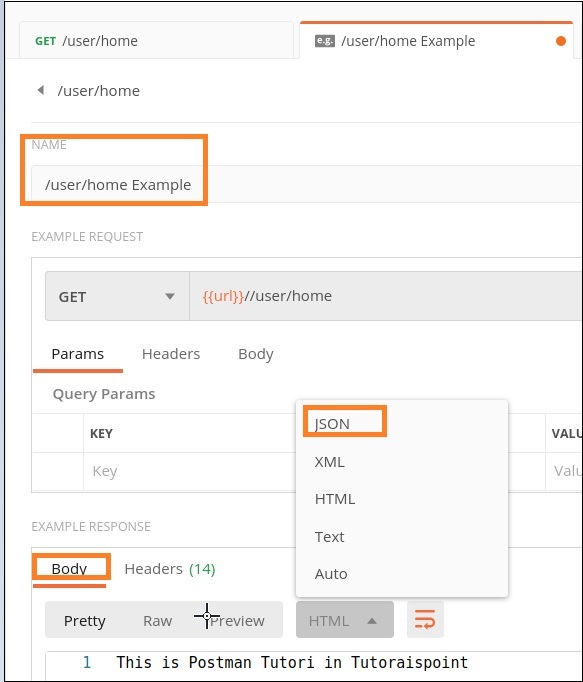
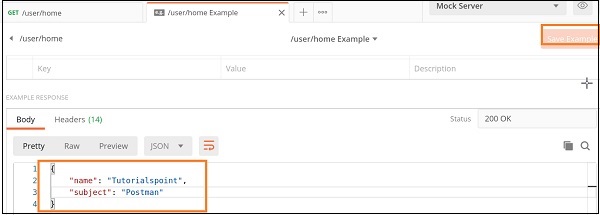
Step 9 − Add the below Response Body in JSON format. Then click on Save Example.
{
	"name": "Tutorialspoint",
	"subject": "Postman"
}
Step 10 − Finally, send the GET request on the same endpoint, and we shall receive the same Response Body as we have passed in the Example request.
The below image shows Response is in HTML format −
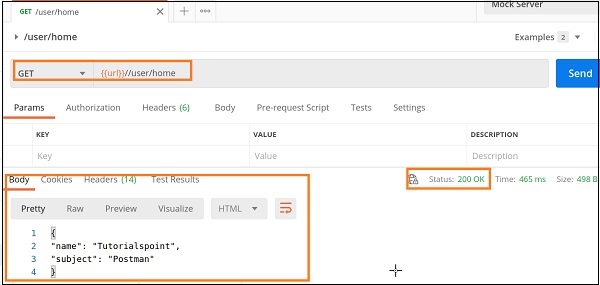
The below image shows Response is in JSON format −
Example Request
Follow the steps given below for Mock Server Creation by example request −
Step 1 − Create a Collection and add a request to it.
The details on how to create a Collection is discussed in detail in the Chapter Postman Create Collections.
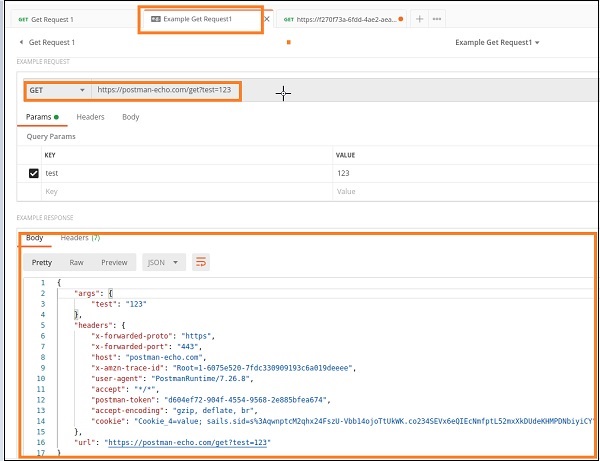
Step 2 − Add the endpoint https://postman-echo.com/get?test=123 and send a GET request.
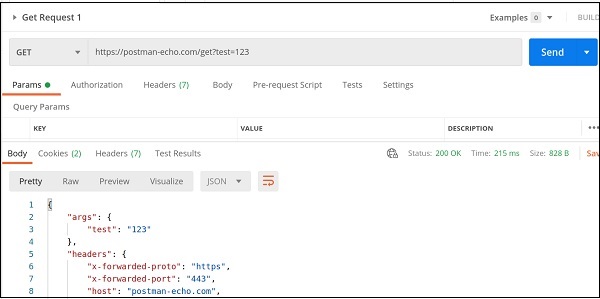
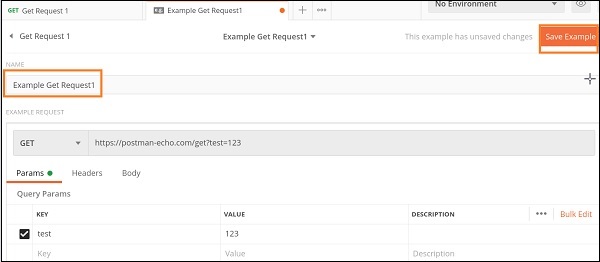
Step 3 − From Response Body, select the option Save as Example from the Save Response dropdown.
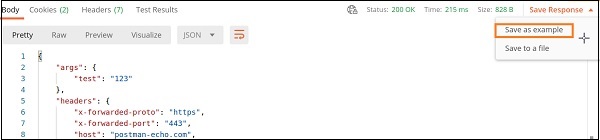
Step 4 − Give an Example name and click on the Save Example button.
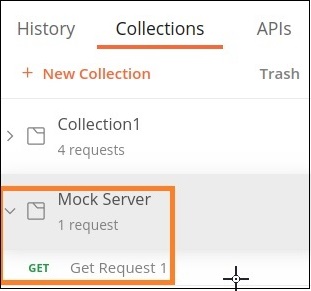
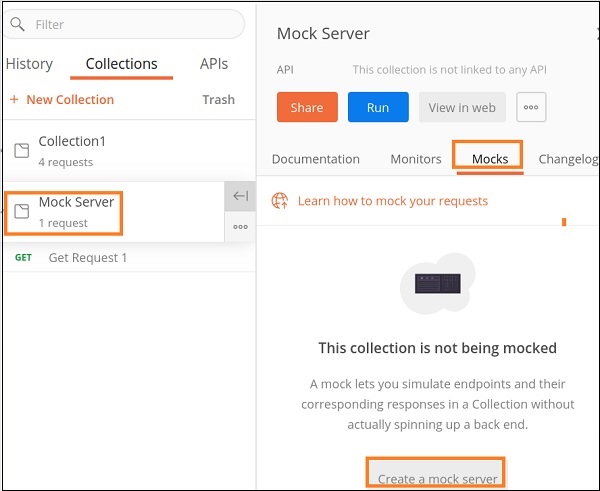
Step 5 − Click on the Collection name Mock Server (that we have created) and click on the Mock tab. Then, click on Create a mock server.
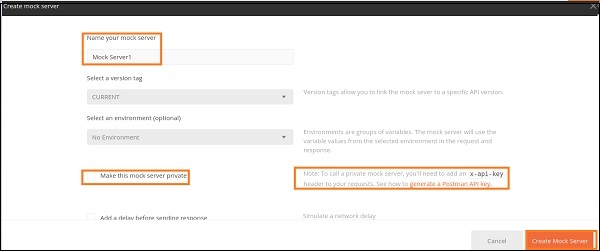
Step 6 − The Create mock server pop-up comes up. Provide a name to the Mock Server and then click on the Create Mock Server button.
Please note − We can make a Mock Server private or public. To make a Mock Server private, we have to check the checkbox Make this mock server private. Then, we need to utilise the Postman API key.
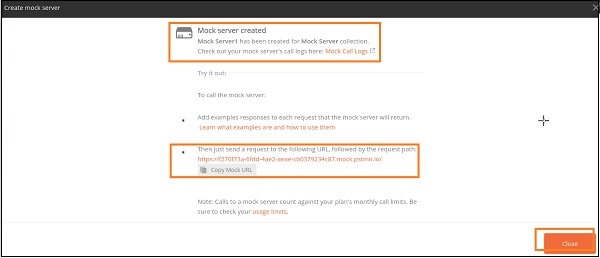
Step 7 − The message Mock server created shall come up. Also, we shall get the Mock URL. We can copy it with the Copy Mock URL button. Then, click on Close.
Step 8 − The Mock Server which we have created gets reflected under the Mock tab in the Collections sidebar. Click on the same.

Step 9 − We shall add a new request and paste the URL we have copied in Step 7. To send a GET request, we shall append the value - /get at the end of the pasted URL.
For example, here, the Mock URL generated is − https://f270f73a-6fdd-4ae2-aeae-cb0379234c87.mock.pstmn.io.
Now to send a GET request, the endpoint should be − https://f270f73a-6fdd-4ae2-aeae-cb0379234c87.mock.pstmn.io/get.
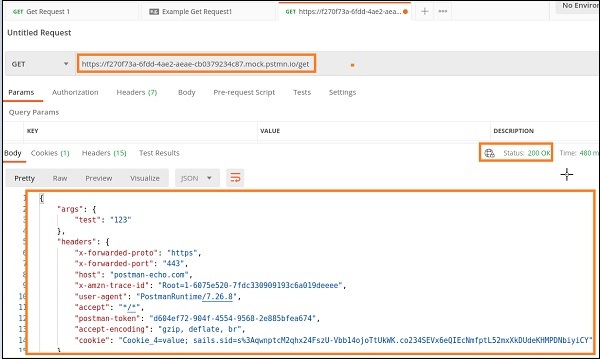
The Response Body received by mocking the server is the same as the Example request.
Response obtained in the Example request is as follows −