- PHP - Home
- PHP - Roadmap
- PHP - Introduction
- PHP - Installation
- PHP - History
- PHP - Features
- PHP - Syntax
- PHP - Hello World
- PHP - Comments
- PHP - Variables
- PHP - Echo/Print
- PHP - var_dump
- PHP - $ and $$ Variables
- PHP - Constants
- PHP - Magic Constants
- PHP - Data Types
- PHP - Type Casting
- PHP - Type Juggling
- PHP - Strings
- PHP - Boolean
- PHP - Integers
- PHP - Files & I/O
- PHP - Maths Functions
- PHP - Heredoc & Nowdoc
- PHP - Compound Types
- PHP - File Include
- PHP - Date & Time
- PHP - Scalar Type Declarations
- PHP - Return Type Declarations
- PHP - Operators
- PHP - Arithmetic Operators
- PHP - Comparison Operators
- PHP - Logical Operators
- PHP - Assignment Operators
- PHP - String Operators
- PHP - Array Operators
- PHP - Conditional Operators
- PHP - Spread Operator
- PHP - Null Coalescing Operator
- PHP - Spaceship Operator
- PHP Control Statements
- PHP - Decision Making
- PHP - If…Else Statement
- PHP - Switch Statement
- PHP - Loop Types
- PHP - For Loop
- PHP - Foreach Loop
- PHP - While Loop
- PHP - Do…While Loop
- PHP - Break Statement
- PHP - Continue Statement
- PHP Arrays
- PHP - Arrays
- PHP - Indexed Array
- PHP - Associative Array
- PHP - Multidimensional Array
- PHP - Array Functions
- PHP - Constant Arrays
- PHP Functions
- PHP - Functions
- PHP - Function Parameters
- PHP - Call by value
- PHP - Call by Reference
- PHP - Default Arguments
- PHP - Named Arguments
- PHP - Variable Arguments
- PHP - Returning Values
- PHP - Passing Functions
- PHP - Recursive Functions
- PHP - Type Hints
- PHP - Variable Scope
- PHP - Strict Typing
- PHP - Anonymous Functions
- PHP - Arrow Functions
- PHP - Variable Functions
- PHP - Local Variables
- PHP - Global Variables
- PHP Superglobals
- PHP - Superglobals
- PHP - $GLOBALS
- PHP - $_SERVER
- PHP - $_REQUEST
- PHP - $_POST
- PHP - $_GET
- PHP - $_FILES
- PHP - $_ENV
- PHP - $_COOKIE
- PHP - $_SESSION
- PHP File Handling
- PHP - File Handling
- PHP - Open File
- PHP - Read File
- PHP - Write File
- PHP - File Existence
- PHP - Download File
- PHP - Copy File
- PHP - Append File
- PHP - Delete File
- PHP - Handle CSV File
- PHP - File Permissions
- PHP - Create Directory
- PHP - Listing Files
- Object Oriented PHP
- PHP - Object Oriented Programming
- PHP - Classes and Objects
- PHP - Constructor and Destructor
- PHP - Access Modifiers
- PHP - Inheritance
- PHP - Class Constants
- PHP - Abstract Classes
- PHP - Interfaces
- PHP - Traits
- PHP - Static Methods
- PHP - Static Properties
- PHP - Namespaces
- PHP - Object Iteration
- PHP - Encapsulation
- PHP - Final Keyword
- PHP - Overloading
- PHP - Cloning Objects
- PHP - Anonymous Classes
- PHP Web Development
- PHP - Web Concepts
- PHP - Form Handling
- PHP - Form Validation
- PHP - Form Email/URL
- PHP - Complete Form
- PHP - File Inclusion
- PHP - GET & POST
- PHP - File Uploading
- PHP - Cookies
- PHP - Sessions
- PHP - Session Options
- PHP - Sending Emails
- PHP - Sanitize Input
- PHP - Post-Redirect-Get (PRG)
- PHP - Flash Messages
- PHP AJAX
- PHP - AJAX Introduction
- PHP - AJAX Search
- PHP - AJAX XML Parser
- PHP - AJAX Auto Complete Search
- PHP - AJAX RSS Feed Example
- PHP XML
- PHP - XML Introduction
- PHP - Simple XML Parser
- PHP - SAX Parser Example
- PHP - DOM Parser Example
- PHP Login Example
- PHP - Login Example
- PHP - Facebook Login
- PHP - Paypal Integration
- PHP - MySQL Login
- PHP Advanced
- PHP - MySQL
- PHP.INI File Configuration
- PHP - Array Destructuring
- PHP - Coding Standard
- PHP - Regular Expression
- PHP - Error Handling
- PHP - Try…Catch
- PHP - Bugs Debugging
- PHP - For C Developers
- PHP - For PERL Developers
- PHP - Frameworks
- PHP - Core PHP vs Frame Works
- PHP - Design Patterns
- PHP - Filters
- PHP - JSON
- PHP - Exceptions
- PHP - Special Types
- PHP - Hashing
- PHP - Encryption
- PHP - is_null() Function
- PHP - System Calls
- PHP - HTTP Authentication
- PHP - Swapping Variables
- PHP - Closure::call()
- PHP - Filtered unserialize()
- PHP - IntlChar
- PHP - CSPRNG
- PHP - Expectations
- PHP - Use Statement
- PHP - Integer Division
- PHP - Deprecated Features
- PHP - Removed Extensions & SAPIs
- PHP - PEAR
- PHP - CSRF
- PHP - FastCGI Process
- PHP - PDO Extension
- PHP - Built-In Functions
- PHP Useful Resources
- PHP - Cheatsheet
- PHP - Questions & Answers
- PHP - Quick Guide
- PHP - Useful Resources
- PHP - Discussion
- PHP - Online Compiler
PHP - Quick Guide
PHP - Introduction
PHP started out as a small open source project that evolved as more and more people found out how useful it was. Rasmus Lerdorf released the first version of PHP way back in 1994. Initially, PHP was supposed to be an abbreviation for "Personal Home Page", but it now stands for the recursive initialism "PHP: Hypertext Preprocessor".
Lerdorf began PHP development in 1993 by writing several Common Gateway Interface (CGI) programs in C, which he used to maintain in his personal homepage. Later on, He extended them to work with web forms and to communicate with databases. This implementation of PHP was "Personal Home Page/Forms Interpreter" or PHP/FI.
Today, PHP is the worlds most popular server-side programming language for building web applications. Over the years, it has gone through successive revisions and versions.
PHP Versions
PHP was developed by Rasmus Lerdorf in 1994 as a simple set of CGI binaries written in C. He called this suite of scripts "Personal Home Page Tools". It can be regarded as PHP version 1.0.
In April 1996, Rasmus introduced PHP/FI. Included built-in support for DBM, mSQL, and Postgres95 databases, cookies, user-defined function support. PHP/FI was given the version 2.0 status.
PHP: Hypertext Preprocessor PHP 3.0 version came about when Zeev Suraski and Andi Gutmans rewrote the PHP parser and acquired the present-day acronym. It provided a mature interface for multiple databases, protocols and APIs, object-oriented programming support, and consistent language syntax.
PHP 4.0 was released in May 2000 powered by Zend Engine. It had support for many web servers, HTTP sessions, output buffering, secure ways of handling user input and several new language constructs.
PHP 5.0 was released in July 2004. It is mainly driven by its core, the Zend Engine 2.0 with a new object model and dozens of other new features. PHP's development team includes dozens of developers and others working on PHP-related and supporting projects such as PEAR, PECL, and documentation.
PHP 7.0 was released in Dec 2015. This was originally dubbed PHP next generation (phpng). Developers reworked Zend Engine is called Zend Engine 3. Some of the important features of PHP 7 include its improved performance, reduced memory usage, Return and Scalar Type Declarations and Anonymous Classes.
PHP 8.0 was released on 26 November 2020. This is a major version having many significant improvements from its previous versions. One standout feature is Just-in-time compilation (JIT) that can provide substantial performance improvements. The latest version of PHP is 8.2.8, released on July 4th, 2023.
PHP Application Areas
PHP is one of the most widely used language over the web. Here are some of the application areas of PHP −
PHP is a server-side scripting language that is embedded in HTML. It is used to manage dynamic content, databases, session tracking, even build entire e-commerce sites. Although it is especially suited to web development, you can also build desktop standalone applications as PHP also has a command-line interface. You can use PHP-GTK extension to build GUI applications in PHP.
PHP is widely used for building web applications, but you are not limited to output only HTML. PHP's ouput abilities include rich file types, such as images or PDF files, encrypting data, and sending emails. You can also output easily any text, such as JSON or XML.
PHP is a cross-platform language, capable of running on all major operating system platforms and with most of the web server programs such as Apache, IIS, lighttpd and nginx. PHP also supports other services using protocols such as LDAP, IMAP, SNMP, NNTP, POP3, HTTP, COM, etc.
Here are some more important features of PHP −
PHP performs system functions. It can create, open, read, write, and close the files.
PHP can handle forms. It can gather data from files, save data to a file, through email you can send data, return data to the user.
You add, delete, modify elements within your database through PHP.
Access cookies variables and set cookies.
Using PHP, you can restrict users to access some pages of your website.
It can encrypt data.
PHP provides a large number of reusable classes and libraries are available on "PEAR" and "Composer". PEAR (PHP Extension and Application Repository) is a distribution system for reusable PHP libraries or classes. "Composer" is a dependency management tool in PHP.
PHP - Installation
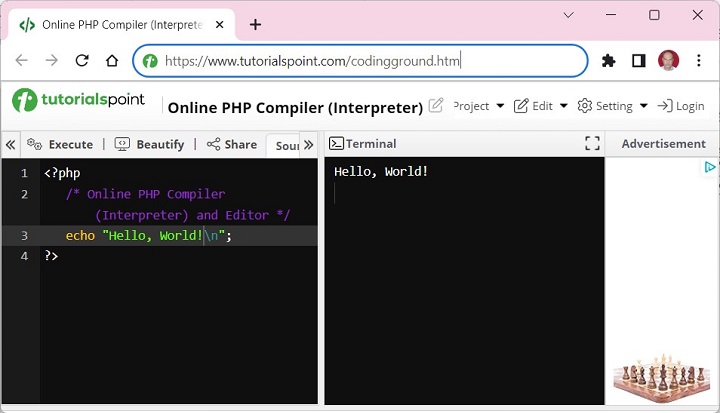
You can start learning the basics of programming in PHP with the help of any of the online PHP compilers freely available on the Internet. This will help in getting acquainted with the features of PHP without installing it on your computer. Later on, install a full-fledged PHP environment on your local machine.
One such online PHP compiler is provided by Tutorialpoints "Coding Ground for Developers". Visit https://www.tutorialspoint.com/codingground.htm, enter PHP script and execute it.
However, to be able to learn the advanced features of PHP, particularly related to the web concepts such as server variables, using backend databases, etc., you need to install the PHP environment on your local machine.
In order to develop and run PHP Web pages, you neeed to install three vital components on your computer system.
Web Server − PHP will work with virtually all Web Server software, including Microsoft's Internet Information Server (IIS), NGNIX, or Lighttpd etc. The most often used web server software is the freely available Apache Server. Download Apache for free here https://httpd.apache.org/download.cgi
Database − PHP will work with virtually all database software, including Oracle and Sybase but most commonly used is freely available MySQL database. Download MySQL for free here https://www.mysql.com/downloads/
PHP Parser − In order to process PHP script instructions a parser must be installed to generate HTML output that can be sent to the Web Browser.
Although it is possible to install these three components separately, and configure the installation correctly, it is a little complex process, particularly for the beginners. Instead, using any all-in-one packaged distribution that contains precompiled Apache, MySQL and PHP binaries is convenient.
XAMPP Installation
There are many precompiled bundles available both in open-source as well as proprietary distributions. XAMPP, from Apache Friends (https://www.apachefriends.org/) is one of the most popular PHP enabled web server packages. We shall be using XAMPP in this tutorial.
XAMPP is an easy to install Apache distribution that contains Apache, MariaDB, PHP and Perl. The letter X in the acronym indicates that it is a cross-platform software, available for use on Windows, Linux and OS X. Note that XAMPP includes MariaDB, which is a fork of MySQL, with no difference in its functionality.
To download the respective installer for your operating system, visit https://www.apachefriends.org/download.html, and download one of the following −
Windows − https://sourceforge.net/projects/
Using the installer on Windows is a completely wizard based installation. All you need to provide is an administrator access and the location of the installation directory which is "c:\xampp" by default.
To install XAMPP on Linux, use the following steps −
Step 1 − Change the permissions to the installer −
chmod 755 xampp-linux-*-installer.run
Run the installer −
sudo ./xampp-linux-*-installer.run
XAMPP is now installed below the "/opt/lamp" directory.
Step 2 − To start XAMPP simply call this command −
sudo /opt/lampp/lampp start
You should now see something like this on your screen −
Starting XAMPP ...
LAMPP: Starting Apache...
LAMPP: Starting MySQL...
LAMPP started.
Ready. Apache and MySQL are running.
You can also use a graphical tool to manage your servers easily. You can start this tool with the following commands −
cd /opt/lampp
sudo ./manager-linux.run (or manager-linux-x64.run)
Step 3 − To stop XAMPP simply call this command −
sudo /opt/lampp/lampp stop
You should now see something like this on your screen −
Stopping XAMPP ...
LAMPP: Stopping Apache...
LAMPP: Stopping MySQL...
LAMPP stopped.
Also, note that there is a graphical tool that you can use to start/stop your servers easily. You can start this tool with the following commands −
cd /opt/lampp
sudo ./manager-linux.run (or manager-linux-x64.run)
If you are using OS X, follow these steps −
To start the installation, Open the DMG-Image, and double-click the image to start the installation process.
To start XAMPP simply open XAMPP Control and start Apache, MySQL and ProFTPD. The name of the XAMPP Control is "manager-osx".
To stop XAMPP simply open XAMPP Control and stop the servers. The name of the XAMPP Control is "manager-osx".
The XAMPP control panel is a GUI tool from which the Apache server, and MySQL can be easily started and stopped.
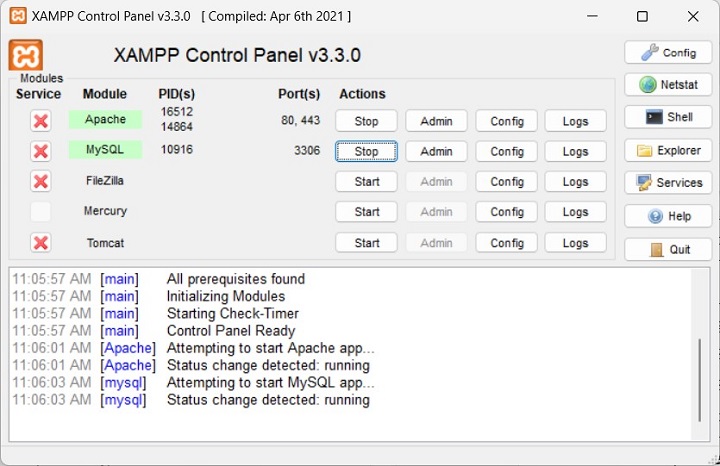
Press the Admin button after starting the Apache module. The XAMPP homepage appears like the one shown below −

PHP Parser Installation
Before you proceed it is important to make sure that you have proper environment setup on your machine to develop your web programs using PHP.
Type the following address into your browser's address box.
http://127.0.0.1/info.php
If this displays a page showing your PHP installation related information then it means you have PHP and Webserver installed properly. Otherwise you have to follow given procedure to install PHP on your computer.
This section will guide you to install and configure PHP over the following four platforms −
Apache Configuration
If you are using Apache as a Web Server then this section will guide you to edit Apache Configuration Files.
Just Check it here − PHP Configuration in Apache Server
PHP.INI File Configuration
The PHP configuration file, php.ini, is the final and most immediate way to affect PHP's functionality.
Just Check it here − PHP.INI File Configuration
Windows IIS Configuration
To configure IIS on your Windows machine you can refer your IIS Reference Manual shipped along with IIS.
You now have a complete PHP development environment on your local machine.
PHP - History
PHP started out as a small open-source project that evolved gradually as more and more people found out how useful it was. Rasmus Lerdorf released the first version of PHP way back in 1994. At that time, PHP stood for Personal Home Page, as he used it to maintain his personal homepage. Later on, he added database support and called it as "Personal Home Page/Forms Interpreter" or PHP/FI, which could be used to build simple, dynamic web applications.
Zeev Suraski and Andi Gutmans rewrote the parser in 1997 and formed the base of PHP 3. The name of the language was also changed to the recursive acronym PHP: Hypertext Preprocessor. They are also the authors of Zend Engine, a compiler and runtime environment for the PHP. Zend Engine powered PHP 4 was released in May 2000.
PHP 5 was released in 2004, which included many new features such as OOP support, the PHP Data Objects (PDO), and numerous performance enhancements.
PHP 7, is a new major PHP version which was developed in 2015. It included new language features, most notable being, the introduction of return type declarations for functions which complement the existing parameter type declarations, and support for the scalar types (integer, float, string, and boolean) in parameter and return type declarations.
New Features in PHP 8
PHP 8 is the latest major version, released in November 2020. Some of the new features and notable changes include:
Just-in-time (JIT) Compilation
PHP 8's JIT compiler provides substantial performance improvements mathematical-type operations than for common web-development use cases. The JIT compiler provides the future potential to move some code from C to PHP.
The "match: Expression
The newly introduced "match" expression is more compact than a switch statement. Because match is an expression, its result can be assigned to a variable or returned from a function.
PHP 8 Type Changes and Additions
PHP 8 introduced union types, a new static return type, and a new mixed type. PHP 8 also provided Attributes, (similar to "annotations" in other programming languages) that help in adding metadata to PHP classes.
In addition, there have been many changes and additions to the PHP standard library. PHP 8.2.9 is the latest stable version available.
Important milestones in PHPs release history are summarized in the following table −
| Version | Description |
|---|---|
Version 1.0 |
Officially called "Personal Home Page Tools (PHP Tools)". This is the first use of the name "PHP". |
Version 2.0 |
Officially called "PHP/FI 2.0". This is the first release that could actually be characterised as PHP, being a standalone language with many features that have endured to the present day. |
Version 3.0 |
Development moves from one person to multiple developers. Zeev Suraski and Andi Gutmans rewritten the base for this version. |
Version 4.0 |
Added more advanced two-stage parse/execute tag-parsing system called the Zend engine. |
Version 5.0 |
Zend Engine II with a new object model. |
Version 5.1 |
Performance improvements with the introduction of compiler variables in re-engineered PHP Engine. Added PHP Data Objects (PDO) as a consistent interface for accessing databases. |
Version 6.x |
Abandoned version of PHP that planned to include native Unicode support. |
Version 7.0 |
|
Version 7.3 |
Flexible Heredoc and Nowdoc syntax |
Version 8.0 |
|
PHP - Features
PHP (Hypertext Preprocessor) is an open-source server-side scripting language primarily used for web development. PHP can be embedded into HTML code.
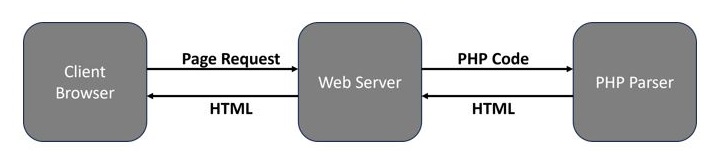
PHP is mainly used for server-side scripting, which runs scripts on the web server and then forwards the HTML they process to the web browser on the client. This makes it possible for programmers to design dynamic webpages that can manage sessions, handle forms, communicate with databases, and carry out a variety of other duties necessary for online applications.
Features of PHP
Over the years, PHP has incorporated numerous features. It is being consistently upgraded with new features and code revisions. In this chapter, let's highlight some of the key features of PHP:
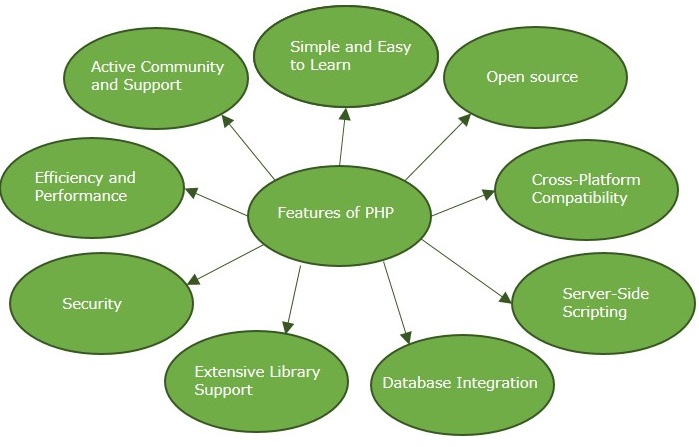
PHP is Simple and Easy to Learn
The syntax of PHP compared to that of C, Java, and Perl, which makes it rather simple for developers to comprehend, particularly for those who are already familiar with other programming languages. Web apps can be developed quickly because of its generous pre-defined functions.
PHP is Open Source
PHP is free and open-source, meaning we can download it for free, and anyone can use it, modify it, and distribute. This encourages a sizable and vibrant developer community that uses forums, tutorials, and documentation to support and contribute to its development.
PHP is Cross-Platform Compatible
Numerous operating systems including Windows, Linux, macOS, and UNIX; and different databases like MongoDB, PostgreSQL, MySQL are compatible with PHP.
PHP-based apps can operate on several environments without requiring any modifications due to this cross-platform inter-operability.
Server-Side Scripting in PHP
PHP is mainly used for server-side scripting, which runs scripts on the web server and then forwards the HTML they process to the web browser on the client. It helps the developers in Form Submission and Session Management with users across multiple requests.
PHP Supports Easy Integration with Databases
PHP offers strong database interaction support for various DBMS. It offers numerous built-in functions to achieve the database connection.
PHP also includes database abstraction layer which integrates the communication between the application and the database. This makes it simple for developers to design database-driven web applications.
PHP Provides Extensive Library Support
PHP provides extensive libraries for various functionalities like image processing, encryption, PDF generation, parsing XML and JSON, handling sessions and cookies, and much more.
Security Features in PHP
PHP provides a plethora of built-in functions for data encryption. Developers can also leverage third-party applications for security.
PHP employs security algorithms like Sha1 and MD5 to encrypt strings. Additionally, functions like filter_var and strip_tags contribute in maintaining a secure environment for the users. PHP also supports secure communication protocols like HTTPS.
Efficient Memory and Session Management in PHP
PHP is a reliable language due to its efficient memory management and session management. It avoids unnecessary memory allocation.
PHP code runs in its own memory space which makes it faster compared to other scripting languages making it more efficient. In PHP, the database connections are also fast.
PHP Has Active Community and Support
Since PHP is an open-source platform, it has a vibrant community of developers who actively contribute to its development, share knowledge, provide support, and create third-party tools and frameworks.
Due to this active community support, PHP remains up-to-date and developers can easily seek help from other community members in case they get any errors or exceptions while writing PHP codes.
PHP - Syntax
The syntax rules of PHP are very similar to C Language. PHP is a server side scripting language. A PHP code is stored as a text file with ".php" extension. A ".php" file is essentially a web page with one or more blocks of PHP code interspersed in the HTML script. However, it must be opened in a browser with a HTTP protocol URL. In other words, if you double-click on the PHP file icon, it will be opened locally with the file protocol. For example, if you open the "index.php" file in the document root folder of your Apache server, it may just show the text of the PHP code. However, if you launch the Apache server and open the URL http://localhost/index.php, it displays the Apache home page.
A ".php" file may contain HTML, CSS and JavaScript code blocks along with the PHP code. Hence, the PHP parser must differentiate between the PHP code from the other elements. When a ".php" file is opened in the web browser, the HTML engine renders the HTML/CSS/JavaScript part and escapes out of the HTML block as soon as the statements included in PHP tags are encountered. The PHP parser interpreter processes this block and returns the response to the browser.
PHP defines two methods of using tags for escaping the PHP code from HTML. Canonical PHP tags and Short-open (SGML-style) tags.
Canonical PHP Tags
The most universally effective PHP tag style is −
<?php
   One or more PHP statements
?>
If you use this style, you can be positive that your tags will always be correctly interpreted.
Short-open (SGML-style) Tags
Short or short-open tags look like this −
<?php
	One or more PHP statements
?>
Short tags are, as one might expect, the shortest option. You must do one of two things to enable PHP to recognize the tags −
Choose the "--enable-short-tags" configuration option when you're building PHP.
Set the "short_open_tag" setting in your php.ini file to on.
short_open_tag=on
This option must be disabled to parse XML with PHP because the same syntax is used for XML tags.
The use of ASP-style tags −
<%...%>
and HTML script tags −
<script language = "PHP">...</script>
has been discontinued.
Escaping from HTML
The PHP parser ignores everything outside of a pair of opening and closing tags. Thus, a PHP file can have mixed content. This allows PHP to be embedded in HTML documents −
<p>This is a HTML statement</p>
<?php echo This is a PHP statement.'; ?>
<p>This is another HTML statement.</p>
A little advanced example of escaping using conditions is shown below −
<?php if ($expression == true): ?>
   This HTML statement will be rendered.
<?php else: ?>
   Otherwise this HTML statement will be rendered.
<?php endif; ?>
PHP skips the blocks where the condition is not met, even though they are outside of the PHP open/close tags.
For outputting large blocks of text, dropping out of PHP parsing mode is generally more efficient than sending all of the text through echo or print.
Basic Syntax of PHP
The basic syntax of PHP is very similar to that of C and C++.
Statements are Expressions Terminated by Semicolons
A statement in PHP is any expression that is followed by a semicolon (;). Any sequence of valid PHP statements that is enclosed by the PHP tags is a valid PHP program.
Here is a typical statement in PHP, which in this case assigns a string of characters to a variable called "$greeting" −
$greeting = "Welcome to PHP!";
A physical line in the text editor doesnt have any significance in a PHP code. There may be multiple semicolon-terminated statements in a single line. On the other hand, a PHP statement may spill over more than one line if required.
Expressions are Combinations of Tokens
The smallest building blocks of PHP are the indivisible tokens such as numbers (3.14159), strings ("two"), variables ($two), constants (TRUE), and the special words that make up the syntax of PHP itself like "if", "else", "while", "for", and so forth.
Braces Make Blocks
Although statements cannot be combined like expressions, you can always put a sequence of statements anywhere a statement can go, by enclosing them in a set of curly braces.
Here, both the following statements are equivalent −
if (3 == 2 + 1)
   print("Good - I haven't totally lost my mind.
");
if (3 == 2 + 1) {
   print("Good - I haven't totally");
   print("lost my mind.
");
}
PHP is Case Sensitive
PHP is a case sensitive language. The names of various PHP identifiers such as variable, function, class, etc., are case sensitive. As a result, the variable "$age" is not the same as "$Age". Similarly, a function called "myfunction()" is different from another function called "MyFunction()".
PHP - Hello World
Conventionally, learners write a "Hello World" program as their first program when learning a new language or a framework. The objective is to verify if the software to be used has been installed correctly and is working as expected. To run a Hello World program in PHP, you should have installed the Apache server along with PHP module on the operating system you are using.
PHP is a server-side programming language. The PHP code must be available in the document root of the web server. The web server document root is the root directory of the web server running on your system. The documents under this root are accessible to any system connected to the web server (provided the user has permissions). If a file is not under this root directory, then it cannot be accessed through the web server.
In this tutorial, we are using XAMPP server software for writing PHP code. The default document root directory is typically "C:\xampp\htdocs\" on Windows and "/opt/lamp/htdocs/" on Linux. However, you can change the default document root by modifying the DocumentRoot setting in Apache servers configuration file "httpd.conf".
While on a Windows operating system, start the Apache server from the XAMPP control panel.

Browse to the "htdocs" directory. Save the following script as "hello.php" in it.
<?php
   echo "Hello World!";
?>
Open a new tab in your browser and enter http://localhost/hello.php as the URL. You should see the "Hello World" message in the browser window.
A PHP script may contain a mix of HTML and PHP code.
<!DOCTYPE html>
<html>
<body>
   <h1>My PHP Website</h1>
   <?php
      echo "Hello World!";
   ?>
</body>
</html>
The "Hello World" message will be rendered as a plain text. However, you can put HTML tags inside the "Hello World" string. The browser will interpret the tags accordingly.
In the following code, the "echo" statement renders "Hello World" so that it is in <h1> heading with the text aligned at the center of the page.
<?php
   echo "<h1 align='center'>Hello World!</h1>";
?>
PHP Script from Command Prompt
You can run your PHP script from the command prompt. Let's assume you have the following content in your "hello.php" file.
<?php
   echo "Hello PHP!!!!!";
?>
Add the path of the PHP executable to your operating systems path environment variable. For example, in a typical XAMPP installation on Windows, the PHP executable "php.exe" is present in "c:\xampp\php" directory. Add this directory in the PATH environment variable string.
Now run this script as command prompt −
C:\xampp\htdocs>php hello.php
You will get the following output −
Hello PHP!!!!!
PHP - Comments
A comment in any computer program (such as a PHP program) is a certain explanatory text that is ignored by the language compiler/interpreter. Its purpose is to help the user understand the logic used in the program algorithm.
Although placing comments in the code is not essential, it is a highly recommended practice. The comments also serve as program documentation. Comments are also useful when the code needs to be debugged and modified.
There are two commenting formats in PHP −
Single-line Comments
Multi-line Comments
Single-line Comments
They are generally used for short explanations or notes relevant to the local code. PHP uses two notations for inserting a single-line comment in a program.
Single-line Comments Using "#"
A line in PHP code starting with the "#" symbol is treated as a single-line comment.
<?php
   # Single line comment starting with # symbol
   echo 'Hello World';
?>
Single-line Comments Using "//"
PHP also supports C style of single-line comments with "//" symbol. A line starting with double oblique symbol is treated as a comment.
<?php
   // Single line comment starting with // symbol
   echo 'Hello World';
?>
A comment that starts with the symbol "#" or "//" need not be closed. The effect of these symbols last till the end of the physical line.
In other words, the PHP parser will treat the next line as a PHP statement and not as a comment even if there is no closing comment marker.
Multi-line Comments
Multi-line comments are generally used to provide pseudocode algorithms and more detailed explanations when necessary.
The multiline style of commenting is the same as in C. One or more lines embedded inside the "/*" and "*/" symbols are treated as a comment.
Example of Multi-line Comment in PHP
Here is the example of a multi-line comment.
<?php

   /* This is a multiline comment example
   program to add two numbers
   Variables used - $x for first number,
   $y for second number */

   $x=10;
   $y=20;
   print "Total = ". $x+$y;
?>
Note that you can put even a single line inside the "/* .. */" symbols. However, if there is a "/*" symbol in the program, it must have a closing end-of comment marker "*/". If not, an error will be displayed as follows −
PHP Parse error: Unterminated comment starting line 3 in /home/cg/root/65ded9eeb52fc/main.php on line 3
PHP - Variables
A variable in PHP is a named memory location that holds data belonging to one of the data types.
PHP uses the convention of prefixing a dollar sign ($) to the name of a variable.
Variable names in PHP are case-sensitive.
Variable names follow the same rules as other labels in PHP. A valid variable name starts with a letter or underscore, followed by any number of letters, numbers, or underscores.
As per the naming convention, "$name", "$rate_of_int", "$Age", "$mark1" are examples of valid variable names in PHP.
Invalid variable names: "name" (not having $ prefix), "$rate of int" (whitespace not allowed), "$Age#1" (invalid character #), "$11" (name not starting with alphabet).
Variables are assigned with the "=" operator, with the variable on the left hand side and the expression to be evaluated on the right.
No Need to Specify the Type of a Variable
PHP is a dynamically typed language. There is no need to specify the type of a variable. On the contrary, the type of a variable is decided by the value assigned to it. The value of a variable is the value of its most recent assignment.
Take a look at this following example −
<?php
   $x = 10;
   echo "Data type of x: " . gettype($x) . "\n";

   $x = 10.55;
   echo "Data type of x now: " . gettype($x) . "";
?>
It will produce the following output −
Data type of x: integer
Data type of x now: double
Automatic Type Conversion of Variables
PHP does a good job of automatically converting types from one to another when necessary. In the following code, PHP converts a string variable "y" to "int" to perform addition with another integer variable and print 30 as the result.
Take a look at this following example −
<?php
   $x = 10;
   $y = "20";

   echo "x + y is: ", $x+$y;
?>
It will produce the following output −
x + y is: 30
Variables are Assigned by Value
In PHP, variables are always assigned by value. If an expression is assigned to a variable, the value of the original expression is copied into it. If the value of any of the variables in the expression changes after the assignment, it doesnt have any effect on the assigned value.
<?php
   $x = 10;
   $y = 20;
   $z = $x+$y;
   echo "(before) z = ". $z . "\n";

   $y=5;
   echo "(after) z = ". $z . "";
?>
It will produce the following output −
(before) z = 30
(after) z = 30
Assigning Values to PHP Variables by Reference
You can also use the way to assign values to PHP variables by reference. In this case, the new variable simply references or becomes an alias for or points to the original variable. Changes to the new variable affect the original and vice versa.
To assign by reference, simply prepend an ampersand (&) to the beginning of the variable which is being assigned (the source variable).
Take a look at this following example −
<?php
   $x = 10;
   $y = &$x;
   $z = $x+$y;
   echo "x=". $x . " y=" . $y . " z = ". $z . "\n";

   $y=20;
   $z = $x+$y;
   echo "x=". $x . " y=" . $y . " z = ". $z . "";
?>
It will produce the following output −
x=10 y=10 z = 20
x=20 y=20 z = 40
Variable Scope
Scope can be defined as the range of availability a variable has to the program in which it is declared. PHP variables can be one of four scope types −
Variable Naming
Rules for naming a variable is −
Variable names must begin with a letter or underscore character.
A variable name can consist of numbers, letters, underscores but you cannot use characters like + , - , % , ( , ) . & , etc
There is no size limit for variables.
PHP - Echo/Print
In PHP, both echo and print statements are used to render the output either on the browser or the PHP console. Both of them are not functions but they are language constructs. Hence, parentheses should not be used with either of them.
The "echo" Statement in PHP
The echo statement is used with following syntax −
echo(string ...$expressions): void
The echo statement outputs one or more expressions, with no additional newlines or spaces.
Example
Here is an example of how the echo statement works in PHP −
<?php
   $name = "Rajesh";
   echo "Hello " . $name . " How are you?"
?>
It will produce the following output −
Hello Rajesh How are you?
Since a double quoted string is similar to a single quoted string in PHP, the following statement produces the same output.
echo 'Hello ' . $name . ' How are you?';
Example
A double quoted string outputs the value of the variable. Hence, the following statement inserts the value of "$name" variable before printing the output.
<?php
   $name = "Rajesh";
   echo "Hello $name How are you?";
?>
It will produce the following output −
Hello Rajesh How are you?
Example
But, a single-quoted string will output "$name" as it is.
<?php
   $name = "Rajesh";
   echo 'Hello $name How are you?';
?>
It will produce the following output −
Hello $name How are you?
A string passed to an echo statement can either be passed individually as multiple arguments or concatenated together and passed as a single argument. So, both the following statements are valid −
echo 'Hello ', 'how ', 'are ', 'you?', "\n";
echo 'Hello ' . 'how ' . 'are ' . 'you?' . "\n";
Example
Note that output of the two successive echo statements will be rendered in the same line if the newline character is not used. Take a look at the following example −
<?php
   echo "hello";
   echo "world";
?>
It will produce the following output −
helloworld
The "print" Statement in PHP
The print statement is similar to echo, but it outputs an expression.
print(string $expression): int
Like echo, print is also a language construct. Its argument is an expression but it is not put in parentheses.
The major difference is that the print statement in PHP accepts a single argument only and always returns 1.
Example
Take a look at this following example −
<?php
   $name = "Rajesh";

   print "Hello " . $name . " How are you?\n";
   print "Hello $name How are you?";
?>
It will produce the following output −
Hello Rajesh How are you?
Hello Rajesh How are you?
Output Multiline Strings Using Print/Echo
Both echo and print statements can output multiline strings spanning over more than one lines in the editor. Take a look at the following example −
<?php
   print "
   Multi-line
   string can be output
   by echo as well as
   print statement in PHP
   ";
?>
It will produce the following output −
Multi-line
string can be output
by echo as well as
print statement in PHP
The output will remain the same if we replace print with echo.
PHP var_dump() Function
One of the built-in functions in PHP is the var_dump() function. This function displays structured information such as type and the value of one or more expressions given as arguments to this function.
var_dump(mixed $value, mixed ...$values): void
This function returns all the public, private and protected properties of the objects in the output. The dump information about arrays and objects is properly indented to show the recursive structure.
For the built-in integer, float and Boolean varibles, the var_dump() function shows the type and value of the argument variable.
Example 1
For example, here is an integer variable −
<?php
   $x = 10;
   var_dump ($x);
?>
The dump information is as follows −
int(10)
Example 2
Let's see how it behaves for a float variable −
<?php
   $x = 10.25;
   var_dump ($x);
?>
The var_dump() function returns the following output −
float(10.25)
Example 3
If the expression is a Boolean value −
<?php
   $x = true;
   var_dump ($x);
?>
It will produce the following output −
bool(true)
Example 4
For a string variable, the var_dump() function returns the length of the string also.
<?php
   $x = "Hello World";
   var_dump ($x);
?>
It will produce the following output −
string(11) "Hello World"
Here we can use the <pre> HTML tag that dislays preformatted text. Text in a <pre> element is displayed in a fixed-width font, and the text preserves both the spaces and the line breaks.
<?php
   echo "<pre>";
   $x = "Hello World";
   var_dump ($x);
   echo "</pre>"
?>
It will produce the following output −
string(11) "Hello World"
Example 5 - Studying the Array Structure Using var_dump()
The var_dump() function is useful to study the array structure. In the following example, we have an array with one of the elements of the array being another array. In other words, we have a nested array situation.
<?php
   $x = array("Hello", false, 99.99, array(10, 20,30));
   var_dump ($x);
?>
It will produce the following output −
array(4) {
  [0]=>
  string(5) "Hello"
  [1]=>
  bool(false)
  [2]=>
  float(99.99)
  [3]=>
  array(3) {
    [0]=>
    int(10)
    [1]=>
    int(20)
    [2]=>
    int(30)
  }
}
Example 6
Since "$x" is an indexed array in the previous example, the index starting with "0" along with its value is dumped. In case the array is an associate array, the key-value pair information is dumped.
<?php
   $x = array(
      "Hello", false, 99.99,
      array(1=>10, 2=>20,3=>30)
   );
   var_dump($x);
?>
Here, you will get the following output −
array(4) {
  [0]=>
  string(5) "Hello"
  [1]=>
  bool(false)
  [2]=>
  float(99.99)
  [3]=>
  array(3) {
    [1]=>
    int(10)
    [2]=>
    int(20)
    [3]=>
    int(30)
  }
}
When you use var_dump() to show array value, there is no need of using the end tag " </pre> ".
Example 7
The var_dump() function can als reveal the properties of an object representing a class. In the following example, we have declared a Point class with two private properties "x" and "y". The class constructor initializes the object "p" with the parameters passed to it.
The var_dump() function provides the information about the object properties and their corrcponding values.
<?php
   class Point {
      private int $x;
      private int $y;

      public function __construct(int $x, int $y = 0) {
         $this->x = $x;
         $this->y = $y;
      }
   }

   $p = new Point(4, 5);
   var_dump($p)
?>
It will produce the following output −
object(Point)#1 (2) {
  ["x":"Point":private]=>
  int(4)
  ["y":"Point":private]=>
  int(5)
}
There is a similar built-in function for producing dump in PHP, named as get_defined_vars().
var_dump(get_defined_vars());
It will dump all the defined variables to the browser.
PHP - $ and $$ Variables
We know that PHP uses the convention of prefixing the variable names by the "$" symbol. PHP also has the provision of declaring dynamic variables by prefixing two dollar symbols ($$) to the name. A variable variable (or a dynamic variable) can be set and used dynamically.
The declaration of a normal variable is like this −
$a = 'good';
A dynamic variable takes the value of a normal variable and treats that as the name of the variable. In the above example, "good" can be used as the name of a variable by using two dollar signs "$$" −
$$a = 'morning';
We now have two variables: "$a" with contents "good" and "$$a" with contents "morning". As a result, the following echo statements will produce the same output −
echo "$a {$$a}";
echo "$a $good";
Both produce the same output −
good morning
Example 1
Take a look at this following example −
<?php
   $a = 'good';
   $$a = 'morning';

   echo "$a {$$a}\n";
   echo "$a $good";
?>
It will produce the following output −
good morning
good morning
Example 2
Let's take a look at another example −
<?php
   $x = "foo";
   $$x = "bar";
   echo "Value of x = " .$x . "\n";
   echo 'Value of $$x = ' . $$x . "\n";
   echo 'Value of foo = ' . $foo;
?>
Here, you will get the following output −
Value of x = foo
Value of $$x = bar
Value of foo = bar
Using Multiple "$" Symbols
Note that the use of "$" symbol is not restricted to two. Any number of dollar symbols can be prefixed.
Suppose there is a variable "$x" with "a" as its value. Next, we define $$x='as', then "$$x" as well as "$a" will have the same value. Similarly, the statement $$$x='and' effectively declares a "$as" variable whose value is 'and'.
Example
Here is a complete example that shows the use of multiple "$" symbols.
<?php
   $php = "a";
   $lang = "php";
   $World = "lang";
   $Hello = "World";
   $a = "Hello";
   echo '$a= ' . $a;
   echo "\n";
   echo '$$a= ' . $$a;
   echo "\n";
   echo '$$$a= ' . $$$a;
   echo "\n";
   echo '$$$$a= ' . $$$$a;
   echo "\n";
   echo '$$$$$a= ' . $$$$$a;
?>
When you run this code, it will produce the following output −
$a= Hello
$$a= World
$$$a= lang
$$$$a= php
$$$$$a= a
Using Dynamic Variables with Arrays
Using dynamic variables with arrays may lead to certain ambiguous situations. With an array "a", if you write $$a[1], then the parser needs to know if you are refering to "$a[1]" as a variable or if you want "$$a" as the variable and then the [1] index from that variable.
To resolve this ambiguity, use ${$a[1]} for the first case and ${$a}[1] for the second.
Example
Take a look at the following example −
<?php
   $vars = array("hw", "os", "lang");
   $var_hw="Intel";
   $var_lang="PHP";
   $var_os="Linux";

   foreach ($vars as $var)
      echo ${"var_$var"} . "\n";

   print "$var_hw\n$var_os\n$var_lang";
?>
It will produce the following output −
Intel
Linux
PHP
Intel
Linux
PHP
It may be noted that this technique cannot be used with PHP's Superglobal arrays (Several predefined variables in PHP are "superglobals", which means they are available in all scopes throughout a script) within functions or class methods. The variable "$this" is a special variable in PHP and it cannot be referenced dynamically.
PHP - Constants
A constant in PHP is a name or an identifier for a simple value. A constant value cannot change during the execution of the PHP script.
By default, a PHP constant is case-sensitive.
By convention, constant identifiers are always uppercase.
A constant name starts with a letter or underscore, followed by any number of letters, numbers, or underscore.
There is no need to write a dollar sign ($) before a constant, however one has to use a dollar sign before a variable.
Examples of Valid and Invalid Constant Names in PHP
Here are some examples of valid and invalid constant names in PHP −
// Valid constant names
define("ONE",     "first thing");
define("TWO2",    "second thing");
define("THREE_3", "third thing");
define("__THREE__", "third value");

// Invalid constant names
define("2TWO",    "second thing");
Difference between Constants and Variables in PHP
Constants cannot be defined by simple assignment; they can only be defined using the define() function.
Constants may be defined and accessed anywhere without regard to variable scoping rules.
Once the Constants have been set, they may not be redefined or undefined.
Defining a Named Constant
The define() function in PHP library is used to define a named constant at runtime.
define(string $const_name, mixed $value, bool $case = false): bool
Parameters
const_name − The name of the constant.
value − The value of the constant. It can be a scalar value (int, float, string, bool, or null) or array values are also accepted.
case − If set to true, the constant will be defined case-insensitive. The default behavior is case-sensitive, i.e., CONSTANT and Constant represent different values.
The define() function returns "true" on success and "false" on failure.
Example 1
The following example demonstrates how the define() function works −
<?php
   define("CONSTANT", "Hello world.");

   echo CONSTANT;
   // echo Constant;
?>
The first echo statement outputs the value of CONSTANT. You will get the following output −
Hello world.
But, when you uncomment the second echo statement, it will display the following error −
Fatal error: Uncaught Error: Undefined constant "Constant" in hello.php: on line 5
If you set the case parameter to False, PHP doesnt differentiate upper and lowercase constants.
Example 2
You can also use an array as the value of a constant. Take a look at the following example −
<?php
   define(
      $name="LANGS",
      $value=array('PHP', 'Java', 'Python')
   );
   var_dump(LANGS);
?>
It will produce the following output −
array(3) {
  [0]=>
  string(3) "PHP"
  [1]=>
  string(4) "Java"
  [2]=>
  string(6) "Python"
}
Using the constant() Function
The echo statement outputs the value of the defined constant. You can also use the constant() function. It returns the value of the constant indicated by name.
constant(string $name): mixed
The constant() function is useful if you need to retrieve the value of a constant, but do not know its name. I.e. it is stored in a variable or returned by a function.
<?php
   define("MINSIZE", 50);

   echo MINSIZE;
   echo PHP_EOL;
   echo constant("MINSIZE");	// same thing as the previous line
?>
It will produce the following output −
50
50
Using the defined() Function
The PHP library provides a defined() function that checks whether a given named constant exists. Take a look at the following example −
<?php
   define('MAX', 100);

   if (defined('MAX')) {
      echo MAX;
   }
?>
It will produce the following output −
100
PHP also has a function called "get_defined_constants()" that returns an associative array of all the defined constants and their values.
PHP - Magic Constants
The magical constants in PHP are predefined constants. They are available to any script on which they run, and they change depending on where they are used. All these "magical" constants are resolved at compile time, unlike regular constants, which are resolved at runtime.
There are nine magical constants in PHP. These special constants are case insensitive.
__LINE__
It returns the current line number of the file. The following example shows how you can use this magic constant.
<?php
   $x="Hello World";
   echo "$x. The current Line number is " . __LINE__ . ".";
?>
It will produce the following output −
Hello World. The current Line number is 5.
__FILE__
This magic constant returns the full path and filename of the file. If used inside an include, the name of the included file is returned. Take a look at the following example −
<?php
   $x="Hello World";
   echo "$x. Current PHP script name is " . __FILE__ . ".";
?>
It will produce the following output −
Hello World. Current PHP script name is C:\xampp\htdocs\hello.php.
__DIR__
This magical constant returns the directory of the file. If used inside an include, the directory of the included file is returned. This is equivalent to "dirname(__FILE__)". This directory name does not have a trailing slash unless it is the root directory. See the following example −
<?php
   $x="Hello World";
   echo "$x. Directory of the Current PHP script name is " . __DIR__ . ".";
?>
It will show the following output on the browser −
Hello World. Directory of the Current PHP script name is C:\xampp\htdocs.
__FUNCTION__
This magical constant returns the function name in which the constant is used, or {closure} for anonymous functions. The following example shows how it works −
<?php
   function hello(){
      $x="Hello World";
      echo "$x. The function name is ". __FUNCTION__ . "";
   }
   hello();
?>
It will produce the following output −
Hello World. The function name is hello
If this magic constant is used outside the function, then it will give a blank output.
__CLASS__
This constant returns the name of a class. The class name includes the namespace it was declared in. See the following example −
<?php
   class myclass {
      public function __construct() {
         echo "Inside the constructor of ". __CLASS__ . PHP_EOL;
      }
      function getClassName(){
         echo "from an instance method of " . __CLASS__ . "";
      }
   }
   $obj = new myclass;
   $obj->getClassName();
?>
It will produce the following output −
Inside the constructor of myclass
from an instance method of myclass
__METHOD__
The __METHOD__ constant returns the class method name. The following example shows how it works −
<?php
   class myclass {
      public function __construct() {
         echo "Calling " . __METHOD__ . " of " . __CLASS__ ."<br>";
      }
      function mymethod(){
         echo "Calling " . __METHOD__ . " of " . __CLASS__ ."";
      }
   }
   $obj = new myclass;
   $obj->mymethod();
?>
It will produce the following output −
Calling myclass::__construct of myclass
Calling myclass::mymethod of myclass
__TRAIT__
It returns the trait name. The trait name includes the namespace it was declared in. In PHP, traits are a mechanism for code reuse. A trait is similar to a class, but only intended to group functionality in a fine-grained and consistent way. It is not possible to instantiate a trait on its own.
Take a look at the following example −
<?php
   trait mytrait {
      public function hello() {
         echo "Hello World from " . __TRAIT__ ."";
      }
   }
   class myclass {
      use mytrait;
   }
   $obj = new myclass();
   $obj->hello();
?>
It will produce the following output −
Hello World from mytrait
__NAMESPACE__
This constant returns the name of the current namespace. In PHP, namespaces allow us to use classes / functions / constants of same name in different contexts without any conflict, thereby encapsulating these items. A namespace is a logical grouping of classes/functions depending on their relevance.
The following example shows how you can use this magic constant −
<?php
   namespace myspace;
   class myclass {
      public function __construct() {
         echo "Name of the class: " . __CLASS__ . " in " . __NAMESPACE__ . "";
      }
   }
   $class_name = __NAMESPACE__ . '\myclass';
   $a = new $class_name;
?>
It will produce the following output −
Name of the class: myspace\myclass in myspace
ClassName::class
Unlike the other magic constants, this magic constant does not start and end with the double underscore (__). It returns the fully qualified class name.
The following example shows how you can use this magic constant −
<?php
   namespace myspace;
   class myclass {
      public function __construct() {
         echo "Name of the class: " . myclass::class ;
      }
   }
   use myspace;
   $a = new myclass;
?>
It will produce the following output −
Name of the class: myspace\myclass
PHP Data Types
The term "data types" refers to the classification of data in distinct categories. PHP has a total of eight data types that we use to construct our variables −
Integers − Whole numbers, without a decimal point, like 4195.
Doubles − Floating-point numbers like 3.14159 or 49.1.
Booleans − Have only two possible values, either true or false.
NULL − Special type that only has one value: NULL.
Strings − Sequences of characters, like 'PHP supports string operations.'
Arrays − Named and indexed collections of other values.
Objects − Instances of programmer-defined classes, which can package up both other kinds of values and functions that are specific to the class.
Resources − Special variables that hold references to resources external to PHP (such as database connections).
The first five are simple types, and the next two (arrays and objects) are compound types. The compound types can package up other arbitrary values of arbitrary type, whereas the simple types cannot.
In this chapter, let's discuss in detail about these built-in data types of PHP.
Integer Data Type in PHP
A whole number without a decimal point (like 4195) is of int type in PHP. Integer data types are the simplest type. They correspond to simple whole numbers, both positive and negative.
An int is a number of the set Z = {..., -2, -1, 0, 1, 2, ...}.
An int can be represented in a decimal (base 10), hexadecimal (base 16), octal (base 8) or binary (base 2) notation.
To use octal notation, a number is preceded with "0o" or "0O". To use hexadecimal notation, precede the number with "0x". To use binary notation, precede the number with "0b".
Given below are some examples −
Decimal Integer − 201, 4195, -15
Octal Integer − 0010, 0O12, -0O21
Hexadecimal Integer − 0x10, -0x100
Binary Integer − 0b10101, -0b100
Integers can be assigned to variables, or they can be used in expressions, like so −
$int_var = 12345;
$another_int = -12345 + 12345;
Double Data Type in PHP
Double variables represent floating point numbers (also known as "floats", "doubles", or "real numbers") that are the numbers with a fractional component. The fractional component follows after the integer component separated by the decimal symbol (.)
Note − A double variable can be positive, negative, or zero.
$var1 = 1.55
$var2 =-123.0
Scientific Float Notation
PHP also allows the use of scientific notation to represent a floating point number with more digits after the decimal point. The symbol "E" or "e" is used to separate the integer and fractional part.
1.2e3, 2.33e-4, 7E-10, 1.0E5
By default, doubles print with the minimum number of decimal places needed. Take a look at the following example −
<?php
   $many = 2.2888800;
   $many_2 = 2.2111200;
   $few = $many + $many_2;

   print("$many + $many_2 = $few");
?>
It produces the following output −
2.28888 + 2.21112 = 4.5
Boolean Data Type in PHP
The bool type only has only two values; it can either be True or False. The bool type is used to express a truth value.
$bool1 = true;
$bool2 = false;
You can also use the integer values "1" and "0" to represent True and False Boolean values −
$bool3 = 1;
$bool4 = 0;
Typically, the result of an operator which returns a bool value is passed on to a control structure such as if, while or do-while. For example,
if (TRUE)
   print("This will always print.");

else
   print("This will never print.");
Interpreting Other Data Types as Booleans
Here is a set of rules that you can use to interpret other data types as Booleans −
If the value is a number, then it is False only if the value is equal to zero, otherwise the value is True.
If the value is a string, it is False if the string is empty (has zero characters) or is the string "0", and is True otherwise.
The values of type NULL are always False.
If the value is an array, it is False if it contains no other values; True otherwise. For an object, containing a value means having a member variable that has been assigned a value.
Valid resources are true (although some functions that return resources when they are successful will return FALSE when unsuccessful).
Note − Don't use double as Booleans.
Each of the following variables has the truth value embedded in its name when it is used in a Boolean context.
$true_num = 3 + 0.14159;
$true_str = "Tried and true"
$true_array[49] = "An array element";
$false_array = array();
$false_null = NULL;
$false_num = 999 - 999;
$false_str = "";
String Data Type in PHP
A string is a sequence of characters, for example, 'PHP supports string operations.'
In PHP, a character is the same as a byte. It means PHP only supports a 256 character set, and hence does not offer native Unicode support.
PHP supports single-quoted as well as double-quoted string formation. Both the following representations are valid in PHP −
$string_1 = "This is a string in double quotes";
$string_2 = 'This is a somewhat longer, singly quoted string';
Here are some more examples of string type −
$string_39 = "This string has thirty-nine characters";
$string_0 = "";		// a string with zero characters
Single-quoted strings are treated almost literally, whereas double-quoted strings replace variables with their values as well as specially interpreting certain character sequences.
<?php
   $variable = "name";
   $literally = 'My $variable will not print!';

   print($literally);
   print "\n";

   $literally = "My $variable will print!";
   print($literally);
?>
When you run this code, it will produce the following output −
My $variable will not print!
My name will print
There are no artificial limits on string length. Within the bounds of available memory, you ought to be able to make arbitrarily long strings.
Strings that are delimited by double quotes (as in "this") are preprocessed in both the following two ways by PHP −
Certain character sequences beginning with backslash (\) are replaced with special characters.
Variable names (starting with $) are replaced with string representations of their values.
The escape-sequence replacements are −
\n is replaced by the newline character
\r is replaced by the carriage-return character
\t is replaced by the tab character
\$ is replaced by the dollar sign itself ($)
\" is replaced by a single double-quote (")
\\ is replaced by a single backslash (\)
PHP also has Heredoc and Nowdoc representations of string data type.
Heredoc Representation of String Data Type
You can assign multiple lines to a single string variable using heredoc −
<?php
   $channel =<<<_XML_

   <channel>
      <title>What's For Dinner</title>
      <link>http://menu.example.com/ </link>
      <description>Choose what to eat tonight.</description>
   </channel>
   _XML_;

   echo <<< END
      This uses the "here document" syntax to output multiple lines with
	  variable interpolation. Note that the here document terminator must
	  appear on a line with just a semicolon. no extra whitespace!
   END;

   print $channel;
?>
When you run this code, it will produce the following output −
This uses the "here document" syntax to output
multiple lines with variable interpolation. Note
that the here document terminator must appear on a
line with just a semicolon. no extra whitespace!

<channel>
   <title>What's For Dinner</title>
   <link>http://menu.example.com/ </link>
   <description>Choose what to eat tonight.</description>
</channel>
Nowdoc Representation of String Data Type
All the rules for heredoc identifiers also apply to nowdoc identifiers. A nowdoc is specified just like a heredoc, but there is no parsing inside a nowdoc. You can use the nowdoc construct for embedding large blocks of text without having to use any escape characters.
A nowdoc is identified with the same <<< sequence used for heredocs, but the identifier is enclosed in single quotes, e.g. <<<'EOT'. Nowdocs apply to single-quoted strings just the way heredocs apply to double-quoted strings.
Take a look at the following example −
<?php
   echo <<<'IDENTIFIER'
   As the cat cleared its throat with a refined "Meow",
   the squirrel chirped excitedly about its latest
   discovery of a hidden stash of peanut treasure!
   IDENTIFIER;
?>
Run the code and check its output −
As the cat cleared its throat with a refined "Meow",
the squirrel chirped excitedly about its latest
discovery of a hidden stash of peanut treasure!
Null Data Type in PHP
In PHP, null represents a special type that only has one value: NULL. Undefined and unset() variables will resolve to the value "null".
Programmers normally use the Null data type in PHP to initialize variables or to indicate that a value is missing.
To give a variable the NULL value, simply assign it like this −
$my_var = NULL;
The special constant NULL is capitalized by convention, but actually it is case insensitive; you could just as well have typed −
$my_var = null;
A variable that has been assigned NULL has the following properties −
It evaluates to FALSE in a Boolean context.
It returns FALSE when tested with IsSet() function.
Note − The data types of variables in PHP are determined at runtime based on the values that are assigned to them.
Array Data Type in PHP
An array in PHP is an ordered map, a key is associated with one or more values. A PHP array is defined using the array() function, or with the use of a short notation where the data is put in square brackets.
Take a look at the following examples of associative arrays −
Using the array() Function
$arr = array(
   "foo" => "bar",
   "bar" => "foo",
);
Using the Short Notation
$arr = [
   "foo" => "bar",
   "bar" => "foo",
];
An array in PHP can also be defined with the "key-value pair" syntax. It is called an indexed array.
$arr = array("foo", "bar", "hello", "world");
In a multi-dimensional array, each element in the main array can also be an array. And, each element in the sub-array can be an array, and so on. Values in the multi-dimensional array are accessed using multiple index.
Note − In PHP, compound data types are used to store collections of data, including arrays and objects.
Object Data Type in PHP
An object type is an instance of a programmer-defined class, which can package up both other kinds of values and functions that are specific to the class.
To create a new object, use the new statement to instantiate a class −
class foo {
   function bar() {
      echo "Hello World.";
   }
}
$obj = new foo;
$obj->bar();
Resource Data Type in PHP
Resources are special variables that hold references to resources external to PHP (such as a file stream or database connections).
Here is an example of file resource −
$fp = fopen("foo.txt", "w");
Data belonging to any of the above types is stored in a variable. However, since PHP is a dynamically typed language, there is no need to specify the type of a variable, as this will be determined at runtime.
Example: The gettype() Function
The gettype() function is helpful to find out the type of data stored in a variable −
<?php
   $x = 10;
   echo gettype($x) . "\n";

   $y = 10.55;
   echo gettype($y) . "\n";

   $z = [1,2,3,4,5];
   echo gettype($z);
?>
When you run this code, it will produce the following output −
integer
double
array
PHP - Type Casting
The term "Type Casting" refers to conversion of one type of data to another. Since PHP is a weakly typed language, the parser coerces certain data types into others while performing certain operations. For example, a string having digits is converted to integer if it is one of the operands involved in the addition operation.
Implicit Type Casting
Here is an example of coercive or implicit type casting −
<?php
   $a = 10;
   $b = '20';
   $c = $a+$b;
   echo "c = " . $c;
?>
In this case, $b is a string variable, cast into an integer to enable addition. It will produce the following output −
c = 30
Let's take another example. Here, an integer variable $a is converted to a string so that it is concatenated with a string variable.
<?php
   $a = 10;
   $b = '20';
   $c = $a.$b;
   echo "c = " . $c;
?>
It will produce the following output −
c = 1020
In addition to such coercive type conversion, there are other ways to explicitly cast one type of data to other. You can use PHPs type casting operators or type casting functions for this purpose.
Type Casting Operators
To convert an expression of one type to another, you need to put the data type of the latter in parenthesis before the expression.
$var = (type)expr;
Some of the type casting operators in PHP are −
(int) or (integer) casts to an integer
(bool) or (boolean) casts to a boolean
(float) or (double) or (real) casts to a float
(string) casts to a string
(array) casts to an array
(object) casts to an object
Casting to Integer
You can easily convert a float value to an integer. Take a look at the following example −
<?php
   $a = 9.99;
   $b = (int)$a;
   var_dump($b);
?>
It will produce the following output −
int(9)
Note that the float value is not rounded to the nearest integer; instead it just returns the integer part.
String to Integer Conversion
The (int) operator also coverts a string to integer. The conversion is straightforward if the string consists of just digits.
<?php
   $a = "99";
   $b = (int)$a;
   var_dump($b);
?>
Here, you will get the following output −
int(99)
Even if the string contains a floating point number, the (int) operator returns just the integer part.
Now let's take another example to understand a special case. If the string is alphanumeric, casting with (int) works differently.
If the string starts with digits followed by non-numeric characters, only the initial digits are considered.
If the string starts with non-numeric characters and the digits are in the middle, the csting operator returns "0".
Take a look at the following example −
<?php
   $a = "10 Rs.";
   $b = (int)$a;
   var_dump($b);

   $a = "$100";
   $b = (int)$a;
   var_dump($b);
?>
It will produce the following output −
int(10)
int(0)
Casting to Float Type
You can use either the (float) or (double) casting operator to explicitly convert a variable or expression to a float.
<?php
   $a = 100;
   $b = (double)$a;
   var_dump($b);
?>
It will produce the following output −
float(100)
A string containing any valid numeric representation may be cast to a float type by using a casting operator.
<?php
   $a = "100";
   $b = (double)$a;
   var_dump($b);

   $a = "9.99";
   $b = (float)$a;
   var_dump($b);
?>
Here, you will get the following output −
float(100)
float(9.99)
The string gets converted to float even when it embeds a scientific notation of float. Take a look at the following example −
<?php
   $a = "1.23E01";
   $b = (double)$a;
   var_dump($b);
   $a = "5.5E-5";
   $b = (float)$a;
   var_dump($b);
?>
It will produce the following output −
float(12.3)
float(5.5E-5)
All the non-numeric characters after the floating point numbers are ignored. Similarly, the string converts to "0" if it starts with any non-numeric character. See the following example −
<?php
   $a = "295.95 only";
   $b = (double)$a;
   var_dump($b);

   $a = "$2.50";
   $b = (float)$a;
   var_dump($b);
?>
It will produce the following output −
float(295.95)
float(0)
Casting to String Type
By using a casting operator, any expression evaluating to a floating-point or integer may be cast to a string type. Few examples are given below −
<?php
   $a = 100;
   $b = (string)$a;
   var_dump($b);

   $x = 55.50;
   $y = (string)$x;
   var_dump($y);
?>
You will get the following output −
string(3) "100"
string(4) "55.5"
Casting to Bool Type
Any non-zero number, either integer or float, is cast to true with (bool) operator. An expression evaluating to "0" returns false. A string is always cast to true.
Take a look at the following example −
<?php
   $a = 100;
   $b = (bool)$a;

   $x = 0;
   $y = (bool)$x;

   $m = "Hello";
   $n = (bool)$m;

   var_dump($b);
   var_dump($y);
   var_dump($n);
?>
It will produce the following output −
bool(true)
bool(false)
bool(true)
Type Casting Functions
PHP includes the following built-in functions for performing type casting −
intval()
floatval()
strval()
Let's discuss these built-in functions in detail.
The intval() Function
This function gets the integer value of a variable.
intval(mixed $value, int $base = 10): int
The $base parameter is 10 by default, which means the value is converted to decimal number.
If the value is a float, the intval() function returns an integer, discarding the fractional part.
A string representation of a number returns a corresponding integer, discarding the fractional part, if any.
If the value is a string with a valid octal number and the base is 8, the intval() function returns a corresponding octal number.
When the base is "0", the conversion of value takes place on the basis of character prefix.
If the value starts with 0X or 0x, a hexadecimal number is returned.
If the value starts with 0B or 0b, a binary number is returned
If the value starts with 0, the function returns an octal number.
The intval() function returns 1 for true, 0 for false Boolean values.
Example
The following example shows how the intval() function works −
<?php
   echo intval(42). PHP_EOL;
   echo intval(4.2). PHP_EOL;
   echo intval('42') . PHP_EOL;

   echo intval(042) . PHP_EOL;         # 0ctal number
   echo intval('042', 0) . PHP_EOL;    # 0ctal number
   echo intval('42', 8) . PHP_EOL;     # octal

   echo intval(0x1A) . PHP_EOL;        # Hexadecimal
   echo intval('0x1A', 16) . PHP_EOL;  # Hexadecimal
   echo intval('0x1A', 0) . PHP_EOL;   # Hexadecimal

   echo intval(false) . PHP_EOL;
   echo intval(true) . PHP_EOL;
?>
It will produce the following output −
42
4
42
34
34
34
26
26
26
0
1
The floatval() Function
The floatval() function gets the float value of an expression.
floatval(mixed $value): float
The value may be any scalar variable. String with non-numeric characters returns "0". A string with a numeric representation or with the starting substring with a numeric representation returns the corresponding number. The following example shows how the floatval() function works −
<?php
   echo floatval(42). PHP_EOL;
   echo floatval(4.2). PHP_EOL;
   echo floatval('42') . PHP_EOL;

   echo floatval('99.90 Rs') . PHP_EOL;
   echo floatval('$100.50') . PHP_EOL;
   echo floatval('ABC123!@#') . PHP_EOL;

   echo (true) . PHP_EOL; ;
   echo (false) . PHP_EOL;
?>
It will produce the following output −
42
4.2
42
99.9
0
0
1
The doubleval() function is an alias of floatval() function, and hence returns similar results.
The strval() Function
The strval() function gets the string value of a variable. This function performs no formatting on the returned value.
strval(mixed $value): string
The value that is being converted to a string may be any scalar type, null, or an object that implements the __toString() method. Take a look at the following example −
<?php
   echo strval(42). PHP_EOL;
   echo strval(4.2). PHP_EOL;
   echo strval(4.2E5) . PHP_EOL;

   echo strval(NULL) . PHP_EOL;

   echo (true) . PHP_EOL;
   echo (false) . PHP_EOL;
?>
It will produce the following output −
42
4.2
420000

1
The following example defines a class that implements the _toString() method.
<?php
   class myclass {
      public function __toString() {
         return __CLASS__;
      }
   }
   echo strval(new myclass);
?>
Here, you will get the following output −
myclass
PHP - Type Juggling
PHP is known as a dynamically typed language. The type of a variable in PHP changes dynamically. This feature is called "type juggling" in PHP.
In C, C++ and Java, you need to declare the variable and its type before using it in the subsequent code. The variable can take a value that matches with the declared type only.
Explicit type declaration of a variable is neither needed nor supported in PHP. Hence the type of PHP variable is decided by the value assigned to it, and not the other way around. Further, when a variable is assigned a value of different type, its type too changes.
Example 1
Look at the following variable assignment in PHP.
<?php
   $var = "Hello";
   echo "The variable \$var is of " . gettype($var) . " type" .PHP_EOL;

   $var = 10;
   echo "The variable \$var is of " . gettype($var) . " type" .PHP_EOL;

   $var = true;
   echo "The variable \$var is of " . gettype($var) . " type" .PHP_EOL;

   $var = [1,2,3,4];
   echo "The variable \$var is of " . gettype($var) . " type" .PHP_EOL;
?>
It will produce the following output −
The variable $var is of string type
The variable $var is of integer type
The variable $var is of boolean type
The variable $var is of array type
You can see the type of "$var" changes dynamically as per the value assigned to it. This feature of PHP is called "type juggling".
Example 2
Type juggling also takes place during calculation of expression. In this example, a string variable containing digits is automatically converted to integer for evaluation of addition expression.
<?php
   $var1=100;
   $var2="100";
   $var3=$var1+$var2;
   var_dump($var3);
?>
Here is its output −
int(200)
Example 3
If a string starts with digits, trailing non-numeric characters if any, are ignored while performing the calculation. However, PHP parser issues a notice as shown below −
<?php
   $var1=100;
   $var2="100 days";
   $var3=$var1+$var2;
   var_dump($var3);
?>
You will get the following output −
int(200)

PHP Warning:  A non-numeric value encountered in /home/cg/root/53040/main.php on line 4
Type Casting vs Type Juggling
Note that "type casting" in PHP is a little different from "type juggling".
In type juggling, PHP automatically converts types from one to another when necessary. For example, if an integer value is assigned to a variable, it becomes an integer.
On the other hand, type casting takes place when the user explicitly defines the data type in which they want to cast.
Example
Type casting forces a variable to be used as a certain type. The following script shows an example of different type cast operators −
<?php
   $var1=100;
   $var2=(boolean)$var1;
   $var3=(string)$var1;
   $var4=(array)$var1;
   $var5=(object)$var1;
   var_dump($var2, $var3, $var4, $var5);
?>
It will produce the following output −
bool(true)
string(3) "100"
array(1) {
  [0]=>
  int(100)
}
object(stdClass)#1 (1) {
  ["scalar"]=>
  int(100)
}
Example
Casting a variable to a string can also be done by enclosing in double quoted string −
<?php
   $var1=100.50;
   $var2=(string)$var1;
   $var3="$var1";
   var_dump($var2, $var3);
?>
Here, you will get the following output −
string(5) "100.5"
string(5) "100.5"
PHP - Strings
A string is a sequence of characters, like 'PHP supports string operations.' A string in PHP as an array of bytes and an integer indicating the length of the buffer. In PHP, a character is the same as a byte. This means that PHP only supports a 256-character set, and hence does not offer native Unicode support.
PHP supports single quoted as well as double quoted string formation. Both the representations 'this is a simple string' as well as "this is a simple string" are valid. PHP also has Heredoc and Newdoc representations of string data type.
Single-Quoted String
A sequence of characters enclosed in single quotes (the character ') is a string.
$str = 'this is a simple string';
Example
If you want to include a literal single quote, escape it with a backslash (\).
<?php
   $str = 'This is a \'simple\' string';
   echo $str;
?>
It will give you the following output −
This is a 'simple' string
Example
To specify a literal backslash, double it (\\).
<?php
   $str = 'The command C:\\*.* will delete all files.';
   echo $str;
?>
Here is its output −
The command C:\*.* will delete all files.
Example
The escape sequences such as "\r" or "\n" will be treated literally and their special meaning will not be interpreted. The variables too will not be expanded if they appear in a single quoted string.
<?php
   $str = 'This will not expand: \n a newline';
   echo $str . PHP_EOL;
   $x=100;
   $str = 'Value of x = $x';
   echo $str;
?>
It will produce the following output −
This will not expand: \n a newline
Value of x = $x
Double-Quoted String
A sequence of characters enclosed in double-quotes (" ") is another string representation.
$str = "this is a simple string";
Single-quoted and double-quoted strings are equivalent except for their treatment of escape sequences. PHP will interpret certain escape sequences for special characters. For example, "\r" and "\n".
| Sequence | Meaning |
|---|---|
| \n | linefeed (LF or 0x0A (10) in ASCII) |
| \r | carriage return (CR or 0x0D (13) in ASCII) |
| \t | horizontal tab (HT or 0x09 (9) in ASCII) |
| \v | vertical tab (VT or 0x0B (11) in ASCII) |
| \e | escape (ESC or 0x1B (27) in ASCII) |
| \f | form feed (FF or 0x0C (12) in ASCII) |
| \\ | backslash |
| \$ | dollar sign |
| \" | double-quote |
How to Escape Octal and Hexademical Characters in PHP?
PHP supports escaping an Octal and a hexadecimal number to its ASCII character. For example, the ASCII character for P is 80 in decimal. 80 in decimal to Octal is 120. Similarly, 80 in decimal to hexadecimal is 50.
To escape an octal character, prefix it with "\"; and to escape a hexadecimal character, prefix it with "\x".
<?php
   $str = "\120\110\120";
   echo "PHP with Octal: ". $str;
   echo PHP_EOL;

   $str = "\x50\x48\x50";
   echo "PHP with Hexadecimal: ". $str;
?>
Check the output −
PHP with Octal: PHP
PHP with Hexadecimal: PHP
As in single quoted strings, escaping any other character will result in the backslash being printed too. The most important feature of double-quoted strings is the fact that variable names will be expanded.
Example
A double-quoted string in PHP expands the variable names (PHP variables are prefixed with $ symbol). To actually represent a "$" symbol in a PHP string, escape it by prefixing with the "\" character.
<?php
   $price = 200;
   echo "Price = \$ $price";
?>
You will get the following output −
Price = $ 200
String Concatenation Operator
To concatenate two string variables together, PHP uses the dot (.) operator −
<?php
   $string1="Hello World";
   $string2="1234";

   echo $string1 . " " . $string2;
?>
Here, you will get the following output −
Hello World 1234
In the above example, we used the concatenation operator twice. This is because we had to insert a third string. Between the two string variables, we added a string with a single character, an empty space, to separate the two variables.
The standard library of PHP includes many functions for string processing. They can be found at PHPs official documentation (https://www.php.net/manual/en/ref.strings.php).
The strlen() Function
The strlen() function is used to find the length of a string.
Example
Let's find the length of our string "Hello world!" −
<?php
   echo strlen("Hello world!");
?>
It will produce the following output −
12
The length of a string is often used in loops or other functions, when it is important to know when the string ends (that is, in a loop, we would want to stop the loop after the last character in the string).
The strpos() Function
The strpos() function is used to search for a string or character within a string.
If a match is found in the string, this function will return the position of the first match.
If no match is found, it will return FALSE.
Example
Let's see if we can find the string "world" in our string −
<?php
   echo strpos("Hello world!","world");
?>
It will produce the following output −
6
As you can see, the position of the string "world" in our string is "6". The reason that it is "6", and not "7", is that the first position in the string is "0", and not "1".
PHP - Boolean
In PHP, "bool" is one of the built-in scalar data types. It is used to express the truth value, and it can be either True or False. A Boolean literal uses the PHP constants True or False. These constants are case-insensitive, in the sense, true, TRUE or True are synonymous.
You can declare a variable of bool type as follows −
$a = true;
Example
Logical operators (<, >, ==, !=, etc.) return Boolean values.
<?php
   $gender="Male";
   var_dump ($gender=="Male");
?>
It will produce the following output −
bool(true)
Boolean Values in Control Statements
Boolean values are used in the construction of control statements such as if, while, for and foreach. The behaviour of these statements depends on the true/false value returned by the Boolean operators.
The following conditional statement uses the Bool value returned by the expression in the parenthesis in front of the if keyword −
$mark=60;

if ($mark>50)
   echo "pass";
else
   echo "fail";
Converting a Value to Boolean
Use the (bool) casting operator to convert a value to bool. When a value is used in a logical context it will be automatically interpreted as a value of type bool.
A non-zero number is considered as true, only 0 (+0.0 or -0.0) is false. Non-empty string represents true, empty string "" is equivalent to false. Similarly, an empty array returns false.
Example
Take a look at this following example −
<?php
   $a = 10;
   echo "$a: ";
   var_dump((bool)$a);

   $a = 0;
   echo "$a: ";
   var_dump((bool)$a);

   $a = "Hello";
   echo "$a: ";
   var_dump((bool)$a);

   $a = "";
   echo "$a: ";
   var_dump((bool)$a);

   $a = array();
   echo "$a: ";
   var_dump((bool)$a);
?>
It will produce the following output −
10: bool(true)
0: bool(false)
Hello: bool(true)
: bool(false)
Array: bool(false)
Integer is one of the built-in scalar types in PHP. A whole number, without a decimal point in the literal, is of the type "int" in PHP. An integer can be represented in decimal (base 10), hexadecimal (base 16), octal (base 8) or binary (base 2) notation.
To use octal notation, a number is preceded with "0o" or "0O" (PHP 8.1.0 and earlier). From PHP 8.1.0 onwards, a number prefixed with "0" and without a decimal point is an octal number.
To use hexadecimal notation, precede the number with "0x". To use binary notation, precede the number with "0b".
Example
Take a look at the following example −
<?php
   $a = 1234;
   echo "1234 is an Integer in decimal notation: $a\n";

   $b = 0123;
   echo "0o123 is an integer in Octal notation: $b\n";

   $c = 0x1A;
   echo "0xaA is an integer in Hexadecimal notation: $c\n";

   $d = 0b1111;
   echo "0b1111 is an integer in binary notation: $d\n";
?>
It will produce the following output −
1234 is an Integer in decimal notation: 1234
0o123 is an integer in Octal notation: 83
0xaA is an integer in Hexadecimal notation: 26
0b1111 is an integer in binary notation: 15
PHP 7.4.0 onwards, integer literals may contain underscores (_) as separators between digits, for better readability of literals. These underscores are removed by PHP's scanner.
Example
Take a look at the following example −
<?php
   $a = 1_234_567;
   echo "1_234_567 is an Integer with _ as separator: $a\n";
?>
It will produce the following output −
1_234_567 is an Integer with _ as separator: 1234567
PHP does not support unsigned ints. The size of an int is platform dependent. On 32 bit systems, the maximum value is about two billion. 64-bit platforms usually have a maximum value of about 9E18.
int size can be determined using the constant PHP_INT_SIZE, maximum value using the constant PHP_INT_MAX, and minimum value using the constant PHP_INT_MIN.
If an integer number happens to be beyond the bounds of the int type, or any operation results in a number beyond the bounds of the int type, it will be interpreted as a float instead.
Example
Take a look at the following example −
<?php
   $x = 1000000;
   $y =  50000000000000 * $x;
   var_dump($y);
?>
It will produce the following output −
float(5.0E+19)
PHP doesn't have any operator for integer division. Hence, a division operation between an integer and a float always results in float. To obtain integral division, you may use the intval() built-in function.
Example
Take a look at the following example −
<?php
   $x = 10;
   $y = 3.5;
   $z = $x/$y;
   var_dump ($z);
   $z = intdiv($x, $y);
   var_dump ($z);
?>
It will produce the following output −
float(2.857142857142857)
int(3)
PHP - Integers
Integer is one of the built-in scalar types in PHP. A whole number, without a decimal point in the literal, is of the type "int" in PHP. An integer can be represented in decimal (base 10), hexadecimal (base 16), octal (base 8) or binary (base 2) notation.
To use octal notation, a number is preceded with "0o" or "0O" (PHP 8.1.0 and earlier). From PHP 8.1.0 onwards, a number prefixed with "0" and without a decimal point is an octal number.
To use hexadecimal notation, precede the number with "0x". To use binary notation, precede the number with "0b".
Example
Take a look at this following example −
<?php
   $a = 1234;
   echo "1234 is an Integer in decimal notation: $a\n";

   $b = 0123;
   echo "0o123 is an integer in Octal notation: $b\n";

   $c = 0x1A;
   echo "0xaA is an integer in Hexadecimal notation: $c\n";

   $d = 0b1111;
   echo "0b1111 is an integer in binary notation: $d";
?>
It will produce the following output −
1234 is an Integer in decimal notation: 1234
0o123 is an integer in Octal notation: 83
0xaA is an integer in Hexadecimal notation: 26
0b1111 is an integer in binary notation: 15
PHP 7.4.0 onwards, integer literals may contain underscores (_) as separators between digits, for better readability of literals. These underscores are removed by PHP's scanner.
Example
Take a look at this following example −
<?php
   $a = 1_234_567;
   echo "1_234_567 is an Integer with _ as separator: $a";
?>
It will produce the following output −
1_234_567 is an Integer with _ as separator: 1234567
PHP does not support unsigned ints. The size of an int is platform dependent. On 32 bit systems, the maximum value is about two billion. 64-bit platforms usually have a maximum value of about 9E18.
int size can be determined using the constant PHP_INT_SIZE, maximum value using the constant PHP_INT_MAX, and minimum value using the constant PHP_INT_MIN.
If an integer number happens to be beyond the bounds of the int type, or any operation results in a number beyond the bounds of the int type, it will be interpreted as a float instead.
Example
Take a look at this following example −
<?php
   $x = 1000000;
   $y =  50000000000000 * $x;
   var_dump($y);
?>
It will produce the following output −
float(5.0E+19)
PHP doesn't have any operator for integer division. Hence, a division operation between an integer and a float always results in float. To obtain integral division, you may use the intval() built-in function.
Example
Take a look at this following example −
<?php
   $x = 10;
   $y = 3.5;
   $z = $x/$y;
   var_dump ($z);
   $z = intdiv($x, $y);
   var_dump ($z);
?>
It will produce the following output −
float(2.857142857142857)
int(3)
PHP - Files & I/O
This chapter will explain following functions related to files −
- Opening a File
- Reading a File
- Writing a File
- Closing a File
Opening and Closing Files
The PHP fopen() function is used to open a file. It requires two arguments stating first the file name and then mode in which to operate.
Files modes can be specified as one of the six options in this table.
| Sr.No | Mode & Purpose |
|---|---|
| 1 |
r Opens the file for reading only. Places the file pointer at the beginning of the file. |
| 2 |
r+ Opens the file for reading and writing. Places the file pointer at the beginning of the file. |
| 3 |
w Opens the file for writing only. Places the file pointer at the beginning of the file. and truncates the file to zero length. If files does not exist then it attempts to create a file. |
| 4 |
w+ Opens the file for reading and writing only. Places the file pointer at the beginning of the file. and truncates the file to zero length. If files does not exist then it attempts to create a file. |
| 5 |
a Opens the file for writing only. Places the file pointer at the end of the file. If files does not exist then it attempts to create a file. |
| 6 |
a+ Opens the file for reading and writing only. Places the file pointer at the end of the file. If files does not exist then it attempts to create a file. |
If an attempt to open a file fails then fopen returns a value of false otherwise it returns a file pointer which is used for further reading or writing to that file.
After making a changes to the opened file it is important to close it with the fclose() function. The fclose() function requires a file pointer as its argument and then returns true when the closure succeeds or false if it fails.
Reading a File
Once a file is opened using fopen() function it can be read with a function called fread(). This function requires two arguments. These must be the file pointer and the length of the file expressed in bytes.
The files length can be found using the filesize() function which takes the file name as its argument and returns the size of the file expressed in bytes.
So here are the steps required to read a file with PHP.
Open a file using fopen() function.
Get the file's length using filesize() function.
Read the file's content using fread() function.
Close the file with fclose() function.
Example
The following example assigns the content of a text file to a variable then displays those contents on the web page.
<html>
<head>
   <title>Reading a file using PHP</title>
</head>
<body>
   <?php
      $filename = "tmp.txt";
      $file = fopen( $filename, "r" );

      if( $file == false ) {
         echo ( "Error in opening file" );
         exit();
      }

      $filesize = filesize( $filename );
      $filetext = fread( $file, $filesize );
      fclose( $file );

      echo ( "File size : $filesize bytes" );
      echo ( "<pre>$filetext</pre>" );
   ?>
</body>
</html>
It will produce the following result −
Writing a File
A new file can be written or text can be appended to an existing file using the PHP fwrite() function. This function requires two arguments specifying a file pointer and the string of data that is to be written. Optionally a third integer argument can be included to specify the length of the data to write. If the third argument is included, writing would will stop after the specified length has been reached.
Example
The following example creates a new text file then writes a short text heading inside it. After closing this file its existence is confirmed using file_exist() function which takes file name as an argument
<?php
   $filename = "/home/user/guest/newfile.txt";
   $file = fopen( $filename, "w" );

   if( $file == false ) {
      echo ( "Error in opening new file" );
      exit();
   }
   fwrite( $file, "This is  a simple test\n" );
   fclose( $file );
?>
<html>
<head>
   <title>Writing a file using PHP</title>
</head>
<body>
   <?php
      $filename = "newfile.txt";
      $file = fopen( $filename, "r" );

      if( $file == false ) {
         echo ( "Error in opening file" );
         exit();
      }

      $filesize = filesize( $filename );
      $filetext = fread( $file, $filesize );

      fclose( $file );

      echo ( "File size : $filesize bytes" );
      echo ( "$filetext" );
      echo("file name: $filename");
   ?>
</body>
</html>
It will produce the following result −

We have covered all the function related to file input and out in PHP File System Function chapter.
PHP - Maths Functions
To enable mathematical operations, PHP has mathematical (arithmetic) operators and a number of mathematical functions. In this chapter, the following mathematical functions are explained with examples.
PHP abs() Function
The abs() function is an in-built function in PHP iterpreter. This function accepts any number as argument and returns a positive value, disregarding its sign. Absolute value of any number is always positive.
abs( mixed $num)
PHP abs() function returns the absolute value of num. If the data type of num is float, its return type will also be float. For integer parameter, the return type is integer.
Example
Take a look at this following example −
<?php
   $num=-9.99;
   echo "negative float number: " . $num . "\n";
   echo "absolute value : " . abs($num) . "\n";

   $num=25.55;
   echo "positive float number: " . $num . "\n";
   echo "absolute value : " . abs($num). "\n";

   $num=-45;
   echo "negative integer number: " . $num . "\n";
   echo "absolute value : " . abs($num) . "\n";

   $num=25;
   echo "positive integer number: " . $num . "\n";
   echo "absolute value : " . abs($num);
?>
It will produce the following output −
negative float number: -9.99
absolute value : 9.99
positive float number: 25.55
absolute value : 25.55
negative integer number: -45
absolute value : 45
positive integer number: 25
absolute value : 25
PHP ceil() Function
The ceil() function is an in-built function in PHP iterpreter. This function accepts any float number as argument and rounds it up to the next highest integer. This function always returns a float number as the range of float is bigger than that of integer.
ceil ( float $num ) : float
PHP ceil() function returns the smallest integer value that is bigger than or equal to given parameter.
Example 1
The following code rounds 5.78 to its next highest integer which is 6
<?php
   $arg=5.78;
   $val=ceil($arg);
   echo "ceil(" . $arg .  ") = " . $val;
?>
It will produce the following output −
ceil(5.78) = 6
Example 2
The following example shows how you can find the next highest integer of 15.05.
<?php
   $arg=15.05;
   $val=ceil($arg);
   echo "ceil(" . $arg .  ") = " . $val;
?>
It will produce the following output −
ceil(15.05) = 16
Example 3
For negative number, it is rounded towards 0.
<?php
   $arg=-3.95;
   $val=ceil($arg);
   echo "ceil(" . $arg .  ") = " . $val;
?>
It will produce the following output −
ceil(-3.95) = -3
PHP exp() Function
The exp() function calculates exponent of e that is Euler Number. PHP has a predefined constant M_E that represents Euler Number and is equal to 2.7182818284590452354. Hence, exp(x) returns 2.7182818284590452354x
This function always returns a float.
exp ( float $arg ) : float
PHP exp() function returns the Euler Number e raised to given arg. Note that e is the base of natural algorithm. The exp() function is the inverse of natural logarithm.
Example 1
One of the predefined constants in PHP is M_LN2 which stands for loge2 and is equal to 0.69314718055994530942. So, the exp() of this value will return 2.
<?php
   echo "exp(" . M_LN2 . ") = " . exp(M_LN2);
?>
It will produce the following output −
exp(0.69314718055995) = 2
Example 2
M_LN10 is another predefined constant representing loge10. This program calculates exp(M_LN10) and returns 10.
<?php
   echo "exp(" . M_LN10 . ") = " . exp(M_LN10);
?>
It will produce the following output −
exp(2.302585092994) = 10
PHP floor() Function
The floor() function is another in-built function in PHP interpreter. This function accepts any float number as argument and rounds it down to the next lowest integer. This function always returns a float number as the range of float is bigger than that of integer.
floor ( float $num ) : float
PHP floor() function returns the largest integer less than or equal to the given parameter.
Example 1
The following example shows how to round 15.05 to its next highest integer which is 15
<?php
   $arg=15.05;
   $val=floor($arg);
   echo "floor(" . $arg .  ") = " . $val;
?>
It will produce the following output −
floor(15.05) = 15
Example 2
The following example shows how to find the next lowest integer of 5.78.
<?php
   $arg=5.78;
   $val=floor($arg);
   echo "floor(" . $arg .  ") = " . $val;
?>
It will produce the following output −
floor(5.78) = 5
Example 3
Negative numbers are rounded away from 0.
<?php
   $arg=-3.95;
   $val=floor($arg);
   echo "floor(" . $arg .  ") = " . $val;
?>
It will produce the following output −
floor(-3.95) = -4
PHP intdiv() Function
The intdiv() function returns the integer quotient of two integer parameters. If x/y results in "i" as division and "r" as remainder, then −
x = y*i+r
In this case, intdiv(x,y) returns "i"
intdiv ( int $x , int $y ) : int
The "x" parameter forms numerator part of the division expression, while the "y" parameter forms the denominator part of the division expression.
PHP intdiv() function returns the integer quotient of division of "x" by "y". The return value is positive if both the parameters are positive or both the parameters are negative.
Example 1
The following example shows that if the numerator is less than the denominator, then intdiv() function returns 0.
<?php
   $x=10;
   $y=3;
   $r=intdiv($x, $y);
   echo "intdiv(" . $x . "," . $y . ") = " . $r . "\n";
   $r=intdiv($y, $x);
   echo "intdiv(" . $y . "," . $x . ") = " . $r;
?>
It will produce the following output −
intdiv(10,3) = 3
intdiv(3,10) = 0
Example 2
In the following example, intdiv() function returns a negative integer because either the numerator or the denominator is negative.
<?php
   $x=10;
   $y=3;
   $r=intdiv($x, $y);
   echo "intdiv(" . $x . "," . $y . ") = " . $r . "\n";

   $x=10;
   $y=-3;
   $r=intdiv($x, $y);
   echo "intdiv(" . $x . "," . $y . ") = " . $r . "\n";

   $x=-10;
   $y=3;
   $r=intdiv($x, $y);
   echo "intdiv(" . $x . "," . $y . ") = " . $r . "\n";

   $x=-10;
   $y=-3;
   $r=intdiv($x, $y);
   echo "intdiv(" . $x . "," . $y . ") = " . $r ;
?>
It will produce the following output −
intdiv(10,3) = 3
intdiv(10,-3) = -3
intdiv(-10,3) = -3
intdiv(-10,-3) = 3
Example 3
Denominator is 0 in the following example. It results in DivisionByZeroError exception.
<?php
   $x=10;
   $y=0;
   $r=intdiv($x, $y);
   echo "intdiv(" . $x . "," . $y . ") = " . $r . "\n";
?>
It will produce the following output −
PHP Fatal error: Uncaught DivisionByZeroError: Division by zero
Example 4
The fractional parts in both the parameters are ignored. PHP intdiv() function is applied only to the integer parts.
<?php
   $x=2.90;
   $y=1.90;
   $r=intdiv($x, $y);
   echo "intdiv(" . $x . "," . $y . ") = " . $r . "";
?>
It will produce the following output −
intdiv(2.9,1.9) = 2
PHP log10() Function
The log10 () function calculates the base-10 logarithm of a number. Base-10 logarithm is also called common or standard algorithm. The log10(x) function calculates log10x. It is related to natural algorithm by the following equation −
log10x=logex/loge10 ; So that
log10100=loge100/loge10 = 2
In PHP, log10 is represented by log10() function
log10 ( float $arg ) : float
PHP log10() function returns the base-10 logarithm of arg.
Example 1
The following code calculates the base-10 logarithm of 100
<?php
   $arg=100;
   echo "log10(" . $arg. ")=" . log10($arg) . "";
?>
It will produce the following output −
log10(100)=2
Example 2
The following code calculates the base-10 logarithm of Euler Number M_E. The result is equal to a predefined constant M_LOG10E
<?php
   $arg=M_E;
   echo "log10(" . $arg. ")=" . log10($arg) . "\n";
   echo "predefined constant M_LOG10E=" . M_LOG10E;
?>
It will produce the following output −
log10(2.718281828459)=0.43429448190325
predefined constant M_LOG10E=0.43429448190325
Example 3
The following code calculates log100 and returns -.
<?php
   $arg=0;
   echo "log10(" . $arg. ")=" . log10($arg) . "";
?>
It will produce the following output −
log10(0)=-INF
Example 4
Similarly sqrt(-1) results in NAN. Hence, its log10() also returns NAN.
<?php
   $arg=sqrt(-1);
   echo "log10(" . $arg. ")=" . log10($arg) . "";
?>
It will produce the following output −
log10(NAN)=NAN
PHP max() Function
The max () function returns the highest element in an array, or the highest amongst two or more comma separated parameters.
max ( array $values ) : mixed
Or,
max ( mixed $value1 [, mixed $... ] ) : mixed
If only one parameter is given, it should be an array of values which may be of same or different types.
If two or more parameters are given, they should be any comparable values of same or different types.
PHP max() function returns the highest value from the array parameter or sequence of values. Standard comparison operators are applicable. If multiple values of different types evaluate as equal (e.g. 0 and 'PHP'), the first parameter to the function will be returned.
Example 1
The following code returns the highest value from a numeric array.
<?php
   $arg=array(23, 5.55, 142, 56, 99);
   echo "array=";
   foreach ($arg as $i) echo $i . ",";
   echo "\n";
   echo "max = " . max($arg);
?>
It will produce the following output −
array=23,5.55,142,56,99,
max = 142
Example 2
The following code returns max() from an array of strings.
<?php
   $arg=array("Java", "Angular", "PHP", "C", "Kotlin");
   echo "array=";
   foreach ($arg as $i) echo $i . ",";
   echo "\n";
   echo "max = " . max($arg);
?>
It will produce the following output −
array=Java,Angular,PHP,C,Kotlin,
max = PHP
Example 3
In the following example, a series of string values is provided to the max() function. Let's see how it behaves −
<?php
   $val1="Java";
   $val2="Angular";
   $val3="PHP";
   $val4="C";
   $val5="Kotlin";
   echo "values=" . $val1 . "," . $val2 . "," . $val3 . "," . 	$val4 . "," . $val5 . "\n";
   echo "max = " . max($val1, $val2, $val3,$val4,$val5);
?>
It will produce the following output −
values=Java,Angular,PHP,C,Kotlin
max = PHP
Example 4
In this example, the given array is a collection of mixed data types.
<?php
   $arg=array(23, "Java", 142, 1e2, 99);
   echo "array=";
   foreach ($arg as $i) echo $i . ",";
   echo "\n";
   echo "max = " . max($arg);
?>
It will produce the following output −
array=23,Java,142,100,99,
max = 142
PHP min() Function
The min () function returns the lowest element in an array, or the lowest amongst two or more comma separated parameters.
min ( array $values ) : mixed
Or,
min ( mixed $value1 [, mixed $... ] ) : mixed
If only one parameter is given, it should be an array of values which may be of same or different types
If two or more parameters are given, they should be any comparable values of same or different types
PHP min() function returns the lowest value from the array parameter or sequence of values. Standard comparison operators are applicable. If multiple values of different types evaluate as equal (e.g. 0 and 'PHP'), the first parameter to the function will be returned
Example 1
The following code returns the smallest value from numeric array.
<?php
   $arg=array(23, 5.55, 142, 56, 99);
   echo "array=";
   foreach ($arg as $i) echo $i . ",";
   echo "\n";
   echo "min = " . min($arg);
?>
It will produce the following output −
array=23,5.55,142,56,99,
min = 5.55
Example 2
The following code returns min() from an array of strings.
<?php
   $arg=array("Java", "Angular", "PHP", "C", "Kotlin");
   echo "array=";
   foreach ($arg as $i) echo $i . ",";
   echo "\n";
   echo "min = " . min($arg);
?>
It will produce the following output −
array=Java,Angular,PHP,C,Kotlin,
min = Angular
Example 3
In this example, a series of string values is provided to the min() function.
<?php
   $val1="Java";
   $val2="Angular";
   $val3="PHP";
   $val4="C";
   $val5="Kotlin";
   echo "values=" . $val1 . "," . $val2 . "," . $val3 . "," . 	$val4 . "," . $val5 . "\n";
   echo "min = " . min($val1, $val2, $val3,$val4,$val5);
?>
It will produce the following output −
values=Java,Angular,PHP,C,Kotlin
min = Angular
Example 4
In this example, the given array is a collection of mixed data types.
<?php
   $arg=array(23, "Java", 142, 1e2, 99);
   echo "array=";
   foreach ($arg as $i) echo $i . ",";
   echo "\n";
   echo "min = " . min($arg);
?>
It will produce the following output −
array=23,Java,142,100,99,
min = 23
PHP pow() Function
The pow () function is used to compute the power of a certain number. It returns xy calculation, also termed as x raised to y. PHP also provides "**" as exponentiation operator.
So, pow(x,y) returns xy which is same as x**y.
pow ( number $base , number $exp ) : number
The first parameter is the base to be raised. The second parameter is the power to which base needs to be raised.
PHP pow() function returns the base raised to the power of exp. If both arguments are non-negative integers, the result is returned as integer, otherwise it is returned as a float.
Example 1
The following example calculates 102 using pow() function −
<?php
   echo "pow(10,2) = " . pow(10,2);
   echo " using ** operator " . 10**2;
?>
It will produce the following output −
pow(10,2) = 100 using ** operator 100
Example 2
Any number raised to 0 results in 1. This is verified in the following example −
<?php
   $x=10;
   $y=0;
   echo "pow(" . $x, "," . $y . ")=". pow($x,$y);
?>
It will produce the following output −
pow(10,0)=1
Example 3
The following example shows how you can compute the square root of 100 using the pow() function −
<?php
   $x=100;
   $y=0.5;
   echo "pow(" . $x, "," . $y . ")=". pow($x,$y) . "\n";
   echo "using sqrt() function : ". sqrt(100);
?>
It will produce the following output −
pow(100,0.5)=10
using sqrt() function : 10
Example 4
This example shows how you can use the pow() function to calculate the area of a circle.
<?php
   $radius=5;
   echo "radius = " . $radius . " area = " . M_PI*pow(5,2);
?>
It will produce the following output −
radius = 5 area = 78.539816339745
PHP round() Function
The round() function proves useful in rounding any floating point number upto a desired precision level. Positive precision parameter causes the number to be rounded after the decimal point; whereas with negative precision, rounding occurs before the decimal point. Precision is "0" by default.
For example, round(10.6) returns 11, round(10.2) returns 10. The function always returns a floating point number.
This function also has another optional parameter called mode that takes one of the redefined constants described later.
round ( float $value , int $precision , int $mode ) : float
Parameters
Value − A float number to be rounded.
Precision − Number of decimal digits to round to. Default is 0. Positive precision rounds given number after decimal point. Negative precision rounds the given number before decimal point.
Mode − One of the following predefined constants.
| Sr.No | Constant & Description |
|---|---|
| 1 | PHP_ROUND_HALF_UP Rounds number away from 0 when it is half way there. Hence, 1.5 becomes 2 and -1.5 to -2 |
| 2 | PHP_ROUND_HALF_DOWN Rounds number towards 0 when it is half way there. Hence 1.5 becomes 1 and -1.5 to -1 |
| 3 | PHP_ROUND_HALF_EVEN Rounds the number to nearest even value |
| 4 | PHP_ROUND_HALF_ODD Rounds the number to nearest odd value |
PHP round() function returns a float number that by rounding the value to a desired precision.
Example 1
The following code rounds the given number to positive precision values −
<?php
   $arg=1234.567;
   echo "round(" . $arg . ") = " . round($arg) . "\n";
   echo "round(" . $arg . ",1) = " . round($arg,1) . "\n";
   echo "round(" . $arg . ",2) = " . round($arg,2) . "";
?>
It will produce the following output −
round(1234.567) = 1235
round(1234.567,1) = 1234.6
round(1234.567,2) = 1234.57
Example 2
The following code rounds the number to negative precision values −
<?php
   $arg=1234.567;
   echo "round(" . $arg . ") = " . round($arg) . "\n";
   echo "round(" . $arg . ",-1) = " . round($arg,-1) . "\n";
   echo "round(" . $arg . ",-2) = " . round($arg,-2) . "";
?>
It will produce the following output −
round(1234.567) = 1235
round(1234.567,-1) = 1230
round(1234.567,-2) = 1200
Example 3
The following code uses UP and DOWN mode constants for rounding −
<?php
   echo "round(3.45,HALF_UP) = " . round(3.45,0, PHP_ROUND_HALF_UP) . "\n";
   echo "round(3.75 HALF_UP) = " . round(3.75, 1, PHP_ROUND_HALF_DOWN) . "";
?>
It will produce the following output −
round(3.45,HALF_UP) = 3
round(3.75 HALF_UP) = 3.7
Example 4
The following code uses ODD and EVEN modes for rounding −
<?php echo "round( 3.45,HALF_ODD) = " . round(3.45,0, PHP_ROUND_HALF_ODD) . "\n"; echo "round(3.78 HALF_EVEN) = " . round(3.78, 0, PHP_ROUND_HALF_EVEN) . ""; ?>
It will produce the following output −
round(3.45,HALF_ODD) = 3 round(3.78, HALF_EVEN) = 4
PHP sqrt() Function
The sqrt() function returns the square root of a positive float number. Since square root for a negative number is not defined, it returns NAN. This is one of the most commonly used functions. This function always returns a floating point number.
sqrt (float $arg) : float
PHP sqrt() function returns the square root of the given arg number. For negative numbers, the function returns NAN.
Example 1
The following code calculates the square root of 100 −
<?php $arg = 100; echo "Square root of " . $arg . "=" . sqrt($arg) . ""; ?>
It will produce the following output −
Square root of 100=10
Example 2
For sqrt(2), 1/sqrt(2) and sqrt(3), PHP has special predefined constants M_SQRT2, M_SQRT1_2 and M_SQRT3, respectively.
<?php echo "sqrt(2) = " . sqrt(2) . "\n"; echo "M_SQRT2 = " . M_SQRT2. "\n"; echo "sqrt(3) = " . sqrt(3) . "\n"; echo "M_SQRT3 = " . M_SQRT3 . "\n"; echo "1/sqrt(2)) = " . 1/sqrt(2) . "\n"; echo "M_SQRT1_2 = " . M_SQRT1_2 . ""; ?>
It will produce the following output −
sqrt(2) = 1.4142135623731 M_SQRT2 = 1.4142135623731 sqrt(3) = 1.7320508075689 M_SQRT3 = 1.7320508075689 1/sqrt(2)) = 0.70710678118655 M_SQRT1_2 = 0.70710678118655
Example 3
The mathematical constants M_SQRTPI and M_2_SQRTPI represent values of sqrt() and 2/sqrt().
<?php echo "sqrt(pi) = " . sqrt(M_PI) . "\n"; echo "M_SQRTPI = " . M_SQRTPI. "\n"; echo "2/sqrt(pi) = " . 2/sqrt(M_PI) . "\n"; echo "M_2_SQRTPI = " . M_2_SQRTPI . ""; ?>
It will produce the following output −
sqrt(pi) = 1.7724538509055 M_SQRTPI = 1.7724538509055 2/sqrt(pi) = 1.1283791670955 M_2_SQRTPI = 1.1283791670955
Example 4
sqrt(-1) is undefined, hence it returns NAN.
<?php echo "sqrt(-1) = " . sqrt(-1) . ""; ?>
It will produce the following output −
sqrt(-1) = NAN
Predefined Mathematical Constants
In addition to the above mathematical functions, PHP also has the following list of predefined mathematical constants −
| Constant | Value | Description |
|---|---|---|
| M_PI | 3.14159265358979323846 | Pi |
| M_E | 2.7182818284590452354 | Euler Number e |
| M_LOG2E | 1.4426950408889634074 | log2 e |
| M_LOG10E | 0.43429448190325182765 | log10 e |
| M_LN2 | 0.69314718055994530942 | loge 2 |
| M_LN10 | M_LN10 2.30258509299404568402 loge 10 | loge 10 |
| M_PI_2 | 1.57079632679489661923 | pi/2 |
| M_PI_4 | 0.78539816339744830962 | pi/4 |
| M_1_PI | 0.31830988618379067154 | 1/pi |
| M_2_PI | 0.63661977236758134308 | 2/pi |
| M_SQRTPI | 1.77245385090551602729 | sqrt(pi) |
| M_2_SQRTPI | 1.12837916709551257390 | 2/sqrt(pi) |
| M_SQRT2 | 1.41421356237309504880 | sqrt(2) |
| M_SQRT3 | 1.73205080756887729352 | sqrt(3) |
| M_SQRT1_2 | 0.70710678118654752440 | 1/sqrt(2) |
| M_LNPI | 1.14472988584940017414 | loge(pi) |
| M_EULER | 0.57721566490153286061 | Euler constant |
| PHP_ROUND_HALF_UP | 1 | Round halves up |
| PHP_ROUND_HALF_DOWN | 2 | Round halves down |
| PHP_ROUND_HALF_EVEN | 3 | Round halves to even numbers |
| PHP_ROUND_HALF_ODD | 4 | Round halves to odd numbers |
| NAN | NAN | Not A Number |
| INF | INF | Infinity |
PHP - Heredoc & Nowdoc
PHP provides two alternatives for declaring single or double quoted strings in the form of heredoc and newdoc syntax.
The single quoted string doesnt interpret the escape characters and doesnt expand the variables.
On the other hand, if you declare a double quoted string that contains a double quote character itself, you need to escape it by the "\" symbol. The heredoc syntax provides a convenient method.
Heredoc Strings in PHP
The heredoc strings in PHP are much like double-quoted strings, without the double-quotes. It means that they dont need to escape quotes and expand variables.
Heredoc Syntax
$str = <<<IDENTIFIER place a string here it can span multiple lines and include single quote ' and double quotes " IDENTIFIER;
First, start with the "<<<" operator. After this operator, an identifier is provided, then a newline. The string itself follows, and then the same identifier again to close the quotation. The string can span multiple lines and includes single quotes () or double quotes (").
The closing identifier may be indented by space or tab, in which case the indentation will be stripped from all lines in the doc string.
Example
The identifier must contain only alphanumeric characters and underscores and start with an underscore or a non-digit character. The closing identifier should not contain any other characters except a semicolon (;). Furthermore, the character before and after the closing identifier must be a newline character only.
Take a look at the following example −
<?php
$str1 = <<<STRING
Hello World
PHP Tutorial
by TutorialsPoint
STRING;
echo $str1;
?>
It will produce the following output −
Hello World
PHP Tutorial
by TutorialsPoint
Example
The closing identifier may or may not contain indentation after the first column in the editor. Indentation, if any, will be stripped off. However, the closing identifier must not be indented further than any lines of the body. Otherwise, a ParseError will be raised. Take a look at the following example and its output −
<?php
$str1 = <<<STRING
Hello World
PHP Tutorial
by TutorialsPoint
STRING;
echo $str1;
?>
It will produce the following output −
PHP Parse error: Invalid body indentation level (expecting an indentation level of at least 16) in hello.php on line 3
Example
The quotes in a heredoc do not need to be escaped, but the PHP escape sequences can still be used. Heredoc syntax also expands the variables.
<?php $lang="PHP"; echo <<<EOS Heredoc strings in $lang expand vriables. The escape sequences are also interpreted. Here, the hexdecimal ASCII characters produce \x50\x48\x50 EOS; ?>
It will produce the following output −
Heredoc strings in PHP expand vriables. The escape sequences are also interpreted. Here, the hexdecimal ASCII characters produce PHP
Nowdoc Strings in PHP
A nowdoc string in PHP is similar to a heredoc string except that it doesnt expand the variables, neither does it interpret the escape sequences.
<?php $lang="PHP"; $str = <<<'IDENTIFIER' This is an example of Nowdoc string. it can span multiple lines and include single quote ' and double quotes " IT doesn't expand the value of $lang variable IDENTIFIER; echo $str; ?>
It will produce the following output −
This is an example of Nowdoc string. it can span multiple lines and include single quote ' and double quotes " IT doesn't expand the value of $lang variable
The nowdocs syntax is similar to the heredocs syntax except that the identifier which follows the "<<<" operator needs to be enclosed in single quotes. The nowdocs identifier also follows the rules for the heredoc identifier.
Heredoc strings are like double-quoted strings without escaping. Nowdoc strings are like single-quoted strings without escaping.
PHP - Compound Types
Data types in PHP can be of "scalar type" or "compound type". Integer, float, Boolean and string types are scalar types, whereas array and object types are classified as compound types. Values of more than one types can be stored together in a single variable of a compound type.
In PHP, objects and arrays are the two compound data types.
An array is an ordered collection of elements of other data types, not necessarily of the same type.
An object is an instance of either a built-in or a user defined class, consisting of properties and methods.
Arrays in PHP
An array is a data structure that stores one or more data values in a single variable. An array in PHP is an ordered map that associates the values to their keys.
There are two ways to declare an array in PHP. One is to use the built-in array() function, and the other is to put the array elements inside square brackets.
An array which is a collection of only values is called an indexed array. Each value is identified by a positional index staring from 0.
If the array is a collection of key-value pairs, it is called as an associative array. The key component of the pair can be a number or a string, whereas the value part can be of any type.
The array() Function in PHP
The built-in array() function uses the parameters given to it and returns an object of array type. One or more comma-separated parameters are the elements in the array.
array(mixed ...$values): array
Each value in the parenthesis may be either a singular value (it may be a number, string, any object or even another array), or a key-value pair. The association between the key and its value is denoted by the "=>" symbol.
Example
Take a look at this following example −
$arr1 = array(10, "asd", 1.55, true);
$arr2 = array("one"=>1, "two"=>2, "three"=>3);
$arr3 = array(
array(10, 20, 30),
array("Ten", "Twenty", "Thirty"),
array("physics"=>70, "chemistry"=>80, "maths"=>90)
);
Using Square Brackets [ ]
Instead of the array() function, the comma-separated array elements may also be put inside the square brackets to declare an array object. In this case too, the elements may be singular values or a string or another array.
$arr1 = [10, "asd", 1.55, true]; $arr2 = ["one"=>1, "two"=>2, "three"=>3]; $arr3 = [ [10, 20, 30], ["Ten", "Twenty", "Thirty"], ["physics"=>70, "chemistry"=>80, "maths"=>90] ];
Accessing Array Elements
To access any element from a given array, you can use the array[key] syntax. For an indexed array, put the index inside the square bracket, as the index itself is anyway the key.
<?php
$arr1 = [10, 20, 30];
$arr2 = array("one"=>1, "two"=>2, "three"=>3);
var_dump($arr1[1]);
var_dump($arr2["two"]);
?>
It will produce the following output −
int(20) int(2)
Array Traversal in PHP
You can also use the foreach loop to iterate through an indexed array.
<?php
$arr1 = [10, 20, 30, 40, 50];
foreach ($arr1 as $val){
echo "$val\n";
}
?>
It will produce the following output −
10 20 30 40 50
Note that PHP internally treats the indexed array as an associative array, with the index being treated as the key. This fact can be verified by the var_dump() output of the array.
We can unpack each element of the indexed array in the key and value variables with the foreach syntax −
<?php
$arr1 = [10, 20, 30, 40, 50];
foreach ($arr1 as $key => $val){
echo "arr1[$key] = $val" . "\n";
}
?>
It will produce the following output −
arr1[0] = 10 arr1[1] = 20 arr1[2] = 30 arr1[3] = 40 arr1[4] = 50
The foreach loop is also used for iterating through an associative array, although any other type of loop can also be used with some maneuver.
Let us look at the foreach loop implementation, with each k-v pair unpacked in two variables.
<?php
$capitals = array(
"Maharashtra"=>"Mumbai",
"Telangana"=>"Hyderabad",
"UP"=>"Lucknow",
"Tamilnadu"=>"Chennai"
);
foreach ($capitals as $k=>$v) {
echo "Capital of $k is $v" . "\n";
}
?>
It will produce the following output −
Capital of Maharashtra is Mumbai Capital of Telangana is Hyderabad Capital of UP is Lucknow Capital of Tamilnadu is Chennai
Objects in PHP
In PHP, an object is a compound data type. It is an instance of either a built in or user defined class. Given below is a simple PHP class −
class SayHello {
function hello() {
echo "Hello World";
}
}
To declare an object of a class, we need to use the new operator.
$obj=new SayHello;
We can now call its method −
<?php
class SayHello {
function hello() {
echo "Hello World". PHP_EOL;
}
}
$obj=new SayHello;
var_dump(gettype($obj));
$obj->hello();
?>
It will produce the following output −
string(6) "object" Hello World
stdClass
PHP provides stdClass as a generic empty class which is useful for adding properties dynamically and casting. An object of stdClass is null to begin with. We can add properties to it dynamically.
<?php $obj=new stdClass; $obj->name="Deepak"; $obj->age=21; $obj->marks=75; print_r($obj); ?>
It will produce the following output −
stdClass Object ( [name] => Deepak [age] => 21 [marks] => 75 )
Array to Object Conversion in PHP
An array in PHP can be typecast to an object as follows −
<?php
$arr=array("name"=>"Deepak", "age"=>21, "marks"=>75);
$obj=(object)$arr;
print_r($obj);
?>
It will produce the following output −
stdClass Object ( [name] => Deepak [age] => 21 [marks] => 75 )
Object to Array Conversion in PHP
Conversely, an object can be cast to an array. Take a look at the following example −
<?php $obj=new stdClass; $obj->name="Deepak"; $obj->age=21; $obj->marks=75; $arr=(array)$obj; print_r($arr); ?>
It will produce the following output −
Array ( [name] => Deepak [age] => 21 [marks] => 75 )
Scalar Type to Object Type Conversion in PHP
A variable of any scalar type can also be converted to an object by type casting. The value of the scalar variable becomes the value of the object's scalar property.
<?php $name="Deepak"; $age=21; $percent=75.50; $obj1=(object)$name; print_r($obj1); $obj2=(object)$age; print_r($obj2); $obj3=(object)$percent; print_r($obj3); ?>
It will produce the following output −
stdClass Object ( [scalar] => Deepak ) stdClass Object ( [scalar] => 21 ) stdClass Object ( [scalar] => 75.5 )
PHP - File Include
The include statement in PHP is similar to the import statement in Java or Python, and #include directive in C/C++. However, there is a slight difference in the way the include statement works in PHP.
The Java/Python import or #include in C/C++ only loads one or more language constructs such as the functions or classes defined in one file into the current file. In contrast, the include statement in PHP brings in everything in another file into the existing PHP script. It may be a PHP code, a text file, HTML markup, etc.
The "include" Statement in PHP
Here is a typical example of how the include statement works in PHP −
myfile.php
<?php # some PHP code ?>
test.php
<?php include 'myfile.php'; # PHP script in test.php ?>
The include keyword in PHP is very handy, especially when you need to use the same PHP code (function or class) or HTML markup across multiple PHP scripts in a project. A case in point is the creation of a menu that should appear across all pages of a web application.
Suppose you want to create a common menu for your website. Then, create a file "menu.php" with the following content.
<a href="http://www.tutorialspoint.com/index.htm">Home</a> - <a href="http://www.tutorialspoint.com/ebxml">ebXML</a> - <a href="http://www.tutorialspoint.com/ajax">AJAX</a> - <a href="http://www.tutorialspoint.com/perl">PERL</a> <br />
Now create as many pages as you like and include this file to create the header. For example, now your "test.php" file can have the following content −
<html>
<body>
<?php include("menu.php"); ?>
<p>This is an example to show how to include PHP file!</p>
</body>
</html>
Both the files are assumed to be present in the document root folder of the XAMPP server. Visit http://localhost/test.php URL. It will produce the following output −

When PHP parser encounters the include keyword, it tries to find the specified file in the same directory from which the current script is being executed. If not found, the directories in the "include_path" setting of "php.ini" are searched.
When a file is included, the code it contains inherits the variable scope of the line on which the include occurs. Any variables available at that line in the calling file will be available within the called file, from that point forward. However, all functions and classes defined in the included file have the global scope.
Example
In the following example, we have a "myname.php" script with two variables declared in it. It is included in another script test.php. The variables are loaded in the global scope.
myname.php
<?php $color = 'green'; $fruit = 'apple'; ?>
test.php
<?php include "myname.php"; echo "<h2>$fname $lname</h2>"; ?>
When the browser visits http://localhost/test.php, it shows −
Ravi Teja
However, if the file is included inside a function, the variables are a part of the local scope of the function only.
myname.php
<?php $color = 'green'; $fruit = 'apple'; ?>
test.php
<?php
function showname() {
include "myname.php";
}
echo "<h2>$fname $lname</h2>";
?>
Now when the browser visits http://localhost/test.php, it shows undefined variable warnings −
Warning: Undefined variable $fname in C:\xampp\htdocs\test.php on line 7 Warning: Undefined variable $lname in C:\xampp\htdocs\test.php on line 7
include_once statement
Just like include, PHP also has the "include_once" keyword. The only difference is that if the code from a file has already been included, it will not be included again, and "include_once" returns true. As the name suggests, the file will be included just once.
"include_once" may be used in cases where the same file might be included and evaluated more than once during a particular execution of a script, so it can help avoid problems such as function redefinitions, variable value reassignments, etc.
PHP Include vs Require
The require keyword in PHP is quite similar to the include keyword. The difference between the two is that, upon failure require will produce a fatal E_COMPILE_ERROR level error.
In other words, require will halt the script, whereas include only emits a warning (E_WARNING) which allows the script to continue.
require_once keyword
The "require_once" keyword is similar to require with a subtle difference. If you are using "require_once", then PHP will check if the file has already been included, and if so, then the same file it will not be included again.
PHP - Date & Time
The built-in library of PHP has a wide range of functions that helps in programmatically handling and manipulating date and time information. Date and Time objects in PHP can be created by passing in a string presentation of date/time information, or from the current system's time.
PHP provides the DateTime class that defines a number of methods. In this chapter, we will have a detailed view of the various Date and Time related methods available in PHP.
The date/time features in PHP implements the ISO 8601 calendar, which implements the current leap-day rules from before the Gregorian calendar was in place. The date and time information is internally stored as a 64-bit number.
Getting the Time Stamp with time()
PHP's time() function gives you all the information that you need about the current date and time. It requires no arguments but returns an integer.
time(): int
The integer returned by time() represents the number of seconds elapsed since midnight GMT on January 1, 1970. This moment is known as the UNIX epoch, and the number of seconds that have elapsed since then is referred to as a time stamp.
<?php print time(); ?>
It will produce the following output −
1699421347
We can convert a time stamp into a form that humans are comfortable with.
Converting a Time Stamp with getdate()
The function getdate() optionally accepts a time stamp and returns an associative array containing information about the date. If you omit the time stamp, it works with the current time stamp as returned by time().
The following table lists the elements contained in the array returned by getdate().
| Sr.No | Key & Description | Example |
|---|---|---|
| 1 | seconds Seconds past the minutes (0-59) |
20 |
| 2 | minutes Minutes past the hour (0 - 59) |
29 |
| 3 | hours Hours of the day (0 - 23) |
22 |
| 4 | mday Day of the month (1 - 31) |
11 |
| 5 | wday Day of the week (0 - 6) |
4 |
| 6 | mon Month of the year (1 - 12) |
7 |
| 7 | year Year (4 digits) |
1997 |
| 8 | yday Day of year ( 0 - 365 ) |
19 |
| 9 | weekday Day of the week |
Thursday |
| 10 | month Month of the year |
January |
| 11 | 0 Timestamp |
948370048 |
Now you have complete control over date and time. You can format this date and time in whatever format you want.
Example
Take a look at this following example −
<?php
$date_array = getdate();
foreach ( $date_array as $key => $val ){
print "$key = $val\n";
}
$formated_date = "Today's date: ";
$formated_date .= $date_array['mday'] . "-";
$formated_date .= $date_array['mon'] . "-";
$formated_date .= $date_array['year'];
print $formated_date;
?>
It will produce the following output −
seconds = 0 minutes = 38 hours = 6 mday = 8 wday = 3 mon = 11 year = 2023 yday = 311 weekday = Wednesday month = November 0 = 1699421880 Today's date: 8-11-2023
Converting a Time Stamp with date()
The date() function returns a formatted string representing a date. You can exercise an enormous amount of control over the format that date() returns with a string argument that you must pass to it.
date(string $format, ?int $timestamp = null): string
The date() optionally accepts a time stamp if omitted then current date and time will be used. Any other data you include in the format string passed to date() will be included in the return value.
The following table lists the codes that a format string can contain −
| Sr.No | Format & Description | Example |
|---|---|---|
| 1 | a 'am' or 'pm' lowercase |
pm |
| 2 | A 'AM' or 'PM' uppercase |
PM |
| 3 | d Day of month, a number with leading zeroes |
20 |
| 4 | D Day of week (three letters) |
Thu |
| 5 | F Month name |
January |
| 6 | h Hour (12-hour format - leading zeroes) |
12 |
| 7 | H Hour (24-hour format - leading zeroes) |
22 |
| 8 | g Hour (12-hour format - no leading zeroes) |
12 |
| 9 | G Hour (24-hour format - no leading zeroes) |
22 |
| 10 | i Minutes ( 0 - 59 ) |
23 |
| 11 | j Day of the month (no leading zeroes |
20 |
| 12 | l (Lower 'L') Day of the week |
Thursday |
| 13 | L Leap year ('1' for yes, '0' for no) |
1 |
| 14 | m Month of year (number - leading zeroes) |
1 |
| 15 | M Month of year (three letters) |
Jan |
| 16 | r The RFC 2822 formatted date |
Thu, 21 Dec 2000 16:01:07 +0200 |
| 17 | n Month of year (number - no leading zeroes) |
2 |
| 18 | s Seconds of hour |
20 |
| 19 | U Time stamp |
948372444 |
| 20 | y Year (two digits) |
06 |
| 21 | Y Year (four digits) |
2006 |
| 22 | z Day of year (0 - 365) |
206 |
| 23 | Z Offset in seconds from GMT |
+5 |
Example
Take a look at this following example −
<?php
print date("m/d/y G.i:s \n", time()) . PHP_EOL;
print "Today is ";
print date("j of F Y, \a\\t g.i a", time());
?>
It will produce the following output −
11/08/23 11.23:08 Today is 8 2023f November 2023, at 11.23 am
Hope you have good understanding on how to format date and time according to your requirement. For your reference a complete list of all the date and time functions is given in PHP Date & Time Functions.
PHP - Scalar Type Declarations
The feature of providing type hints has been in PHP since version 5. Type hinting refers to the practice of providing the data type of a parameter in the function definition. Before PHP 7, it was possible to use only the array, callable, and class for type hints in a function. PHP 7 onwards, you can also insert type hints for parameters of scalar data type such as int, string, bool, etc.
PHP is a dynamically (and weakly) typed language. Hence, you dont need to declare the type of the parameter when a function is defined, something which is necessary in a statically type language like C or Java.
A typical definition of function in PHP is as follows −
function addition($x, $y) {
echo "First number: $x Second number: $y Addition: " . $x+$y;
}
Here, we assume that the parameters $x and $y are numeric. However, even if the values passed to the function arent numeric, the PHP parser tries to cast the variables into compatible type as far as possible.
If one of the values passed is a string representation of a number, and the second is a numeric variable, PHP casts the string variable to numeric in order to perform the addition operation.
Example
Take a look at this following example −
<?php
function addition($x, $y) {
echo "First number: " . $x;
echo "\nSecond number: " . $y;
echo "\nAddition: " . $x+$y;
}
$x="10";
$y=20;
addition($x, $y);
?>
It will produce the following output −
First number: 10 Second number: 20 Addition: 30
However, if $x in the above example is a string that doesnt hold a valid numeric representation, an error is encountered.
<?php
function addition($x, $y) {
echo "First number: " . $x;
echo "\nSecond number: " . $y;
echo "\nAddition: " . $x+$y;
}
$x="Hello";
$y=20;
addition($x, $y);
?>
Run this code and see how it shows an error.
Scalar Type Declarations in PHP 7
A new feature introduced with PHP version 7 allows defining a function with parameters whose data type can be specified within the parenthesis.
PHP 7 has introduced the following Scalar type declarations −
Int
Float
Bool
String
Interfaces
Array
Callable
Older versions of PHP allowed only the array, callable and class types to be used as type hints. Furthermore, in the older versions of PHP (PHP 5), the fatal error used to be a recoverable error while the new release (PHP 7) returns a throwable error.
Scalar type declaration is implemented in two modes −
Coercive Mode − Coercive is the default mode and need not to be specified.
Strict Mode − Strict mode has to be explicitly hinted.
Coercive Mode
The addition() function defined in the earlier example can now be re-written by incorporating the type declarations as follows −
function addition(int $x, int $y) {
echo "First number: $x Second number: $y Addition: " . $x+$y;
}
Note that the parser still casts the incompatible types i.e., string to an int if the string contains an integer as earlier.
Example
Take a look at this following example −
<?php
function addition(int $x, int $y) {
echo "First number: " . $x;
echo "\nSecond number: " . $y;
echo "\nAddition: " . $x+$y;
}
$x="10";
$y=20;
echo addition($x, $y);
?>
It will produce the following output −
First number: 10 Second number: 20 Addition: 30
Obviously, this is because PHP is a weakly typed language, as PHP tries to coerce a variable of string type to an integer. PHP 7 has introduced a strict mode feature that addresses this issue.
Strict Mode
To counter the weak type checking of PHP, a strict mode has been introduced. This mode is enabled with a declare statement −
declare (strict_types=1);
You should put this statement at the top of the PHP script (usually just below the PHP tag). This means that the strictness of typing for scalars is configured on a per-file basis.
In the weak mode, the strict_types flag is 0. Setting it to 1 forces the PHP parser to check the compatibility of the parameters and values passed. Add this statement in the above code and check the result. It will show the following error message −
Fatal error: Uncaught TypeError: addition():
Argument #1 ($x) must be of type int, string given,
called in add.php on line 12 and defined in add.php:4
Stack trace:
#0 add.php(12): addition('10', 20)
#1 {main}
thrown in add.php on line 4
Example
Here is another example of scalar type declaration in the function definition. The strict mode when enabled raises fatal error if the incompatible types are passed as parameters.
<?php
// Strict mode
// declare(strict_types = 1);
function sum(int ...$ints) {
return array_sum($ints);
}
print(sum(2, '3', 4.1));
?>
Uncomment the declare statement at the top of this code and run it. Now it will produce an error −
Fatal error: Uncaught TypeError:
sum(): Argument #2 must be of type int, string given,
called in add.php on line 9 and defined in add.php:4
Stack trace:
#0 add.php(9): sum(2, '3', 4.1)
#1 {main}
thrown in add.php on line 4
The type-hinting feature is mostly used by IDEs to prompt the user about the expected types of the parameters used in the function declaration. The following screenshot shows the VS Code editor popping up the function prototype as you type.
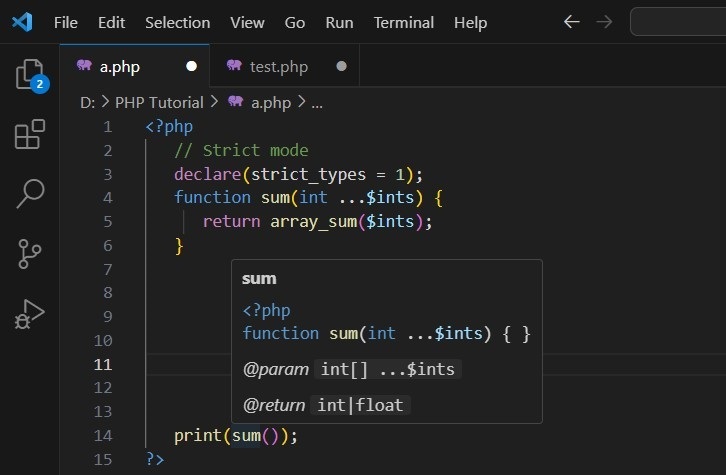
PHP - Return Type Declarations
PHP version 7 extends the scalar type declaration feature to the return value of a function also. As per this new provision, the return type declaration specifies the type of value that a function should return. We can declare the following types for return types −
int
float
bool
string
interfaces
array
callable
To implement the return type declaration, a function is defined as −
function myfunction(type $par1, type $param2): type {
# function body
return $val;
}
PHP parser is coercive typing by default. You need to declare "strict_types=1" to enforce stricter verification of the type of variable to be returned with the type used in the definition.
Example
In the following example, the division() function is defined with a return type as int.
<?php
function division(int $x, int $y): int {
$z = $x/$y;
return $z;
}
$x=20.5;
$y=10;
echo "First number: " . $x;
echo "\nSecond number: " . $y;
echo "\nDivision: " . division($x, $y);
?>
Since the type checking has not been set to strict_types=1, the division take place even if one of the parameters is a non-integer.
First number: 20.5 Second number: 10 Division: 2
However, as soon as you add the declaration of strict_types at the top of the script, the program raises a fatal error message.
Fatal error: Uncaught TypeError: division(): Argument #1 ($x) must be of type int, float given, called in div.php on line 12 and defined in div.php:3
Stack trace:
#0 div.php(12): division(20.5, 10)
#1 {main}
thrown in div.php on line 3
VS Code warns about the error even before running the code by displaying error lines at the position of error −
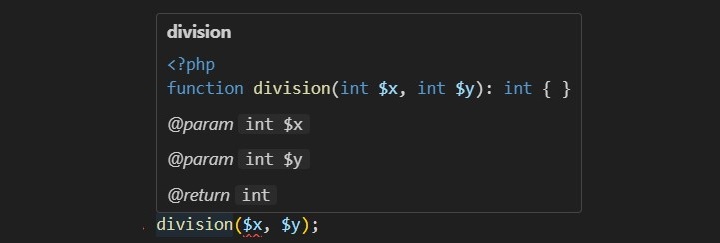
Example
To make the division() function return a float instead of int, cast the numerator to float, and see how PHP raises the fatal error −
<?php
// declare(strict_types=1);
function division(int $x, int $y): int {
$z = (float)$x/$y;
return $z;
}
$x=20;
$y=10;
echo "First number: " . $x;
echo "\nSecond number: " . $y;
echo "\nDivision: " . division($x, $y);
?>
Uncomment the declare statement at the top and run this code here to check its output. It will show an error −
First number: 20
Second number: 10PHP Fatal error: Uncaught TypeError: division(): Return value must be of type int, float returned in /home/cg/root/14246/main.php:5
Stack trace:
#0 /home/cg/root/14246/main.php(13): division()
#1 {main}
thrown in /home/cg/root/14246/main.php on line 5
PHP - Operators Types
What are Operators in PHP?
As in any programming language, PHP also has operators which are symbols (sometimes keywords) that are predefined to perform certain commonly required operations on one or more operands.
For example, using the expression "4 + 5" is equal to 9. Here "4" and "5" are called operands and "+" is called an operator.
We have the following types of operators in PHP −
Arithmetic Operators
Comparison Operators
Logical Operators
Assignment Operators
String Operators
Array Operators
Conditional (or Ternary Operators)
This chapter will provide an overview of how you can use these operators in PHP. In the subsequent chapters, we will take a closer look at each of the operators and how they work.
Arithmetic Operators in PHP
We use Arithmetic operators to perform mathematical operations like addition, subtraction, multiplication, division, etc. on the given operands. Arithmetic operators (excluding the increment and decrement operators) always work on two operands, however the type of these operands should be the same.
The following table highligts the arithmetic operators that are supported by PHP. Assume variable "$a" holds 42 and variable "$b" holds 20 −
| Operator | Description | Example |
|---|---|---|
| + | Adds two operands | $a + $b = 62 |
| - | Subtracts second operand from the first | $a - $b = 22 |
| * | Multiply both operands | $a * $b = 840 |
| / | Divide numerator by de-numerator | $a / $b = 2.1 |
| % | Modulus Operator and remainder of after an integer division | $a % $b = 2 |
| ++ | Increment operator, increases integer value by one | $a ++ = 43 |
| -- | Decrement operator, decreases integer value by one | $a -- = 42 |
Comparison Operators in PHP
You would use Comparison operators to compare two operands and find the relationship between them. They return a Boolean value (either true or false) based on the outcome of the comparison.
The following table highligts the comparison operators that are supported by PHP. Assume variable $a holds 10 and variable $b holds 20, then −
| Operator | Description | Example |
|---|---|---|
| == | Checks if the value of two operands are equal or not, if yes then condition becomes true. | ($a == $b) is not true |
| != | Checks if the value of two operands are equal or not, if values are not equal then condition becomes true. | ($a != $b) is true |
| > | Checks if the value of left operand is greater than the value of right operand, if yes then condition becomes true. | ($a > $b) is false |
| < | Checks if the value of left operand is less than the value of right operand, if yes then condition becomes true. | ($a < $b) is true |
| >= | Checks if the value of left operand is greater than or equal to the value of right operand, if yes then condition becomes true. | ($a >= $b) is false |
| <= | Checks if the value of left operand is less than or equal to the value of right operand, if yes then condition becomes true. | ($a <= $b) is true |
Logical Operators in PHP
You can use Logical operators in PHP to perform logical operations on multiple expressions together. Logical operators always return Boolean values, either true or false.
Logical operators are commonly used with conditional statements and loops to return decisions according to the Boolean conditions. You can also combine them to manipulate Boolean values while dealing with complex expressions.
The following table highligts the logical operators that are supported by PHP.
Assume variable $a holds 10 and variable $b holds 20, then −
| Operator | Description | Example |
|---|---|---|
| and | Called Logical AND operator. If both the operands are true then condition becomes true. | (A and B) is true |
| or | Called Logical OR Operator. If any of the two operands are non zero then condition becomes true. | (A or B) is true |
| && | Called Logical AND operator. If both the operands are non zero then condition becomes true. | (A && B) is true |
| || | Called Logical OR Operator. If any of the two operands are non zero then condition becomes true. | (A || B) is true |
| ! | Called Logical NOT Operator. Use to reverses the logical state of its operand. If a condition is true then Logical NOT operator will make false. | !(A && B) is false |
Assignment Operators in PHP
You can use Assignment operators in PHP to assign or update the values of a given variable with a new value. The right-hand side of the assignment operator holds the value and the left-hand side of the assignment operator is the variable to which the value will be assigned.
The data type of both the sides should be the same, else you will get an error. The associativity of assignment operators is from right to left. PHP supports two types of assignment operators −
Simple Assignment Operator − It is the most commonly used operator. It is used to assign value to a variable or constant.
Compound Assignment Operators − A combination of the assignment operator (=) with other operators like +, *, /, etc.
The following table highligts the assignment operators that are supported by PHP −
| Operator | Description | Example |
|---|---|---|
| = | Simple assignment operator, Assigns values from right side operands to left side operand | C = A + B will assign value of A + B into C |
| += | Add AND assignment operator, It adds right operand to the left operand and assign the result to left operand | C += A is equivalent to C = C + A |
| -= | Subtract AND assignment operator, It subtracts right operand from the left operand and assign the result to left operand | C -= A is equivalent to C = C - A |
| *= | Multiply AND assignment operator, It multiplies right operand with the left operand and assign the result to left operand | C *= A is equivalent to C = C * A |
| /= | Divide AND assignment operator, It divides left operand with the right operand and assign the result to left operand | C /= A is equivalent to C = C / A |
| %= | Modulus AND assignment operator, It takes modulus using two operands and assign the result to left operand | C %= A is equivalent to C = C % A |
String Operators in PHP
There are two operators in PHP for working with string data types −
The "." (dot) operator is PHP's concatenation operator. It joins two string operands (characters of right hand string appended to left hand string) and returns a new string.
PHP also has the ".=" operator which can be termed as the concatenation assignment operator. It updates the string on its left by appending the characters of right hand operand.
$third = $first . $second; $leftstring .= $rightstring;
Array Operators in PHP
PHP defines the following set of symbols to be used as operators on array data types −
| Symbol | Example | Name | Result |
|---|---|---|---|
| + | $a + $b | Union | Union of $a and $b. |
| == | $a == $b | Equality | TRUE if $a and $b have the same key/value pairs. |
| === | $a === $b | Identity | TRUE if $a and $b have the same key/value pairs in the same order and of the same types. |
| != | $a != $b | Inequality | TRUE if $a is not equal to $b. |
| <> | $a <> $b | Inequality | TRUE if $a is not equal to $b. |
| !== | $a !== $b | Non identity | TRUE if $a is not identical to $b. |
Conditional Operators in PHP
There is one more operator in PHP which is called conditional operator. It is also known as ternary operator. It first evaluates an expression for a true or false value and then executes one of the two given statements depending upon the result of the evaluation.
| Operator | Description | Example |
|---|---|---|
| ? : | Conditional Expression | If Condition is true ? Then value X : Otherwise value Y |
Operator Categories in PHP
All the operators we have discussed above can be categorised into following categories −
Unary prefix operators, which precede a single operand.
Binary operators, which take two operands and perform a variety of arithmetic and logical operations.
The conditional operator (a ternary operator), which takes three operands and evaluates either the second or third expression, depending on the evaluation of the first expression.
Assignment operators, which assign a value to a variable.
Operator Precedence in PHP
Precedence of operators decides the order of execution of operators in an expression. For example, in "2+6/3", division of 6/3 is done first and then the addition of "2+2" takes place because the division operator "/" has higher precedence over the addition operator "+".
To force a certain operator to be called before other, parentheses should be used. In this example, (2+6)/3 performs addition first, followed by division.
Some operators may have the same level of precedence. In that case, the order of associativity (either left or right) decides the order of operations. Operators of same precedence level but are non-associative cannot be used next to each other.
The following table lists the PHP operators in their decreasing order of precedence −
| Operators | Purpose |
|---|---|
| clone new | clone and new |
| ** | exponentiation |
| ++ -- | increment/decrement |
| ~(int) (float) (string) (array) (object) (bool) | casting |
| instanceof | types |
| ! | logical |
| * / | multiplication/division |
| % | modulo |
| + - . | arithmetic and string |
| << >> | bitwise shift |
| < <= > >= | comparison |
| == != === !== <> <=> | comparison |
| & | bitwise and/references |
| ^ | bitwise XOR |
| | | bitwise OR |
| && | logical and |
| || | logical or |
| ?? | null coalescing |
| ? : | ternary |
| = += -= *= **= /= .= %= &= |= ^= <<= >>= ??= | assignment operators |
| yield from | yield from |
| yield | yield |
| and | logical |
| xor | logical |
| or | logical |
PHP - Arithmetic Operators Examples
In PHP, arithmetic operators are used to perform mathematical operations on numeric values. The following table highligts the arithmetic operators that are supported by PHP. Assume variable "$a" holds 42 and variable "$b" holds 20 −
| Operator | Description | Example |
|---|---|---|
| + | Adds two operands | $a + $b = 62 |
| - | Subtracts the second operand from the first | $a - $b = 22 |
| * | Multiply both the operands | $a * $b = 840 |
| / | Divide the numerator by the denominator | $a / $b = 2.1 |
| % | Modulus Operator and remainder of after an integer division | $a % $b = 2 |
| ++ | Increment operator, increases integer value by one | $a ++ = 43 |
| -- | Decrement operator, decreases integer value by one | $a -- = 42 |
Example
The following example shows how you can use these arithmetic operators in PHP −
<?php $a = 42; $b = 20; $c = $a + $b; echo "Addtion Operation Result: $c \n"; $c = $a - $b; echo "Substraction Operation Result: $c \n"; $c = $a * $b; echo "Multiplication Operation Result: $c \n"; $c = $a / $b; echo "Division Operation Result: $c \n"; $c = $a % $b; echo "Modulus Operation Result: $c \n"; $c = $a++; echo "Increment Operation Result: $c \n"; $c = $a--; echo "Decrement Operation Result: $c"; ?>
It will produce the following output −
Addtion Operation Result: 62 Substraction Operation Result: 22 Multiplication Operation Result: 840 Division Operation Result: 2.1 Modulus Operation Result: 2 Increment Operation Result: 42 Decrement Operation Result: 43
PHP - Comparison Operators Examples
In PHP, Comparison operators are used to compare two values and determine their relationship. These operators return a Boolean value, either True or False, based on the result of the comparison.
The following table highligts the comparison operators that are supported by PHP. Assume variable $a holds 10 and variable $b holds 20, then −
| Operator | Description | Example |
|---|---|---|
| == | Checks if the value of two operands are equal or not, if yes then condition becomes true. | ($a == $b) is not true |
| != | Checks if the value of two operands are equal or not, if values are not equal then condition becomes true. | ($a != $b) is true |
| > | Checks if the value of left operand is greater than the value of right operand, if yes then condition becomes true. | ($a > $b) is false |
| < | Checks if the value of left operand is less than the value of right operand, if yes then condition becomes true. | ($a < $b) is true |
| >= | Checks if the value of left operand is greater than or equal to the value of right operand, if yes then condition becomes true. | ($a >= $b) is false |
| <= | Checks if the value of left operand is less than or equal to the value of right operand, if yes then condition becomes true. | ($a <= $b) is true |
Additionally, these operators can also be combined with logical operators (&&, ||, !) to form complex conditions for decision making in PHP programs.
Example
The following example shows how you can use these comparison operators in PHP −
<?php
$a = 42;
$b = 20;
if ($a == $b) {
echo "TEST1 : a is equal to b \n";
} else {
echo "TEST1 : a is not equal to b \n";
}
if ($a > $b) {
echo "TEST2 : a is greater than b \n";
} else {
echo "TEST2 : a is not greater than b \n";
}
if ($a < $b) {
echo "TEST3 : a is less than b \n";
} else {
echo "TEST3 : a is not less than b \n";
}
if ($a != $b) {
echo "TEST4 : a is not equal to b \n";
} else {
echo "TEST4 : a is equal to b \n";
}
if ($a >= $b) {
echo "TEST5 : a is either greater than or equal to b \n";
} else {
echo "TEST5 : a is neither greater than nor equal to b \n";
}
if ($a <= $b) {
echo "TEST6 : a is either less than or equal to b \n";
} else {
echo "TEST6 : a is neither less than nor equal to b";
}
?>
It will produce the following output −
TEST1 : a is not equal to b TEST2 : a is greater than b TEST3 : a is not less than b TEST4 : a is not equal to b TEST5 : a is either greater than or equal to b TEST6 : a is neither less than nor equal to b
PHP - Logical Operators Examples
In PHP, logical operators are used to combine conditional statements. These operators allow you to create more complex conditions by combining multiple conditions together.
Logical operators are generally used in conditional statements such as if, while, and for loops to control the flow of program execution based on specific conditions.
The following table highligts the logical operators that are supported by PHP.
Assume variable $a holds 10 and variable $b holds 20, then −
| Operator | Description | Example |
|---|---|---|
| and | Called Logical AND operator. If both the operands are true then condition becomes true. | (A and B) is true |
| or | Called Logical OR Operator. If any of the two operands are non zero then condition becomes true. | (A or B) is true |
| && | Called Logical AND operator. The AND operator returns true if both the left and right operands are true. | (A && B) is true |
| || | Called Logical OR Operator. If any of the two operands are non zero then condition becomes true. | (A || B) is true |
| ! | Called Logical NOT Operator. Use to reverses the logical state of its operand. If a condition is true then Logical NOT operator will make false. | !(A && B) is false |
Example
The following example shows how you can use these logical operators in PHP −
<?php
$a = 42;
$b = 0;
if ($a && $b) {
echo "TEST1 : Both a and b are true \n";
} else {
echo "TEST1 : Either a or b is false \n";
}
if ($a and $b) {
echo "TEST2 : Both a and b are true \n";
} else {
echo "TEST2 : Either a or b is false \n";
}
if ($a || $b) {
echo "TEST3 : Either a or b is true \n";
} else {
echo "TEST3 : Both a and b are false \n";
}
if ($a or $b) {
echo "TEST4 : Either a or b is true \n";
} else {
echo "TEST4 : Both a and b are false \n";
}
$a = 10;
$b = 20;
if ($a) {
echo "TEST5 : a is true \n";
} else {
echo "TEST5 : a is false \n";
}
if ($b) {
echo "TEST6 : b is true \n";
} else {
echo "TEST6 : b is false \n";
}
if (!$a) {
echo "TEST7 : a is true \n";
} else {
echo "TEST7 : a is false \n";
}
if (!$b) {
echo "TEST8 : b is true \n";
} else {
echo "TEST8 : b is false";
}
?>
It will produce the following output −
TEST1 : Either a or b is false TEST2 : Either a or b is false TEST3 : Either a or b is true TEST4 : Either a or b is true TEST5 : a is true TEST6 : b is true TEST7 : a is false TEST8 : b is false
PHP - Assignment Operators Examples
You can use assignment operators in PHP to assign values to variables. Assignment operators are shorthand notations to perform arithmetic or other operations while assigning a value to a variable. For instance, the "=" operator assigns the value on the right-hand side to the variable on the left-hand side.
Additionally, there are compound assignment operators like +=, -= , *=, /=, and %= which combine arithmetic operations with assignment. For example, "$x += 5" is a shorthand for "$x = $x + 5", incrementing the value of $x by 5. Assignment operators offer a concise way to update variables based on their current values.
The following table highligts the assignment operators that are supported by PHP −
| Operator | Description | Example |
|---|---|---|
| = | Simple assignment operator. Assigns values from right side operands to left side operand | C = A + B will assign value of A + B into C |
| += | Add AND assignment operator. It adds right operand to the left operand and assign the result to left operand | C += A is equivalent to C = C + A |
| -= | Subtract AND assignment operator. It subtracts right operand from the left operand and assign the result to left operand | C -= A is equivalent to C = C - A |
| *= | Multiply AND assignment operator. It multiplies right operand with the left operand and assign the result to left operand | C *= A is equivalent to C = C * A |
| /= | Divide AND assignment operator. It divides left operand with the right operand and assign the result to left operand | C /= A is equivalent to C = C / A |
| %= | Modulus AND assignment operator. It takes modulus using two operands and assign the result to left operand | C %= A is equivalent to C = C % A |
Example
The following example shows how you can use these assignment operators in PHP −
<?php $a = 42; $b = 20; $c = $a + $b; echo "Addition Operation Result: $c \n"; $c += $a; echo "Add AND Assignment Operation Result: $c \n"; $c -= $a; echo "Subtract AND Assignment Operation Result: $c \n"; $c *= $a; echo "Multiply AND Assignment Operation Result: $c \n"; $c /= $a; echo "Division AND Assignment Operation Result: $c \n"; $c %= $a; echo "Modulus AND Assignment Operation Result: $c"; ?>
It will produce the following output −
Addition Operation Result: 62 Add AND Assignment Operation Result: 104 Subtract AND Assignment Operation Result: 62 Multiply AND Assignment Operation Result: 2604 Division AND Assignment Operation Result: 62 Modulus AND Assignment Operation Result: 20
PHP String Operators
There are two operators in PHP for working with string data types: concatenation operator (".") and the concatenation assignment operator (".="). Read this chapter to learn how these operators work in PHP.
Concatenation Operator in PHP
The dot operator (".") is PHP's concatenation operator. It joins two string operands (characters of right hand string appended to left hand string) and returns a new string.
$third = $first . $second;
Example
The following example shows how you can use the concatenation operator in PHP −
<?php $x="Hello"; $y=" "; $z="PHP"; $str=$x . $y . $z; echo $str; ?>
It will produce the following output −
Hello PHP
Concatenation Assignment Operator in PHP
PHP also has the ".=" operator which can be termed as the concatenation assignment operator. It updates the string on its left by appending the characters of right hand operand.
$leftstring .= $rightstring;
Example
The following example uses the concatenation assignment operator. Two string operands are concatenated returning the updated contents of string on the left side −
<?php $x="Hello "; $y="PHP"; $x .= $y; echo $x; ?>
It will produce the following output −
Hello PHP
PHP Array Operators
PHP defines the following set of symbols to be used as operators on array data types −
| Symbol | Example | Name | Result |
|---|---|---|---|
| + | $a + $b | Union | Union of $a and $b. |
| == | $a == $b | Equality | TRUE if $a and $b have the same key/value pairs. |
| === | $a === $b | Identity | TRUE if $a and $b have the same key/value pairs in the same order and of the same types. |
| != | $a != $b | Inequality | TRUE if $a is not equal to $b. |
| <> | $a <> $b | Inequality | TRUE if $a is not equal to $b. |
| !== | $a !== $b | Non identity | TRUE if $a is not identical to $b. |
The Union operator appends the right-hand array appended to left-hand array. If a key exists in both arrays, the elements from the left-hand array will be used, and the matching elements from the right-hand array will be ignored.
Example: Union Opeator in PHP
The following example shows how you can use the union operator in PHP −
<?php
$arr1=array("phy"=>70, "che"=>80, "math"=>90);
$arr2=array("Eng"=>70, "Bio"=>80,"CompSci"=>90);
$arr3=$arr1+$arr2;
var_dump($arr3);
?>
It will produce the following output −
array(6) {
["phy"]=>
int(70)
["che"]=>
int(80)
["math"]=>
int(90)
["Eng"]=>
int(70)
["Bio"]=>
int(80)
["CompSci"]=>
int(90)
}
Example: When Two Array are Equal
Two arrays are said to be equal if they have the same key-value pairs.
In the following example, we have an indexed array and other associative array with keys corresponding to index of elements in first. Hence, both are equal.
<?php $arr1=array(0=>70, 2=>80, 1=>90); $arr2=array(70,90,80); var_dump ($arr1==$arr2); var_dump ($arr2!=$arr1); ?>
It will produce the following output −
bool(true) bool(false)
Example: When Two Arrays are Identical
Arrays are identical if and only if both of them have same set of key-value pairs and in same order.
<?php $arr1=array(0=>70, 1=>80, 2=>90); $arr2=array(70,90,80); var_dump ($arr1===$arr2); $arr3=[70,80,90]; var_dump ($arr3===$arr1); ?>
It will produce the following output −
bool(false) bool(true)
PHP Conditional Operators Examples
You would use conditional operators in PHP when there is a need to set a value depending on conditions. It is also known as ternary operator. It first evaluates an expression for a true or false value and then executes one of the two given statements depending upon the result of the evaluation.
Ternary operators offer a concise way to write conditional expressions. They consist of three parts: the condition, the value to be returned if the condition evaluates to true, and the value to be returned if the condition evaluates to false.
| Operator | Description | Example |
|---|---|---|
| ? : | Conditional Expression | If Condition is true ? Then value X : Otherwise value Y |
Syntax
The syntax is as follows −
condition ? value_if_true : value_if_false
Ternary operators are especially useful for shortening if-else statements into a single line. You can use a ternary operator to assign different values to a variable based on a condition without needing multiple lines of code. It can improve the readability of the code.
However, you should use ternary operators judiciously, else you will end up making the code too complex for others to understand.
Example
Try the following example to understand how the conditional operator works in PHP. Copy and paste the following PHP program in test.php file and keep it in your PHP Server's document root and browse it using any browser.
<?php $a = 10; $b = 20; /* If condition is true then assign a to result otheriwse b */ $result = ($a > $b ) ? $a :$b; echo "TEST1 : Value of result is $result \n"; /* If condition is true then assign a to result otheriwse b */ $result = ($a < $b ) ? $a :$b; echo "TEST2 : Value of result is $result"; ?>
It will produce the following output −
TEST1 : Value of result is 20 TEST2 : Value of result is 10
PHP - Spread Operator
PHP recognizes the three dots symbol (...) as the spread operator. The spread operator is also sometimes called the splat operator. This operator was first introduced in PHP version 7.4. It can be effectively used in many cases such as unpacking arrays.
Example 1
In the example below, the elements in $arr1 are inserted in $arr2 after a list of its own elements.
<?php $arr1 = [4,5]; $arr2 = [1,2,3, ...$arr1]; print_r($arr2); ?>
It will produce the following output −
Array ( [0] => 1 [1] => 2 [2] => 3 [3] => 4 [4] => 5 )
Example 2
The Spread operator can be used more than once in an expression. For example, in the following code, a third array is created by expanding the elements of two arrays.
<?php $arr1 = [1,2,3]; $arr2 = [4,5,6]; $arr3 = [...$arr1, ...$arr2]; print_r($arr3); ?>
It will produce the following output −
Array ( [0] => 1 [1] => 2 [2] => 3 [3] => 4 [4] => 5 [5] => 6 )
Example 3
Note that the same result can be obtained with the use of array_merge() function, as shown below −
<?php $arr1 = [1,2,3]; $arr2 = [4,5,6]; $arr3 = array_merge($arr1, $arr2); print_r($arr3); ?>
It will produce the same output −
Array ( [0] => 1 [1] => 2 [2] => 3 [3] => 4 [4] => 5 [5] => 6 )
However, the use of (...) operator is much more efficient as it avoids the overhead a function call.
Example 4
PHP 8.1.0 also introduced another feature that allows using named arguments after unpacking the arguments. Instead of providing a value to each of the arguments individually, the values from an array will be unpacked into the corresponding arguments, using ... (three dots) before the array.
<?php
function myfunction($x, $y, $z=30) {
echo "x = $x y = $y z = $z";
}
myfunction(...[10, 20], z:30);
?>
It will produce the following output −
x = 10 y = 20 z = 30
Example 5
In the following example, the return value of a function is an array. The array elements are then spread and unpacked.
<?php
function get_squares() {
for ($i = 0; $i < 5; $i++) {
$arr[] = $i**2;
}
return $arr;
}
$squares = [...get_squares()];
print_r($squares);
?>
It will produce the following output −
Array ( [0] => 0 [1] => 1 [2] => 4 [3] => 9 [4] => 16 )
PHP - Null Coalescing Operator
The Null Coalescing operator is one of the many new features introduced in PHP 7. The word "coalescing" means uniting many things into one. This operator is used to replace the ternary operation in conjunction with the isset() function.
Ternary Operator in PHP
PHP has a ternary operator represented by the "?" symbol. The ternary operator compares a Boolean expression and executes the first operand if it is true, otherwise it executes the second operand.
expr ? statement1 : statement2;
Example
Let us use the ternary operator to check if a certain variable is set or not with the help of the isset() function, which returns true if declared and false if not.
<?php $x = 1; $var = isset($x) ? $x : "not set"; echo "The value of x is $var"; ?>
It will produce the following output −
The value of x is 1
Now, let's remove the declaration of "x" and rerun the code −
<?php # $x = 1; $var = isset($x) ? $x : "not set"; echo "The value of x is $var"; ?>
The code will now produce the following output −
The value of x is not set
The Null Coalescing Operator
The Null Coalescing Operator is represented by the "??" symbol. It acts as a convenient shortcut to use a ternary in conjunction with isset(). It returns its first operand if it exists and is not null; otherwise it returns its second operand.
$Var = $operand1 ?? $operand2;
The first operand checks whether a certain variable is null or not (or is set or not). If it is not null, the first operand is returned, else the second operand is returned.
Example
Take a look at the following example −
<?php # $num = 10; $val = $num ?? 0; echo "The number is $val"; ?>
It will produce the following output −
The number is 0
Now uncomment the first statement that sets $num to 10 and rerun the code −
<?php $num = 10; $val = $num ?? 0; echo "The number is $val"; ?>
It will now produce the following output −
The number is 10
A useful application of Null Coalescing operator is while checking whether a username has been provided by the client browser.
Example
The following code reads the name variable from the URL. If indeed there is a value for the name parameter in the URL, a Welcome message for him is displayed. However, if not, the user is called Guest.
<?php $username = $_GET['name'] ?? 'Guest'; echo "Welcome $username"; ?>
Assuming that this script "hello.php" is in the htdocs folder of the PHP server, enter http://localhost/hello.php?name=Amar in the URL, the browser will show the following message −
Welcome Amar
If http://localhost/hello.php is the URL, the browser will show the following message −
Welcome Guest
The Null coalescing operator is used as a replacement for the ternary operators specific case of checking isset() function. Hence, the following statements give similar results −
<?php $username = isset($_GET['name']) ? $_GET['name'] : 'Guest'; echo "Welcome $username"; ?>
It will now produce the following output −
Welcome Guest
You can chain the "??" operators as shown below −
<?php $username = $_GET['name'] ?? $_POST['name'] ?? 'Guest'; echo "Welcome $username"; ?>
It will now produce the following output −
Welcome Guest
This will set the username to Guest if the variable $name is not set either by GET or by POST method.
PHP - Spaceship Operator
The Spaceship operator is one of the many new features introduced in PHP with its 7.0 version. It is a three-way comparison operator.
The conventional comparison operators (<, >, !=, ==, etc.) return true or false (equivalent to 1 or 0). On the other hand, the spaceship operator has three possible return values: -1,0,or 1. This operator can be used with integers, floats, strings, arrays, objects, etc.
Syntax
The symbol used for spaceship operator is "<=>".
$retval = operand1 <=> operand2
Here, $retval is -1 if operand1 is less than operand2, 0 if both the operands are equal, and 1 if operand1 is greater than operand2.
The spaceship operator is implemented as a combined comparison operator. Conventional comparison operators could be considered mere shorthands for <=> as the following table shows −
Operator |
<=> equivalent |
|---|---|
$a < $b |
($a <=> $b) === -1 |
$a <= $b |
($a <=> $b) === -1 || ($a <=> $b) === 0 |
$a == $b |
($a <=> $b) === 0 |
$a != $b |
($a <=> $b) !== 0 |
$a >= $b |
($a <=> $b) === 1 || ($a <=> $b) === 0 |
$a > $b |
($a <=> $b) === 1 |
Example 1
The following example shows how you can use the spaceship operator in PHP −
<?php $x = 5; $y = 10; $z = $x <=> $y/2; echo "$x <=> $y/2 = $z"; ?>
It will produce the following output −
5 <=> 10/2 = 0
Example 2
Change $x=4 and check the result −
<?php $x = 4; $y = 10; $z = $x <=> $y/2; echo "$x <=> $y/2 = $z"; ?>
It will produce the following output −
4 <=> 10/2 = -1
Example 3
Change $y=7 and check the result again −
<?php $x = 7; $y = 10; $z = $x <=> $y/2; echo "$x <=> $y/2 = $z"; ?>
It will produce the following output −
7 <=> 10/2 = 1
Example 4
When used with string operands, the spaceship operand works just like the strcmp() function.
<?php $x = "bat"; $y = "ball"; $z = $x <=> $y; echo "$x <=> $y = $z"; ?>
It will produce the following output −
bat <=> ball = 1
Example 5
Change $y = "baz" and check the result −
<?php $x = "bat"; $y = "baz"; $z = $x <=> $y; echo "$x <=> $y = $z"; ?>
It will produce the following output −
bat <=> baz = -1
Spaceship Operator with Boolean Operands
The spaceship operator also works with Boolean operands −
true <=> false returns 1 false <=> true returns -1 true <=> true as well as false <=> false returns 0
PHP Decision Making
A computer program by default follows a simple input-process-output path sequentially. This sequential flow can be altered with the decision control statements offered by all the computer programming languages including PHP.
Decision Making in a Computer Program
Decision-making is the anticipation of conditions occurring during the execution of a program and specified actions taken according to the conditions.
You can use conditional statements in your code to make your decisions. The ability to implement conditional logic is one of the fundamental requirements of a programming language.
A Typical Decision Making Structure
Following is the general form of a typical decision making structure found in most of the programming languages −
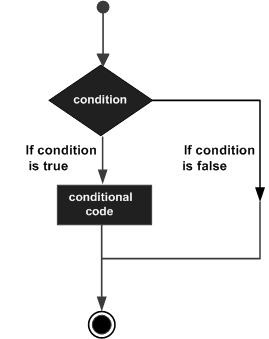
Decision Making Statements in PHP
PHP supports the following three decision making statements −
if...else statement − Use this statement if you want to execute a set of code when a condition is true and another if the condition is not true.
elseif statement − Use this statement with the if...else statement to execute a set of code if one of the several conditions is true
switch statement − If you want to select one of many blocks of code to be executed, use the Switch statement. The switch statement is used to avoid long blocks of if..elseif..else code.
Almost all the programming languages (including PHP) define the if-else statements. It allows for conditional execution of code fragments. The syntax for using the if-else statement in PHP is similar to that of C −
if (expr) statement1 else statement2
The expression here is a Boolean expression, evaluating to true or false
Any expression involving Boolean operators such as <, >, <=, >=, !=, etc. is a Boolean expression.
If the expression results in true, the subsequent statement it may be a simple or a compound statement i.e., a group of statements included in pair of braces will be executed.
If the expression is false, the subsequent statement is ignored, and the program flow continues from next statement onwards.
The use of else statement is optional. If the program logic requires another statement or a set of statements to be executed in case the expression (after the if keyword) evaluates to false.
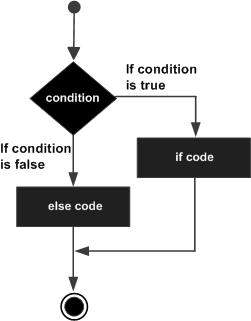
The elseif statement is a combination of if and else. It allows you to check multiple expressions for TRUE and execute a block of code as soon as one of the conditions evaluates to TRUE. Just like the else statement, the elseif statement is optional.
The switch statement is similar to a series of if statements on the same expression. We shall learn about these statements in detail in the subsequent chapters of this tutorial.
PHP - IfElse Statement
The ability to implement conditional logic is the fundamental requirement of any programming language (PHP included). PHP has three keywords (also called as language constructs) if, elseif and else are used to take decision based on the different conditions.
The if keyword is the basic construct for the conditional execution of code fragments. More often than not, the if keyword is used in conjunction with else keyword, although it is not always mandatory.
If you want to execute some code if a condition is true and another code if the sme condition is false, then use the "if....else" statement.
Syntax
The usage and syntax of the if statement in PHP is similar to that of the C language. Here is the syntax of if statement in PHP −
if (expression) code to be executed if expression is true; else code to be executed if expression is false;
The if statement is always followed by a Boolean expression.
PHP will execute the statement following the Boolean expression if it evaluates to true.
If the Boolean expression evaluates to false, the statement is ignored.
If the algorithm needs to execute another statement when the expression is false, it is written after the else keyword.
Example
Here is a simple PHP code that demonstrates the usage of if else statements. There are two variables $a and $b. The code identifies which one of them is bigger.
<?php
$a=10;
$b=20;
if ($a > $b)
echo "a is bigger than b";
else
echo "a is not bigger than b";
?>
When the above code is run, it displays the following output −
a is not bigger than b
Interchange the values of "a" and "b" and run again. Now, you will get the following output −
a is bigger than b
Example
The following example will output "Have a nice weekend!" if the current day is Friday, else it will output "Have a nice day!" −
<?php
$d = date("D");
if ($d == "Fri")
echo "Have a nice weekend!";
else
echo "Have a nice day!";
?>
It will produce the following output −
Have a nice weekend!
Using endif in PHP
PHP code is usually intermixed with HTML script. We can insert HTML code in the if part as well as the else part in PHP code. PHP offers an alternative syntax for if and else statements. Change the opening brace to a colon (:) and the closing brace to endif; so that a HTML block can be added to the if and else part.
<?php
$d = date("D");
if ($d == "Fri"): ?>
<h2>Have a nice weekend!</h2>
<?php else: ?>
<h2>Have a nice day!</h2>
<?php endif ?>
Make sure that the above script is in the document root of PHP server. Visit the URL http://localhost/hello.php. Following output should be displayed in the browser, if the current day is not a Friday −
Have a nice day!
Using elseif in PHP
If you want to execute some code if one of the several conditions are true, then use the elseif statement. The elseif language construct in PHP is a combination of if and else.
Similar to else, it specifies an alternative statement to be executed in case the original if expression evaluates to false.
However, unlike else, it will execute that alternative expression only if the elseif conditional expression evaluates to true.
if (expr1) code to be executed if expr1 is true; elseif (expr2) code to be executed if expr2 is true; else code to be executed if expr2 is false;
Example
Let us modify the above code to display a different message on Sunday, Friday and other days.
<?php
$d = date("D");
if ($d == "Fri")
echo "<h3>Have a nice weekend!</h3>";
elseif ($d == "Sun")
echo "<h3>Have a nice Sunday!</h3>";
else
echo "<h3>Have a nice day!</h3>";
?>
On a Sunday, the browser shall display the following output −
Have a nice Sunday!
Example
Here is another example to show the use of ifelselifelse statements −
<?php
$x=13;
if ($x%2==0) {
if ($x%3==0)
echo "<h3>$x is divisible by 2 and 3</h3>";
else
echo "<h3>$x is divisible by 2 but not divisible by 3</h3>";
}
elseif ($x%3==0)
echo "<h3>$x is divisible by 3 but not divisible by 2</h3>";
else
echo "<h3>$x is not divisible by 3 and not divisible by 2</h3>";
?>
The above code also uses nestedif statements.
For the values of x as 13, 12 and 10, the output will be as follows −
13 is not divisible by 3 and not divisible by 2 12 is divisible by 2 and 3 10 is divisible by 2 but not divisible by 3
PHP - Switch Statement
The switch statement in PHP can be treated as an alternative to a series of ifelse statements on the same expression. Suppose you need to compare an expression or a variable with many different values and execute a different piece of code depending on which value it equals to. In such a case, you would use multiple ifelseifelse constructs.
However, such a construct can make the code quite messy and difficult to follow. To simplify such codes, you can use the switch case construct in PHP that offers a more compact alternative to avoid long blocks of if..elseif..else codes.
The following PHP script uses if elseif statements −
if ($x == 0) {
echo "x equals 0";
} elseif ($x == 1) {
echo "i equals 1";
} elseif ($x == 2) {
echo "x equals 2";
}
You can get the same result by using the switch case statements as shown below −
switch ($x) {
case 0:
echo "x equals 0";
break;
case 1:
echo "x equals 1";
break;
case 2:
echo "x equals 2";
break;
}
The switch statement is followed by an expression, which is successively compared with value in each case clause. If it is found that the expression matches with any of the cases, the corresponding block of statements is executed.
The switch statement executes the statements inside the curly brackets line by line.
If and when a case statement is found whose expression evaluates to a value that matches the value of the switch expression, PHP starts to execute the statements until the end of the switch block, or the first time it encounters a break statement.
If you don't write a break statement at the end of a case's statement list, PHP will go on executing the statements of the following case.
Example
Try to run the above code by removing the breaks. If the value of x is 0, youll find that the output includes "x equals 1" as well as "x equals 2" lines.
<?php
$x=0;
switch ($x) {
case 0:
echo "x equals 0 \n";
case 1:
echo "x equals 1 \n";
case 2:
echo "x equals 2";
}
?>
It will produce the following output −
x equals 0 x equals 1 x equals 2
Thus, it is important make sure to end each case block with a break statement.
The Default Case in Switch
A special case is the default case. This case matches anything that wasn't matched by the other cases. Using default is optional, but if used, it must be the last case inside the curly brackets.
You can club more than one cases to simulate multiple logical expressions combined with the or operator.
<?php
$x=10;
switch ($x) {
case 0:
case 1:
case 2:
echo "x between 0 and 2 \n";
break;
default:
echo "x is less than 0 or greater than 2";
}
?>
The values to be compared against are given in the case clause. The value can be a number, a string, or even a function. However you cannot use comparison operators (<, > == or !=) as a value in the case clause.
You can choose to use semicolon instead of colon in the case clause. If no matching case found, and there is no default branch either, then no code will be executed, just as if no if statement was true.
The switch-endswitch Statement
PHP allows the usage of alternative syntax by delimiting the switch construct with switch-endswitch statements. The following version of switch case is acceptable.
<?php
$x=0;
switch ($x) :
case 0:
echo "x equals 0";
break;
case 1:
echo "x equals 1 \n";
break;
case 2:
echo "x equals 2 \n";
break;
default:
echo "None of the above";
endswitch
?>
Using the Break Statement in SwitchCase
Obviously, you neednt write a break to terminate the default case, it being the last case in the switch construct.
Example
Take a look at the following example −
<?php
$d = date("D");
switch ($d){
case "Mon":
echo "Today is Monday";
break;
case "Tue":
echo "Today is Tuesday";
break;
case "Wed":
echo "Today is Wednesday";
break;
case "Thu":
echo "Today is Thursday";
break;
case "Fri":
echo "Today is Friday";
break;
case "Sat":
echo "Today is Saturday";
break;
case "Sun":
echo "Today is Sunday";
break;
default:
echo "Wonder which day is this ?";
}
?>
It will produce the following output −
Today is Monday
PHP Loop Types
Loops in PHP are used to execute the same block of code a specified number of times. PHP supports following four loop types.
for − Loops through a block of code a specified number of times.
foreach − Loops through a block of code for each element in an array.
while − Loops through a block of code if and as long as a specified condition is true.
do-while − Loops through a block of code once, and then repeats the loop as long as a special condition is true.
In addition, we will also explain how the continue and break statements are used in PHP to control the execution of loops.
PHP for Loop
The for statement is used when you know how many times you want to execute a statement or a block of statements.
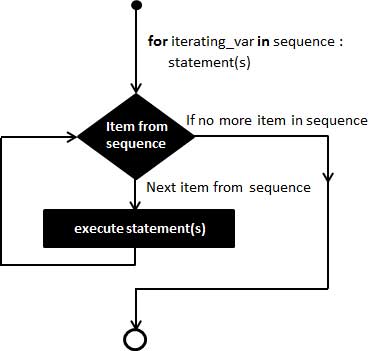
Syntax
for (initialization; condition; increment){
code to be executed;
}
The initializer is used to set the start value for the counter of the number of loop iterations. A variable may be declared here for this purpose and it is traditional to name it $i.
Example
The following example makes five iterations and changes the assigned value of two variables on each pass of the loop −
<?php
$a = 0;
$b = 0;
for( $i = 0; $i<5; $i++ ) {
$a += 10;
$b += 5;
}
echo ("At the end of the loop a = $a and b = $b" );
?>
It will produce the following output −
At the end of the loop a = 50 and b = 25
PHP foreach Loop
The foreach statement is used to loop through arrays. For each pass the value of the current array element is assigned to $value and the array pointer is moved by one and in the next pass next element will be processed.
Syntax
foreach (array as value) {
code to be executed;
}
Example
Try out following example to list out the values of an array.
<?php
$array = array( 1, 2, 3, 4, 5);
foreach( $array as $value ) {
echo "Value is $value \n";
}
?>
It will produce the following output −
Value is 1 Value is 2 Value is 3 Value is 4 Value is 5
PHP while Loop
The while statement will execute a block of code if and as long as a test expression is true.
If the test expression is true then the code block will be executed. After the code has executed the test expression will again be evaluated and the loop will continue until the test expression is found to be false.
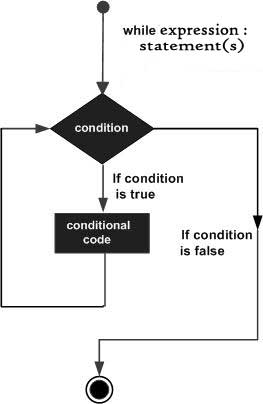
Syntax
while (condition) {
code to be executed;
}
Example
This example decrements a variable value on each iteration of the loop and the counter increments until it reaches 10 when the evaluation is false and the loop ends.
<?php
$i = 0;
$num = 50;
while($i < 10) {
$num--;
$i++;
}
echo ("Loop stopped at i = $i and num = $num" );
?>
It will produce the following output −
Loop stopped at i = 10 and num = 40
PHP do-while Loop
The do-while statement will execute a block of code at least once - it then will repeat the loop as long as a condition is true.
Syntax
do {
code to be executed;
}
while (condition);
Example
The following example will increment the value of i at least once, and it will continue incrementing the variable i as long as it has a value of less than 10 −
<?php
$i = 0;
$num = 0;
do {
$i++;
}
while( $i < 10 );
echo ("Loop stopped at i = $i" );
?>
It will produce the following output −
Loop stopped at i = 10
PHP break Statement
The PHP break keyword is used to terminate the execution of a loop prematurely.
The break statement is situated inside the statement block. It gives you full control and whenever you want to exit from the loop you can come out. After coming out of a loop immediate statement to the loop will be executed.

Example
In the following example condition test becomes true when the counter value reaches 3 and loop terminates.
<?php
$i = 0;
while( $i < 10) {
$i++;
if( $i == 3 )break;
}
echo ("Loop stopped at i = $i" );
?>
It will produce the following output −
Loop stopped at i = 3
PHP continue Statement
The PHP continue keyword is used to halt the current iteration of a loop but it does not terminate the loop.
Just like the break statement the continue statement is situated inside the statement block containing the code that the loop executes, preceded by a conditional test. For the pass encountering continue statement, rest of the loop code is skipped and next pass starts.

Example
In the following example loop prints the value of array but for which condition becomes true it just skip the code and next value is printed.
<?php
$array = array( 1, 2, 3, 4, 5);
foreach( $array as $value ) {
if( $value == 3 )continue;
echo "Value is $value \n";
}
?>
It will produce the following output −
Value is 1 Value is 2 Value is 4 Value is 5
PHP - For Loop
A program by default follows a sequential execution of statements. If the program flow is directed towards any of earlier statements in the program, it constitutes a loop. The for statement in PHP is a convenient tool to constitute a loop in a PHP script. In this chapter, we will discuss PHPs for statement.
Flowchart of "for" Loop
The following flowchart explains how a for loop works −
The for statement is used when you know how many times you want to execute a statement or a block of statements.
Syntax of "for" Loop
The syntax of for statement in PHP is similar to the for statement in C language.
for (expr1; expr2; expr3){
code to be executed;
}
The for keyword is followed by a parenthesis containing three expressions separated by a semicolon. Each of them may be empty or may contain multiple expressions separated by commas. The parenthesis is followed by one or more statements put inside curly brackets. It forms the body of the loop.
The first expression in the parenthesis is executed only at the start of the loop. It generally acts as the initializer used to set the start value for the counter of the number of loop iterations.
In the beginning of each iteration, expr2 is evaluated. If it evaluates to true, the loop continues and the statements in the body block are executed. If it evaluates to false, the execution of the loop ends. Generally, the expr2 specifies the final value of the counter.
The expr3 is executed at the end of each iteration. In most cases, this expression increments the counter variable.
Example
The most general example of a for loop is as follows −
<?php
for ($i=1; $i<=10; $i++){
echo "Iteration No: $i \n";
}
?>
Here is its output −
Iteration No: 1 Iteration No: 2 Iteration No: 3 Iteration No: 4 Iteration No: 5 Iteration No: 6 Iteration No: 7 Iteration No: 8 Iteration No: 9 Iteration No: 10
An infinite "for" loop
Note that all the three expressions in the parenthesis are optional. A for statement with only two semicolons constitutes an infinite loop.
for (; ;) {
Loop body
}
To stop the infinite iteration, you need to use a break statement inside the body of the loop.
A decrementing "for" loop
You can also form a decrementing for loop. To have a for loop that goes from 10 to 1, initialize the looping variable with 10, the expression in the middle that is evaluated at the beginning of each iteration checks whether it is greater than 1. The last expression to be executed at the end of each iteration should decrement it by 1.
<?php
for ($i=10; $i>=1; $i--){
echo "Iteration No: $i \n";
}
?>
It will produce the following output −
Iteration No: 10 Iteration No: 9 Iteration No: 8 Iteration No: 7 Iteration No: 6 Iteration No: 5 Iteration No: 4 Iteration No: 3 Iteration No: 2 Iteration No: 1
Using the "forendfor" construct
You can also use the ":" (colon) symbol to start the looping block and put endfor statement at the end of the block.
<?php
for ($i=1; $i<=10; $i++):
echo "Iteration No: $i \n";
endfor;
?>
Iterating an indexed array using "for" loop
Each element in the array is identified by an incrementing index starting with "0". If an array of 5 elements is present, its lower bound is 0 and is upper bound is 4 (size of array -1).
To obtain the number of elements in an array, there is a count() function. Hence, we can iterate over an indexed array by using the following for statement −
<?php
$numbers = array(10, 20, 30, 40, 50);
for ($i=0; $i<count($numbers); $i++){
echo "numbers[$i] = $numbers[$i] \n";
}
?>
It will produce the following output −
numbers[0] = 10 numbers[1] = 20 numbers[2] = 30 numbers[3] = 40 numbers[4] = 50
Iterating an Associative Array Using "for" Loop
An associative array in PHP is a collection of key-value pairs. An arrow symbol (=>) is used to show the association between the key and its value. We use the array_keys() function to obtain array of keys.
The following for loop prints the capital of each state from an associative array $capitals defined in the code −
<?php
$capitals = array(
"Maharashtra"=>"Mumbai",
"Telangana"=>"Hyderabad",
"UP"=>"Lucknow",
"Tamilnadu"=>"Chennai"
);
$keys=array_keys($capitals);
for ($i=0; $i<count($keys); $i++){
$cap = $keys[$i];
echo "Capital of $cap is $capitals[$cap] \n";
}
?>
Here is its output −
Capital of Maharashtra is Mumbai Capital of Telangana is Hyderabad Capital of UP is Lucknow Capital of Tamilnadu is Chennai
Using Nested "for" Loops in PHP
If another for loop is used inside the body of an existing loop, the two loops are said to have been nested.
For each value of counter variable of the outer loop, all the iterations of inner loop are completed.
<?php
for ($i=1; $i<=3; $i++){
for ($j=1; $j<=3; $j++){
echo "i= $i j= $j \n";
}
}
?>
It will produce the following output −
i= 1 j= 1 i= 1 j= 2 i= 1 j= 3 i= 2 j= 1 i= 2 j= 2 i= 2 j= 3 i= 3 j= 1 i= 3 j= 2 i= 3 j= 3
Note that a string is a form of an array. The strlen() function gives the number of characters in a string.
Example
The following PHP script uses two nested loops to print incrementing number of characters from a string in each line.
<?php
$str = "TutorialsPoint";
for ($i=0; $i<strlen($str); $i++){
for ($j=0; $j<=$i; $j++){
echo "$str[$j]";
}
echo "\n";
}
?>
It will produce the following output −
T Tu Tut Tuto Tutor Tutori Tutoria Tutorial Tutorials TutorialsP TutorialsPo TutorialsPoi TutorialsPoin TutorialsPoint
PHP - Foreach Loop
The foreach construct in PHP is specially meant for iterating over arrays. If you try to use it on a variable with a different data type, PHP raises an error.
The foreach loop in PHP can be used with indexed array as well as associative array. There are two types of usage syntaxes available −
foreach (array as $value) {
statements
}
The above method is useful when you want to iterate an indexed array. The syntax below is more suitable for associative arrays.
foreach (array as $key => $value) {
statements
}
However, both these approaches work well with indexed array, because the index of an item in the array also acts as the key.
Using "foreach" Loop with an Indexed Array
The first type of syntax above shows a parenthesis in front of the foreach keyword. The name of the array to be traversed is then followed by the "as" keyword and then a variable.
When the fist iteration starts, the first element in the array is assigned to the variable. After the looping block is over, the variable takes the value of the next element and repeats the statements in the loop body till the elements in the array are exhausted.
A typical use of foreach loop is as follows −
<?php
$arr = array(10, 20, 30, 40, 50);
foreach ($arr as $val) {
echo "$val \n";
}
?>
Example
PHP provides a very useful function in array_search() which returns the key of a given value. Since the index itself is the key in an indexed array, the array_search() for each $val returns the zero based index of each value. The following code demonstrates how it works −
<?php
$arr = array(10, 20, 30, 40, 50);
foreach ($arr as $val) {
$index = array_search($val, $arr);
echo "Element at index $index is $val \n";
}
?>
It will produce the following output −
Element at index 0 is 10 Element at index 1 is 20 Element at index 2 is 30 Element at index 3 is 40 Element at index 4 is 50
Example
The second variation of foreach syntax unpacks each element in the array into two variables: one for the key and one for value.
Since the index itself acts as the key in case of an indexed array, the $k variable successively takes the incrementing index of each element in the array.
<?php
$arr = array(10, 20, 30, 40, 50);
foreach ($arr as $k=>$v) {
echo "Key: $k => Val: $v \n";
}
?>
It will produce the following output −
Key: 0 => Val: 10 Key: 1 => Val: 20 Key: 2 => Val: 30 Key: 3 => Val: 40 Key: 4 => Val: 50
Iterating an Associative Array using "foreach" Loop
An associative array is a collection of key-value pairs. To iterate through an associative array, the second variation of foreach syntax is suitable. Each element in the array is unpacked in two variables each taking up the value of key and its value.
Example
Here is an example in which an array of states and their respective capitals is traversed using the foreach loop.
<?php
$capitals = array(
"Maharashtra"=>"Mumbai", "Telangana"=>"Hyderabad",
"UP"=>"Lucknow", "Tamilnadu"=>"Chennai"
);
foreach ($capitals as $k=>$v) {
echo "Capital of $k is $v \n";
}
?>
It will produce the following output −
Capital of Maharashtra is Mumbai Capital of Telangana is Hyderabad Capital of UP is Lucknow Capital of Tamilnadu is Chennai
However, you can still use the first version of foreach statement, where only the value from each key-value pair in the array is stored in the variable. We then obtain the key corresponding to the value using the array_search() function that we had used before.
<?php
$capitals = array(
"Maharashtra"=>"Mumbai", "Telangana"=>"Hyderabad",
"UP"=>"Lucknow", "Tamilnadu"=>"Chennai"
);
foreach ($capitals as $pair) {
$cap = array_search($pair, $capitals);
echo "Capital of $cap is $capitals[$cap] \n";
}
?>
Iterating a 2D Array using "foreach" Loop
It is possible to declare a multi-dimensional array in PHP, wherein each element in an array is another array itself. Note that both the outer array as well as the sub-arry may be an indexed array or an associative array.
In the example below, we have a two-dimensional array, which can be called as an array or arrays. We need nested loops to traverse the nested array structure as follows −
<?php
$twoD = array(
array(1,2,3,4),
array("one", "two", "three", "four"),
array("one"=>1, "two"=>2, "three"=>3)
);
foreach ($twoD as $idx=>$arr) {
echo "Array no $idx \n";
foreach ($arr as $k=>$v) {
echo "$k => $v" . "\n";
}
echo "\n";
}
?>
It will produce the following output −
Array no 0 0 => 1 1 => 2 2 => 3 3 => 4 Array no 1 0 => one 1 => two 2 => three 3 => four Array no 2 one => 1 two => 2 three => 3
PHP - While Loop
The easiest way to create a loop in a PHP script is with the while construct. The syntax of while loop in PHP is similar to that in C language. The loop body block will be repeatedly executed as long as the Boolean expression in the while statement is true.
The following flowchart helps in understanding how the while loop in PHP works −
The value of the expression is checked each time at the beginning of the loop. If the while expression evaluates to false from the very beginning, the loop won't even be run once. Even if the expression becomes false during the execution of the block, the execution will not stop until the end of the iteration.
The syntax of while loop can be expressed as follows −
while (expr){
statements
}
Example
The following code shows a simple example of how the while loop works in PHP. The variable $x is initialized to 1 before the loop begins. The loop body is asked to execute as long as it is less than or equal to 10. The echo statement in the loop body prints the current iteration number, and increments the value of x, so that the condition will turn false eventually.
<?php
$x = 1;
while ($x<=10) {
echo "Iteration No. $x \n";
$x++;
}
?>
It will produce the following output −
Iteration No. 1 Iteration No. 2 Iteration No. 3 Iteration No. 4 Iteration No. 5 Iteration No. 6 Iteration No. 7 Iteration No. 8 Iteration No. 9 Iteration No. 10
Note that the test condition is checked at the beginning of each iteration. Even if the condition turns false inside the loop, the execution will not stop until the end of the iteration.
Example
In the following example, "x" is incremented by 3 in each iteration. On the third iteration, "x" becomes 9. Since the test condition is still true, the next round takes place in which "x" becomes 12. As the condition turns false, the loop stops.
<?php
$x = 0;
while ($x<=10){
$x+=3;
echo "Iteration No. $x \n";
}
?>
It will produce the following output −
Iteration No. 3 Iteration No. 6 Iteration No. 9 Iteration No. 12
Example
It is not always necessary to have the looping variable incrementing. If the initial value of the loop variable is greater than the value at which the loop is supposed to end, then it must be decremented.
<?php
$x = 5;
while ($x>0) {
echo "Iteration No. $x \n";
$x--;
}
?>
It will produce the following output −
Iteration No. 5 Iteration No. 4 Iteration No. 3 Iteration No. 2 Iteration No. 1
Iterating an Array with "while"
An indexed array in PHP is a collection of elements, each of which is identified by an incrementing index starting from 0.
You can traverse an array by constituting a while loop by repeatedly accessing the element at the xth index till "x" reaches the length of the array. Here, "x" is a counter variable, incremented with each iteration. We also need a count() function that returns the size of the array.
Example
Take a look at the following example −
<?php
$numbers = array(10, 20, 30, 40, 50);
$size = count($numbers);
$x=0;
while ($x<$size) {
echo "Number at index $x is $numbers[$x] \n";
$x++;
}
?>
It will produce the following output −
Number at index 0 is 10 Number at index 1 is 20 Number at index 2 is 30 Number at index 3 is 40 Number at index 4 is 50
Nested "while" Loops
You may include a while loop inside another while loop. Both the outer and inner while loops are controlled by two separate variables, incremented after each iteration.
Example
<?php
$i=1;
$j=1;
while ($i<=3){
while ($j<=3){
echo "i= $i j= $j \n";
$j++;
}
$j=1;
$i++;
}
?>
It will produce the following output −
i= 1 j= 1 i= 1 j= 2 i= 1 j= 3 i= 2 j= 1 i= 2 j= 2 i= 2 j= 3 i= 3 j= 1 i= 3 j= 2 i= 3 j= 3
Note that "j" which is the counter variable for the inner while loop is re-initialized to 1 after it takes all the values so that for the next value of "i", "j" again starts from 1.
Traversing the Characters in a String
In PHP, a string can be considered as an indexed collection of characters. Hence, a while loop with a counter variable going from "0" to the length of string can be used to fetch one character at a time.
Example
The following example counts number of vowels in a given string. We use strlen() to obtain the length and str_contains() to check if the character is one of the vowels.
<?php
$line = "PHP is a popular general-purpose scripting language that is especially suited to web development.";
$vowels="aeiou";
$size = strlen($line);
$i=0;
$count=0;
while ($i<$size){
if (str_contains($vowels, $line[$i])) {
$count++;
}
$i++;
}
echo "Number of vowels = $count";
?>
It will produce the following output −
Number of vowels = 32
Using the "endwhile" Statement
PHP also lets you use an alternative syntax for the while loop. Instead of clubbing more than one statement in curly brackets, the loop body is marked with a ":" (colon) symbol after the condition and the endwhile statement at the end.
Example
<?php
$x = 1;
while ($x<=10):
echo "Iteration No. $x \n";
$x++;
endwhile;
?>
It will produce the following output −
Iteration No. 1 Iteration No. 2 Iteration No. 3 Iteration No. 4 Iteration No. 5 Iteration No. 6 Iteration No. 7 Iteration No. 8 Iteration No. 9 Iteration No. 10
Note that the endwhile statement ends with a semicolon.
PHP - DoWhile Loop
The "dowhile" loop is another looping construct available in PHP. This type of loop is similar to the while loop, except that the test condition is checked at the end of each iteration rather than at the beginning of a new iteration.
The while loop verifies the truth condition before entering the loop, whereas in "dowhile" loop, the truth condition is verified before re entering the loop. As a result, the "dowhile" loop is guaranteed to have at least one iteration irrespective of the truth condition.
The following figure shows the difference in "while" loop and "dowhile" loop by using a comparative flowchart representation of the two.
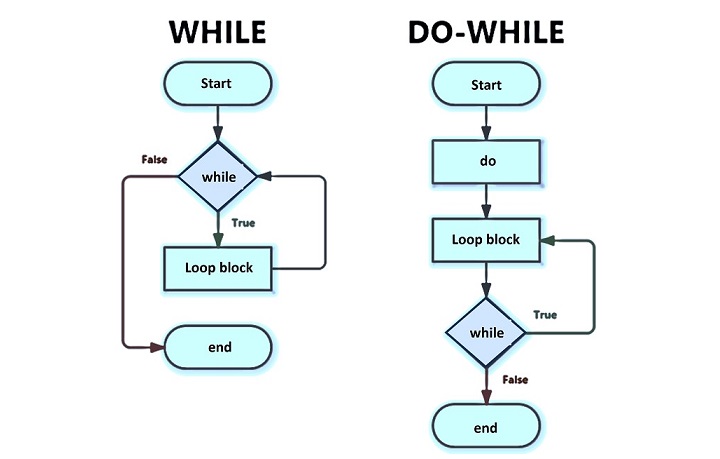
The syntax for constituting a "dowhile" loop is similar to its counterpart in C language.
do {
statements;
}
while (expression);
Example
Here is a simple example of "dowhile" loop that prints iteration numbers 1 to 5.
<?php
$i=1;
do{
echo "Iteration No: $i \n";
$i++;
}
while ($i<=5);
?>
It will produce the following output −
Iteration No: 1 Iteration No: 2 Iteration No: 3 Iteration No: 4 Iteration No: 5
Example
The following code uses a while loop and also generates the same output −
<?php
$i=1;
while ($i<=5){
echo "<h3>Iteration No: $i</h3>";
$i++;
}
?>
Hence, it can be said that the "dowhile" and "while" loops behave similarly. However, the difference will be evident when the initial value of the counter variable (in this case $i) is set to any value more than the one used in the test expression in the parenthesis in front of the while keyword.
Example
In the following code, both the loops while and "dowhile" are used. The counter variable for the while loop is $i and for "dowhile" loop, it is $j. Both are initialized to 10 (any value greater than 5).
<?php
echo "while Loop \n";
$i=10;
while ($i<=5){
echo "Iteration No: $i \n";
$i++;
}
echo "do-while Loop \n";
$j=10;
do{
echo "Iteration No: $j \n";
$j++;
}
while ($j<=5);
?>
It will produce the following output −
while Loop do - while Loop Iteration No: 10
The result shows that the while loop doesnt perform any iterations as the condition is false at the beginning itself ($i is initialized to 10, which is greater than the test condition $i<=5). On the other hand, the "dowhile" loop does undergo the first iteration even though the counter variable $j is initialized to a value greater than the test condition.
We can thus infer that the "dowhile" loop guarantees at least one iteration because the test condition is verified at the end of looping block. The while loop may not do any iteration as the test condition is verified before entering the looping block.
Another syntactical difference is that the while statement in "dowhile" terminates with semicolon. In case of while loop, the parenthesis is followed by a curly bracketed looping block.
Apart from these, there are no differences. One can use both these types of loops interchangeably.
Decrementing a "dowhile" Loop
To design a "dowhile" with decrementing count, initialize the counter variable to a higher value, use decrement operator (--) inside the loop to reduce the value of the counter on each iteration, and set the test condition in the while parenthesis to run the loop till the counter is greater than the desired last value.
Example
In the example below, the counter decrements from 5 to 1.
<?php
$j=5;
do{
echo "Iteration No: $j \n";
$j--;
}
while ($j>=1);
?>
It will produce the following output −
Iteration No: 5 Iteration No: 4 Iteration No: 3 Iteration No: 2 Iteration No: 1
Traverse a String in Reverse Order
In PHP, a string can be treated as an indexed array of characters. We can extract and display one character at a time from end to beginning by running a decrementing "dowhile" loop as follows −
<?php
$string = "TutorialsPoint";
$j = strlen($string);
do{
$j--;
echo "Character at index $j : $string[$j] \n";
}
while ($j>=1);
?>
It will produce the following output −
Character at index 13 : t Character at index 12 : n Character at index 11 : i Character at index 10 : o Character at index 9 : P Character at index 8 : s Character at index 7 : l Character at index 6 : a Character at index 5 : i Character at index 4 : r Character at index 3 : o Character at index 2 : t Character at index 1 : u Character at index 0 : T
Nested "dowhile" Loops
Like the for loop or while loop, you can also write nested "dowhile" loops. In the following example, the upper "dowhile" loop counts the iteration with $i, the inner "dowhile" loop increments $j and each time prints the product of $i*j, thereby printing the tables from 1 to 10.
<?php
$i=1;
$j=1;
do{
print "\n";
do{
$k = sprintf("%4u",$i*$j);
print "$k";
$j++;
}
while ($j<=10);
$j=1;
$i++;
}
while ($i<=10);
?>
It will produce the following output −
1 2 3 4 5 6 7 8 9 10 2 4 6 8 10 12 14 16 18 20 3 6 9 12 15 18 21 24 27 30 4 8 12 16 20 24 28 32 36 40 5 10 15 20 25 30 35 40 45 50 6 12 18 24 30 36 42 48 54 60 7 14 21 28 35 42 49 56 63 70 8 16 24 32 40 48 56 64 72 80 9 18 27 36 45 54 63 72 81 90 10 20 30 40 50 60 70 80 90 100
PHP - Break Statement
The break statement along with the continue statement in PHP are known as "loop control statements". Any type of loop (for, while or do-while) in PHP is designed to run for a certain number of iterations, as per the test condition used. The break statement inside the looping block takes the program flow outside the block, abandoning the rest of iterations that may be remaining.
The break statement is normally used conditionally. Otherwise, the loop will terminate without completing the first iteration itself.
The syntax of break statement is as follows −
while(expr){
if (condition){
break;
}
}
The following flowchart explains how the break statement works −
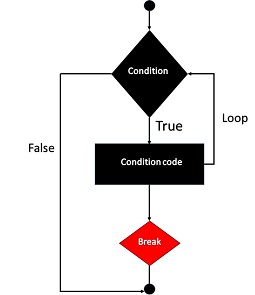
Example
The following PHP code is a simple example of using break in a loop. The while loop is expected to perform ten iterations. However, a break statement inside the loop terminates it when the counter exceeds 3.
<?php
$i = 1;
while ($i<=10){
echo "Iteration No. $i \n";
if ($i>=3){
break;
}
$i++;
}
?>
It will produce the following output −
Iteration No. 1 Iteration No. 2 Iteration No. 3
An optional numeric argument can be given in front of break keyword. It is especially useful in nested looping constructs. It tells how many nested enclosing structures are to be broken out of. The default value is 1, only the immediate enclosing structure is broken out of.
Example
The following example has three nested loops: a for loop inside which there is a while loop which in turn contains a do-while loop.
The innermost loop executes the break. The number "2" in front of it takes the control out of the current scope into the for loop instead of the immediate while loop.
<?php
for ($x=1; $x<=3; $x++){
$y=1;
while ($y<=3){
$z=1;
do {
echo "x:$x y:$y z:$z \n";
if ($z==2){
break 2;
}
$z++;
}
while ($z<=3);
$z=1;
$y++;
}
}
?>
It will produce the following output −
x:1 y:1 z:1 x:1 y:1 z:2 x:2 y:1 z:1 x:2 y:1 z:2 x:3 y:1 z:1 x:3 y:1 z:2
Note that each time the value of "z" becomes 2, the program breaks out of the "y" loop. Hence, the value of "y" is always 1.
PHP - Continue Statement
Like the break statement, continue is another "loop control statement" in PHP. Unlike the break statement, the continue statement skips the current iteration and continues execution at the condition evaluation and then the beginning of the next iteration.
The continue statement can be used inside any type of looping constructs, i.e., for, foreach, while or do-while loops. Like break, the continue keyword is also normally used conditionally.
while(expr){
if (condition){
continue;
}
}
The following flowchart explains how the continue statement works −
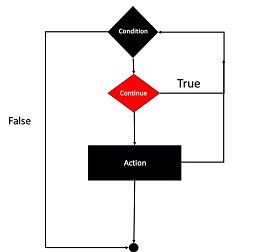
Example
Given below is a simple example showing the use of continue. The for loop is expected to complete ten iterations. However, the continue statement skips the iteration whenever the counter id is divisible by 2.
<?php
for ($x=1; $x<=10; $x++){
if ($x%2==0){
continue;
}
echo "x = $x \n";
}
?>
It will produce the following output −
x = 1 x = 3 x = 5 x = 7 x = 9
Example
The continue statement accepts an optional numeric argument which tells it how many levels of enclosing loops it should skip to the end of. The default is 1.
<?php
for ($i=1; $i<=3; $i++){
for ($j=1; $j<=3; $j++){
for ($k=1; $k<=3; $k++){
if ($k>1){
continue 2;
}
print "i: $i j:$j k: $k\n";
}
}
}
?>
It will produce the following output −
i: 1 j:1 k: 1 i: 1 j:2 k: 1 i: 1 j:3 k: 1 i: 2 j:1 k: 1 i: 2 j:2 k: 1 i: 2 j:3 k: 1 i: 3 j:1 k: 1 i: 3 j:2 k: 1 i: 3 j:3 k: 1
The continue statement in the inner for loop skips the iterations 2 and 3 and directly jumps to the middle loop. Hence, the output shows "k" as 1 for all the values of "i" and "k" variables.
PHP - Arrays
An array is a data structure that stores one or more data values having some relation among them, in a single variable. For example, if you want to store the marks of 10 students in a class, then instead of defining 10 different variables, its easy to define an array of 10 length.
Arrays in PHP behave a little differently than the arrays in C, as PHP is a dynamically typed language as against C which is a statically type language.
An array in PHP is an ordered map that associates values to keys.
A PHP array can be used to implement different data structures such as a stack, queue, list (vector), hash table, dictionary, etc.
The value part of an array element can be other arrays. This fact can be used to implement tree data structure and multidimensional arrays.
There are two ways to declare an array in PHP. One is to use the built-in array() function, and the other is to use a shorter syntax where the array elements are put inside square brackets.
The array() Function
The built-in array() function uses the parameters given to it and returns an object of array type. One or more comma-separated parameters are the elements in the array.
array(mixed ...$values): array
Each value in the parenthesis may be either a singular value (it may be a number, string, any object or even another array), or a key-value pair. The association between the key and its value is denoted by the "=>" symbol.
Examples
$arr1 = array(10, "asd", 1.55, true);
$arr2 = array("one"=>1, "two"=>2, "three"=>3);
$arr3 = array(
array(10, 20, 30),
array("Ten", "Twenty", "Thirty"),
array("physics"=>70, "chemistry"=>80, "maths"=>90)
);
Using Square Brackets [ ]
Instead of the array() function, the comma-separated array elements may also be put inside the square brackets to declare an array object. In this case too, the elements may be singular values or a string or another array.
$arr1 = [10, "asd", 1.55, true]; $arr2 = ["one"=>1, "two"=>2, "three"=>3]; $arr3 = [ [10, 20, 30], ["Ten", "Twenty", "Thirty"], ["physics"=>70, "chemistry"=>80, "maths"=>90] ];
Types of Arrays in PHP
There are three different kind of arrays and each array value is accessed using an ID which is called the array index.
Indexed Array − An array which is a collection of values only is called an indexed array. Each value is identified by a positional index staring from "0". Values are stored and accessed in linear fashion.
Associative Array − If the array is a collection of key-value pairs, it is called as an associative array. The key component of the pair can be a number or a string, whereas the value part can be of any type. Associative arrays store the element values in association with key values rather than in a strict linear index order.
Multi Dimensional Array − If each value in either an indexed array or an associative array is an array itself, it is called a multi dimensional array. Values are accessed using multiple indices
NOTE − Built-in array functions is given in function reference PHP Array Functions
It may be noted that PHP internally considers any of the above types as an associative array itself. In case of an indexed array, where each value has index, the index itself is its key. The var_dump() function reveals this fact.
Example
In this example, arr1 is an indexed array. However, var_dump()which displays the structured information of any object, shows that each value is having its index as its key.
<?php $arr1 = [10, "asd", 1.55, true]; var_dump($arr1); ?>
It will produce the following output −
array(4) {
[0]=>
int(10)
[1]=>
string(3) "asd"
[2]=>
float(1.55)
[3]=>
bool(true)
}
Example
The same principle applies to a multi-dimensional index array, where each value in an array is another array.
<?php
$arr1 = [
[10, 20, 30],
["Ten", "Twenty", "Thirty"],
[1.1, 2.2, 3.3]
];
var_dump($arr1);
?>
It will produce the following output −
array(3) {
[0]=>
array(3) {
[0]=>
int(10)
[1]=>
int(20)
[2]=>
int(30)
}
[1]=>
array(3) {
[0]=>
string(3) "Ten"
[1]=>
string(6) "Twenty"
[2]=>
string(6) "Thirty"
}
[2]=>
array(3) {
[0]=>
float(1.1)
[1]=>
float(2.2)
[2]=>
float(3.3)
}
}
Accessing the Array Elements
To access any element from a given array, you can use the array[key] syntax.
Example
For an indexed array, put the index inside the square bracket, as the index itself is anyway the key.
<?php
$arr1 = [10, 20, 30];
$arr2 = array("one"=>1, "two"=>2, "three"=>3);
var_dump($arr1[1]);
var_dump($arr2["two"]);
?>
It will produce the following output −
int(20) int(2)
We shall explore the types of PHP arrays in more details in the subsequent chapters.
PHP - Indexed Array
In PHP, the array elements may be a collection of key-value pairs or it may contain values only. If the array consists of values only, it is said to be an indexed array, as each element is identified by an incrementing index, starting with "0".
An indexed array in PHP may be created either by using the array() function or with the square bracket syntax.
$arr1 = array("a", 10, 9.99, true);
$arr2 = ["a", 10, 9.99, true];
Each element in the array has a positional index, the first element being at index "0". The var_dump() function reveals the structured information of these arrays as −
array(4) {
[0]=>
string(1) "a"
[1]=>
int(10)
[2]=>
float(9.99)
[3]=>
bool(true)
}
We can use the index to traverse the array, fetch the value at a given index or modify the value of an element in place.
Traversing an Indexed Array in PHP
Any type of PHP loop can be employed to traverse an array. If we want to use a for or while loop, we have to find the number of elements in the array with count() function and use its value as the test condition for the counted for or while loop.
Example
The following code uses a for loop to list all the elements in an indexed array.
<?php
$numbers = array(10, 20, 30, 40, 50);
for ($i=0; $i<count($numbers); $i++){
echo "numbers[$i] = $numbers[$i] \n";
}
?>
It will produce the following output −
numbers[0] = 10 numbers[1] = 20 numbers[2] = 30 numbers[3] = 40 numbers[4] = 50
You can also use a while or do-while loop to traverse an indexed array. Here too, we need to find the array length with count() function.
Example
The following code traverses the given indexed array in reverse order −
<?php
$numbers = array(10, 20, 30, 40, 50);
$i = count($numbers)-1;
while ($i>=0){
echo "numbers[$i] = $numbers[$i] \n";
$i--;
}
?>
It will produce the following output −
numbers[4] = 50 numbers[3] = 40 numbers[2] = 30 numbers[1] = 20 numbers[0] = 10
Accessing the Array Elements Using Index
You can access any value from an array using the array[index] syntax. The value at a specific index may be assigned with a new value. The array is thus modified in place.
Example
The following program fetches the values from an array $arr1 and places them in $arr2 in the reverse order. So the value at 0th position in $arr1 becomes the last value in $arr2.
<?php
$arr1 = array(10, 20, 30, 40, 50);
$size = count($arr1);
for ($i=0; $i<$size; $i++){
$arr2[$size-$i-1] = $arr1[$i];
}
for ($i=0; $i<$size; $i++){
echo "arr1[$i] = $$arr1[$i] arr2[$i] = $$arr2[$i] \n";
}
?>
It will produce the following output −
arr1[0] = $10 arr2[0] = $50 arr1[1] = $20 arr2[1] = $40 arr1[2] = $30 arr2[2] = $30 arr1[3] = $40 arr2[3] = $20 arr1[4] = $50 arr2[4] = $10
Traversing an Indexed Array Using "foreach" Loop
You can also use the foreach loop to iterate through an indexed array. Take a look at the following example −
<?php
$arr1 = [10, 20, 30, 40, 50];
foreach ($arr1 as $val){
echo "$val \n";
}
?>
It will produce the following output −
10 20 30 40 50
Note that PHP internally treats the indexed array as an associative array, with the index being treated as the key. This fact can be verified by the var_dump() output of the array.
Example
We can unpack each element of an indexed array in the key and value variables with foreach syntax −
<?php
$arr1 = [10, 20, 30, 40, 50];
foreach ($arr1 as $key => $val){
echo "arr1[$key] = $val \n";
}
?>
It will produce the following output −
arr1[0] = 10 arr1[1] = 20 arr1[2] = 30 arr1[3] = 40 arr1[4] = 50
In PHP, an array may be a mix of only values and key-value pairs. PHP assigns the index only to the values without keys.
Example
In this example, PHP assigns incrementing index to the numbers, skipping the key-value pair appearing in it.
<?php
$arr1 = [10, 20,
"vals" => ["ten", "twenty"],
30, 40, 50];
var_dump($arr1);
?>
It will produce the following output −
array(6) {
[0]=>
int(10)
[1]=>
int(20)
["vals"]=>
array(2) {
[0]=>
string(3) "ten"
[1]=>
string(6) "twenty"
}
[2]=>
int(30)
[3]=>
int(40)
[4]=>
int(50)
}
PHP - Associative Array
If each element in a PHP array is a key-value pair, such an array is called an associative array. In this type of array, each value is identified by its associated key and not an index.
Associative arrays are used to implement data structures such as dictionary, maps, trees, etc.
In PHP, the "=>" symbol is used to establish association between a key and its value.
How to Declare an Associative Array in PHP?
Both the approaches of declaring an array the array() function and the square bracket notation can be used.
$arr1 = array( "Maharashtra"=>"Mumbai", "Telangana"=>"Hyderabad", "UP"=>"Lucknow", "Tamilnadu"=>"Chennai" ); $arr2 = ["Maharashtra"=>"Mumbai", "Telangana"=>"Hyderabad", "UP"=>"Lucknow", "Tamilnadu"=>"Chennai"];
If we call the var_dump() function, both the above arrays will show the similar structure −
array(4) {
["Maharashtra"]=>
string(6) "Mumbai"
["Telangana"]=>
string(9) "Hyderabad
["UP"]=>
string(7) "Lucknow"
["Tamilnadu"]=>
string(7) "Chennai"
}
The key part of each element in an associative array can be any number (integer, float or Boolean), or a string. The value part can be of any type. However, the float key is cast to an integer. So, a Boolean true/false is used as "1" or "0" as the key.
Example
Take a look at the following example −
<?php
$arr1 = array(
10=>"hello",
5.75=>"world",
-5=>"foo",
false=>"bar"
);
var_dump($arr1);
?>
It will produce the following output −
array(4) {
[10]=>
string(5) "hello"
[5]=>
string(5) "world"
[-5]=>
string(3) "foo"
[0]=>
string(3) "bar"
}
Note that the key 5.75 gets rounded to 5, and the key "true" is reflected as "0". If the same key appears more than once in an array, the key-value pair that appears last will be retained, discarding the association of the key with earlier value.
PHP internally treats even an indexed array as an associative array, where the index is actually the key of the value. It means the value at the 0th index has a key equal to "0", and so on. A var_dump() on an indexed array also brings out this characteristics of a PHP array.
Iterating a PHP Associative Array
A foreach loop is the easiest and ideal for iterating through an associative array, although any other type of loop can also be used with some maneuver.
Example
Let us look at the foreach loop implementation, with each key value pair unpacked in two variables.
<?php
$capitals = array(
"Maharashtra"=>"Mumbai",
"Telangana"=>"Hyderabad",
"UP"=>"Lucknow",
"Tamilnadu"=>"Chennai"
);
foreach ($capitals as $k=>$v) {
echo "Capital of $k is $v \n";
}
?>
It will produce the following output −
Capital of Maharashtra is Mumbai Capital of Telangana is Hyderabad Capital of UP is Lucknow Capital of Tamilnadu is Chennai
There is another way of using the foreach loop in PHP, where each element is stored in a variable. We can then separate the key and value parts using array_search() and use them in the loop body.
<?php
$capitals = array(
"Maharashtra"=>"Mumbai",
"Telangana"=>"Hyderabad",
"UP"=>"Lucknow",
"Tamilnadu"=>"Chennai"
);
foreach ($capitals as $pair) {
$cap = array_search($pair, $capitals);
echo "Capital of $cap is $capitals[$cap] \n";
}
?>
It will produce the following output −
Capital of Maharashtra is Mumbai Capital of Telangana is Hyderabad Capital of UP is Lucknow Capital of Tamilnadu is Chennai
To use for, while or do-while loop, we have to first get the array of all the keys (use array_keys()), find the size and use it as the test condition in the loop syntax.
Example
Here is how we can use a for loop to traverse an associative array −
<?php
$capitals = array(
"Maharashtra"=>"Mumbai",
"Telangana"=>"Hyderabad",
"UP"=>"Lucknow",
"Tamilnadu"=>"Chennai"
);
$keys=array_keys($capitals);
for ($i=0; $i<count($keys); $i++){
$cap = $keys[$i];
echo "Capital of $cap is $capitals[$cap] \n";
}
?>
It will produce the following output −
Capital of Maharashtra is Mumbai Capital of Telangana is Hyderabad Capital of UP is Lucknow Capital of Tamilnadu is Chennai
Accessing the Value with its Key
In an associative array, the key is the identifier of value instead of index. Hence, to fetch value associated with a certain key, use $arr[key] syntax. The same can be used to update the value of a certain key.
Example
In the following code, an associative array $arr1 is declared. Another array $arr2 is created such that it stores each pair from $arr1 with the value of each key being doubled.
<?php
$arr1 = array("a"=>10, "b"=>20, "c"=>30, "d"=>40);
foreach ($arr1 as $k=>$v){
$arr2[$k] = $v*2;
}
print_r($arr2);
?>
It will produce the following output −
Array ( [a] => 20 [b] => 40 [c] => 60 [d] => 80 )
The print_r() function used here displays the data stored in the array in an easy to understand human readable form.
PHP - Multidimensional Array
A multidimensional array is an array of arrays. In a PHP array, each element can be another array. If the array consists of values or key-value pairs with values being of singular scalar types, it is a one-dimensional array. If each element in an array is an array of one or more scalar values, it is a two-dimensional array.
A PHP array may be a two-dimensional associative array also, where each element of the outer array is key-value pair, the value being another associative array.
# one dimensional indexed array $arr = [10, 20, 30, 40]; # one dimensional associative array $arr = ["key1"=> "val1", "key2" => "val2", "key3" => "val3"]; # two dimensional indexed array $arr = [ [1,2,3,4], [10, 20, 30, 40], [100, 200, 300, 400] ]; # two dimensional associative array $arr = [ "row1" => ["key11" => "val11", "key12" => "val12", "key13" => "val13"], "row2" => ["key21" => "val21", "key22" => "val22", "key23" => "val23"], "row3" => ["key31" => "val31", "key32" => "val32", "key33" => "val33"] ];
Iterating over a 2D Array
Two nested loops will be needed to traverse all the elements in a 2D array. The foreach loop is more suitable for array traversal. A 2D array is like a tabular representation of data in rows and columns.
Example
The following example shows how you can reproduce a 2D array in a tabular form −
<?php
$tbl = [
[1,2,3,4],
[10, 20, 30, 40],
[100, 200, 300, 400]
];
echo ("\n");
foreach ($tbl as $row){
foreach ($row as $elem){
$val = sprintf("%5d", $elem);
echo $val;
}
echo "\n";
}
?>
It will produce the following output −
1 2 3 4 10 20 30 40 100 200 300 400
Example
We can also employ two nested foreach loops to traverse a 2D associative array. Unpack each row of the outer array in row-key and row-value variables and traverse each row elements with the inner foreach loop.
<?php
$tbl = [
"row1" => ["key11" => "val11", "key12" => "val12", "key13" => "val13"],
"row2" => ["key21" => "val21", "key22" => "val22", "key23" => "val23"],
"row3" => ["key31" => "val31", "key32" => "val32", "key33" => "val33"]
];
echo ("\n");
foreach ($tbl as $rk=>$rv){
echo "$rk\n";
foreach ($rv as $k=>$v){
echo "$k => $v ";
}
echo "\n";
}
?>
It will produce the following output −
row1 key11 => val11 key12 => val12 key13 => val13 row2 key21 => val21 key22 => val22 key23 => val23 row3 key31 => val31 key32 => val32 key33 => val33
Accessing the Elements in a 2D Array
The $arr[$key] syntax of accessing and modifying an element in the array can be extended to a 2D array too. For a 2D indexed array, the jth element in the ith row can be fetched and assigned by using the expression "$arr[$i][$j]".
Example
<?php
$tbl = [[1,2,3,4], [10, 20, 30, 40], [100, 200, 300, 400]];
# prints number in index 2 of the row 2
print ("Value at [2], [2] :" . $tbl[2][2]);
?>
It will produce the following output −
Value at [2], [2] :300
Similarly, the value at ith row and jth column may be set to another value.
$tbl[2][2] = 250;
Example
If it is a 2D associative array, we need to use the row key and key-value variables of the desired column to access or modify its value.
<?php $tbl = [ "row1" => ["key11" => "val11", "key12" => "val12", "key13" => "val13"], "row2" => ["key21" => "val21", "key22" => "val22", "key23" => "val23"], "row3" => ["key31" => "val31", "key32" => "val32", "key33" => "val33"] ]; print "value at row2 - key22 is " . $tbl["row2"]["key22"]; ?>
It will produce the following output −
value at row2 - key22 is val22
Multi-dimensional Array
In the above example, we had an array in which the associated value of each key was another collection of key-value pairs, and we call it as a 2D array. The concept can be extended to any number of levels. For example, if each element in the inner array associates its key to another array, it becomes a three-dimensional array.
Here is an example of a three-dimensional array −
$arr3D = [
[
[1, 0, 9],
[0, 5, 6],
[1, 0, 3]
],
[
[0, 4, 6],
[0, 0, 1],
[1, 2, 7]
],
];
Example
To traverse such a 3D array, we need three nested foreach loops, as shown below −
<?php
$arr3D = [
[[1, 0, 9],[0, 5, 6],[1, 0, 3]],
[[0, 4, 6],[0, 0, 1],[1, 2, 7]],
];
foreach ($arr3D as $arr) {
foreach ($arr as $row) {
foreach ($row as $element) {
echo "$element ";
}
echo "\n";
}
echo "\n";
}
?>
It will produce the following output −
1 0 9 0 5 6 1 0 3 0 4 6 0 0 1 1 2 7
However, it is entirely possible to declare an array extending upto any number of dimensions. For that we need to have a generalized solution to traverse an array of any dimensions.
Recurve Traversal of Multidimensional Array
The following code shows a recursive function that calls itself if the value of a certain key is another array. If we pass any array as an argument to this function, it will be traversed, showing all the k-v pairs in it.
function showarray($arr) {
foreach ($arr as $k=>$v) {
if (is_array($v)) {
showarray($v);
} else {
echo "$k => $v ";
}
}
echo "\n";
}
Example
Let us pass the above 3D array $arr3D to it and see the result −
<?php
$arr3D = [
[[1, 0, 9],[0, 5, 6],[1, 0, 3]],
[[0, 4, 6],[0, 0, 1],[1, 2, 7]],
];
function showarray($arr){
foreach ($arr as $k=>$v){
if (is_array($v)){
showarray($v);
} else {
echo "$k => $v ";
}
}
echo "\n";
}
showarray($arr3D);
?>
It will produce the following output −
0 => 1 1 => 0 2 => 9 0 => 0 1 => 5 2 => 6 0 => 1 1 => 0 2 => 3 0 => 0 1 => 4 2 => 6 0 => 0 1 => 0 2 => 1 0 => 1 1 => 2 2 => 7
This recursive function can be used with any type of array, whether indexed or associative, and of any dimension.
Example
Let us use a 2D associative array as argument to showarray() function −
<?php
$tbl = [
"row1" => ["key11" => "val11", "key12" => "val12", "key13" => "val13"],
"row2" => ["key21" => "val21", "key22" => "val22", "key23" => "val23"],
"row3" => ["key31" => "val31", "key32" => "val32", "key33" => "val33"]
];
function showarray($arr){
foreach ($arr as $k=>$v){
if (is_array($v)){
showarray($v);
} else {
echo "$k => $v ";
}
}
echo "\n";
}
showarray($tbl);
?>
It will produce the following output −
key11 => val11 key12 => val12 key13 => val13 key21 => val21 key22 => val22 key23 => val23 key31 => val31 key32 => val32 key33 => val33
PHP Array Functions
PHP Array Functions allow you to interact with and manipulate arrays in various ways. PHP arrays are essential for storing, managing, and operating on sets of variables.
PHP supports simple and multi-dimensional arrays and may be either user created or created by another function.
Installation
There is no installation needed to use PHP array functions; they are part of the PHP core and comes alongwith standard PHP installation.
Runtime Configuration
This extension has no configuration directives defined in php.ini.
PHP Array Functions
Following table lists down all the functions related to PHP Array. Here column version indicates the earliest version of PHP that supports the function.
| Sr.No | Function & Description | Version |
|---|---|---|
| 1 | array()
Create an array |
4.2.0 |
| 2 | array_change_key_case()
Returns an array with all keys in lowercase or uppercase |
4.2.0 |
| 3 | array_chunk()
Splits an array into chunks of arrays |
4.2.0 |
| 3 | array_column()
Return the values from a single column in the input array |
5.5.0 |
| 4 | array_combine()
Creates an array by using one array for keys and another for its values |
5 |
| 5 | array_count_values()
Returns an array with the number of occurrences for each value |
4 |
| 6 | array_diff()
Compares array values, and returns the differences |
4 |
| 7 | array_diff_assoc()
Compares array keys and values, and returns the differences |
4 |
| 8 | array_diff_key()
Compares array keys, and returns the differences |
5 |
| 9 | array_diff_uassoc()
Compares array keys and values, with an additional user-made function check, and returns the differences |
5 |
| 10 | array_diff_ukey()
Compares array keys, with an additional user-made function check, and returns the differences |
5 |
| 11 | array_fill()
Fills an array with values |
4 |
| 12 | array_fill_keys()
Fill an array with values, specifying keys |
5 |
| 13 | array_filter()
Filters elements of an array using a user-made function |
4 |
| 14 | array_flip()
Exchanges all keys with their associated values in an array |
4 |
| 15 | array_intersect()
Compares array values, and returns the matches |
4 |
| 16 | array_intersect_assoc()
Compares array keys and values, and returns the matches |
4 |
| 17 | array_intersect_key()
Compares array keys, and returns the matches |
5 |
| 18 | array_intersect_uassoc()
Compares array keys and values, with an additional user-made function check, and returns the matches |
5 |
| 19 | array_intersect_ukey()
Compares array keys, with an additional user-made function check, and returns the matches |
5 |
| 20 | array_key_exists()
Checks if the specified key exists in the array |
4 |
| 21 | array_keys()
Returns all the keys of an array |
4 |
| 22 | array_map()
Sends each value of an array to a user-made function, which returns new values |
4 |
| 23 | array_merge()
Merges one or more arrays into one array |
4 |
| 24 | array_merge_recursive()
Merges one or more arrays into one array |
4 |
| 25 | array_multisort()
Sorts multiple or multi-dimensional arrays |
4 |
| 26 | array_pad()
Inserts a specified number of items, with a specified value, to an array |
4 |
| 27 | array_pop()
Deletes the last element of an array |
4 |
| 28 | array_product()
Calculates the product of the values in an array |
5 |
| 29 | array_push()
Inserts one or more elements to the end of an array |
4 |
| 30 | array_rand()
Returns one or more random keys from an array |
4 |
| 31 | array_reduce()
Returns an array as a string, using a user-defined function |
4 |
| 32 | array_reverse()
Returns an array in the reverse order |
4 |
| 33 | array_search()
Searches an array for a given value and returns the key |
4 |
| 34 | array_shift()
Removes the first element from an array, and returns the value of the removed element |
4 |
| 35 | array_slice()
Returns selected parts of an array |
4 |
| 36 | array_splice()
Removes and replaces specified elements of an array |
4 |
| 37 | array_sum()
Returns the sum of the values in an array |
4 |
| 38 | array_udiff()
Compares array values in a user-made function and returns an array |
5 |
| 39 | array_udiff_assoc()
Compares array keys, and compares array values in a user-made function, and returns an array |
5 |
| 40 | array_udiff_uassoc()
Compares array keys and array values in user-made functions, and returns an array |
5 |
| 41 | array_uintersect()
Compares array values in a user-made function and returns an array |
5 |
| 42 | array_uintersect_assoc()
Compares array keys, and compares array values in a user-made function, and returns an array |
5 |
| 43 | array_uintersect_uassoc()
Compares array keys and array values in user-made functions, and returns an array |
5 |
| 44 | array_unique()
Removes duplicate values from an array |
4 |
| 45 | array_unshift()
Adds one or more elements to the beginning of an array |
4 |
| 46 | array_values()
Returns all the values of an array |
4 |
| 47 | array_walk()
Applies a user function to every member of an array |
3 |
| 48 | array_walk_recursive()
Applies a user function recursively to every member of an array |
5 |
| 49 | arsort()
Sorts an array in reverse order and maintain index association |
3 |
| 50 | asort()
Sorts an array and maintain index association |
3 |
| 51 | compact()
Create array containing variables and their values |
4 |
| 52 | count()
Counts elements in an array, or properties in an object |
3 |
| 53 | current()
Returns the current element in an array |
3 |
| 54 | each()
Returns the current key and value pair from an array |
3 |
| 55 | end()
Sets the internal pointer of an array to its last element |
3 |
| 56 | extract()
Imports variables into the current symbol table from an array |
3 |
| 57 | in_array()
Checks if a specified value exists in an array |
4 |
| 58 | key()
Fetches a key from an array |
3 |
| 59 | krsort()
Sorts an array by key in reverse order |
3 |
| 60 | ksort()
Sorts an array by key |
3 |
| 61 | list()
Assigns variables as if they were an array |
3 |
| 62 | natcasesort()
Sorts an array using a case insensitive "natural order" algorithm |
4 |
| 63 | natsort()
Sorts an array using a "natural order" algorithm |
4 |
| 64 | next()
Advance the internal array pointer of an array |
3 |
| 65 | pos()
Alias of current() |
3 |
| 66 | prev()
Rewinds the internal array pointer |
3 |
| 67 | range()
Creates an array containing a range of elements |
3 |
| 68 | reset()
Sets the internal pointer of an array to its first element |
3 |
| 69 | rsort()
Sorts an array in reverse order |
3 |
| 70 | shuffle()
Shuffles an array |
3 |
| 71 | sizeof()
Alias of count() |
3 |
| 72 | sort()
Sorts an array |
3 |
| 73 | uasort()
Sorts an array with a user-defined function and maintain index association |
3 |
| 74 | uksort()
Sorts an array by keys using a user-defined function |
3 |
| 75 | usort()
Sorts an array by values using a user-defined function |
3 |
PHP Array Constants
| Sr.No | Constant & Description |
|---|---|
| 1 | CASE_LOWER Used with array_change_key_case() to convert array keys to lower case |
| 2 |
CASE_UPPER Used with array_change_key_case() to convert array keys to upper case |
| 3 |
SORT_ASC Used with array_multisort() to sort in ascending order |
| 4 |
SORT_DESC Used with array_multisort() to sort in descending order |
| 5 |
SORT_REGULAR Used to compare items normally |
| 6 |
SORT_NUMERIC Used to compare items numerically |
| 7 |
SORT_STRING Used to compare items as strings |
| 8 |
SORT_LOCALE_STRING Used to compare items as strings, based on the current locale |
| 9 |
COUNT_NORMAL |
| 10 |
COUNT_RECURSIVE |
| 11 |
EXTR_OVERWRITE |
| 12 |
EXTR_SKIP |
| 13 |
EXTR_PREFIX_SAME |
| 14 |
EXTR_PREFIX_ALL |
| 15 |
EXTR_PREFIX_INVALID |
| 16 |
EXTR_PREFIX_IF_EXISTS |
| 17 | EXTR_IF_EXISTS |
| 18 | EXTR_REFS |
PHP - Constant Arrays
It was not possible to declare a constant array before PHP version 5.6. From PHP 5.6 onwards, you can use the "const" keyword to declare a constant array. From PHP 7 onwards, constant arrays can also be formed with define() function.
A constant array is an array which cannot be modified after it has been formed. Unlike a normal array, its identifier doesnt start with the "$" sign.
The older syntax for declaring constant array is −
const ARR = array(val1, val2, val3);
Example
<?php
const FRUITS = array(
"Watermelon",
"Strawberries",
"Pomegranate",
"Blackberry",
);
var_dump(FRUITS);
?>
It will produce the following output −
array(4) {
[0]=>
string(10) "Watermelon"
[1]=>
string(12) "Strawberries"
[2]=>
string(11) "Pomegranate"
[3]=>
string(10) "Blackberry"
}
You can also use the conventional square bracket syntax to declar a constant array in PHP −
const FRUITS = [ "Watermelon", "Strawberries", "Pomegranate", "Blackberry", ];
Example
It is not possible to modify any element in a constant array. Hence, the following code throws a fatal error −
<?php
const FRUITS = [
"Watermelon",
"Strawberries",
"Pomegranate",
"Blackberry",
];
FRUITS[1] = "Mango";
?>
It will produce the following output −
PHP Fatal error: Cannot use temporary expression in write context
Constant Arrays PHP 7 Onwards
The newer versions of PHP allow you to declare a constant array with define() function.
<?php
define ('FRUITS', [
"Watermelon",
"Strawberries",
"Pomegranate",
"Blackberry",
]);
print_r(FRUITS);
?>
It will produce the following output −
Array ( [0] => Watermelon [1] => Strawberries [2] => Pomegranate [3] => Blackberry )
You can also use the array() function to declare the constant array here.
define ('FRUITS', array(
"Watermelon",
"Strawberries",
"Pomegranate",
"Blackberry",
));
Example
It is also possible to declare an associative constant array. Here is an example −
<?php
define ('CAPITALS', array(
"Maharashtra" => "Mumbai",
"Telangana" => "Hyderabad",
"Gujarat" => "Gandhinagar",
"Bihar" => "Patna"
));
print_r(CAPITALS);
?>
It will produce the following output −
Array ( [Maharashtra] => Mumbai [Telangana] => Hyderabad [Gujarat] => Gandhinagar [Bihar] => Patna )
PHP - Functions
Like most of the programming languages, a function in PHP is a block of organized, reusable code that is used to perform a single, related action. Functions provide better modularity for your application and a high degree of code reuse.
PHP supports a structured programming approach by arranging the processing logic by defining blocks of independent reusable functions. The main advantage of this approach is that the code becomes easy to follow, develop and maintain.
The following figure shows how the process of salary computation is successively broken down to independent and reusable functions.
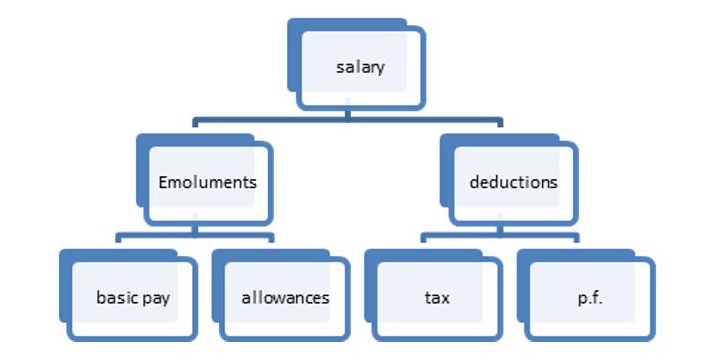
Types of Functions
You already have seen many functions like fopen() and fread() etc. They are built-in functions but PHP gives you option to create your own functions as well. There are two types of functions in PHP −
Built-in functions − PHPs standard library contains a large number of built-in functions for string processing, file IO, mathematical computations and more.
User-defined functions − You can create user-defined functions too, specific to the requirements of the programming logic.
A function may be invoked from any other function by passing required data (called parameters or arguments). The called function returns its result back to the calling environment.
There are two parts which should be clear to you −
Creating a PHP Function
Calling a PHP Function
In fact you hardly need to create your own PHP function because there are already more than 1000 built-in library functions created for different area and you just need to call them according to your requirement.
Please refer to PHP Function Reference for a complete set of useful functions.
User-defined Functions in PHP
Its very easy to create your own PHP function. Let's start with a simple example after which we will elaborate how it works. Suppose you want to create a PHP function which will simply write a simple message on your browser when you will call it.
Example
In this example, we create a function called writeMessage() and then call it to print a simple message −
<?php
/* Defining a PHP Function */
function writeMessage() {
echo "You are really a nice person, Have a nice time!";
}
/* Calling a PHP Function */
writeMessage();
?>
It will produce the following output −
You are really a nice person, Have a nice time!
Creating a Function in PHP
Now let's understand the process in detail. The first step is to write a function and then you can call it as many times as required. To create a new function, use the function keyword, followed by the name of the function you may want to use. In front of the name, put a parenthesis, which may or may not contain arguments. It is followed by a block of statements delimited by curly brackets. This function block contains the statements to be executed every time the function is called.
The general syntax of defining a function is as follows −
function foo($arg_1, $arg_2, $arg_n) {
statements;
return $retval;
}
If the function is intended to return some result back to the calling environment, there should be a return statement as the last statement in the function block. It is not mandatory to have a return statement, as even without it, the program flow goes back to the caller, albeit without carrying any value with it.
Any valid PHP code may appear inside a function, even other functions and class definitions. Name of the function must follow the same rules as used to form the name of a variable. It should start with a letter or underscore, followed by any number of letters, numbers, or underscores.
Here is a simple function in PHP. Whenever called, it is expected to display the message "Hello World".
function sayhello() {
echo "Hello World";
}
Calling a Function in PHP
Once a function is defined, it can be called any number of times, from anywhere in the PHP code. Note that a function will not be called automatically. To call the function, use its name in a statement; the name of the function followed by a semicolon.
<?php
# define a function
function sayhello(){
echo "Hello World";
}
# calling the function
sayhello();
?>
It will produce the following output −
Hello World
Assuming that the above script "hello.php" is present in the document root folder of the PHP server, open the browser and enter the URL as http://localhost/hello.php. You should see the "Hello World" message in the browser window.
In this example, the function is defined without any arguments or any return value. In the subsequent chapters, we shall learn about how to define and pass arguments, and how to make a function return some value. Also, some advanced features of PHP functions such as recursive functions, calling a function by value vs by reference, etc. will also be explained in detail.
PHP - Function Parameters
A function in PHP may be defined to accept one or more parameters. Function parameters are a comma-separated list of expressions inside the parenthesis in front of the function name while defining a function. A parameter may be of any scalar type (number, string or Boolean), an array, an object, or even another function.
function foo($arg_1, $arg_2, $arg_n) {
statements;
return $retval;
}
The arguments act as the variables to be processed inside the function body. Hence, they follow the same naming conventions as any normal variable, i.e., they should start with "$" and can contain alphabets, digits and underscore.
Note − There is no restriction on how many parameters can be defined.
When a parameterized function needs to be called, you have to make sure that the same number of values as in the number of arguments in functions definition, are passed to it.
foo(val1, val2, val_n);
A function defined with parameters can produce a result that changes dynamically depending on the passed values.
Example
The following code contains the definition of addition() function with two parameters, and displays the addition of the two. The run-time output depends on the two values passed to the function.
<?php
function addition($first, $second) {
$result = $first+$second;
echo "First number: $first \n";
echo "Second number: $second \n";
echo "Addition: $result";
}
addition(10, 20);
$x=100;
$y=200;
addition($x, $y);
?>
It will produce the following output −
First number: 10 Second number: 20 Addition: 30 First number: 100 Second number: 200 Addition: 300
Formal and Actual Arguments
Sometimes the term argument is used for parameter. Actually, the two terms have a certain difference.
A parameter refers to the variable used in functions definition, whereas an argument refers to the value passed to the function while calling.
An argument may be a literal, a variable or an expression
The parameters in a function definition are also often called as formal arguments, and what is passed is called actual arguments.
The names of formal arguments and actual arguments need not be same. The value of the actual argument is assigned to the corresponding formal argument, from left to right order.
The number of formal arguments defined in the function and the number of actual arguments passed should be same.
Example
PHP raises an ArgumentCountError when the number of actual arguments is less than formal arguments. However, the additional actual arguments are ignored if they are more than the formal arguments.
<?php
function addition($first, $second) {
$result = $first+$second;
echo "First number: $first \n";
echo "Second number: $second \n";
echo "Addition: $result \n";
}
# Actual arguments more than formal arguments
addition(10, 20, 30);
# Actual arguments fewer than formal arguments
$x=10;
$y=20;
addition($x);
?>
It will produce the following output −
First number: 10 Second number: 20 Addition: 30 PHP Fatal error: Uncaught ArgumentCountError: Too few arguments to function addition(), 1 passed in /home/cg/root/20048/main.php on line 16 and exactly 2 expected in /home/cg/root/20048/main.php:2
Arguments Type Mismatch
PHP is a dynamically typed language, hence it doesnt enforce type checking when copying the value of an actual argument with a formal argument. However, if any statement inside the function body tries to perform an operation specific to a particular data type which doesnt support it, PHP raises an exception.
In the addition() function above, it is assumed that numeric arguments are passed. PHP doesnt have any objection if string arguments are passed, but the statement performing the addition encounters exception because the "+" operation is not defined for string type.
Example
Take a look at the following example −
<?php
function addition($first, $second) {
$result = $first+$second;
echo "First number: $first \n";
echo "Second number: $second \n";
echo "Addition: $result";
}
# Actual arguments are strings
$x="Hello";
$y="World";
addition($x, $y);
?>
It will produce the following output −
PHP Fatal error: Uncaught TypeError: Unsupported operand types: string + string in hello.php:5
However, PHP is a weakly typed language. It attempts to cast the variables into compatible type as far as possible. Hence, if one of the values passed is a string representation of a number and the second is a numeric variable, then PHP casts the string variable to numeric in order to perform the addition operation.
Example
Take a look at the following example −
<?php
function addition($first, $second) {
$result = $first+$second;
echo "First number: $first \n";
echo "Second number: $second \n";
echo "Addition: $result";
}
# Actual arguments are strings
$x="10";
$y=20;
addition($x, $y);
?>
It will produce the following output −
First number: 10 Second number: 20 Addition: 30
PHP - Call by Value
By default, PHP uses the "call by value" mechanism for passing arguments to a function. When a function is called, the values of actual arguments are copied to the formal arguments of the functions definition.
During the execution of the function body, if there is any change in the value of any of the formal arguments, it is not reflected in the actual arguments.
Actual Arguments − The arguments that are passed in a function call.
Formal Arguments − The arguments that are declared in a function definition.
Example
Let us consider the function used in the code below −
<?php
function change_name($nm) {
echo "Initially the name is $nm \n";
$nm = $nm."_new";
echo "This function changes the name to $nm \n";
}
$name = "John";
echo "My name is $name \n";
change_name($name);
echo "My name is still $name";
?>
It will produce the following output −
My name is John Initially the name is John This function changes the name to John_new My name is still John
In this example, the change_name() function appends _new to the string argument passed to it. However, the value of the variable that was passed to it remains unchanged after the functions execution.
Formal arguments, in fact, behave as local variables for the function. Such a variable is accessible only inside the scope in which it is initialized. For a function, its body marked by the curly brackets "{ }" is its scope. Any variable inside this scope is not available for the code outside it. Hence, manipulation of any local variable has no effect on the world outside.
The "call by value" method is suitable for a function that uses the values passed to it. It performs certain computation and returns the result without having to change the value of parameters passed to it.
Note − Any function that performs a formula-type computation is an example of call by value.
Example
Take a look at the following example −
<?php
function addFunction($num1, $num2) {
$sum = $num1 + $num2;
return $sum;
}
$x = 10;
$y = 20;
$num = addFunction($x, $y);
echo "Sum of the two numbers is : $num";
?>
It will produce the following output −
Sum of the two numbers is : 30
Example
Here is another example of calling a function by passing the argument by value. The function increments the received number by 1, but that doesnt affect the variable passed to it.
<?php
function increment($num) {
echo "The initial value: $num \n";
$num++;
echo "This function increments the number by 1 to $num \n";
}
$x = 10;
increment($x);
echo "Number has not changed: $x";
?>
It will produce the following output −
The initial value: 10 This function increments the number by 1 to 11 Number has not changed: 10
PHP also supports passing the reference of variables to the function while calling. We shall discuss it in the next chapter.
PHP - Call by Reference
PHP uses the "call by value" mechanism, by default, for passing arguments to a function. If the arguments within the function are changed, the changes do not reflect outside of the function. To allow a function to modify its arguments, the "call by reference" mechanism must be used.
In PHP, a reference variable acts as an "alias" to the original or host variable so that both of them can read and write a single value. In other words, variables of two different names can access to the same value and they behave as if they are the same variable.
The following PHP script will help in understanding what references are. Here, $var is a normal string variable. We declare $var1 as a reference to $var, append "&" symbol to the latter.
$var = "Hello"; $var1 = &$var;
When we say that $var1 is an alias or reference of $var, it means any change in its value will also change the value of $var, and vice versa.
Example
The following example demonstrates how "call by reference" works in PHP −
<?php $var = "Hello"; $var1 = &$var; $var1 = "Hello World"; echo "var=$var var1=$var1" . PHP_EOL; $var = "How are you?"; echo "var=$var var1=$var1" . PHP_EOL; ?>
It will produce the following output −
var=Hello World var1=Hello World var=How are you? var1=How are you?
Calling a PHP Function by Reference
To call a function by reference, you need to declare the formal arguments with name prefixed by "&" symbol.
function callref(&$arg1, &$arg2) {
Statements;
}
The call to the function is just as in "call by value" method.
callref($x, $y);
When the function is invoked, $arg1 becomes a reference to $x and $arg2 becomes a reference to $y.
If, inside the function body, the value of $arg1 or $arg2 (or both) changes, it also causes the values of $x and $y to change.
Example
Let us have a look at the following example −
<?php
function change_name(&$nm) {
echo "Initially the name is $nm" . PHP_EOL;
$nm = $nm."_new";
echo "This function changes the name to $nm" . PHP_EOL;
}
$name = "John";
echo "My name is $name" . PHP_EOL;
change_name($name);
echo "My name now is $name" . PHP_EOL;
?>
The variable $name is passed to the function change_name(). A reference variable &$nm becomes its reference variable. Any change in $nm is reflected in $name outside the function.
It will produce the following output −
My name is John Initially the name is John This function changes the name to John_new My name now is John_new
Swapping Two Variables
In the following PHP code, we call a function by passing the arguments by value. The function attempts to swap their values.
Inside the function, their values are changed, but this swap doesnt reflect in the actual arguments after the execution of the function.
When the same function is called by passing the arguments by reference, the swap effect is reflected in the actual arguments as well.
<?php
function swap_value($a, $b) {
echo "Initial values a = $a b = $b \n";
$c = $a; $a = $b; $b = $c;
echo "Swapped values a = $a b = $b \n";
}
$x = 10; $y =20;
echo "Actual arguments x = $x y = $y \n\n";
swap_value($x, $y);
echo "Actual arguments do not change after the function: \n";
echo "x = $x y = $y \n\n";
function swap_ref(&$a, &$b) {
echo "Initial values a = $a b = $b \n";
$c = $a; $a = $b; $b = $c;
echo "Swapped values a = $a b = $b \n";
}
swap_ref($x, $y);
echo "Actual arguments get changed after the function: \n";
echo "x = $x y = $y";
?>
It will produce the following output −
Actual arguments x = 10 y = 20 Initial values a = 10 b = 20 Swapped values a = 20 b = 10 Actual arguments do not change after the function: x = 10 y = 20 Initial values a = 10 b = 20 Swapped values a = 20 b = 10 Actual arguments get changed after the function: x = 20 y = 10
Return by Reference
Just as a function in PHP can accept arguments by reference, it can also return a reference. To define a function that returns a reference, prefix the name of the function by "&" symbol.
Example
The following code shows the example of a function returning a reference. It returns $x, which is a local static variable inside myfunction(). Since "&" symbol is prepended to it, $a (the variable that stores the return value) becomes a reference to &x. As a result, any change in $a will also change the value of $x.
<?php
function &myfunction(){
static $x=10;
echo "x Inside function: $x \n";
return $x;
}
$a=&myfunction();
echo "Returned by Reference: $a \n";
$a=$a+10;
$a=&myfunction();
?>
It will produce the following output −
x Inside function: 10 Returned by Reference: 10 x Inside function: 20
PHP - Default Arguments
Like most of the languages that support imperative programming, a function in PHP may have one or more arguments that have a default value. As a result, such a function may be called without passing any value to it. If there is no value meant to be passed, the function will take its default value for processing. If the function call does provide a value, the default value will be overridden.
function fun($arg1 = val1, $arg2 = val2) {
Statements;
}
Such a function can be called in different ways −
fun(); # Function will use defaults for both arguments fun($x); # Function passes $x to arg1 and uses default for arg2 fun($x, $y); # Both arguments use the values passed
Example 1
Here we define a function called greeting() with two arguments, both having string as their default values. We call it by passing one string, two strings and without any argument.
<?php
function greeting($arg1="Hello", $arg2="world") {
echo $arg1 . " ". $arg2 . PHP_EOL;
}
greeting();
greeting("Thank you");
greeting("Welcome", "back");
greeting("PHP");
?>
It will produce the following output −
Hello world Thank you world Welcome back PHP world
Example 2
You can define a function with only some of the arguments with default value, and the others to which the value must be passed.
<?php
function greeting($arg1, $arg2="World") {
echo $arg1 . " ". $arg2 . PHP_EOL;
}
# greeting(); ## This will raise ArgumentCountError
greeting("Thank you");
greeting("Welcome", "back");
?>
It will produce the following output −
Thank you World Welcome back
The first call (without argument) raises ArgumentCountError because you must pass value for the first argument. If only one value is passed, it will be used by the first argument in the list.
However, if you declare arguments with default before arguments without defaults, such function can be only called if values for both are passed. You cannot have a situation where the first argument uses the default, and the second using the passed value.
The greeting() function now has $arg1 with default and $arg2 without any default value.
function greeting($arg1="Hello", $arg2) {
echo $arg1 . " ". $arg2 . PHP_EOL;
}
If you pass a string "PHP" −
greeting("PHP");
with the intension to print the result as "Hello PHP", the following error message will be displayed.
PHP Fatal error: Uncaught ArgumentCountError: Too few arguments to function greeting(), 1 passed in hello.php on line 10 and exactly 2 expected
Example 3
Let's define a function percent() that calculates the percentage of marks in three subjects.
Assuming that the marks in each subject are out of 100, the $total argument in the function definition is given a default value as 300.
<?php
function percent($p, $c, $m, $ttl=300) {
$per = ($p+$c+$m)*100/$ttl;
echo "Marks obtained: \n";
echo "Physics = $p Chemistry = $c Maths = $m \n";
echo "Percentage = $per \n";
}
percent(50, 60, 70);
?>
It will produce the following output −
Marks obtained: Physics = 50 Chemistry = 60 Maths = 70 Percentage = 60
However, if the maximum marks in each subject is 50, then you must pass the fourth value to the function, otherwise the percentage will be calculated out of 300 instead of 150.
<?php
function percent($p, $c, $m, $ttl=300) {
$per = ($p+$c+$m)*100/$ttl;
echo "Marks obtained: \n";
echo "Physics = $p Chemistry = $c Maths = $m \n";
echo "Percentage = $per \n";
}
percent(30, 35, 40, 150);
?>
It will produce the following output −
Marks obtained: Physics = 30 Chemistry = 35 Maths = 40 Percentage = 70
PHP - Named Arguments
The feature of Named Arguments has been introduced in PHP with the version 8.0. It is an extension of the existing mechanism of passing positional arguments to a function while calling.
By default, values of passed arguments are copied to the corresponding formal arguments at the same position. This feature of named arguments in PHP makes it possible to pass the value based on the parameter name instead of the position.
If we have a function defined as follows −
function myfunction($x, $y) {
statement1;
statement2;
. . .
}
and it is called as −
myfunction(10, 20);
In this case, the values are passed to the variables "x" and "y" in the order of declaration. It means, the first value to the first argument, second value to second argument and so on. The variables "x" and "y" are positional arguments.
To pass the values by named arguments, specify the parameter name to which argument the value is to be passed. The name of the parameter is the name of formal argument without the "$" symbol. The value to be passed is put in front of the ":" symbol.
myfunction(x:10, y:20);
Example
Here is the code that demonstrates how you can use named arguments in PHP −
<?php
function myfunction($x, $y) {
echo "x = $x y = $y";
}
myfunction(x:10, y:20);
?>
It will produce the following output −
x = 10 y = 20
Using named arguments makes it possible to pass the values in any order, and not necessarily in the same order in which the arguments are declared in the function definition. We can call myfunction() as shown below and it will produce the same result.
myfunction(y:20, x:10);
With this feature, the arguments become order-independent and self-documenting. It also makes it possible to skip the arguments with default values arbitrarily.
Combining Named Arguments with Positional Arguments
Named arguments can be combined with positional arguments, with the condition that, the named arguments must come after the positional arguments.
Example
<?php
function myfunction($x, $y, $z) {
echo "x = $x y = $y z = $z";
}
myfunction(10, z:20, y:30);
?>
It will produce the following output −
x = 10 y = 30 z = 20
However, if you try to treat $z as a positional argument,
myfunction(x:10, y:20, 30);
In this case, PHP will encounter the following error −
PHP Fatal error: Cannot use positional argument after named argument in hello.php on line 7
Passing Named Arguments from an Array
PHP 8.1.0 also introduced another feature that allows using named argument after unpacking the arguments. Instead of providing values to each argument individually, the values in an array an be unpacked into the corresponding arguments, using "..." (three dots) before the array.
Example
<?php
function myfunction($x, $y, $z=30) {
echo "x = $x y = $y z = $z";
}
myfunction(...[10, 20], z:30);
?>
It will produce the following output −
x = 10 y = 20 z = 30
Note that passing the same parameter multiple times results in an exception as follows −
myfunction(x:10, z:20, x:20);
Error −
PHP Fatal error: Uncaught Error: Named parameter $x overwrites previous argument in hello.php:7
PHP - Variable Arguments
In PHP, it is possible to write a function capable of accepting a list of arguments with variable number of elements. To declare a variable argument list, the name of the argument is prepended by the "..." (three dots) symbol. The values passed are collected into an array with the arguments name.
function myfunction(...$arg) {
Statement1;
Statement2;
}
To call such a function, put any number of comma-separated values in the parenthesis.
myfunction(v1, v2, v3, . . . , vn);
The formal argument declared in the function is an array of all the values passed. We van use any of the appropriate built_in array functions to perform the process.
Example
In the following example, the user defined function myfunction() is capable of receiving variable number of values and finds their average.
<?php
function myfunction(...$numbers) {
$avg = array_sum($numbers)/count($numbers);
return $avg;
}
$avg = myfunction(5, 12, 9, 23, 8);
echo "average = $avg";
?>
It will produce the following output −
average = 11.4
Try changing the size of the passed array and run the program again.
You can use a foreach loop to traverse the array inside the function. The function may have any positional arguments before the variable length argument. From the received values, the positional arguments will be populated first, leaving others to be copied to the array.
Example
<?php
function myfunction($x, ...$numbers) {
echo "First number: $x" . PHP_EOL;
echo "Remaining numbers: ";
foreach ($numbers as $n) {
echo "$n ";
}
}
myfunction(5, 12, 9, 23, 8, 41);
?>
It will produce the following output −
First number: 5 Remaining numbers: 12 9 23 8 41
Variadic Functions
It is possible to process a variable number of arguments to a function, even without the "..." syntax. PHP has built_in functions like func_num_args(), func_get_arg() and func_get_args(), which can be used with similar result.
func_num_args() − Returns the number of arguments passed to the function.
func_get_arg() − Returns an item from the argument list
func_get_args() − Returns an array comprising a function's argument list
Example
The above example of variable arguments can be rewritten with these functions as below −
<?php
function myfunction() {
$sum = 0;
foreach (func_get_args() as $n) {
$sum += $n;
}
return $sum;
}
echo myfunction(5, 12, 9, 23, 8, 41);
?>
It will produce the following output −
98
Example
This program prints all the numbers passed to the function −
<?php
function myfunction() {
$len = func_num_args();
echo "Numbers : ";
$i=0;
for ($i=0; $i<$len; $i++)
echo func_get_arg($i) . " ";
}
myfunction(5, 12, 9, 23, 8, 41);
?>
It will produce the following output −
Numbers : 5 12 9 23 8 41
PHP - Returning Values
A PHP function can have an optional return statement as the last statement in its function body. Most of the built-in functions in PHP return a certain value. For example the strlen() function returns the length of a string. Similarly, a user defined function can also return a certain value.
A function is an independent, complete and reusable block of statements. When called, it performs a certain task and sends the program control back to position from where it was called even if return statement is not used. The return statement allows it to take a value, along with the control, back to the calling environment.
function foo($arg_1, $arg_2) {
statements;
return $retval;
}
A function may return any type of data, including scalar variables, arrays and objects. A return keyword without any expression in front of it returns null, and is equivalent to a function not having a return value at all.
The value returned by a function can be stored in a variable, can be put in an expression, or, if appearing inside print or echo, is displayed in the output.
$res = foo($x, $y);
It allows the returned value of a function to be used further in the program.
Example
Let us modify the addition() function in the previous chapter to include a return statement to return the result of addition.
<?php
function addition($first, $second) {
$result = $first+$second;
return $result;
}
$x=10;
$y=20;
$z = addition($x, $y);
echo "First number: $x Second number: $y Addition: $z". PHP_EOL;
?>
It will produce the following output −
First number: 10 Second number: 20 Addition: 30
A function in PHP may have any number of arguments, but can return only one value. The function goes back to the calling environment as soon as it comes across a return statement for the first time, abandoning the rest of statements in the function body.
Example
If you try to include more than one values in the return statement, a PHP parse error is encountered as below −
<?php
function raiseto($x) {
$sqr = $x**2;
$cub = $x**3;
return $sqr, $cub;
}
$a = 5;
$val = raiseto($a);
?>
It will produce the following output −
PHP Parse error: syntax error, unexpected token ",", expecting ";"
Conditional Return
You can have multiple return statements executed under different conditional statements.
Example
In the following program, the raiseto() function returns either the square or the cube of a number of the index argument, that is either 2 or 3, respectively.
<?php
function raiseto($x, $i) {
if ($i == 2) {
return $x**2;
} elseif ($i==3) {
return $x**3;
}
}
$a = 5;
$b = 2;
$val = raiseto($a, $b);
echo "$a raised to $b = $val" . PHP_EOL;
$x = 7;
$y = 3;
echo "$x raised to $y = " . raiseto($x, $y) . PHP_EOL;
?>
It will produce the following output −
5 raised to 2 = 25 7 raised to 3 = 343
Return Multiple Values as Array
The function in PHP is capable of returning only a single value. However, that single value can be an array of more than one values. We can take the advantage of this feature to return the square as well as the cube of a number at once.
Example
Take a look at the following example −
<?php
function raiseto($x){
$sqr = $x**2;
$cub = $x**3;
$ret = ["sqr" => $sqr, "cub" => $cub];
return $ret;
}
$a = 5;
$val = raiseto($a);
echo "Square of $a: " . $val["sqr"] . PHP_EOL;
echo "Cube of $a: " . $val["cub"] . PHP_EOL;
?>
It will produce the following output −
Square of 5: 25 Cube of 5: 125
PHP - Passing Functions
To a function in PHP, in addition to scalar types, arrays, and objects, you can also pass a function as one of its arguments. If a function is defined to accept another function as an argument, the passed function will be invoked inside it. PHPs standard library has certain built-in functions of this type, where one of the arguments to be passed is a function, which may be another built-in function or even a user defined function.
array_map
The array_map() is one of the built-in functions. The first argument to this function is a callback function. There may be one or more arrays as the other arguments. The callback function is applied to all the elements of arrays.
array_map(?callable $callback, array $array, array ...$arrays): array
The array_map() function returns an array. It contains the result of applying the callback function to the corresponding elements of arrays passed as other arguments.
Example
In the following example, we have a square() function that computes the square of a number passed to it. This function in turn is used as an argument for array_map() function, along with another array of numbers. Each number is successively passed to the squares() function. The resultant array is a list of squares.
<?php
function square($number) {
return $number * $number;
}
$arr = [1, 2, 3, 4, 5];
$squares = array_map('square', $arr);
var_dump($squares);
?>
It will produce the following output −
array(5) {
[0]=>
int(1)
[1]=>
int(4)
[2]=>
int(9)
[3]=>
int(16)
[4]=>
int(25)
}
call_user_func
Another example of passing a function to another function is call_user_func(). As the name suggests, it calls another user defined callback function, and the other arguments are passed to the callback.
call_user_func(callable $callback, mixed ...$args): mixed
Example
In the example below, the square() function is invoked repeatedly, passing each number in an array.
<?php
function square($number) {
return $number * $number;
}
$arr = [1, 2, 3, 4, 5];
foreach($arr as $a) {
echo "square of $a:" . call_user_func("square", $a). PHP_EOL;
}
?>
It will produce the following output −
square of 1:1 square of 2:4 square of 3:9 square of 4:16 square of 5:25
usort
As another example of passing function, we take a look a usort() function.
usort(array &$array, callable $callback): true
The first parameter is an array. The array is sorted as per the callback function, which is the second parameter.
The callback parameter is a comparison function must return an integer less than, equal to, or greater than zero if the first argument is considered to be respectively less than, equal to, or greater than the second.
Example
Here is an example. First we have a mysort() function. It compares two numbers and returns "-1", "0" or "1" if the first number is less than, equal to or greater than second number.
The first argument to usort() is the mysort() function, and the second one is an array. To begin with, the first two numbers are passed to mysort(). If it returns 1, they are swapped. Next, the second and third numbers are passed and swapped if the comparison returns 1. The same process repeats so that the array elements are arranged in ascending order.
<?php
function mysort($a, $b) {
if ($a == $b) {
return 0;
}
return ($a < $b) ? -1 : 1;
}
$a = array(3, 2, 5, 6, 1);
usort($a, "mysort");
foreach ($a as $key => $value) {
echo "$key: $value\n";
}
?>
It will produce the following output −
0: 1 1: 2 2: 3 3: 5 4: 6
Pass Callback to User-defined Function
Apart from the above built-in functions, you can define your own function that accepts one of the arguments as another function.
In the example below, we have two functions, square() and cube(), that return the square and cube of a given number.
Next, there is myfunction(), whose first argument is used as a variable function and the second argument to myfunction() is passed to it.
Thus, myfunction() internally calls square() or cube() to return either square or cube of a given number.
Example
<?php
function myfunction($function, $number) {
$result = $function($number);
return $result;
}
function cube($number) {
return $number ** 2;
}
function square($number) {
return $number ** 3;
}
$x = 5;
$cube = myfunction('cube', $x);
$square = myfunction('square', $x);
echo "Square of $x = $square" . PHP_EOL;
echo "Cube of $x = $cube" . PHP_EOL;
?>
It will produce the following output −
Square of 5 = 125 Cube of 5 = 25
PHP - Recursive Functions
A recursive function is such a function that calls itself until a certain condition is satisfied. In PHP, it is possible to defines a recursive function.
Recursion is used when a certain problem is defined in terms of itself.
Sometimes, it can be tedious to solve a problem using iterative approach. Recursive approach provides a very concise solution to seemingly complex problems.
Recursion in PHP is very similar to the one in C and C++.
Recursive functions are particularly used in traversing nested data structures, and searching or sorting algorithms.
Binary tree traversal, heap sort and finding shortest route are some of the cases where recursion is used.
Calculation of Factorial using Recursion
The most popular example of recursion is calculation of factorial. Mathematically factorial is defined as −
n! = n (n-1)!
It can be seen that we use factorial itself to define factorial. Hence, this is a fit case to write a recursive function.
Let us expand the above definition for calculation of factorial value of 5
5! = 5 4!
5 4 3!
5 4 3 2!
5 4 3 2 1!
5 4 3 2 1
= 120
While we can perform this calculation using a loop, its recursive function involves successively calling it by decrementing the number till it reaches 1.
Example
Following is the recursive function to calculate factorial.
<?php
function factorial ($n) {
if ($n == 1) {
echo $n . PHP_EOL;
return 1;
} else {
echo "$n * ";
return $n*factorial($n-1);
}
}
echo "Factorial of 5 = " . factorial(5);
?>
It will produce the following output −
5 * 4 * 3 * 2 * 1 Factorial of 5 = 120
Binary Search using Recursion
Let us have a look at another example to understand how recursion works. The problem at hand is to check whether a given number is present in a list.
While we can perform a sequential search for a certain number in the list using a for loop and comparing each number, the sequential search is not efficient especially if the list is too large. Here, we can use the binary search algorithm that checks if the index 'high' is greater than index 'low. Based on the value present at 'mid' variable, the function is called again to search for the element.
We have a list of numbers, arranged in ascending order. Then, we find the midpoint of the list and restrict the checking to either left or right of midpoint depending on whether the desired number is less than or greater than the number at midpoint.
The following diagram shows how binary search works −
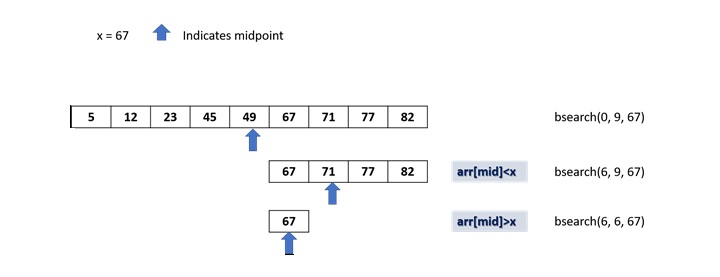
Example
The following code implements the recursive binary searching technique −
<?php
function bsearch($my_list, $low, $high, $elem) {
if ($high >= $low) {
$mid = intval(($high + $low)/2);
if ($my_list[$mid] == $elem)
return $mid;
elseif ($my_list[$mid] > $elem)
return bsearch($my_list, $low, $mid - 1, $elem);
else
return bsearch($my_list, $mid + 1, $high, $elem);
}
else
return -1;
}
$list = [5,12,23, 45, 49, 67, 71, 77, 82];
$num = 67;
$result = bsearch($list,0,count($list)-1, $num);
if ($result != -1)
echo " Number $num found at index " . $result;
else
echo "Element not found!";
?>
It will produce the following output −
Number 67 found at index 5
You can check the output for different numbers present in the given list, as well as those which are not present in the list.
PHP - Type Hints
PHP supports using "type hints" at the time of declaring variables in the function definition and properties or instance variables in a class. PHP is widely regarded as a weakly typed language. In PHP, you need not declare the type of a variable before assigning it any value.
The PHP parser tries to cast the variables into compatible type as far as possible. Hence, if one of values passed is a string representation of a number, and the second is a numeric variable, PHP casts the string variable to numeric in order to perform the addition operation.
Example
Take a look at the following example −
<?php
function addition($x, $y) {
echo "First number: $x Second number: $y Addition: " . $x+$y;
}
$x="10";
$y=20;
addition($x, $y);
?>
It will produce the following output −
First number: 10 Second number: 20 Addition: 30
However, if $x in the above example is a string that doesnt hold a valid numeric representation, then you would encounter an error.
<?php
function addition($x, $y) {
echo "First number: $x Second number: $y Addition: " . $x+$y;
}
$x="Hello";
$y=20;
addition($x, $y);
?>
It will produce the following output −
PHP Fatal error: Uncaught TypeError: Unsupported operand types: string + int in hello.php:5
Type-hinting is supported from PHP 5.6 version onwards. It means you can explicitly state the expected type of a variable declared in your code. PHP allows you to type-hint function arguments, return values, and class properties. With this, it is possible to write more robust code.
Let us incorporate type-hinting in the addition function in the above program −
function addition($x, $y) {
echo "First number: $x Second number: $y Addition: " . $x+$y;
}
The type-hinting feature is mostly used by IDEs (Integrated Development Environment) to prompt the user about the expected types of the parameters used in function declaration.
The following figure shows the VS Code editor popping up the function prototype as you type −
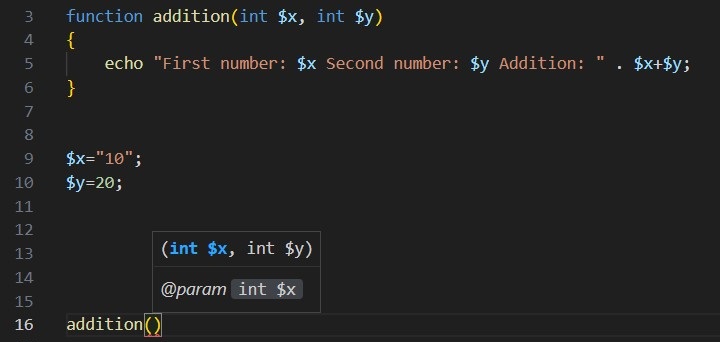
If the cursor hovers on the name of the function, the type declarations for the parameters and the return value are displayed −
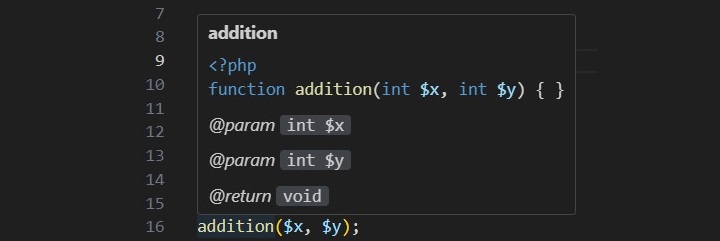
Note that by merely using the data types in the variable declarations doesnt prevent the unmatched type exception raised, as PHP is a dynamically typed language. In other words, $x="10" and $y=20 will still result in the addition as 30, where as $x="Hello" makes the parser raise the error.
strict_types
PHP can be made to impose stricter rules for type conversion, so that "10" is not implicitly converted to 10. This can be enforced by setting strict_types directive to 1 in a declare() statement. The declare() statement must be the first statement in the PHP code, just after the "<?php" tag.
Example
<?php
declare (strict_types=1);
function addition(int $x, int $y) {
echo "First number: $x Second number: $y Addition: " . $x+$y;
}
$x=10;
$y=20;
addition($x, $y);
?>
It will produce the following output −
First number: 10 Second number: 20 Addition: 30
Now, if $x is set to "10", the implicit conversion wont take place, resulting in the following error −
PHP Fatal error: Uncaught TypeError: addition(): Argument #1 ($x) must be of type int, string given
The VS Code IDE too indicates the error of the same effect −
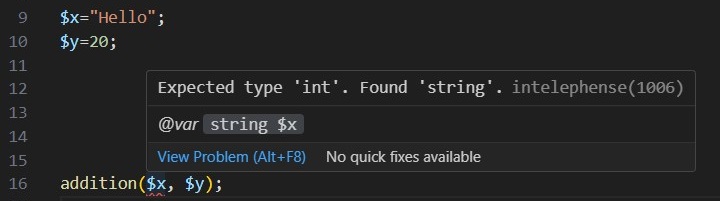
From PHP 7 onwards with type-hinting support has been extended for function returns to prevent unexpected return values. You can type-hint return values by adding the intended type after the parameter list prefixed with a colon (:) symbol.
Example
Let us add a type hint to the return value of the addition function above −
<?php
declare (strict_types=1);
function addition(int $x, int $y) : int {
return $x+$y;
}
$x=10;
$y=20;
$result = addition($x, $y);
echo "First number: $x Second number: $y Addition: " . $result;
?>
Here too, if the function is found to return anything other than an integer, the IDE indicates the reason even before you run.

Union Types
The PHP introduced union types with its version 8.0. You can now specify more than one type for a single declaration. The data types are separated by the "|" symbol.
Example
In the definition of addition() function below, the $x and $y arguments can be of int or float type.
<?php
declare (strict_types=1);
function addition(int|float $x, int|float $y) : float {
return $x+$y;
}
$x=10.55;
$y=20;
$result = addition($x, $y);
echo "First number: $x Second number: $y Addition: " . $result;
?>
Type-hinting in Class
In PHP, from version 7.4 onwards, you can use the type hints in declaration of class properties and methods.
Example
In the following example, the class constructor uses type hints −
<?php
declare (strict_types=1);
class Student {
public $name;
public $age;
public function __construct(string $name, int $age) {
$this->name = $name;
$this->age = $age;
}
public function dispStudent() {
echo "Name: $this->name Age: $this->age";
}
}
$s1 = new Student("Amar", 21);
$s1->dispStudent();
?>
It is also possible to use type hints in the declaration of class properties.
class Student {
public string $name;
public int $age;
public function __construct($name, $age) {
$this->name = $name;
$this->age = $age;
}
public function dispStudent() {
echo "Name: $this->name Age: $this->age";
}
}
The most commonly encountered errors during program development are type errors. The type-hinting feature helps in reducing them.
PHP - Variable Scope
In PHP, the scope of a variable is the context within which it is defined and accessible to the extent in which it is accessible. Generally, a simple sequential PHP script that doesnt have any loop or a function etc., has a single scope. Any variable declared inside the "<?php" and "?>" tag is available throughout the program from the point of definition onwards.
Based on the scope, a PHP variable can be any of these three types −
A variable in a main script is also made available to any other script incorporated with include or require statements.
Example
In the following example, a "test.php" script is included in the main script.
main.php
<?php $var=100; include "test.php"; ?>
test.php
<?php echo "value of \$var in test.php : " . $var; ?>
When the main script is executed, it will display the following output −
value of $var in test.php : 100
However, when the script has a user defined function, any variable inside has a local scope. As a result, a variable defined inside a function can't be accessed outside. Variables defined outside (above) the function have a global scope.
Example
Take a look at the following example −
<?php
$var=100; // global variable
function myfunction() {
$var1="Hello"; // local variable
echo "var=$var var1=$var1" . PHP_EOL;
}
myfunction();
echo "var=$var var1=$var1" . PHP_EOL;
?>
It will produce the following output −
var= var1=Hello var=100 var1= PHP Warning: Undefined variable $var in /home/cg/root/64504/main.php on line 5 PHP Warning: Undefined variable $var1 in /home/cg/root/64504/main.php on line 8
Note that a global variable is not automatically available within the local scope of a function. Also, the variable inside a function is not accessible outside.
The "global" Keyword
To enable access to a global variable inside local scope of a function, it should be explicitly done by using the "global" keyword.
Example
The PHP script is as follows −
<?php
$a=10;
$b=20;
echo "Global variables before function call: a = $a b = $b" . PHP_EOL;
function myfunction() {
global $a, $b;
$c=($a+$b)/2;
echo "inside function a = $a b = $b c = $c" . PHP_EOL;
$a=$a+10;
}
myfunction();
echo "Variables after function call: a = $a b = $b c = $c";
?>
It will produce the following output −
Global variables before function call: a = 10 b = 20 inside function a = 10 b = 20 c = 15 Variables after function call: a = 20 b = 20 c = PHP Warning: Undefined variable $c in /home/cg/root/48499/main.php on line 12
Global variables can now be processed inside the function. Moreover, any changes made to the global variables inside the function will be reflected in the global namespace.
$GLOBALS Array
PHP stores all the global variables in an associative array called $GLOBALS. The name and value of the variables form the key-value pair.
Example
In the following PHP script, $GLOBALS array is used to access global variables −
<?php
$a=10;
$b=20;
echo "Global variables before function call: a = $a b = $b" . PHP_EOL;
function myfunction() {
$c=($GLOBALS['a']+$GLOBALS['b'])/2;
echo "c = $c" . PHP_EOL;
$GLOBALS['a']+=10;
}
myfunction();
echo "Variables after function call: a = $a b = $b c = $c";
?>
It will produce the following output −
Global variables before function call: a = 10 b = 20 c = 15 PHP Warning: Undefined variable $c in C:\xampp\htdocs\hello.php on line 12 Variables after function call: a = 20 b = 20 c =
Static Variable
A variable defined with static keyword is not initialized at every call to the function. Moreover, it retains its value of the previous call.
Example
Take a look at the following example −
<?php
function myfunction() {
static $x=0;
echo "x = $x" . PHP_EOL;
$x++;
}
for ($i=1; $i<=3; $i++) {
echo "call to function :$i : ";
myfunction();
}
?>
It will produce the following output −
call to function :1 : x = 0 call to function :2 : x = 1 call to function :3 : x = 2
PHP - Strict Typing
PHP is widely regarded as a weakly typed language. In PHP, you need not declare the type of a variable before assigning it any value. The PHP parser tries to cast the variables into compatible type as far as possible.
For example, if one of the values passed is a string representation of a number, and the second is a numeric variable, PHP casts the string variable to numeric in order to perform the addition operation.
Example
Take a look at the following example −
<?php
function addition($x, $y) {
echo "First number: $x Second number: $y Addition: " . $x+$y;
}
$x="10";
$y=20;
addition($x, $y);
?>
It will produce the following output −
First number: 10 Second number: 20 Addition: 30
However, if $x in the above example is a string that doesnt hold a valid numeric representation, then you will encounter an error.
<?php
function addition($x, $y) {
echo "First number: $x Second number: $y Addition: " . $x+$y;
}
$x="Hello";
$y=20;
addition($x, $y);
?>
It will produce the following output −
PHP Fatal error: Uncaught TypeError: Unsupported operand types: string + int in hello.php:5
Type Hints
Type-hinting is supported from PHP 5.6 version onwards. It means you can explicitly state the expected type of a variable declared in your code. PHP allows you to type-hint function arguments, return values, and class properties. With this, it is possible to write more robust code.
Let us incorporate type-hinting in the addition function in the above program −
function addition(int $x, int $y) {
echo "First number: $x Second number: $y Addition: " . $x+$y;
}
Note that by merely using the data types in the variable declarations doesnt prevent the unmatched type exception raised, as PHP is a dynamically typed language. In other words, $x="10" and $y=20 will still result in the addition as 30, whereas $x="Hello" makes the parser raise the error.
Example
<?php
function addition($x, $y) {
echo "First number: $x \n";
echo "Second number: $y \n";
echo "Addition: " . $x+$y . "\n\n";
}
$x=10;
$y=20;
addition($x, $y);
$x="10";
$y=20;
addition($x, $y);
$x="Hello";
$y=20;
addition($x, $y);
?>
It will produce the following output −
First number: 10 Second number: 20 Addition: 30 First number: 10 Second number: 20 Addition: 30 First number: Hello Second number: 20 PHP Fatal error: Uncaught TypeError: Unsupported operand types: string + int in hello.php:5
strict_types
PHP can be made to impose stricter rules for type conversion, so that "10" is not implicitly converted to 10. This can be enforced by setting strict_types directive to 1 in a declare() statement.
The declare() statement must be the first statement in the PHP code, just after the "<?php" tag.
Example
Take a look at the following example −
<?php
declare (strict_types=1);
function addition(int $x, int $y) {
echo "First number: $x Second number: $y Addition: " . $x+$y;
}
$x=10;
$y=20;
addition($x, $y);
?>
It will produce the following output −
First number: 10 Second number: 20 Addition: 30
Now, if $x is set to "10", the implicit conversion won't take place, resulting in the following error −
PHP Fatal error: Uncaught TypeError: addition(): Argument #1 ($x) must be of type int, string given
From PHP 7 onwards, type-hinting support has been extended for function returns to prevent unexpected return values. You can type-hint the return values by adding the intended type after the parameter list prefixed with a colon (:) symbol.
Example
Let us add a type hint to the return value of the division() function below.
<?php
declare (strict_types=1);
function division(int $x, int $y) : int {
return $x/$y;
}
$x=10;
$y=20;
$result = division($x, $y);
echo "First number: $x Second number: $y Addition: " . $result;
?>
Because the function returns 0.5, which is not of int type (that is, the type hint used for the return value of the function), the following error is displayed −
Fatal error: Uncaught TypeError: division(): Return value must be of type int, float returned in hello.php:5
PHP - Anonymous Functions
What are Anonymous Functions?
PHP allows defining anonymous functions. Normally, when we define a function in PHP, we usually provide it a name which is used to call the function whenever required. In contrast, an anonymous function is a function that doesnt have any name specified at the time of definition. Such a function is also called closure or lambda function.
Sometimes, you may want a function for one time use only. The most common use of anonymous functions is to create an inline callback function.
Anonymous functions are implemented using the Closure class. Closure is an anonymous function that closes over the environment in which it is defined.
The syntax for defining an anonymous function is as follows −
$var=function ($arg1, $arg2) { return $val; };
Note that there is no function name between the function keyword and the opening parenthesis, and the fact that there is a semicolon after the function definition. This implies that anonymous function definitions are expressions. When assigned to a variable, the anonymous function can be called later using the variables name.
Example
Take a look at the following example −
<?php
$add = function ($a, $b) {
return "a:$a b:$b addition: " . $a+$b;
};
echo $add(5,10);
?>
It will produce the following output −
a:5 b:10 addition: 15
Anonymous Function as a Callback
Anonymous functions are often used as callbacks. Callback functions are used as one of the arguments of another function. An anonymous function is executed on the fly and its return value becomes the argument of the parent function, which may be either a built-in or a user-defined function.
Example
In this example, we use an anonymous function inside the usort() function, a built in function that sorts an array by values using a user-defined comparison function.
<?php
$arr = [10,3,70,21,54];
usort ($arr, function ($x , $y) {
return $x > $y;
});
foreach ($arr as $x){
echo $x . "\n";
}
?>
It will produce the following output −
3 10 21 54 70
Example
The following example uses an anonymous function to calculate the cumulative sum after successive numbers in an array. Here, we use the array_walk() function. This function applies a user defined function to each element in the array.
<?php
$arr=array(1,2,3,4,5);
array_walk($arr, function($n){
$s=0;
for($i=1;$i<=$n;$i++){
$s+=$i;
}
echo "Number: $n Sum: $s". PHP_EOL;
});
?>
It will produce the following output −
Number: 1 Sum: 1 Number: 2 Sum: 3 Number: 3 Sum: 6 Number: 4 Sum: 10 Number: 5 Sum: 15
Anonymous Function as Closure
Closure is also an anonymous function that can access the variables outside its scope with the help of the "use" keyword.
Example
Take a look a the following example −
<?php
$maxmarks=300;
$percent=function ($marks) use ($maxmarks) {
return $marks*100/$maxmarks;
};
$m = 250;
echo "Marks = $m Percentage = ". $percent($m);
?>
It will produce the following output −
Marks = 250 Percentage = 83.333333333333
PHP - Arrow Functions
Arrow functions were introduced in PHP 7.4 version. Arrow functions provide a simpler and more concise syntax for writing anonymous functions. With PHP 7.4, a keyword "fn" has been introduced for defining arrow functions, instead of the conventional use of the "function" keyword.
fn (argument_list) => expr
There is only one expression after the "=>" symbol, and its value is the return value of the arrow function.
The arrow function doesnt have an explicit return statement.
Like in the anonymous function, the arrow function is assigned to a variable for it to be called.
Example
The following example demonstrates how you can use the arrow function in PHP −
<?php $add = fn ($a, $b) => $a + $b; $x = 10; $y = 20; echo " x: $x y: $y Addition: " . $add($x, $y); ?>
It will produce the following output −
x: 10 y: 20 Addition: 30
Using the Arrow Function as a Callback Function
We can also use the arrow function as a callback function. Callback functions are used as one of the arguments of another function. The arrow function is executed on the fly and the value of the expression after "=>" becomes the argument of the parent function, which may be either a built-in or a user-defined function.
Example
In this example, we use an arrow function inside usort() function, a built_in function that sorts an array by values using a user-defined comparison function.
<?php
$arr = [10,3,70,21,54];
usort ($arr, fn ($x , $y) => $x > $y);
foreach ($arr as $x){
echo $x . "\n";
}
?>
It will produce the following output −
3 10 21 54 70
Accessing Variables from the Parent Scope
Arrow functions can automatically access variables from the parent scope. Unlike the anonymous functions, the "use" keyword is not necessary for it to act as a closure. When a variable used in the expression is defined in the parent scope, it will be implicitly captured by-value.
<?php $maxmarks=300; $percent=fn ($marks) => $marks*100/$maxmarks; $m = 250; echo "Marks = $m Percentage = ". $percent($m); ?>
It will produce the following output −
Marks = 250 Percentage = 83.333333333333
Example
Arrow functions capture variables by value automatically, even when nested.
In the following example, an arrow function is defined in the expression part of another arrow function.
<?php $z = 1; $fn = fn($x) => fn($y) => $x * $y + $z; $x = 5; $y = 10; echo "x:$x y:$y \n"; echo "Result of nested arrow functions: " . ($fn($x)($y)); ?>
It will produce the following output −
x:5 y:10 Result of nested arrow functions: 51
Just like anonymous functions, the arrow function syntax allows arbitrary function signatures, including parameter and return types, default values, variadics, as well as by-reference passing and returning.
PHP Variable Handling Functions
PHP Variable Handling Functions are the inbuilt PHP library functions that enable us to manipulate and test php variables in various ways.
Installation
There is no installation needed to use PHP variable handling functions; they are part of the PHP core and comes alongwith standard PHP installation.
Runtime Configuration
This extension has no configuration directives defined in php.ini.
PHP Variable Handling Functions
Following table lists down all the functions related to PHP Variable Handling. Here column version indicates the earliest version of PHP that supports the function.
| Sr.No | Function & Description | Version |
|---|---|---|
| 1 | boolval()
Function returns boolean value of a defined variable, i.e, it returns TRUE or FALSE. |
5.5.0 |
| 2 | debug_zval_dump()
Function is used to dump a string representation of an internal zend value to output. |
4.2.0 |
| 3 | doubleval()
Function is used to return the float value of a defined variable. |
4, 5, 7, 8 |
| 4 | empty()
Function is used to check if the defined variable has empty value. |
4, 5, 7, 8 |
| 5 | floatval()
Function used return the float value of a defined variable. |
4.2.0, 5, 7, 8 |
| 6 | get_defined_vars()
Function is used to return all the defined variables as an array. |
4.0.4, 5, 7, 8 |
| 7 | get_resource_id()
Function is used to return an integer identifier for the given resource. |
8 |
| 8 | get_resource_type()
Function returns the type a resource of the variable defined. |
4.0.2, 5, 7, 8 |
| 9 | gettype()
Function returns the type of the variable defined. |
4, 5, 7, 8 |
| 10 | intval()
Function returns integer value of the defined variable. |
4, 5, 7, 8 |
| 11 | is_array()
Function is used to check if the defined variable is an array. |
4, 5, 7, 8 |
| 12 | is_bool()
Function is used to check if the defined variable is boolean, i.e, it returns true or false value. |
4, 5, 7, 8 |
| 13 | is_callable()
Function is used to check if the data in the variable can be called as a function |
4.0.6, 5, 7, 8 |
| 14 | is_countable()
Function is used to check if the data in the variable is countable. |
7.3.0, 8 |
| 15 | is_double()
Function is used to check if the variable defined is of the type float |
4, 5, 7, 8 |
| 16 | is_float()
Function is used to check if the variable defined is an float |
4, 5, 7, 8 |
| 17 | is_int()
Function is used to check if the variable defined is of the type integer |
4, 5, 7, 8 |
| 18 | is_integer()
Function is used to check if the variable defined is an integer. |
4, 5, 7, 8 |
| 19 | is_iterable()
Function is used to check if the data in the variable is an iterable value. |
7.1.0, 8 |
| 20 | is_long()
Function is used to check if the variable is of the type integer. |
4, 5, 7, 8 |
| 21 | is_null()
Function checks if the variable has NULL value. |
4.0.4, 5, 7, 8 |
| 22 | is_numeric()
Function is used to check if the defined variable is numeric or a numeric string. |
4, 5, 7, 8 |
| 23 | is_object()
Function is used to check if the variable is an object. |
4, 5, 7, 8 |
| 24 | is_real()
Function is used to check if the defined variable is of the type float or not. |
4, 5, 7, 8 |
| 25 | is_resource()
Function is used to check if the defined variable is resource. |
4, 5, 7, 8 |
| 26 | is_scalar()
Function is used to check if the defined variable is scalar. |
4.0.5, 5, 7, 8 |
| 27 | is_string()
Function is used to check if the defined variable is of the type string. |
4, 5, 7, 8 |
| 28 | isset()
Function is used to check if a variable is declared and set. |
4, 5, 7, 8 |
| 29 | print_r()
Function used to represent or print the data of a variable into a readable format. |
4, 5, 7, 8 |
| 30 | serialize()
Function used to convert the data of a variable into a storable representation, so that the data can be stored in a file, a memory buffer |
4, 5, 7, 8 |
| 31 | settype()
Function is used to set a variable into a specific type. |
4, 5, 7, 8 |
| 32 | strval()
Function is used to return a string value of a variable. |
4, 5, 7, 8 |
| 33 | unserialize()
Function is used to unserialize the data of a variable. i.e, this function returns actual data of a serialize variable. |
4, 5, 7, 8 |
| 34 | unset()
Function used unset a variable |
4, 5, 7, 8 |
| 35 | var_dump()
Function is used to dump information about one or more variables. The information holds type and value of the variable(s). |
4, 5, 7, 8 |
| 36 | var_export()
Function returns structured information about a variable. |
4.2.0, 5, 7, 8 |
PHP - Local Variables
Scope can be defined as the range of availability a variable has to the program in which it is declared. PHP variables can be one of four scope types −
- Local Variables
- Global Variables
- Static Variables
- Function Parameters
Local Variables
A variable declared in a function is considered local; that is, it can be referenced solely in that function. Any assignment outside of that function will be considered to be an entirely different variable from the one contained in the function −
<?php
$x = 4;
function assignx () {
$x = 0;
print "\$x inside function is $x. \n";
}
assignx();
print "\$x outside of function is $x.";
?>
This will produce the following result −
$x inside function is 0. $x outside of function is 4.
PHP - Global Variables
In PHP, any variable that can be accessed from anywhere in a PHP script is called as a global variable. If the variable is declared outside all the functions or classes in the script, it becomes a global variable.
While global variables can be accessed directly outside a function, they arent automatically available inside a function.
Example
In the script below, $name is global for the function sayhello().
<?php
$name = "Amar";
function sayhello() {
echo "Hello " . $name;
}
sayhello();
?>
However, the variable is not accessible inside the function. Hence, you will get an error message "Undefined variable $name".
Hello PHP Warning: Undefined variable $name in /home/cg/root/93427/main.php on line 5
Example
To get access within a function, you need to use the "global" keyword before the variable.
<?php
$name = "Amar";
function sayhello() {
GLOBAL $name;
echo "Hello " . $name;
}
sayhello();
?>
It will produce the following output −
Hello Amar
If a function accesses a global variable and modifies it, the modified value is available everywhere after the function call is completed.
Let us change the value of $name inside the sayhello() function and check its value after the function is called.
Example
Take a look at this following example −
<?php
$name = "Amar";
function sayhello() {
GLOBAL $name;
echo "Global variable name: $name" .PHP_EOL;
$name = "Amarjyot";
echo "Global variable name changed to: $name" .PHP_EOL;
}
sayhello();
echo "Global variable name after function call: $name" .PHP_EOL;
?>
It will produce the following output −
Global variable name: Amar Global variable name changed to: Amarjyot Global variable name after function call: Amarjyot
The $GLOBALS Array
PHP maintains an associative array named $GLOBALS that holds all the variables and their values declared in a global scope. The $GLOBALS array also stores many predefined variables called as superglobals, along with the user defined global variables.
Any of the global variables can also be accessed inside any function with the help of a regular syntax of accessing an arrow element. For example, the value of the global variable $name is given by $GLOBALS["name"].
Example
In the following example, two global variable $x and $y are accessed inside the addition() function.
<?php
$x = 10;
$y = 20;
function addition() {
$z = $GLOBALS['x']+$GLOBALS['y'];
echo "Addition: $z" .PHP_EOL;
}
addition();
?>
It will produce the following output −
Addition: 30
Example
You can also add any local variable into the global scope by adding it in the $GLOBALS array. Let us add $z in the global scope.
<?php
$x = 10;
$y = 20;
function addition() {
$z = $GLOBALS['x']+$GLOBALS['y'];
$GLOBALS['z'] = $z;
}
addition();
echo "Now z is the global variable. Addition: $z" .PHP_EOL;
?>
It will produce the following output −
Now z is the global variable. Addition: 30
Including One PHP Script in Another
You can include one PHP script in another. Variables declared in the included script are added in the global scope of the PHP script in which it is included.
Here is "a.php" file −
<?php
include 'b.php';
function addition() {
$z = $GLOBALS['x']+$GLOBALS['y'];
echo "Addition: $z" .PHP_EOL;
}
addition();
?>
It includes "b.php" that has the $x and $y variables, so they become the global variables for the addition() function in "a.php" script.
<?php $x = 10; $y = 20; ?>
Global variables are generally used while implementing singleton patterns, and accessing registers in embedded systems and also when a variable is being used by many functions.
PHP - Superglobals
The PHP parser populates the current script with a number of predefined variables in its global namespace. The predefined variables are known as "PHP superglobals".
Any user defined variable declared outside of any function, method, or class also is a global variable. However, to access it, you need to use the global keyword.
In contrast, superglobals are always available anywhere in the PHP script, without mentioning them with the global keyword.
Most of the superglobals in PHP are associative arrays, and the web server populates them. Hence, if a script is run in the command-line environment, some of the superglobals may be empty.
The list of superglobal variables in PHP includes the following −
$GLOBALS
$_SERVER
$_GET
$_POST
$_FILES
$_COOKIE
$_SESSION
$_REQUEST
$_ENV
In this chapter, we will have a brief introduction to these superglobal variables in PHP. In the subsequent chapters, we will discuss these superglobal variables in detail.
$GLOBALS
It is an associative array of references to all globally defined variables. Names of variables form keys and their contents are values of associative array.
$_SERVER
All the server and execution environment related information is available in this associative array.
PHP versions prior to 5.4.0 contained $HTTP_SERVER_VARS contained the same information but has now been removed.
$_GET
It is an associative array of variables passed to the current script via query string appended to URL of HTTP request. Note that the array is populated by all requests with a query string in addition to GET requests.
A query string is a list of all variables and their values in the form var=val and concatenated by the "&" symbol.
The query string itself is appended to the name of PHP script after the "?" symbol. For example, http://localhost/hello.php?first_name=Amar&last_name=Sharma.
$_POST
It is an associative array of key-value pairs passed to a URL by HTTP POST method that uses URLEncoded or multipart/form-data content-type in request.
$HTTP_POST_VARS also contains the same information as $_POST, but is not a superglobal, and now been deprecated. The easiest way to send data to a server with POST request is specifying the method attribute of HTML form as POST.
$_FILES
The variable $_FILES is an associative array containing items uploaded via HTTP POST method. A file is uploaded when a HTML form contains an input element with file type, its enctype attribute set to multipart/form-data, and the method attribute set to HTTP POST method.
$_COOKIE
Cookies are text files stored by a server on the client computer and they are kept of use tracking purpose.
The superglobal $_COOKIE stores variables passed to the current PHP script along with the HTTP request in the form of cookies.
$_SESSION
An HTTP session is the time duration between the time a user establishes connection with a server and the time the connection is terminated. During this interval, some data is persistently available across pages in the form of session variables.
The $_SESSION superglobal is an associative array of session variables available to the current script.
$_REQUEST
$_REQUEST is an associative array which is a collection of contents of $_GET, $_POST and $_COOKIE variables.
The order of these variables is decided by the values of requests_order and varables_order settings in the "php.ini" file.
$_ENV
$_ENV is an associative array that stores all the environment variables available to the current script. This array also includes CGI variables in case PHP is running as a server module or CGI processor.
PHP - $GLOBALS
$GLOBALS is one of the "superglobal" or "automatic global" variables in PHP. It is available in all scopes throughout a script. There is no need to do "global $variable;" to access it within functions or methods.
$GLOBALS is an associative array of references to all globally defined variables. The names of variables form keys and their contents are the values of an associative array.
Example
This example shows $GLOBALS array containing the name and contents of global variables −
<?php $var1="Hello"; $var2=100; $var3=array(1,2,3); echo $GLOBALS["var1"] . "\n"; echo $GLOBALS["var2"] . "\n"; echo implode($GLOBALS["var3"]) . "\n"; ?>
It will produce the following output −
Hello 100 123
Example
In the following example, $var1 is defined in the global namespace as well as a local variable inside the function. The global variable is extracted from the $GLOBALS array.
<?php
function myfunction() {
$var1="Hello PHP";
echo "var1 in global namespace: " . $GLOBALS['var1']. "\n";
echo "var1 as local variable: ". $var1;
}
$var1="Hello World";
myfunction();
?>
It will produce the following output −
var1 in global namespace: Hello World var1 as local variable: Hello PHP
Example
Prior to PHP version 8.1.0, global variables could be modified by a copy of $GLOBALS array.
<?php $a = 1; $globals = $GLOBALS; $globals['a'] = 2; var_dump($a); ?>
It will produce the following output −
int(1)
Here, $globals is a copy of the $GLOBALS superglobal. Changing an element in the copy, with its key as "a" to 2, actually changes the value of $a.
It will produce the following output −
int(2)
Example
As of PHP 8.1.0, $GLOBALS is a read-only copy of the global symbol table. That is, global variables cannot be modified via their copy. The same operation as above wont change $a to 2.
<?php $a = 1; $globals = $GLOBALS; $globals['a'] = 2; var_dump($a); ?>
It will produce the following output −
int(1)
PHP - $_SERVER
$_SERVER is a superglobal in PHP. It holds information regarding HTTP headers, path and script location, etc.
$_SERVER is an associative array and it holds all the server and execution environment related information.
Most of the entries in this associative array are populated by the web server. The entries may change from one web server to other, as servers may omit some, or provide others.
For a PHP script running on the command line, most of these entries will not be available or have any meaning.
PHP will also create additional elements with values from request headers. These entries will be named "HTTP_" followed by the header name, capitalized and with underscores instead of hyphens.
For example, the "Accept-Language" header would be available as $_SERVER['HTTP_ACCEPT_LANGUAGE'].
PHP versions prior to 5.4.0 had $HTTP_SERVER_VARS which contained the same information but it has now been removed.
The following table lists some of the important server variables of the $_SERVER array followed by the description of their values.
| Sr.No | Server Variables & Description |
|---|---|
| 1 | PHP_SELF Stores filename of currently executing script. |
| 2 | SERVER_ADDR This property of array returns the IP address of the server under which the current script is executing. |
| 3 | SERVER_NAME Name of server host under which the current script is executing. In case of a server running locally, localhost is returned. |
| 4 | QUERY_STRING A query string is the string of key value pairs separated by the "&" symbol and appended to the URL after the "?" symbol. For example, http://localhost/testscript?name=xyz&age=20 URL returns trailing query string |
| 5 | REQUEST_METHOD HTTP request method used for accessing a URL, such as POST, GET, POST, PUT or DELETE. In the above query string example, a URL attached to query string with the "?" symbol requests the page with GET method |
| 6 | DOCUMENT_ROOT Returns the name of the directory on the server that is configured as the document root. On XAMPP apache server, it returns htdocs as the name of document root c:/xampp/htdocs |
| 7 | REMOTE_ADDR IP address of the machine from where the user is viewing the current page. |
| 8 | SERVER_PORT Port number on which the web server is listening to the incoming request. Default is 80 |
Example
The following script invoked from document root of XAMPP server lists all the server variables −
<?php foreach ($_SERVER as $k=>$v) echo $k . "=>" . $v . "\n"; ?>
It will produce the following output −
MIBDIRS=>C:/xampp/php/extras/mibs MYSQL_HOME=>\xampp\mysql\bin OPENSSL_CONF=>C:/xampp/apache/bin/openssl.cnf PHP_PEAR_SYSCONF_DIR=>\xampp\php PHPRC=>\xampp\php TMP=>\xampp\tmp HTTP_HOST=>localhost HTTP_CONNECTION=>keep-alive HTTP_SEC_CH_UA=>"Chromium";v="116", "Not) A;Brand";v="24", "Google Chrome";v="116" HTTP_SEC_CH_UA_MOBILE=>?0 HTTP_SEC_CH_UA_PLATFORM=>"Windows" HTTP_DNT=>1 HTTP_UPGRADE_INSECURE_REQUESTS=>1 HTTP_USER_AGENT=>Mozilla/5.0 (Windows NT 10.0; Win64; x64) AppleWebKit/537.36 (KHTML, like Gecko) Chrome/116.0.0.0 Safari/537.36 HTTP_ACCEPT=>text/html,application/xhtml+xml,application/xml; q=0.9,image/avif,image/webp,image/apng,*/*; q=0.8,application/signed-exchange;v=b3;q=0.7 HTTP_SEC_FETCH_SITE=>none HTTP_SEC_FETCH_MODE=>navigate HTTP_SEC_FETCH_USER=>?1 HTTP_SEC_FETCH_DEST=>document HTTP_ACCEPT_ENCODING=>gzip, deflate, br HTTP_ACCEPT_LANGUAGE=>en-US,en;q=0.9,mr;q=0.8 PATH=>C:\Python311\Scripts\; C:\Python311\;C:\WINDOWS\system32; C:\WINDOWS;C:\WINDOWS\System32\Wbem; C:\WINDOWS\System32\WindowsPowerShell\v1.0\; C:\WINDOWS\System32\OpenSSH\;C:\xampp\php; C:\Users\user\AppData\Local\Microsoft\WindowsApps; C:\VSCode\Microsoft VS Code\bin SystemRoot=>C:\WINDOWS COMSPEC=>C:\WINDOWS\system32\cmd.exe PATHEXT=>.COM;.EXE;.BAT;.CMD;.VBS;.VBE;.JS;.JSE;.WSF;.WSH;.MSC;.PY;.PYW WINDIR=>C:\WINDOWS SERVER_SIGNATURE=> Apache/2.4.56 (Win64) OpenSSL/1.1.1t PHP/8.0.28 Server at localhost Port 80 SERVER_SOFTWARE=>Apache/2.4.56 (Win64) OpenSSL/1.1.1t PHP/8.0.28 SERVER_NAME=>localhost SERVER_ADDR=>::1 SERVER_PORT=>80 REMOTE_ADDR=>::1 DOCUMENT_ROOT=>C:/xampp/htdocs REQUEST_SCHEME=>http CONTEXT_PREFIX=> CONTEXT_DOCUMENT_ROOT=>C:/xampp/htdocs SERVER_ADMIN=>postmaster@localhost SCRIPT_FILENAME=>C:/xampp/htdocs/hello.php REMOTE_PORT=>54148 GATEWAY_INTERFACE=>CGI/1.1 SERVER_PROTOCOL=>HTTP/1.1 REQUEST_METHOD=>GET QUERY_STRING=> REQUEST_URI=>/hello.php SCRIPT_NAME=>/hello.php PHP_SELF=>/hello.php REQUEST_TIME_FLOAT=>1694802456.9816 REQUEST_TIME=>1694802456
PHP - $_REQUEST
In PHP, $_REQUEST is a superglobal variable. It is an associative array which is a collection of contents of $_GET, $_POST and $_COOKIE variables.
The settings in your "php.ini" file decides the composition of this variable.
One of the directives in "php.ini" is request_order, which decides the order in which PHP registers GET, POST and COOKIE variables.
The presence and order of variables listed in this array is defined according to the PHP variables_order.
If a PHP script is run from the command line, the argc and argv variables are not included in the $_REQUST array because their values are taken from the $_SERVER array, which in turn is populated by the web server.
$_REQUEST with GET Method
Save the following script in the document folder of the Apache server. If you are using XAMPP server on Windows, place the script as "hello.php" in the "c:/xampp/htdocs" folder.
<html>
<body>
<?php
echo "<h3>First Name: " . $_REQUEST['first_name'] . "<br />"
. "Last Name: " . $_REQUEST['last_name'] . "</h3>";
?>
</body>
</html>
Start the XAMPP server and enter http://localhost/hello.php?first_name=Amar&last_name=Sharma as the URL in a browser window.
You should get the output as −
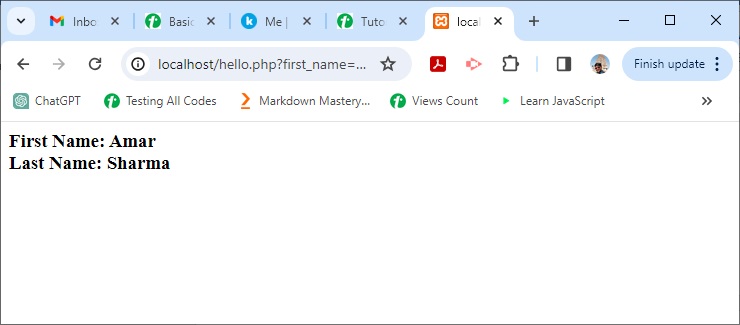
$_REQUEST with POST Method
Under the document root, save the following script as "hello.html".
<html>
<body>
<form action="hello.php" method="post">
First Name: <input type="text" name="first_name" /> <br />
Last Name: <input type="text" name="last_name" />
<input type="submit" value="Submit" />
</form>
</body>
</html>
In your browser, enter the URL "http://localhost/hello.html". You should get the similar output in the browser window.
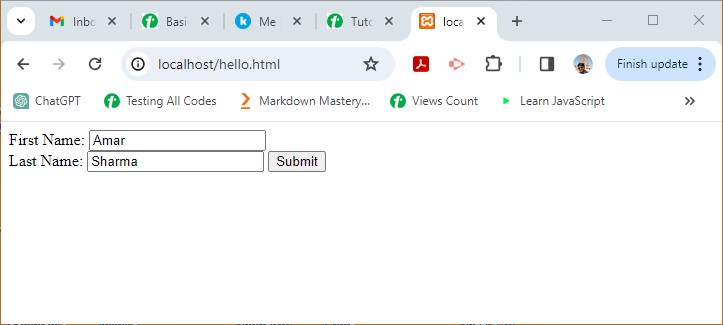
You may also embed the PHP code inside the HTML script and POST the form to itself with the PHP_SELF variable −
<html>
<body>
<form action="<?php echo $_SERVER['PHP_SELF'];?>" method="post">
<p>First Name: <input type="text" name="first_name" /></p>
<p>Last Name: <input type="text" name="last_name" /></p>
<input type="submit" value="Submit" />
</form>
<?php
if ($_SERVER["REQUEST_METHOD"] == "POST")
echo "<h3>First Name: " . $_REQUEST['first_name'] . "<br />"
. "Last Name: " . $_REQUEST['last_name'] . "</h3>";
?>
</body>
</html>
It will produce the following output −
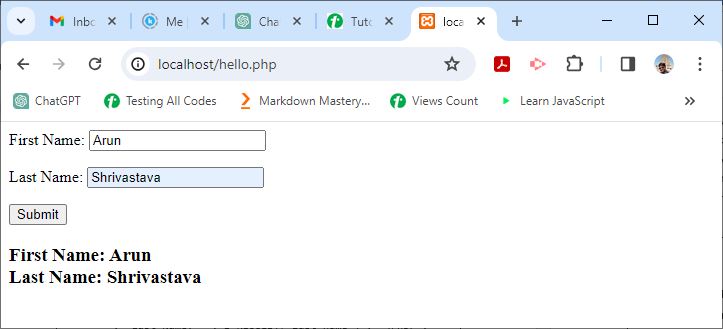
PHP - $_POST
$_POST is one of the predefined or superglobal variables in PHP. It is an associative array of key-value pairs passed to a URL by the HTTP POST method that uses URLEncoded or multipart/form-data content-type in the request.
$HTTP_POST_VARS also contains the same information as $_POST, but is not a superglobal, and now been deprecated.
The easiest way to send data to a server with POST request is specifying the method attribute of HTML form as POST.
Assuming that the URL in the browser is "http://localhost/hello.php", method=POST is set in a HTML form "hello.html" as below −
<html>
<body>
<form action="hello.php" method="post">
<p>First Name: <input type="text" name="first_name"/> </p>
<p>Last Name: <input type="text" name="last_name" /> </p>
<input type="submit" value="Submit" />
</form>
</body>
</html>
The "hello.php" script (in the document root folder) for this exercise is as follows:
<?php echo "<h3>First name: " . $_POST['first_name'] . "<br /> " . "Last Name: " . $_POST['last_name'] . "</h3>"; ?>
Now, open http://localhost/hello.html in your browser. You should get the following output on the screen −
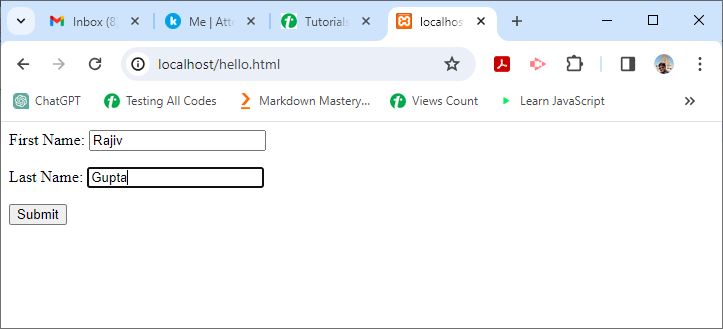
As you press the Submit button, the data will be submitted to "hello.php" with the POST method.
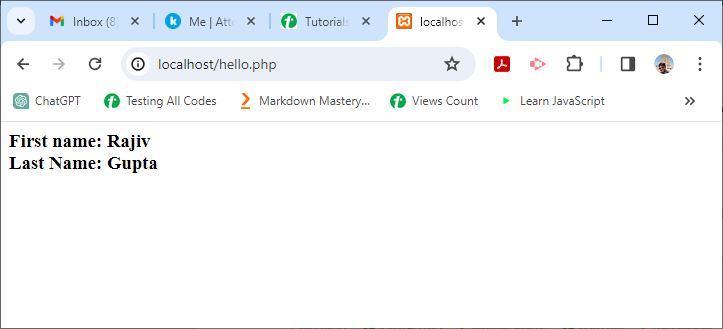
You can also mix the HTML form with PHP code in hello.php, and post the form data to itself using the "PHP_SELF" variable −
<html>
<body>
<form action="<?php echo $_SERVER['PHP_SELF'];?>" method="post">
<p>First Name: <input type="text" name="first_name"/> </p> <br />
<p>Last Name: <input type="text" name="last_name" /></p>
<input type="submit" value="Submit" />
</form>
<?php
echo "<h3>First Name: " . $_POST['first_name'] . "<br /> " .
"Last Name: " . $_POST['last_name'] . "</h3>";
?>
</body>
</html>
It will produce the following output −
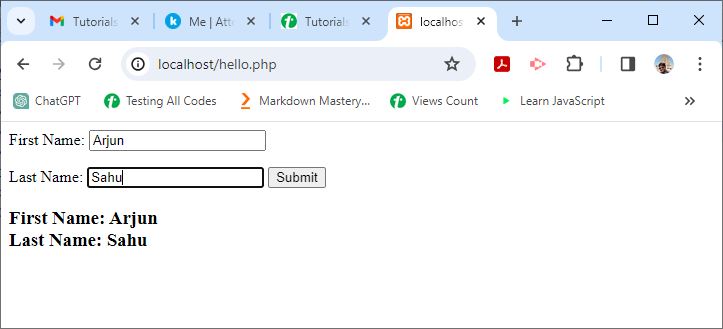
PHP - $_GET
$_GET is one of the superglobals in PHP. It is an associative array of variables passed to the current script via the query string appended to the URL of HTTP request. Note that the array is populated by all requests with a query string in addition to GET requests.
$HTTP_GET_VARS contains the same initial information, but that has now been deprecated.
By default, the client browser sends a request for the URL on the server by using the HTTP GET method. A query string attached to the URL may contain key value pairs concatenated by the "&" symbol. The $_GET associative array stores these key value pairs.
Save the following script in the document folder of Apache server. If you are using XAMPP server on Windows, place the script as "hello.php" in the "c:/xampp/htdocs" folder.
<?php echo "<h3>First Name: " . $_REQUEST['first_name'] . "<br />" . "Last Name: " . $_REQUEST['last_name'] . "</h3>"; ?>
Start the XAMPP server, and enter "http://localhost/hello.php?first_name=Mukesh&last_name=Sinha" as the URL in a browser window. You should get the following output −
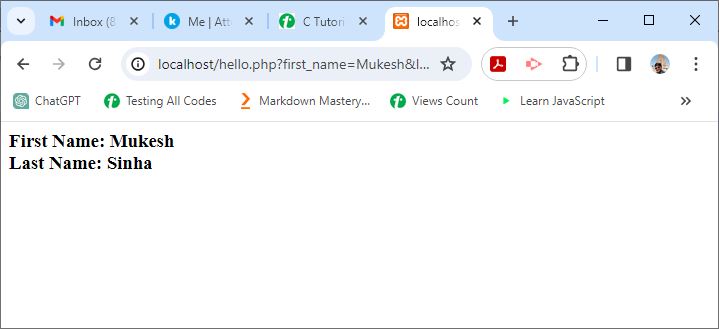
The $_GET array is also populated when a HTML form data is submitted to a URL with GET action.
Under the document root, save the following script as "hello.html" −
<html>
<body>
<form action="hello.php" method="get">
<p>First Name: <input type="text" name="first_name"/></p>
<p>Last Name: <input type="text" name="last_name" /></p>
<input type="submit" value="Submit" />
</form>
</body>
</html>
In your browser, enter the URL "http://localhost/hello.html" −
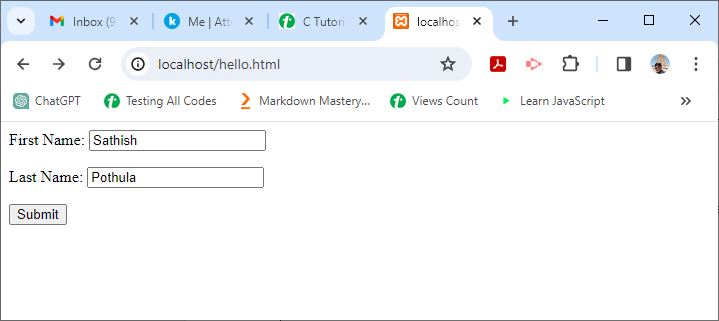
You should get a similar output in the browser window −
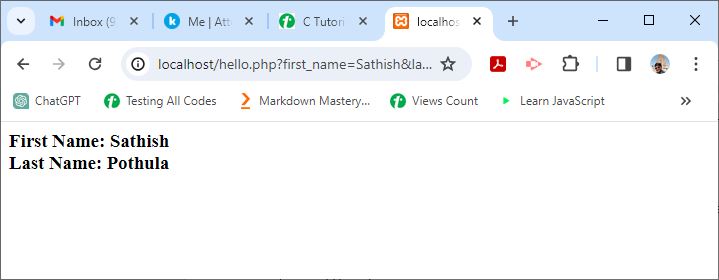
In the following example, htmlspecialchars() is used to convert characters in HTML entities −
Character |
Replacement |
|---|---|
& (ampersand) |
& |
" (double quote) |
" |
' (single quote) |
' or ' |
< (less than) |
< |
> (greater than) |
> |
Assuming that the URL in the browser is "http://localhost/hello.php?name=Suraj&age=20" −
<?php echo "Name: " . htmlspecialchars($_GET["name"]) . ""; echo "Age: " . htmlspecialchars($_GET["age"]) . "<br/>"; ?>
It will produce the following output −
Name: Suraj Age: 20
PHP - $_FILES
$_FILES is one of the 'superglobal', or automatic global, variables in PHP. It is available in all scopes throughout a script. The variable $_FILES is an associative array containing items uploaded via HTTP POST method.
A file is uploaded when a HTML form contains an input element with a file type, its enctype attribute set to multipart/form-data, and the method attribute set to HTTP POST method.
$HTTP_POST_FILES also contains the same information, but it is not a superglobal, and it has now been deprecated.
The following HTML script contains a form with input element of file type −
<input type="file" name="file">
This "input type" renders a button captioned as file. When clicked, a file dialogbox pops up. You can choose a file to be uploaded.
The PHP script on the server can access the file data in $_FILES variable.
The $_FILES array contains the following properties −
$_FILES['file']['name'] − The original name of the file that the user has chosen to be uploaded.
$_FILES['file']['type'] − The mime type of the file. An example would be "image/gif". This mime type is however not checked on the PHP side.
$_FILES['file']['size'] − The size, in bytes, of the uploaded file.
$_FILES['file']['tmp_name'] − The temporary filename of the file in which the uploaded file was stored on the server.
$_FILES['file']['full_path'] − The full path as submitted by the browser. Available as of PHP 8.1.0.
$_FILES['file']['error'] − The error code associated with this file upload.
The error codes are enumerated as below −
| Error Codes | Description |
|---|---|
UPLOAD_ERR_OK (Value=0) |
There is no error, the file uploaded with success. |
UPLOAD_ERR_INI_SIZE (Value=1) |
The uploaded file exceeds the upload_max_filesize directive in php.ini. |
UPLOAD_ERR_FORM_SIZE (Value=2) |
The uploaded file exceeds the MAX_FILE_SIZE. |
UPLOAD_ERR_PARTIAL (Value=3) |
The uploaded file was only partially uploaded. |
UPLOAD_ERR_NO_FILE (Value=4) |
No file was uploaded. |
UPLOAD_ERR_NO_TMP_DIR (Value=6) |
Missing a temporary folder. |
UPLOAD_ERR_CANT_WRITE (Value=7) |
Failed to write file to disk. |
UPLOAD_ERR_EXTENSION (Value=8) |
A PHP extension stopped the file upload. |
Example
The following "test.html" contains a HTML form whose enctype is set to multiform/form-data. It also has an input file element which presents a button on the form for the user to select file to be uploaded. Save this file in the document root folder of your Apache server.
<html>
<body>
<form action="hello.php" method="POST" enctype="multipart/form-data">
<p><input type="file" name="file"></p>
<p><input type ="submit" value="submit"></p>
</form>
</body>
</html>
The above HTML renders a button named "Choose File" in the browser window. To open a file dialog box, click the "Choose File" button. As the name of selected file appears, click the submit button.
Example
The server-side PHP script (upload.php) in the document root folder reads the variables $_FILES array as follows −
<?php echo "Filename: " . $_FILES['file']['name']."<br>"; echo "Type : " . $_FILES['file']['type'] ."<br>"; echo "Size : " . $_FILES['file']['size'] ."<br>"; echo "Temp name: " . $_FILES['file']['tmp_name'] ."<br>"; echo "Error : " . $_FILES['file']['error'] . "<br>"; ?>
It will produce the following output −
Filename: abc.txt Type : text/plain Size : 556762 Temp name: C:\xampp\tmp\phpD833.tmp Error : 0
Example
In PHP, you can upload multiple files using the HTML array feature −
<html>
<body>
<form action="hello.php" method="POST" enctype="multipart/form-data">
<input type="file" name="files[]"/>
<input type="file" name="files[]"/>
<input type ="submit" value="submit"/>
</form>
</body>
</html>
Now, change the PHP script (hello.php) to −
<?php
foreach ($_FILES["files"]["name"] as $key => $val) {
echo "File uploaded: $val <br>";
}
?>
The browser will show multiple "Choose File" buttons. After you upload the selected files by clicking the "Submit" button, the browser will show the names of files in response to the URL http://localhost/hello.html as shown below −
PHP - $_ENV
$_ENV is a superglobal variable in PHP. It is an associative array that stores all the environment variables available in the current script. $HTTP_ENV_VARS also contains the same information, but it is not a superglobal, and it has now been deprecated.
The environment variables are imported into the global namespace. Most of these variables are provided by the shell under which the PHP parser is running. Hence, the list of environment variables may be different on different platforms.
This array ($_ENV) also includes CGI variables in case PHP is running as a server module or a CGI processor.
We can use the foreach loop to display all the environment variables available −
<?php foreach ($_ENV as $k=>$v) echo $k . " => " . $v . "<br>"; ?>
On a Windows OS and with XAMPP server, you may get the list of environment variables as follows −
Variable |
Value |
|---|---|
ALLUSERSPROFILE |
C:\ProgramData |
APPDATA |
C:\Users\user\AppData\Roaming |
CommonProgramFiles |
C:\Program Files\Common Files |
CommonProgramFiles(x86) |
C:\Program Files (x86)\Common Files |
CommonProgramW6432 |
C:\Program Files\Common Files |
COMPUTERNAME |
GNVBGL3 |
ComSpec |
C:\WINDOWS\system32\cmd.exe |
DriverData |
C:\Windows\System32\Drivers\DriverData |
HOMEDRIVE |
C − |
HOMEPATH |
\Users\user |
LOCALAPPDATA |
C:\Users\user\AppData\Local |
LOGONSERVER |
\\GNVBGL3 |
MOZ_PLUGIN_PATH |
C:\Program Files (x86)\ Foxit Software\ Foxit PDF Reader\plugins\ |
NUMBER_OF_PROCESSORS |
8 |
OneDrive |
C:\Users\user\OneDrive |
OneDriveConsumer |
C:\Users\user\OneDrive |
OS |
Windows_NT |
Path |
C:\Python311\Scripts\; C:\Python311\; C:\WINDOWS\system32; C:\WINDOWS; C:\WINDOWS\System32\Wbem; C:\WINDOWS\System32\WindowsPowerShell\ v1.0\; C:\WINDOWS\System32\OpenSSH\; C:\xampp\php; C:\Users\user\AppData\Local\Microsoft\ WindowsApps; C:\VSCode\Microsoft VS Code\bin |
PATHEXT |
.COM;.EXE;.BAT;.CMD;.VBS;.VBE;.JS;.JSE; .WSF;.WSH;.MSC;.PY;.PYW |
PROCESSOR_ARCHITECTURE |
AMD64 |
PROCESSOR_IDENTIFIER |
Intel64 Family 6 Model 140 Stepping 1, GenuineIntel |
PROCESSOR_LEVEL |
6 |
PROCESSOR_REVISION |
8c01 |
ProgramData |
C:\ProgramData |
ProgramFiles |
C:\Program Files |
ProgramFiles(x86) |
C:\Program Files (x86) |
ProgramW6432 |
C:\Program Files |
PSModulePath |
C:\Program Files\WindowsPowerShell\Modules; C:\WINDOWS\system32\WindowsPowerShell\v1.0\ Modules |
PUBLIC |
C:\Users\Public |
SystemDrive |
C − |
SystemRoot |
C:\WINDOWS |
TEMP |
C:\Users\user\AppData\Local\Temp |
TMP |
C:\Users\user\AppData\Local\Temp |
USERDOMAIN |
GNVBGL3 |
USERDOMAIN_ROAMINGPROFILE |
GNVBGL3 |
USERNAME |
user |
USERPROFILE |
C:\Users\user |
windir |
C:\WINDOWS |
ZES_ENABLE_SYSMAN |
1 |
__COMPAT_LAYER |
RunAsAdmin Installer |
AP_PARENT_PID |
10608 |
You can access the value of individual environment variable too. This code fetches the PATH environment variable −
<?php echo "Path: " . $_ENV['Path']; ?>
It will produce the following output −
Path: C:\Python311\Scripts\;C:\Python311\;C:\WINDOWS\system32; C:\WINDOWS;C:\WINDOWS\System32\Wbem; C:\WINDOWS\System32\WindowsPowerShell\v1.0\; C:\WINDOWS\System32\OpenSSH\;C:\xampp\php; C:\Users\mlath\AppData\Local\Microsoft\WindowsApps; C:\VSCode\Microsoft VS Code\bin
Note − The $_ENV array may yield empty result, depending on "php.ini" setting "variables_order". You may have to edit the "php.ini" file and set variables_order="EGPCS" instead of variables_order="GPCS" value.
The getenv() Function
The PHP library provides the getenv() function to retrieve the list of all the environment variables or the value of a specific environment variable.
The following script displays the values of all the available environment variables −
<?php $arr=getenv(); foreach ($arr as $key=>$val) echo "$key=>$val"; ?>
To obtain the value of a specific variable, use its name as the argument for the getenv() function −
<?php
echo "Path: " . getenv("PATH");
?>
The putenv() Function
PHP also provides the putenv() function to create a new environment variable. The environment variable will only exist for the duration of the current request.
Changing the value of certain environment variables should be avoided. By default, users will only be able to set the environment variables that begin with "PHP_" (e.g. PHP_FOO=BAR).
The "safe_mode_protected_env_vars" directive in "php.ini" contains a comma-delimited list of environment variables that the end user won't be able to change using putenv().
<?php
putenv("PHP_TEMPUSER=GUEST");
echo "Temp user: " . getenv("PHP_TEMPUSER");
?>
The browser will display the following output −
Temp user: GUEST
PHP - $_COOKIE
The PHP superglobal $_COOKIE stores the variables passed to the current PHP script along with the HTTP request in the form of cookies. $HTTP_COOKIE_VARS also contains the same information, but it is not a superglobal, and it has now been deprecated.
What is a Cookie?
Cookies are text files stored by a server on the client computer and they are kept for tracking purpose. PHP transparently supports HTTP cookies. Cookies are usually set in an HTTP header. JavaScript can also sets a cookie directly on a browser.
The server script sends a set of cookies to the browser. It stores this information on the local machine for future use. Next time, when the browser sends any request to the web server, it sends those cookies information to the server and the server uses that information to identify the user.
The setcookie() Function
PHP provides the setcookie function to create a cookie object to be sent to the client along with the HTTP response.
setcookie(name, value, expire, path, domain, security);
Parameters
Name − Name of the cookie stored.
Value − This sets the value of the named variable.
Expiry − This specifes a future time in seconds since 00:00:00 GMT on 1st Jan 1970.
Path − Directories for which the cookie is valid.
Domain − Specifies the domain name in very large domains.
Security − 1 for HTTPS. Default 0 for regular HTTP.
How to Set Cookies
Take a look at the following example. This script sets a cookie named username if it is not already set.
Example
<?php
if (isset($_COOKIE['username'])) {
echo "<h2>Cookie username already set: " . $_COOKIE['username'] . "</h2>";
} else {
setcookie("username", "Mohan Kumar");
echo "<h2>Cookie username is now set.</h2>";
}
?>
Run this script from the document root of the Apache server. You should see this message as the output −
Cookie username is now set
If this script is re-executed, the cookie is now already set.
Cookie username already set: Mohan Kumar
Example
To retrieve cookies on subsequent visit of client −
<?php $arr=$_COOKIE; foreach ($arr as $key=>$val); echo "<h2>$key => $val </h2>"; ?>
The browser will display the following output −
Username => Mohan Kumar
How to Remove Cookies
To delete a cookie, set the cookie with a date that has already expired, so that the browser triggers the cookie removal mechanism.
<?php
setcookie("username", "", time() - 3600);
echo "<h2>Cookie username is now removed</h2>";
?>
The browser will now show the following output −
Cookie username is now removed
Setting Cookies Using the Array Notation
You may also set the array cookies by using the array notation in the cookie name.
setcookie("user[three]", "Guest");
setcookie("user[two]", "user");
setcookie("user[one]", "admin");
If the cookie name contains dots (.), then PHP replaces them with underscores (_).
PHP - $_SESSION
One of the superglobal variables in PHP, $_SESSION is an associative array of session variables available in the current script. $HTTP_SESSION_VARS also contains the same information, but it is not a superglobal, and it has now been deprecated.
What is a Session?
A Session is an alternative way to make data accessible across the pages of an entire website. It is the time duration between the time a user establishes a connection with a server and the time the connection is terminated. During this interval, the user may navigate to different pages. Many times, it is desired that some data is persistently available across the pages. This is facilitated by session variables.
A session creates a file in a temporary directory on the server where the registered session variables and their values are stored. This data will be available to all the pages on the site during that visit.
The server assigns a unique SESSIONID to each session. Since HTTP is a stateless protocol, data in session variables is automatically deleted when the session is terminated.
The session_start() Function
In order to enable access to session data, the session_start() function must be invoked. session_start() creates a session or resumes the current one based on a session identifier passed via a GET or POST request, or passed via a cookie.
session_start(array $options = []): bool
This function returns true if a session was successfully started, else it returns false.
Handling Session Variables
To create a new session variable, add a key-value pair in the $_SESSION array −
$_SESSION[ "var"]=value;
To read back the value of a session variable, you can use echo/print statements, or var_dump() or print_r() functions.
echo $_SESSION[ "var"];
To obtain the list of all the session variables in the current session, you can use a foreach loop to traverse the $_SESSION −
foreach ($_SESSION as $key=>$val) echo $key . "=>" . $val;
To manually clear all the session data, there is session_destroy() function. A specific session variable may also be released by calling the unset() function.
unset($_SESSION[ "var"]);
List of Session Functions
In PHP, there are many built-in functions for managing the session data.
| Session Functions | Description |
|---|---|
| session_abort | Discard session array changes and finish session |
| session_cache_expire | Return current cache expire |
| session_cache_limiter | Get and/or set the current cache limiter |
| session_commit | Alias of session_write_close |
| session_create_id | Create new session id |
| session_decode | Decodes session data from a session encoded string |
| session_destroy | Destroys all data registered to a session |
| session_encode | Encodes the current session data as a session encoded string |
| session_gc | Perform session data garbage collection |
| session_get_cookie_params | Get the session cookie parameters |
| session_id | Get and/or set the current session id |
| session_is_registered | Find out whether a global variable is registered in a session |
| session_module_name | Get and/or set the current session module |
| session_name | Get and/or set the current session name |
| session_regenerate_id | Update the current session id with a newly generated one |
| session_register_shutdown | Session shutdown function |
| session_register | Register one or more global variables with the current session |
| session_reset | Re-initialize session array with original values |
| session_save_path | Get and/or set the current session save path |
| session_set_cookie_params | Set the session cookie parameters |
session_set_save_handler |
Sets user-level session storage functions |
| session_start | Start new or resume existing session |
| session_status | Returns the current session status |
| session_unregister | Unregister a global variable from the current session |
| session_unset | Free all session variables |
| session_write_close | Write session data and end session |
Example
The following PHP script renders an HTML form. The form data is used to create three session variables. A hyperlink takes the browser to another page, which reads back the session variables.
Save this code as "test.php" in the document root folder, and open it in a client browser. Enter the data and press the Submit button.
<html>
<body>
<form action="<?php echo $_SERVER['PHP_SELF'];?>" method="post">
<h3>User's ID: <input type="text" name="ID"/></h3>
<h3>Your Name: <input type="text" name="name"/></h3>
<h3>Enter Age: <input type="text" name="age"/></h3>
<input type="submit" value="Submit"/>
</form>
<?php
session_start();
if ($_SERVER["REQUEST_METHOD"] == "POST") {
$_SESSION['UserID'] = $_POST['ID'];
$_SESSION['Name'] = $_POST['name'];
$_SESSION['age'] = $_POST['age'];
}
echo "Following Session Variables Created: \n";
foreach ($_SESSION as $key=>$val)
echo "<h3>" . $key . "=>" . $val . "</h3>";
echo "<br/>" . '<a href="hello.php">Click Here</a>';
?>
</body>
</html>
When you click the "Submit" button, it will show a list of all the session variables created −
Next, have the following script in the "hello.php" file and save it.
<?php session_start(); echo "<h2>Following Session variables Read:</h2>"; foreach ($_SESSION as $key=>$val) echo "<h3>" . $key . "=>" . $val . "</h3>"; ?>
Now, follow the link on the "test.php" page to navigate to "hello.php". It will show the session variables that are read −
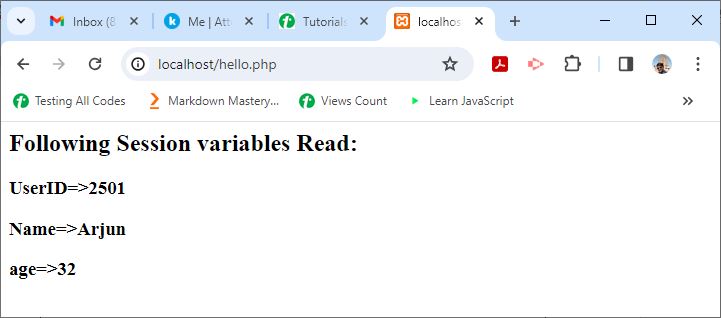
PHP - File Handling
In PHP, a file is a resource object, from which data can be read or written to in a linear fashion. The term "file handling" refers to a set of functions in PHP that enable read/write operations on disk files with PHP code.
A file object is classified as a stream. Any resource on which linear read/write operations are done is a stream. Other stream-like objects are the TCP sockets, standard input stream, i.e., a system keyboard represented by "php://stdin", the standard output stream represented by "php://stdout", and the error stream "php://stderr".
Note − Tthe constants STDIN, STDOUT, and STDERR stand for the respective standard streams.
Although PHP is regarded as a server-side scripting language for developing web applications, PHP also has a command-line interface to perform console IO operations.
Example
The readline() function in PHP accepts the user input from a standard keyboard, and echo/print statements render the output on the console.
<?php
$str = readline("Type something:");
echo $str;
?>
It will produce the following output −
C:\xampp\php>php hello.php Type something: Are you enjoying this PHP tutorial? Are you enjoying this PHP tutorial?
Example
We can obtain the same effect by reading the input from "php://stdin" and outputting it to "php://stdout".
<?php
$f = fopen("php://stdin", "r");
echo "Type something: ";
$str = fgets($f);
$f1 = fopen("php://stdout", "w");
fputs($f1, $str);
?>
Here, the fopen() function is used to open the stdin stream for reading and the stdout stream for writing.
Example
PHP supports a variety of stream protocols for stream related functions such as fopen(), file_exists(), etc. Use php_get_wrappers() function to get a list of all the registered wrappers.
<?php print_r(stream_get_wrappers()); ?>
It will produce the following output −
Array ( [0] => php [1] => file [2] => glob [3] => data [4] => http [5] => ftp [6] => zip [7] => compress.zlib [8] => compress.bzip2 [9] => https [10] => ftps [11] => phar )
The streams are referenced as "scheme://target". For instance, the file stream is "file://xyz.txt".
The input data from the console is stored in the computer's main memory (RAM) until the application is running. Thereafter, the memory contents from RAM are erased.
We would like to store it in such a way that it can be retrieved whenever required in a persistent medium such as a disk file. Hence, instead of the standard streams (keyboard for input and the display device for output), we will use the disk files for reading the data, and destination for storing the data.
In addition to the read and write modes as used in the above example (IO operations with standard streams), the file stream can be opened in various other modes like "r+" and "w+" for simultaneous read/write, "b" for binary mode, etc.
To open a disk file for reading and obtain its reference pointer, use the fopen() function.
$handle = fopen('file://' . __DIR__ . '/data.txt', 'r');
The "file://" scheme is the default. Hence, it can be easily dropped, especially when dealing with local files.
Note − It is always recommended to close the stream that was opened. Use the fclose() function for this purpose.
fclose($handle);
PHP has several built-in functions for performing read/write operations on the file stream. In the subsequent chapters, we shall explore the filesystem functions.
PHP - Open File
PHPs built-in function library provides fopen() function to open a file or any other stream and returns its "reference pointer", also called as "handle".
The fopen() function in PHP is similar to fopen() in C, except that in C, it cannot open a URL.
Syntax of fopen()
The fopen() function has the following signature −
fopen( string $filename, string $mode, bool $use_include_path = false, ?resource $context = null ): resource|false
The $filename and $mode parameters are mandatory. Heres the explanation of the parameters −
$filename − This parameter is a string representing the resource to be opened. It may be a file in the local filesystem, or on a remote server with the scheme:// prefix.
$mode − A string that represents the type of access given to the file/resource.
$use_include_path − A Boolean optional parameter can be set to '1' or true if you want to search for the file in the include_path, too.
$context − A context stream resource.
Modes of Opening a File
PHP allows a file to be opened in the following modes −
| Modes | Description |
|---|---|
| r | Open a file for read only. |
| w | Open a file for write only. creates a new file even if it exists. |
| a | Open a file in append mode |
| x | Creates a new file for write only. |
| r+ | Open a file for read/write. |
| w+ | Open a file for read/write. creates a new file even if it exists. |
| a+ | Open a file for read/write in append mode. |
| x+ | Creates a new file for read/write. |
| c | Open the file for writing, if it doesnt exist. However, if it exists, it isnt truncated (as in w mode). |
| c++ | Open the file for read/write, if it doesnt exist. However, if it exists, it isnt truncated (as in w mode). |
| e | Set close-on-exec flag on the opened file descriptor. Only available in PHP compiled on POSIX.1-2008 conform systems. |
If the fopen() function is successfully executed, it returns a "file pointer" or "handle" resource bound to the file stream. However, if it fails, it returns false with E_WARNING being emitted.
$handle = fopen('a.txt, 'r');
var_dump($handle);
If the file exists in the current directory, the success is shown by the output −
resource(5) of type (stream)
If not, you get the following error message −
Warning: fopen(a.txt): Failed to open stream: No such file or directory in a.php on line 2 bool(false)
Examples
The following examples show different usages of the fopen() function −
<?php
$handle = fopen("hello.txt", "w");
$handle = fopen("c:/xampp/htdocs/welcome.png", "rb");
$handle = fopen("http://localhost/hello.txt", "r");
?>
Note that this function may also succeed when the filename is a directory. In that case, you may need to use the is_dir() function to check whether it is a file before doing any read/write operations.
Once a file is opened, you can write data in it with the help of functions such as fwrite() or fputs(), and read data from it with fread() and fgets() functions.
Closing a File
It is always recommended to close the open stream referenced by the handle −
fclose($handle);
PHP - Read File
There are a number of options in PHP for reading data from a file that has been opened with the fopen() function. The following built-in functions in PHPs library can help us perform the read operation −
fgets() − gets a line from the file pointer.
fgetc() − returns a string with a single character from the file pointer.
fread() − reads a specified number of bytes from the file pointer.
fscanf() − reads data from the file and parses it as per the specified format.
The fgets() Function
The fgets() function can return a line from an open file. This function stops returning on a new line at a specified length or EOF, whichever comes first and returns false on failure.
fgets(resource $stream, ?int $length = null): string|false
Here, the $stream parameter is a file pointer or handle to the file opened with the fopen() function with read or read/write mode, and $length is an optional parameter specifying the number of bytes to be read.
The read operation ends when "length-1" bytes are read or a newline is encountered, whichever is first.
Example
The following code reads the first available line from the "hello.txt" file −
<?php
$file = fopen("hello.txt", "r");
$str = fgets($file);
echo $str;
fclose($file);
?>
It will produce the following output −
Hello World
Example
You can put the fgets() function in a loop to read the file until the end of file is reached.
<?php
$file = fopen("hello.txt", "r");
while(! feof($file)) {
echo fgets($file). "<br>";
}
fclose($file);
?>
It will produce the following output −
Hello World TutorialsPoint PHP Tutorials
Here, we have used the feof() function which returns true if the file pointer is at EOF; otherwise returns false.
The fgetc() Function
The fgetc() function returns a single character read from the current position of the file handle. It returns false when EOF is encountered.
fgetc(resource $stream): string|false
Here, the $stream parameter is a file pointer or handle to the file opened with the fopen() function with read or read/write mode.
Example
The following code displays the first character read from the "hello.txt" file −
<?php
$file = fopen("hello.txt", "r");
$str = fgets($file);
echo $str;
fclose($file);
?>
It will produce the following output −
H
Example
You can also put the fgetc() function inside a loop to read the file character by character until it reaches EOF.
<?php
$file = fopen("hello.txt", "r");
while(! feof($file)) {
$char = fgetc($file);
if ($char == "\n")
echo "<br>";
echo $char;
}
fclose($file);
?>
It will produce the following output −
Hello World TutorialsPoint PHP Tutorials
The fread() Function
The fread() function in PHP is a binary-safe function for reading data from a file. While the fgets() function reads only from a text file, the fread() function can read a file in binary mode.
fread(resource $stream, int $length): string|false
Here, the $stream parameter is a file pointer or handle to the file opened with the fopen() function with binary read or read/write mode (rb or rb+). The $length parameter specifies number of bytes to be read.
If the $length parameter is not given, PHP tries to read the entire file until EOF is reached, subject to the chunk size specified.
Example
The following code reads a text file −
<?php $name = "hello.txt"; $file = fopen($name, "r"); $data = fread($file, filesize($name)); echo $data; fclose($file); ?>
It will produce the following output −
Hello World TutorialsPoint PHP Tutorials
Example
You can also read a non-ASCII file such as an image file opened in rb mode.
<?php $name = "welcome.png"; $file = fopen($name, "rb"); $data = fread($file, filesize($name)); var_dump($data); fclose($file); ?>
The browser displays the "var_dump" information as the following −

The fscanf() Function
The fscanf() function in PHP reads the input from a file stream and parses it according to the specified format, thereby converts it into the variables of respective types. Each call to the function reads one line from the file.
fscanf(resource $stream, string $format, mixed &...$vars): array|int|false|null
Here, the $stream parameter is the handle to the file opened with the fopen() function and in read mode. And, $format is a string containing one or more of the following formatting specifiers −
%% − Returns a percent
%b − Binary number
%c − The character according to the ASCII value
%f − Floating-point number
%F − Floating-point number
%o − Octal number
%s − String
%d − Signed decimal number
%e − Scientific notation
%u − Unsigned decimal number
%x − Hexadecimal number for lowercase letters
%X − Hexadecimal number for uppercase letters
$vars is an optional parameter that specifies variables by reference which will contain the parsed values.
Assuming that the "employees.txt" file is available in the same directory in which the PHP script given below is present. Each line in the text file has name, email, post and salary of each employee, separated by tab character.
Example
The following PHP script reads the file using the format specifiers in fscanf() function −
<?php
$fp = fopen("employees.txt", "r");
while ($employee_info = fscanf($fp, "%s\t%s\t%s\t%d\n")) {
list ($name, $email, $post, $salary) = $employee_info;
echo "<b>Name</b>: $name <b>Email</b>:
$email <b>Salary</b>: Rs. $salary <br>";
}
fclose($fp);
?>
It will produce the following output −
Name: Ravishankar Email: ravi@gmail.com Salary: Rs. 40000 Name: Kavita Email: kavita@hotmail.com Salary: Rs. 25000 Name: Nandkumar Email: nandu@example.com Salary: Rs. 30000
PHP - Write File
PHPs built-in function library provides two functions to perform write operations on a file stream. These functions are fwrite() and fputs().
To be able to write data in a file, it must be opened in write mode (w), append mode (a), read/write mode (r+ or w+) or binary write/append mode (rb+, wb+ or wa).
The fputs() Function
The fputs() function writes a string into the file opened in a writable mode.
fputs(resource $stream, string $string, int $length)
Here, the $stream parameter is a handle to a file opened in a writable mode. The $string parameter is the data to be written, and $length is an optional parameter that specifies the maximum number of bytes to be written.
The fputs() function returns the number of bytes written, or false if the function is unsuccessful.
Example
The following code opens a new file, writes a string in it, and returns the number of bytes written.
<?php
$fp = fopen("hello.txt", "w");
$bytes = fputs($fp, "Hello World\n");
echo "bytes written: $bytes";
fclose($fp);
?>
It will produce the following output −
bytes written: 12
Example
If you need to add text in an earlier existing file, it must be opened in append mode (a). Let us add one more string in the same file in previous example.
<?php
$fp = fopen("hello.txt", "a");
$bytes = fputs($fp, "Hello PHP");
echo "bytes written: $bytes";
fclose($fp);
?>
If you open the "hello.txt" file in a text editor, you should see both the lines in it.
Example
In the following PHP script, an already existing file (hello.txt) is read line by line in a loop, and each line is written to another file (new.txt)
It is assumed thar "hello.txt" consists of following text −
Hello World TutorialsPoint PHP Tutorials
Here is the PHP code to create a copy of an existing file −
<?php
$file = fopen("hello.txt", "r");
$newfile = fopen("new.txt", "w");
while(! feof($file)) {
$str = fgets($file);
fputs($newfile, $str);
}
fclose($file);
fclose($newfile);
?>
The newly created "new.txt" file should have exactly the same contents.
The fwrite() Function
The frwrite() function is a counterpart of fread() function. It performs binary-safe write operations.
fwrite(resource $stream, string $data, ?int $length = null): int|false
Here, the $stream parameter is a resource pointing to the file opened in a writable mode. Data to be written to the file is provided in the $data parameter. The optional $length parameter may be provided to specify the number of bytes to be written. It should be int, writing will stop after length bytes have been written or the end of data is reached, whichever comes first.
The fwrite() function returns the number of bytes written, or false on failure along with E_WARNING.
Example
The following program opens a new file, performs write operation and displays the number of bytes written.
<?php
$file = fopen("/PhpProject/sample.txt", "w");
echo fwrite($file, "Hello Tutorialspoint!!!!!");
fclose($file);
?>
Example
In the example code given below, an existing file "welcome.png" in opened in binary read mode. The fread() function is used to read its bytes in "$data" variable, and in turn written to another file "new.png" −
<?php
$name = "welcome.png";
$file = fopen($name, "rb");
$newfile = fopen("new.png", "wb");
$size = filesize($name);
$data = fread($file, $size);
fwrite($newfile, $data, $size);
fclose($file);
fclose($newfile);
?>
Run the above code. The current directory should now have a copy of the existing "welcome.png" file.
PHP - File Existence
It is often handy to check if the file you are trying to open really exists in the first place before performing any processing on it. Otherwise, the program is likely to raise a runtime exception.
PHPs built-in library provides some utility functions in this regard. Some of the functions we shall discuss in this chapter are −
file_exists() − tests if the file exists
is_file() − if the handle returned by the fopen() refers to a file or directory.
is_readable() − test if the file you have opened allows reading data
is_writable() − test if writing data in the file is allowed
The file_exists() Function
This function works with a file as well as a directory. It checks whether the given file or directory exists or not.
file_exists(string $filename): bool
The only parameter to this function is a string representing the file/directory with full path. The function returns true or false depending upon the file exists or not.
Example
The following program checks if the file "hello.txt" exists or not.
<?php
$filename = 'hello.txt';
if (file_exists($filename)) {
$message = "The file $filename exists";
} else {
$message = "The file $filename does not exist";
}
echo $message;
?>
If the file does exist in the current directory, the message is −
The file hello.txt exists
If not, the message is −
The file hello.txt does not exist
Example
The string pointing to the file may have a relative or absolute path. Assuming that "hello.txt" file is available in a "hello" subdirectory which is inside the current directory.
<?php
$filename = 'hello/hello.txt';
if (file_exists($filename)) {
$message = "The file $filename exists";
} else {
$message = "The file $filename does not exist";
}
echo $message;
?>
It will produce the following output −
The file hello/hello.txt exists
Example
Try giving the absolute path as below −
<?php
$filename = 'c:/xampp/htdocs/hello.txt';
if (file_exists($filename)) {
$message = "The file $filename exists";
} else {
$message = "The file $filename does not exist";
}
echo $message;
?>
It will produce the following output −
The file c:/xampp/htdocs/hello.txt exists
The is_file() Function
The file_exists() function returns true for existing file as well as directory. The is_file() function helps you to determine if its a file.
is_file ( string $filename ) : bool
The following example shows how the is_file() function works −
<?php
$filename = 'hello.txt';
if (is_file($filename)) {
$message = "$filename is a file";
} else {
$message = "$filename is a not a file";
}
echo $message;
?>
The output tells that it is a file −
hello.txt is a file
Now, change the "$filename" to a directory, and see the result −
<?php
$filename = hello;
if (is_file($filename)) {
$message = "$filename is a file";
} else {
$message = "$filename is a not a file";
}
echo $message;
?>
Now you will be told that "hello" is not a file.
Note that The is_file() function accepts a $filename and returns true only if the $filename is a file and exists.
The is_readable() Function
Sometimes, you may want to check before hand if the file can be read from or not. The is_readable() function can ascertain this fact.
is_readable ( string $filename ) : bool
Example
Given below is an example of how the is_readable() function works −
<?php
$filename = 'hello.txt';
if (is_readable($filename)) {
$message = "$filename is readable";
} else {
$message = "$filename is not readable";
}
echo $message;
?>
It will produce the following output −
hello.txt is readable
The is_writable() Function
You can use the is_writable() function to can check if a file exists and if it is possible to perform write operation on the given file.
is_writable ( string $filename ) : bool
Example
The following example shows how the is_writable() function works −
<?php
$filename = 'hello.txt';
if (is_writable($filename)) {
$message = "$filename is writable";
} else {
$message = "$filename is not writable";
}
echo $message;
?>
For a normal archived file, the program tells that it is writable. However, change its property to "read_only" and run the program. You now get −
hello.txt is writable
PHP - Download File
Most modern browsers allow files of certain types to be downloaded automatically, without any server-side code such as a PHP script. For example, a zip file, or an EXE file.
If an HTML hyperlink points to a ZIP or EXE file, the browser downloads it and pops up a save dialog. However, text files, image files, etc., are not downloaded but opened in the browser, which you can save to your local filesystem.
The readfile() Function
To download such files (instead of the browser automatically opening them), we can use the readfile() function in PHPs built-in function library.
readfile(string $filename, bool $use_include_path = false, ?resource $context = null) : int|false
This function reads a file and writes it to the output buffer.
The second parameter $use_include_path is false by default, hence the file in the current directory will be downloaded. If set to true, the directories added to the include_path setting of php.ini configuration will be searched to locate the file to be downloaded.
The readfile() function returns the number of bytes read or false even it is successfully completed or not.
Example
The following PHP script shows the usage of readfile() function.
To download a file, the Content-Type response header should be set to application/octect-stream. This MIME type is the default for binary files. Browsers usually don't execute it, or even ask if it should be executed.
Additionally, setting the Content-Disposition header to attachment prompts the "Save As" dialog to pop up.
<?php
$filePath = 'welcome.png';
// Set the Content-Type header to application/octet-stream
header('Content-Type: application/octet-stream');
// Set the Content-Disposition header to the filename of the downloaded file
header('Content-Disposition: attachment; filename="'. basename($filePath).'"');
// Read the contents of the file and output it to the browser.
readfile($filePath);
?>
Save the above script as "download.php" in the document root folder. Make sure that the file to be downloaded is present in the same folder.
Start the server and visit http://localhost/download.php in the browser. You will get a "Save As" dialog as below −
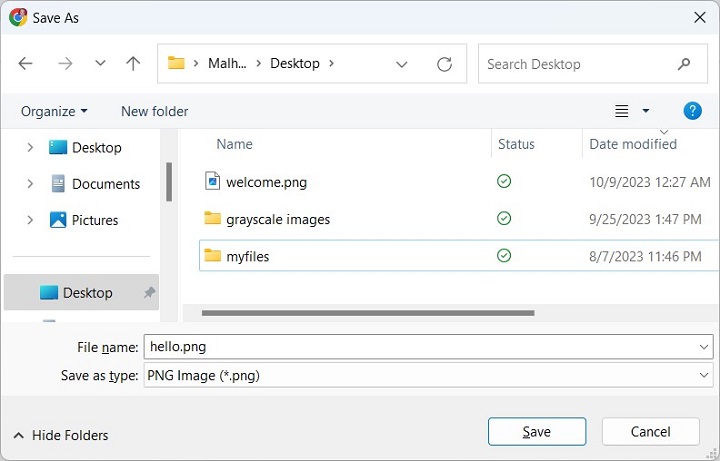
You can select a name and download the file.
For a large file, you can read it from the file stream in the chunk of a certain predefined size. The browser offers to save it in the local filesystem, if the Content-Disposition head is set to "attachment", as in the previous example.
<?php
$filename = 'welcome.png';
header('Content-Type: application/octet-stream');
header('Content-Disposition: attachment; filename="' . basename($filename) . '"');
$handle = fopen($filename, 'rb');
$buffer = '';
$chunkSize = 1024 * 1024;
ob_start();
while (!feof($handle)) {
$buffer = fread($handle, $chunkSize);
echo $buffer;
ob_flush();
flush();
}
fclose($handle);
?>
PHP - Copy File
You can copy an existing file to a new file in three different ways −
Reading a line from one and writing to another in a loop
Reading entire contents to a string and writing the string to another file
Using PHPs built-in function library includes copy() function.
Method 1
In the first approach, you can read each line from an existing file and write into a new file till the existing file reaches the end of file.
In the following PHP script, an already existing file (hello.txt) is read line by line in a loop, and each line is written to another file (new.txt)
It is assumed that "hello.txt" contains the following text −
Hello World TutorialsPoint PHP Tutorials
Example
Here is the PHP code to create a copy of an existing file −
<?php
$file = fopen("hello.txt", "r");
$newfile = fopen("new.txt", "w");
while(! feof($file)) {
$str = fgets($file);
fputs($newfile, $str);
}
fclose($file);
fclose($newfile);
?>
The newly created "new.txt" file should have exactly the same contents.
Method 2
Here we use two built-in functions from the PHP library −
file_get_contents( string $filename, bool $use_include_path = false, ?resource $context = null, int $offset = 0, ?int $length = null ): string|false
This function reads the entire file into a string. The $filename parameter is a string containing the name of the file to be read
The other function is −
file_put_contents( string $filename, mixed $data, int $flags = 0, ?resource $context = null ): int|false
The function puts the contents of $data in $filename. It returns the number of bytes written.
Example
In the following example, we read contents of "hello.txt" in a string $data, and use it as a parameter to write into "test.txt" file.
<?php $source = "hello.txt"; $target = "test.txt"; $data = file_get_contents($source); file_put_contents($target, $data); ?>
Method 3
PHP provides the copy() function, exclusively to perform copy operation.
copy(string $from, string $to, ?resource $context = null): bool
The $from parameter is a string containing the existing file. The $to paramenter is also a string containing the name of the new file to be created. If the target file already exists, it will be overwritten.
The copy operation will return true or false based on the file being successfully copied or not.
Example
Let's use the copy() function to make "text.txt" as a copy of "hello.txt" file.
<?php
$source = "a.php";
$target = "a1.php";
if (!copy($source, $target)) {
echo "failed to copy $source...\n";
}
?>
PHP - Append File
In PHP, the fopen() function returns the file pointer of a file used in different opening modes such as "w" for write mode, "r" read mode and "r+" or "r+" mode for simultaneous read/write operation, and "a" mode that stands for append mode.
When a file is opened with "w" mode parameter, it always opens a new file. It means that if the file already exists, its content will be lost. The subsequent fwrite() function will put the data at the starting position of the file.
Assuming that a file "new.txt" is present with the following contents −
Hello World TutorialsPoint PHP Tutorial
The following statement −
$fp = fopen("new.txt", "w");
Erases all the existing data before new contents are written.
Read/Write Mode
Obviously, it is not possible to add new data if the file is opened with "r" mode. However, "r+" or "w+" mod opens the file in "r/w" mode, but still a fwrite() statement immediately after opening a file will overwrite the contents.
Example
Take a look at the following code −
<?php
$fp = fopen("new.txt", "r+");
fwrite($fp, "PHP-MySQL Tutorial\n");
fclose($fp);
?>
With this code, the contents of the "new.txt" file will now become −
PHP-MySQL Tutorial lsPoint PHP Tutorial
To ensure that the new content is added at the end of the existing file, we need to manually put the file pointer to the end, before write operation. (The initial file pointer position is at the 0th byte)
The fseek() Function
PHPs fseek() function makes it possible to place the file pointer anywhere you want −
fseek(resource $stream, int $offset, int $whence = SEEK_SET): int
The $whence parameter is from where the offset is counted. Its values are −
SEEK_SET − Set position equal to offset bytes.
SEEK_CUR − Set position to current location plus offset.
SEEK_END − Set position to end-of-file plus offset.
Example
So, we need to move the pointer to the end with the fseek() function as in the following code which adds the new content to the end.
<?php
$fp = fopen("new.txt", "r+");
fseek($fp, 0, SEEK_END);
fwrite($fp, "\nPHP-MySQL Tutorial\n");
fclose($fp);
?>
Now check the contents of "new.txt". It will have the following text −
Hello World TutorialsPoint PHP Tutorial PHP-MySQL Tutorial
Append Mode
Instead of manually moving the pointer to the end, the "a" parameter in fopen() function opens the file in append mode. Each fwrite() statement adds the content at the end of the existing contents, by automatically moving the pointer to SEEK_END position.
<?php
$fp = fopen("new.txt", "a");
fwrite($fp, "\nPHP-MySQL Tutorial\n");
fclose($fp);
?>
One of the allowed modes for fopen() function is "r+" mode, with which the file performs read/append operation. To read data from any position, you can place the pointer to the desired byte by fseek(). But, every fwrite() operation writes new content at the end only.
Example
In the program below, the file is opened in "a+" mode. To read the first line, we shift the file position to 0the position from beginning. However, the fwrite() statement still adds new content to the end and doesnt overwrite the following line as it would have if the opening mode "r+" mode.
<?php
$fp = fopen("new.txt", "a+");
fseek($fp, 0, SEEK_SET);
$data = fread($fp, 12);
echo $data;
fwrite($fp, "PHP-File Handling");
fclose ($fp);
?>
Thus, we can append data to an existing file if it is opened in "r+/w+" mode or "a/a+" mode
PHP - Delete File
PHP doesnt have either a delete keyword or a delete() function. Instead, it provides the unlink() function, which when called, deletes a file from the filesystem. It is similar to Unix/C unlink function.
If the delete operation could not be completed, PHP returns false and shows an E_WARNING message.
unlink(string $filename, ?resource $context = null): bool
The mandatory string parameter to unlink() function is a string that refers to the file to be deleted.
Example
The following code demonstrates a simple use of the unlink() function −
<?php
$file = "my_file.txt";
if (unlink($file)) {
echo "The file was deleted successfully.";
} else {
echo "The file could not be deleted.";
}
?>
Deleting the Symlink to a File
The unlink() function can also delete a symlink to a file. However, deleting a symlink doesnt delete the original file. A symlink is a shortcut to an existing file.
In Windows, open a command prompt with administrator privilege and use the mlink command with /h switch to create a symlink to a file. (/j switch is used for symlink to a folder)
mklink /h hellolink.lnk hello.txt Hardlink created for hellolink.lnk <<===>> hello.txt
In Ubuntu Linux, to create a symbolic link to a file, you would use the following command −
ln -s /path/to/original_file /path/to/symlink
To create a symbolic link to a directory, you would use the following command −
ln -s /path/to/original_directory /path/to/symlink
In PHP, there is also a symlink() function for the purpose.
symlink(string $target, string $link): bool
Example
Create a symlink with the following code −
<?php $target = 'hello.txt'; $link = 'hellolink.lnk'; symlink($target, $link); echo readlink($link); ?>
Now delete the symlink created above −
unlink("hellolink.lnk");
If you check the current working directory, the symlink will be deleted, leaving the original file intact.
How to Rename a File in PHP
You can change the name of an existing file with the help of respective command from the console of an operating system. For example, the "mv command in Linux terminal or the "rename command" in Windows command prompt helps you to change the name of a file.
However, to rename a file programmatically, PHPs built-in library includes a rename() function.
Here is the syntax of the rename() function −
rename(string $from, string $to, ?resource $context = null): bool
Both $from and $to strings are the names of files, existing and new respectively. The rename() function attempts to rename $from to $to, moving it between directories if necessary.
If you are renaming a file and $to already exists, then it will be overwritten. If you are renaming a directory and $to exists, then this function will emit a warning.
To change the name of "hello.txt" to "test.txt" −
<?php
rename("hello.txt", "test.txt");
?>
You can also employ a little indirect approach for renaming a file. Make a copy of an existing file and delete the original one. This also renames "hello.txt" to "test.txt" −
copy("hello.txt", "test.txt");
unlink("hello.txt");
PHP Handle CSV File
Popular spreadsheet programs use the CSV file format (which stands for Comma Separated Values) to export worksheet data in plain text. Each line in the file represents one row of the worksheet, with values in each column separated by commas.
PHPs filesystem function library provides two functions fgetcsv() and fputcsv() respectively to read data from a CSV file into an array and put the array elements in a CSV file.
The fgetcsv() Function
The getcsv() function reads the line from the file pointer, and parses it into CSV fields.
fgetcsv( resource $stream, ?int $length = null, string $separator = ",", string $enclosure = "\"", string $escape = "\\" ): array|false
The $stream parameter is a handle to the file resource, opened in read mode. The default separator symbol to parse the fields is comma, you can specify any other symbol if required.
The fgetcsv() function returns an indexed array containing the fields. If the function encounters any error, it returns false.
To demonstrate the use of fgetcsv() function, store the following text as "hello.txt" in the current working directory.
Name, Email, Post, Salary Ravishankar, ravi@gmail.com, Manager, 40000 Kavita, kavita@hotmail.com, Assistant, 25000 Nandkumar, nandu@example.com, Programmer, 30000
Example
The following PHP code reads the CSV data from this file, and returns an array. The fields in the array are then rendered in a HTML table −
<?php
$filename = 'hello.csv';
$data = [];
// open the file
$f = fopen($filename, 'r');
if ($f === false) {
die('Cannot open the file ' . $filename);
}
// read each line in CSV file at a time
while (($row = fgetcsv($f)) !== false) {
$data[] = $row;
}
// close the file
fclose($f);
echo "<table border=1>";
foreach ($data as $row) {
echo "<tr>";
foreach($row as $val) {
echo "<td>$val</td>";
}
echo "</tr>";
}
echo "</table>";
?>
It will produce the following output −
| Name | Post | Salary | |
|---|---|---|---|
| Ravishankar | ravi@gmail.com | Manager | 40000 |
| Kavita | kavita@hotmail.com | Assistant | 25000 |
| Nandkumar | nandu@example.com | Programmer | 30000 |
The fputcsv() Function
Te fputcsv() function puts an indexed array with its elements separated by commas, at the current file pointer position of a CSV file.
fputcsv( resource $stream, array $fields, string $separator = ",", string $enclosure = "\"", string $escape = "\\", string $eol = "\n" ): int|false
The target file must be opened in write mode. The second mandatory parameter is an array consisting of comma separated fields. As in case of fgetcsv() function, the default separator is comma.
Example
In the following code, a two dimensional array of comma separated values is written into a CSV file.
<?php
$data = [
["Name", "Email", "Post", "Salary"],
["Ravishankar", "ravi@gmail.com", "Manager", "40000"],
["Kavita", "kavita@hotmail.com", "Assistant", "25000"],
["Nandkumar", "nandu@example.com", "Programmer", "30000"],
];
$filename = 'employee.csv';
// open csv file for writing
$f = fopen($filename, 'w');
if ($f === false) {
die('Error opening the file ' . $filename);
}
// write each row at a time to a file
foreach ($data as $row) {
fputcsv($f, $row);
}
// close the file
fclose($f);
?>
The "employee.csv" file should be created in the current working directory, after the above program is executed.
PHP File Permissions
The concept of permissions is at the core of Unix/Linux file system. The permissions determine who can access a file and how one can access a file. File permissions in Linux are manipulated by the chmod command, which can be run inside the Linux terminal. PHP provides the chmod() function with which you can handle file permissions programmatically.
PHPs chmod() function is effective only when you are working on a Linux OS. It doesnt work on Windows, as Windows OS has a different mechanism of controlling file permissions.
To view the permissions enabled on a file, obtain the list of files using the "ls -l" command (long listing)
mvl@GNVBGL3:~$ ls -l -rwxr-xr-x 1 mvl mvl 16376 May 5 21:52 a.out -rw-r--r-- 1 mvl mvl 83 May 5 21:52 hello.cpp -rwxr-xr-x 1 mvl mvl 43 Oct 11 14:50 hello.php -rwxr-xr-x 1 mvl mvl 43 May 8 10:01 hello.py drwxr-xr-x 5 mvl mvl 4096 Apr 20 21:52 myenv
The first column contains permission flags of each file. Third and fourth columns indicate the owner and group of each file, followed by size, date and time, and the file name.
The permissions string has ten characters, their meaning is described as follows −
| Position | Meaning |
|---|---|
| 1 | "d" if a directory, "-" if a normal file |
| 2, 3, 4 | read, write, execute permission for user (owner) of file |
| 5, 6, 7 | read, write, execute permission for group |
| 8, 9, 10 | read, write, execute permission for other (world) |
The characters in the permission string have following meaning −
| Value | Meaning |
|---|---|
| - | Flag is not set. |
| r | File is readable. |
| w | File is writable. For directories, files may be created or removed. |
| x | File is executable. For directories, files may be listed. |
If you consider the first entry in the above list −
-rwxr-xr-x 1 mvl mvl 16376 May 5 21:52 a.out
The "a.out" file is owned by the user "mvl" and group "mvl". It is a normal file with "read/write/execute" permissions for the owner, and "read/ execute" permissions for the group as well as others.
The binary and octal representation of permission flags can be understood with the following table −
| Octal Digit | Binary Representation (rwx) | Permission |
|---|---|---|
| 0 | 000 | none |
| 1 | 001 | execute only |
| 2 | 010 | write only |
| 3 | 011 | write and execute |
| 4 | 100 | read only |
| 5 | 101 | read and execute |
| 6 | 110 | read and write |
| 7 | 111 | read, write, and execute (full permissions) |
The chmod() Function
The chmod() function can change permissions of a specified file. It returns true on success, otherwise false on failure.
chmod(string $filename, int $permissions): bool
The chmod() function attempts to change the mode of the specified file ($filename) to that given in permissions.
The second parameter $permissions is an octal number with four octal digits. The first digit is always zero, second specifies permissions for the owner, third for the owner's user group and fourth for everybody else. Each digit is the sum of values for each type of permission.
| 1 | Execute Permission |
| 2 | Write Permission |
| 4 | Read Permission |
The default value of $permissions parameters is 0777, which means the directory is created with execute, write and read permissions enabled.
Example
Take a look at the following example −
<?php
// Read and write for owner, nothing for everybody else
chmod("/PhpProject/sample.txt", 0600);
// Read and write for owner, read for everybody else
chmod("/PhpProject/sample.txt", 0644);
// Everything for owner, read and execute for everybody else
chmod("/PhpProject/sample.txt", 0755);
// Everything for owner, read for owner's group
chmod("/PhpProject/sample.txt", 0740);
?>
The chown() Function
The chown() function attempts to change the owner of the file filename to a new user. Note that only the superuser may change the owner of a file.
chown(string $filename, string|int $user): bool
Example
Take a look at the following example −
<?php // File name and username to use $file_name= "index.php"; $path = "/PhpProject/backup: " . $file_name ; $user_name = "root"; // Set the user chown($path, $user_name); // Check the result $stat = stat($path); print_r(posix_getpwuid(fileowner($path))); ?>
The chgrp() Function
The chgrp() function attempts to change the group of the file filename to group.
chgrp(string $filename, string|int $group): bool
Only a superuser may change the group of a file arbitrarily; other users may change the group of a file to any group of which that user is a member.
Example
Take a look at the following example −
<?php
$filename = "/PhpProject/sample.txt";
$format = "%s's Group ID @ %s: %d\n";
printf($format, $filename, date('r'), filegroup($filename));
chgrp($filename, "admin");
clearstatcache(); // do not cache filegroup() results
printf($format, $filename, date('r'), filegroup($filename));
?>
It will produce the following output −
/PhpProject/sample.txt's Group ID @ Fri, 13 Oct 2023 07:42:21 +0200: 0 /PhpProject/sample.txt's Group ID @ Fri, 13 Oct 2023 07:42:21 +0200: 0
PHP Create Directory
Computer files are stored in the local storage device (called drive) in a hierarchical order, where a directory contains one or more files as well as subdirectories. Respective DOS commands defined in operating systems Windows, Linux etc. are used to create and manage directories.
PHP provides directory management functions to create a directory, change the current directory and remove a certain directory.
This chapter discusses the usage of the following directory functions in PHP −
The mkdir() Function
The mkdir() function creates a new directory whose path is given as one of the parameters to the function
mkdir( string $directory, int $permissions = 0777, bool $recursive = false, ?resource $context = null ): bool
Parameters
$directory − The first parameter $directory is mandatory. It is a string with either absolute or relative path of the new directory to be created.
$permissions − The second parameter $permissions is an octal number with four octal digits. The first digit is always zero, second specifies permissions for the owner, third for the owner's user group and fourth for everybody else.
Each digit is the sum of values for each type of permission −
1 = execute permission
2 = write permission
4 = read permission
The default value of $permissions parameters is 0777, which means the directory is created with execute, write and read permissions enabled.
Note that the $permissions parameter is ignored when working on Windows OS.
$recursive − If true, then any parent directories to the directory specified will also be created, with the same permissions.
$context − This optional parameter is the stream resource.
The mkdir() function returns either true or false, indicating if the function has been successfully executed or not.
Examples
Here are some examples of mkdir() function.
The following call to mkdir() creates a subdirectory inside the current working directory. The dot indicates that the path is relative.
$dir = "./mydir/"; mkdir($dir);
We can give the string parameter that contains the absolute path of the directory to be created.
$dir = "c:/newdir/"; mkdir($dir);
The following call to mkdir() contains nested directory structure inside the current directory, as the $recursive parameter is set to true.
$dirs = "./dir1/dir2/dir3/"; mkdir($dirs, 0777, true);
The Windows explorer will show the nested directory structure as follows −

The chdir() Function
The chdir() function in PHP corresponds to the chdir or cd command in Linux/Windows. It causes the current directory to be changed as required.
chdir(string $directory): bool
The string parameter to this function is either an absolute or relative path of a directory to which the current directory needs to be changed to. It returns true or false.
The getcwd() Function
The getcwd() function works similar to pwd command in Ubuntu Linux, and returns the path to the current working directory.
Example
With the following code snippet, PHP displays the current working directory before and after changing the current working directory. A couple of files are created inside the new current directory. With the scandir() function, the files are listed.
<?php
echo "current directory: ". getcwd() . PHP_EOL;
$dir = "./mydir";
chdir($dir);
echo "current directory changed to: ". getcwd() .PHP_EOL;
$fp = fopen("a.txt", "w");
fwrite($fp, "Hello World");
fclose($fp);
copy("a.txt", "b.txt");
$dir = getcwd();
foreach(scandir($dir) as $file)
echo $file . PHP_EOL;
?>
It will produce the following output −
current directory: C:\xampp\php current directory changed to: C:\xampp\php\mydir . .. a.txt b.txt
The rmdir() Function
The rmdir() function removes a certain directory whose path is given as parameter. The directory to be removed must be empty.
$dir = "c:/newdir/";
rmdir($dir) or die("The directory is not present or not empty");
PHP Listing Files
Windows command DIR and Linux command ls both display the list of files in the current directory. These commands can be operated with different switches to apply conditions on the list of files displayed. PHP provides a couple of options for programmatically listing files in a given directory.
The readdir() Function
The opendir() function in PHP is similar to fopen() function. It returns handles to the directory so that the contents of the directory can be read from in a serialized manner.
opendir(string $directory, ?resource $context = null): resource|false
This function opens up a directory handle to be used in the subsequent closedir(), readdir(), and rewinddir() calls.
The readdir() function reads the next available entry from the stream handle returned by opendir() function.
readdir(?resource $dir_handle = null): string|false
Here, dir_handle is the directory handle previously opened with opendir().not specified, the last link opened by opendir() is assumed.
The closedir() function is similar to fclose() function. It closes the directory handle.
closedir(?resource $dir_handle = null): void
The function closes the directory stream indicated by dir_handle. The stream must have previously been opened by opendir().
Example
The following PHP code reads one file at a time from the currently logged directory.
<?php
$dir = getcwd();
// Open a known directory, and proceed to read its contents
if (is_dir($dir)) {
if ($dh = opendir($dir)) {
while (($file = readdir($dh)) !== false) {
echo "filename:" . $file . "\n";
}
closedir($dh);
}
}
?>
The scandir() Function
The scandir() function retrieves the files ans subdirectories inside a given directory.
scandir(string $directory, int $sorting_order = SCANDIR_SORT_ASCENDING, ?resource $context = null): array|false
The "sorting_order" by default is alphabetical in ascending order. If this optional parameter is set to SCANDIR_SORT_DESCENDING, then the sort order becomes alphabetical in descending order. If it is set to SCANDIR_SORT_NONE, then the result becomes unsorted.
Example
With the following PHP code, the scandir() function returns an array of files in the given directory.
<?php $dir = "c:/xampp/php/mydir/"; $files = scandir($dir); var_dump($files); ?>
It will produce the following output −
array(4) {
[0]=>
string(1) "."
[1]=>
string(2) ".."
[2]=>
string(5) "a.txt"
[3]=>
string(5) "b.txt"
}
You can use a foreach loop to traverse the array returned by the scandir() function.
<?php $dir = "c:/xampp/php/mydir/"; $files = scandir($dir); foreach ($files as $file) echo $file . PHP_EOL; ?>
It will produce the following output −
. .. a.txt b.txt
Object Oriented Programming in PHP
We can imagine our universe made of different objects like sun, earth, moon etc. Similarly we can imagine our car made of different objects like wheel, steering, gear etc. Same way there is object oriented programming concepts which assume everything as an object and implement a software using different objects.
Object Oriented Concepts
Before we go in detail, lets define important terms related to Object Oriented Programming.
Class − This is a programmer-defined data type, which includes local functions as well as local data. You can think of a class as a template for making many instances of the same kind (or class) of object.
Object − An individual instance of the data structure defined by a class. You define a class once and then make many objects that belong to it. Objects are also known as instance.
Member Variable − These are the variables defined inside a class. This data will be invisible to the outside of the class and can be accessed via member functions. These variables are called attribute of the object once an object is created.
Member function − These are the function defined inside a class and are used to access object data.
Inheritance − When a class is defined by inheriting existing function of a parent class then it is called inheritance. Here child class will inherit all or few member functions and variables of a parent class.
Parent class − A class that is inherited from by another class. This is also called a base class or super class.
Child Class − A class that inherits from another class. This is also called a subclass or derived class.
Polymorphism − This is an object oriented concept where same function can be used for different purposes. For example function name will remain same but it take different number of arguments and can do different task.
Overloading − a type of polymorphism in which some or all of operators have different implementations depending on the types of their arguments. Similarly functions can also be overloaded with different implementation.
Data Abstraction − Any representation of data in which the implementation details are hidden (abstracted).
Encapsulation − refers to a concept where we encapsulate all the data and member functions together to form an object.
Constructor − refers to a special type of function which will be called automatically whenever there is an object formation from a class.
Destructor − refers to a special type of function which will be called automatically whenever an object is deleted or goes out of scope.
Defining PHP Classes
The general form for defining a new class in PHP is as follows −
<?php
class phpClass {
var $var1;
var $var2 = "constant string";
function myfunc ($arg1, $arg2) {
[..]
}
[..]
}
?>
Here is the description of each line −
The special form class, followed by the name of the class that you want to define.
A set of braces enclosing any number of variable declarations and function definitions.
Variable declarations start with the special form var, which is followed by a conventional $ variable name; they may also have an initial assignment to a constant value.
Function definitions look much like standalone PHP functions but are local to the class and will be used to set and access object data.
Example
Here is an example which defines a class of Books type −
<?php
class Books {
/* Member variables */
var $price;
var $title;
/* Member functions */
function setPrice($par){
$this->price = $par;
}
function getPrice(){
echo $this->price ."<br/>";
}
function setTitle($par){
$this->title = $par;
}
function getTitle(){
echo $this->title ." <br/>";
}
}
?>
The variable $this is a special variable and it refers to the same object ie. itself.
Creating Objects in PHP
Once you defined your class, then you can create as many objects as you like of that class type. Following is an example of how to create object using new operator.
$physics = new Books; $maths = new Books; $chemistry = new Books;
Here we have created three objects and these objects are independent of each other and they will have their existence separately. Next we will see how to access member function and process member variables.
Calling Member Functions
After creating your objects, you will be able to call member functions related to that object. One member function will be able to process member variable of related object only.
Following example shows how to set title and prices for the three books by calling member functions.
$physics->setTitle( "Physics for High School" ); $chemistry->setTitle( "Advanced Chemistry" ); $maths->setTitle( "Algebra" ); $physics->setPrice( 10 ); $chemistry->setPrice( 15 ); $maths->setPrice( 7 );
Now you call another member functions to get the values set by in above example −
$physics->getTitle(); $chemistry->getTitle(); $maths->getTitle(); $physics->getPrice(); $chemistry->getPrice(); $maths->getPrice();
This will produce the following result −
Physics for High School Advanced Chemistry Algebra 10 15 7
Constructor Functions
Constructor Functions are special type of functions which are called automatically whenever an object is created. So we take full advantage of this behaviour, by initializing many things through constructor functions.
PHP provides a special function called __construct() to define a constructor. You can pass as many as arguments you like into the constructor function.
Following example will create one constructor for Books class and it will initialize price and title for the book at the time of object creation.
function __construct( $par1, $par2 ) {
$this->title = $par1;
$this->price = $par2;
}
Now we don't need to call set function separately to set price and title. We can initialize these two member variables at the time of object creation only. Check following example below −
$physics = new Books( "Physics for High School", 10 );
$maths = new Books ( "Advanced Chemistry", 15 );
$chemistry = new Books ("Algebra", 7 );
/* Get those set values */
$physics->getTitle();
$chemistry->getTitle();
$maths->getTitle();
$physics->getPrice();
$chemistry->getPrice();
$maths->getPrice();
This will produce the following result −
Physics for High School Advanced Chemistry Algebra 10 15 7
Destructor
Like a constructor function you can define a destructor function using function __destruct(). You can release all the resources with-in a destructor.
Inheritance
PHP class definitions can optionally inherit from a parent class definition by using the extends clause. The syntax is as follows −
class Child extends Parent {
<definition body>
}
The effect of inheritance is that the child class (or subclass or derived class) has the following characteristics −
Automatically has all the member variable declarations of the parent class.
Automatically has all the same member functions as the parent, which (by default) will work the same way as those functions do in the parent.
Following example inherit Books class and adds more functionality based on the requirement.
class Novel extends Books {
var $publisher;
function setPublisher($par){
$this->publisher = $par;
}
function getPublisher(){
echo $this->publisher. "<br />";
}
}
Now apart from inherited functions, class Novel keeps two additional member functions.
Function Overriding
Function definitions in child classes override definitions with the same name in parent classes. In a child class, we can modify the definition of a function inherited from parent class.
In the following example getPrice and getTitle functions are overridden to return some values.
function getPrice() {
echo $this->price . "<br/>";
return $this->price;
}
function getTitle(){
echo $this->title . "<br/>";
return $this->title;
}
Public Members
Unless you specify otherwise, properties and methods of a class are public. That is to say, they may be accessed in three possible situations −
From outside the class in which it is declared
From within the class in which it is declared
From within another class that implements the class in which it is declared
Till now we have seen all members as public members. If you wish to limit the accessibility of the members of a class then you define class members as private or protected.
Private members
By designating a member private, you limit its accessibility to the class in which it is declared. The private member cannot be referred to from classes that inherit the class in which it is declared and cannot be accessed from outside the class.
A class member can be made private by using private keyword infront of the member.
class MyClass {
private $car = "skoda";
$driver = "SRK";
function __construct($par) {
// Statements here run every time
// an instance of the class
// is created.
}
function myPublicFunction() {
return("I'm visible!");
}
private function myPrivateFunction() {
return("I'm not visible outside!");
}
}
When MyClass class is inherited by another class using extends, myPublicFunction() will be visible, as will $driver. The extending class will not have any awareness of or access to myPrivateFunction and $car, because they are declared private.
Protected members
A protected property or method is accessible in the class in which it is declared, as well as in classes that extend that class. Protected members are not available outside of those two kinds of classes. A class member can be made protected by using protected keyword in front of the member.
Here is different version of MyClass −
class MyClass {
protected $car = "skoda";
$driver = "SRK";
function __construct($par) {
// Statements here run every time
// an instance of the class
// is created.
}
function myPublicFunction() {
return("I'm visible!");
}
protected function myPrivateFunction() {
return("I'm visible in child class!");
}
}
Interfaces
Interfaces are defined to provide a common function names to the implementers. Different implementors can implement those interfaces according to their requirements. You can say, interfaces are skeletons which are implemented by developers.
As of PHP5, it is possible to define an interface, like this −
interface Mail {
public function sendMail();
}
Then, if another class implemented that interface, like this −
class Report implements Mail {
// sendMail() Definition goes here
}
Constants
A constant is somewhat like a variable, in that it holds a value, but is really more like a function because a constant is immutable. Once you declare a constant, it does not change.
Declaring one constant is easy, as is done in this version of MyClass −
class MyClass {
const requiredMargin = 1.7;
function __construct($incomingValue) {
// Statements here run every time
// an instance of the class
// is created.
}
}
In this class, requiredMargin is a constant. It is declared with the keyword const, and under no circumstances can it be changed to anything other than 1.7. Note that the constant's name does not have a leading $, as variable names do.
Abstract Classes
An abstract class is one that cannot be instantiated, only inherited. You declare an abstract class with the keyword abstract, like this −
When inheriting from an abstract class, all methods marked abstract in the parent's class declaration must be defined by the child; additionally, these methods must be defined with the same visibility.
abstract class MyAbstractClass {
abstract function myAbstractFunction() {
}
}
Note that function definitions inside an abstract class must also be preceded by the keyword abstract. It is not legal to have abstract function definitions inside a non-abstract class.
Static Keyword
Declaring class members or methods as static makes them accessible without needing an instantiation of the class. A member declared as static can not be accessed with an instantiated class object (though a static method can).
Try out following example −
<?php
class Foo {
public static $my_static = 'foo';
public function staticValue() {
return self::$my_static;
}
}
print Foo::$my_static . "\n";
$foo = new Foo();
print $foo->staticValue() . "\n";
?>
Final Keyword
PHP 5 introduces the final keyword, which prevents child classes from overriding a method by prefixing the definition with final. If the class itself is being defined final then it cannot be extended.
Following example results in Fatal error: Cannot override final method BaseClass::moreTesting()
<?php
class BaseClass {
public function test() {
echo "BaseClass::test() called<br>";
}
final public function moreTesting() {
echo "BaseClass::moreTesting() called<br>";
}
}
class ChildClass extends BaseClass {
public function moreTesting() {
echo "ChildClass::moreTesting() called<br>";
}
}
?>
Calling parent constructors
Instead of writing an entirely new constructor for the subclass, let's write it by calling the parent's constructor explicitly and then doing whatever is necessary in addition for instantiation of the subclass. Here's a simple example −
class Name {
var $_firstName;
var $_lastName;
function Name($first_name, $last_name) {
$this->_firstName = $first_name;
$this->_lastName = $last_name;
}
function toString() {
return($this->_lastName .", " .$this->_firstName);
}
}
class NameSub1 extends Name {
var $_middleInitial;
function NameSub1($first_name, $middle_initial, $last_name) {
Name::Name($first_name, $last_name);
$this->_middleInitial = $middle_initial;
}
function toString() {
return(Name::toString() . " " . $this->_middleInitial);
}
}
In this example, we have a parent class (Name), which has a two-argument constructor, and a subclass (NameSub1), which has a three-argument constructor. The constructor of NameSub1 functions by calling its parent constructor explicitly using the :: syntax (passing two of its arguments along) and then setting an additional field. Similarly, NameSub1 defines its non constructor toString() function in terms of the parent function that it overrides.
NOTE − A constructor can be defined with the same name as the name of a class. It is defined in above example.
PHP Classes and Objects
The concept of classes and objects is central to PHPs object-oriented programming methodology. A class is the template description of its objects. It includes the properties and functions that process the properties. An object is the instance of its class. It is characterized by the properties and functions defined in the class.
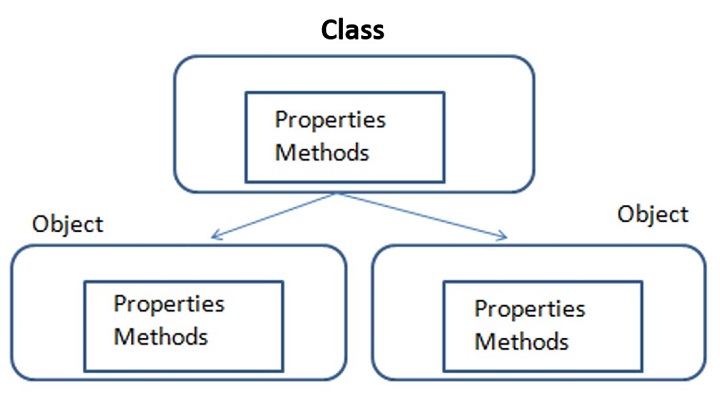
Defining a Class in PHP
To define a class, PHP has a keyword "class". Similarly, PHP provides the keyword "new" to declare an object of any given class.
The general form for defining a new class in PHP is as follows −
<?php
class phpClass {
var $var1;
var $var2 = "constant string";
function myfunc ($arg1, $arg2) {
[..]
}
[..]
}
?>
The keyword class is followed by the name of the class that you want to define. Class name follows the same naming conventions as used for a PHP variable. It is followed by a pair of braces enclosing any number of variable declarations (properties) and function definitions.
Variable declarations start with another reserved keyword var, which is followed by a conventional $variable name; they may also have an initial assignment to a constant value.
Function definitions look much like standalone PHP functions but are local to the class and will be used to set and access object data. Functions inside a class are also called methods.
Example
Here is an example which defines a class of Book type −
class Book {
/* Member variables */
var $price;
var $title;
/* Member functions */
function setPrice($par){
$this->price = $par;
}
function getPrice(){
echo $this->price ."<br/>";
}
function setTitle($par){
$this->title = $par;
}
function getTitle(){
echo $this->title ." <br/>";
}
}
The pseudo-variable $this is available when a method is called from within an object context. $this refers to the calling object.
The Book class has two member variables (or properties) - $title and $price. The member variables (also sometimes called instance variables) usually have different values for each object; like each book has a title and price different from the other.
The Book class has functions (functions defined inside the class are called methods) setTitle() and setPrice(). These functions are called with reference to an object and a parameter, used to set the value of title and price member variables respectively.
The Book class also has getTitle() and getPrice() methods. When called, they return the title and price of the object whose reference is passed.
Once a class is defined, you can declare one or more objects, using new operator.
$b1 = new Book; $b2 = new Book;
The new operator allocates the memory required for the member variables and methods of each object. Here we have created two objects and these objects are independent of each other and they will have their existence separately.
Each object has access to its member variables and methods with the "->" operator. For example, the $title property of b1 object is "$b1->title" and to call setTitle() method, use the "$b1->setTitle()" statement.
To set the title and price of b1 object,
$b1->setTitle("PHP Programming");
$b1->setPrice(450);
Similarly, the following statements fetch the title and price of b1 book −
echo $b1->getPrice(); echo $b1->getTitle();
Example
Given below is the complete PHP script that defines Book class, declares two objects and calls the member functions.
<?php
class Book {
/* Member variables */
var $price;
var $title;
/* Member functions */
function setPrice($par){
$this->price = $par;
}
function getPrice(){
echo $this->price ."\n";
}
function setTitle($par){
$this->title = $par;
}
function getTitle(){
echo $this->title ."\n";
}
}
$b1 = new Book;
$b2 =new Book;
$b1->setTitle("PHP Programming");
$b1->setPrice(450);
$b2->setTitle("PHP Fundamentals");
$b2->setPrice(275);
$b1->getTitle();
$b1->getPrice();
$b2->getTitle();
$b2->getPrice();
?>
It will produce the following output −
PHP Programming 450 PHP Fundamentals 275
PHP Constructor and Destructor
As in most of the object-oriented languages, you can define a constructor function in a class in PHP also. When you declare an object with the new operator, its member variables are not assigned any value. The constructor function is used to initialize every new object at the time of declaration. PHP also supports having a destructor function that destroys the object from the memory as it no longer has any reference.
The __construct() Function
PHP provides a __construct() function that initializes an object.
__construct(mixed ...$values = ""): void
The constructor method inside a class is called automatically on each newly created object. Note that defining a constructor is not mandatory. However, if present, it is suitable for any initialization that the object may need before it is used.
You can pass as many as arguments you like into the constructor function. The __construct() function doesnt have any return value.
Let us define a constructor in the Book class used in the previous chapter
<?php
class Book {
/* Member variables */
var $price;
var $title;
/*Constructor*/
function __construct(){
$this->title = "PHP Fundamentals";
$this->price = 275;
}
/* Member functions */
function getPrice() {
echo "Price: $this->price \n";
}
function getTitle(){
echo "Title: $this->title \n";
}
}
$b1 = new Book;
$b1->getTitle();
$b1->getPrice();
?>
It will produce the following output −
Title: PHP Fundamentals Price: 275
Parameterized Constructor
The member variables of $b1 have been initialized without having to call setTitle() and setPrice() methods, because the constructor was called as soon as the object was declared. However, this constructor will be called for each object, and hence each object has the same values of title and price properties.
To initialize each object with different values, define the __construct() function with parameters.
Change the definition of __construct() function to the following −
function __construct($param1, $param2) {
$this->title = $param1;
$this->price = $param2;
}
To initialize the object, pass values to the parameters inside a parenthesis in the declaration.
$b1 = new Book("PHP Fundamentals", 375);
Example
Now, you can have each object with different values to the member variables.
<?php
class Book {
/* Member variables */
var $price;
var $title;
/*Constructor*/
function __construct($param1, $param2) {
$this->title = $param1;
$this->price = $param2;
}
/* Member functions */
function getPrice(){
echo "Price: $this->price \n";
}
function getTitle(){
echo "Title: $this->title \n";
}
}
$b1 = new Book("PHP Fundamentals", 375);
$b2 = new Book("PHP Programming", 450);
$b1->getTitle();
$b1->getPrice();
$b2->getTitle();
$b2->getPrice();
?>
It will produce the following output −
Title: PHP Fundamentals Price: 375 Title: PHP Programming Price: 450
Constructor Overloading
Method overloading is an important concept in object-oriented programming, where a class may have more than one definitions of constructor, each having different number of arguments. However, PHP doesnt support method overloading. This limitation may be overcome by using arguments with default values in the constructor function.
Change the __construct() function to the following −
function __construct($param1="PHP Basics", $param2=380) {
$this->title = $param1;
$this->price = $param2;
}
Now, declare an object without passing parameters, and the other with parameters. One without parameters will be initialized with default arguments, the other with the values passed.
$b1 = new Book();
$b2 = new Book("PHP Programming", 450);
It will produce the following output −
Title: PHP Basics Price: 380 Title: PHP Programming Price: 450
Type Declaration in Constructor
Since PHP (version 7.0 onwards) allows scalar type declarations for function arguments, the __construct() function may be defined as −
function __construct(string $param1="PHP Basics", int $param2=380) {
$this->title = $param1;
$this->price = $param2;
}
In the earlier versions of PHP, using the name of class to define a constructor function was allowed, but this feature has been deprecated since PHP version 8.0.
The __destruct() Function
PHP also has a __destructor() function. It implements a destructor concept similar to that of other object-oriented languages, as in C++. The destructor method will be called as soon as there are no other references to a particular object.
__destruct(): void
The __destruct() function doesnt have any parameters, neither does it have any return value. The fact that the __destruct() function is automatically called when any object goes out of scope, can be verified by putting var_dump($this) inside the function.
As mentioned above, $this carries the reference to the calling object, the dump shows that the member variables are set to NULL
Add destructor function in the Book class as follows −
function __destruct() {
var_dump($this);
echo "object destroyed";
}
As the program exits, the following output will be displayed −
object(Book)#1 (2) {
["price"]=>
NULL
["title"]=>
NULL
}
object destroyed
PHP Access Modifiers
In PHP, the keywords public, private and protected are known as the access modifiers. These keywords control the extent of accessibility or visibility of the class properties and methods. One of these keywords is prefixed while declaring the member variables and defining member functions.
Whether the PHP code has free access to a class member, or it is restricted from getting access, or it has a conditional access, is determined by these keywords −
Public − class members are accessible from anywhere, even from outside the scope of the class, but only with the object reference.
Private − class members can be accessed within the class itself. It prevents members from outside class access even with the reference of the class instance.
Protected − members can be accessed within the class and its child class only, nowhere else.
The principle of data encapsulation is the cornerstone of the object-oriented programming methodology. It refers to the mechanism of keeping the data members or properties of an object away from the reach of the environment outside the class, allowing controlled access only through the methods or functions available in the class.
To implement encapsulation, data members of a class are made private and the methods are made public.
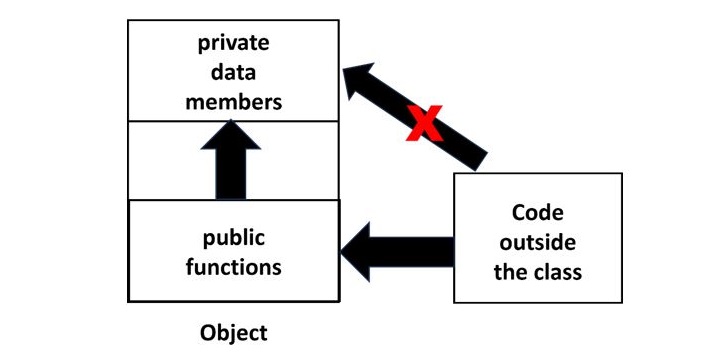
Public Members
In PHP, the class members (both member variables as well as member functions) are public by default.
Example
In the following program, the member variables title and price of the object are freely accessible outside the class because they are public by default, if not otherwise specified.
<?php
class Book {
/* Member variables */
var $price;
var $title;
/*Constructor*/
function __construct(string $param1="PHP Basics", int $param2=380) {
$this->title = $param1;
$this->price = $param2;
}
function getPrice() {
echo "Title: $this->price \n";
}
function getTitle() {
echo "Price: $this->title \n";
}
}
$b1 = new Book();
echo "Title : $b1->title Price: $b1->price";
?>
It will produce the following output −
Title : PHP Basics Price: 380
Private Members
As mentioned above, the principle of encapsulation requires that the member variables should not be accessible directly. Only the methods should have the access to the data members. Hence, we need to make the member variables private and methods public.
<?php
class Book {
/* Member variables */
private $price;
private $title;
/*Constructor*/
function __construct(string $param1="PHP Basics", int $param2=380) {
$this->title = $param1;
$this->price = $param2;
}
public function getPrice() {
echo "Price: $this->price \n";
}
public function getTitle() {
echo "Title: $this->title \n;";
}
}
$b1 = new Book();
$b1->getTitle();
$b1->getPrice();
echo "Title : $b1->title Price: $b1->price";
?>
Output
Now, the getTitle() and getPrice() functions are public, able to access the private member variables title and price. But, while trying to display the title and price directly, an error is encountered as they are not public.
Title: PHP Basics Price: 380 Fatal error: Uncaught Error: Cannot access private property Book::$title in hello.php:31
Protected Members
The effect of specifying protected access to a class member is effective in case of class inheritance. We know that public members are accessible from anywhere outside the class, and private members are denied access from anywhere outside the class.
The protected keyword grants access to an object of the same class and an object of its inherited class, denying it to any other environment.
Let us set the title member in Book class example to protected, leaving price to private.
class Book {
/* Member variables */
private $price;
protected $title;
# rest of the code kept as it is
}
$b1 = new Book();
$b1->getTitle();
$b1->getPrice();
PHP allows the both the member variables to be accessed, as the object belongs to the same class.
Let us add a mybook class that inherits the Book class −
class mybook extends Book {
# no additional members defined
}
whose object is still able to access the member variables, as the child class inherits public and protected members of the parent class.
However, make mybook class as an independent class (not extending Book class) and define a getmytitle() function that tries to access protected title member variable of Book class.
class mybook {
public function getmytitle($b) {
echo "Title: $b->title <br/>";
}
}
$b1 = new mybook();
$b = new Book();
$b1->getmytitle($b);
As the getmytitle() function tries to print title of Book object, an error message showing Cannot access protected property Book::$title is raised.
Example
Try to run the following code −
<?php
class Book {
private $price;
protected $title;
function __construct(string $param1="PHP Basics", int $param2=380) {
$this->title = $param1;
$this->price = $param2;
}
public function getPrice(){
echo "Price: $this->price <br/>";
}
public function getTitle(){
echo "Title: $this->title <br/>";
}
}
class mybook {
public function getmytitle($b) {
echo "Title: $b->title <br/>";
}
}
$b1 = new mybook();
$b = new Book();
$b1->getmytitle($b);
?>
It will produce the following output −
PHP Fatal error: Uncaught Error: Cannot access protected property Book::$title in /home/cg/root/97848/main.php:18
Hence, it can be seen that the protected member is accessible by object of same class and inherited class only. For all other environment, protected members are not accessible.
The accessibility rules can be summarized by the following table −
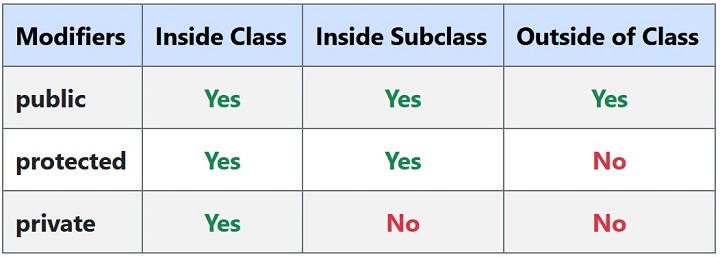
PHP Inheritance
Inheritance is one of the fundamental principles of object-oriented programming methodology. Inheritance is a software modelling approach that enables extending the capability of an existing class to build new class instead of building from scratch.
PHP provides all the functionality to implement inheritance in its object model. Incorporating inheritance in PHP software development results in code reuse, remove redundant code duplication and logical organization.
Imagine that you need to design a new class whose most of the functionality already well defined in an existing class. Inheritance lets you to extend the existing class, add or remove its features and develop a new class. In fact, PHP has the "extends" keyword to establish inheritance relationship between existing and new classes.
class newclass extends oldclass {
...
...
}
Inheritance comes into picture when a new class (henceforth will be called inherited class, sub class, child class, etc.) possesses "IS A" relationship with an existing class (which will be called base class, super class, parent class, etc.).

In PHP, when a new class is defined by extending another class, the subclass inherits the public and protected methods, properties and constants from the parent class. You are free to override the functionality of an inherited method, otherwise it will retain its functionality as defined in the parent class.
Example
Take a look at the following example −
<?php
class myclass {
public function hello() {
echo "Hello from the parent class" . PHP_EOL;
}
public function thanks() {
echo "Thank you from parent class" . PHP_EOL;
}
}
class newclass extends myclass {
public function thanks() {
echo "Thank you from the child class" . PHP_EOL;
}
}
# object of parent class
$obj1 = new myclass;
$obj1->hello();
$obj1->thanks();
# object of child class
$obj2 = new newclass;
$obj2->hello();
$obj2->thanks();
?>
It will produce the following output −
Hello from the parent class Thank you from parent class Hello from the parent class Thank you from the child class
As mentioned before, the child class inherits public and protected members (properties and methods) of the parent. The child class may introduce additional properties or methods.
In the following example, we use the Book class as the parent class. Here, we create an ebook class that extends the Book class. The new class has an additional property format (indicating ebooks file format EPUB, PDF, MOBI etc). The ebook class defines two new methods to initialize and output the ebbok data getebook() and dispebook() respectively.
Example
The complete code of inheritance example is given below −
<?php
class Book {
/* Member variables */
protected int $price;
protected string $title;
public function getbook(string $param1, int $param2) {
$this->title = $param1;
$this->price = $param2;
}
public function dispbook() {
echo "Title: $this->title Price: $this->price \n";
}
}
class ebook extends Book {
private string $format;
public function getebook(string $param1, int $param2, string $param3) {
$this->title = $param1;
$this->price = $param2;
$this->format = $param3;
}
public function dispebook() {
echo "Title: $this->title Price: $this->price\n";
echo "Format: $this->format \n";
}
}
$eb = new ebook;
$eb->getebook("PHP Fundamentals", 450, "EPUB");
$eb->dispebook();
?>
The browser output is as shown below −
Title: PHP Fundamentals Price: 450 Format: EPUB
If you take a closer look at the getebook() function, the first two assignment statements are in fact there getbook() function, which the ebook class has inherited. Hence, we can call it with parent keyword and scope resolution operator.
Change the getebook() function code with the following −
public function getebook(string $param1, int $param2, string $param3) {
parent::getbook($param1, $param2);
$this->format = $param3;
}
Similarly, the first echo statement in dispebook() function is replaced by a call to the dispbook() function in parent class −
public function dispebook() {
parent::dispbook();
echo "Format: $this->format<br/>";
}
Constructor in Inheritance
The constructor in the parent class constructor is inherited by the child class but it cannot be directly called in the child class if the child class defines a constructor.
In order to run a parent constructor, a call to parent::__construct() within the child constructor is required.
Example
Take a look at the following example −
<?php
class myclass{
public function __construct(){
echo "This is parent constructor". PHP_EOL;
}
}
class newclass extends myclass {
public function __construct(){
parent::__construct();
echo "This is child class destructor" . PHP_EOL;
}
}
$obj = new newclass();
?>
It will produce the following output −
This is parent constructor This is child class destructor
However, if the child does not have a constructor, then it may be inherited from the parent class just like a normal class method (if it was not declared as private).
Example
Take a look at the following example −
<?php
class myclass{
public function __construct(){
echo "This is parent constructor". PHP_EOL;
}
}
class newclass extends myclass{ }
$obj = new newclass();
?>
It will produce the following output −
This is parent constructor
PHP doesnt allow developing a class by extending more than one parents. You can have hierarchical inheritance, wherein class B extends class A, class C extends class B, and so on. But PHP doesnt support multiple inheritance where class C tries to extend both class A and class B. We can however extend one class and implement one or more interfaces. We shall learn about interfaces in one of the subsequent chapters.
PHP Class Constants
PHP allows an identifier in a class to be defined as a "class constant" with a constant value, the one that remains unchanged on a per class basis. To differentiate from a variable or property within class, the name of the constant is not prefixed with the usual "$" symbol and is defined with the "const" qualifier. Note that a PHP program can also have a global constant created using the define() function.
The default visibility of a constant is public, although other modifiers may be used in the definition. The value of a constant must be an expression and not a variable, nor a function call/property. The value of a constant is accessed through the class name using the scope resolution operator. Inside a method though, it can be referred to through self variable.
class SomeClass {
const CONSTANT = 'constant value';
}
echo SomeClass::CONSTANT;
Constant names are case sensitive. Conventionally, the names of constants are in upper case.
Example
This example shows how a Class Constant is defined and accessed −
<?php
class square {
const PI=M_PI;
var $side=5;
function area() {
$area=$this->side**2*self::PI;
return $area;
}
}
$s1=new square();
echo "PI=". square::PI . "\n";
echo "area=" . $s1->area();
?>
It will produce the following output −
PI=3.1415926535898 area=78.539816339745
Class Constant as Expression
In this example, the class constant is assigned an expression −
<?php
const X = 22;
const Y=7;
class square {
const PI=X/Y;
var $side=5;
function area() {
$area=$this->side**2*self::PI;
return $area;
}
}
$s1=new square();
echo "PI=". square::PI . "\n";
echo "area=" . $s1->area();
?>
It will produce the following output −
PI=3.1428571428571 area=78.571428571429
Class Constant Visibility Modifiers
Take a look at the following example −
<?php
class example {
const X=10;
private const Y=20;
}
$s1=new example();
echo "public=". example::X. "\n";
echo "private=" . $s1->Y ."\n";
echo "private=" . $example::Y ."\n";
?>
It will produce the following output −
public=10 PHP Notice: Undefined property: example::$Y in line 11 private= PHP Fatal error: Uncaught Error: Cannot access private const example::Y
PHP Abstract Classes
The list of reserved words in PHP includes the "abstract" keyword. When a class is defined with the "abstract" keyword, it cannot be instantiated, i.e., you cannot declare a new object of such a class. An abstract class can be extended by another class.
abstract class myclass {
// class body
}
As mentioned above, you cannot declare an object of this class. Hence, the following statement −
$obj = new myclass;
will result in an error message as shown below −
PHP Fatal error: Uncaught Error: Cannot instantiate abstract class myclass
An abstract class may include properties, constants or methods. The class members may be of public, private or protected type. One or more methods in a class may also be defined as abstract.
If any method in a class is abstract, the class itself must be an abstract class. In other words, a normal class cannot have an abstract method defined in it.
This will raise an error −
class myclass {
abstract function myabsmethod($arg1, $arg2);
function mymethod() #this is a normal method {
echo "Hello";
}
}
The error message will be shown as −
PHP Fatal error: Class myclass contains 1 abstract method and must therefore be declared abstract
You can use an abstract class as a parent and extend it with a child class. However, the child class must provide concrete implementation of each of the abstract methods in the parent class, otherwise an error will be encountered.
Example
In the following code, myclass is an abstract class with myabsmethod() as an abstract method. Its derived class is mynewclass, but it doesnt have the implementation of the abstract method in its parent.
<?php
abstract class myclass {
abstract function myabsmethod($arg1, $arg2);
function mymethod() {
echo "Hello";
}
}
class newclass extends myclass {
function newmethod() {
echo "World";
}
}
$m1 = new newclass;
$m1->mymethod();
?>
The error message in such a situation is −
PHP Fatal error: Class newclass contains 1 abstract method and must therefore be declared abstract or implement the remaining methods (myclass::myabsmethod)
It indicates that newclass should either implement the abstract method or it should be declared as an abstract class.
Example
In the following PHP script, we have marks as an abstract class with percent() being an abstract method in it. Another student class extends the marks class and implements its percent() method.
<?php
abstract class marks {
protected int $m1, $m2, $m3;
abstract public function percent(): float;
}
class student extends marks {
public function __construct($x, $y, $z) {
$this->m1 = $x;
$this->m2 = $y;
$this->m3 = $z;
}
public function percent(): float {
return ($this->m1+$this->m2+$this->m3)*100/300;
}
}
$s1 = new student(50, 60, 70);
echo "Percentage of marks: ". $s1->percent() . PHP_EOL;
?>
It will produce the following output −
Percentage of marks: 60
Difference between Interface and Abstract Class in PHP
The concept of abstract class in PHP is very similar to interface. However, there are a couple of differences between an interface and an abstract class.
| Abstract class | Interface |
|---|---|
| Use abstract keyword to define abstract class | Use interface keyword to define interface |
| Abstract class cannot be instantiated | Interface cannot be instantiated. |
| Abstract class may have normal and abstract methods | Interface must declare the methods with arguments and return types only and not with any body. |
| Abstract class is extended by child class which must implement all abstract methods | Interface must be implemented by another class, which must provide functionality of all methods in the interface. |
| Can have public, private or protected properties | Properties cannot be declared in interface |
PHP Interfaces
Just as a class is a template for its objects, an interface in PHP can be called as a template for classes. We know that when a class is instantiated, the properties and methods defined in a class are available to it. Similarly, an interface in PHP declares the methods along with their arguments and return value. These methods do not have any body, i.e., no functionality is defined in the interface.
A concrete class has to implement the methods in the interface. In other words, when a class implements an interface, it must provide the functionality for all methods in the interface.
An interface is defined in the same way as a class is defined, except that the keyword "interface" is used in place of class.
interface myinterface {
public function myfunction(int $arg1, int $arg2);
public function mymethod(string $arg1, int $arg2);
}
Note that the methods inside the interface have not been provided with any functionality. Definitions of these methods must be provided by the class that implements this interface.
When we define a child class, we use the keyword "extends". In this case, the class that must use the keyword "implements".
All the methods declared in the interface must be defined, with the same number and type of arguments and return value.
class myclass implements myinterface {
public function myfunction(int $arg1, int $arg2) {
## implementation of myfunction;
}
public function mymethod(string $arg1, int $arg2) {
# implementation of mymethod;
}
}
Note that all the methods declared in an interface must be public.
Example
Let us define an interface called shape. A shape has a certain area. You have shapes of different geometrical appearance, such as rectangle, circle etc., each having an area, calculated with different formula. Hence the shape interface declares a method area() that returns a float value.
interface shape {
public function area(): float;
}
Next, we shall define a circle class that implements shape interface, to implement, the class must provide a concrete implementation of the functions in the interface. Here, the area() function in circle class calculates the area of a circle of a given radius.
class circle implements shape {
var $radius;
public function __construct($arg1) {
$this->radius = $arg1;
}
public function area(): float {
return pow($this->radius,2)*pi();
}
}
We can now declare an object of circle class, and call the area() method.
$cir = new circle(5); echo "Radius : " . $cir->radius . " Area of Circle: " . $cir->area(). PHP_EOL;
An interface can be implemented by any number of classes (which may be unrelated to each other) provided the implementing class provides functionality of each method in the interface.
Here is a Square class that implements shape. The area() method returns the square of the side property.
class square implements shape {
var $side;
public function __construct($arg1) {
$this->side = $arg1;
}
public function area(): float {
return pow($this->side, 2);
}
}
Similarly, create a Square object and call the area() method.
Example
Given below is the complete code for a shape interface, implemented by circle and Square classes −
<?php
interface shape {
public function area(): float;
}
class square implements shape {
var $side;
public function __construct($arg1) {
$this->side = $arg1;
}
public function area(): float {
return pow($this->side, 2);
}
}
class circle implements shape {
var $radius;
public function __construct($arg1) {
$this->radius = $arg1;
}
public function area(): float {
return pow($this->radius,2)*pi();
}
}
$sq = new square(5);
echo "Side: " . $sq->side . " Area of Square: ". $sq->area() . PHP_EOL;
$cir = new circle(5);
echo "Radius: " . $cir->radius . " Area of Circle: " . $cir->area(). PHP_EOL;
?>
It will produce the following output −
Side: 5 Area of Square: 25 Radius: 5 Area of Circle: 78.539816339745
Multiple Inheritance in PHP
PHP doesnt have the provision to build a child class that extends two parent classes. In other words, the statement −
class child extends parent1, parent2
is not accepted. However, PHP does support having a child class that extends one parent class, and implementing one or more interfaces.
Let use look at the following example that shows a class that extends another and implements an interface.
First, the parent class marks. It has three instance variables or properties $m1, $m2, $m3 representing the marks in three subjects. A constructor is provided to initialize the object.
class marks {
protected int $m1, $m2, $m3;
public function __construct($x, $y, $z) {
$this->m1 = $x;
$this->m2 = $y;
$this->m3 = $z;
}
}
We now provide an interface called percent that declares a method percent(), which should return a float but doesnt have a function body.
interface percent {
public function percent(): float;
}
We now develop a class that extends marks class and provides implementation for percent() method in the interface.
class student extends marks implements percent {
public function percent(): float {
return ($this->m1+$this->m2+$this->m3)*100/300;
}
}
The student class inherits the parent constructor, but provides implementation of parent() method that returns the percentage of marks.
Example
The complete code is as follows −
<?php
class marks {
protected int $m1, $m2, $m3;
public function __construct($x, $y, $z) {
$this->m1 = $x;
$this->m2 = $y;
$this->m3 = $z;
}
}
interface percent {
public function percent(): float;
}
class student extends marks implements percent {
public function percent(): float {
return ($this->m1+$this->m2+$this->m3)*100/300;
}
}
$s1 = new student(50, 60, 70);
echo "Percentage of marks: ". $s1->percent() . PHP_EOL;
?>
It will produce the following output −
Percentage of marks: 60
The interface in PHP defines a framework of methods that classes use to provide a different but concrete implementation of their own.
PHP Traits
In PHP, a class can inherit only from one parent class, multiple inheritance is not defined in PHP. Traits in PHP have been introduced to overcome this limitation. You can define one or more method in a trait, which can be reused freely in various independent classes.
Syntax
The "trait" keyword is used as per the following syntax −
trait mytrait {
function method1() {
/*function body*/
}
function method2() {
/*function body*/
}
}
To be able to call the methods in a trait, it needs to made available to another class with use keyword.
Example
A Trait is similar to a class, but only intended to group functionality in a fine-grained and consistent way. It is not possible to instantiate a Trait on its own.
<?php
trait mytrait {
public function hello() {
echo "Hello World from " . __TRAIT__ . "";
}
}
class myclass {
use mytrait;
}
$obj = new myclass();
$obj->hello();
?>
It will produce the following output −
Hello World from mytrait
Example
A trait can be used in more than one classes. The following example has a mytrait with avg() function int it. It is used inside a marks class. The percent() method internally calls the avg() function from the trait.
Take a look at the following example −
<?php
trait mytrait {
function avg($x, $y) {
return ($x+$y)/2;
}
}
class marks {
use mytrait;
private int $m1, $m2;
function __construct($x, $y) {
$this->m1 = $x;
$this->m2 = $y;
}
function percent():float {
return $this->avg($this->m1, $this->m2);
}
}
$obj = new marks(50, 60);
echo "percentage: " . $obj->percent();
?>
It will produce the following output −
percentage: 55
Using Multiple Traits
A class can use more than one traits. Here we have two traits with one function each performing addition and multiplication of two numbers. Both are used inside a third class.
<?php
trait addition {
function add($x, $y) {
return $x+$y;
}
}
trait multiplication {
function multiply($x, $y) {
return $x*$y;
}
}
class numbers {
use addition, multiplication;
private int $m1, $m2;
function __construct($x, $y) {
$this->m1 = $x;
$this->m2 = $y;
}
function calculate():array {
$arr = [$this->add($this->m1, $this->m2), $this->multiply($this->m1, $this->m2)];
return $arr;
}
}
$obj = new numbers(50, 60);
$res = $obj->calculate();
echo "Addition: " . $res[0] . PHP_EOL;
echo "Multiplication: " . $res[1] . PHP_EOL;
?>
It will produce the following output −
Addition: 110 Multiplication: 3000
Overriding Trait Function
When a class uses a certain trait, its function are available to it just as a child class inherits the parent methods. The trait function may also be overridden.
<?php
trait mytrait {
public function sayHello() {
echo 'Hello World!';
}
}
class myclass {
use mytrait;
public function sayHello() {
echo 'Hello PHP!';
}
}
$o = new myclass();
$o->sayHello();
?>
It will produce the following output −
Hello PHP!
The "insteadof" Keyword
Sometimes, more two traits might have same name of the function. Hence, using them in a class creates ambiguous situation. PHP provides insteadof keyword to tell the parser function from which trait you intend to use.
<?php
trait mytrait {
public function sayHello() {
echo 'Hello World!';
}
}
trait newtrait {
public function sayHello() {
echo 'Hello PHP!';
}
}
class myclass {
use mytrait, newtrait{
newtrait::sayHello insteadof mytrait;
}
}
$o = new myclass();
$o->sayHello();
?>
It will produce the following output −
Hello PHP!
Aliasing a Trait Function
If you want to be able to call functions from both traits even if they have function with same name, a workaround is to specify an alias name to one of them.
Example
In the following example, we will call sayHello() from mytrait as hello() −
<?php
trait mytrait {
public function sayHello() {
echo 'Hello World!' . PHP_EOL;
}
}
trait newtrait {
public function sayHello() {
echo 'Hello PHP!' . PHP_EOL;
}
}
class myclass {
use mytrait, newtrait{
mytrait::sayHello as hello;
newtrait::sayHello insteadof mytrait;
}
}
$o = new myclass();
$o->hello();
$o->sayHello();
?>
It will produce the following output −
Hello World! Hello PHP!
PHP Static Methods
The "static" keyword in PHP is used to define static properties and static methods in a PHP class. It may be noted that the static keyword is also used to define static variable, and static anonymous functions. This chapter discusses static methods in a PHP class.
In a class definition, a function declared with a static qualifier becomes its static method.
class myclass {
public static function myStaticMethod() {
// ...
}
You dont need to create the instance of the class to call its static method. The static method is called by the class name though the scope resolution operator. The syntax of a static method call is −
myclass::myStaticMethod();
As the static methods are callable without creating an instance of the class, the pseudo-variable $this is not available inside static methods. A static method is allowed to be called by an object, although calling an instance method as a static method raises error.
Example
Take a look at the following example −
<?php
class myclass {
/* Member variables */
static int $var1 = 0;
public static function mystaticmethod() {
echo "This is a static method". PHP_EOL;
}
public function myinstancemethod() {
echo "This is an instance method". PHP_EOL;
}
}
myclass::mystaticmethod();
$obj = new myclass;
$obj->myinstancemethod();
$obj->mystaticmethod();
myclass::myinstancemethod();
?>
It will produce the following output −
This is a static method This is an instance method This is a static method PHP Fatal error: Uncaught Error: Non-static method myclass::myinstancemethod() cannot be called statically
The "self" Keyword in Static Method
If you need to call a static method from inside an instance method defined in the same class, you have to use self keyword referring to the name of the class, followed by the scope resolution operator (such as self::mystaticmethod)
<?php
class myclass {
/* Member variables */
static int $var1 = 0;
public static function mystaticmethod() {
echo "This is a static method". PHP_EOL;
}
public function myinstancemethod() {
echo "This is an instance method". PHP_EOL;
echo "calling static method from instance method" . PHP_EOL;
self::mystaticmethod();
}
}
$obj = new myclass;
$obj->myinstancemethod();
?>
It will produce the following output −
This is an instance method calling static method from instance method This is a static method
Using the "parent" Keyword
In case of inheritance, a static method defined in a base class may be called by an object of derived class, or from inside an instance method of the derived class, by referring it with the "parent" keyword.
Example
Take a look at the following example −
<?php
class myclass {
/* Member variables */
static int $var1 = 0;
public static function mystaticmethod() {
echo "This is a static method". PHP_EOL;
}
public function myinstancemethod() {
echo "This is an instance method". PHP_EOL;
echo "calling static method from instance method" . PHP_EOL;
self::mystaticmethod();
}
}
class mynewclass extends myclass {
public function myfunction() {
echo "This an instance method of the derived class" . PHP_EOL;
echo "Calling static method of the parent class" . PHP_EOL;
parent::mystaticmethod();
}
}
$obj = new mynewclass;
mynewclass::mystaticmethod();
$obj->myfunction();
?>
It will produce the following output −
This is a static method This an instance method of the derived class Calling static method of the parent class This is a static method
Static Method Inside Another Class
It is entirely possible to call the static method from one class in another. You have to qualify its name with its class name followed by the scope resolution operator.
Example
Take a look at the following example −
<?php
class myclass {
/* Member variables */
static int $var1 = 0;
public static function mystaticmethod() {
echo "This is a static method". PHP_EOL;
}
}
#this is not a derived class
class mynewclass {
public function myfunction() {
echo "This an instance method" . PHP_EOL;
echo "Calling static method of the another class" . PHP_EOL;
myclass::mystaticmethod();
}
}
$obj = new mynewclass;
$obj->myfunction();
?>
It will produce the following output −
This an instance method Calling static method of another class This is a static method
Since $this pseudo-variable is not available for a static method, the instance variables of an object cannot be accessed inside a static method. It can process only the static properties of the class.
Example
Take a look at the following example −
<?php
class myclass {
/* Member variables */
static int $var1 = 0;
function __construct() {
self::$var1++;
echo "object number ". self::$var1 . PHP_EOL;
}
public static function mystaticmethod() {
echo "Number of objects available: " . self::$var1 . PHP_EOL;
}
}
for ($i=1; $i<=3; $i++) {
$obj = new myclass;
}
myclass::mystaticmethod();
?>
It will produce the following output −
object number 1 object number 2 object number 3 Number of objects available: 3
PHP Static Properties
The "static" keyword in PHP is used to define static properties and static methods in a PHP class. It may be noted that the static keyword is also used to define static variable, and static anonymous functions. Read this chapter to learn about the static properties in a PHP class.
In a class definition, a variable declared with a static qualifier becomes its static property. The static keyword may appear before or after the access modifier.
static private $var1; public static $var2;
If you want to use type hints, the type must not be before the static keyword.
static private string $var1; public static float $var2;
The value of the static property in a class is not accessible by its object (with the -> operator). Doing so will result in a notice stating Accessing static property myclass::$var1 as non static. Instead, the static properties are accessed using the Scope Resolution Operator represented by the "::" symbol.
Example
Take a look at the following example −
<?php
class myclass {
static string $var1 = "My Class";
function __construct() {
echo "New object declared" . PHP_EOL;
}
}
$obj = new myclass;
echo "accessing static property with scope resolution operator: " . myclass::$var1 . PHP_EOL;
echo "accessing static property with -> operator: ". $obj->var1 . PHP_EOL;
?>
It will produce the following output −
New object declared accessing static property with scope resolution operator: My Class PHP Notice: Accessing static property myclass::$var1 as non static in hello.php on line 14
The "self" Keyword
To access the static property from inside a method, refer to the current class with the self keyword. In the following example, the class has an integer static property, which is incremented every time a new object is declared.
<?php
class myclass {
/* Member variables */
static int $var1 = 0;
function __construct(){
self::$var1++;
echo "object number ". self::$var1 . PHP_EOL;
}
}
for ($i=1; $i<=3; $i++) {
$obj = new myclass;
}
?>
It will produce the following output −
object number 1 object number 2 object number 3
The "parent" Keyword
The static property of a base class can be used inside a function of the inherited class by referring to the base by parent keyword. You need to use the "parent::static_property" syntax.
Example
Take look at the following example −
<?php
class myclass {
/* Member variables */
static int $var1 = 0;
function __construct() {
self::$var1++;
echo "object number ". self::$var1 . PHP_EOL;
}
}
class newclass extends myclass{
function getstatic() {
echo "Static property in parent class: " . parent::$var1 . PHP_EOL;
}
}
$obj = new newclass;
$obj->getstatic();
?>
It will produce the following output −
object number 1 Static property in parent class: 1
PHP - Namespaces
We often organize the files in different folders. Usually a folder contains files related to a certain objective, or application or category. A folder cant contain two files with the same name, though different folders may have a file of the same name so that the path of each file is different.
The idea of namespaces in PHP is somewhat similar. In PHP, namespaces allow classes or functions or constants of same name be used in different contexts without any conflict, thereby encapsulating these items.
A PHP namespace is logical grouping of classes/functions etc., depending on their relevance. Just as a file with same name can exist in two different folders, a class of a certain name can be defined in two namespaces. Further, as we specify the complete path of a file to gain access, we need to specify full name of class along with namespace.
As your application size becomes bigger, involving many class and function definitions, giving give a unique name to each class/function may become tedious and not exactly elegant. Using namespaces lets you organize such code blocks in a neat manner. For example, if we need to declare a calculate() function to calculate area as well as tax, instead of defining them as something like calculate_area() and calculate_tax(), we can create two namespaces area and tax and use calculate() inside them.
Advantages of Namespace
Here are some of the advantages of using namespaces in PHP −
Namsepaces help in avoiding name collisions between classes/functions/constants defined by someone with third-party classes/functions/constants.
Namespaces provide the ability to alias (or shorten) Extra_Long_Names, thereby improving the readability of source code.
PHP Namespaces provide a way in which to group related classes, interfaces, functions and constants. Namespace names are case insensitive.
Defining a Namespace
PHP's namespace keyword is used to define a new namespace.
namespace myspace;
A ".php" file containing a namespace must declare the namespace at the top of the file before any other (except the declare directive). Declaration of class, function and constants inside a namespace affects its access.
A PHP script may contain other code apart from the definition of a namespace. To load the namespace defined in the same code, PHP has the "use" keyword.
use myspace;
Example
In the following "hello.php" script, we define a hello() function inside myspace namespace, and call it after loading the namespace in the current script.
<?php
namespace myspace;
function hello() {
echo "Hello World";
}
use myspace;
myspace\hello();
?>
It will produce the following output −
Hello World
Note that you must qualify the hello() function with its full name that includes the namespace - myspace\hello().
Include Namespace
You may have one script consisting of a declaration of a namespace, and the other script in which the namespace is loaded with include statement.
a.php
<?php
namespace myspace {
function hello() {
echo "Hello World in myspace";
}
}
?>
b.php
<?php include 'a.php'; myspace\hello(); ?>
It will produce the following output −
Hello World in myspace
There may be a case where the current script ("b.php" as above) also has a function of the same name as in the included file. The fully qualified function that prepends the namespace, helps the parser to resolve the name conflict.
Example
Take a look at the following example −
<?php
include 'a.php';
function hello() {
echo "Hello World from current namespace";
}
hello();
myspace\hello();
?>
It will produce the following output −
Hello World from current namespace Hello World in myspace
Example
As mentioned above, the namespace declaration must be at the top, immediately after the opening <?php tag. Otherwise the parser throws a fatal error.
<?php
echo "hello"
namespace myspace;
function hello() {
echo "Hello World";
}
use myspace;
myspace\hello();
?>
It will produce the following output −
PHP Parse error: syntax error, unexpected token "namespace", expecting "," or ";" in /home/cg/root/67771/main.php on line 4
The above error message makes it clear that only the "declare statement" is allowed to appear before the namespace declaration.
<?php
declare (strict_types=1);
namespace myspace;
function hello() {
echo "Hello World";
}
use myspace;
myspace\hello();
?>
Relative Namespace
The objects such as functions, classes and constants may be accessed in the current namespace by referring the with relative namespace paths.
In the following example, "b.php" contains a namespace space1\myspace with a hello() function and a TEMP constant. The same objects are also defined in namespace space1, present in "a.php".
Obviously, when "b.php" is included in "a.php", "myspace" is a subspace of "space1". Hence, hello() from "myspace" is called by prefixing its relative namespace (also the TEMP constant)
b.php
<?php
namespace space1\myspace;
const TEMP = 10;
function hello() {
echo "Hello from current namespace:" . __NAMESPACE__ . ;
}
?>
a.php
<?php
namespace space1;
include 'b.php';
function hello() {
echo "Hello from current namespace:" . __NAMESPACE__ . ;
}
const TEMP = 100;
hello(); // current namespace
myspace\hello(); // sub namespace
echo "TEMP : " . TEMP . " in " . __NAMESPACE__ . ;
echo "TEMP : " . myspace\TEMP . " \\in space1\\myspace\n";
?>
It will produce the following output −
Hello from current namespace:space1 Hello from current namespace:space1\myspace TEMP : 100 in space1 TEMP : 10 in space1\myspace
Absolute Namespace
You can also access the functions/constants from any namespace by prefixing the absolute namespace path. For example, hello() in "b.php" is "\space\myspace\hello()".
a.php
<?php
namespace space1;
include 'b.php';
function hello() {
echo "Hello from current namespace:" . __NAMESPACE__ . ;
}
const TEMP = 100;
\space1\hello(); //current namespace
\space1\myspace\hello(); //sub namespace
echo "TEMP: " . \space1\TEMP . " in " . __NAMESPACE__ . ;
echo "TEMP: " . \space1\myspace\TEMP . " in space1\\myspace\n";
?>
The __NAMESPACE__ is a predefined constant in PHP that returns the name of current namespace.
Namespace Rules
Any conflict in the names of function/classes/constants appearing between different namespaces is resolved by following these rules −
A namespace identifier without namespace separator symbol (/) means it is referring to current namespace. This is an unqualified name.
If it contains separator symbol as in myspace\space1, it resolves to a subnamespace space1 under myspace. Such type of naming is relative namespace.
Name of fully qualified namespace starts with the "\" character. For example, "\myspace" or "\myspace\space1".
Fully qualified names resolve to absolute namespace. For example \myspace\space1 resolves to myspace\space1 namespace
If the name occurs in the global namespace, the "namespace\" prefix is removed. For example, "namespace\space1" resolves to space1.
However, if it occurs inside another namespace, it is treated differently. For example, if namespace\space1 is inside myspace, it is equivalent to "myspace\space1".
First segment of the name in qualified name is translated according to the current class/namespace import table.
If no import rule applies, the current namespace is prepended to the name.
class-like names are translated according to the class/namespace import table, function names according to the function import table and constants according to the constant import table.
For unqualified names, if no import rule applies and the name refers to a function or constant and the code is outside the global namespace, the name is resolved at runtime. First it looks for a function from the current namespace, then it tries to find and call the global function.
PHP - Object Iteration
A foreach loop may be employed to iterate through all the publicly visible members of an object of a PHP class. This feature has been available in versions of PHP 5 onwards. You can of course access the list of private properties inside an instance method. PHP also defines Iterator interface which can be used for the purpose.
Using foreach Loop
In the example below, the public properties of the class are listed with the use of foreach loop.
Example
<?php
class myclass {
private $var;
protected $var1;
public $x, $y, $z;
public function __construct() {
$this->var="Hello World";
$this->var1=array(1,2,3);
$this->x=100;
$this->y=200;
$this->z=300;
}
}
$obj = new myclass();
foreach($obj as $key => $value) {
print "$key => $value\n";
}
?>
It will produce the following output −
x => 100 y => 200 z => 300
Note that only the public members are accessible outside the class. If the class includes a method, all the members (public, private or protected) can be traversed with a foreach loop from inside it.
Let us add an iterate method in the above myclass.
public function iterate() {
foreach ($this as $k=>$v) {
if (is_array($v)) {
var_dump($v);
echo PHP_EOL;
} else {
echo "$k : $v". PHP_EOL;
}
}
}
Call this instance method to get the list of all the members.
It will produce the following output −
var : Hello World
array(3) {
[0]=>
int(1)
[1]=>
int(2)
[2]=>
int(3)
}
x : 100
y : 200
z : 300
Using Iterator Interface
PHP provides Iterator interface for external iterators or objects that can be iterated themselves internally. It defines following abstract methods which need to be implemented in the user defined class.
interface Iterator extends Traversable {
/* Methods */
public current(): mixed
public key(): mixed
public next(): void
public rewind(): void
public valid(): bool
}
The rewind() method rewinds the Iterator to the first element. This is the first method called when starting a foreach loop. It will not be executed after foreach loops.
The current() method returns the current element.
The key() method returns the key of the current element on each iteration of foreach loop.
The next() method is called after each iteration of foreach loop and moves forward to next element.
The valid() method checks if current position is valid.
Example
The following example demonstrates object iteration by implementing Iterator interface
<?php
class myclass implements Iterator {
private $arr = array('a','b','c');
public function rewind():void {
echo "rewinding\n";
reset($this->arr);
}
public function current() {
$var = current($this->arr);
echo "current: $var\n";
return $var;
}
public function key() {
$var = key($this->arr);
echo "key: $var\n";
return $var;
}
public function next() : void {
$var = next($this->arr);
echo "next: $var\n";
# return $var;
}
public function valid() : bool {
$key = key($this->arr);
$var = ($key !== NULL && $key !== FALSE);
echo "valid: $var\n";
return $var;
}
}
$obj = new myclass();
foreach ($obj as $k => $v) {
print "$k: $v\n";
}
?>
It will produce the following output −
rewinding valid: 1 current: a key: 0 0: a next: b valid: 1 current: b key: 1 1: b next: c valid: 1 current: c key: 2 2: c next:
PHP - Encapsulation
PHP implements encapsulation, one of the important principles of OOP with access control keywords: public, private and protected.
Encapsulation refers to the mechanism of keeping the data members or properties of an object away from the reach of the environment outside the class, allowing controlled access only through the methods or functions available in the class.
The following diagram illustrates the principle of encapsulation in object-oriented programming methodology.
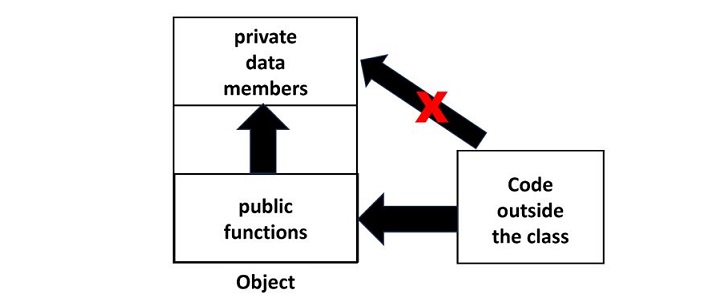
PHPs keywords list contains the following keywords that determine the accessibility of properties and methods of an object, which is an instance of a class in PHP −
Public − Class members are accessible from anywhere, even from outside the scope of the class, but only with the object reference.
Private − Class members can be accessed within the class itself. It prevents members from outside class access even with the reference of the class instance.
Protected − Members can be accessed within the class and its child class only, nowhere else.
These three keywords "public, private and protected" are often called access modifiers. They are also referred as visibility modes, as they decide upto what extent a certain class member is available.
Public Members
In PHP, the class members (both member variables as well as member functions) are public by default.
Example
In the following program, the member variables title and price of the object are freely accessible outside the class because they are public by default, if not otherwise specified.
<?php
class Person {
/* Member variables */
var $name;
var $age;
/*Constructor*/
function __construct(string $param1="Ravi", int $param2=28) {
$this->name = $param1;
$this->age = $param2;
}
function getName() {
echo "Name: $this->name" . PHP_EOL;;
}
function getAge() {
echo "Age: $this->age" . PHP_EOL;;
}
}
$b1 = new Person();
$b1->getName();
$b1->getAge();
echo "Name : $b1->name Age: $b1->age" . PHP_EOL;
?>
It will produce the following output −
Name: Ravi Age: 28 Name : Ravi Age: 28
Note that the properties all the class members are public by default, you can explicitly declare them as public if desired. As a result, the instance methods getName() and getAge() can be called from outside the class.
Since properties name and age are also public, hence they can also be accessed outside the class, something which is not desired as per the principle of encapsulation.
Private Members
As mentioned above, the principle of encapsulation requires that the member variables should not be accessible directly. Only the methods should have the access to the data members. Hence, we need to make the member variables private and methods public.
Example
Let us change the declaration of name and age properties to private and run the following PHP script −
<?php
class Person {
/* Member variables */
private $name;
private $age;
/*Constructor*/
function __construct(string $param1="Ravi", int $param2=28) {
$this->name = $param1;
$this->age = $param2;
}
public function getName() {
echo "Name: $this->name" . PHP_EOL;;
}
public function getAge(){
echo "Age: $this->age" . PHP_EOL;;
}
}
$b1 = new Person();
$b1->getName();
$b1->getAge();
echo "Name : $b1->name Age: $b1->age" . PHP_EOL;
?>
It will produce the following output −
Name: Ravi Age: 28 PHP Fatal error: Uncaught Error: Cannot access private property Person::$name in person.php:27
The error message tells the reason that a private property cannot be accessed from a public scope.
Protected Members
The effect of specifying protected access to a class member is effective in case of class inheritance. We know that public members are accessible from anywhere outside the class, and private members are denied access from anywhere outside the class.
The protected keyword grants access to an object of the same class and an object of its inherited class, denying it to any other environment.
Example
Let us inherit the person class and define a student class. We shall change the name property from private to protected. The student class has a new public method getDetails() that prints the values of name and age properties.
Person class
<?php
class Person {
/* Member variables */
protected $name;
private $age;
/*Constructor*/
function __construct(string $param1="Ravi", int $param2=28) {
$this->name = $param1;
$this->age = $param2;
}
public function getName(){
echo "Name: $this->name" . PHP_EOL;;
}
public function getAge() {
echo "Age: $this->age" . PHP_EOL;;
}
}
Student class
class student extends Person {
public function getDetails() {
echo "My Name: $this->name" . PHP_EOL;
echo "My age: $this->age" . PHP_EOL;
}
}
$s1 = new student();
$s1->getDetails();
?>
It will produce the following output −
My Name: Ravi PHP Warning: Undefined property: student::$age in person.php on line 28 My age:
The following table illustrates the rules of accessibility of class members in PHP −

PHP - The "Final" Keyword
The "final" keyword in PHP is used in the definition of a class, a method inside a class, as well as with the definition of a constant property of a class.
A Class with "final" Keyword
Let's see how to create a class with the "final" keyword −
final class myclass {
/*class members*/
}
The "final" keyword in class definition prevents such a class from being extended. In other words, you cannot use a final class as a parent. If you try, PHP parser throws an error
<?php
final class myclass {
/* class body */
}
class newclass extends myclass {
/* class body */
}
?>
When you run this code, it will show an error −
PHP Fatal error: Class newclass may not inherit from final class (myclass)
Method with "final" Keyword
Here is how you can create a method with the "final" keyword −
class myclass {
final function myfunction() {
/* function body */
}
}
Prefixing a method definition with the final keyword prevents it from being overridden in a child class. A class with final method can be extended, but the child class cannot override it.
Example
Take a look at the following example −
<?php
class myclass {
final public function hello() {
echo "Hello World!";
}
}
class newclass extends myclass {
public function hello() {
echo "Hello PHP!";
}
}
?>
When you run this code, it will show an error −
PHP Fatal error: Cannot override final method myclass::hello() in hello.php
Constant with "final" Keyword
You can also declare a constant in a class with the final keyword, starting from PHP 8.1.0 onwards.
final public const NAME = "My Class";
If you try to override a final constant from parent class in a child class, an error is encountered.
<?php
class myclass {
final public const NAME = "My Class";
final public function hello() {
echo "Hello World!";
}
}
class newclass extends myclass {
public const NAME = "New Class";
}
?>
When you run this code, it will show an error −
Fatal error: newclass::NAME cannot override final constant myclass::NAME
Example
The following PHP script contains a parent class ellipse with a PI constant and area() method both declared as final. They are inherited by the circle class. The area() function calculates the area of circle.
<?php
class ellipse {
final public const PI=22/7;
private float $a, $b;
public function __construct($x, $y) {
$this->a = $x;
$this->b = $y;
}
final public function area() : float {
return self::PI*$this->a*$this->b;
}
}
class circle extends ellipse {
public function __construct(float $x) {
parent::__construct($x, $x);
}
}
$c1 = new circle(5);
echo "Area: " . $c1->area() . PHP_EOL;
?>
It will produce the following output −
Area: 78.571428571429
Note that the instance variables or properties of a class cannot be declared as final.
PHP - Overloading
In C++ or Java, the term means a class can a class method of same name more than once but with different arguments and/or return type. In PHP, the term overloading has a different interpretation. It is a feature with which properties and methods can be created dynamically. PHP's magic methods (method names starting with double underscore) are used to set up dynamic properties and methods.
The magic methods used for the purpose of overloading are invoked when interacting with properties or methods that have not been declared or are not visible in the current scope.
Property Overloading
The examples of PHPs magic methods are __construct(), __destruct(), __tostring(), etc. PHP uses the following magic methods for overloading properties.
public __set ( string $name , mixed $value ) : void public __get ( string $name ) : mixed public __isset ( string $name ) : bool public __unset ( string $name ) : void
Here,
__set() is run for writing data to inaccessible properties that are protected or private or non-existing.
__get() reads data from inaccessible properties.
__isset() calls isset() or empty() on inaccessible properties.
__unset() is invoked when unset() is called on inaccessible properties.
The $name argument used above is the name of the property to be set or retrieved. The $value argument of __set() method specifies the value to be assigned to the property.
The __isset() method checks if a certain property has been set or not. The __unset() method removes the property.
Property overloading works only in object context. In any static context, these magic methods will not be triggered. Hence they should not be declared static.
Example
In the following code, a dynamic property named myprop, which is not declared in the class, is set and retrieved.
<?php
class myclass {
public function __set($name, $value) {
echo "setting $name property to $value \n";
$this->$name = $value;
}
public function __get($name) {
echo "value of $name property is ";
return $this->$name;
}
}
$obj = new myclass();
# This calls __set() method
$obj->myproperty="Hello World!";
# This call __get() method
echo "Retrieving myproperty: " . $obj->myproperty . PHP_EOL;
?>
It will produce the following output −
setting myproperty property to Hello World! Retrieving myproperty: Hello World!
The __set() and __get() magical methods also set and retrieve a property which is declared as private. Add the following statement inside myclass (before the function definitions)
private $myproperty;
You can check if the property, define __isset() method in myclass −
public function __isset($name) {
return isset($this->$name);
}
Check if the property is set with this statement −
var_dump (isset($obj->myproperty));
Which in this case returns true.
To unset the dynamically created property with the __unset() method defined in myclass −
public function __unset($name) {
unset($this->$name);
}
The following code would return false −
var_dump (isset($obj->myproperty));
Method Overloading
Two magic methods used to set methods dynamically are __call() and __callStatic().
public __call (string $name , array $arguments) : mixed public static __callStatic (string $name , array $arguments) : mixed
The __call() is triggered when invoking inaccessible (not defined or private) methods in an object context. On the other hand, the __callStatic() is triggered when invoking inaccessible methods in a static context.
Example
The following example demonstrates method overloading in PHP
<?php
class myclass {
public function __call($name, $args) {
// Value of $name is case sensitive.
echo "Calling object method $name with " . implode(" ", $args). "\n";
}
public static function __callStatic($name, $args) {
echo "Calling static method $name with " . implode(" ", $args). "\n";
}
}
$obj = new myclass();
# This invokes __call() magic method
$obj->mymethod("Hello World!");
# This invokes __callStatic() method
myclass::mymethod("Hello World!");
?>
It will produce the following output −
Calling object method mymethod with Hello World! Calling static method mymethod with Hello World!
Note that the use of "->" operator implies that the method is an instance method, and "::" operator means that the method is a static method.
PHP - Cloning Objects
A PHP statement such as "$obj1 = $obj2" merely creates another reference to the same object in memory. Hence, changes in attribute reflect both in original and duplicate object. The clone keyword in PHP creates a shallow copy of an object.
$obj2 = $obj1
Changes in the original object do not reflect in the shallow copy.
Example
Take a look at the following example −
<?php
class foo {
var $var1 = 'Hello';
}
$x = new foo();
$y = $x; # reference copy
echo $x->var1 . " " . $y->var1 . PHP_EOL;
$x->var1 = "Hello World";
echo $x->var1 . " " . $y->var1 . PHP_EOL;
?>
It will produce the following output −
Hello Hello Hello World Hello World
In the first case, $y is just a reference copy of $x. Hence, any change in var1 property reflects in both.
However, if we declare $y as a clone of $x, then any change in the original object is not reflected in its shallow copy.
Example
Take a look at the following example −
<?php
class foo {
var $var1 = 'Hello World';
}
$x = new foo();
# shallow copy
$y = clone $x;
echo $x->var1 . " " . $y->var1 . PHP_EOL;
$x->var1 = "Hello PHP";
echo $x->var1 . " " . $y->var1 . PHP_EOL;
?>
It will produce the following output −
Hello World Hello World Hello PHP Hello World
Example
In the following code, myclass has one of attributes as object of address class. An object of myclass is duplicated by assignment. Any change in the value of its embedded address object is reflected in both the objects, but change in the name property is not effected in the cloned object.
<?php
class address {
var $city="Nanded";
var $pin="431601";
function setaddr($arg1, $arg2) {
$this->city=$arg1;
$this->pin=$arg2;
}
}
class myclass {
var $name="Raja";
var $obj;
function setname($arg) {
$this->name=$arg;
}
}
$obj1=new myclass();
$obj1->obj=new address();
echo "original object\n";
print_r($obj1);
echo "\n";
$obj2=$obj1; # reference copy
$obj1->setname("Ravi");
$obj1->obj->setaddr("Mumbai", "400001");
echo "after change: Original object\n";
print_r($obj1);
echo "\nCopied object\n";
print_r($obj2);
?>
It will produce the following output −
original object
myclass Object
(
[name] => Raja
[obj] => address Object
(
[city] => Nanded
[pin] => 431601
)
)
after change: Original object
myclass Object
(
[name] => Ravi
[obj] => address Object
(
[city] => Mumbai
[pin] => 400001
)
)
Copied object
myclass Object
(
[name] => Ravi
[obj] => address Object
(
[city] => Mumbai
[pin] => 400001
)
)
Using the "clone" Keyword
In a shallow copy, any properties of the original object that are references to other variables will remain references. The clone keyword does not copy the contained objects of the copied objects.
We now create a clone of myclass object, so that $obj2 is the clone of $obj1. We change the name property of $obj1 from Raja to Ravi, and also modify the embedded address object. The property change will not reflect in its clone, but the referred address object will be changed.
Example
Take a look at the following example −
<?php
class address {
var $city="Nanded";
var $pin="431601";
function setaddr($arg1, $arg2) {
$this->city=$arg1;
$this->pin=$arg2;
}
}
class myclass {
var $name="Raja";
var $obj;
function setname($arg) {
$this->name=$arg;
}
}
$obj1=new myclass();
$obj1->obj=new address();
echo "original object\n";
print_r($obj1);
echo "\n";
$obj2=clone $obj1; # clone copy
$obj1->setname("Ravi");
$obj1->obj->setaddr("Mumbai", "400001");
echo "after change: Original object\n";
print_r($obj1);
echo "\nCopied object\n";
print_r($obj2);
?>
It will produce the following output −
original object
myclass Object
(
[name] => Raja
[obj] => address Object
(
[city] => Nanded
[pin] => 431601
)
)
after change: Original object
myclass Object
(
[name] => Ravi
[obj] => address Object
(
[city] => Mumbai
[pin] => 400001
)
)
Copied object
myclass Object
(
[name] => Raja
[obj] => address Object
(
[city] => Mumbai
[pin] => 400001
)
)
Using __clone() Method
The clone keyword creates a shallow copy of the object. When an object is cloned, PHP will perform a shallow copy of all of the object's properties. Any properties that are references to other variables will remain references. Hence, any changes done to the original object will also appear in the cloned object.
If you wish to prevent the copied object to update automatically, we need to create a deep copy of the object with the __clone() method. It is one of the magic methods in PHP.
Once the cloning is complete, if a __clone() method is defined, then the newly created object's __clone() method will be called, to allow any necessary properties that need to be changed.
Example
In the above example, we have an object of myclass, one of its attributes $obj holding the reference to an object of address class. To achieve a deep copy, we override the __clone() magic method in myclass.
<?php
class address {
var $city="Nanded";
var $pin="431601";
function setaddr($arg1, $arg2) {
$this->city=$arg1;
$this->pin=$arg2;
}
}
class myclass {
var $name="Raja";
var $obj;
function setname($arg) {
$this->name=$arg;
}
public function __clone() {
$this->obj = clone $this->obj ;
}
}
$obj1=new myclass();
$obj1->obj=new address();
echo "original object\n";
print_r($obj1);
echo "\n";
$obj2=clone $obj1; # cloned deep copy
$obj1->setname("Ravi");
$obj1->obj->setaddr("Mumbai", "400001");
echo "after change: Original object\n";
print_r($obj1);
echo "\nCloned object\n";
print_r($obj2);
?>
You will now see that the changes in the original object (we change the address attributes) wont reflect in the cloned object, as the following output shows −
original object
myclass Object
(
[name] => Raja
[obj] => address Object
(
[city] => Nanded
[pin] => 431601
)
)
after change: Original object
myclass Object
(
[name] => Ravi
[obj] => address Object
(
[city] => Mumbai
[pin] => 400001
)
)
Cloned object
myclass Object
(
[name] => Raja
[obj] => address Object
(
[city] => Nanded
[pin] => 431601
)
)
PHP - Anonymous Classes
The release of version 7.0 is an important milestone in the evolution of PHP language, when a lot of new features were introduced. The feature of Anonymous class was also made available in PHP version 7.0.
As the term "anonymous" suggests, it is a class without a (programmer declared) name. The usual practice is to define a class with a certain identifier, so that it can be used repeatedly. The anonymous class, on the other hand is for one-time use only.
$obj = new class() {
/* class body */
};
Apart from this class not having a name, it is similar to a normal named class, in the sense it can contain properties and methods. Its functionality is no different from that of an object of a named class.
An anonymous class might be used over a named class especially when the class does not need to be documented, and when the class is used only once during execution. Anonymous classes are useful when simple, one-off objects need to be created.
Example
In the following code, an anonymous class is instantiated and stored in $obj object. The class includes definitions of addition() and division() methods, which are called with the $obj object.
<?php
$obj = new class(10) {
private int $x;
function __construct($x) {
$this->x = $x;
}
public function addition($x) {
return $this->x+$x;
}
public function division($x) {
return $this->x/$x;
}
};
echo "Addition: " . $obj->addition(20) . PHP_EOL;
echo "Division: " . $obj->division(20) . PHP_EOL;
?>
It will produce the following output −
Addition: 30 Division: 0.5
Anonymous Class as a Child Class
An anonymous class can do everything that a normal class can. It can extends another class, implement an interface or even use a trait.
Example
In the example below, the anonymous class is a child class, extending a parent already available.
<?php
class myclass {
public function hello() {
echo "Hello World!" . PHP_EOL;
}
}
$obj = new class("Neena") extends myclass {
private string $nm;
function __construct($x) {
$this->nm = $x;
}
public function greeting() {
parent::hello();
echo "Welcome " . $this->nm . PHP_EOL;
}
};
$obj->greeting();
?>
It will produce the following output −
Hello World! Welcome Neena
Example
Although the anonymous class doesnt have any user defined name, PHP does assign it an internal name, which can be obtained with the built-in get_class() function as follows −
<?php
$obj = new class() {
function greeting() {
echo "Hello World" . PHP_EOL;
}
};
$obj->greeting();
echo "Name of class: " . get_class($obj);
?>
It will produce the following output −
Hello World Name of class: class@anonymousC:\xampp\htdocs\hello.php:2$0
PHP parser assigns the internal name randomly.
PHP - Web Concepts
PHP is a server-side scripting language that is used to create dynamic webpages. It is one of the most popular programming languages for web development. This chapter aims to let you get familiarized with certain important concepts of web application development using PHP.
A web-based application is a collection of webpages. A webpage is mainly created with HTML tags. HTML consists of different HTML tags which are required to define the appearance of page elements like text, image, table, etc. Hence, HTML essentially creates a static webpage.
A Web application is hosted on a HTTP server with PHP module installed. The browser acts as a http client, to establish communication with the server, following HTTP protocol.
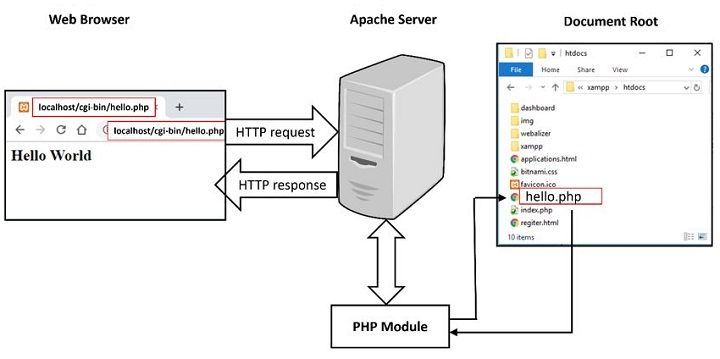
How to Add Dynamic Content on a Webpage?
To add dynamic content io a webpage, there are two possibilities.
JavaScript is a client-side scripting language, that can access the HTML document object model and render dynamic content on the client browser. JavaScript code can be embedded in HTML page.
The browser may collect data from the user in the form of HTML form elements and send it to a HTTP server for processing. PHP is a widely used Server-side processing language. PHP script can also be embedded inside HTML page.
Example
In the following script, JavaScript code embedded in HTML renders the current date as per the client browser, and the PHP code displays the current date as per the server, where this script is hosted.
<!DOCTYPE html>
<html>
<body>
<script type="text/JavaScript">
document.write("Client's date :"+Date()+"\n");
</script>
<?php
date_default_timezone_set("Asia/Calcutta");
echo "server's date is " . date("Y-m-d") . "\n";
echo "The time is " . date("h:i:sa");
?>
</body>
</html>
PHP can intercept and process the data from HTML forms. This allows you to collect information from your users. The next chapter discusses PHPs form handling.
PHP can be used to interact with databases such as MySQL and PostgreSQL. This allows you to store and retrieve data from your database, and dynamically populate the web pages or to power the web applications. PHP includes mysql, mysqli and PDO extensions for database handling.
PHP can handle the data received from the client with HTTP GET as well as POST methods. We shall discuss in detail, how PHP handles GET/POST methods in one of the latter chapters.
HTTP is a stateless protocol. However, it allows Sessions and cookies to be maintained on server and client respectively. PHP can be used to create and manage sessions and cookies. Sessions allow you to track individual users as they navigate your website, while cookies allow you to store information on the user's computer for later use. In of the subsequent chapters, we shall learn how PHP handles sessions and cookies.
PHP can be used to upload files to your web server. This allows you to create web applications that allow users to upload files, such as images, videos, or documents.
You can use PHP to create a login page for your website. When the user enters their username and password, PHP can check the database to see if the user is valid. If the user is valid, PHP can log the user in and redirect them to the main page of your website.
Identifying Browser & Platform
PHP creates some useful environment variables that can be seen in the phpinfo.php page that was used to setup the PHP environment.
One of the environment variables set by PHP is HTTP_USER_AGENT which identifies the user's browser and operating system.
PHP provides a function getenv() to access the value of all the environment variables. The information contained in the HTTP_USER_AGENT environment variable can be used to create dynamic content appropriate to the browser.
Example
Following example demonstrates how you can identify a client browser and operating system.
NOTE − The function preg_match()is discussed in PHP Regular expression session.
<?php
function getBrowser() {
$u_agent = $_SERVER['HTTP_USER_AGENT'];
$bname = 'Unknown';
$platform = 'Unknown';
$version = "";
//First get the platform
if (preg_match('/linux/i', $u_agent)) {
$platform = 'linux';
} elseif (preg_match('/macintosh|mac os x/i', $u_agent)) {
$platform = 'mac';
} elseif (preg_match('/windows|win32/i', $u_agent)) {
$platform = 'windows';
}
// Next get the name of the useragent yes seperately and for good reason
if(preg_match('/MSIE/i',$u_agent) && !preg_match('/Opera/i',$u_agent)) {
$bname = 'Internet Explorer';
$ub = "MSIE";
} elseif(preg_match('/Firefox/i',$u_agent)) {
$bname = 'Mozilla Firefox';
$ub = "Firefox";
} elseif(preg_match('/Chrome/i',$u_agent)) {
$bname = 'Google Chrome';
$ub = "Chrome";
} elseif(preg_match('/Safari/i',$u_agent)) {
$bname = 'Apple Safari';
$ub = "Safari";
} elseif(preg_match('/Opera/i',$u_agent)) {
$bname = 'Opera';
$ub = "Opera";
} elseif(preg_match('/Netscape/i',$u_agent)) {
$bname = 'Netscape';
$ub = "Netscape";
}
// finally get the correct version number
$known = array('Version', $ub, 'other');
$pattern = '#(?<browser>' . join('|', $known) . ')
[/ ]+(?<version>[0-9.|a-zA-Z.]*)#';
if (!preg_match_all($pattern, $u_agent, $matches)) {
// we have no matching number just continue
}
// see how many we have
$i = count($matches['browser']);
if ($i != 1) {
//we will have two since we are not using 'other' argument yet
//see if version is before or after the name
if (strripos($u_agent,"Version") < strripos($u_agent,$ub)){
$version= $matches['version'][0];
} else {
$version= $matches['version'][1];
}
} else {
$version= $matches['version'][0];
}
// check if we have a number
if ($version == null || $version == "") {$version = "?";}
return array(
'userAgent' => $u_agent,
'name' => $bname,
'version' => $version,
'platform' => $platform,
'pattern' => $pattern
);
}
// now try it
$ua = getBrowser();
$yourbrowser = "Your browser: " . $ua['name'] . " " . $ua['version'] .
" on " .$ua['platform'] . " reports: <br >" . $ua['userAgent'];
print_r($yourbrowser);
?>
This is producing following result on my machine. This result may be different for your computer depending on what you are using.
It will produce the following result −
Your browser: Google Chrome 54.0.2840.99 on windows reports: Mozilla/5.0 (Windows NT 6.3; Win64; x64) AppleWebKit/537.36 (KHTML, like Gecko) Chrome/54.0.2840.99 Safari/537.36
Display Images Randomly
The PHP rand() function is used to generate a random number.i This function can generate numbers with-in a given range. The random number generator should be seeded to prevent a regular pattern of numbers being generated. This is achieved using the srand() function that specifies the seed number as its argument.
Example
Following example demonstrates how you can display different image each time out of four images −
<?php
srand( microtime() * 1000000 );
$num = rand( 1, 4 );
switch( $num ) {
case 1: $image_file = "/php/images/php_image_sample_1.jpg";
break;
case 2: $image_file = "/php/images/php_image_sample_2.jpg";
break;
case 3: $image_file = "/php/images/php_image_sample_3.jpg";
break;
case 4: $image_file = "/php/images/php_image_sample_4.jpg";
break;
}
echo "Random Image : <img src=$image_file />";
?>
It will produce the following result −
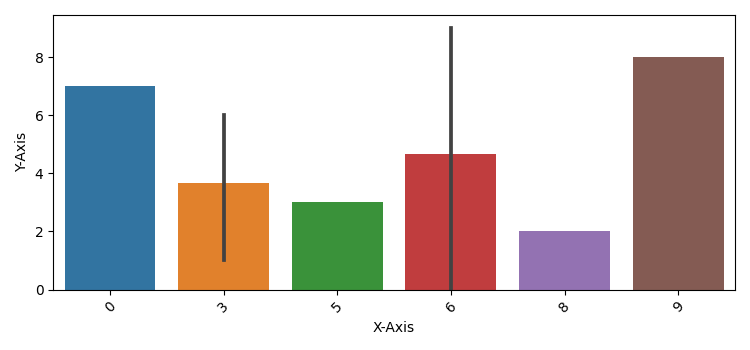
Using HTML Forms
The most important thing to notice when dealing with HTML forms and PHP is that any form element in an HTML page will automatically be available to your PHP scripts.
Example
Try out following example by putting the source code in test.php script.
<?php
if( $_POST["name"] || $_POST["age"] ) {
if (preg_match("/[^A-Za-z'-]/",$_POST['name'] )) {
die ("invalid name and name should be alpha");
}
echo "Welcome ". $_POST['name']. "<br />";
echo "You are ". $_POST['age']. " years old.";
exit();
}
?>
<form action = "<?php <b>$_PHP_SELF</b> ?>" method = "POST">
Name: <input type = "text" name = "name" />
Age: <input type = "text" name = "age" />
<input type = "submit" />
</form>
It will produce the following result −

The PHP default variable $_PHP_SELF is used for the PHP script name and when you click "submit" button then same PHP script will be called and will produce following result −
The method = "POST" is used to post user data to the server script. There are two methods of posting data to the server script which are discussed in PHP GET & POST chapter.
Browser Redirection
The PHP header() function supplies raw HTTP headers to the browser and can be used to redirect it to another location. The redirection script should be at the very top of the page to prevent any other part of the page from loading.
The target is specified by the Location: header as the argument to the header() function. After calling this function the exit() function can be used to halt parsing of rest of the code.
Example
Following example demonstrates how you can redirect a browser request to another web page. Try out this example by putting the source code in test.php script.
<?php
if( $_POST["location"] ) {
$location = $_POST["location"];
header( "Location:$location" );
exit();
}
?>
<p>Choose a site to visit :</p>
<form action = "<?php <b>$_SERVER['PHP_SELF']</b> ?>" method ="POST">
<select name = "location">.
<option value = "http://www.tutorialspoint.com">
Tutorialspoint.com
</option>
<option value = "http://www.google.com">
Google Search Page
</option>
</select>
<input type = "submit" />
</form>
It will produce the following result −

PHP - Form Handling
HTML Forms play an important role in PHP web applications. Although a webpage composed purely with HTML is a static webpage, the HTML form component is an important feature that helps in bringing interactivity and rendering dynamic content. PHPs form handling functionality can validate data collected from the user, before processing.
An HTML Form is a collection various form controls such as text fields, checkboxes, radio buttons, etc., with which the user can interact, enter or choose certain data that may be either locally processed by JavaScript (client-side processing), or sent to a remote server for processing with the help of server-side programming scripts such as PHP.
One or more form control elements are put inside <form> and </form> tags. The form element is characterized by different attributes such as name, action, and method.
<form [attributes]> Form controls </form>
Form Attributes
Out of the many attributes of the HTML form element, the following attributes are often required and defined −
Action Attribute
a string representing the URL that processes the form submission. For example, http://example.com/test.php. To submit the for-data to the same PHP script in which the HTML form is defined, use the PHP_SELF server variable −
<form action="<?php echo $_SERVER['PHP_SELF'];?>" method="post">
Enctype Attribute
specifies the method using which the form-data should be encoded before sending it to the server. Possible values are −
application/x-www-form-urlencoded − The default value.
multipart/form-data − Use this if the form contains <input> elements with type=file.
text/plain − Useful for debugging purposes.
Method Attribute
a string representing the HTTP method to submit the form with. The following methods are the possible values of method attribute −
post − The POST method; form data sent as the request body.
get (default) − The GET; form data appended to the action URL with a "?" separator. Use this method when the form has no side effects.
dialog − When the form is inside a <dialog>, closes the dialog and causes a submit event to be fired on submission, without submitting data or clearing the form.
Name Attribute
The name of the form. The value must not be the empty string, and must be unique if there are multiple forms in the same HTML document.
Target Attribute
a string that indicates where to display the response after submitting the form. Should be one of the following −
_self (default) − Load into the same browsing context as the current one.
_blank − Load into a new unnamed browsing context.
_parent − Load into the parent browsing context of the current one.
_top − Load into the top-level browsing context (an ancestor of the current one and has no parent).
Hence, a typical HTML form, used in a PHP web application looks like −
<form name="form1" action="<?php echo $_SERVER['PHP_SELF'];?>" action="POST"> Form controls </form>
Form Elements
A HTML form is designed with different types of controls or elements. The user can interact with these controls to enter data or choose from the available options presented. Some of the elements are described below −
Input Element
The input element represents a data field, which enables the user to enter and/or edit the data.
The type attribute of INPUT element controls the data. The INPUT element may be of the following types −
Text
A text field to enter a single line text.
<input type="text" name="employee">
Password
A single line text filed that masks the entered characters.
<input type="password" name="pwd"><br>
Checkbox
A rectangular checkable box which is a set of zero or more values from a predefined list.
<input type="checkbox" id="s1" name="sport1" value="Cricket"> <label for="s1">I like Cricket</label><br> <input type="checkbox" id="s2" name="sport2" value="Football"> <label for="s2">I like Football</label><br> <input type="checkbox" id="s3" name="sport3" value="Tennis"> <label for="s3">I like Tennis</label><br><br>
Radio
This type renders a round clickable button with two states (ON or OFF), usually a part of multiple buttons in a radio group.
<input type="radio" id="g1" name="gender" value="Male"> <label for="g1">Male</label><br> <input type="radio" id="g2" name="female" value="Female"> <label for="g2">Female</label><br>
File
The input type renders a button captioned file and allows the user to select a file from the client filesystem, usually to be uploaded on the server. The forms enctype attribute must be set to "multipart/form-data"
<input type="file" name="file">
A single line text field, customized to accept a string conforming to valid email ID.
URL
A single line text filed customized to accept a string conforming to valid URL.
Submit
This input element renders a button, which when clicked, initiates the the submission of form data to the URL specified in the action attribute of the current form.
<input type="submit" name="Submit">
Select Element
The select element represents a control for selecting amongst a set of options. Each choice is defined with option attribute of Select Control. For example −
<select name="Subjects" id="subject"> <option value="Physics">Physics</option> <option value="Chemistry">Chemistry</option> <option value="Maths">Maths</option> <option value="English">English</option> </select>
Form Example
Let us use these form elements to design a HTML form and send it to a PHP_SELF script
<html>
<body>
<form method = "post" action = "<?php
echo htmlspecialchars($_SERVER["PHP_SELF"]);?>">
<table>
<tr>
<td>Name:</td>
<td><input type = "text" name = "name"></td>
</tr>
<tr>
<td>E-mail: </td>
<td><input type = "email" name = "email"></td>
</tr>
<tr>
<td>Website:</td>
<td><input type = "url" name = "website"></td>
</tr>
<tr>
<td>Classes:</td>
<td><textarea name = "comment" rows = "5" cols = "40"></textarea></td>
</tr>
<tr>
<td>Gender:</td>
<td>
<input type = "radio" name = "gender" value = "female">Female
<input type = "radio" name = "gender" value = "male">Male
</td>
</tr>
<td>
<input type = "submit" name = "submit" value = "Submit">
</td>
</table>
</form>
<?php
$name = $email = $gender = $comment = $site = "";
if ($_SERVER["REQUEST_METHOD"] == "POST") {
$name = $_POST["name"];
$email = $_POST["email"];
$name = $_POST["name"];
$comment = $_POST["comment"];
$gender = $_POST["gender"];
$site = $_POST["website"];
}
echo "<h2>Your given values are as:</h2>";
echo $name;
echo "<br>";
echo $email;
echo "<br>";
echo $site;
echo "<br>";
echo $comment;
echo "<br>";
echo $gender;
?>
</body>
</html>
It will produce the following output −

PHP - Form Validation
The term "Form Validation" refers to the process of ascertaining if the data entered by the user in various form elements is acceptable for further processing. Validation of data before its subsequent processing avoids possible exceptions and runtime errors.
Validation can be done both on the client-side and on the server-side. When the client submits the form, the form data is intercepted by the PHP script running on the server. Using various functions available in PHP, the server-side form validation can be done.
Client-side Validation
The new input controls as per the HTML5 specifications have in-built validation. For example an input element of the type email, even though is a text field, is customized to accept a string that is according to email address protocol.
Validation takes place befor the data is submitted to the server. Same thing is true with other input types such as URL, number, etc.
Example
Given below is an HTML form with input elements of number type, email type and URL type. If you enter data that is not as per the required format, a suitable error message is flashed as you try to submit the form.
<h1>Input Validation</h1> <form> <p><Label for "name">Enter your name</label> <input type = "text" id="name" name="name"></p> <p><label for="age">Enter age</label> <input type = "text" id = "age" name="age"></p> <p><label for="email">Enter your email:</label> <input type="text" id="email" name="email"></p> <p><label for="URL">Enter your website<label> <input type = "text" id="URL" name="url"></p> <input type="submit"> </form>
The number type text field shows up/down counter arrows on the right. Only number is accepted, and can be incremented or decremented.
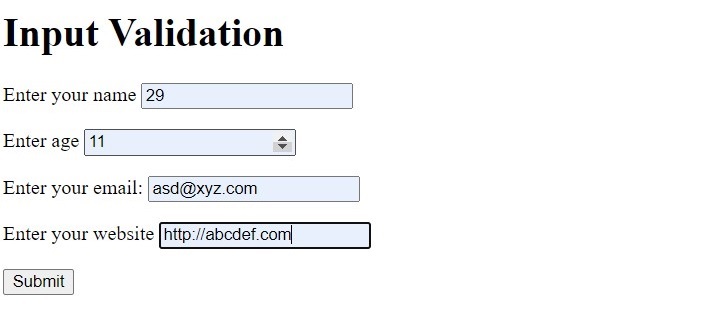
If the data in email field is invalid, you get the error message flashed as below.
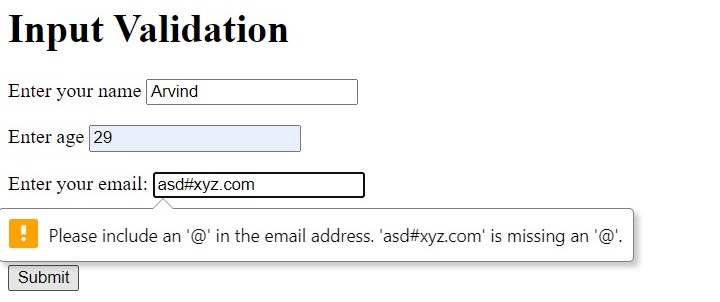
Similarly, any incorrect format for the URL also flashes the error as shown −
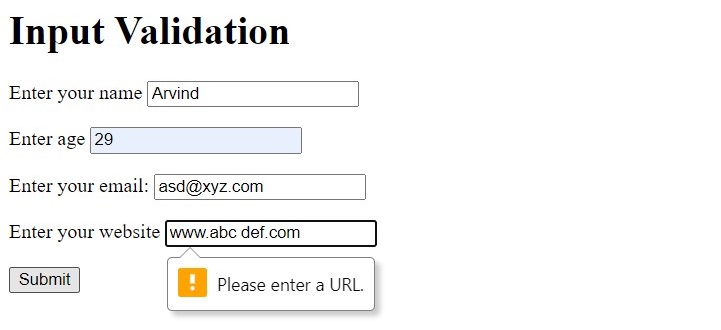
Validation Functions
The validation on the server-side with PHP comes into picture, either when the form data passes the client-side validation, or theres no validation on the client side at all.
In the HTML form used in the above example, let us remove all special input types and use all text fields of text type. The form is submitted with POST method to hello.php on the server.
<form action="hello.php" method="POST"> <p><Label for "name">Enter your name</label> <input type = "text" id="name" name="name"></p> <p><label for="age">Enter age</label> <input type = "text" id = "age" name="age"></p> <p><label for="email">Enter your email:</label> <input type="text" id="email" name="email"></p> <p><label for="URL">Enter your website<label> <input type = "text" id="URL" name="url"></p> <input type="submit"> </form>
Form is Empty
If the user (may be inadvertently) clicks the submit button, you can ask PHP to display the form again. You need to check if the $_POST array has been initialized with isset() function. If not, the header() function redirects the control back to the form.
<?php
if ($_SERVER["REQUEST_METHOD"] == "POST") {
if (isset($_POST)) {
header("Location: hello.html", true, 301);
exit();
}
// form processing if the form is not empty
}
?>
Example
You can also check if any of the fields is empty at the time of submitting the form.
<?php
if ($_SERVER["REQUEST_METHOD"] == "POST") {
foreach($_POST as $k=>$v) {
if (empty($v)==true) {
echo "One or more fields are empty \n";
echo "<a href = 'hello.html'>Click here to go back </a>";
exit;
}
else
echo "$k => $v \n";
}
}
?>
Age field is non-numeric
In the HTML form the input field for name is of text type, hence it can accept any characters. However, we want it to be numeric. This can be ensured by is_numeric() function
<?php
if (is_numeric($_POST["age"])==false) {
echo "Age cannot be non-numeric \n";
echo "<a href = 'hello.html'>Click here to go back</a>";
}
?>
PHP also has is_string() function to check if a filed contains a string or not. Two other functions, trim() and htmlspecialchars() are also useful for form validation.
trim() − Removes whitespace from the beginning and end of a string
htmlspecialchars() − Converts special characters to HTML entities to prevent cross-site scripting (XSS) attacks.
PHP - Form Email/URL
PHP provides two alternatives for validating the form data items which are strings but are expected to be a representation of Email ID or a URL. One way to check the form element contains email/URL is with the use of RegEx (regular expressions), and the other, more convenient approach is to use filter_var() function. Let us apply both these methods and validate email and URL submitted by a form to a PHP script.
The HTML Form used for this chapter is as follows −
<h1>Email and URL Validation</h1> <form action="hello.php" method="POST"> <p><label for="email">Enter your email:</label> <input type="text" id="email" name="email"></p> <p><label for="URL">Enter your website<label> <input type = "text" id="URL" name="url"></p> <input type="submit"> </form>
Validation with Regex
PHPs built-in function library includes the preg_match() function that performs a regular expression match.
preg_match( string $pattern, string $subject, array &$matches = null, int $flags = 0, int $offset = 0 ): int|false
This function searches subject for a match to the regular expression given in pattern. preg_match() returns 1 if the pattern matches given subject, 0 if it does not, or false on failure.
A valid email ID should satisfy the following regular expression −
"/^([a-z0-9\+_\-]+)(\.[a-z0-9\+_\-]+)*@([a-z0-9\-]+\.)+[a-z]{2,6}$/ix"
Similarly, a valid URL should satisfy the following regular expression −
"/\b(?:(?:https?|ftp):\/\/|www\.)[-a-z0-9+&@#\/%?=~_|!:,.;]*[-a-z0-9+&@#\/%=~_|]/i"
The following function returns "1" or "0" if the string is a valid email ID.
function checkemail($str) {
return (!preg_match("/^([a-z0-9\+_\-]+)(\.[a-z0-9\+_\-]+)*@([a-z0-9\-]+\.)+[a-z]{2,6}$/ix", $str)) ? FALSE : TRUE;
}
Example
Let us use the checkmail() function to check whether the email field in the above HTML is valid or not, with the help of following PHP code −
<?php
function checkemail($str) {
return (!preg_match("/^([a-z0-9\+_\-]+)(\.[a-z0-9\+_\-]+)*@
([a-z0-9\-]+\.)+[a-z]{2,6}$/ix", $str)) ? FALSE : TRUE;
}
if ($_SERVER["REQUEST_METHOD"] == "POST") {
$email = $_POST['email'];
if(!checkemail($email)){
echo "Invalid email address.";
} else {
echo "Valid email address.";
}
}
?>
The HTML form is rendered as below −

Test the PHP code by entering valid/invalid email string in the email field.
The following checkURL() function checks if a string represents a valid or invalid URL, and returns "1 or "0".
function checkURL($str) {
return (!preg_match("/\b(?:(?:https?|ftp):\/\/|www\.)
[-a-z0-9+&@#\/%?=~_|!:,.;]*[-a-z0-9+&@#\/%=~_|]/i", $str)) ? FALSE : TRUE;
}
Example
The URL field extracted from the $_POST array is given as argument to the above function.
<?php
function checkURL($str) {
return (!preg_match("/\b(?:(?:https?|ftp):\/\/|www\.)[-a-z0-9+&@#\/%?=~_|!:,.;]
*[-a-z0-9+&@#\/%=~_|]/i", $str)) ? FALSE : TRUE;
}
if ($_SERVER["REQUEST_METHOD"] == "POST") {
$url = $_POST['url'];
if(!checkURL($url)){
echo "Invalid URL.";
} else {
echo "Valid URL.";
}
}
?>
You can test the above code by entering URL string in the URL field of the above form.
Using filter_var() function
The built-in filter_var() function filters a variable with a specified filter.
filter_var(mixed $value, int $filter = FILTER_DEFAULT, array|int $options = 0): mixed
Depending on the enumerated filter ID as the value of $filter parameter, the $value parameter is checked and the function returns the filtered data, or false if the filter fails.
There are various predefined filter ID constants available −
| Sr.No | ID & Description |
|---|---|
| 1 | FILTER_VALIDATE_BOOL Returns true for "1", "true", "on" and "yes". Returns false otherwise. |
| 2 | FILTER_VALIDATE_DOMAIN Validates whether the domain name label lengths are valid. |
| 3 | FILTER_VALIDATE_EMAIL Validates whether the value is a valid e-mail address. |
| 4 | FILTER_VALIDATE_IP Validates value as IP address |
| 5 | FILTER_VALIDATE_URL Validates value as URL |
Example
The following PHP script validates the email and URL data submitted by the HTML for above −
<?php
if ($_SERVER["REQUEST_METHOD"] == "POST") {
$email = $_POST['email'];
$url = $_POST['url'];
if (!filter_var($email, FILTER_VALIDATE_EMAIL)) {
echo "Invalid email format and please re-enter valid email\n";
}
else
echo "Email entered is in valid format\n";
if (!filter_var($url, FILTER_VALIDATE_URL)) {
echo "Invalid URL format and please re-enter valid URL\n";
}
else
echo "URL entered is in valid format\n";
}
?>
You can test the performance of the above script by entering valid/invalid email/URL.
PHP - Complete Form
This chapter puts all the concepts of form validation and extraction of HTML form data into PHP code. The complete form handling code given below has three sections: A PHP code section in the beginning that looks for any validation errors when the form is submitted, the HTML form with various elements such as text fields, radio buttons, Select control, checkbox, etc. The third part is again a PHP code that renders the data entered by the user.
PHP Error Tracking
The code that traps errors, is in the beginning of the entire script. Obviously, this will be executed every time the page is loaded. If its being loaded after the form is submitted, the following segment checks whether each element is empty, the email field is well-formed, and the checkbox is clicked (indicating that the user agrees to the terms).
<?php
// define variables and set to empty values
$nameErr = $emailErr = $genderErr = $websiteErr = "";
$name = $email = $gender = $class = $course = $subject = "";
if ($_SERVER["REQUEST_METHOD"] == "POST") {
if (empty($_POST["name"])) {
$nameErr = "Name is required";
} else {
$name = test_input($_POST["name"]);
}
if (empty($_POST["email"])) {
$emailErr = "Email is required";
} else {
$email = test_input($_POST["email"]);
// check if e-mail address is well-formed
if (!filter_var($email, FILTER_VALIDATE_EMAIL)) {
$emailErr = "Invalid email format";
}
}
if (empty($_POST["course"])) {
$course = "";
} else {
$course = test_input($_POST["course"]);
}
if (empty($_POST["class"])) {
$class = "";
} else {
$class = test_input($_POST["class"]);
}
if (empty($_POST["gender"])) {
$genderErr = "Gender is required";
} else {
$gender = test_input($_POST["gender"]);
}
if (empty($_POST["subject"])) {
$subjectErr = "You must select one or more subjects";
} else {
$subject = $_POST["subject"];
}
}
function test_input($data) {
$data = trim($data);
$data = stripslashes($data);
$data = htmlspecialchars($data);
return $data;
}
?>
HTML Form
The HTML script that renders an entry form, follows the error trapping code. Various for elements have been employed in the form design.
<h2>Absolute Classes Registration Form</h2>
<p><span class = "error">* required field.</span></p>
<form method = "POST" action = "<?php echo htmlspecialchars($_SERVER["PHP_SELF"]);?>">
<table>
<tr>
<td>Name:</td>
<td>
<input type = "text" name = "name">
<span class = "error">* <?php echo $nameErr;?></span>
</td>
</tr>
<tr>
<td>E-mail: </td>
<td>
<input type = "text" name = "email">
<span class = "error">* <?php echo $emailErr;?></span>
</td>
</tr>
<tr>
<td>Time:</td>
<td>
<input type = "text" name = "course">
<span class = "error"><?php echo $websiteErr;?></span>
</td>
</tr>
<tr>
<td>Classes:</td>
<td><textarea name = "class" rows = "5" cols = "40"></textarea></td>
</tr>
<tr>
<td>Gender:</td>
<td>
<input type = "radio" name = "gender" value = "female">Female
<input type = "radio" name = "gender" value = "male">Male
<span class = "error">* <?php echo $genderErr;?></span>
</td>
</tr>
<tr>
<td>Select:</td>
<td>
<select name = "subject[]" size = "4" multiple>
<option value = "Android">C</option>
<option value = "Java">Java</option>
<option value = "C#">C#</option>
<option value = "Data Base">C++</option>
<option value = "Hadoop">PHP</option>
<option value = "VB script">Python</option>
</select>
</td>
</tr>
<tr>
<td>Agree</td>
<td><input type = "checkbox" name = "checked" value = "1"></td>
<?php if(!isset($_POST['checked'])){ ?>
<span class = "error">* <?php echo "You must agree to terms";?></span>
<?php } ?>
</tr>
<tr>
<td>
<input type = "submit" name = "submit" value = "Submit">
</td>
</tr>
</table>
</form>
Note that the form data is submitted back to the same script, hence the forms action attribute is set to $_SERVER["PHP_SELF"] superglobal. This part also contains certain inline PHP code that flashes the error messages besides the respective form control such as Name Required message just besides the Name text box, if the name field is empty while submitting the form.
Display Form Data
The third part of the script is again a PHP code that echoes the values of each of the form fields submitted by the user.
<?php
if ($_SERVER["REQUEST_METHOD"] == "POST") {
echo "<h2>Your given values are as :</h2>";
echo ("<p><b>Name</b> : $name</p>");
echo ("<p><b>Email address</b> : $email</p>");
echo ("<p><b>Preffered class time</b> : $course</p>");
echo ("<p><b>Class info</b> : $class </p>");
echo ("<p><b>Gender</b> : $gender</p>");
echo "<p><b>Subjcts Chosen:</b><p>";
if (!empty($subject)) {
echo "<ul>";
for($i = 0; $i < count($subject); $i++) {
echo "<li>$subject[$i]</u/li>";
}
echo "</ul>";
}
}
?>
Heres the sample data filled in the form when the script is run from the servers document root folder −
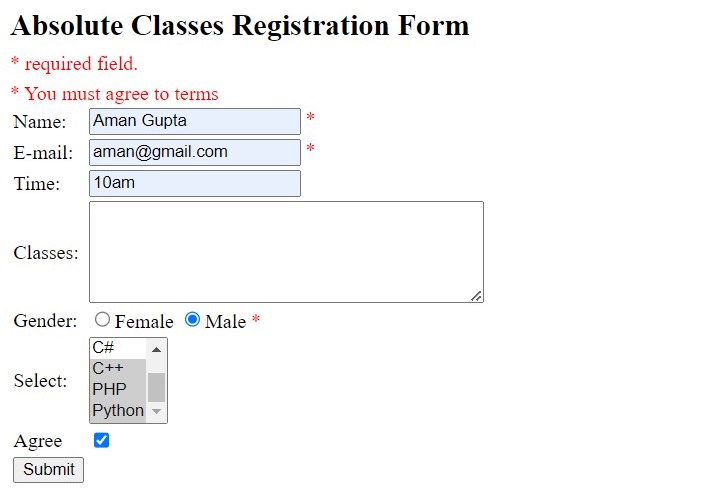
When submitted, the output is rendered as below −

Example
The complete code of PHPs handling HTML form is as follows −
<html>
<head>
<style>
.error {color: #FF0000;}
</style>
</head>
<body>
<?php
// define variables and set to empty values
$nameErr = $emailErr = $genderErr = $websiteErr = "";
$name = $email = $gender = $class = $course = $subject = "";
if ($_SERVER["REQUEST_METHOD"] == "POST") {
if (empty($_POST["name"])) {
$nameErr = "Name is required";
}else {
$name = test_input($_POST["name"]);
}
if (empty($_POST["email"])) {
$emailErr = "Email is required";
} else {
$email = test_input($_POST["email"]);
// check if e-mail address is well-formed
if (!filter_var($email, FILTER_VALIDATE_EMAIL)) {
$emailErr = "Invalid email format";
}
}
if (empty($_POST["course"])) {
$course = "";
} else {
$course = test_input($_POST["course"]);
}
if (empty($_POST["class"])) {
$class = "";
} else {
$class = test_input($_POST["class"]);
}
if (empty($_POST["gender"])) {
$genderErr = "Gender is required";
} else {
$gender = test_input($_POST["gender"]);
}
if (empty($_POST["subject"])) {
$subjectErr = "You must select one or more subjects";
} else {
$subject = $_POST["subject"];
}
}
function test_input($data) {
$data = trim($data);
$data = stripslashes($data);
$data = htmlspecialchars($data);
return $data;
}
?>
<h2>Absolute Classes Registration Form</h2>
<p><span class = "error">* required field.</span></p>
<form method = "POST" action = "<?php echo htmlspecialchars($_SERVER["PHP_SELF"]);?>">
<table>
<tr>
<td>Name:</td>
<td>
<input type = "text" name = "name">
<span class = "error">* <?php echo $nameErr;?></span>
</td>
</tr>
<tr>
<td>E-mail: </td>
<td>
<input type = "text" name = "email">
<span class = "error">* <?php echo $emailErr;?></span>
</td>
</tr>
<tr>
<td>Time:</td>
<td>
<input type = "text" name = "course">
<span class = "error"><?php echo $websiteErr;?></span>
</td>
</tr>
<tr>
<td>Classes:</td>
<td><textarea name = "class" rows = "5" cols = "40"></textarea></td>
</tr>
<tr>
<td>Gender:</td>
<td>
<input type = "radio" name = "gender" value = "female">Female
<input type = "radio" name = "gender" value = "male">Male
<span class = "error">* <?php echo $genderErr;?></span>
</td>
</tr>
<tr>
<td>Select:</td>
<td>
<select name = "subject[]" size = "4" multiple>
<option value = "C">C</option>
<option value = "Java">Java</option>
<option value = "C#">C#</option>
<option value = "c++">C++</option>
<option value = "PHP">PHP</option>
<option value = "Python">Python</option>
</select>
</td>
</tr>
<tr>
<td>Agree</td>
<td><input type = "checkbox" name = "checked" value = "1"></td>
<?php if(!isset($_POST['checked'])){ ?>
<span class = "error">* <?php echo "You must agree to terms";?></span>
<?php } ?>
</tr>
<tr>
<td>
<input type = "submit" name = "submit" value = "Submit">
</td>
</tr>
</table>
</form>
<?php
if ($_SERVER["REQUEST_METHOD"] == "POST") {
echo "<h2>Your given values are as :</h2>";
echo ("<p><b>Name</b> : $name</p>");
echo ("<p><b>Email address</b> : $email</p>");
echo ("<p><b>Preffered class time</b> : $course</p>");
echo ("<p><b>Class info</b> : $class </p>");
echo ("<p><b>Gender</b> : $gender</p>");
echo "<p><b>Subjcts Chosen:</b><p>";
if (!empty($subject)) {
echo "<ul>";
for($i = 0; $i < count($subject); $i++) {
echo "<li>$subject[$i]</u/li>";
}
echo "</ul>";
}
}
?>
</body>
</html>
It will produce the following output −
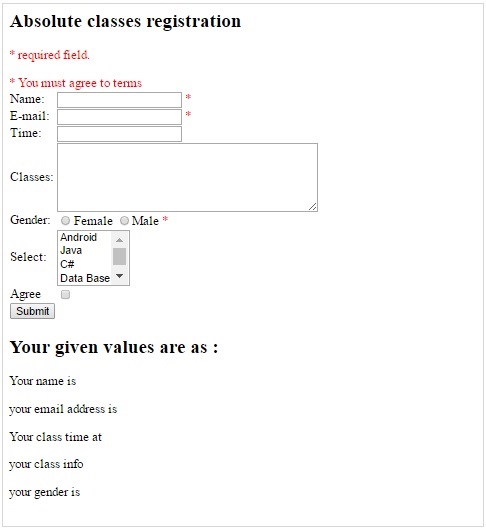
PHP - File Inclusion
You can include the content of a PHP file into another PHP file before the server executes it. There are two PHP functions which can be used to included one PHP file into another PHP file.
The include() Function
The require() Function
This is a strong point of PHP which helps in creating functions, headers, footers, or elements that can be reused on multiple pages. This will help developers to make it easy to change the layout of complete website with minimal effort. If there is any change required then instead of changing thousand of files just change included file.
The include() Function
The include() function takes all the text in a specified file and copies it into the file that uses the include function. If there is any problem in loading a file then the include() function generates a warning but the script will continue execution.
Assume you want to create a common menu for your website. Then create a file menu.php with the following content.
<a href="http://www.tutorialspoint.com/index.htm">Home</a> <a href="http://www.tutorialspoint.com/ebxml">ebXML</a> <a href="http://www.tutorialspoint.com/ajax">AJAX</a> <a href="http://www.tutorialspoint.com/perl">PERL</a>
Now create as many pages as you like and include this file to create header. For example now your test.php file can have following content.
<?php <b>include("menu.php");</b> ?>
<p>This is an example to show how to include PHP file!</p>
It will produce the following result −
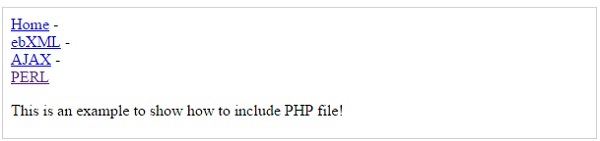
The require() Function
The require() function takes all the text in a specified file and copies it into the file that uses the include function. If there is any problem in loading a file then the require() function generates a fatal error and halt the execution of the script.
So there is no difference in require() and include() except they handle error conditions. It is recommended to use the require() function instead of include(), because scripts should not continue executing if files are missing or misnamed.
You can try using above example with require() function and it will generate same result. But if you will try following two examples where file does not exist then you will get different results.
<?php include("xxmenu.php"); ?>
<p>This is an example to show how to include wrong PHP file!</p>
This will produce the following result −
This is an example to show how to include wrong PHP file!
Now lets try same example with require() function.
<?php <b>require("xxmenu.php");</b> ?>
<p>This is an example to show how to include wrong PHP file!</p>
This time file execution halts and nothing is displayed.
NOTE − You may get plain warning messages or fatal error messages or nothing at all. This depends on your PHP Server configuration.
PHP - GET & POST
Since PHP is mostly used for web application development, the data sent by the browser client is mainly with the GET and POST types of HTTP request methods. The HTTP protocol also defines other methods for sending the request to the server. They are PUT, DELETE, HEAD and OPTIONS (in addition to GET and POST methods). In this chapter, we shall concentrate on how PHP handles the GET and POST methods.
The GET Method
The GET method sends the encoded user information appended to the page request. The page and the encoded information are separated by the ? character.
http://www.test.com/index.htm?name1=value1&name2=value2
The GET method produces a long string that appears in your server logs, in the browser's Location: box.
The GET method is restricted to send upto 1024 characters only.
Never use GET method if you have password or other sensitive information to be sent to the server.
GET can't be used to send binary data, like images or word documents, to the server.
The data sent by GET method can be accessed using QUERY_STRING environment variable.
The PHP provides $_GET associative array to access all the sent information using GET method.
Try out following example by putting the source code in test.php script.
<?php
if( $_GET["name"] || $_GET["age"] ) {
echo "Welcome ". $_GET['name']. "<br />";
echo "You are ". $_GET['age']. " years old.";
exit();
}
?>
<form action = "<?php <b>$_PHP_SELF</b> ?>" method = "GET">
Name: <input type = "text" name = "name" />
Age: <input type = "text" name = "age" />
<input type = "submit" />
</form>
It will produce the following result −
The POST Method
The POST method transfers information via HTTP headers. The information is encoded as described in case of GET method and put into a header called QUERY_STRING.
The POST method does not have any restriction on data size to be sent.
The POST method can be used to send ASCII as well as binary data.
The data sent by POST method goes through HTTP header so security depends on HTTP protocol. By using Secure HTTP you can make sure that your information is secure.
The PHP provides $_POST associative array to access all the sent information using POST method.
Try out following example by putting the source code in test.php script.
<?php
if( $_POST["name"] || $_POST["age"] ) {
if (preg_match("/[^A-Za-z'-]/",$_POST['name'] )) {
die ("invalid name and name should be alpha");
}
echo "Welcome ". $_POST['name']. "<br />";
echo "You are ". $_POST['age']. " years old.";
exit();
}
?>
<form action = "<?php <b>$_PHP_SELF</b> ?>" method = "POST">
Name: <input type = "text" name = "name" />
Age: <input type = "text" name = "age" />
<input type = "submit" />
</form>
It will produce the following result −
Difference between GET and POST
The main difference between the GET and POST methods is that while the request parameters appended to the URL are exposed in the browsers URL, the POST data is included in the message body, and not revealed in the URL. Hence, the GET method shouldnt be used to send sensitive data to the server.
Secondly, the request data in GET method cannot exceed 2048 characters and can consist of ASCII characters only, while with POST method, there is no limit to the request data which can be in binary also (the default maximum size of POST data is determined by post_max_size setting in php.ini file)
PHP provides the following three superglobals to retrieve and process the request parameters −
$_GET − an associative array to access all the sent information using GET method.
$_POST − an associative array to access all the sent information using POST method.
$_REQUEST − an associative array that can be used to get the result from form data sent with both the GET and POST methods.
$_GET Array
You can pass the request parameters in the form of query string directly appended to the URL.
Save the following PHP script in the document root folder (htdocs) as "hello.php" −
<?php
echo "First name: " . $_REQUEST['first_name'] . " " .
"Last Name: " . $_REQUEST['last_name'] . "";
?>
Enter http://localhost/hello.php?first_name=Amar&last_name=Sharma as the URL in a browser window (ensure that the PHP server is running).
The $_GET array is populated from the request and the output is displayed as below −
First name: Amar Last Name: Sharma
You can also populate the $_GET array with the HTML form data if its method attribute is GET.
Use the following HTML form to collect the data and send it to "hello.php". Under the document root, save the following script as "hello.html" −
<form action="hello.php" method="get"> First Name: <input type="text" name="first_name"/> <br/> Last Name: <input type="text" name="last_name" /> <input type="submit" value="Submit" /> </form>
In your browser, enter the URL "http://localhost/hello.html" −

You should get the similar output in the browser window.
$_POST Array
The easiest way to send data to a server with the POST request is specifying the method attribute of HTML form as POST. Assuming that the URL in the browser is "http://localhost/hello.php", method=POST is set in a HTML form "hello.html" as in the earlier example −
<form action="hello.php" method="post"> First Name: <input type="text" name="first_name"/> <br/> Last Name: <input type="text" name="last_name" /> <input type="submit" value="Submit" /> </form>
The "hello.php" script (in document root folder) retrieves the form data in the $_POST array and renders it as the HTTP response back to the browser −
<?php
echo "First name: " . $_POST['first_name'] . " " .
"Last Name: " . $_POST['last_name'] . "";
?>
Open "http://localhost/hello.html" in your browser. The data entered is retrieved by the server, and rendered back to the client, as in the earlier example.
PHP - File Uploading
One of the common features required in a typical PHP web application is the provision of letting the user upload files. Uploading files from a client is very easy in PHP. In this chapter, we shall learn how to use PHP script for the file upload process.
The process of uploading a file follows these steps −
The user opens the page containing a HTML form featuring a text files, a browse button and a submit button.
The user clicks the browse button and selects a file to upload from the local PC.
The full path to the selected file appears in the text filed then the user clicks the submit button.
The selected file is sent to the temporary directory on the server.
The PHP script that was specified as the form handler in the form's action attribute checks that the file has arrived and then copies the file into an intended directory.
The PHP script confirms the success to the user.
In order to perform this activity, we must first ensure that configuration settings related to file upload are enabled in "php.ini".
Open the "php.ini" file and ensure that the following settings are enabled by removing the leading semicolon (;) symbol in file_uploads, upload_tmp_dir, upload_max_filesize and max_file_uploads parameters −
;;;;;;;;;;;;;;;; ; File Uploads ; ;;;;;;;;;;;;;;;; ; Whether to allow HTTP file uploads. ; http://php.net/file-uploads file_uploads=On ; Temporary directory for HTTP uploaded files (will use system ; default if not specified). ; http://php.net/upload-tmp-dir upload_tmp_dir="C:\xampp\tmp" ; Maximum allowed size for uploaded files. ; http://php.net/upload-max-filesize upload_max_filesize=40M ; Maximum number of files that can be uploaded via a single request max_file_uploads=20
It is necessary that the folders for both temporary and final locations have permissions set that enable file writing. If either is set to be read-only then process will fail.
Creating a File Upload Form
Next, we need to design a HTML form for file upload. The forms method attribute must be POST and enctype must be multipart/form-data. Use the input type as file to let the user browse and select the file to be uploaded.
<h2>File Upload Form</h2> <form method = "POST" action = "uploadfile.php" enctype="multipart/form-data"> <label for="file">File name:</label> <input type="file" name="uploadfile" /> <input type="submit" name="submit" value="Upload" /> </form>
Creating an Upload Script
The uploadfile.php script receives the uploaded file. The file data is collected in a suparglobal variable $_FILES. Fetch the name, file type, size and the tmp_name attributes of the uploaded file.
The move_uploaded_file() function copies the selected file to the document folder.
<?php
echo "<b>File to be uploaded: </b>" . $_FILES["uploadfile"]["name"] . "<br>";
echo "<b>Type: </b>" . $_FILES["uploadfile"]["type"] . "<br>";
echo "<b>File Size: </b>" . $_FILES["uploadfile"]["size"]/1024 . "<br>";
echo "<b>Store in: </b>" . $_FILES["uploadfile"]["tmp_name"] . "<br>";
if (file_exists($_FILES["uploadfile"]["name"])){
echo "<h3>The file already exists</h3>";
} else {
move_uploaded_file($_FILES["uploadfile"]["tmp_name"], $_FILES["uploadfile"]["name"]);
echo "<h3>File Successfully Uploaded</h3>";
}
?>
Assuming that both the files myform.php and uploadfile.php are stored in the document folder.
Open "myform.php" in the browser (http://localhost/myform.php) −

Click the File button, browse to the desired file to be uploaded, and click the Upload button.
The server responds with the following message −

PHP - Cookies
The worldwide web is powered by HTTP protocol, which is a stateless protocol. The mechanism of Cookies helps the server maintain the information of previous requests. PHP transparently supports HTTP cookies.
When a client first sends its request, the server includes a small piece of data along with its response as cookies. PHP provides the setcookie() method to inject cookies in the response.
This cookie data is stored in the clients machine as text files. On subsequent visits of the same client, these cookies are included as a part of the request header.
The server populates the PHP superglobal variable "$_COOKIE" with all the cookies present in the client request.
This chapter will teach you how to set cookies, how to access them and how to delete them.
The Anatomy of a Cookie
Cookies are usually set in an HTTP header (although JavaScript can also set a cookie directly on a browser). A PHP script that sets a cookie might send headers that look something like this −
HTTP/1.1 200 OK
Date: Fri, 04 Feb 2000 21:03:38 GMT
Server: Apache/1.3.9 (UNIX) PHP/4.0b3
Set-Cookie: name=xyz; expires=Friday, 04-Feb-07 22:03:38 GMT;
path=/; domain=tutorialspoint.com
Connection: close
Content-Type: text/html
As you can see, the Set-Cookie header contains a name value pair, a GMT date, a path and a domain. The name and value will be URL encoded. The expires field is an instruction to the browser to "forget" the cookie after the given time and date.
If the browser is configured to store cookies, it will then keep this information until the expiry date. If the user points the browser at any page that matches the path and domain of the cookie, it will resend the cookie to the server.The browser's headers might look something like this −
GET / HTTP/1.0 Connection: Keep-Alive User-Agent: Mozilla/4.6 (X11; I; Linux 2.2.6-15apmac ppc) Host: zink.demon.co.uk:1126 Accept: image/gif, */* Accept-Encoding: gzip Accept-Language: en Accept-Charset: iso-8859-1,*,utf-8 Cookie: name=xyz
A PHP script will then have access to the cookie in the environmental variables $_COOKIE or $HTTP_COOKIE_VARS[] which holds all cookie names and values. Above cookie can be accessed using $HTTP_COOKIE_VARS["name"].
How to Set a Cookie in PHP?
PHP contains the setcookie function to create a cookie object to be sent to the client along with HTTP response.
setcookie(name, value, expire, path, domain, security);
Parameters
Here is the detail of all the arguments −
Name − This sets the name of the cookie and is stored in an environment variable called HTTP_COOKIE_VARS. This variable is used while accessing cookies.
Value − This sets the value of the named variable and is the content that you actually want to store.
Expiry − This specify a future time in seconds since 00:00:00 GMT on 1st Jan 1970. After this time cookie will become inaccessible. If this parameter is not set then cookie will automatically expire when the Web Browser is closed.
Path − This specifies the directories for which the cookie is valid. A single forward slash character permits the cookie to be valid for all directories.
Domain − This can be used to specify the domain name in very large domains and must contain at least two periods to be valid. All cookies are only valid for the host and domain which created them.
Security − This can be set to 1 to specify that the cookie should only be sent by secure transmission using HTTPS otherwise set to 0 which mean cookie can be sent by regular HTTP.
Example
The PHP script give below checks if the cookie named username is already set, and retrieves its value, if so. If not, a new cookie username is set.
<?php
if (isset($_COOKIE['username'])) {
echo "<h2>Cookie username already set:" . $_COOKIE['username'] . "</h2>";
} else {
setcookie("username", "MohanKumar");
echo "<h2>Cookie username is now set</h2>";
}
?>
Run this script from the document root of the Apache server. You should see this message −
Cookie username is now set
If this script is re-executed, the cookie is now already set.
Cookie username already set: MohanKumar
Your browsers developer tool is a very useful facility. You can set, retrieve and delete cookies with its help. The cookie set by the above program can be viewed under the Application tab of the browsers developer tools.
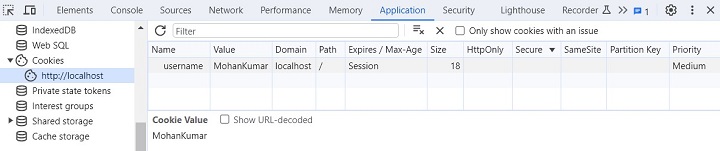
A foreach loop as below retrieves all the cookies −
<?php $arr=$_COOKIE; foreach ($arr as $key=>$val); echo "<h2>$key=>$val </h2>"; ?>
The following script contains an HTML form. It sends the form data to setcookie.php script, that sets the cookies with the use of data retrieved from the $_POST array.
The HTML form is rendered by the following code −
<form action="setcookie.php" method="POST"> <input type="text" name="name"> <input type="text" name="age"> <input type="submit" name="Submit"> </form>
SetCookie.php reads the form data and sets the cookies.
if (isset($_POST["submit"]) {
setcookie("name", $_POST["name"]);
setcookie("age", $_POST["age"]);
}
With another getcookie.php code, we can retrieve the cookies set.
if (isset($_COOKIE["name"]) echo "Cookie: name => " . $_COOKIE["name"]. "<br>"; if (isset($_COOKIE["age"]) echo "Cookie: age => " . $_COOKIE["age"]. "<br>";
Accessing Cookies with PHP
PHP provides many ways to access cookies. Simplest way is to use either $_COOKIE or $HTTP_COOKIE_VARS variables. Following example will access all the cookies set in above example.
<?php echo $_COOKIE["name"]. "<br />"; /* is equivalent to */ echo $HTTP_COOKIE_VARS["name"]. "<br />"; echo $_COOKIE["age"] . "<br />"; /* is equivalent to */ echo $HTTP_COOKIE_VARS["age"] . "<br />"; ?>
You can use isset() function to check if a cookie is set or not.
<?php
if( isset($_COOKIE["name"]))
echo "Welcome " . $_COOKIE["name"] . "<br />";
else
echo "Sorry... Not recognized" . "<br />";
?>
Deleting the Cookies
To delete cookie set the cookie with a date that has already expired, so that the browser triggers cookie removal mechanism.
Example
Take a look at the following example −
<?php
setcookie("username", "", time() - 3600);
echo "<h2>Cookie username is now removed</h2>";
?>
The browser shows the following response −
Cookie username is now removed
You may also set array cookies by using array notation in the cookie name.
setcookie("user[three]", "Guest");
setcookie("user[two]", "user");
setcookie("user[one]", "admin");
If the cookie name contains dots (.), PHP replaces them with underscores (_).
Although the main purpose behind the concept of cookies is to help web developers provide a more personalized and convenient user experience, it may pose a risk to your privacy and personal information.
In some cases, the application may deny you full access you don't accept their cookies. In such cases, periodically clearing the cookie related data from your browsers cache is advised.
PHP - Sessions
A web session is the time duration between the time a user establishes connection with a server and the time the connection is terminated. Along with the cookies, the session variables make the data accessible across the various pages of an entire website.
During a session, the website maintains information about the user's actions and preferences. The session data is populated in a superglobal associative array $_SESSION.
To start a new session in PHP, you need to call the session_start() function.
Starting a Session
In order to enable access to session data, session_start() function must be invoked. session_start() creates a session or resumes the current one based on a session identifier passed via a GET or POST request, or passed via a cookie.
session_start(array $options = []): bool
This function returns true if a session was successfully started, otherwise false.
PHP first creates a unique identifier for that particular session which is a random string of 32 hexadecimal numbers.
The session_id() function sets or retrieves a unique session ID.
session_id(?string $id = null): string|false
PHP will generate a random session ID, if the $id parameter is not given. You may specify your own ID instead. The function returns the session id for the current session or the empty string if there is no current session. On failure, it returns false.
Example
Take a look at the following example −
<?php // Starting the session session_start(); $id = session_id(); echo "Session Id: ".$id ; ?>
The browser will show a random string as the output −
Session Id: mi3976f8ssethe9f04vq1ag6it
A cookie called PHPSESSID is automatically sent to the user's computer to store unique session identification string.
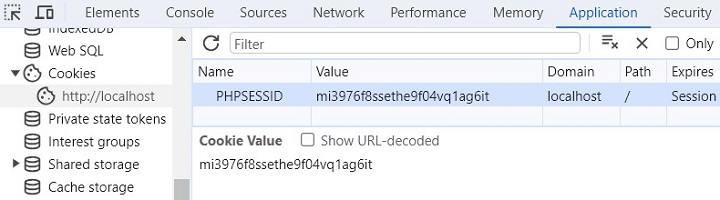
A session creates a file in a temporary directory on the server where registered session variables and their values are stored. This data will be available to all pages on the site during that visit.
The location of the temporary file is determined by a setting in the "php.ini" file called "session.save_path".
Handling Session Variables
Session variables are stored in associative array called $_SESSION[]. These variables can be accessed during lifetime of a session.
To create a new session variable, add a key-value pair in the $_SESSION array −
$_SESSION[ "var"]=value;
To read back the value of a session variable, you can use echo/print statements, or var_dump() or print_r() functions.
echo $_SESSION[ "var"];
To obtain the list of all the session variables in the current session, you can use a foreach loop to traverse the $_SESSION −
foreach ($_SESSION as $key=>$val) echo $key . "=>" . $val;
Example
The following example starts a session then register a variable called counter that is incremented each time the page is visited during the session.
Use the isset() function to check if a session variable is already set or not.
The following PHP script starts a session when it runs for the first time, and sets a session variable named counter. When the client revisits the same URL again, since the session variable is already set, the counter is incremented.
<?php
session_start();
if( isset( $_SESSION['counter'] ) ) {
$_SESSION['counter'] += 1;
} else {
$_SESSION['counter'] = 1;
}
$msg = "Number of visits in this session: ". $_SESSION['counter'];
?>
<?php
echo "$msg";
?>
Refresh the browser multiple times to simulate repeated visits. The browser displays the counter −
Number of visits in this session: 5
Destroying a PHP Session
A PHP session can be destroyed by session_destroy() function. This function does not need any argument and a single call can destroy all the session variables. If you want to destroy a single session variable then you can use unset() function to unset a session variable.
Here is an example to unset a single variable −
<?php unset($_SESSION['counter']); ?>
Here is the call which will destroy all the session variables −
<?php session_destroy(); ?>
You don't need to call start_session() function to start a session when a user visits your site if you can set session.auto_start variable to 1 in php.ini file.
Example
The following PHP script renders a HTML form. The form data is used to create three session variables. A hyperlink takes the browser to another page, which reads back the session variables.
<html>
<body>
<form action="<?php echo $_SERVER['PHP_SELF'];?>" method="post">
<h3>User's ID: <input type="text" name="ID"/></h3>
<h3>User's Name: <input type="text" name="name"/></h3>
<h3>User Type: <input type="text" name="type"/></h3>
<input type="submit" value="Submit" />
</form>
<?php
session_start();
if ($_SERVER["REQUEST_METHOD"] == "POST") {
$_SESSION['ID'] = $_POST['ID'];
$_SESSION['Name'] = $_POST['name'];
$_SESSION['type'] = $_POST['type'];
echo "<h2>Following Session variables Created</h2>";
foreach ($_SESSION as $key=>$val) {
echo "<h3>" . $key . "=>" . $val . "</h3>";
}
echo "<a href='test.php'><b>Click Here</b></a>";
}
?>
</body>
</html>
Save this code as "hello.php" in the document root folder, and open it in a client browser.
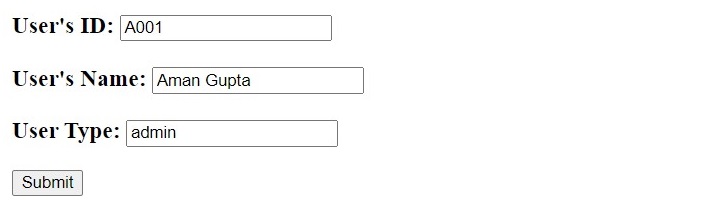
Press the Submit button. The browser will show the session variables created −
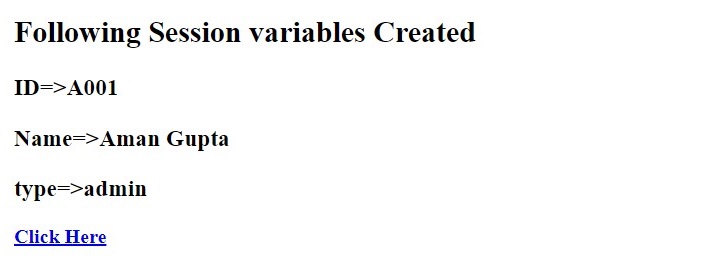
The browser navigates to another page by following the link shown. It reads back the session variables.
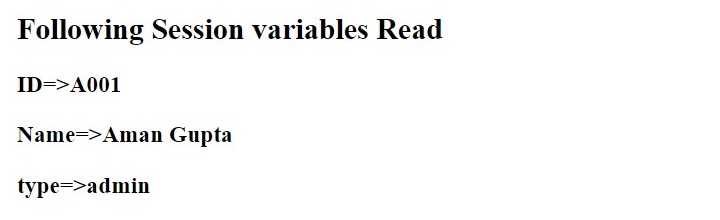
PHP - Session Options
From PHP version 7 onwards, the session_start() function accepts an array of options to override the session configuration directives set in "php.ini". The [session] session in "php.ini" defines the default values of various options.
The options, if provided, are in the form of an associative array of options that will override the currently set session configuration directives. The keys should not include the "session." prefix.
Example
For example, you may start the HTTP session with the two session options defined as the parameters of session_start() function −
<?php
session_start([
'cache_limiter' => 'private',
'read_and_close' => true,
]);
?>
Configurable Options of an HTTP Session
Some of the configurable options of an HTTP session in PHP are as follows −
session.name
It specifies the name of the session which is used as cookie name. It should only contain alphanumeric characters. Defaults to PHPSESSID.
session.save_handler
It defines the name of the handler which is used for storing and retrieving data associated with a session. Defaults to files.
session.auto_start
It specifies whether the session module starts a session automatically on request startup. Defaults to 0 (disabled).
session.cookie_lifetime
It specifies the lifetime of the cookie in seconds which is sent to the browser. The value 0 means "until the browser is closed." Defaults to 0.
session.cache_limiter
It specifies the cache control method used for session pages. It may be one of the following values: nocache, private, private_no_expire, or public. Defaults to nocache.
session.sid_length
It allows you to specify the length of session ID string. Session ID length can be between 22 to 256. The default is 32.
session.upload_progress.enabled
It enables upload progress tracking, populating the $_SESSION variable. Defaults to 1, enabled.
session.lazy_write
When it is set to 1, it means that the session data is only rewritten if it changes. Defaults to 1, enabled.
PHP - Sending Emails
The provision of sending emails is one the commonly required features of a typical PHP powered web application. You would like to send emails containing notifications, updates and other communications to your registered users, through your PHP application itself, instead of a different mail service. You can add this capability to your PHP application by adopting the techniques described in this chapter.
PHP has a built-in mail() function to send an email. However, you need configure properly the "php.ini" settings to be able to do so. First, you must know the SMTP domain of the web hosting platform that you are using. For example, if your website is being hosted on GoDaddy hosting service, the SMTP domain is "smtp.secureserver.net", which you should use in the configuration.
If you use Windows based hosting of GoDaddy, you should ensure that two directives are enabled in php.ini file. The first is called SMTP that defines your email server address. The second is called sendmail_from which defines your own email address.
The configuration for Windows should look something like this −
[mail function] ; For Win32 only. SMTP = smtp.secureserver.net ; For win32 only sendmail_from = webmaster@tutorialspoint.com
Linux users simply need to let PHP know the location of their sendmail application. The path and any desired switches should be specified to the sendmail_path directive.
The configuration for Linux should look something like this −
[mail function] ; For Win32 only. SMTP = ; For win32 only sendmail_from = ; For Unix only sendmail_path = /usr/sbin/sendmail -t -i
mail() function in PHP requires three mandatory arguments that specify the recipient's email address, the subject of the message and the actual message additionally there are other two optional parameters.
mail( to, subject, message, headers, parameters );
Parameters
to − Required. Specifies the receiver / receivers of the email
subject − Required. Specifies the subject of the email. This parameter cannot contain any newline characters
message − Required. Defines the message to be sent. Each line should be separated with a LF (\n). Lines should not exceed 70 characters
headers − Optional. Specifies additional headers, like From, Cc, and Bcc. The additional headers should be separated with a CRLF (\r\n)
parameters − Optional. Specifies an additional parameter to the send mail program
Multiple recipients can be specified as the first argument to the mail() function in a comma separated list.
Sending HTML Email
When you send a text message using PHP then all the content will be treated as simple text. Even if you will include HTML tags in a text message, it will be displayed as simple text and HTML tags will not be formatted according to HTML syntax. But PHP provides option to send an HTML message as actual HTML message.
While sending an email message you can specify a Mime version, content type and character set to send an HTML email.
Example
The following example shows how to send an HTML email message to "xyz@somedomain.com" copying it to "afgh@somedomain.com". You can code this program in such a way that it should receive all content from the user and then it should send an email.
It should receive all content from the user and then it should send an email.
<?php
$to = "xyz@somedomain.com";
$subject = "This is subject";
$message = "<b>This is HTML message.</b>";
$message .= "<h1>This is headline.</h1>";
$header = "From:abc@somedomain.com \r\n";
$header .= "Cc:afgh@somedomain.com \r\n";
$header .= "MIME-Version: 1.0\r\n";
$header .= "Content-type: text/html\r\n";
$retval = mail ($to,$subject,$message,$header);
if( $retval == true ) {
echo "Message sent successfully...";
}else {
echo "Message could not be sent...";
}
?>
It will produce the following output −
Message could not be sent... sh: 1: /usr/sbin/sendmail: not found
Sending Email from Localhost
The above method of calling PHP mail() may not work on your localhost. In that case, there is an alternate solution to sending email. You can use PHPMailer to send email using SMTP from localhost.
PHPMailer is an open-source library to connect SMTP to send emails. You can download it from PEAR or Composer repositories, or download it from https://github.com/PHPMailer/PHPMailer. Download the ZIP file from here, and copy the contents of the PHPMailer folder into one of the include_path directories specified in your PHP configuration and load each class file manually.
Example
Use the following PHP script to send email with PHPMailer library −
Phpmailer.php
<?php
use PHPMailer\PHPMailer\PHPMailer;
use PHPMailer\PHPMailer\SMTP;
use PHPMailer\PHPMailer\Exception;
require_once __DIR__ . '/vendor/phpmailer/src/Exception.php';
require_once __DIR__ . '/vendor/phpmailer/src/PHPMailer.php';
require_once __DIR__ . '/vendor/phpmailer/src/SMTP.php';
require 'vendor/autoload.php';
$mail = new PHPMailer;
if(isset($_POST['send'])){
// getting post values
$fname=$_POST['fname'];
$toemail=$_POST['toemail'];
$subject=$_POST['subject'];
$message=$_POST['message'];
$mail->isSMTP(); // Set mailer to use SMTP
$mail->Host = 'smtp.gmail.com';
$mail->SMTPAuth = true;
$mail->Username = 'myID@gmail.com'; // SMTP username
$mail->Password = 'mypassword'; // SMTP password
// Enable TLS encryption, 'ssl' also accepted
$mail->SMTPSecure = 'tls';
$mail->Port = 587;
$mail->setFrom(myID@gmail.com', 'My_Name');
$mail->addReplyTo(myID@gmail.com', 'My_Name');
$mail->addAddress($toemail); // Add a recipient
$mail->isHTML(true); // Set email format to HTML
$bodyContent=$message;
$mail->Subject =$subject;
$body = 'Dear'.$fname;
$body .='<p>'.$message.'</p>';
$mail->Body = $body;
if(!$mail->send()) {
echo 'Message could not be sent.';
echo 'Mailer Error: ' . $mail->ErrorInfo;
} else {
echo 'Message has been sent';
}
}
?>
Use the following HTML form to compose the mail message. The form is submitted to the above phpmail.php script
Email.html
<h1>PHP - Sending Email</h1> <form action="PHPmailer.php" method="post"> <label for="inputName">Name</label> <input type="text" id="inputName" name="fname" required> <label for="inputEmail">Email</label> <input type="email" id="inputEmail" name="toemail" required> <label for="inputSubject">Subject</label> <input type="text" id="inputSubject" name="subject" required> <label for="inputMessage">Message</label> <textarea id="inputMessage" name="message" rows="5" required></textarea> <button type="submit" name="send">Send</button> </form>
Sending Attachments with Email
To send an email with mixed content you should set Content-type header to multipart/mixed. Then text and attachment sections can be specified within boundaries.
A boundary is started with two hyphens followed by a unique number which can not appear in the message part of the email. A PHP function md5() is used to create a 32 digit hexadecimal number to create unique number. A final boundary denoting the email's final section must also end with two hyphens.
Example
Take a look at the following example −
<?php
// request variables
$from = $_REQUEST["from"];
$emaila = $_REQUEST["emaila"];
$filea = $_REQUEST["filea"];
if ($filea) {
function mail_attachment ($from , $to, $subject, $message, $attachment){
$fileatt = $attachment; // Path to the file
$fileatt_type = "application/octet-stream"; // File Type
$start = strrpos($attachment, '/') == -1 ?
strrpos($attachment, '//') : strrpos($attachment, '/')+1;
// Filename that will be used for the file as the attachment
$fileatt_name = substr($attachment, $start,
strlen($attachment));
$email_from = $from; // Who the email is from
$subject = "New Attachment Message";
$email_subject = $subject; // The Subject of the email
$email_txt = $message; // Message that the email has in it
$email_to = $to; // Who the email is to
$headers = "From: ".$email_from;
$file = fopen($fileatt,'rb');
$data = fread($file,filesize($fileatt));
fclose($file);
$msg_txt="\n\n You have recieved a new attachment message from $from";
$semi_rand = md5(time());
$mime_boundary = "==Multipart_Boundary_x{$semi_rand}x";
$headers .= "\nMIME-Version: 1.0\n" . "Content-Type: multipart/mixed;\n" . "
boundary=\"{$mime_boundary}\"";
$email_txt .= $msg_txt;
$email_message .= "This is a multi-part message in MIME format.\n\n" .
"--{$mime_boundary}\n" . "Content-Type:text/html;
charset = \"iso-8859-1\"\n" . "Content-Transfer-Encoding: 7bit\n\n" .
$email_txt . "\n\n";
$data = chunk_split(base64_encode($data));
$email_message .= "--{$mime_boundary}\n" . "Content-Type: {$fileatt_type};\n" .
" name = \"{$fileatt_name}\"\n" . //"Content-Disposition: attachment;\n" .
//" filename = \"{$fileatt_name}\"\n" . "Content-Transfer-Encoding:
"base64\n\n" . $data . "\n\n" . "--{$mime_boundary}--\n";
$ok = mail($email_to, $email_subject, $email_message, $headers);
if($ok) {
echo "File Sent Successfully.";
// delete a file after attachment sent.
unlink($attachment);
} else {
die("Sorry but the email could not be sent. Please go back and try again!");
}
}
move_uploaded_file($_FILES["filea"]["tmp_name"],
'temp/'.basename($_FILES['filea']['name']));
mail_attachment("$from", "youremailaddress@gmail.com",
"subject", "message", ("temp/".$_FILES["filea"]["name"]));
}
?>
<html>
<head>
<script language = "javascript" type = "text/javascript">
function CheckData45() {
with(document.filepost) {
if(filea.value ! = "") {
document.getElementById('one').innerText = "Attaching File ... Please Wait";
}
}
}
</script>
</head>
<body>
<table width = "100%" height = "100%" border = "0"
cellpadding = "0" cellspacing = "0">
<tr>
<td align = "center">
<form name = "filepost" method = "post"
action = "file.php" enctype = "multipart/form-data" id = "file">
<table width = "300" border = "0" cellspacing = "0"
cellpadding = "0">
<tr valign = "bottom">
<td height = "20">Your Name:</td>
</tr>
<tr>
<td><input name = "from" type = "text" id = "from" size = "30"></td>
</tr>
<tr valign = "bottom">
<td height = "20">Your Email Address:</td>
</tr>
<tr>
<td class = "frmtxt2"><input name = "emaila" type = "text" id = "emaila" size = "30"></td>
</tr>
<tr>
<td height = "20" valign = "bottom">Attach File:</td>
</tr>
<tr valign = "bottom">
<td valign = "bottom"><input name = "filea" type = "file" id = "filea" size = "16"></td>
</tr>
<tr>
<td height = "40" valign = "middle">
<input name = "Reset2" type = "reset" id = "Reset2" value = "Reset">
<input name = "Submit2" type = "submit" value = "Submit" onClick = "return CheckData45()">
</td>
</tr>
</table>
</form>
<center>
<table width = "400">
<tr>
<td id = "one"></td>
</tr>
</table>
</center>
</td>
</tr>
</table>
</body>
</html>
It will produce the following output −
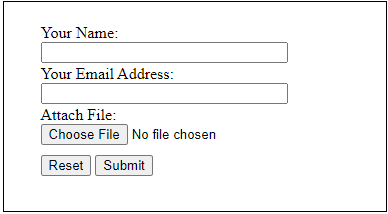
PHP - Sanitize Input
In PHP, it is important to ensure that the input data is sanitized properly by removed any undesired characters before it is processed by the server side code. Usually, the users input their data to a PHP web application through a HTML form. If the form data consists of any undesired characters, it may prove to be harmful, hence an appropriate cleansing operation must be performed.
Input sanitization can be done with the help of one or more of the following functions in PHP.
The htmlspecialchars() Function
This function converts special characters to HTML entities.
htmlspecialchars( string $string, int $flags = ENT_QUOTES | ENT_SUBSTITUTE | ENT_HTML401, ?string $encoding = null, bool $double_encode = true ): string
In HTML, certain characters have special significance. This htmlspecialchars() function is used to encode special characters in HTML entities. This is useful when you want to display user input as HTML and want to prevent script injection attacks.
The following special characters are translated as shown −
| Character | Replaced by |
|---|---|
| & (ampersand) | & |
| " (double quote) | ", unless ENT_NOQUOTES is set |
| ' (single quote) | ' (for ENT_HTML401) or ' (for ENT_XML1, ENT_XHTML or ENT_HTML5), but only when ENT_QUOTES is set |
| < (less than) | < |
| > (greater than) | > |
Flag Constants
The flags parameter is a bitmask of one or more of the following flags, which specify how to handle quotes, invalid code unit sequences and the used document type.
| Sr.No | Constant & Description |
|---|---|
| 1 | ENT_COMPAT Will convert double-quotes and leave single-quotes alone. |
| 2 | ENT_QUOTES Will convert both double and single quotes. |
| 3 | ENT_NOQUOTES Will leave both double and single quotes unconverted. |
| 4 | ENT_IGNORE discard invalid code unit sequences instead of returning an empty string. |
| 5 | ENT_SUBSTITUTE Replace invalid code unit sequences with a Unicode Replacement Character U+FFFD (UTF-8) or � |
| 6 | ENT_DISALLOWED Replace invalid code points for the given document type with a Unicode Replacement Character U+FFFD (UTF-8) or � (otherwise) instead of leaving them as is. This may be useful. |
| 7 | ENT_HTML401 Handle code as HTML 4.01. |
| 8 | ENT_XML1 Handle code as XML 1. |
| 9 | ENT_XHTML Handle code as XHTML. |
| 10 | ENT_HTML5 Handle code as HTML 5. |
Example
Take a look at the following example −
<?php $str = 'Welcome To "PHP Tutorial" by <b>TutorialsPoint</b>'; echo htmlspecialchars($str); ?>
It will produce the following output −
Welcome To "PHP Tutorial" by <b>TutorialsPoint</b>
The strip_tags() Function
The strip_tags() function removes all the HTML and PHP tags from a given string.
strip_tags(string $string, array|string|null $allowed_tags = null): string
This function is very useful when you want ensure that the user input doesnt contain any potentially malicious tags.
The allowed_tags parameter is an optional second parameter to specify tags which should not be stripped. These are either given as string, or as an array.
Example
Take a look at the following example −
<?php
$text = '<p>Hello World</p><!-- Comment -->
<a href="/test.html">Click Here</a>';
echo strip_tags($text);
echo "\n";
// Allow <p> and <a>
echo strip_tags($text, '<p><a>');
?>
It will produce the following output −
Hello World
Click Here
Hello World
Click Here
The addslashes() Function
The addslashes() function adds backslashes to a string.
addslashes(string $string): string
The function returns a string with backslashes added before characters that need to be escaped. These characters are −
Single Quote (')
Double Quote (")
Backslash (\)
NUL (The NUL Byte)
Use this function when you are storing user input in a database and want to prevent SQL injection attacks.
Example
Take a look at the following example −
<?php $text = "Newton's Laws"; $str = addslashes($text); // prints the escaped string echo($str); ?>
It will produce the following output −
Newton\'s Laws
The filter_var() Function
With the help of a specific filter flag, you can use filter_var() function to sanitize user input.
filter_var(mixed $value, int $filter = FILTER_DEFAULT, array|int $options = 0): mixed
The $value parameter is a variable whose value needs to be sanitized. The $filter parameter is any of the predefined filter constants.
| Sr.No | ID & Description | |
|---|---|---|
| 1 | FILTER_SANITIZE_EMAIL Remove all characters except letters, digits and !#$%&'*+-=?^_`{|}~@.[]. |
|
| 2 | FILTER_SANITIZE_ENCODED URL-encode string, optionally strip or encode special characters. |
|
| 3 | FILTER_SANITIZE_ADD_SLASHES Apply addslashes(). (Available as of PHP 7.3.0). |
|
| 4 | FILTER_SANITIZE_NUMBER_FLOAT Remove all characters except digits, +- and optionally .,eE. |
|
| 5 | FILTER_SANITIZE_NUMBER_INT Remove all characters except digits, plus and minus sign. |
|
| 6 | FILTER_SANITIZE_SPECIAL_CHARS HTML-encode '"<>& and characters with ASCII value less than 32, optionally strip or encode other |
|
| 7 | FILTER_SANITIZE_FULL_SPECIAL_CHARS Equivalent to calling htmlspecialchars() with ENT_QUOTES set. Encoding quotes can be disabled by setting FILTER_FLAG_NO_ ENCODE_QUOTES. td> | |
| 8 | FILTER_SANITIZE_URL Remove all characters except letters, digits and $-_.+!*'(),{}|\\^~[]`<>#%";/?:@&=. |
|
| 9 | FILTER_UNSAFE_RAW |
Example
The following code shows how you can sanitize Email data −
<?php $a = 'abc def@xyz.com'; $sa = filter_var($a, FILTER_SANITIZE_EMAIL); echo "$sa"; ?>
It will produce the following output −
abcdef@xyz.com
Example
The following code shows how you can sanitize URLs −
<?php $a = "http://example.c o m"; $sa = filter_var($a, FILTER_SANITIZE_URL); echo "$sa"; ?>
It will produce the following output −
http://example.com
PHP - Post-Redirect-Get (PRG)
In PHP, PRG stands for "Post/Redirect/Get". It is a commonly used technique that is designed to prevent the resubmission of a form after it's been submitted. You can easily implement this technique in PHP to avoid duplicate form submissions.
Usually a HTML form sends data to the server with the POST method. The server script fetches the data for further processing like adding a new record in a backend database, or running a query to fetch data. If the user accidentally refreshes the browser, there is a possibility of the same form data being resubmitted again, possibly leading to loss of data integrity. The PRG approach in PHP helps you avoid this pitfall.
Example
To start with, let us consider the following PHP script that renders a simple HTML form, and submits it back to itself with POST method. When the user fills the data and submits, the backend script fetches the data, renders the result, and comes back to show the blank form again.
<?php
if (isset($_POST["submit"])) {
if ($_SERVER["REQUEST_METHOD"] == "POST")
echo "First name: " . $_REQUEST['first_name'] . " " . "Last Name: " . $_REQUEST['last_name'] . "";
}
?>
<html>
<body>
<form action="<?php echo $_SERVER['PHP_SELF'];?>" method="post">
First Name: <input type="text" name="first_name"> <br/>
Last Name: <input type="text" name="last_name" />
<button type="submit" name="submit">Submit</button>
</form>
</body>
</html>
Assuming that the server is running, the above script is placed in the document root folder and visited in the browser.
Fill the data and submit. The browser echoes the result, and re-renders the form. Now if you try to refresh the browser page, a warning pops up as shown below −
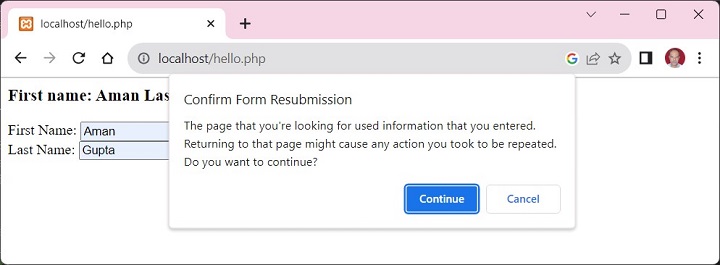
If you press Continue, the same data is posted again.
The problem can be understood with the following figure −

Following steps are taken in the PHP script to avoid the problem −
The PHP script before the HTML form starts a new session.
Check if the form has been submitted with POST method.
If so, store the form data in session variables
Redirect the browser to a result page. In our case, it is the same page. With the exit command, to terminate this script to make sure no more code gets executed.
If PHP finds that the REQUEST method is not POST, it checks if the session variables are set. If so, they are rendered along with the fresh copy of form.
Now even if the form is refreshed, you have successfully averted the possibility of resubmission.
Example
Here is the PHP code that uses the PRG technique −
<?php
session_start();
if (isset($_POST["submit"])) {
$_SESSION['fname'] = $_POST['first_name'];
$_SESSION['lname'] = $_POST['last_name'];
header("Location: hello.php");
exit;
}
if (isset($_SESSION["fname"])) {
echo "First name: " . $_SESSION['fname'] . " " . "Last Name: " . $_SESSION['lname'] . "";
unset($_SESSION["fname"]); unset($_SESSION["lname"]);
}
?>
<html>
<body>
<form action="<?php echo $_SERVER['PHP_SELF'];?>" method="post">
First Name: <input type="text" name="first_name"> <br />
Last Name: <input type="text" name="last_name" />
<button type="submit" name="submit">Submit</button>
</form>
</body>
</html>
PHP - Flash Messages
Message flashing in a PHP web application refers to the technique that makes certain messages popup on the browser window for the user to receive applications feedback. To be able to give the user a meaningful feedback to his interactions is an important design principle, that gives a better user experience.
In a PHP web application, we can use the session data to flash messages regarding success or failure of a certain action, notifications or warnings, etc., from time to time to keep the user informed.
A flash message allows you to create a message on one page and display it once on another page. To transfer a message from one page to another, you use the $_SESSION superglobal variable.
To start with, you add a variable to the $_SESSION array as follows −
<?php session_start(); $_SESSION['flash_message'] = "Hello World"; ?>
Later, navigate to another page, and retrieve the flashed message from the $_SESSION variable and assign it to a variable. Then, you can display the message and then delete the message from the $_SESSION −
<?php
session_start();
if(isset($_SESSION['flash_message'])) {
$message = $_SESSION['flash_message'];
unset($_SESSION['flash_message']);
echo $message;
}
?>
To generalize the basic idea of handling the flashed messages, we shall write a function that adds a message to the $_SESSION −
session_start();
function create_flash_message(string $name, string $message): void {
// remove existing message with the name
if (isset($_SESSION[FLASH][$name])) {
unset($_SESSION[FLASH][$name]);
}
// add the message to the session
$_SESSION[FLASH][$name] = ['message' => $message];
}
Let us also have another function that reads back a message, flashes it on the browser, and removes it from the $_SESSION.
function display_flash_message(string $name): void {
if (!isset($_SESSION[FLASH][$name])) {
return;
}
// get message from the session
$flash_message = $_SESSION[FLASH][$name];
// delete the flash message
unset($_SESSION[FLASH][$name]);
// display the flash message
echo format_flash_message($flash_message);
}
The format_flash_message() function applies desired formatting to the obtained string with appropriate CSS rules.
If there are more than messages that have been flashed by the application, all of them can be retrieved and flashed with the following example −
function display_all_flash_messages(): void {
if (!isset($_SESSION[FLASH])) {
return;
}
// get flash messages
$flash_messages = $_SESSION[FLASH];
// remove all the flash messages
unset($_SESSION[FLASH]);
// show all flash messages
foreach ($flash_messages as $flash_message) {
echo format_flash_message($flash_message);
}
}
Use the following flash() function to create, format and flash the messages
function flash(string $name = '', string $message = ''): void {
if ($name !== '' && $message !== '') {
create_flash_message($name, $message);
}
elseif ($name !== '' && $message === '') {
display_flash_message($name); // display a flash message
} elseif ($name === '' && $message === '' ) {
display_all_flash_messages(); // display all flash message
}
}
To implement the above method, call the flash() function on the first page.
flash('first', 'Hello World');
Navigate to another page and call the flash() function to retrieve and display the message −
flash('first');
Mechanism of using the flash messages is usually employed on a signup page to redirect users to the login page with a welcome message after they sign up.
PHP - AJAX Introduction
PHP powered web applications often make use of AJAX, together they are useful to create dynamic and interactive web applications. AJAX stands for Asynchronous Javascript and XML. It allows webpages to be updated asynchronously without reloading the entire page.
In AJAX applications, the exchange of data between a web browser and the server-side PHP script is asynchronous. PHP is a server-side scripting language that can be used to generate dynamic content and process data.
AJAX creates an additional layer known as AJAX engine in between the web application and web server due to which we can make background server calls using JavaScript and retrieve the required data, can update the requested portion of a web page without casing full reload of the page. It reduces the page refresh timing and provides a fast and responsive experience to the user.
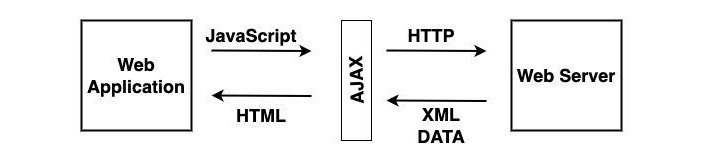
What is Required to Run AJAX?
The technologies that are used by AJAX are already implemented in all the Morden browsers. So the client does not require any extra module to run the AJAX application. The technologies used by AJAX are −
Javascript − It is an important part of AJAX. It allows you to create client-side functionality. Or we can say that it is used to create AJAX applications.
XML − It is used to exchange data between web server and client.
The XMLHttpRequest − It is used to perform asynchronous data exchange between a web browser and a web server.
HTML and CSS − It is used to provide markup and style to the webpage text.
DOM − It is used to interact with and alter the webpage layout and content dynamically.
To use AJAX with PHP, you will need to use the XMLHttpRequest object in JavaScript to send requests to the PHP server. The PHP server will then process the request and return a response, typically in the form of JSON or XML. The JavaScript code can then parse the response and update the web page accordingly.
The XMLHttpRequest object in JavaScript is a browser-based API that allows developers to make HTTP requests to a server without reloading the page. This is the foundation of AJAX programming, which allows for dynamic and interactive web applications.
The XMLHttpRequest object can be used to −
Retrieve data from a server, such as JSON, XML, or HTML.
Send data to a server, such as form data or file uploads.
Update a web page without reloading it.
Create chat applications and other interactive features.
To use the XMLHttpRequest object, you first need to create a new instance of it. Then, you can use the open() method to specify the HTTP method and request URL. Next, you can set any request headers, if needed. Finally, you can send the request using the send() method.
Example
Here is a simple JavaScript code of how to use the XMLHttpRequest object to retrieve data from a server −
// Create a new XMLHttpRequest object
var xhr = new XMLHttpRequest();
// Set the HTTP method and request URL
xhr.open("GET", "test.php");
// Send the request
xhr.send();
// Listen for the onload event to be fired
xhr.onload = function() {
// Check the status code to ensure the request was successful
if (xhr.status === 200) {
// Get the response data.
var users = JSON.parse(xhr.responseText);
// Do something with the user data.
} else {
// Handle the error
}
};
The PHP script on the server retrieves the data from AJAX request and sends back the response.
// Get the request data.
$name = $_GET["name"];
// Create a response object.
$response = new stdClass();
$response->message = "Hello, $name!";
// Send the response back to the client.
header("Content-Type: application/json");
echo json_encode($response);
PHP - AJAX Search
AJAX is a shortform of the term Asynchronous JavaScript and XML. Ajax is used to build fast and dynamic web pages. Below example demonstrates interaction with the backend PHP script with AJAX functions to provide a search field on the webpage.
Step 1
Save the following script as "example.php" −
<html>
<head>
<style>
span {
color: green;
}
</style>
<script>
function showHint(str) {
if (str.length == 0) {
document.getElementById("txtHint").innerHTML = "";
return;
} else {
var xmlhttp = new XMLHttpRequest();
xmlhttp.onreadystatechange = function() {
if (xmlhttp.readyState == 4 && xmlhttp.status == 200) {
document.getElementById("txtHint").innerHTML = xmlhttp.responseText;
}
}
xmlhttp.open("GET", "hello.php?q=" + str, true);
xmlhttp.send();
}
}
</script>
</head>
<body>
<p><b>Search your favourite tutorials:</b></p>
<form>
<input type = "text" onkeyup = "showHint(this.value)">
</form>
<p>Entered Course name: <span id="txtHint"></span></p>
</body>
</html>
This code is essentially a HTML script that renders a HTML form with a text field. On its onkeyup event, a showHint() JavaScript function is called. The function sends a HTTP GET request to another PHP script on the server.
Step 2
Save the following script as "php_ajax.php" −
<?php
// Array with names
$a[] = "Android";
$a[] = "B programming language";
$a[] = "C programming language";
$a[] = "D programming language";
$a[] = "euphoria";
$a[] = "F#";
$a[] = "GWT";
$a[] = "HTML5";
$a[] = "ibatis";
$a[] = "Java";
$a[] = "K programming language";
$a[] = "Lisp";
$a[] = "Microsoft technologies";
$a[] = "Networking";
$a[] = "Open Source";
$a[] = "Prototype";
$a[] = "QC";
$a[] = "Restful web services";
$a[] = "Scrum";
$a[] = "Testing";
$a[] = "UML";
$a[] = "VB Script";
$a[] = "Web Technologies";
$a[] = "Xerox Technology";
$a[] = "YQL";
$a[] = "ZOPL";
$q = $_REQUEST["q"];
$hint = "";
if ($q !== "") {
$q = strtolower($q);
$len = strlen($q);
foreach($a as $name) {
if (stristr($q, substr($name, 0, $len))) {
if ($hint === "") {
$hint = $name;
} else {
$hint .= ", $name";
}
}
}
}
echo $hint === "" ? "Please enter a valid course name" : $hint;
?>
Step 3
We will start this application by opening example.php in the browser by entering the URL http://localhost/example.php
On every keystroke in the search field, a GET request goes to the server. The server script reads the character from $_REQUEST array and searches for the course name that matches. The matched value is displayed below the text field in the browser.

PHP - AJAX XML Parser
Using PHP with AJAX, we can parse an XML document from local directory as well as on a server. The following example demonstrates how to parse XML with web browser.
The client-end script renders a HTML form and defines a JavaScript function for sending a HTTP request to the server with XMLHttpRequest object.
On the server, a PHP script loads the DOM object from the required XML document, fetches the selected course from $_REQUEST variable, and renders the details of the course chosen as the response back to the client.
Step 1
The following XML document is stored on the document root of the XAMPP server.
<?xml version = "1.0" encoding = "utf-8"?>
<CATALOG>
<SUBJECT>
<COURSE>Android</COURSE>
<COUNTRY>India</COUNTRY>
<COMPANY>TutorialsPoint</COMPANY>
<PRICE>$10</PRICE>
<YEAR>2015</YEAR>
</SUBJECT>
<SUBJECT>
<COURSE>Html</COURSE>
<COUNTRY>India</COUNTRY>
<COMPANY>TutorialsPoint</COMPANY>
<PRICE>$15</PRICE>
<YEAR>2015</YEAR>
</SUBJECT>
<SUBJECT>
<COURSE>Java</COURSE>
<COUNTRY>India</COUNTRY>
<COMPANY>TutorialsPoint</COMPANY>
<PRICE>$20</PRICE>
<YEAR>2015</YEAR>
</SUBJECT>
<SUBJECT>
<COURSE>Microsoft</COURSE>
<COUNTRY>India</COUNTRY>
<COMPANY>TutorialsPoint</COMPANY>
<PRICE>$25</PRICE>
<YEAR>2015</YEAR>
</SUBJECT>
</CATALOG>
Step 2
The AJAX code below has a HTML form and a JavaScript function to raise HTTP request through XMLHttpRequest object.
<html>
<head>
<script>
function showCD(str) {
if (str == "") {
document.getElementById("txtHint").innerHTML = "";
return;
}
if (window.XMLHttpRequest) {
// code for IE7+, Firefox, Chrome, Opera, Safari
xmlhttp = new XMLHttpRequest();
} else {
// code for IE6, IE5
xmlhttp = new ActiveXObject("Microsoft.XMLHTTP");
}
xmlhttp.onreadystatechange = function() {
if (xmlhttp.readyState == 4 && xmlhttp.status == 200) {
document.getElementById("txtHint").innerHTML = xmlhttp.responseText;
}
}
xmlhttp.open("GET","hello.php?q="+str,true);
xmlhttp.send();
}
</script>
</head>
<body>
<form>
Select a Course:
<select name = "cds" onchange = "showCD(this.value)">
<option value = "">Select a course:</option>
<option value = "Android">Android </option>
<option value = "Html">HTML</option>
<option value = "Java">Java</option>
<option value = "Microsoft">MS technologies</option>
</select>
</form>
<div id = "txtHint"><b>Course info will be listed here...</b></div>
</body>
</html>
Step 3
The server-side PHP script to search within the XML document is as follows −
<?php
$q = $_GET["q"];
$xmlDoc = new DOMDocument();
$xmlDoc->load("test.xml");
$x = $xmlDoc->getElementsByTagName('COURSE');
for ($i = 0; $i<=$x->length-1; $i++) {
if ($x->item($i)->nodeType == 1) {
if ($x->item($i)->childNodes->item(0)->nodeValue == $q) {
$y = ($x->item($i)->parentNode);
}
}
}
$cd = ($y->childNodes);
for ($i = 0;$i<$cd->length;$i++) {
if ($cd->item($i)->nodeType == 1) {
echo("<b>" . $cd->item($i)->nodeName . ":</b> ");
echo($cd->item($i)->childNodes->item(0)->nodeValue);
echo("<br>");
}
}
?>
Visit "http://localhost/example.php" to let the user select a course. Upon selection, the relevant details are fetched from the server and displayed as below −

PHP - AJAX Auto Complete Search
Autocomplete feature is a typeahead mechanism to show input suggestion as the user enters data in the search box provided. It is also called live search because it reacts to the users' input. In this example, we shall use AJAX and XML parser in PHP to demonstrate the use of auto complete text box.
This application has three main constituents −
The XML Document
JavaScript Code
XML Parser in PHP
Let us now discuss these three constituents in detail −
The XML Document
Save the following XML script as "autocomplete.xml" in the document root folder
<?xml version = "1.0" encoding = "utf-8"?>
<pages>
<link>
<title>android</title>
<url>https://www.tutorialspoint.com/android/index.htm</url>
</link>
<link>
<title>Java</title>
<url>https://www.tutorialspoint.com/java/index.htm</url>
</link>
<link>
<title>CSS </title>
<url>https://www.tutorialspoint.com/css/index.htm</url>
</link>
<link>
<title>angularjs</title>
<url>https://www.tutorialspoint.com/angularjs/index.htm </url>
</link>
<link>
<title>hadoop</title>
<url>https://www.tutorialspoint.com/hadoop/index.htm </url>
</link>
<link>
<title>swift</title>
<url>https://www.tutorialspoint.com/swift/index.htm </url>
</link>
<link>
<title>ruby</title>
<url>https://www.tutorialspoint.com/ruby/index.htm </url>
</link>
<link>
<title>nodejs</title>
<url>https://www.tutorialspoint.com/nodejs/index.htm </url>
</link>
</pages>
JavaScript Code
The following script renders a text field for the user to enter a course name of his choice. On every keystroke a JavaScript function is called, and the input value is passed to the server-side PHP script with GET method. The servers response is asynchronously rendered.
Save this code as "index.php".
<html>
<head>
<script>
function showResult(str) {
if (str.length == 0) {
document.getElementById("livesearch").innerHTML = "";
document.getElementById("livesearch").style.border = "0px";
return;
}
if (window.XMLHttpRequest) {
xmlhttp = new XMLHttpRequest();
} else {
xmlhttp = new ActiveXObject("Microsoft.XMLHTTP");
}
xmlhttp.onreadystatechange = function() {
if (xmlhttp.readyState == 4 && xmlhttp.status == 200) {
document.getElementById("livesearch").innerHTML = xmlhttp.responseText;
document.getElementById("livesearch").style.border = "1px solid #A5ACB2";
}
}
xmlhttp.open("GET","livesearch.php?q="+str,true);
xmlhttp.send();
}
</script>
</head>
<body>
<form>
<h2>Enter Course Name</h2>
<input type = "text" size = "30" onkeyup = "showResult(this.value)">
<div id = "livesearch"></div>
<a href = "https://www.tutorialspoint.com">More Details</a>
</form>
</body>
</html>
XML Parser in PHP
This the PHP script on the server. It parses the given XML source document, reads the characters entered in the input field, searches for it in the parsed XNL object, and sends back the response.
Save the following code as "livesearch.php".
<?php
$xml_doc = new DOMDocument();
$xml_doc->load('autocomplete.xml');
$x=$xml_doc->getElementsByTagName('link');
$q = $_GET['q'];
$result = '';
foreach($x as $node) {
if (stripos("{$node->nodeValue}", $q) !== false) {
$result .= "{$node->nodeValue}";
}
}
// Set $response to "No records found." in case no hint was found
// or the values of the matching values
if ($result == '')
$result = 'No records found.';
// show the results or "No records found."
echo $result;
?>
With the XAMPP server running, visit "http://localhost/index.php" and the browser displays a input text field. For each character typed in it, the relevant suggestions appear below it.
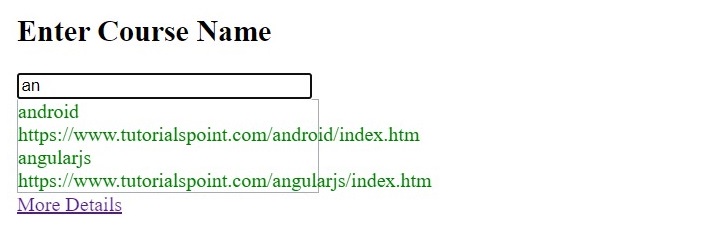
PHP - AJAX RSS Feed Example
Really Simple Syndication (RSS)
RSS, which stands for Really Simple Syndication, is used to publish often updated information from website like audio, video, images, etc. We can integrate RSS feeds to a website by using AJAX and PHP. This code demonstrates how to show RSS feeds in our site.
Index.html
The index page should be as follows −
<html>
<head>
<script>
function showRSS(str) {
if (str.length == 0) {
document.getElementById("output").innerHTML = "";
return;
}
if (window.XMLHttpRequest) {
xmlhttp = new XMLHttpRequest();
} else {
xmlhttp = new ActiveXObject("Microsoft.XMLHTTP");
}
xmlhttp.onreadystatechange = function() {
if (xmlhttp.readyState == 4 && xmlhttp.status == 200) {
document.getElementById("output").innerHTML = xmlhttp.responseText;
}
}
xmlhttp.open("GET","rss.php?q="+str,true);
xmlhttp.send();
}
</script>
</head>
<body>
<p>Please Select an option to get RSS:</p>
<form>
<select onchange = "showRSS(this.value)">
<option value = "">Select an RSS-feed:</option>
<option value = "cnn">CNN</option>
<option value = "bbc">BBC News</option>
<option value = "pc">PC World</option>
</select>
</form>
<br>
<div id = "output">RSS-feeds</div>
</body>
</html>
rss.php
"rss.php" has contained syntax about how to get access to RSS Feeds RSS Feeds and return RSS Feeds to the webpages.
<?php
$q = $_GET["q"];
if($q == "cnn") {
$xml = ("http://rss.cnn.com/rss/cnn_topstories.rss");
} elseif($q == "bbc") {
$xml = ("http://newsrss.bbc.co.uk/rss/newsonline_world_edition/americas/rss.xml");
} elseif($q = "pcw"){
$xml = ("http://www.pcworld.com/index.rss");
}
$xmlDoc = new DOMDocument();
$xmlDoc->load($xml);
$channel = $xmlDoc->getElementsByTagName('channel')->item(0);
$channel_title = $channel->getElementsByTagName('title')
->item(0)->childNodes->item(0)->nodeValue;
$channel_link = $channel->getElementsByTagName('link')
->item(0)->childNodes->item(0)->nodeValue;
$channel_desc = $channel->getElementsByTagName('description')
->item(0)->childNodes->item(0)->nodeValue;
echo("<p><a href = '" . $channel_link . "'>" .
$channel_title . "</a>");
echo("<br>");
echo($channel_desc . "</p>");
$x = $xmlDoc->getElementsByTagName('item');
for ($i = 0; $i<=2; $i++) {
$item_title = $x->item($i)->getElementsByTagName('title')
->item(0)->childNodes->item(0)->nodeValue;
$item_link = $x->item($i)->getElementsByTagName('link')
->item(0)->childNodes->item(0)->nodeValue;
$item_desc = $x->item($i)->getElementsByTagName('description')
->item(0)->childNodes->item(0)->nodeValue;
echo ("<p><a href = '" . $item_link . "'>" . $item_title . "</a>");
echo ("<br>");
echo ($item_desc . "</p>");
}
?>
It will produce the following output −
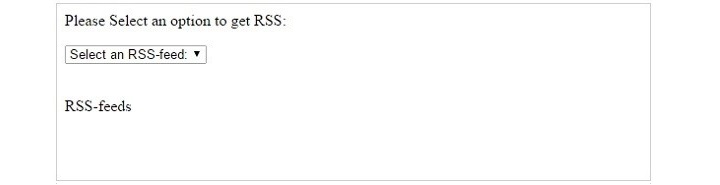
PHP - XML Introduction
With the help of PHPs built-in functions and libraries, we can handle manipulation of XML data. XML, which stands for eXtensible Markup Language, is a data format for structured document interchange, especially on the Web.
XML is a popular file format used for serialization of data storing the data, transmitting it to another location, and reconstructing it at the destination.
In this chapter, we shall learn about the basics of XML processing with PHP.
Features of XML
One of the features of XML is that it is both human readable and machine readable. The specifications of XML are defined and standardized by The World Wide Web Consortium. PHP parser can perform read/write operations on XML data.
XML Tags
Like HTML, XML document is also composed with the help of tags. However, you can define your own tags, which is unlike HTML where you need to use predefined tags to compose a HTML document.
The HTML tags essentially apply formatting attributes over text, image, multimedia resources etc. The XML tags define user specified attributes to the data elements.
XML Document
An XML document has a hierarchical structure of tags that define the elements and attributes of data within a document. Each XML document consists of a root element that encloses other elements. Elements can have attributes, which provide additional information or properties about the element. The data within elements are enclosed by opening and closing tags.
Example
An example of a typical XML document is given below −
<?xml version = '1.0' encoding = 'UTF-8'?> <note> <Course>Android</Course> <Subject>Android</Subject> <Company>TutorialsPoint</Company> <Price>$10</Price> </note>
Types of XML Parsers
In PHP, there are two types of XML parsers available −
Tree based parsers
Event based parsers
Tree-based Parsers
With this type of a parser, PHP loads the entire XML document in the memory and transforms the XML document into a Tree structure. It analyzes the whole document, and provides access to the Tree elements.
For smaller documents, tree-based parser works well, but for large XML document, it causes major performance issues. SimpleXML parser and DOM XML parser are the examples of tree-based parsers
Simple XML Parser
The Simple XML parser also called as tree-based XML parser and it will parse the simple XML file. Simple XML parse will call simplexml_load_file() method to get access to the xml from specific path.
DOM Parser
DOM Parser also called as a complex node parser, Which is used to parse highly complex XML file. It is used as interface to modify the XML file. DOM parser has encoded with UTF-8 character encoding.
Event-based Parsers
An event-based parser doesnt load the entire XML document in the memory. instead, it reads in one node at a time. The parser allows you to interact with in real time. Once you move onto the next node, the old one is removed from the memory.
As there is no memory overload involved, this type of parser is suitable for large XML documents, and the document is parsed faster than any tree-based parser. XMLReader and XML Expat Parser are the examples of event-based parsers.
XML Parser
XML parsing is based on SAX parse. It is more faster the all above parsers. It will create the XML file and parse the XML. XML parser has encoded by ISO-8859-1, US-ASCII and UTF-8 character encoding.
XML Reader
XML Reader parse also called as Pull XML parse. It is used to read the XML file in a faster way. It works with high complex XML document with XML Validation.
PHP - Simple XML Parser
The SimpleXML extension of PHP provides a very simple and easy to use toolset to convert XML to an object that can be processed with normal property selectors and array iterators. It is a tree_based parser, and works well with simple XML files, but may face issues when working with larger and complex XML documents.
The following functions are defined in SimpleXML extension −
simplexml_load_file
The simplexml_load_file() function interprets an XML file into an object −
simplexml_load_file( string $filename, ?string $class_name = SimpleXMLElement::class, int $options = 0, string $namespace_or_prefix = "", bool $is_prefix = false ): SimpleXMLElement|false
A well-formed XML document in the given file is converted into an object.
The filename parameter is a string representing the XML file to be parsed. class_name is the optional parameter. It specifies the class whose object will be returned by the function. The function returns an object of class SimpleXMLElement with properties containing the data held within the XML document, or false on failure.
Example
Take a look at the following example −
<?php
$xml = simplexml_load_file("test.xml") or die("Error: Cannot create object");
print_r($xml);
?>
It will produce the following output −
SimpleXMLElement Object ( [Course] => Android [Subject] => Android [Company] => TutorialsPoint [Price] => $10 )
simplexml_load_string
The simplexml_load_string() function interprets an XML file into an object.
simplexml_load_string( string $filename, ?string $class_name = SimpleXMLElement::class, int $options = 0, string $namespace_or_prefix = "", bool $is_prefix = false ): SimpleXMLElement|false
A well-formed XML document in the given string is converted into an object.
The $data parameter is a string representing the XML document to be parsed. class_name is the optional parameter. It specifies the class whose object will be returned by the function. The function returns an object of class SimpleXMLElement with properties containing the data held within the XML document, or false on failure.
Example
Take a look at the following example −
<?php
$data = "<?xml version = '1.0' encoding = 'UTF-8'?>
<note>
<Course>Android</Course>
<Subject>Android</Subject>
<Company>TutorialsPoint</Company>
<Price>$10</Price>
</note>";
$xml = simplexml_load_string($data) or die("Error: Cannot create object");
print_r($xml);
?>
It will produce the following output −
SimpleXMLElement Object ( [Course] => Android [Subject] => Android [Company] => TutorialsPoint [Price] => $10 )
simplexml_import_dom
The simplexml_import_dom() function constructs a SimpleXMLElement object from a DOM node.
simplexml_import_dom(SimpleXMLElement|DOMNode $node, ?string $class_name = SimpleXMLElement::class): ?SimpleXMLElement
This function takes a node of a DOM document and makes it into a SimpleXML node. This new object can then be used as a native SimpleXML element.
The node parameter is a DOM Element node. The optional class_name may be given so that simplexml_import_dom() will return an object of the specified sub class of the SimpleXMLElement class. The value returned by this function is a SimpleXMLElement or null on failure.
Example
Take a look at the following example −
<?php
$dom = new DOMDocument;
$dom->loadXML('<books><book><title>PHP Handbook</title></book></books>');
if (!$dom) {
echo 'Error while parsing the document';
exit;
}
$s = simplexml_import_dom($dom);
echo $s->book[0]->title;
?>
It will produce the following output −
PHP Handbook
Get the Node Values
The following code shows how to get the node values from an XML file and the XML should be as follows −
<?xml version = "1.0" encoding = "utf-8"?>
<tutorialspoint>
<course category = "JAVA">
<title lang = "en">Java</title>
<tutor>Gopal</tutor>
<duration></duration>
<price>$30</price>
</course>
<course category = "HADOOP">
<title lang = "en">Hadoop</title>.
<tutor>Satish</tutor>
<duration>3</duration>
<price>$50</price>
</course>
<course category = "HTML">
<title lang = "en">html</title>
<tutor>raju</tutor>
<duration>5</duration>
<price>$50</price>
</course>
<course category = "WEB">
<title lang = "en">Web Technologies</title>
<tutor>Javed</tutor>
<duration>10</duration>
<price>$60</price>
</course>
</tutorialspoint>
Example
PHP code should be as follows −
<?php
$xml = simplexml_load_file("books.xml") or die("Error: Cannot create object");
foreach($xml->children() as $books) {
echo $books->title . "<br> ";
echo $books->tutor . "<br> ";
echo $books->duration . "<br> ";
echo $books->price . "<hr>";
}
?>
It will produce the following output −
Java Gopal $30 ________________________________________ Hadoop Satish 3 $50 ________________________________________ html raju 5 $50 ________________________________________ Web Technologies Javed 10 $60 ________________________________________
PHP - SAX Parser Example
PHP has the XML parser extension enabled by default in the php.ini settings file. This parser implements SAX API, which is an event-based parsing algorithm.
An event-based parser doesnt load the entire XML document in the memory. instead, it reads in one node at a time. The parser allows you to interact with in real time. Once you move onto the next node, the old one is removed from the memory.
SAX based parsing mechanism is faster than the tree based parsers. PHP library includes functions to handle the XML events, as explained in this chapter.
The first step in parsing a XML document is to have a parser object, with xml_parse_create() function
xml_parser_create(?string $encoding = null): XMLParser
This function creates a new XML parser and returns an object of XMLParser to be used by the other XML functions.
The xml_parse() function starts parsing an XML document
xml_parse(XMLParser $parser, string $data, bool $is_final = false): int
xml_parse() parses an XML document. The handlers for the configured events are called as many times as necessary.
The XMLParser extension provides different event handler functions.
xml_set_element_handler()
This function sets the element handler functions for the XML parser. Element events are issued whenever the XML parser encounters start or end tags. There are separate handlers for start tags and end tags.
xml_set_element_handler(XMLParser $parser, callable $start_handler, callable $end_handler): true
The start_handler() function is called when a new XML element is opened. end_handler() function is called when an XML element is closed.
xml_set_character_data_handler()
This function sets the character data handler function for the XML parser parser. Character data is roughly all the non-markup contents of XML documents, including whitespace between tags.
xml_set_character_data_handler(XMLParser $parser, callable $handler): true
xml_set_processing_instruction_handler()
This function sets the processing instruction (PI) handler function for the XML parser parser. <?php ?> is a processing instruction, where php is called the "PI target". The handling of these are application-specific.
xml_set_processing_instruction_handler(XMLParser $parser, callable $handler): true
A processing instruction has the following format −
<?target data ?>
xml_set_default_handler()
This function sets the default handler function for the XML parser parser. What goes not to another handler goes to the default handler. You will get things like the XML and document type declarations in the default handler.
xml_set_default_handler(XMLParser $parser, callable $handler): true
Example
The following example demonstrates the use of SAX API for parsing the XML document. We shall use the SAX.xml as below −
<?xml version = "1.0" encoding = "utf-8"?>
<tutors>
<course>
<name>Android</name>
<country>India</country>
<email>contact@tutorialspoint.com</email>
<phone>123456789</phone>
</course>
<course>
<name>Java</name>
<country>India</country>
<email>contact@tutorialspoint.com</email>
<phone>123456789</phone>
</course>
<course>
<name>HTML</name>
<country>India</country>
<email>contact@tutorialspoint.com</email>
<phone>123456789</phone>
</course>
</tutors>
Example
The PHP code to parse the above document is given below. It opens the XML file and calls xml_parse() function till its end of file is reached. The event handlers store the data in tutors array. Then the array is echoed element wise.
<?php
// Reading XML using the SAX(Simple API for XML) parser
$tutors = array();
$elements = null;
// Called to this function when tags are opened
function startElements($parser, $name, $attrs) {
global $tutors, $elements;
if(!empty($name)) {
if ($name == 'COURSE') {
// creating an array to store information
$tutors []= array();
}
$elements = $name;
}
}
// Called to this function when tags are closed
function endElements($parser, $name) {
global $elements;
if(!empty($name)) {
$elements = null;
}
}
// Called on the text between the start and end of the tags
function characterData($parser, $data) {
global $tutors, $elements;
if(!empty($data)) {
if ($elements == 'NAME' || $elements == 'COUNTRY' || $elements == 'EMAIL' || $elements == 'PHONE') {
$tutors[count($tutors)-1][$elements] = trim($data);
}
}
}
$parser = xml_parser_create();
xml_set_element_handler($parser, "startElements", "endElements");
xml_set_character_data_handler($parser, "characterData");
// open xml file
if (!($handle = fopen('sax.xml', "r"))) {
die("could not open XML input");
}
while($data = fread($handle, 4096)) {
xml_parse($parser, $data);
}
xml_parser_free($parser);
$i = 1;
foreach($tutors as $course) {
echo "course No - ".$i. '<br/>';
echo "course Name - ".$course['NAME'].'<br/>';
echo "Country - ".$course['COUNTRY'].'<br/>';
echo "Email - ".$course['EMAIL'].'<br/>';
echo "Phone - ".$course['PHONE'].'<hr/>';
$i++;
}
?>
The above code gives the following output −
course No - 1 course Name - Android Country - India Email - contact@tutorialspoint.com Phone - 123456789 ________________________________________ course No - 2 course Name - Java Country - India Email - contact@tutorialspoint.com Phone - 123456789 ________________________________________ course No - 3 course Name - HTML Country - India Email - contact@tutorialspoint.com Phone - 123456789 ________________________________________
PHP - DOM Parser Example
The DOM extension in PHP comes with extensive functionality with which we can perform various operations on XML and HTML documents. We can dynamically construct a DOM object, load a DOM document from a HTML file or a string with HTML tag tree. We can also save the DOM document to a XML file, or extract the DOM tree from a XML document.
The DOMDocument class is one the most important classes defined in the DOM extension.
$obj = new DOMDocument($version = "1.0", $encoding = "")
It represents an entire HTML or XML document; serves as the root of the document tree. The DOMDocument class includes definitions of a number of static methods, some of which are introduced here −
| Sr.No | Methods & Description |
|---|---|
| 1 | createElement Create new element node |
| 2 | createAttribute Create new attribute |
| 3 | createTextNode Create new text node |
| 4 | getElementById Searches for an element with a certain id |
| 5 | getElementsByTagName Searches for all elements with given local tag name |
| 6 | load Load XML from a file |
| 7 | loadHTML Load HTML from a string |
| 8 | loadHTMLFile Load HTML from a file |
| 9 | loadXML Load XML from a string |
| 10 | save Dumps the internal XML tree back into a file |
| 11 | saveHTML Dumps the internal document into a string using HTML formatting |
| 12 | saveHTMLFile Dumps the internal document into a file using HTML formatting |
| 13 | saveXML Dumps the internal XML tree back into a string |
Example
Let us use the following HTML file for this example −
<html>
<head>
<title>Tutorialspoint</title>
</head>
<body>
<h2>Course details</h2>
<table border = "0">
<tbody>
<tr>
<td>Android</td>
<td>Gopal</td>
<td>Sairam</td>
</tr>
<tr>
<td>Hadoop</td>
<td>Gopal</td>
<td>Satish</td>
</tr>
<tr>
<td>HTML</td>
<td>Gopal</td>
<td>Raju</td>
</tr>
<tr>
<td>Web technologies</td>
<td>Gopal</td>
<td>Javed</td>
</tr>
<tr>
<td>Graphic</td>
<td>Gopal</td>
<td>Satish</td>
</tr>
<tr>
<td>Writer</td>
<td>Kiran</td>
<td>Amith</td>
</tr>
<tr>
<td>Writer</td>
<td>Kiran</td>
<td>Vineeth</td>
</tr>
</tbody>
</table>
</body>
</html>
We shall now extract the Document Object Model from the above HTML file by calling the loadHTMLFile() method in the following PHP code −
<?php
/*** a new dom object ***/
$dom = new domDocument;
/*** load the html into the object ***/
$dom->loadHTMLFile("hello.html");
/*** discard white space ***/
$dom->preserveWhiteSpace = false;
/*** the table by its tag name ***/
$tables = $dom->getElementsByTagName('table');
/*** get all rows from the table ***/
$rows = $tables[0]->getElementsByTagName('tr');
/*** loop over the table rows ***/
foreach ($rows as $row) {
/*** get each column by tag name ***/
$cols = $row->getElementsByTagName('td');
/*** echo the values ***/
echo 'Designation: '.$cols->item(0)->nodeValue.'<br />';
echo 'Manager: '.$cols->item(1)->nodeValue.'<br />';
echo 'Team: '.$cols->item(2)->nodeValue;
echo '<hr />';
}
?>
It will produce the following output −
Designation: Android Manager: Gopal Team: Sairam ________________________________________ Designation: Hadoop Manager: Gopal Team: Satish ________________________________________ Designation: HTML Manager: Gopal Team: Raju ________________________________________ Designation: Web technologies Manager: Gopal Team: Javed ________________________________________ Designation: Graphic Manager: Gopal Team: Satish ________________________________________ Designation: Writer Manager: Kiran Team: Amith ________________________________________ Designation: Writer Manager: Kiran Team: Vineeth ________________________________________
PHP - Login Example
A typical PHP web application authenticates the user before logging in, by asking his credentials such as username and password. The credentials are then checked against the user data available with the server. In this example, the user data is available in the form of an associative array. The following PHP Login script is explained below −
HTML Form
The HTML part of the code presents a simple HTML form, that accepts username and password, and posts the data to itself.
<form action = "<?php echo htmlspecialchars($_SERVER['PHP_SELF']); ?>" method="post">
<div>
<label for="username">Username:</label>
<input type="text" name="username" id="name">
</div>
<div>
<label for="password">Password:</label>
<input type="password" name="password" id="password">
</div>
<section style="margin-left:2rem;">
<button type="submit" name="login">Login</button>
</section>
</form>
PHP Authentication
The PHP script parses the POST data, and checks if the username is present in the users array. If found, it further checks whether the password corresponds to the registered user in the array
<?php
if (array_key_exists($user, $users)) {
if ($users[$_POST['username']]==$_POST['password']) {
$_SESSION['valid'] = true;
$_SESSION['timeout'] = time();
$_SESSION['username'] = $_POST['username'];
$msg = "You have entered correct username and password";
} else {
$msg = "You have entered wrong Password";
}
} else {
$msg = "You have entered wrong user name";
}
?>
The username and the appropriate message is added to the $_SESSION array. The user is prompted with a respective message, whether the credentials entered by him are correct or not.
The Complete Code
Here is the complete code −
Login.php
<?php
ob_start();
session_start();
?>
<html lang = "en">
<head>
<meta charset="UTF-8">
<meta name="viewport" content="width=device-width, initial-scale=1.0">
<link rel="stylesheet" href="loginstyle.css">
<title>Login</title>
</head>
<body>
<h2 style="margin-left:10rem; margin-top:5rem;">Enter Username and Password</h2>
<?php
$msg = '';
$users = ['user'=>"test", "manager"=>"secret", "guest"=>"abc123"];
if (isset($_POST['login']) && !empty($_POST['username'])
&& !empty($_POST['password'])) {
$user=$_POST['username'];
if (array_key_exists($user, $users)){
if ($users[$_POST['username']]==$_POST['password']){
$_SESSION['valid'] = true;
$_SESSION['timeout'] = time();
$_SESSION['username'] = $_POST['username'];
$msg = "You have entered correct username and password";
}
else {
$msg = "You have entered wrong Password";
}
}
else {
$msg = "You have entered wrong user name";
}
}
?>
<h4 style="margin-left:10rem; color:red;"><?php echo $msg; ?></h4>
<br/><br/>
<form action = "<?php echo htmlspecialchars($_SERVER['PHP_SELF']); ?>" method="post">
<div>
<label for="username">Username:</label>
<input type="text" name="username" id="name">
</div>
<div>
<label for="password">Password:</label>
<input type="password" name="password" id="password">
</div>
<section style="margin-left:2rem;">
<button type="submit" name="login">Login</button>
</section>
</form>
<p style="margin-left: 2rem;">
<a href = "logout.php" tite = "Logout">Click here to clean Session.</a>
</p>
</div>
</body>
</html>
Logout.php
To logout, the user clicks on the link to logout.php
<?php
session_start();
unset($_SESSION["username"]);
unset($_SESSION["password"]);
echo '<h4>You have cleaned session</h4>';
header('Refresh: 2; URL = login.php');
?>
Start the application by entering "http://localhost/login.php". Here are the different scenarios −
Correct Username and Password
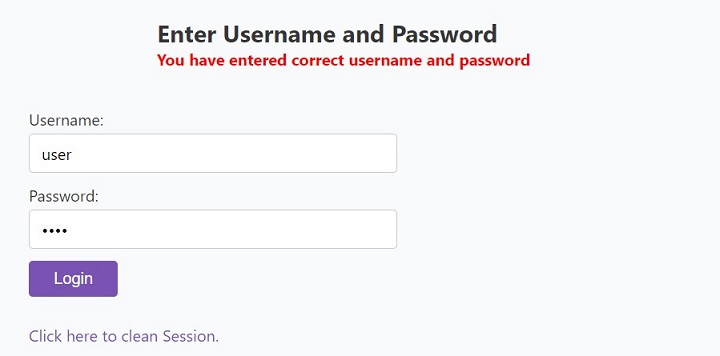
Incorrect Password
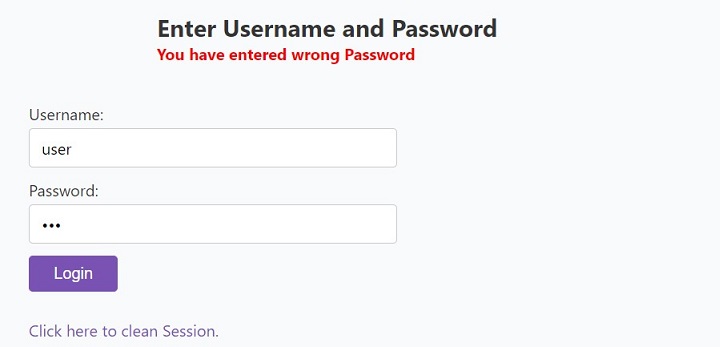
Incorrect Username
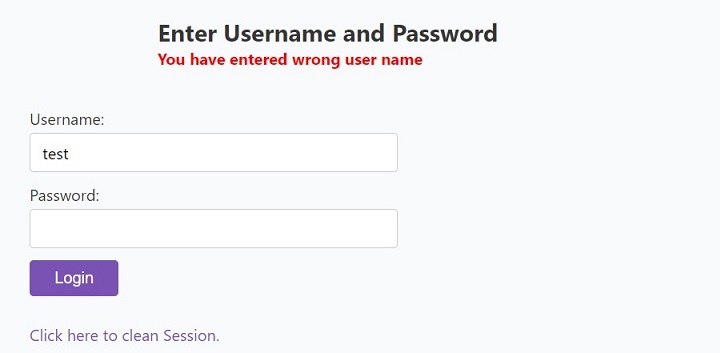
When the user clicks the link at the bottom, the session variables are removed, and the login screen reappears.
PHP - Facebook Login
Users can be asked to log into a web application with the help of Social media login, also called SSO. This way users need not create a new account. Instead, users can use their existing social media account information to log in. Some examples of social media login include: Google, Facebook, LinkedIn, Apple.
In this chapter, we shall explain how to activate logging into a PHP application with Facebook credentials.
The first step to add Facebook login feature is to create a Facebook app. Visit https://developers.facebook.com/apps/creation/ and sign in with your Facebook account.
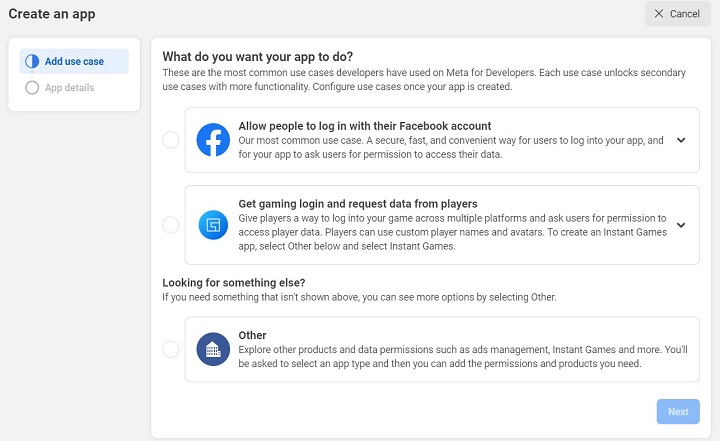
Next, enter the name of the Facebook app you want to create −
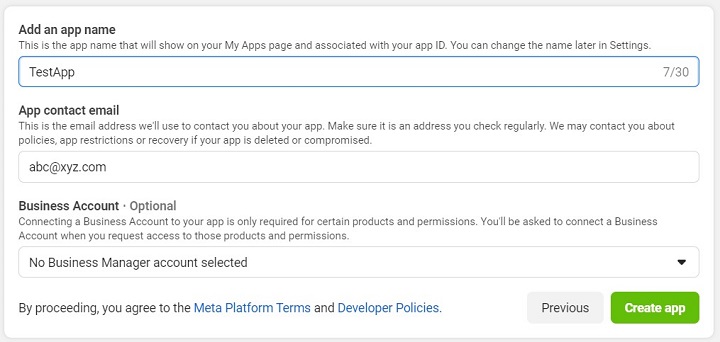
Go in the App settings and obtain Application ID and secret code −

Select platform as website −
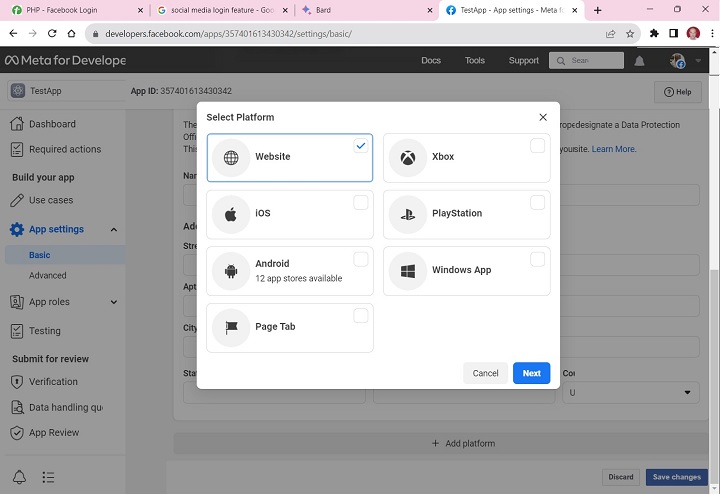
Next, you need to set Up Facebook SDK in PHP. Download the Facebook SDK for PHP from "https://packagist.org/packages/facebook/php-sdk" or use composer: composer require "facebook/graph-sdk-v5". Extract the SDK files to a directory accessible by your PHP application.
To configure Facebook SDK in PHP Code, include the Facebook SDK autoloader in your PHP file: require_once __DIR__ . '/vendor/autoload.php';
Set up your app's access token and app secret −
$app_id = 'YOUR_APP_ID'; $app_secret = 'YOUR_APP_SECRET';
Next, create Facebook Login Button. Create an HTML button and add the Facebook login JavaScript SDK to trigger the login flow −
<button id="facebook-login-button">Login with Facebook</button>
Include the Facebook JavaScript SDK −
<script src="https://connect.facebook.net/en_US/sdk.js#xfbml=1&version=v13.0&appId=YOUR_APP_ID&autoLogApp=true" async defer></script>
Create a PHP script to handle the Facebook login callback −
<?php
session_start();
$fb = new Facebook\Facebook([
'app_id' => $app_id,
'app_secret' => $app_secret,
'default_graph_version' => 'v13.0',
]);
$helper = $fb->getRedirectLoginHelper();
$accessToken = $helper->getAccessToken();
if ($accessToken) {
// User is logged in, handle their data
$user = $fb->get('/me', ['fields' => 'id,name,email']);
$_SESSION['user_data'] = $user;
header('Location: profile.php');
} else {
// User is not logged in, redirect to login page
$loginUrl = $helper->getLoginUrl(['scope' => 'public_profile,email']);
header('Location: ' . $loginUrl);
}
?>
After successful login, store user data in the session and redirect to a protected page. On protected pages, check the session for user data to verify access.
PHP - Paypal Integration
PayPal is a payment processing system. We can integrate PayPal with websites by using with PHP.
PayPal Integration File System
PayPal integration file system included four files as shown below −
constants.php − This file includes the API user name, password and signature.
CallerService.php − This file includes the PayPal Services, which are used to call PayPal services.
confirmation.php − This file includes a form with minimum fields required to make payment process and it will return payment success or failure.
PayPal_entry.php − This page has used to send the user the data to PayPal. It acts as an adapter between PayPal and user form.
The user has to download a PayPal SDK file from here and exact a zip file. The zip file contains four PHP files. We don't need to change any file except "constants.php".
constants.php
The "constants.php" file contains code as shown below −
<?php
define('API_USERNAME', 'YOUR USER NAME HERE');
define('API_PASSWORD', 'YOUR PASSWORD HERE');
define('API_SIGNATURE', 'YOUR API SIGNATURE HERE');
define('API_ENDPOINT', 'https://api-3t.paypal.com/nvp');
define('USE_PROXY',FALSE);
define('PROXY_HOST', '127.0.0.1');
define('PROXY_PORT', '808');
define('PAYPAL_URL', 'https://www.PayPal.com/webscr&cmd=_express-checkout&token=');
define('VERSION', '53.0');
?>
The user will declare the username, password and signature in the above syntax which are placed in "constants.php".
This is an experimental example so the last amount will be added to sandbox's account.
PHP - MySQL Login
MySQL is a popular choice as a backend database for PHP powered web applications. In this chapter, we shall learn to develop a login page for a PHP application that authenticates the given username and password.
You should have a web server having PHP and MySQL installed for experimenting with the example discussed in this chapter. The bundled binaries of Apache, PHP and MySQL (MariaDB) in the form of XAMPP for your operating system can be easily installed.
Before running the example code, you should have a MySQL database called mydb in which there must be a table called admin. You can use following SQL script to create the table and insert a test data
use mydb;
CREATE TABLE `admin` (
`username` varchar(10) NOT NULL,
`passcode` varchar(10) NOT NULL
) ENGINE=InnoDB DEFAULT CHARSET=utf8mb4 COLLATE=utf8mb4_general_ci;
INSERT INTO `admin` (`username`, `passcode`) VALUES
('guest', 'abc123'),
('manager', 'secret'),
('user', 'test');
ALTER TABLE `admin`
ADD PRIMARY KEY (`username`);
COMMIT;
The first part of PHP login application is to establish database connection object. We use myqli API to obtain connection object. Save following code as "config.php"
Config.php
<?php
define('DB_SERVER', 'localhost');
define('DB_USERNAME', 'root');
define('DB_PASSWORD', '');
define('DB_DATABASE', 'mydb');
$db = mysqli_connect(DB_SERVER,DB_USERNAME,DB_PASSWORD,DB_DATABASE);
?>
This PHP script is called inside the login script. It presents the user with a HTML form to enter username and password. In case the form is submitted, PHP runs a SELECT query to retrieve a row in the admin table where the username and passcode matches with the user inputs.
$myusername = mysqli_real_escape_string($db,$_POST['username']);
$mypassword = mysqli_real_escape_string($db,$_POST['password']);
$sql = "SELECT * FROM admin WHERE username = '$myusername' and passcode = '$mypassword'";
$result = mysqli_query($db,$sql);
$row = mysqli_num_rows($result);
If the row count is one, it indicates that the username and the password entered matches. The username is save to the $_SESSION variable and the browser is directed to welcome.php script.
Login.php
Save the following code as "login.php" −
<?php
include("config.php");
session_start();
$error='';
if($_SERVER["REQUEST_METHOD"] == "POST") {
// username and password sent from form
$myusername = mysqli_real_escape_string($db,$_POST['username']);
$mypassword = mysqli_real_escape_string($db,$_POST['password']);
$sql = "SELECT * FROM admin WHERE username = '$myusername' and passcode = '$mypassword'";
$result = mysqli_query($db,$sql);
$row = mysqli_num_rows($result);
$count = mysqli_num_rows($result);
if($count == 1) {
// session_register("myusername");
$_SESSION['login_user'] = $myusername;
header("location: welcome.php");
} else {
$error = "Your Login Name or Password is invalid";
}
}
?>
<html>
<head>
<title>Login Page</title>
<style type = "text/css">
body {
font-family:Arial, Helvetica, sans-serif;
font-size:14px;
}
label {
font-weight:bold;
width:100px;
font-size:14px;
}
.box {
border:#666666 solid 1px;
}
</style>
</head>
<body bgcolor = "#FFFFFF">
<div align = "center">
<div style = "width:300px; border: solid 1px #333333; " align = "left">
<div style = "background-color:#333333; color:#FFFFFF; padding:3px;"><b>Login</b></div>
<div style = "margin:30px">
<form action = "" method = "post">
<label>UserName :</label><input type = "text" name = "username" class = "box"/><br /><br />
<label>Password :</label><input type = "password" name = "password" class = "box" /><br/><br />
<input type = "submit" value = " Submit "/><br />
</form>
<div style = "font-size:11px; color:#cc0000; margin-top:10px"><?php echo $error; ?></div>
</div>
</div>
</div>
</body>
</html>
Welcome.php
The "welcome.php" script gets invoked when the user is authenticated. It reads the session variable to display a welcome message.
<?php
include('session.php');
?>
<html>
<head>
<title>Welcome </title>
</head>
<body>
<h1>Welcome <?php echo $login_session; ?></h1>
<h2><a href = "logout.php">Sign Out</a></h2>
</body>
</html>
Logout.php
Finally, the logout script removes the destroys the session and redirects the user to the login page.
<?php
session_start();
if(session_destroy()) {
header("Location: login.php");
}
?>
To start the login application, visit "http://localhost/login.php"
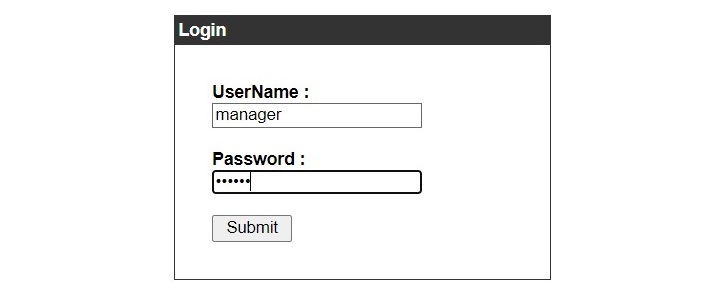
Enter the username and password. On pressing the submit button, these inputs are checked against the rows in admin table. On success, you get the following message −
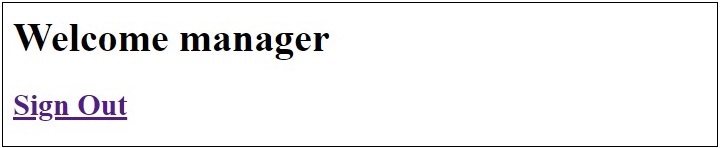
If the query doesnt fetch any matching row, the error message is displayed as follows −
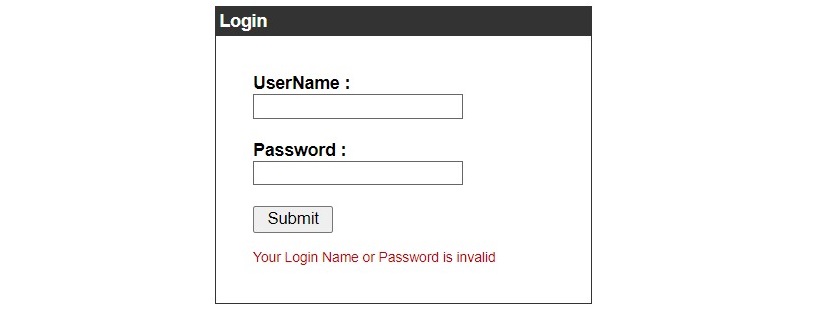
PHP & MySQL
PHP will work with virtually all database software, including Oracle and Sybase but most commonly used is freely available MySQL database.
What you should already have ?
You have gone through MySQL tutorial to understand MySQL Basics.
Downloaded and installed a latest version of MySQL.
Created database user guest with password guest123.
If you have not created a database then you would need root user and its password to create a database.
We have divided this chapter in the following sections −
Connecting to MySQL database − Learn how to use PHP to open and close a MySQL database connection.
Create MySQL Database Using PHP − This part explains how to create MySQL database and tables using PHP.
Delete MySQL Database Using PHP − This part explains how to delete MySQL database and tables using PHP.
Insert Data To MySQL Database − Once you have created your database and tables then you would like to insert your data into created tables. This session will take you through real example on data insert.
Retrieve Data From MySQL Database − Learn how to fetch records from MySQL database using PHP.
Using Paging through PHP − This one explains how to show your query result into multiple pages and how to create the navigation link.
Updating Data Into MySQL Database − This part explains how to update existing records into MySQL database using PHP.
Deleting Data From MySQL Database − This part explains how to delete or purge existing records from MySQL database using PHP.
Using PHP To Backup MySQL Database − Learn different ways to take backup of your MySQL database for safety purpose.
PHP.INI File Configuration
On installing PHP software on your machine, php.ini is created in the installation directory. In case of XAMPP, php.ini is found in c:\xamm\php folder. It is an important configuration file that controls the performance and sets all the PHP related parameters.
The phpinfo() function displays a list of different parameters and their current values of PHP, Aache, MySQL and other parts of the web server installation.
Run the following code to display the settings, one of which shows the path to the "php.ini" file:
<?php echo phpinfo(); ?>
Loaded Configuration File
Locate the Loaded Configuration File setting that displays the location of php.ini file
C:\xampp\php\php.ini
Different aspects of PHPs behaviour are configured by a large number of parameters (called directives). The "php.ini" file comes with most of the lines starting with semicolon (;) symbol indicating that the line is commented. The uncommented line is actually the effective directive and its value. In other words, to activate and assign a value to a particular directive, remove the leading semicolon.
directive = value
Directive names are *case sensitive. Directives are variables used to configure PHP or PHP extensions. Note that there is no name validation, so if an expected directive is not found a default value will be used, which can be a string, a number, a PHP constant (e.g. E_ALL or M_PI), one of the INI constants (On, Off, True, False, Yes, No and None).
Actually, the C:\XAMPP\PHP folder contains two INI files, one to be used in production environment and other in development environment.
The php.ini-development.ini is very similar to its production variant, except it is much more verbose when it comes to errors. In development stage, copy this as php.ini to be able to trace the bugs in the code. Once the code is ready for deployment, use php.ini-production.ini file as the effective php.ini file, which essentially supress the error messages to a large extent.
The directives in php.ini are divided in different categories, like Error handling, data handling, path and directories, file uploads, PHP extensions and module settings.
Here is a list of some of the important directives in "php.ini" file:
short_open_tag = Off
Short open tags look like this: <? ?>. This option must be set to Off if you want to use XML functions.
safe_mode = Off
If this is set to On, you probably compiled PHP with the --enable-safe-mode flag. Safe mode is most relevant to CGI use. See the explanation in the section "CGI compile-time options". earlier in this chapter.
safe_mode_exec_dir = [DIR]
This option is relevant only if safe mode is on; it can also be set with the --with-exec-dir flag during the Unix build process. PHP in safe mode only executes external binaries out of this directory. The default is /usr/local/bin. This has nothing to do with serving up a normal PHP/HTML Web page.
safe_mode_allowed_env_vars = [PHP_]
This option sets which environment variables users can change in safe mode. The default is only those variables prepended with "PHP_". If this directive is empty, most variables are alterable.
safe_mode_protected_env_vars = [LD_LIBRARY_PATH]
This option sets which environment variables users can't change in safe mode, even if safe_mode_allowed_env_vars is set permissively
disable_functions = [function1, function2...]
A welcome addition to PHP4 configuration and one perpetuated in PHP5 is the ability to disable selected functions for security reasons. Previously, this necessitated hand-editing the C code from which PHP was made. Filesystem, system, and network functions should probably be the first to go because allowing the capability to write files and alter the system over HTTP is never such a safe idea.
max_execution_time = 30
The function set_time_limit() won.t work in safe mode, so this is the main way to make a script time out in safe mode. In Windows, you have to abort based on maximum memory consumed rather than time. You can also use the Apache timeout setting to timeout if you use Apache, but that will apply to non-PHP files on the site too.
error_reporting = E_ALL & ~E_NOTICE
The default value is E_ALL & ~E_NOTICE, all errors except notices. Development servers should be set to at least the default; only production servers should even consider a lesser value
error_prepend_string = [""]
With its bookend, error_append_string, this setting allows you to make error messages a different color than other text, or what have you.
warn_plus_overloading = Off
This setting issues a warning if the + operator is used with strings, as in a form value.
variables_order = EGPCS
This configuration setting supersedes gpc_order. Both are now deprecated along with register_globals. It sets the order of the different variables: Environment, GET, POST, COOKIE, and SERVER (aka Built-in). You can change this order around.
Variables will be overwritten successively in left-to-right order, with the rightmost one winning the hand every time. This means if you left the default setting and happened to use the same name for an environment variable, a POST variable, and a COOKIE variable, the COOKIE variable would own that name at the end of the process. In real life, this doesn't happen much.
register_globals = Off
This setting allows you to decide whether you wish to register EGPCS variables as global. This is now deprecated, and as of PHP4.2, this flag is set to Off by default. Use superglobal arrays instead. All the major code listings in this book use superglobal arrays.
magic_quotes_gpc = On
This setting escapes quotes in incoming GET/POST/COOKIE data. If you use a lot of forms which possibly submit to themselves or other forms and display form values, you may need to set this directive to On or prepare to use addslashes() on string-type data.
magic_quotes_runtime = Off
This setting escapes quotes in incoming database and text strings. Remember that SQL adds slashes to single quotes and apostrophes when storing strings and does not strip them off when returning them. If this setting is Off, you will need to use stripslashes() when outputting any type of string data from a SQL database. If magic_quotes_sybase is set to On, this must be Off.
magic_quotes_sybase = Off
This setting escapes single quotes in incoming database and text strings with Sybase-style single quotes rather than backslashes. If magic_quotes_runtime is set to On, this must be Off.
auto-prepend-file = [path/to/file]
If a path is specified here, PHP must automatically include() it at the beginning of every PHP file. Include path restrictions do apply.
auto-append-file = [path/to/file]
If a path is specified here, PHP must automatically include() it at the end of every PHP file.unless you escape by using the exit() function. Include path restrictions do apply.
include_path = [DIR]
If you set this value, you will only be allowed to include or require files from these directories. The include directory is generally under your document root; this is mandatory if you.re running in safe mode. Set this to . in order to include files from the same directory your script is in. Multiple directories are separated by colons: .:/usr/local/apache/htdocs:/usr/local/lib.
doc_root = [DIR]
If you are using Apache, you have already set a document root for this server or virtual host in httpd.conf. Set this value here if you.re using safe mode or if you want to enable PHP only on a portion of your site (for example, only in one subdirectory of your Web root).
file_uploads = [on/off]
Turn on this flag if you will upload files using PHP script.
upload_tmp_dir = [DIR]
Do not comment this line unless you understand the implications of HTTP uploads!
session.save-handler = files
Except in rare circumstances, you will not want to change this setting. So don't touch it.
ignore_user_abort = [On/Off]
This setting controls what happens if a site visitor clicks the browsers Stop button. The default is On, which means that the script continues to run to completion or timeout. If the setting is changed to Off, the script will abort. This setting only works in module mode, not CGI.
mysql.default_host = hostname
The default server host to use when connecting to the database server if no other host is specified.
mysql.default_user = username
The default user name to use when connecting to the database server if no other name is specified.
mysql.default_password = password
The default password to use when connecting to the database server if no other password is specified.
PHP - Array Destructuring
In PHP, the term Array destructuring refers to the mechanism of extracting the array elements into individual variables. It can also be called unpacking of array. PHPs list() construct is used to destrucrure the given array assign its items to a list of variables in one statement.
list($var1, $var2, $var3, . . . ) = array(val1, val2, val3, . . .);
As a result, val1 is assigned to $var1, val2 to $var2 and so on. Even though because of the parentheses, you may think list() is a function, but its not as it doesnt have return value. PHP treats a string as an array, however it cannot be unpacked with list(). Moreover, the parenthesis in list() cannot be empty.
Instead of list(), you can also use the square brackets [] as a shortcut for destructuring the array.
[$var1, $var2, $var3, . . . ] = array(val1, val2, val3, . . .);
Example
Take a look at the following example −
<?php $marks = array(50, 56, 70); list($p, $c, $m) = $marks; echo "Physics: $p Chemistry: $c Maths: $m" . PHP_EOL; # shortcut notation [$p, $c, $m] = $marks; echo "Physics: $p Chemistry: $c Maths: $m" . PHP_EOL; ?>
It will produce the following output −
Physics: 50 Chemistry: 56 Maths: 70 Physics: 50 Chemistry: 56 Maths: 70
Destructuring an Associative Array
Before PHP 7.1.0, list() only worked on numerical arrays with numerical indices start at 0. PHP 7.1, array destructuring works with associative arrays as well.
Let us try to destructure (or unpack) the following associative array, an array with non-numeric indices.
$marks = array('p'=>50, 'c'=>56, 'm'=>70);
To destructure this array the list() statement associates each array key with a independent variable.
list('p'=>$p, 'c'=>$c, 'm'=>$m) = $marks;
Instead, you can also use the [] alternative destructuring notation.
['p'=>$p, 'c'=>$c, 'm'=>$m] = $marks;
Try and execute the following PHP script −
<?php
$marks = array('p'=>50, 'c'=>56, 'm'=>70);
list('p'=>$p, 'c'=>$c, 'm'=>$m) = $marks;
echo "Physics: $p Chemistry: $c Maths: $m" . PHP_EOL;
# shortcut notation
['p'=>$p, 'c'=>$c, 'm'=>$m] = $marks;
echo "Physics: $p Chemistry: $c Maths: $m" . PHP_EOL;
?>
Skipping Array Elements
In case of an indexed array, you can skip some of its elements in assign only others to the required variables
<?php $marks = array(50, 56, 70); list($p, , $m) = $marks; echo "Physics: $p Maths: $m" . PHP_EOL; # shortcut notation [$p, , $m] = $marks; echo "Physics: $p Maths: $m" . PHP_EOL; ?>
In case of an associative array, since the indices are not incremental starting from 0, it is not necessary to follow the order of elements while assigning.
<?php
$marks = array('p'=>50, 'c'=>56, 'm'=>70);
list('c'=>$c, 'p'=>$p, 'm'=>$m) = $marks;
echo "Physics: $p Chemistry: $c Maths: $m" . PHP_EOL;
['c'=>$c, 'm'=>$m, 'p'=>$p] = $marks; # shortcut notation
echo "Physics: $p Chemistry: $c Maths: $m" . PHP_EOL;
?>
Destructuring a Nested Array
You can extend the concept of array destructuring to nested arrays as well. In the following example, the subarray nested inside is an indexed array.
<?php $marks = ['marks' => [50, 60, 70]]; ['marks' => [$p, $c, $m]] = $marks; echo "Physics: $p Chemistry: $c Maths: $m" . PHP_EOL; ?>
Destructuring works well even if the nested array is also an associative array.
<?php $marks = ['marks' => ['p'=>50, 'c'=>60, 'm'=>70]]; ['marks' => ['p'=>$p, 'c'=>$c, 'm'=>$m]] = $marks; echo "Physics: $p Chemistry: $c Maths: $m" . PHP_EOL; ?>
PHP - Coding Standard
Every company follows its own coding standard based on its best practices. Coding standard is required because there may be many developers working on different modules so if they will start inventing their own standards then source will become very un-manageable and it will become difficult to maintain that source code in future.
Here are some reasons why one should use coding specifications −
Your peer programmers have to understand the code you produce. A coding standard acts as the blueprint for all the team to decipher the code.
Simplicity and clarity achieved by consistent coding saves you from common mistakes.
If you revise your code after some time then it becomes easy to understand that code.
Following a uniform coding standard brings more quality in software.
There are few guidelines which can be followed while coding in PHP.
Indenting and Line Length
Use an indent of 4 spaces and don't use any tab because different computers use different setting for tab. It is recommended to keep lines at approximately 75-85 characters long for better code readability.
Control Structures
These include if, for, while, switch, etc. Control statements should have one space between the control keyword and opening parenthesis, to distinguish them from function calls. You are strongly encouraged to always use curly braces even in situations where they are technically optional.
Examples
if ((condition1) || (condition2)) {
action1;
} elseif ((condition3) && (condition4)) {
action2;
} else {
default action;
}
You can write the switch statements as follows:
switch (condition) {
case 1:
action1;
break;
case 2:
action2;
break;
default:
defaultaction;
break;
}
Function Calls
Functions should be called with no spaces between the function name, the opening parenthesis, and the first parameter; spaces between commas and each parameter, and no space between the last parameter, the closing parenthesis, and the semicolon. Here's an example −
$var = foo($bar, $baz, $quux);
Function Definitions
Function declarations follow the "BSD/Allman style" −
function fooFunction($arg1, $arg2 = '') {
if (condition) {
statement;
}
return $val;
}
Comments
C style comments (/* */) and standard C++ comments (//) are both fine. Use of Perl/shell style comments (#) is allowed but discouraged.
PHP Code Tags
Always use <?php ?> to delimit PHP code, not the <? ?> shorthand. This is required for PHP compliance and is also the most portable way to include PHP code on differing operating systems and setups.
Variable Names
Use all lower case letters
Use '_' as the word separator.
Global variables should be prepended with a 'g'.
Global constants should be all caps with '_' separators.
Static variables may be prepended with 's'.
Make Functions Reentrant
Functions should not keep static variables that prevent a function from being reentrant.
Alignment of Declaration Blocks
Block of declarations should be aligned.
One Statement Per Line
There should be only one statement per line unless the statements are very closely related.
Short Methods or Functions
Methods should limit themselves to a single page of code.
There could be many more points which should be considered while writing your PHP program. Over all intention should be to be consistent throughout of the code programming and it will be possible only when you will follow any coding standard. You can device your own standard if you like something different.
PHP - Regular Expressions
Regular expressions are nothing more than a sequence or pattern of characters itself. They provide the foundation for pattern-matching functionality.
Using regular expression you can search a particular string inside a another string, you can replace one string by another string and you can split a string into many chunks.
PHP offers functions specific to two sets of regular expression functions, each corresponding to a certain type of regular expression. You can use any of them based on your comfort.
- POSIX Regular Expressions
- PERL Style Regular Expressions
POSIX Regular Expressions
The structure of a POSIX regular expression is not dissimilar to that of a typical arithmetic expression: various elements (operators) are combined to form more complex expressions.
The simplest regular expression is one that matches a single character, such as g, inside strings such as g, haggle, or bag.
Lets give explanation for few concepts being used in POSIX regular expression. After that we will introduce you with regular expression related functions.
Brackets
Brackets ([]) have a special meaning when used in the context of regular expressions. They are used to find a range of characters.
| Sr.No | Expression & Description |
|---|---|
| 1 | [0-9] It matches any decimal digit from 0 through 9. |
| 2 | [a-z] It matches any character from lower-case a through lowercase z. |
| 3 | [A-Z] It matches any character from uppercase A through uppercase Z. |
| 4 | [a-Z] It matches any character from lowercase a through uppercase Z. |
The ranges shown above are general; you could also use the range [0-3] to match any decimal digit ranging from 0 through 3, or the range [b-v] to match any lowercase character ranging from b through v.
Quantifiers
The frequency or position of bracketed character sequences and single characters can be denoted by a special character. Each special character having a specific connotation. The +, *, ?, {int. range}, and $ flags all follow a character sequence.
| Sr.No | Expression & Description |
|---|---|
| 1 | p+ It matches any string containing at least one p. |
| 2 | p* It matches any string containing zero or more p's. |
| 3 | p? It matches any string containing zero or one p's. |
| 4 | p{N} It matches any string containing a sequence of N p's |
| 5 | p{2,3} It matches any string containing a sequence of two or three p's. |
| 6 | p{2, } It matches any string containing a sequence of at least two p's. |
| 7 | p$ It matches any string with p at the end of it. |
| 8 | ^p It matches any string with p at the beginning of it. |
Examples
Following examples will clear your concepts about matching characters.
| Sr.No | Expression & Description |
|---|---|
| 1 | [^a-zA-Z] It matches any string not containing any of the characters ranging from a through z and A through Z. |
| 2 | p.p It matches any string containing p, followed by any character, in turn followed by another p. |
| 3 | ^.{2}$ It matches any string containing exactly two characters. |
| 4 | <b>(.*)</b> It matches any string enclosed within <b> and </b>. |
| 5 | p(hp)* It matches any string containing a p followed by zero or more instances of the sequence php. |
Predefined Character Ranges
For your programming convenience several predefined character ranges, also known as character classes, are available. Character classes specify an entire range of characters, for example, the alphabet or an integer set −
| Sr.No | Expression & Description |
|---|---|
| 1 | [[:alpha:]] It matches any string containing alphabetic characters aA through zZ. |
| 2 | [[:digit:]] It matches any string containing numerical digits 0 through 9. |
| 3 | [[:alnum:]] It matches any string containing alphanumeric characters aA through zZ and 0 through 9. |
| 4 | [[:space:]] It matches any string containing a space. |
PHP's Regexp POSIX Functions
PHP currently offers seven functions for searching strings using POSIX-style regular expressions −
| Sr.No | Function & Description |
|---|---|
| 1 | ereg()
The ereg() function searches a string specified by string for a string specified by pattern, returning true if the pattern is found, and false otherwise. |
| 2 | ereg_replace()
The ereg_replace() function searches for string specified by pattern and replaces pattern with replacement if found. |
| 3 | eregi()
The eregi() function searches throughout a string specified by pattern for a string specified by string. The search is not case sensitive. |
| 4 | eregi_replace()
The eregi_replace() function operates exactly like ereg_replace(), except that the search for pattern in string is not case sensitive. |
| 5 | split()
The split() function will divide a string into various elements, the boundaries of each element based on the occurrence of pattern in string. |
| 6 | spliti()
The spliti() function operates exactly in the same manner as its sibling split(), except that it is not case sensitive. |
| 7 | sql_regcase()
The sql_regcase() function can be thought of as a utility function, converting each character in the input parameter string into a bracketed expression containing two characters. |
PERL Style Regular Expressions
Perl-style regular expressions are similar to their POSIX counterparts. The POSIX syntax can be used almost interchangeably with the Perl-style regular expression functions. In fact, you can use any of the quantifiers introduced in the previous POSIX section.
Lets give explanation for few concepts being used in PERL regular expressions. After that we will introduce you wih regular expression related functions.
Meta characters
A meta character is simply an alphabetical character preceded by a backslash that acts to give the combination a special meaning.
For instance, you can search for large money sums using the '\d' meta character: /([\d]+)000/, Here \d will search for any string of numerical character.
Following is the list of meta characters which can be used in PERL Style Regular Expressions.
Character Description . a single character \s a whitespace character (space, tab, newline) \S non-whitespace character \d a digit (0-9) \D a non-digit \w a word character (a-z, A-Z, 0-9, _) \W a non-word character [aeiou] matches a single character in the given set [^aeiou] matches a single character outside the given set (foo|bar|baz) matches any of the alternatives specified
Modifiers
Several modifiers are available that can make your work with regexps much easier, like case sensitivity, searching in multiple lines etc.
Modifier Description i Makes the match case insensitive m Specifies that if the string has newline or carriage return characters, the ^ and $ operators will now match against a newline boundary, instead of a string boundary o Evaluates the expression only once s Allows use of . to match a newline character x Allows you to use white space in the expression for clarity g Globally finds all matches cg Allows a search to continue even after a global match fails
PHP's Regexp PERL Compatible Functions
PHP offers following functions for searching strings using Perl-compatible regular expressions −
| Sr.No | Function & Description |
|---|---|
| 1 | preg_match()
The preg_match() function searches string for pattern, returning true if pattern exists, and false otherwise. |
| 2 | preg_match_all()
The preg_match_all() function matches all occurrences of pattern in string. |
| 3 | preg_replace()
The preg_replace() function operates just like ereg_replace(), except that regular expressions can be used in the pattern and replacement input parameters. |
| 4 | preg_split()
The preg_split() function operates exactly like split(), except that regular expressions are accepted as input parameters for pattern. |
| 5 | preg_grep()
The preg_grep() function searches all elements of input_array, returning all elements matching the regexp pattern. |
| 6 | preg_ quote()
Quote regular expression characters |
PHP - Error Handling
Error handling in PHP refers to the making a provision in PHP code to effectively identifying and recovering from runtime errors that the program might come across. In PHP, the errors are handled with the help of −
The die() function
The Error Handler Function
The die() Function
The die() function is an alias of exit() in PHP. Both result in termination of the current PHP script when encountered. An optional string if specified in the parenthesis, will be output before the program terminates.
die("message");
Example
The following code is a typical usage of die() in a PHP script. It displays the File not found message if PHP doesnt find a file, otherwise proceeds to open it for subsequent processing.
<?php
if(!file_exists("nosuchfile.txt")) {
die("File not found");
} else {
$file = fopen("nosuchfile","r");
print "Opend file sucessfully";
// Rest of the code here.
fclose($file);
}
?>
It will produce the following output −
File not found
Using above technique, you can stop your program whenever it errors out and display more meaningful and user friendly message, rather than letting PHP generate fatal error message.
The Error Handler Function
Using die() for error handling is considered an ungainly and poor program design, as it results in an ugly experience for site users. PHP offers a more elegant alternative with which you can define a custom function and nominate it for handling the errors.
The set_error_handler() function has the following parameters −
set_error_handler(?callable $callback, int $error_levels = E_ALL): ?callable
The first parameter is a user defined function which is called automatically whenever an error is encountered.
The custom error handler callback function should have the following parameters −
handler( int $errno, string $errstr, string $errfile = ?, int $errline = ?, array $errcontext = ? ): bool
Parameters
| Parameter | Importance | Description |
|---|---|---|
| errno | Required | It specifies the error level for the user-defined error. It must be numerical value. |
| errstr | Required | It specifies the error message for the user-defined error. |
| errfile | Optional | It specifies the filename in which the error occurred. |
| errline | Optional | It specifies the line number at which the error occurred. |
| errcontext | Optional | It specifies an array containing variables and their values in use when the error occurred. |
If the callback function returns false, the default error will be called.
The $errno is an integer corresponding to the predefined error levels.
| Sr.No | Constant & Description | Value |
|---|---|---|
| 1 | E_ERROR (int) Fatal run-time errors that can not be recovered from. Execution of the script is halted. |
1 |
| 2 | E_WARNING (int) Run-time warnings (non-fatal errors). Execution of the script is not halted. |
2 |
| 3 | E_PARSE (int) Compile-time parse errors. Parse errors should only be generated by the parser. |
4 |
| 4 | E_NOTICE (int) Run-time notices. Something that could indicate an error, but could also happen in the normal course of running a script. |
8 |
| 5 | E_CORE_ERROR (int) Fatal errors that occur during PHP's initial startup. This is like an E_ERROR |
16 |
| 6 | E_CORE_WARNING (int) Warnings (non-fatal errors) that occur during PHP's initial startup. This is like an E_WARNING, |
32 |
| 7 | E_COMPILE_ERROR (int) Fatal compile-time errors. This is like an E_ERROR. |
64 |
| 8 | E_COMPILE_WARNING (int) Compile-time warnings (non-fatal errors). This is like an E_WARNING. |
128 |
| 9 | E_USER_ERROR (int) User-generated error message. This is like an E_ERROR, generated in PHP code by using the PHP function trigger_error(). |
256 |
| 10 | E_USER_WARNING (int) User-generated warning message. This is like an E_WARNING, generated in PHP code by using the function trigger_error(). |
512 |
| 11 | E_USER_NOTICE (int) User-generated notice message. This is like an E_NOTICE generated in PHP code by using the function trigger_error(). |
1024 |
| 12 | E_STRICT (int) Enable to have PHP suggest changes to your code which will ensure the best interoperability and forward compatibility of your code. |
2048 |
| 13 | E_RECOVERABLE_ERROR (int) Catchable fatal error. If the error is not caught by a user defined handler, the application aborts as it was an E_ERROR. |
4096 |
| 14 | E_DEPRECATED (int) Run-time notices. Enable this to receive warnings about code that will not work in future versions. |
8192 |
| 15 | E_USER_DEPRECATED (int) User-generated warning message. This is like an E_DEPRECATED, generated in PHP code by using the function trigger_error(). |
16384 |
| 16 | E_ALL (int) All errors, warnings, and notices. |
32767 |
Example
Take a look at the following example −
<?php
error_reporting(E_ERROR);
function myerrorhandler($errno, $errstr) {
echo "error No: $errno Error message: $errstr" . PHP_EOL;
echo "Terminating PHP script";
die();
}
set_error_handler("myerrorhandler");
$f = fopen("nosuchfile.txt", "r");
echo "file opened successfully";
// rest of the code
fclose($f);
?>
It will produce the following output −
error No: 2 Error message: fopen(nosuchfile.txt): Failed to open stream: No such file or directory Terminating PHP script
PHPs error class hierarchy starts from throwable interface. All the predefined Error classes in PHP are inherited from Error class.
The ArithmeticError Class
The ArithmeticError class is inherited from the Error class. This type of error may occur while performing certain mathematical operations such as performing bitwise shift operation by negative amount.
Example
Take a look at the following example −
<?php
try {
$a = 10;
$b = -3;
$result = $a << $b;
}
catch (ArithmeticError $e) {
echo $e->getMessage();
}
?>
It will produce the following output −
Bit shift by negative number
This error is also thrown when call to intdiv() function results in value such that it is beyond the legitimate boundaries of integer.
Example
Take a look at the following example −
<?php
try {
$a = PHP_INT_MIN;
$b = -1;
$result = intdiv($a, $b);
echo $result;
}
catch (ArithmeticError $e) {
echo $e->getMessage();
}
?>
It will produce the following output −
Division of PHP_INT_MIN by -1 is not an integer
DivisionByZeroError
DivisionByZeroError class is a subclass of ArithmeticError class. This type of error occurs when value of denominator is zero in the division operation.
Example: Modulo by Zero
Take a look at the following example:
<?php
try {
$a = 10;
$b = 0;
$result = $a%$b;
echo $result;
}
catch (DivisionByZeroError $e) {
echo $e->getMessage();
}
?>
It will produce the following output −
Modulo by zero
This can also occur when a modulo operator (%) has 0 as second operator, and intdiv() function having second argument as 0.
Example: Division by Zero
Take a look at the following example −
<?php
try {
$a = 10;
$b = 0;
$result = $a/$b;
echo $result;
}
catch (DivisionByZeroError $e) {
echo $e->getMessage();
}
?>
It will produce the following output −
Division by zero
ArgumentCountError
PHP parser throws ArgumentCountError when arguments passed to a user defined function or method are less than those in its definition.
Example
Take a look at the following example −
<?php
function add($x, $y) {
return $x+$y;
}
try {
echo add(10);
}
catch (ArgumentCountError $e) {
echo $e->getMessage();
}
?>
It will produce the following output −
Too few arguments to function add(), 1 passed in C:\xampp\php\test.php on line 9 and exactly 2 expected
TypeError
This error is raised when actual and formal argument types don't match, return type doesn't match the declared returned type.
Example
Take a look at the following example −
<?php
function add(int $first, int $second) {
echo "addition: " . $first + second;
}
try {
add('first', 'second');
}
catch (TypeError $e) {
echo $e->getMessage(), "";
}
?>
It will produce the following output −
add(): Argument #1 ($first) must be of type int, string given, called in /home/cg/root/63814/main.php on line 7
TypeError is also thrown when PHP's built-in function is passed incorrect number of arguments. However, the "strict_types=1" directive must be set in the beginning.
Example
Take a look at the following example −
<?php
declare(strict_types=1);
try {
echo pow(100,2,3);
}
catch (TypeError $e) {
echo $e->getMessage(), "";
}
?>
It will produce the following output −
pow() expects exactly 2 parameters, 3 given
Exceptions Handling in PHP
PHP has an exception model similar to that of other programming languages. Exceptions are important and provides a better control over error handling.
Lets explain there new keyword related to exceptions.
Try − A function using an exception should be in a "try" block. If the exception does not trigger, the code will continue as normal. However if the exception triggers, an exception is "thrown".
Throw − This is how you trigger an exception. Each "throw" must have at least one "catch".
Catch − A "catch" block retrieves an exception and creates an object containing the exception information.
When an exception is thrown, code following the statement will not be executed, and PHP will attempt to find the first matching catch block. If an exception is not caught, a PHP Fatal Error will be issued with an "Uncaught Exception ...
An exception can be thrown, and caught ("catched") within PHP. Code may be surrounded in a try block.
Each try must have at least one corresponding catch block. Multiple catch blocks can be used to catch different classes of exceptions.
Exceptions can be thrown (or re-thrown) within a catch block.
Example
Following is the piece of code, copy and paste this code into a file and verify the result.
<?php
try {
$error = 'Always throw this error';
throw new Exception($error);
// Code following an exception is not executed.
echo 'Never executed';
}catch (Exception $e) {
echo 'Caught exception: ', $e->getMessage(), "";
}
// Continue execution
echo 'Hello World';
?>
In the above example $e->getMessage function is used to get error message. There are following functions which can be used from Exception class.
getMessage() − message of exception
getCode() − code of exception
getFile() − source filename
getLine() − source line
getTrace() − n array of the backtrace()
getTraceAsString() − formated string of trace
Creating Custom Exception Handler
You can define your own custom exception handler. Use following function to set a user-defined exception handler function.
string set_exception_handler ( callback $exception_handler )
Here exception_handler is the name of the function to be called when an uncaught exception occurs. This function must be defined before calling set_exception_handler().
Example
Take a look at the following example −
<?php
function exception_handler($exception) {
echo "Uncaught exception: " , $exception->getMessage(), "\n";
}
set_exception_handler('exception_handler');
throw new Exception('Uncaught Exception');
echo "Not Executed";
?>
Check complete set of error handling functions at PHP Error Handling Functions
PHP TryCatch
In PHP, the keywords try, catch, throw and finally are provided to deal with exceptions. Whereas an Error is an unexpected program result, which cannot be handled by the program itself and the program has to be terminated with die() or setting a custom error handler.
On the other hand, an exception refers to an unexpected situation which can be handled in such a way that the program may keep running after throwing the exception out of its normal flow.
An exception can be thrown, and caught with the catch keyword within PHP code. A code block which is potentially prone to exception is surrounded by a try block. Each try must have at least one corresponding catch or finally block.
Try, Throw, Catch, and Finally
The four exception related keywords have the following role to play −
Try − A block of code where some exception is likely to occur is placed in "try" block. If exception is not triggered, the code continues execution. However, if exception does occur, it is "thrown". The execution is halted and PHP looks for matching "catch" block. If the exception is not caught, PHP issues a Fatal Error.
Throw − Here is how you trigger an exception. Each "throw" must have at least one "catch" or "finally" block.
Catch − a block that retrieves an exception and creates an object containing the exception information. Multiple catch blocks can be used to catch different exceptions.
Finally − Code within a finally block is always executed after throw or catch block.
Example
Here is an example of exception handling technique. The code renders two text fields on the browser and asks the user to enter two numbers for their division to be performed. If the second number (denominator) is 0, an exception is thrown and the program enters the catch block and prints the exception message. Otherwise the result of division is displayed.
<html>
<body>
<form action="<?php echo $_SERVER['PHP_SELF'];?>" method="post">
<h3>First No: <input type="text" name="first"/></h3>
<h3>Second No: <input type="text" name="second"/></h3>
<input type="submit" value="Submit" />
</form>
<?php
if ($_SERVER["REQUEST_METHOD"] == "POST") {
$x = $_POST['first'];
$y = $_POST['second'];
echo "$x $y";
try {
if ($y == 0) {
throw new Exception("Division by Zero");
}
$z = $x/$y;
echo "<h3>x = $x y = $y Division = $z<br>";
}
catch (Exception $e) {
echo "<h3> Exception: " . $e->getMessage();
}
}
?>
</body>
</html>
It will produce the following output −
Case 1: x = 10 y = 5 Division = 2 Case 2: x = 10 y = 0 Exception: Division by Zero
The Exception Class
PHP throws an object of Exception class. In PHP, Exception class is the base for user exceptions. It implements throwable interface.
This class defines the following methods −
getMessage()
This function returns the Exception message as a string −
final public Exception::getMessage(): string
getCode()
This function returns the exception code as int in Exception −
final public Exception::getCode(): int
Take a look at the following example −
try {
throw new Exception("Some error message", 30);
}
catch(Exception $e) {
echo "The exception code is: " . $e->getCode();
}
getFile()
This function returns the filename in which the exception was created −
final public Exception::getFile(): string
Take a look at the following example −
try {
if ($y == 0) {
throw new Exception("Division by Zero");
}
$z = $x/$y;
echo "<h3>x = $x y = $y Division = $z<br>";
}
catch (Exception $e) {
echo "<h3> Exception: " . $e->getMessage(). " in " . $e->getFile();
}
It will produce the following output −
Exception: Division by Zero in C:\xampp\htdocs\hello.php
getLine()
This function returns the line number where the exception was created −
final public Exception::getLine(): int
Example
Take a look at the following example −
<?php
if ($_SERVER["REQUEST_METHOD"] == "POST") {
$x = $_POST['first'];
$y = $_POST['second'];
echo "$x $y";
try {
if ($y == 0) {
throw new Exception("Division by Zero");
}
$z = $x/$y;
echo "<h3>x = $x y = $y Division = $z<br>";
}
catch (Exception $e) {
echo "<h3> Exception: " . $e->getMessage(). " in " . $e->getLine() . " of " . $e->getFile();
}
}
?>
It will produce the following output −
Exception: Division by Zero in 21 of C:\xampp\htdocs\hello.php
Multiple Catch Blocks
PHP allows a series of catch blocks following a try block to handle different exception cases. Multiple catch blocks may be employed to handle predefined exceptions and errors as well as user defined exceptions.
Example
The following example uses catch blocks to process DivisioByZeroError, TypeError, ArgumentCountError and InvalidArgumentException conditions. There is also a catch block to handle general Exception.
<?php
declare(strict_types=1);
function divide(int $a, int $b) : int {
return $a / $b;
}
$a=10;
$b=0;
try {
if (!$b) {
throw new DivisionByZeroError('Division by zero.');
if (is_int($a)==FALSE || is_int($b)==FALSE)
throw new InvalidArgumentException("Invalid type of arguments");
$result=divide($a, $b);
echo $result;
}
// if argument types not matching
catch (TypeError $x) {
echo $x->getMessage();
}
// if denominator is 0
catch (DivisionByZeroError $y) {
echo $y->getMessage();
}
// if number of arguments not equal to 2
catch (ArgumentCountError $z) {
echo $z->getMessage();
}
// if argument types not matching
catch (InvalidArgumentException $i) {
echo $i->getMessage();
}
// any uncaught exception
catch (Exception $ex) {
echo $ex->getMessage();
}
?>
To begin with, since denominator is 0, "divide by 0" error will be displayed −
Division by 0
Set $b=3 which will cause TypeError because divide function is expected to return integer but division results in float.
divide(): Return value must be of type int, float returned
If just one variable is passed to divide function by changing $res=divide($a); this will result in an ArgumentCountError −
Too few arguments to function divide(), 1 passed in C:\xampp\htdocs\hello.php on line 16 and exactly 2 expected
If one of arguments is not integer, it is a case of InvalidArgumentException. Change $b to a string −
Invalid type of arguments
The Finally Block
A finally block may also be specified after or instead of catch blocks. Code within the finally block will always be executed after the try and catch blocks, regardless of whether an exception has been thrown, and before normal execution resumes.
try {
if ($y == 0) {
throw new Exception("Division by Zero");
}
$z = $x/$y;
echo "<h3>x = $x y = $y Division = $z </h3><br>";
}
catch (Exception $e) {
echo "<h3> Exception: " . $e->getMessage(). "</h3>";
}
finally {
echo "<h3>End of try - catch - finally</h3>";
}
It will produce the following output −
Case 1 −
x = 10 y = 5 Division = 2 End of try - catch finally
Case 2 −
X=10 y=0 Exception: Division by Zero End of try - catch finally
Finally With Return
There is a peculiar behaviour of finally block when either try block or catch block (or both) contain a return statement. Normally a return statement causes the control of program to go back to the calling position. However, in case of a function with try/catch block with return, the statements in finally block are executed first before returning.
Example
In the following example, the div() function has a "try-catch-finally" construct. The try block without exception returns result of division. In case of exception, the catch block returns an error message. However, in either case, the statement in the finally block is executed first.
<?php
function div($x, $y) {
try {
if ($y==0)
throw new Exception("Division by 0");
else
$res=$x/$y;;
return $res;
}
catch (Exception $e) {
return $e->getMessage();
}
finally {
echo "This block is always executed\n";
}
}
$x=10;
$y=0;
echo div($x,$y);
?>
It will produce the following output −
This block is always executed Division by 0
PHP - Bugs Debugging
A bug in a PHP code refers to an error in the program that leads to unexpected results or crash. A systematic approach towards the process of finding bugs before users do is called debugging. In this chapter, some important tips to trace bugs in a PHP code are given.
Programs rarely work correctly the first time. Many things can go wrong in your program that can cause the PHP interpreter to generate an error message. You have a choice about where those error messages go. The messages can be sent along with other program output to the web browser. They can also be included in the "web server error log".
To make error messages display in the browser, set the "display_errors" configuration directive to ON. Ensure that the following settings are enabled in the "php.ini" file.
display_errors=On display_startup_errors=On
You can also use the ini_set() function to override the "pnp.ini" configuration −
ini_set('display_errors', 1)
ini_set('display_startup_errors', 1)
To send errors to the web server error log, set "log_errors" to ON. You can set them both to On if you want error messages in both places.
PHP defines some constants that you can use to set the value of error_reporting such that only errors of certain types get reported −
E_ALL (for all errors except strict notices)
E_PARSE (parse errors)
E_ERROR (fatal errors)
E_WARNING (warnings)
E_NOTICE (notices)
E_STRICT (strict notices)
While writing your PHP program, it is a good idea to use PHP-aware editors like BBEdit or Emacs. One of the special features of these editors is syntax highlighting. It changes the color of different parts of your program based on what those parts are. For example, strings are pink, keywords such as if and while are blue, comments are grey, and variables are black.
VS Code from Microsoft is also a good choice for editing PHP code. If you install VS Code extension Intelephense, you will get type hints and error message as you enter PHP statements in the editor window.
Another feature is quote and bracket matching, which helps to make sure that your quotes and brackets are balanced. When you type a closing delimiter such as "}", the editor highlights the opening "{" that it matches.
Points to Check while Debugging a Code
One needs to verfity the following points while debugging a program code −
Missing Semicolons
Every PHP statement ends with a semicolon (;). PHP doesn't stop reading a statement until it reaches a semicolon. If you leave out the semicolon at the end of a line, PHP continues reading the statement on the following line.
Not Enough Equal Signs
When you ask whether two values are equal in a comparison statement, you need two equal signs (==). Using one equal sign is a common mistake.
Misspelled Variable Names
If you misspelled a variable then PHP understands it as a new variable. Remember: To PHP, $test is not the same variable as $Test.
Missing Dollar Signs
A missing dollar sign in a variable name is really hard to see, but at least it usually results in an error message so that you know where to look for the problem.
Troubling Quotes
You can have too many, too few, or the wrong kind of quotes. So check for a balanced number of quotes.
Missing Parentheses and curly brackets
They should always be in pairs.
Array Index
An array in PHP is a collection of items, each item assigned an incrementing index starting with 0.
Moreover, handle all the errors properly and direct all trace messages into system log file so that if any problem happens then it will be logged into system log file and you will be able to debug that problem.
PHP For C Developers
If you have a prior knowledge of C programming, learning PHP becomes a lot easier, especially the basics. Although PHP is a lot like C, it is bundled with a whole lot of Web-specific libraries, with everything hooked up directly to your favorite Web server.
The simplest way to think of PHP is as interpreted C that you can embed in HTML documents. PHP script can also be executed from the command line, much like a C program.
The syntax of statements and function definitions should be familiar, except that variables are always preceded by $, and functions do not require separate prototypes.
Let us take a look at some of the similarities and differences in PHP and C −
Similarities Between C and PHP
Syntax − Broadly speaking, PHP syntax is the same as in C, which is what makes learning PHP easier, if you are already conversant with C.Similar to C, PHP Code is blank insensitive, statements are terminated with semicolons.
function calls have the same structure
my_function(expression1, expression2) {
Statements;
}
Curly brackets are used to put multiple statements into blocks.
PHP supports C and C++-style comments (/* */ as well as //), and also Perl and shell-script style (#).
Operators − The assignment operators (=, +=, *=, and so on), the Boolean operators (&&, ||, !), the comparison operators (<,>, <=, >=, ==, !=), and the basic arithmetic operators (+, -, *, /, %) all behave in PHP as they do in C.
Control Structures − The basic control structures (if, switch, while, for) behave as they do in C, including supporting break and continue. One notable difference is that switch in PHP can accept strings as case identifiers.
PHP also has foreach looping construct that traverses the collections such as arrays.
Function Names − As you peruse the documentation, you.ll see many function names that seem identical to C functions.
Differences Between C and PHP
Dollar Sign − All variable names are prefixed with a leading $. Variables do not need to be declared in advance of assignment, and they have no intrinsic type. PHP is a dynamically typed language, as against C being a statically typed language.
Types − PHP has only two numerical types: integer (corresponding to a long in C) and double (corresponding to a double in C). In PHP, float is synonymous to double. Strings are of arbitrary length. There is no separate char type in PHP, as is the case in C.
Type Conversion − C is a strongly typed language, as type of a variable must be declared before using, and the types are checked at compile time. PHP on the other hand, is a weakly typed language, types are not checked at compile time, and type errors do not typically occur at runtime either. Instead, variables and values are automatically converted across types as needed.
Arrays − Arrays have a syntax superficially similar to C's array syntax, but they are implemented completely differently. In C, an array is a collection of similar data types. In a PHP array, the items may be of different types. PHP arrays are actually associative arrays or hashes, and the index can be either a number or a string. They do not need to be declared or allocated in advance.
No Struct Type − The struct keyword in C is used to define a new data type. There is no struct keyword or its equivalent in PHP, partly because the array and object types together make it unnecessary. The elements of a PHP array need not be of a consistent type.
No Pointers − Pointers are an important concept in C. There are no pointers available in PHP, although the tapeless variables play a similar role. Unlike C, PHP does support variable references. You can also emulate function pointers to some extent, in that function names can be stored in variables and called by using the variable rather than a literal name.
No Prototypes − Functions do not need to be declared before their implementation is defined, as long as the definition can be found somewhere in the current code file or included files. On the contrary, a C function must defined before it is used.
No main() − In a C program, the main() function is the entry point, irrespective of where it is present in the code. A PHP program on the other hand starts execution from the first statement in the script
Memory Management − The PHP engine is effectively a garbage-collected environment (reference-counted), and in small scripts there is no need to do any deallocation. You should freely allocate new structures - such as new strings and object instances. IN PHP5, it is possible to define destructor for objects, but there is are no free or delete keywords as in C/C++. Destructor are called when the last reference to an object goes away, before the memory is reclaimed.
Compilation and Linking − PHP is an interpreted language. Hence, the compiled version of PHP script is not created. A C program is first compiled to obtain the object code, which is then linked to the required libraries to build an executable. There is no separate compilation step for PHP scripts. A PHP script cannot be turned into a self executable.
Permissiveness − As a general matter, PHP is more forgiving than C (especially in its type system) and so will let you get away with new kinds of mistakes. Unexpected results are more common than errors.
PHP For PERL Developers
PERL is a dynamically typed, high level and general-purpose programming language. It is normally believed that PERL is an acronym for Practical Extraction and Reporting Language. PHP on the other hand is also a general-purpose scripting language. Initially PHP used to be a short for Personal Home Page, but these days it has now been recognized as a recursive acronym PHP: Hypertext Preprocessor.
In this chapter, certain major similarities and differences in between PHP and PERL are listed. This will help PERL developers to understand PHP very quickly and avoid common mistakes.
Similarities between PERL and PHP
Both Perl and PHP are scripting languages. They are not used to build native standalone executables in advance of execution.
Early versions of PHP were inspired by PERL. PHP's basic syntax is very similar to PERL. Both share a lot of syntactic features with C. Their code is insensitive to whitespace, Each statement is terminated by semicolons.
Both PHP and PERL use curly braces to organize multiple statements into a single block. Function calls start with the name of the function, followed by the actual arguments enclosed in parentheses and separated by commas, in both the cases.
All variables in PHP look like scalar variables in PERL: a name with a dollar sign ($) in front of it.
Since both the languages are dynamically typed, you dont need to declare the type of a PHP as well as a PERL variable before using it.
In PHP, as in PERL, variables have no intrinsic type other than the value they currently hold. You can store either number or string in same type of variable.
Both PHP and Perl do more interpretation of double-quoted strings ("string") than of single-quoted strings ('string').
Differences between PERL and PHP
PHP can be embedded inside HTML. Although it is possible to run a PHP script from the command line, it is more popularly used as a server-side scripting language on a Web server and used for producing Web pages.
If you are used to writing CGI scripts in PERL, the main difference in PHP is that you no longer need to explicitly print large blocks of static HTML using print or heredoc statements and instead can simply write the HTML itself outside of the PHP code block.
No @ or % variables − PHP has one only kind of variable, which starts with a dollar sign ($). Any of the datatypes in the language can be stored in such variables, whether scalar or compound. In PERL, the array variable is prefixed with @ symbol. Also, the hash variable is prefixed by % symbol.
Unlike PERL, PHP has a single datatype called an array which can be an indexed array or associative array, which is similar to hash in PERL.
Function calls in PHP look pretty much like subroutine calls in PERL. Function definitions in PHP, on the other hand, typically require some kind of list of formal arguments as in C or Java which is not the case in PERL.
Scope of variables in PERL is global by default. This means that top-level variables are visible inside subroutines. Often, this leads to promiscuous use of globals across functions. In PHP, the scope of variables within function definitions is local by default.
No module system in PHP as such. In PHP there is no real distinction between normal code files and code files used as imported libraries.
Break and continue rather than next and last PHP is more like C language and uses break and continue instead of next and last statement as in PERL.
No elsif − A minor spelling difference: Perl's elsif is PHP's elseif.
In addition to Perl-style (#) single-line comments, PHP offers C-style multiline comments (/* comment */) and Java-style single-line comments (// comment).
Regular expressions − PHP does not have a built-in syntax specific to regular expressions, but has most of the same functionality in its "Perl-compatible" regular expression functions.
PHP Frameworks
The PHP ecosystem has a number of web frameworks. Some of the popular PHP web frameworks are Laravel, Yii, CakePHP etc. While one can build a web application with the help of core PHP, developers are increasingly preferring web frameworks for rapid application development.
What are Software Frameworks?
In computer programming, a software framework is a collection of libraries and classes that provide a generic functionality that allows the developer to concentrate more on the application logic, rather than writing code for routine but tedious low-level processes.
A framework provides a reusable software environment that quickly builds a minimal working template application. Developer can then modify these blocks for additional functionality.
Each framework is built to help the developer build an application of a certain type. For example, web frameworks (sometimes also called "web application framework") are used for the development of web applications including web services, web resources, and web APIs.
In this chapter, let us take a brief overview of some of the popular PHP frmeworks.
FuelPHP
FuelPHP (https://fuelphp.com/) works based on Model View Control and having innovative plug ins. FuelPHP supports router-based theory where you might route directly to a nearer the input uri, making the closure the controller and giving it control of further execution.
CakePHP
CakePHP (https://cakephp.org/) is a great source to build up simple and great web application in an easy way. Some great features which are inbuilt in PHP are input validation, SQL injection prevention that keeps you application safe and secure.
FlightPHP
FlightPHP (https://flightphp.com/) is very helpful to make RESTful web services and it is under MIT licence.
Symfony
Symfony is for highly professional developers to build websites with PHP components such as Drupal, PHPBB, laravel, eX, OROCRM and piwik.
yiiFramework
YiiFramework (https://www.yiiframework.com/) works based on web 2.0 with high end security. It included input Validation, output filtering, and SQL injection.
Laravel
Laravel (https://laravel.com/) is most useful for RESRful Routing and light weight bled tempting engine. Laravel has integrated with some of great components of well tested and reliable code.

Zend
Zend (https://framework.zend.com/) is Modern frame work for performing high end web applications. This works based on Cryptographic and secure coding tools. Zend Framework is a collection of professional PHP packages with more than 570 million installations.
It can be used to develop web applications and services using PHP 5.6+, and provides 100% object-oriented code using a broad spectrum of language features.
Codeigniter
Codeigiter is simple to develop small footprint for developer who need simple and elegant tool kit to create innovative web applications.
Phalcon PHP
Pholcon (https://phalcon.io/en-us) is a PHP framework that works based on MVC and integrated with innovative architecture to do perform faster.
PHPixie
PHPixie (https://phpixie.com/) works based on MVC and designed for fast and reliability to develop web sites.
Agavi
Agavi is a powerful and scalable PHP5 application framework and it follows the MVC model. Agavi can help PHP developers in writing clean and maintainable code.
Core PHP vs Frameworks
PHP is by far the most popular server-side programming language for web application development, with nearly 75% of websites using PHP either in its core form or one of the PHP frameworks available. To make a choice between using "core PHP" or frameworks for web development, we need to understand the pros and cons of both.
To give a simple analogy, developing a web application purely with core PHP is like solving a mathematical problem manually by writing down each step on the paper. On the other hand, using a framework is similar to using tools such as a calculator to solve a problem. Just as a calculator, the frameworks are useful tools for rapid application development.
Core PHP vs Frameworks Pros and Cons
A web framework, especially a PHP framework is a collection of one or more PHP libraries and classes. It provides a generic functionality that allows the developer to concentrate more on the application logic, rather than writing code scratch. It provides a reusable software environment that quickly builds a minimal working template application.
Developing a web application purely in core PHP has its own advantages and disadvantages −
It gives the developer better control and flexibility.
At the same time, for a larger application developed with core PHP only can become unwieldy, difficult to manage and maintain.
Now, let's turn to pros and cons of using PHP Frameworks −
A PHP framework such as Symfony, Laravel or Yii offers a more standardized approach towards web application development. With most of the routine and repetitive part handled by the framework, the developer can concentrate more on the application logic. Hence, there is lesser time wasted in debugging.
On the other hand, a framework is not as flexible compared to core PHP. The skeleton template of the application is readily made available by the framework, leaving the developer to customize the functionality only within the scope defined by the framework.
The MVC Architecture
Most of the web application frameworks employ the MVC (Model, View and Controller) architecture, which makes it a lot easier to write quality, robust code, by separating the logic from the style.

If you wish to use the core PHP features for your application development, you are free to adopt an object oriented approach or a modular approach, whichever suits you.
Built-in Security Measures
PHP frameworks offer built-in security measures to be incorporated in a web applications.
If you choose to develop an application with core PHP, you will have to provide the security measures explicitly.
Most of the frameworks however have a few external dependencies, which may leave the application rather vulnerable, as compared to a core PHP application which is a self-contained solution.
A framework-based application may be a little slow when it comes to performance, as compared to core PHP application, especially for a smaller application.
Comparison: Core PHP vs Frameworks
The comparison between the two can be summarized as follows −
For smaller applications, core PHP is preferrable over framework.
Framework offers rapid development and code reusability.
Frameworks are less flexible.
Using core PHP features, the developer has complete control.
For large applications, the MVC architecture is helpful.
Frameworks offer integrated authorization and authentication support. In a core PHP application, the security rules need to be explicitly defined.
PHP Design Patterns
In the theory of software engineering, the term "Design patterns" generally refers to a reusable solution that can be used as a template for developing applications to address commonly occurring problems. You can consider the software design patterns as formalized best practices when developing software solutions.
Most of the standard design patterns can be very effectively implemented in developing applications in PHP. In this chapter, we shall learn how to apply some of the popular design patterns in developing PHP applications.
Singleton Pattern
The singleton design pattern is useful when you want to restrict the instantiation of an object of a certain class to only one instance. The name "singleton pattern" comes from the concept of singleton in Mathematics. Singleton pattern ensures that there will be only one instance, having a global access to it throughout the application.
Typical application of singleton pattern is creation of a database connection object, which must be created once in the lifetime of an application.
Example
In the following code, the DataBaseConnector class can be instantiated only once, otherwise a message that disallows duplicate object will be issued.
<?php
class DataBaseConnector {
private static $obj;
private final function __construct() {
echo __CLASS__ . " object created for first time ". PHP_EOL;
}
public static function getConnect() {
if (!isset(self::$obj)) {
self::$obj = new DataBaseConnector();
return self::$obj;
} else {
echo "connection object could not be created again" . PHP_EOL;
}
}
}
$obj1 = DataBaseConnector::getConnect();
$obj2 = DataBaseConnector::getConnect();
var_dump($obj1 == $obj2);
?>
It will produce the following output −
DataBaseConnector object created for first time connection object could not be created again bool(false)
Factory Pattern
This is one of the most commonly used design patterns. In this pattern, you dont declare the object of the desired class directly, but another class is provided whose static method creates the required object.
Example
The following example demonstrates how factory design pattern works −
<?php
class Automobile {
private $bikeMake;
private $bikeModel;
public function __construct($make, $model) {
$this->bikeMake = $make;
$this->bikeModel = $model;
}
public function getMakeAndModel() {
return $this->bikeMake . ' ' . $this->bikeModel;
}
}
class AutomobileFactory {
public static function create($make, $model) {
return new Automobile($make, $model);
}
}
$pulsar = AutomobileFactory::create('ktm', 'Pulsar');
print_r($pulsar->getMakeAndModel());
?>
It will produce the following output −
ktm Pulsar
Strategy Pattern
The strategy pattern recommends an approach where you encapsulate specific families of algorithms allowing the client class responsible for instantiating a particular algorithm. The class that implements the pattern has no knowledge of the actual implementation.
Example
Here is a code that demonstrates the use of strategy pattern. We have an interface whose case() method is implemented differently by two different classes. The object of testdata class calls the respective case() methods indirectly through its own process() method.
<?php
interface example {
public function case($str);
}
class ucase implements example {
public function case($str) {
return strtoupper($str);
}
}
class lcase implements example {
public function case($str) {
return strtolower($str);
}
}
class testdata {
private $data;
public function __construct($input) {
$this->data = $input;
}
public function process(example $type) {
return $this->data = $type->case($this->data);
}
}
$str = "hello";
$obj = new testdata($str);
echo $obj->process(new ucase) . PHP_EOL;
$str = "HELLO";
echo $obj->process(new lcase);
?>
It will produce the following output −
HELLO Hello
MVC Design Pattern
MVC, which stands for Model, View and Controller, is a very popular softeware architecture pattern. Most of the PHP networks such as Laravel, Symfony etc. implement the MVC architecture.
The separation of the role of each layer in an application is as follows −
Model − Refers to the data structure. In this case, the database.
View − Refers to the user interface. The HTML and CSS.
Controller − The "middleman" doing the processing. Accepts input from the view, and works with the model. Self-explanatory, the PHP scripts and libraries themselves.
The View acts as the GUI, the Model acts as the back-end and the Control acts as an adapter. Here, three parts are interconnected with each other. It will pass the data and access the data between each other.
Example
Let us implement the MVC design pattern in pure PHP, JavaScript and HTML in the example below −
The presentation layer of the application is view.php, which renders a HTML form. The user submits the data to a controller script. The result returned by the controller is rendered on the web page with a bit of JavaScript
view.php
<!DOCTYPE html>
<html>
<head>
<title>View (User Interface)</title>
<link rel="stylesheet" href="style.css">
</head>
<body>
<form id="mysearch" action="controller.php" method="POST">
<input type="text" id = "nm" name="search" required>
<input type="submit" value="Search">
</form>
<div id="results"></div>
<script>
let results = document.getElementById("results");
results.innerHTML = "";
</script>
<?php
session_start();
if (isset($_SESSION['result'])) {
$arr=$_SESSION['result'];
foreach ($arr as $obj) {?>
<script>
results.innerHTML += "<div><?php echo $obj['id'] . "-" .
$obj['name'] . "</div>"; ?>";
</script>
<?php
}
}
?>
</body>
</html>
The controller script requires model.php, and uses the database object, calls the select method to fetch data from the database. The result is stored in the current session so that it can be accessed on the view page.
controller.php
<?php
session_start();
require "model.php";
$results = $_DB->select(
"SELECT * FROM `users` WHERE `name` LIKE ?",
["%{$_POST["search"]}%"]
);
$_SESSION['search'] = $_POST['search'];
$_SESSION['result'] = $results;
Header("Location: view.php", true);
?>
The model layer of the application is coded in "model.php". It establishes connection with mysql database named mydb, using PDO extension.
model.php
<?php
class DB {
public $error = "";
private $pdo = null;
private $stmt = null;
var $dsn="localhost";
var $dbName="myDB";
var $username="root";
var $password="";
function __construct () {
$this->pdo = new PDO("mysql:host=$this->dsn;dbname=$this->
dbName",$this->username,$this->password);
}
function __destruct () {
if ($this->stmt!==null) { $this->stmt = null; }
if ($this->pdo!==null) { $this->pdo = null; }
}
function select ($sql, $data=null) {
$this->stmt = $this->pdo->prepare($sql);
$this->stmt->execute($data);
return $this->stmt->fetchAll();
}
}
$_DB = new DB();
?>
The backend mydb database must have a users table with ID and NAME fields.
-- Table structure for table `users` -- CREATE TABLE `users` ( `id` bigint(20) NOT NULL, `name` varchar(255) NOT NULL ) ENGINE=InnoDB DEFAULT CHARSET=utf8mb4 COLLATE=utf8mb4_general_ci; -- -- Dumping data for table `users` -- INSERT INTO `users` (`id`, `name`) VALUES (21, 'Ahmad Shaikh'), (24, 'Akshay Wadkar'), (26, 'Bridget Wooten'), (10, 'Coby Kelleigh'), (20, 'Dashan Shah'), (12, 'Elizabeth Taylor'), (41, 'Issac Newton'), (34, 'Julia Roberts'), (31, 'Junior Mahmood'), (32, 'Kailas Bende'), (47, 'Karan Sharma'), (16, 'Kenneth Sanders'), (28, 'Kirstie Thomas'), (33, 'Lawrence Murphy'), (14, 'Leah Shan'), (51, 'Marcus Best'), (29, 'Maya Pande'), (50, 'Nathaniel Khan'), (6, 'Richard Breann'), (54, 'Rowan Avalos'), (3, 'Rusty Terry'), (37, 'Sacha Gross'), (27, 'Sally Castillo'), (11, 'Sarah Sanders'), (18, 'Seth Sonnel'), (38, 'Shannon Peterson'), (25, 'Shayan Clements'), (49, 'Shoaib Vickers'), (43, 'Simran Kaur'), (35, 'Sulaiman Gilmour'), (44, 'Taran Morin'), (48, 'Taran Morin'), (22, 'Thelma Kim'), (8, 'Tillie Sharalyn'), (36, 'Virgil Collier');
Start the application by visiting "http://localhost/view.php" in the browser. Enter a search term corresponding to the names having required letters.
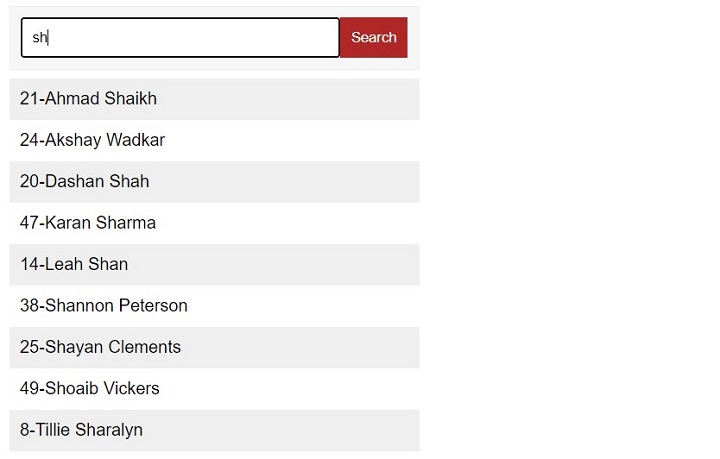
PHP Filters
It is important that the input data received in the form of client request is validated before processing in a PHP application. To perform input validation, the filter extension in PHP provides a number of filter functions, backed up by predefined filter constants and flags. The filter extension of PHP library also helps in sanitizing the input received by either GET or POST methods.
The filter extension is a powerful feature that helps prevention of security vulnerabilities, such as SQL injection and cross-site scripting. The extension has two types of filters −
Validation Filters
Validation filters check if the data meets certain criteria. For example, you want to ensure that the user has correctly input an email field in the HTML form. The FILTER_VALIDATE_EMAIL will determine if the data is a valid email address. The validation filters, however, will not change the data itself.
Sanitization Filters
Sanitization refers to the process of removing undesired characters from the input. Hence, it may alter the data by removing undesired characters. For example, passing in FILTER_SANITIZE_EMAIL will remove characters that are inappropriate for an email address to contain, without performing validation.
Filter Flags
The filter extension in PHP defines a number of filter flags as follows −
| Sr.No | ID & Description |
|---|---|
| 1 | FILTER_FLAG_STRIP_LOW Strips characters that have a numerical value <32. |
| 2 | FILTER_FLAG_STRIP_HIGH Strips characters that have a numerical value >127. |
| 3 | FILTER_FLAG_STRIP_BACKTICK Strips backtick characters. |
| 4 | FILTER_FLAG_ALLOW_FRACTION Allows a period (.) as a fractional separator in numbers. |
| 5 | FILTER_FLAG_ALLOW_THOUSAND Allows a comma (,) as a thousands separator in numbers. |
| 6 | FILTER_FLAG_ALLOW_SCIENTIFIC Allows an e or E for scientific notation in numbers. |
| 7 | FILTER_FLAG_NO_ENCODE_QUOTES If this flag is present, single (') and double (") quotes will not be encoded. |
| 8 | FILTER_FLAG_ENCODE_LOW Encodes all characters with a numerical value <32. |
| 9 | FILTER_FLAG_ENCODE_HIGH Encodes all characters with a numerical value >127. |
| 10 | FILTER_FLAG_ENCODE_AMP Encodes ampersands (&). |
| 11 | FILTER_NULL_ON_FAILURE Returns null for unrecognized values. |
| 12 | FILTER_FLAG_ALLOW_OCTAL Regards inputs starting with a zero (0) as octal numbers. |
| 13 | FILTER_FLAG_ALLOW_HEX Regards inputs starting with 0x or 0X as hexadecimal numbers. |
| 14 | FILTER_FLAG_EMAIL_UNICODE Allows the local part of the email address to contain Unicode characters. |
| 15 | FILTER_FLAG_IPV4 Allows the IP address to be in IPv4 format. |
| 16 | FILTER_FLAG_IPV6 Allows the IP address to be in IPv6 format. |
| 17 | FILTER_FLAG_NO_PRIV_RANGE Fails validation for the following private IPv4 ranges: 10.0.0.0/8, 172.16.0.0/12 and 192.168.0.0/16. |
| 18 | FILTER_FLAG_NO_RES_RANGE Fails validation for the following reserved IPv4 ranges: 0.0.0.0/8, 169.254.0.0/16, 127.0.0.0/8 and 240.0.0.0/4. Fails validation for the following reserved IPv6 ranges: ::1/128, ::/128, ::ffff:0:0/96 and fe80::/10. |
| 19 | FILTER_FLAG_GLOBAL_RANGE Fails validation for non global IPv4/IPv6 ranges |
| 20 | FILTER_FLAG_SCHEME_REQUIRED Requires the URL to contain a scheme part. |
| 21 | FILTER_FLAG_HOST_REQUIRED Requires the URL to contain a host part. |
| 22 | FILTER_FLAG_PATH_REQUIRED Requires the URL to contain a path part. |
| 23 | FILTER_FLAG_QUERY_REQUIRED Requires the URL to contain a query string. |
| 24 | FILTER_REQUIRE_SCALAR Requires the value to be scalar. |
| 25 | FILTER_REQUIRE_ARRAY Requires the value to be an array. |
| 26 | FILTER_FORCE_ARRAY If the value is a scalar, it is treated as array with the scalar value as only element. |
Filter Functions
The filter extension includes the following filter functions −
| Sr.No | ID & Description |
|---|---|
| 1 | filter_has_var() Checks if variable of specified type exists |
| 2 | filter_id() Returns the filter ID belonging to a named filter |
| 3 | filter_input_array() Gets external variables and optionally filters them |
| 4 | filter_input () Gets a specific external variable by name and filters it |
| 5 | filter_list() Returns a list of all supported filters |
| 6 | filter_var_array() Gets multiple variables and optionally filters them |
| 7 | filter_var() Filters a variable with a specified filter |
Predefined Constants
The above functions use one parameter called input_type which is one of the predefined enumerated constants representing how the input has been provided to the PHP script for filtering purpose.
| Constant | Types |
|---|---|
| INPUT_POST (int) | POST Variables |
| INPUT_GET (int) | GET Variables |
| INPUT_COOKIE (int) | COOKIE Variables |
| INPUT_ENV (int) | ENV Variables |
| INPUT_SERVER (int) | SERVER Variables |
| INPUT_SESSION (int) | SESSION Variables |
| INPUT_REQUEST (int) | REQUEST Variables |
filter_has_var() function
The filter_has_var() function checks if variable of specified type exists.
filter_has_var(int $input_type, string $var_name): bool
The input_type is one of predefined constants INPUT_GET, INPUT_POST, INPUT_COOKIE, INPUT_SERVER, or INPUT_ENV; where as the var_name parameter is the name of a variable to check. The function returns true on success or false on failure.
Example
Visit the following PHP script on the XAMPP server.
<?php
if (!filter_has_var(INPUT_GET, "email")) {
echo("Email not found");
} else {
echo("Email found");
}
?>
It will produce the following output −
Visit http://localhost/hello.php?email=abc@example.com
Email found
filter_input() function
The filter_input() function gets a specific external variable by name and filters it accorfing to the applied filter constant
filter_input( int $type, string $var_name, int $filter = FILTER_DEFAULT, array|int $options = 0 ): mixed
The type parameter is one of the constants INPUT_GET, INPUT_POST, INPUT_COOKIE, INPUT_SERVER, or INPUT_ENV. Second parameter is var_name, the name of a variable to get. You can use the filter to be applied. Use any of the predefined filter flags. If omitted, FILTER_DEFAULT will be used
The function returns the value of the requested variable on success, false if the filter fails, or null if the var_name variable is not set.
Example
Take a look at the following example −
<?php
if (!filter_input(INPUT_GET, "email", FILTER_VALIDATE_EMAIL)) {
echo("Email is not valid");
} else {
echo("Email is valid");
}
?>
It will produce the following output −
If you use the URL http://localhost/hello.php?email=abc@example.com,
Email is valid
If the URL is http://localhost/hello.php?email=a b c@example.com,
Email is not valid
You can also use INPUT_POST type for validating the input received through the POST method −
<?php
if (!filter_input(INPUT_POST, "email", FILTER_VALIDATE_EMAIL)) {
echo("Email is not valid");
} else {
echo("Email is valid");
}
?>
To pass data with POST request, open the command prompt, and use the following CURL command
curl -X POST -d "{\"email\": \"a@b.com\"}" http://localhost/hello.php
filter_list() function
The filter_list() function returns a list of all supported filters
filter_list(): array
Example
The function returns an array of names of all supported filters, empty array if there are no such filters.
<?php print_r(filter_list()); ?>
It will produce the following output −
Array ( [0] => int [1] => boolean [2] => float [3] => validate_regexp [4] => validate_domain [5] => validate_url [6] => validate_email [7] => validate_ip [8] => validate_mac [9] => string [10] => stripped [11] => encoded [12] => special_chars [13] => full_special_chars [14] => unsafe_raw [15] => email [16] => url [17] => number_int [18] => number_float [19] => add_slashes [20] => callback )
filter_input_array() function
The filter_input_array() gets external variables and optionally filters them.
filter_input_array(int $type, array|int $options = FILTER_DEFAULT, bool $add_empty = true): array|false|null
This function is useful for retrieving many values without repetitively calling filter_input().
The type parameter is one of INPUT_GET, INPUT_POST, INPUT_COOKIE, INPUT_SERVER, or INPUT_ENV.
The options parameter is an array defining the arguments. A valid key is a string containing a variable name and a valid value is either a filter type, or an array optionally specifying the filter, flags and options. This parameter can be also an integer holding a filter constant. Then all values in the input array are filtered by this filter.
The function returns an array containing the values of the requested variables on success. If the input array designated by type is not populated, the function returns null if the FILTER_NULL_ON_FAILURE flag is not given, or false otherwise. For other failures, false is returned.
Example
To include an array in the HTTP request, we use the following HTML form in "hello.html", and send it by POST method.
<!DOCTYPE html>
<html>
<body>
<h1>Filter Input Array</h1>
<form action="hello.php" method="POST">
<p><label for="email">Enter your email:</label>
<input type="text" id="email" name="email"></p>
<p><label for="age">Enter your age<label>
<input type = "text" id="age" name="age"></p>
<input type="submit">
</form>
</body>
</html>
The PHP script to validate the input array is as follows −
<?php
$filters = array (
"age" => array ("filter"=>FILTER_VALIDATE_INT,
"options"=>array("min_range"=>20,"max_range"=>40) ),
"email" => FILTER_VALIDATE_EMAIL
);
print_r(filter_input_array(INPUT_POST, $filters));
?>
Open the HTML form and enter 30 as age, abc@example.com as email, the result will be an array, validating both the inputs −
Array ( [age] => 30 [email] => abc@example.com )
Try giving invalid inputs such as "age=15". The output array will show a null value for age key
Array ( [age] => [email] => abc@example.com )
PHP JSON
Standard distributions of PHP have the JSON support enabled by default. The PHP extension implements the JavaScript Object Notation (JSON) data interchange format. The JSON extension in PHP parser handles the JSON data.
JSON (JavaScript Object Notation) is a lightweight, text-based, language-independent data interchange format. JSON defines a small set of formatting rules for the portable representation of structured data. It is a text based data format that is easy for the humans as well as machines to read.
The JSON extension in PHP version 5.2 onwards provides a number of predefined constants, JSON related functions, and also a JsonException class.
PHP JSON Functions
PHP has the following JSON functions −
json_encode()
This function returns a string containing the JSON representation of the supplied value. If the parameter is an array or object, it will be serialized recursively.
json_encode(mixed $value, int $flags = 0, int $depth = 512): string|false
json_decode()
This function takes a JSON encoded string and converts it into a PHP value.
json_decode( string $json, ?bool $associative = null, int $depth = 512, int $flags = 0 ): mixed
When the associative parameter of this function is true, JSON objects will be returned as associative arrays; when false, JSON objects will be returned as objects.
The encode/decode operations are affected by the supplied flags. The predefined constants and their integer values are as below −
| Predefined Constant | Values |
|---|---|
| JSON_HEX_TAG | 1 |
| JSON_HEX_AMP | 2 |
| JSON_HEX_APOS | 4 |
| JSON_HEX_QUOT | 8 |
| JSON_FORCE_OBJECT | 16 |
| JSON_NUMERIC_CHECK | 32 |
| JSON_UNESCAPED_SLASHES | 64 |
| JSON_PRETTY_PRINT | 128 |
| JSON_UNESCAPED_UNICODE | 256 |
json_last_error_msg()
This function returns the error string of the last json_encode() or json_decode() call.
json_last_error_msg(): string
"No error" message is returned if no error has occurred.
json_last_error()
This function returns an integer.
json_last_error(): int
The function returns an integer corresponding to one of the following constants −
| Sr.No | Constant & Meaning |
|---|---|
| 1 | JSON_ERROR_NONE
No error has occurred |
| 2 | JSON_ERROR_DEPTH
The maximum stack depth has been exceeded |
| 3 | JSON_ERROR_STATE_MISMATCH
Invalid or malformed JSON |
| 4 | JSON_ERROR_CTRL_CHAR
Control character error, possibly incorrectly encoded |
| 5 | JSON_ERROR_SYNTAX
Syntax error |
| 6 | JSON_ERROR_UTF8
Malformed UTF-8 characters, possibly incorrectly encoded |
| 7 | JSON_ERROR_RECURSION
One or more recursive references in the value to be encoded |
| 8 | JSON_ERROR_INF_OR_NAN
One or more NAN or INF values in the value to be encoded |
| 9 | JSON_ERROR_UNSUPPORTED_TYPE
A value of a type that cannot be encoded was given |
| 10 | JSON_ERROR_INVALID_PROPERTY_NAME
A property name that cannot be encoded was given |
| 11 | JSON_ERROR_UTF16
Malformed UTF-16 characters, possibly incorrectly encoded |
Example
The following PHP code encodes a given array to JSON representation, and decodes the JSON string back to PHP array.
<?php
$arr = array('a' => 1, 'b' => 2, 'c' => 3, 'd' => 4, 'e' => 5);
$encoded = json_encode($arr);
echo "The initial array: " . PHP_EOL;
var_dump($arr);
echo "Encoded JSON: $encoded" . PHP_EOL;
$decoded = json_decode($encoded);
echo "Array obtained after decoding: " . PHP_EOL;
var_dump($decoded);
?>
It will produce the following output −
The initial array:
array(5) {
["a"]=>
int(1)
["b"]=>
int(2)
["c"]=>
int(3)
["d"]=>
int(4)
["e"]=>
int(5)
}
Encoded JSON: {"a":1,"b":2,"c":3,"d":4,"e":5}
Array obtained after decoding:
object(stdClass)#1 (5) {
["a"]=>
int(1)
["b"]=>
int(2)
["c"]=>
int(3)
["d"]=>
int(4)
["e"]=>
int(5)
}
PHP Exceptions
Prior to version 7, PHP parser used to report errors in response to various conditions. Each error used to be of a certain predefined type. PHP7 has changed the mechanism of error reporting. Instead of traditional error reporting, most errors are now reported by throwing error exceptions.
The exception handling mechanism in PHP is similar to many other languages, and is implemented with the try, catch, throw and finally keywords.
The Throwable Interface
Exceptions in PHP implements the Throwable interface. The Throwable interface acts as the base for any object that can be thrown via throw statement, including Error and Exception objects.
A user defined class cannot implement Throwable interface directly. Instead, to declare a user defined exception class, it must extend the Exception class.
PHP code with potential exceptions is surrounded in a try block. An exception object is thrown if it is found, to facilitate the catching of potential exceptions. Each try must have at least one corresponding catch or finally block. Moreover, there may be more than one catch/finally blocks corresponding to a try block.
try {
// throw errors in the try-block
// if an error occurs we can throw an exception
throw new Exception('this is an error.');
}
catch(Exception $e) {
// catch the throws in the catch-block
// do something with the exception object, eg.
// display its message
echo 'Error message: ' .$e->getMessage();
}
If an exception is thrown and there is no catch block, the exception will "bubble up" until it finds a matching catch block. If the call stack is unwound all the way to the global scope without encountering a matching catch block, a global exception handler will be called (if it is set) otherwise the program will terminate with a fatal error.
set_exception_handler
This function sets the default exception handler if an exception is not caught within a try/catch block. After the callback is executed, the program execution will stop.
set_exception_handler(?callable $callback): ?callable
The $callback parameter is the name of the function to be called when an uncaught exception occurs. This function must be defined before calling set_exception_handler(). This handler function needs to accept one parameter, which will be the exception object that was thrown.
The function returns the name of the previously defined exception handler, or NULL on error. If no previous handler was defined, NULL is also returned.
Example
Take a look at the following example −
<?php
function handler($ex) {
echo "Uncaught exception is : " , $ex->getMessage(), "\n";
}
set_exception_handler('handler');
throw new Exception('Not Found Exception');
echo "not included Executed\n";
?>
It will produce the following output −
Uncaught exception is : Not Found Exception
SPL Exceptions
Standard PHP library contains predefined exceptions −
| Sr.No | Predefined Exceptions |
|---|---|
| 1 | LogicException Exception that represents error in the program logic. |
| 2 | BadFunctionCallException Exception thrown if a callback refers to an undefined function or if some arguments are missing. |
| 3 | BadMethodCallException Exception thrown if a callback refers to an undefined method or if some arguments are missing. |
| 4 | DomainException Exception thrown if a value does not adhere to a defined valid data domain. |
| 5 | InvalidArgumentException Exception thrown if an argument is not of the expected type. |
| 6 | LengthException Exception thrown if a length is invalid. |
| 7 | OutOfRangeException Exception thrown when an illegal index was requested. |
| 8 | RuntimeException Exception thrown if an error which can only be found on runtime occurs. |
| 9 | OutOfBoundsException Exception thrown if a value is not a valid key. |
| 10 | OverflowException Exception thrown when adding an element to a full container. |
| 11 | RangeException Exception thrown to indicate range errors during program execution. An arithmetic error other than under/overflow. |
| 12 | UnderflowException Exception thrown when performing an invalid operation on an empty container, such as removing an element. |
| 13 | UnexpectedValueException Exception thrown if a value does not match with a set of values. |
User-defined Exception
You can define a custom exception class that extends the base Exception class. Following script defines a custom exception class called myException. This type of exception is thrown if value of $num is less than 0 or greater than 100.
Example
The getMessage() method of Exception class returns the error message and getLine() method returns line of code in which exception appears.
<?php
class myException extends Exception {
function message() {
return "error : ". $this->getMessage(). "in line no". $this->getLine();
}
}
$num=125;
try {
if ($num>100 || $num<0)
throw new myException("$num is invalid number");
else
echo "$num is a valid number";
}
catch (myException $m) {
echo $m->message();
}
?>
Run the above code with $num=125 and $num=90 to get an error message and a message of valid number −
error : 125 is invalid number in line no 10
PHP Special Types
PHPs two data types resource and NULL are classified as special types. An object of resource type refers to external resources like database connection, file streams etc. On the other hand, a NULL data type is a variable without any data assigned to it. In this chapter, we shall learn more about these types.
Resource Type
A PHP program often needs to interact with an external environment such as a database, or a disk file etc. These are treated as resources in PHP. Resource is a special data type that refers to any such external resource. PHP uses relevant functions to create these resources. For example, fopen() function opens a disk file and its reference is stored in a resource variable.
PHP's Zend engine uses reference counting system. Hence, a resource with zero reference count is destroyed automatically by garbage collector and the memory used by resource data type need not be freed manually.
Different built-in PHP functions return respective resource variables. Subsequently, PHP uses them for interacting with the corresponding external environment. For example, the fopen() function returns a file resource, which acts as a file handle and the read/write operations on the file are facilitated by this resource variable.
The following table summarizes different functions that return resource variables −
| Resource Type | Built-in functions | Definition | |
|---|---|---|---|
| Produced | Sold | ||
| bzip2 | bzopen() | bzclose() | Bzip2 file |
| curl | curl_init() | curl_close() | Curl session |
| ftp | ftp_connect(), | ftp_close() | FTP stream |
| mssql link | mssql_connect() | mssql_close() | Link to Microsoft SQL Server database |
| mysql link | mysql_connect() | mysql_close() | Link to MySQL database |
| mysql result | mysql_db_query(), | mysql_free_result() | MySQL result |
| oci8 connection | oci_connect() | oci_close() | Connection to Oracle Database |
| ODBC link | odbc_connect() | odbc_close() | Link to ODBC database |
| pdf document | pdf_new() | pdf_close() | PDF document |
| stream | opendir() | closedir() | Dir handle |
| stream | fopen(), tmpfile() | fclose() | File handle |
| socket | socket_create() | Socket_close() | Socket handle |
| xml | xml_parser_create() | xml_parser_free() | XML parser |
| zlib | gzopen() | gzclose() | gz-compressed file |
| zlib.deflate | deflate_init() | None() | incremental deflate context |
| zlib.inflate | inflate_init() | None() | incremental inflate context |
PHP has get_resource_type() function that returns resource type of a variable.
get_resource_type ( resource $handle ) : string
where $handle is the resource variable whose type is to be obtained. This function returns a string corresponding to resource type.
There is also get_resource_id() function an integer identifier for the given resource.
get_resource_id(resource $resource): int
Example
This function provides a type-safe way for generating the integer identifier for a given resource.
<?php
$fp = fopen("hello.php", "r");
$resource = get_resource_type($fp);
$id = get_resource_id($fp);
echo "The resource type is : $resource The resource ID is : $id";
?>
It will produce the following output −
The resource type is : stream The resource ID is : 5
NULL type
In PHP, a variable with no value is said to be of null data type. Such a variable has a value defined as NULL. A variable can be explicitly assigned NULL or its value been set to null by using unset() function.
$var=NULL;
It is possible to cast variable of other type to null, although casting null to other type has been deprecated from PHP 7.2. In earlier versions, casting was done using (unset)$var syntax
Example
The following example shows how to assign NULL to a variable
<?php $var=NULL; var_dump($var); ?>
It will produce the following output −
NULL
Example
The following example performs null variable to other primary variables −
<?php $var = NULL; var_dump( (int) $var); var_dump((float)$var); var_dump((bool) $var) ; var_dump( (boolean) $var); ?>
It will produce the following output −
int(0) float(0) bool(false) bool(false)
PHP Hashing
The term "hashing" represents a technique of encrypting data (specially a text) to obtain a fixed-length value. PHP library includes a number of functions that can perform hashing on data by applying different hashing algorithms such as md5, SHA2, HMAC etc. The encrypted value obtained is called as the hash of the original key.
Processing of hashing is a one-way process, in the sense, it is not possible to reverse the hash so as to obtain the original key.
Applications of Hashing
The hashing technique is effectively used for the following purposes −
Password Authentication
We often register for various online applications such as gmail, Facebook etc. You are required to fill up a form wherein you create a password for an online account. The server hashes your password and the hashed value is stored in the database. At the time of logging in, the password submitted is hashed and compared with the one in the database. This protects your password from being stolen.
Data Integrity
One of the important uses of hashing is to verify if the data has not been tampered with. When a file is downloaded from the internet, you are shown its hash value, which you can compare with the downloaded to make sure that the file has not been corrupted.
The Process of Hashing
The process of hashing can be represented by the following figure −
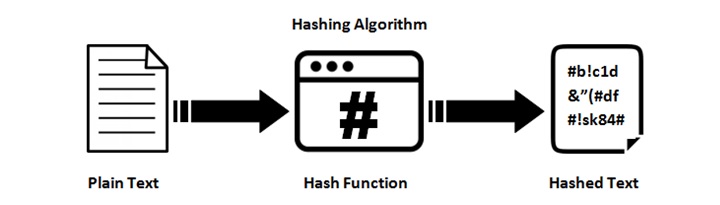
Hashing Algorithms in PHP
PHP supports a number of hashing algorithms −
MD5 − MD5 is a 128-bit hash function that is widely used in software to verify the integrity of transferred files. The 128-bit hash value is typically represented as a 32-digit hexadecimal number. For example, the word "frog" always generates the hash "8b1a9953c4611296a827abf8c47804d7"
SHA − SHA stands for Secure Hash Algorithm. It's a family of standards developed by the National Institute of Standards and Technology (NIST). SHA is a modified version of MD5 and is used for hashing data and certificates. SHA-1 and SHA-2 are two different versions of that algorithm. SHA-1 is a 160-bit hash. SHA-2 is actually a family of hashes and comes in a variety of lengths, the most popular being 256-bit.
HMAC − HMAC (Hash-Based Message Authentication Code) is a cryptographic authentication technique that uses a hash function and a secret key.
HKDF − HKDF is a simple Key Derivation Function (KDF) based on the HMAC message authentication code.
PBKDF2 − PBKDF2 (Password-Based Key Derivation Function 2) is a hashing algorithm that creates cryptographic keys from passwords.
Hash Functions in PHP
The PHP library includes several hash functions −
The hash_algos Function
This function returns a numerically indexed array containing the list of supported hashing algorithms.
hash_algos(): array
The hash_file Function
The function returns a string containing the calculated message digest as lowercase hexits.
hash_file( string $algo, string $filename, bool $binary = false, array $options = [] ): string|false
The algo parameter is the type of selected hashing algorithm (i.e. "md5", "sha256", "haval160,4", etc.). The filename is the URL describing location of file to be hashed; supports fopen wrappers.
Example
Take a look at the following example −
<?php
/* Create a file to calculate hash of */
$fp=fopen("Hello.txt", "w");
$bytes = fputs($fp, "The quick brown fox jumped over the lazy dog.");
fclose($fp);
echo hash_file('md5', "Hello.txt");
?>
It will produce the following output −
5c6ffbdd40d9556b73a21e63c3e0e904
The hash() Function
The hash() function generates a hash value (message digest) −
hash( string $algo, string $data, bool $binary = false, array $options = [] ): string
The algo parameter is the type of selected hashing algorithm (i.e. "md5", "sha256", "haval160,4", etc..). The data parameter is the message to be hashed. If the binary parameter is "true", it outputs raw binary data; "false" outputs lowercase hexits.
Example
The function returns a string containing the calculated message digest as lowercase hexits.
<?php
echo "Using SHA256 algorithm:" . hash('sha256', 'The quick brown fox jumped over the lazy dog.'). PHP_EOL;
echo "Using MD5 algorithm:",hash('md5', 'The quick brown fox jumped over the lazy dog.'), PHP_EOL;
echo "Using SHA1 algorithm:" . hash('sha1', 'The quick brown fox jumped over the lazy dog.');
?>
It will produce the following output −
Using SHA256 algorithm:68b1282b91de2c054c36629cb8dd447f12f096d3e3c587978dc2248444633483 Using MD5 algorithm:5c6ffbdd40d9556b73a21e63c3e0e904 Using SHA1 algorithm:c0854fb9fb03c41cce3802cb0d220529e6eef94e
PHP Encryption
Early versions of PHP included mcrypt extension, that provided encryption/decryption capabilities. Due to lack of maintenance, the mycrypt extension has been deprecated and removed from PHP 7.2 version onwards. PHP now includes OpenSSL library that has an extensive functionality to support encryption and decryption features.
OpenSSL supports various encryption algorithms such as AES (Advanced Encryption Standard). All the supported algorithms can be obtained by invoking openssl_get_cipher_methods() function.
The two important functions in OpenSSL extension are −
openssl_encrypt() − Encrypts data
openssl_decrypt() − Decrypts data
The openssl_encrypt() Function
This function encrypts the given data with given method and key, and returns a raw or base64 encoded string −
openssl_encrypt( string $data, string $cipher_algo, string $passphrase, int $options = 0, string $iv = "", string &$tag = null, string $aad = "", int $tag_length = 16 ): string|false
The function has the following parameters −
| Sr.No | Parameter & Description |
|---|---|
| 1 | data The plaintext message data to be encrypted. |
| 2 | cipher_algo The cipher method. |
| 3 | passphrase The passphrase. If the passphrase is shorter than expected, padded with NULL characters; if the passphrase is longer than expected, it is truncated. |
| 4 | options options is a bitwise disjunction of the flags OPENSSL_RAW_DATA and OPENSSL_ZERO_PADDING. |
| 5 | iv A non-NULL Initialization Vector. |
| 6 | tag The authentication tag passed by reference when using AEAD cipher mode (GCM or CCM). |
| 7 | aad Additional authenticated data. |
| 8 | tag_length The length of the authentication tag. Its value can be between 4 and 16 for GCM mode. |
The function returns the encrypted string on success or false on failure.
The openssl_decrypt() Function
This function takes a raw or base64 encoded string and decrypts it using a given method and key.
openssl_decrypt( string $data, string $cipher_algo, string $passphrase, int $options = 0, string $iv = "", ?string $tag = null, string $aad = "" ): string|false
The openssl_decrypt() function uses the same parameters as the openssl_encrypt function.
This function returns the decrypted string on success or false on failure.
Example
Take a look at the following example −
<?php
function sslencrypt($source, $algo, $key, $opt, $iv) {
$encstring = openssl_encrypt($source, $algo, $key, $opt, $iv);
return $encstring;
}
function ssldecrypt($encstring, $algo, $key, $opt, $iv) {
$decrstring = openssl_decrypt($encstring, $algo, $key, $opt, $iv);
return $decrstring;
}
// string to be encrypted
$source = "PHP: Hypertext Preprocessor";
// Display the original string
echo "Before encryption: " . $source . "\n";
$algo = "BF-CBC";
$opt=0;
$ivlength = openssl_cipher_iv_length($algo);
$iv = random_bytes($ivlength);
$key = "abcABC123!@#";
// Encryption process
$encstring = sslencrypt($source, $algo, $key, $opt, $iv);
// Display the encrypted string
echo "Encrypted String: " . $encstring . "\n";
// Decryption process
$decrstring = ssldecrypt($encstring, $algo, $key, $opt, $iv);
// Display the decrypted string
echo "Decrypted String: " . $decrstring;
?>
It will produce the following output −
Before encryption: PHP: Hypertext Preprocessor Encrypted String: Decrypted String:
PHP is_null() Function
PHP defines NULL as one of its special data types. It indicates that a certain variable has not been assigned a value any specific data type. It is a built-in constant in PHP and is used to indicate the intentional absence of any object or value. A variable can be explicitly assigned NULL or its value been set to null by using the unset() function.
The is_null() Function
PHP provides a Boolean function is_null() to check if a variable is indeed of NULL type.
is_null(mixed $value): bool
Example 1
If any variable is explicitly assigned NULL, obviously the is_null() function returns true.
<?php $x = NULL; echo "Variable \$x is null? "; var_dump(is_null($x)); ?>
It will produce the following output −
Variable $x is null? bool(true)
Example 2
If a variable with a certain value is unset, then too the is_null() function returns true, but with a warning
<?php $x = "Hello"; unset($x); echo "Variable \$x is null?\n"; var_dump(is_null($x)); ?>
It will produce the following output −
Variable $x is null? bool(true) PHP Warning: Undefined variable $x in /home/cg/root/89262/main.php on line 5
Example 3
Similarly, if you just declare a variable, without assigning any value to it, the is_null() function returns true with a warning −
<?php $y; echo "Variable \$y is null?\n"; var_dump(is_null($y)); ?>
It will produce the following output −
Variable $y is null? bool(true) Warning: Undefined variable $y in hello.php on line 9
Example 4
You can also use the equality operator (==) to check if a variable is NULL.
<?php
$x = NULL;
if ($x === NULL) {
echo '$x is NULL';
} else {
echo '$x is not NULL';
}
?>
It will produce the following output −
$x is NULL
Example 5
A null string "" is not considered equal to NULL. Hence, the is_null() function as well as the "==" operator return false. Take a look at the following example −
<?php
$y = "";
if ($y === NULL) {
echo '$y is NULL';
} else {
echo '$y is not NULL';
}
echo "$y is null?\n";
var_dump(is_null($y));
?>
It will produce the following output −
$y is not NULL is null? bool(false)
Two other functions in PHP that are relevant to is_null() function are the isset() function and the empty() function.
The isset() Function
The isset() function determines if a variable is declared and is different than NULL.
isset(mixed $var, mixed ...$vars): bool
Example
A variable that is assigned NULL is considered as unset.
<?php $x = NULL; echo '$x is set? '; var_dump(isset($x)); ?>
It will produce the following output −
$x is set? bool(false)
Note that a null character ("\0") is not equivalent to the PHP null constant.
The empty() Function
The empty() function checks if a variable is considered to be empty. A variable is considered empty if it does not exist or if its value is NULL. empty() does not generate a warning if the variable does not exist.
Example 1
Take a look at the following example −
<?php $x = NULL; echo '$x is empty? '; var_dump(empty($x)); $y; echo '$y is empty? '; var_dump(empty($y)); ?>
It will produce the following output −
$x is empty? bool(true) $y is empty? bool(true)
Example 2
The empty() function returns true if a variable is set to "0", NULL, or is not set at all.
<?php
$var = 0;
if (empty($var)) {
echo '$var is either 0, empty, or not set at all';
}
?>
It will produce the following output −
$var is either 0, empty, or not set at all
PHP System Calls
PHP's library of built-in function includes a category of functions that deal with invoking operating system utilities and external programs from within the PHP code. In this chapter, we shall discuss the PHP functions used to perform system calls.
The system() Function
The system() function is similar to the system() function in C that it executes the given command and outputs the result.
system(string $command, int &$result_code = null): string|false
The system() call tries to automatically flush the web server's output buffer after each line of output if PHP is running as a server module. It returns the last line of the command output on success, and false on failure.
Example
The following PHP snippet invokes DIR command of Windows OS and displays the list of files in the current directory.
<?php
echo '<pre>';
// Outputs all the result of DOS command "dir", and returns
// the last output line into $last_line. Stores the return value
// of the shell command in $retval.
$last_line = system('dir/w', $retval);
// Printing additional info
echo '
</pre>
<hr />Last line of the output: ' . $last_line . '
<hr />Return value: ' . $retval;
?>
It will produce the following output −
Volume in drive C has no label.
Volume Serial Number is 7EE4-E492
Directory of C:\xampp\htdocs
[.] [..] applications.html bitnami.css
[dashboard] employee.csv favicon.ico hello.csv
hello.html hello.php homepage.php [img]
index.php [Langi] menu.php myform.php
myname.php new.png new.txt test.php
test.zip [TPcodes] uploadfile.php [webalizer]
welcome.png [xampp]
18 File(s) 123,694 bytes
8 Dir(s) 168,514,232,320 bytes free
Last line of the output: 8 Dir(s) 168,514,232,320 bytes free
Return value: 0
The shell_exec() Function
The shell_exec() function is identical to PHPs backtick operator. It executes the given command via shell and return the complete output as a string
shell_exec(string $command): string|false|null
The function returns a string containing the output from the executed command, false if the pipe cannot be established or null if an error occurs or the command produces no output.
Example
In the following code, we use shell_exec() function to obtain a list of files with ".php" as the extension in the current directory −
<?php
$output = shell_exec('dir *.php');
echo "<pre>$output</pre>";
?>
It will produce the following output −
Volume in drive C has no label.
Volume Serial Number is 7EE4-E492
Directory of C:\xampp\htdocs
10/26/2023 08:27 PM 73 hello.php
10/12/2023 10:40 AM 61 homepage.php
07/16/2015 09:02 PM 260 index.php
10/12/2023 10:39 AM 49 menu.php
09/25/2023 01:43 PM 338 myform.php
10/12/2023 10:49 AM 51 myname.php
10/26/2023 02:00 PM 369 test.php
09/25/2023 01:42 PM 555 uploadfile.php
8 File(s) 1,756 bytes
0 Dir(s) 168,517,771,264 bytes free
The exec() Function
The exec() function executes the given command as a string argument.
exec(string $command, array &$output = null, int &$result_code = null):string|false
The $output parameter, if specified, is an array that will be filled with every line of output from the command.
Example
In this case, we use exec() function to call whoami command from inside the program. The whoami command returns the username.
<?php
// outputs the username that owns the running php/httpd process
// (on a system with the "whoami" executable in the path)
$output=null;
$retval=null;
exec('whoami', $output, $retval);
echo "Returned with status $retval and output:\n";
var_dump($output);
?>
It will produce the following output −
Returned with status 0 and output: array(1)
{ [0]=> string(13) "gnvbgl3\mlath" }
The passthru() Function
The passthru() function executes an external program and display raw output. Though the passthru() function is similar to the exec() or system() function in that it executes a command, it should be used in their place when the output from the OS command is binary data which needs to be passed directly back to the browser.
Example
A PHP program that uses passthu() function to display the contents of system PATH environment variable
passthru(string $command, int &$result_code = null): ?false
<?php
passthru ('PATH');
?>
It will produce the following output −
PATH=C:\Python311\Scripts\;C:\Python311\;C:\WINDOWS\system32;C:\WINDOWS; C:\WINDOWS\System32\Wbem;C:\WINDOWS\System32\WindowsPowerShell\v1.0\; C:\WINDOWS\System32\OpenSSH\;C:\xampp\php;C:\Users\mlath\AppData\Local \Microsoft\WindowsApps;C:\VSCode\Microsoft VS Code\bin
Backtick Operator
PHP supports one execution operator: backticks (``). (they are not single-quotes!) PHP will attempt to execute the contents of the backticks as a shell command; the output will be returned. Use of the backtick operator is identical to shell_exec().
Example
Take a look at the following example −
<?php $output = `dir *.php`; echo "<pre>$output</pre>"; ?>
It will produce the following output −
Volume in drive C has no label.
Volume Serial Number is 7EE4-E492
Directory of C:\xampp\htdocs
10/26/2023 08:42 PM 61 hello.php
10/12/2023 10:40 AM 61 homepage.php
07/16/2015 09:02 PM 260 index.php
10/12/2023 10:39 AM 49 menu.php
09/25/2023 01:43 PM 338 myform.php
10/12/2023 10:49 AM 51 myname.php
10/26/2023 02:00 PM 369 test.php
09/25/2023 01:42 PM 555 uploadfile.php
8 File(s) 1,744 bytes
0 Dir(s) 168,471,289,856 bytes free
The backtick operator is disabled when shell_exec() is disabled.
PHP HTTP Authentication
In PHP, the header() function is used to send an "Authentication Required" message to the client browser causing it to pop up a Username/Password input window. In fact header() allows you to send any raw HTTP header.
header(string $header, bool $replace = true, int $response_code = 0): void
The string parameter is passed to the header() function. For example
header("HTTP/1.1 404 Not Found");
It is used to figure out the HTTP status code to send.
You can also use header() function to redirect the browser to another URL.
Once the user has filled in a username and a password, the URL containing the PHP script will be called again with the predefined variables PHP_AUTH_USER, PHP_AUTH_PW, and AUTH_TYPE set to the user name, password and authentication type respectively. These predefined variables are found in the $_SERVER array. Only "Basic" and "Digest" authentication methods are supported.
<?php
/* Redirect browser */
header("Location: http://www.example.com/");
/* Make sure that code below does not get executed when we redirect. */
exit;
?>
The optional replace parameter indicates whether the header should replace a previous similar header, or add a second header of the same type, and response_code parameter forces the HTTP response code to the specified value.
To be able to force he client authentication, you need a .htaccess file in document root folder. Open a new text file, put the following text in it, and save it with .htaccess as its name.
CGIPassAuth On
Example
An example script fragment which would force client authentication on a page is as follows −
<?php
if (!isset($_SERVER['PHP_AUTH_USER'])) {
header('WWW-Authenticate: Basic realm="My Realm"');
header('HTTP/1.0 401 Unauthorized');
echo 'User hits Cancel button';7
exit;
} else {
echo "<p>Hello {$_SERVER['PHP_AUTH_USER']}.</p>";
echo "<p>You entered {$_SERVER['PHP_AUTH_PW']} as your password.</p>";
}
?>
Output
When you visit the script in a browser, it pops up a dialog box as shown −
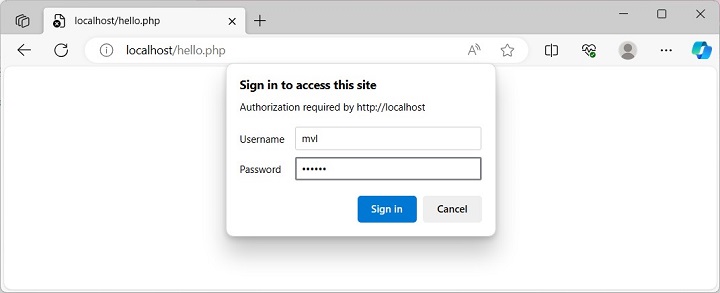
Once you click on the sign in button, there may be a backend script to authenticate the login credentials. Once authenticated, two server variables will be created with the keys PHP_AUTH_USER and PHP_AUTH_PW, which can be verified with the output of phpinfo() function.

PHP Swapping Variables
PHP doesnt provide any built-in function with which you can swap or interchange values of two variables. However, there are a few techniques which you can use to perform the swap.
One of the most straightforward approaches is to use a third variable as a temporary place holder to facilitate swapping. Using the arithmetic operators in a specific order also is very effective. You can also use the binary XOR operator for swapping purpose. In this chapter, we shall implement these swapping techniques in PHP
Temporary Variable
This is logically the most obvious and the simplest approach. To swap values of "a" and "b", use a third variable "c". Assign the value of "a" to "c", overwrite "a" with existing value of "b" and then set "b" to the earlier value of "a" that was stored in "c".
Example
Take a look at the following example −
<?php $a = 10; $b = 20; echo "Before swapping - \$a = $a, \$b = $b". PHP_EOL; $c = $a; $a = $b; $b = $c; echo "After swapping - \$a = $a, \$b = $b". PHP_EOL; ?>
It will produce the following output −
Before swapping - $a = 10, $b = 20 After swapping - $a = 20, $b = 10
Using addition (+) Operator
This solution takes the advantage of the fact that subtracting a number from the sum of two numbers gives back the second number. In other words, "sum(a+b) a" is equal to "b" and vice versa.
Example
Let us take advantage of this property to swap "a" and "b" −
<?php $a = 10; $b = 20; echo "Before swapping - \$a = $a, \$b = $b". PHP_EOL; $a = $a + $b; $b = $a - $b; $a = $a - $b; echo "After swapping - \$a = $a, \$b = $b". PHP_EOL; ?>
It will produce the following output −
Before swapping - $a = 10, $b = 20 After swapping - $a = 20, $b = 10
You can also use the other arithmetic operators subtraction (-), multiplication (*) and division (/) in a similar manner to perform swapping.
Using list() Function
The list() function in PHP unpacks the array in separate variables. This helps in our objective of performing swap between two variables. To do that, build an array of "a" and "b", and then unpack it to "b" and "a" variables to obtain "a" and "b" with interchanged values.
Example
Take a look at the following example −
<?php $a = 10; $b = 20; echo "Before swapping - \$a = $a, \$b = $b". PHP_EOL; $arr = [$a, $b]; list($b, $a) = $arr; echo "After swapping - \$a = $a, \$b = $b". PHP_EOL; ?>
It will produce the following output −
Before swapping - $a = 10, $b = 20 After swapping - $a = 20, $b = 10
Bitwise XOR
The bitwise XOR (^) operator can also be used to swap the value of two variables "x" and "y". It returns 1 when one of two bits at same position in both operands is 1, otherwise returns 0.
Example
Take a look at the following example −
<?php $a = 10; $b = 20; echo "Before swapping - \$a = $a, \$b = $b". PHP_EOL; $a = $a ^ $b; $b = $a ^ $b; $a = $a ^ $b; echo "After swapping - \$a = $a, \$b = $b". PHP_EOL; ?>
It will produce the following output −
Before swapping - $a = 10, $b = 20 After swapping - $a = 20, $b = 10
PHP Closure::call()
In PHP, a closure is an anonymous function that has access to the variables in the scope in which it was created, even after that scope has closed. You need to specify use keyword in it.
Closures are objects that encapsulate the function code and the scope in which they were created. With PHP 7, a new closure::call() method was introduced to bind an object scope to a closure and invoke it.
Methods in the Closure Class
The Closure class has the following methods including the call() method −
final class Closure {
/* Methods */
private __construct()
public static bind(Closure $closure, ?object $newThis, object|string|null $newScope = "static"): ?Closure
public bindTo(?object $newThis, object|string|null $newScope = "static"): ?Closure
public call(object $newThis, mixed ...$args): mixed
public static fromCallable(callable $callback): Closure
}
The call() method is a static method of Closure class. It has been introduced as a shortcut the bind() or bindTo() methods.
The bind() method Duplicates a closure with a specific bound object and class scope while the bindTo() method duplicates the closure with a new bound object and class scope.
The call() method has the following signature −
public Closure::call(object $newThis, mixed ...$args): mixed
The call() method temporarily binds the closure to newThis, and calls it with any given parameters.
With version prior to PHP 7, the bindTo() method can be used as follows −
<?php
class A {
private $x = 1;
}
// Define a closure Pre PHP 7 code
$getValue = function() {
return $this->x;
};
// Bind a clousure
$value = $getValue->bindTo(new A, 'A');
print($value());
?>
The program binds the $getValue which is a closure object, to the object of A class and prints the value of its private variable $x it is 1.
With PHP 7, the binding is achieved by call() method as shown below −
<?php
class A {
private $x = 1;
}
// PHP 7+ code, Define
$value = function() {
return $this->x;
};
print($value->call(new A));
?>
PHP Filtered unserialize()
In PHP, the built-in function unserialize() is available from PHP version 4 onwards. With PHP 7, a provision to pass a list of allowed classes has been added. This allows the untrusted source to be filtered out. The unserialze() function unserializes the data from only the trusted classes.
In PHP, serialization means generation of a storable representation of a value. This is useful for storing or passing PHP values around without losing their type and structure. The built-in serialize() function is used for this purpose.
serialize(mixed $value): string
The unserialze() function gives a PHP value from the serialized representation. From PHP 7 onwards, the unserialize() function follows the format below −
unserialize(string $data, array $options = [ ]): mixed
The $data parameter is the serialized string which you want to unserialize.
The $options parameter has been newly introduced. It is an associative array of following keys −
| Sr.No | Name & Description |
|---|---|
| 1 | allowed_classes an array of class names which should be accepted, or false to accept no classes, or true to accept all classes. Omitting this option is the same as defining it as true |
| 2 | max_depth The maximum depth of structures permitted during unserialization. |
Example
Take a look at the following example −
<?php
class MyClass {
var int $x;
function __construct(int $x) {
$this->x = $x;
}
}
class NewClass {
var int $y;
function __construct(int $y) {
$this->y = $y;
}
}
$obj1 = new MyClass(10);
$obj2 = new NewClass(20);
$sob1 = serialize($obj1);
$sob2 = serialize($obj2);
// default behaviour that accepts all classes
// second argument can be ommited.
// if allowed_classes is passed as false, unserialize converts all objects into __PHP_Incomplete_Class object
$usob1 = unserialize($sob1 , ["allowed_classes" => true]);
// converts all objects into __PHP_Incomplete_Class object except those of MyClass and NewClass
$usob2 = unserialize($sob2 , ["allowed_classes" => ["MyClass", "NewClass"]]);
echo $usob1->x . PHP_EOL;
echo $usob2->y . PHP_EOL;
?>
It will produce the following output −
10 20
PHP IntlChar
In PHP7, a new IntlChar class has been introduced. It provides access to a number of utility methods that can be used to access information about Unicode characters. There are a number of static methods and constants in Intl class. They adhere closely to the names and behavior used by the underlying ICU (International Components for Unicode) library.
Note that you need to enable the Intl extension in the PHP installation in your system. To enable, open php.ini file and uncomment (remove the leading semicolon from the line)
extension=intl
Some static functions from Intl class are explained with examples as below −
IntlChar::charAge
This function gets the "age" of the code point
public static IntlChar::charAge(int|string $codepoint): ?array
The "age" is the Unicode version when the code point was first designated (as a non-character or for Private Use) or assigned a character.
Example
Take a look at the following example −
<?php
var_dump(IntlChar::charage("\u{2603}"));
?>
It will produce the following output −
array(4) {
[0]=>
int(1)
[1]=>
int(1)
[2]=>
int(0)
[3]=>
int(0)
}
IntlChar::charFromName
The charFromName() function finds Unicode character by name and return its code point value
public static IntlChar::charFromName(string $name, int $type = IntlChar::UNICODE_CHAR_NAME): ?int
The type parameter sets of names to use for the lookup. Can be any of these constants −
IntlChar::UNICODE_CHAR_NAME (default)
IntlChar::UNICODE_10_CHAR_NAME
IntlChar::EXTENDED_CHAR_NAME
IntlChar::CHAR_NAME_ALIAS
IntlChar::CHAR_NAME_CHOICE_COUNT
Example
Take a look at the following example −
<?php
var_dump(IntlChar::charFromName("LATIN CAPITAL LETTER A"));
var_dump(IntlChar::charFromName("SNOWMAN"));
?>
It will produce the following output −
int(65) int(9731)
IntlChar::charName
The charName() function retrieves the name of a Unicode character
public static IntlChar::charName(int|string $codepoint, int $type = IntlChar::UNICODE_CHAR_NAME): ?string
Example
Take a look at the following example −
<?php
var_dump(IntlChar::charName(".", IntlChar::UNICODE_CHAR_NAME));
var_dump(IntlChar::charName("\u{2603}"));
?>
It will produce the following output −
string(9) "FULL STOP" string(7) "SNOWMAN"
IntlChar::isalpha
The isalpha() function determines whether the specified code point is a letter character. true for general categories "L" (letters).
public static IntlChar::isalpha(int|string $codepoint): ?bool
Example
Take a look at the following example −
<?php
var_dump(IntlChar::isalpha("A"));
var_dump(IntlChar::isalpha("1"));
?>
It will produce the following output −
bool(true) bool(false)
The Intl class defines similar static methods such as isdigit(), isalnum(), isblank(), etc.
IntlChar::islower
The islower() function determines whether the specified code point has the general category "Ll" (lowercase letter).
public static IntlChar::islower(int|string $codepoint): ?bool
Example
Take a look at the following example −
<?php
var_dump(IntlChar::islower("A"));
var_dump(IntlChar::islower("a"));
?>
It will produce the following output −
bool(false) bool(true)
Similarly, there are functions such as isupper(), istitle(), iswhitespace() etc.
IntlChar::toupper
The given character is mapped to its uppercase equivalent.
public static IntlChar::toupper(int|string $codepoint): int|string|null
If the character has no uppercase equivalent, the character itself is returned.
Example
Take a look at the following example −
<?php
var_dump(IntlChar::toupper("A"));
var_dump(IntlChar::toupper("a"));
?>
It will produce the following output −
string(1) "A" string(1) "A"
PHP CSPRNG
The acronym CSPRNG stands for Cryptographically Secure Pseudorandom Number Generator. PHP function library includes many functions that generate random numbers. For example −
mt_rand() − Generate a random value via the Mersenne Twister Random Number Generator
mt_srand() − Seeds the Mersenne Twister Random Number Generator
rand() − Generate a random integer.
Example
The following code shows how you can use the function mt_rand() to generate random numbers −
<?php # Generates random integer between the range echo "Random integer: " . rand(1,100) . PHP_EOL; # Generate a random value via the Mersenne Twister Random Number Generator echo "Random number: " . mt_rand(1,100); ?>
It will produce the following output −
Random integer: 45 Random number: 86
Note that the output may vary every time the code is executed. However, random numbers generated by these functions are not cryptographically safe, as it is possible to guess their outcome. PHP 7, introduced a couple of functions that generate secure random numbers.
The following functions which are cryptographically secure, are newly added −
random_bytes() − Generates cryptographically secure pseudo-random bytes.
random_int() − Generates cryptographically secure pseudo-random integers.
The random_bytes() Function
random_bytes() generates an arbitrary-length string of cryptographic random bytes that are suitable for cryptographic use, such as when generating salts, keys or initialization vectors.
string random_bytes ( int $length )
Parameters
length − The length of the random string that should be returned in bytes.
The function returns a string containing the requested number of cryptographically secure random bytes.
If an appropriate source of randomness cannot be found, an Exception will be thrown. If invalid parameters are given, a TypeError will be thrown. If an invalid length of bytes is given, an Error will be thrown.
Example
Take a look at the following example −
<?php $bytes = random_bytes(5); print(bin2hex($bytes)); ?>
It may produce the following output (it may differ every time) −
6a85eec950
The random_int() Function
random_int() generates cryptographic random integers that are suitable for use where unbiased results are critical.
int random_int ( int $min , int $max )
Parameters
min − The lowest value to be returned, which must be PHP_INT_MIN or higher.
max − The highest value to be returned, which must be less than or equal to PHP_INT_MAX.
The function returns a cryptographically secure random integer in the range min to max, inclusive.
If an appropriate source of randomness cannot be found, an Exception will be thrown. If invalid parameters are given, a TypeError will be thrown. If max is less than min, an Error will be thrown.
Example
Take a look at the following example −
<?php
print(random_int(100, 999));
print("\n");
print(random_int(-1000, 0));
?>
It may produce the following output (it differs every time) −
495 -563
PHP Expectations
Expectations are a backwards compatible enhancement to the older assert() function. Expectation allows for zero-cost assertions in production code, and provides the ability to throw custom exceptions when the assertion fails.
assert() is now a language construct, where the first parameter is an expression as compared to being a string or Boolean to be tested.
Configuration Directives for assert()
The following table lists down the configuration directives for the assert() function −
| Directive | Default value | Possible values |
|---|---|---|
| zend.assertions | 1 |
1 − generate and execute code (development mode) 0 − generate code but jump around it at runtime -1 − do not generate code (production mode) |
| assert.exception | 0 |
1 − throw, when the assertion fails, either by throwing the object provided as the exception or by throwing a new AssertionError object if exception was not provided. 0 − use or generate a Throwable as described above, but only generates a warning based on that object rather than throwing it (compatible with PHP 5 behaviour) |
Parameters
Assertion − The assertion. In PHP 5, this must be either a string to be evaluated or a Boolean to be tested. In PHP 7, this may also be any expression that returns a value, which will be executed and the result is used to indicate whether the assertion succeeded or failed.
Description − An optional description that will be included in the failure message, if the assertion fails.
Exception − In PHP 7, the second parameter can be a Throwable object instead of a descriptive string, in which case this is the object that will be thrown, if the assertion fails and the assert.exception configuration directive is enabled.
Return Values
FALSE if the assertion is false, TRUE otherwise.
Example
Take a look at the following example −
<?php
ini_set('assert.exception', 1);
class CustomError extends AssertionError {}
assert(false, new CustomError('Custom Error Message!'));
?>
It will produce the following output −
PHP Fatal error: Uncaught CustomError: Custom Error Message! In test.php:6
PHP The "use" Statement
The "use" keyword in PHP is found to be associated with multiple purposes, such as aliasing, inserting traits and inheriting variables in closures.
Aliasing
Aliasing is accomplished with the use operator. It allows you to refer to an external fully qualified name with an alias or alternate name.
Example
Take a look at the following example −
use My\namespace\myclass as Another; $obj = new Another;
You can also have groupped use declaration as follows −
use some\namespace\{ClassA, ClassB, ClassC as C};
use function some\namespace\{fn_a, fn_b, fn_c};
use const some\namespace\{ConstA, ConstB, ConstC};
Traits
With the help of use keyword, you can insert a trait into a class. A Trait is similar to a class, but only intended to group functionality in a fine-grained and consistent way. It is not possible to instantiate a Trait on its own.
Example
Take a look at the following example −
<?php
trait mytrait {
public function hello() {
echo "Hello World from " . __TRAIT__ .;
}
}
class myclass {
use mytrait;
}
$obj = new myclass();
$obj->hello();
?>
It will produce the following output −
Hello World from mytrait
Closures
Closure is also an anonymous function that can access variables outside its scope with the help of the "use" keyword.
Example
Take a look at the following example −
<?php
$maxmarks=300;
$percent=function ($marks) use ($maxmarks) {
return $marks*100/$maxmarks;
};
$m = 250;
echo "marks=$m percentage=". $percent($m);
?>
It will produce the following output −
marks=250 percentage=83.333333333333
PHP Integer Division
PHP has introduced a new function intdiv(), which performs integer division of its operands and return the division as int.
The intdiv() function returns integer quotient of two integer parameters. If "a/b" results in "c" as division and "r" as remainder such that −
a=b*c+r
In this case, intdiv(a,b) returns r −
intdiv ( int $x , int $y ) : int
The $x and $y are the numerator and denominator parts of the division expression. The intdiv() function returns an integer. The return value is positive if both parameters are positive or both parameters are negative.
Example 1
If numerator is < denominator, the intdiv() function returns "0", as shown below −
<?php
$x=10;
$y=3;
$r=intdiv($x, $y);
echo "intdiv(" . $x . "," . $y . ") = " . $r . "\n";
$r=intdiv($y, $x);
echo "intdiv(" . $y . "," . $x . ") = " . $r;
?>
It will produce the following output −
intdiv(10,3) = 3 intdiv(3,10) = 0
Example 2
In the following example, the intdiv() function returns negative integer because either the numerator or denominator is negative.
<?php
$x=10;
$y=-3;
$r=intdiv($x, $y);
echo "intdiv(" . $x . "," . $y . ") = " . $r . "\n";
$x=-10;
$y=3;
$r=intdiv($x, $y);
echo "intdiv(" . $x . "," . $y . ") = " . $r . "\n";
?>
It will produce the following output −
intdiv(10,-3) = -3 intdiv(-10,3) = -3
Example 3
The intdiv() function returns a positive integer in the case of numerator and denominator both being positive or both being negative.
<?php
$x=10;
$y=3;
$r=intdiv($x, $y);
echo "intdiv(" . $x . "," . $y . ") = " . $r . "\n";
$x=-10;
$y=-3;
$r=intdiv($x, $y);
echo "intdiv(" . $x . "," . $y . ") = " . $r ;
?>
It will produce the following output −
intdiv(10,3) = 3 intdiv(-10,-3) = 3
Example 4
In the following example, the denominator is "0". It results in DivisionByZeroError exception.
<?php
$x=10;
$y=0;
$r=intdiv($x, $y);
echo "intdiv(" . $x . "," . $y . ") = " . $r . "\n";
?>
It will produce the following output −
PHP Fatal error: Uncaught DivisionByZeroError: Division by zero in hello.php:4
PHP Deprecated Features
As some new features are added with each new version, some features are also removed as they are deemed to be obsolete. In this chapter, we have a look at deprecated features after PHP version 5.
Deprecated in PHP Ver 7
PHP 4 Style Constructors
PHP 4 style Constructors are methods having same name as the class they are defined in, are now deprecated, and will be removed in the future. PHP 7 will emit E_DEPRECATED if a PHP 4 constructor is the only constructor defined within a class. Classes implementing a __construct() method are unaffected.
Example
Take a look at the following example −
<?php
class A {
function A() {
print('Style Constructor');
}
}
?>
It produces the following output on the browser −
Deprecated: Methods with the same name as their class will not be constructors in a future version of PHP; A has a deprecated constructor in...
Static Calls to Non-static Methods
Static calls to non-static methods are deprecated, and may be removed in the future.
Example
Take a look at the following example −
<?php
class A {
function b() {
print('Non-static call');
}
}
A::b();
?>
It produces the following output on the browser −
Deprecated: Non-static method A::b() should not be called statically in... Non-static call
password_hash() salt option
The salt option for the password_hash() function has been deprecated so that the developers do not generate their own (usually insecure) salts. The function itself generates a cryptographically secure salt, when no salt is provided by the developer - thus custom salt generation is not required any more.
capture_session_meta SSL context option
The capture_session_meta SSL context option has been deprecated. SSL metadata is now used through the stream_get_meta_data() function.
ext/mcrypt
The mcrypt extension has been deprecated in favour of OpenSSL.
Unquoted Strings
Unquoted strings that are non-existent global constants are taken to be strings of themselves. This behaviour used to emit an E_NOTICE, but will now emit an E_WARNING. In the next major version of PHP, an Error exception will be thrown instead.
The __autoload() Method
The __autoload() method has been deprecated because it is inferior to spl_autoload_register() (due to it not being able to chain autoloaders), and there is no interoperability between the two autoloading styles.
The create_function() Function
Given the security issues of this function has now been deprecated. The preferred alternative is to use anonymous functions.
The each() Function
This function causes implementation issues for some language changes. It has therefore been deprecated.
Case-Insensitive Constants
The declaration of case-insensitive constants has been deprecated. Passing true as the third argument to define() will now generate a deprecation warning.
The (real) and is-real() Function
The (real) cast is deprecated, use (float) instead. The is_real() function is also deprecated, use is_float() instead.
The "parent" Leyword
Using parent inside a class without a parent is deprecated, and will throw a compile-time error in the future. Currently an error will only be generated if/when the parent is accessed at run-time.
Deprecated in PHP Ver 8
If a parameter with a default value is followed by a required parameter, the default value has no effect. This is deprecated as of PHP 8.0.0 and can generally be resolved by dropping the default value, without a change in functionality −
<?php
function test($a = [], $b) {} // Before
function test($a, $b) {} // After
?>
One exception to this rule are parameters of the form Type $param = null, where the null default makes the type implicitly nullable. This usage remains allowed, but it is recommended to use an explicit nullable type instead −
<?php
function test(A $a = null, $b) {} // Still allowed
function test(?A $a, $b) {} // Recommended
?>
Calling get_defined_functions() with exclude_disabled explicitly set to false is deprecated and no longer has an effect. get_defined_functions() will never include disabled functions.
Sort comparison functions that return true or false will now throw a deprecation warning, and should be replaced with an implementation that returns an integer less than, equal to, or greater than zero.
<?php // Replace usort($array, fn($a, $b) => $a > $b); // With usort($array, fn($a, $b) => $a <=> $b); ?>
Implicit Incompatible float to int Conversions
The implicit conversion of float to int which leads to a loss in precision is now deprecated. This affects array keys, int type declarations in coercive mode, and operators working on ints.
Calling a Static Element on a Trait
Calling a static method, or accessing a static property directly on a trait is deprecated. Static methods and properties should only be accessed on a class using the trait.
Date Functions
date_sunrise() and date_sunset() have been deprecated. Use date_sun_info() instead.
strptime() has been deprecated. Use date_parse_from_format() instead (for locale-independent parsing), or IntlDateFormatter::parse() (for locale-dependent parsing).
strftime() and gmstrftime() have been deprecated. You can use date() instead (for locale-independent formatting), or IntlDateFormatter::format() (for locale-dependent formatting).
Dynamic Properties
The creation of dynamic properties is deprecated. Instead, use stdClass that allows dynamic properties.
PHP Removed Extensions & SAPIs
With each new version of PHP, new functionality is added and at the same time certain obsolete functionality is removed. PHP version 7 is a major version when a number of PHP extensions and SAPIs (Server-side Application Programming Interface) were removed. In the subsequent PHP 8 version also, a few more extensions have been removed.
In PHP, an extension is a library or plugin, written in C/C++, and compiled into shared libraries so that can be loaded into the PHP interpreter. Once the PHP interpreter starts, the functions in the extension are available to PHP scripts.
The extensions are periodically removed because they are either no longer maintained or have been replaced with more modern alternatives. Coinciding with PHP 7 for example, the ereg extension was replaced with the preg extension, and the mssql extension was replaced with the PDO_MSSQL extension.
Removed Extensions
The following extensions have been removed with effect from PHP 7 −
ereg extension replaced by preg
mssql extension replaced by pdo_mssql
mysql extension mysqli
sybase_ct replaced by pdo_sybase
The following extensions have been removed from PHP 8 onwards −
Mcrypt − The Mcrypt extension was used for encryption and decryption, but it has been deprecated since PHP 7.1 and removed in PHP 8 due to security vulnerabilities.
MDB2 − The MDB2 extension, earlier used for accessing MDB database files, is removed in PHP 8 due to lack of maintenance.
Ming − As Flash is not popular nowadays, the Ming extension, used for generating flash content, has been deprecated since PHP 5.5 and removed in PHP 8.
Phar Data − The Phar Data extension was used for accessing data within PHAR archives, but it has been removed in PHP 8 as there are other methods for accessing PHAR data.
SNMP − Because it is not being maintained, the SNMP extension has been removed in PHP 8.
Tidy − Since new libraries for HTML validation have been added, the Tidy extension was removed in PHP.
Tokenizer − The Tokenizer extension was also removed in PHP 8 for the same reason.
cURL − The cURL extension was removed in PHP 8.1, as it was no longer maintained.
Removed SAPIs
SAPI stands for Server-side Application Programming Interface in PHP. The SAPI is responsible for translating PHP code into something that the web server can understand. It parses the PHP code and calls the appropriate web server functions. The web server then generates an HTTP response that is sent back to the client.
The following SAPIs (Server-side Application Programming Interfaces) have been removed from PHP 7 onwards −
aolserver
apache
apache_hooks
apache2filter
caudium
cgi
cgi-fcgi
fastcgi
isapi
litespeed
nsapi
pwsapi
router
thttpd
uwsgi
webserver
apache2filter
continuity
isapi
milter
nsapi
pi3web
roxen
thttpd
tux
webjames
PHP PEAR
PEAR is an acronym for PHP Extension and Application Repository. It is a repository of PHP packages or extensions. You can freely incorporate any of these extensions from PEAR in your code. The PEAR project was established by Stig S. Bakken in 1999.
Most of the precompiled distributions of PHP such as XAMPP already have PEAR bundled with it. If not, you can install PEAR by downloading go-pear.phar file from https://pear.php.net/go-pear.phar and run
php go-pear.phar
In a Windows Command Prompt to start the installation.
Based on your responses to the setup steps, the PEAR Package Manager will be installed in the path, specified during installation.
You can then add that installation path to your PATH environment. Either do this manually (Start > Control Panel > System > Environment) or run (double-click) the newly generated PEAR_ENV.reg that's now found in the PHP source directory.
You can now access the PEAR Package Manager by running the command −
C:\xampp\php>pear
In a Windows Command Prompt.
You will get the list of PEAR commands as follows −
C:\xampp\php>pear Commands: build Build an Extension From C Source bundle Unpacks a Pecl Package channel-add Add a Channel channel-alias Specify an alias to a channel name channel-delete Remove a Channel From the List channel-discover Initialize a Channel from its server channel-info Retrieve Information on a Channel channel-login Connects and authenticates to remote channel server channel-logout Logs out from the remote channel server channel-update Update an Existing Channel clear-cache Clear Web Services Cache config-create Create a Default configuration file config-get Show One Setting config-help Show Information About Setting config-set Change Setting config-show Show All Settings convert Convert a package.xml 1.0 to package.xml 2.0 format cvsdiff Run a "cvs diff" for all files in a package cvstag Set CVS Release Tag download Download Package download-all Downloads each available package from the default channel info Display information about a package install Install Package list List Installed Packages In The Default Channel list-all List All Packages list-channels List Available Channels list-files List Files In Installed Package list-upgrades List Available Upgrades login Connects and authenticates to remote server [Deprecated in favor of channel-login] logout Logs out from the remote server [Deprecated in favor of channel-logout] makerpm Builds an RPM spec file from a PEAR package package Build Package package-dependencies Show package dependencies package-validate Validate Package Consistency pickle Build PECL Package remote-info Information About Remote Packages remote-list List Remote Packages run-scripts Run Post-Install Scripts bundled with a package run-tests Run Regression Tests search Search remote package database shell-test Shell Script Test sign Sign a package distribution file svntag Set SVN Release Tag uninstall Un-install Package update-channels Update the Channel List upgrade Upgrade Package upgrade-all Upgrade All Packages [Deprecated in favor of calling upgrade with no parameters]
Installing packages with PEAR is so easy. One way to find packages, is using the official PEAR site https://pear.php.net/packages.php and then run
pear install <package-name>
The next step is to use the PEAR package in your code. To do that, you should include the main PHP script of the package in your program with include, require, include_once or require_once statements.
<?php include "PEARPACKAGE.php"; . . . . . // rest of the code . . . . . ?>
A newer PHP package manager called Composer is an alternative available for managing packages for a PHP project. Composer also supports the installation of PEAR packages. Composer is preferred by many instead of PEAR for PHP package distribution.
PHP CSRF
The acronym "CSRF" stands for Cross-Site Request Forgery. CSRF is an Internet exploit that involves a trusted website user issuing unauthorized commands. Providing adequate protection to a PHP web application against this attack can be achieved by taking the measures explained in this chapter.
By default, the browser uses the "GET" request method to send data. This is commonly used as the exploit point in a CSRF. To inject commands into a specific website, the attacker employs HTML tags like "IMG." For example, the url endpoint of a web application such as "/delete.php?empcode=1234" deletes account as passed from empcode parameter of a GET request. Now, if an authenticated user come across the following script in any other application.
<img src="http://example.com/delete.php?empcode=1234" width="0" height="0" border="0">
Inadvertently causes the data related to empcode=1234 to be deleted.
A common workaround for this problem is the use of CSRF tokens. A CSRF token is a string of random characters embedded into requests so that a web application can trust that a request has been received from an expected source as per the normal workflow.
Steps to Implement CSRF
The steps to implement CSRF token protection in PHP are as follows −
Begin the script by starting a new session.
Generate a token of random characters. You can use any of the several built-in function that PHP provides for generation of random string. Let use md5() function to obtain the hash value of uniqueid() function that generates a unique randome string.
Inside the HTML form to be provided for the user to submit the data, include a hidden file with its value as the random token generated in the above step.
The token can is then validated by the server against the user session after form submission to eliminate malicious requests.
You can also add another session variable whose value is the current time, and send an expiry time for the validation purpose.
Example
Here is the PHP code that implements CSRF token verification mechanism. The following script generates a token and embeds in a HTML form.
<?php
session_start();
if(!isset($_SESSION["csrf_token"])) {
// No token present, generate a new one
$token = md5(uniqid(rand(), true));
$_SESSION["csrf_token"] = $token;
} else {
// Reuse the token
$token = $_SESSION["csrf_token"];
}
?>
<html>
<body>
<form method="get" action="test.php">
<input type="text" name="empcode" placeholder="empcode" />
<input type="hidden" name="csrf_token" value="<?php echo $token;?>" />
<input type="submit" />
</form>
</body>
</html>
The form is submitted to "test.php" script as below −
<?php
session_start();
echo "hello";
if ($_GET["csrf_token"] == $_SESSION["csrf_token"]) {
// Reset token
echo $_GET["csrf_token"] . "<br>";
echo $_SESSION["csrf_token"] . "<br>";
echo "<h3>CSRF token validation successful. Proceed to further action</h3>";
} else {
echo "<h3>CSRF token validation failed</h3>";
}
?>
It will produce the following output −
To simulate the failure of CSRF validation, open the inspect tool of the browser, edit the value in the hidden field manually and submit the form to see that the tokens dont match leading to the validation failure.
PHP FastCGI Process
PHP FastCGI Process Manager (PHP-FPM) is an efficient alternative to traditional CGI-based methods for handling PHP requests, particularly in high-traffic environments. PHP-FPM has a number of important features. These features are as follows −
Reduced Memory Consumption
With the help of a pool of worker processes to handle requests PHP-FPM significantly reduces memory overhead compared to traditional CGI methods that spawn a new process for each request.
Improved Performance
PHP-FPM's worker processes are persistent. It allows them to handle multiple requests. It doesnt need ti repeatedly create and destroy processes. This leads to faster response times and improved handling of high concurrency.
Enhanced Scalability
PHP-FPM's pool of worker processes can be dynamically adjusted based on traffic demands, allowing it to scale effectively to handle varying workloads.
Advanced Process Management
PHP-FPM offers graceful startup and shutdown. It also has granular control over process management, including, emergency restarts, and monitoring of worker processes.
Environment Isolation
PHP-FPM enables the creation of separate pools for different applications or user groups, so that better isolation and security can be provided for each environment.
Customizable Configuration
PHP-FPM uses php.ini based configuration options. With these extensive options, fine-tuning of its behavior is possible to match specific application requirements.
Supports multiple PHP Versions
PHP-FPM can manage multiple PHP versions simultaneously, enabling the deployment of different PHP applications on a single server.
PHP-FPM is commonly used with web servers like Nginx or Apache. It acts as a backend processor for handling PHP requests. It has become the preferred method for managing PHP applications in production environments due to its performance, scalability, and reliability.
PHP PDO Extension
PDO is an acronym for PHP Data Objects. PHP can interact with most of the relational as well as NOSQL databases. The default PHP installation comes with vendor-specific database extensions already installed and enabled. In addition to such database drivers specific to a certain type of database, such as the mysqli extension for MySQL, PHP also supports abstraction layers such as PDO and ODBC.
The PDO extension defines a lightweight, consistent interface for accessing databases in PHP. The functionality of each vendor-specific extension varies from the other. As a result, if you intend to change the backend database of a certain PHP application, say from PostGreSql to MySQL, you need to make a lot of changes to the code. The PDO API on the other hand doesnt require any changes apart from specifying the URL and the credentials of the new database to be used.
Your current PHP installation must have the corresponding PDO driver available to be able to work with. Currently the following databases are supported with the corresponding PDO interfaces −
| Driver Name | Supported Databases |
|---|---|
| PDO_CUBRID | Cubrid |
| PDO_DBLIB | FreeTDS / Microsoft SQL Server / Sybase |
| PDO_FIREBIRD | Firebird |
| PDO_IBM | IBM DB2 |
| PDO_INFORMIX | IBM Informix Dynamic Server |
| PDO_MYSQL | MySQL 3.x/4.x/5.x/8.x |
| PDO_OCI | Oracle Call Interface |
| PDO_ODBC | ODBC v3 (IBM DB2, unixODBC and win32 ODBC) |
| PDO_PGSQL | PostgreSQL |
| PDO_SQLITE | SQLite 3 and SQLite 2 |
| PDO_SQLSRV | Microsoft SQL Server / SQL Azure |
By default, the PDO_SQLITE driver is enabled in the settings of php.ini, so if you wish to interact with a MySQL database with PDO, make sure that the following line is uncommented by removing the leading semicolon.
extension=pdo_mysql
You can obtain the list of currently available PDO drivers by calling PDO::getAvailableDrivers() static function in PDO class.
PDO Connection
An instance of PDO base class represents a database connection. The constructor accepts parameters for specifying the database source (known as the DSN) and optionally for the username and password (if any).
The following snippet is a typical way of establishing connection with a MySQL database −
<?php
$dbh = new PDO('mysql:host=localhost;dbname=test', $user, $pass);
?>
If there is any connection error, a PDOException object will be thrown.
Example
Take a look at the following example −
<?php
$dsn="localhost";
$dbName="myDB";
$username="root";
$password="";
try{
$dbConn= new PDO("mysql:host=$dsn;dbname=$dbName",$username,$password);
Echo "Successfully connected with $dbName database";
} catch(Exception $e){
echo "Connection failed" . $e->getMessage();
}
?>
It will produce the following output −
Successfully connected with myDB database
In case of error −
Connection failedSQLSTATE[HY000] [1049] Unknown database 'mydb'
PDO Class Methods
The PDO class defines the following static methods −
PDO::beginTransaction
After obtaining the connection object, you should call this method to that initiates a transaction.
public PDO::beginTransaction(): bool
This method turns off autocommit mode. Hence, you need to call commit() method to make persistent changes to the database Calling rollBack() will roll back all changes to the database and return the connection to autocommit mode.This method returns true on success or false on failure.
PDO::commit
The commit() method commits a transaction.
public PDO::commit(): bool
Since the BeginTransaction disables the autocommit mode, you should call this method after a transaction. It commits a transaction, returning the database connection to autocommit mode until the next call to PDO::beginTransaction() starts a new transaction. This method returns true on success or false on failure.
PDO::exec
The exec() method executes an SQL statement and return the number of affected rows
public PDO::exec(string $statement): int|false
The exec() method executes an SQL statement in a single function call, returning the number of rows affected by the statement.
Note that it does not return results from a SELECT statement. If you have a SELECT statement that is to be executed only once during your program, consider issuing PDO::query().
On the other hand For a statement that you need to issue multiple times, prepare a PDOStatement object with PDO::prepare() and issue the statement with PDOStatement::execute().
The exec() method need a string parameter that represents a SQL statement to prepare and execute, and returns the number of rows that were modified or deleted by the SQL statement you issued. If no rows were affected, PDO::exec() returns 0.
PDO::query
The query() method prepares and executes an SQL statement without placeholders
public PDO::query(string $query, ?int $fetchMode = null): PDOStatement|false
This method prepares and executes an SQL statement in a single function call, returning the statement as a PDOStatement object.
PDO::rollBack
The rollback() method rolls back a transaction as initiated by PDO::beginTransaction().
public PDO::rollBack(): bool
If the database was set to autocommit mode, this function will restore autocommit mode after it has rolled back the transaction.
Note that some databases, including MySQL, automatically issue an implicit COMMIT when a DDL statement such as DROP TABLE or CREATE TABLE is issued within a transaction, and hence it will prevent you from rolling back any other changes within the transaction boundary. This method returns true on success or false on failure.
Example
The following code creates a student table in the myDB database on a MySQL server.
<?php
$dsn="localhost";
$dbName="myDB";
$username="root";
$password="";
try{
$conn= new PDO("mysql:host=$dsn;dbname=$dbName",$username,$password);
Echo "Successfully connected with $dbName database";
$qry = <<<STRING
CREATE TABLE IF NOT EXISTS STUDENT (
student_id INT AUTO_INCREMENT,
name VARCHAR(255) NOT NULL,
marks INTEGER(3),
PRIMARY KEY (student_id)
);
STRING;
echo $qry . PHP_EOL;
$conn->exec($qry);
$conn->commit();
echo "Table created\n";
}
catch(Exception $e){
echo "Connection failed : " . $e->getMessage();
}
?>
Example
Use the following code to insert a new record in student table created in the above example −
<?php
$dsn="localhost";
$dbName="myDB";
$username="root";
$password="";
try {
$conn= new PDO("mysql:host=$dsn;dbname=$dbName",$username,$password);
echo "Successfully connected with $dbName database";
$sql = "INSERT INTO STUDENT values(1, 'Raju', 60)";
$conn->exec($sql);
$conn->commit();
echo "A record inserted\n";
} catch(Exception $e){
echo "Connection failed : " . $e->getMessage();
}
?>
Example
The following PHP script fetches all the records in the student table −
<?php
$dsn="localhost";
$dbName="myDB";
$username="root";
$password="";
try {
$conn= new PDO("mysql:host=$dsn;dbname=$dbName",$username,$password);
echo "Successfully connected with $dbName database";
$sql = "SELECT * from student";
$statement = $conn->query($sql);
$rows = $statement->fetchAll(PDO::FETCH_ASSOC);
foreach ($rows as $row) {
var_dump($row);
}
} catch(Exception $e){
echo "Connection failed : " . $e->getMessage();
}
?>
PHP - Function References
PHP is very rich in terms of Buil-in functions. Here is the list of various important function categories. There are various other function categories which are not covered here.
Select a category to see a list of all the functions related to that category.
