- OpenCV Python - Home
- OpenCV Python - Overview
- OpenCV Python - Environment
- OpenCV Python - Reading Image
- OpenCV Python - Write Image
- OpenCV Python - Using Matplotlib
- OpenCV Python - Image Properties
- OpenCV Python - Bitwise Operations
- OpenCV Python - Shapes and Text
- OpenCV Python - Mouse Events
- OpenCV Python - Add Trackbar
- OpenCV Python - Resize and Rotate
- OpenCV Python - Image Threshold
- OpenCV Python - Image Filtering
- OpenCV Python - Edge Detection
- OpenCV Python - Histogram
- OpenCV Python - Color Spaces
- OpenCV Python - Transformations
- OpenCV Python - Image Contours
- OpenCV Python - Template Matching
- OpenCV Python - Image Pyramids
- OpenCV Python - Image Addition
- OpenCV Python - Image Blending
- OpenCV Python - Fourier Transform
- OpenCV Python - Capture Videos
- OpenCV Python - Play Videos
- OpenCV Python - Images From Video
- OpenCV Python - Video from Images
- OpenCV Python - Face Detection
- OpenCV Python - Meanshift/Camshift
- OpenCV Python - Feature Detection
- OpenCV Python - Feature Matching
- OpenCV Python - Digit Recognition
- OpenCV Python Resources
- OpenCV Python - Quick Guide
- OpenCV Python - Resources
- OpenCV Python - Discussion
OpenCV Python - Meanshift and Camshift
In this chapter, let us learn about the meanshift and the camshift in the OpenCV-Python. First, let us understand what is meanshift.
Meanshift
The mean shift algorithm identifies places in the data set with a high concentration of data points, or clusters. The algorithm places a kernel at each data point and sums them together to make a Kernel Density Estimation (KDE).
The KDE will have places with a high and low data point density, respectfully. Meanshift is a very useful method to keep the track of a particular object inside a video.
Every instance of the video is checked in the form of pixel distribution in that frame. An initial window as region of interest (ROI) is generally a square or a circle. For this, the positions are specified by hardcoding and the area of maximum pixel distribution is identified.
The ROI window moves towards the region of maximum pixel distribution as the video runs. The direction of movement depends upon the difference between the center of our tracking window and the centroid of all the k-pixels inside that window.
In order to use Meanshift in OpenCV, first, find the histogram (of which, only Hue is considered) of our target and can back project its target on each frame for calculation of Meanshift. We also need to provide an initial location of the ROI window.
We repeatedly calculate the back projection of the histogram and calculate the Meanshift to get the new position of track window. Later on, we draw a rectangle using its dimensions on the frame.
Functions
The openCV functions used in the program are −
cv.calcBackProject() − Calculates the back projection of a histogram.
cv.meanShift() − Back projection of the object histogram using initial search window and Stop criteria for the iterative search algorithm.
Example
Here is the example program of Meanshift −
import numpy as np
import cv2 as cv

cap = cv.VideoCapture('traffic.mp4')

ret,frame = cap.read()

# dimensions of initial location of window
x, y, w, h = 300, 200, 100, 50
tracker = (x, y, w, h)

region = frame[y:y+h, x:x+w]
hsv_reg = cv.cvtColor(region, cv.COLOR_BGR2HSV)
mask = cv.inRange(hsv_reg, np.array((0., 60.,32.)), np.array((180.,255.,255.)))
reg_hist = cv.calcHist([hsv_reg],[0],mask,[180],[0,180])
cv.normalize(reg_hist,reg_hist,0,255,cv.NORM_MINMAX)

# Setup the termination criteria
criteria = ( cv.TERM_CRITERIA_EPS | cv.TERM_CRITERIA_COUNT, 10, 1 )

while(1):
   ret, frame = cap.read()

   if ret == True:
      hsv = cv.cvtColor(frame, cv.COLOR_BGR2HSV)
      dst = cv.calcBackProject([hsv],[0],reg_hist,[0,180],1)

      # apply meanshift
      ret, tracker = cv.meanShift(dst, tracker, criteria)

      # Draw it on image
      x,y,w,h = tracker
      img = cv.rectangle(frame, (x,y), (x+w,y+h), 255,2)
      cv.imshow('img',img)

      k = cv.waitKey(30) & 0xff
      if k==115:
         cv.imwrite('capture.png', img)
      if k == 27:
         break
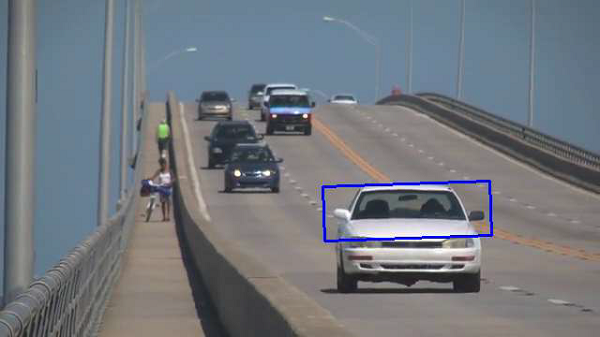
As the program is run, the Meanshift algorithm moves our window to the new location with maximum density.
Output
Heres a snapshot of moving window −
Camshift
One of the disadvantages of Meanshift algorithm is that the size of the tracking window remains the same irrespective of the object's distance from the camera. Also, the window will track the object only if it is in the region of that object. So, we must do manual hardcoding of the window and it should be done carefully.
The solution to these problems is given by CAMshift (stands for Continuously Adaptive Meanshift). Once meanshift converges, the Camshift algorithm updates the size of the window such that the tracking window may change in size or even rotate to better correlate to the movements of the tracked object.
In the following code, instead of meanshift() function, the camshift() function is used.
First, it finds an object center using meanShift and then adjusts the window size and finds the optimal rotation. The function returns the object position, size, and orientation. The position is drawn on the frame by using polylines() draw function.
Example
Instead of Meanshift() function in earlier program, use CamShift() function as below −
# apply camshift
ret, tracker = cv.CamShift(dst, tracker, criteria)
pts = cv.boxPoints(ret)
pts = np.int0(pts)
img = cv.polylines(frame,[pts],True, 255,2)
cv.imshow('img',img)
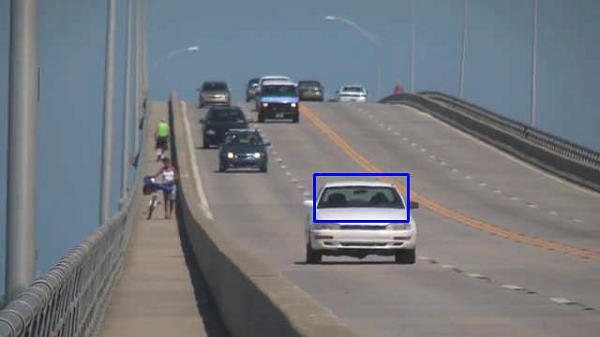
Output
One snapshot of the result of modified program showing rotated rectangle of the tracking window is as follows −