- OpenCV Python - Home
- OpenCV Python - Overview
- OpenCV Python - Environment
- OpenCV Python - Reading Image
- OpenCV Python - Write Image
- OpenCV Python - Using Matplotlib
- OpenCV Python - Image Properties
- OpenCV Python - Bitwise Operations
- OpenCV Python - Shapes and Text
- OpenCV Python - Mouse Events
- OpenCV Python - Add Trackbar
- OpenCV Python - Resize and Rotate
- OpenCV Python - Image Threshold
- OpenCV Python - Image Filtering
- OpenCV Python - Edge Detection
- OpenCV Python - Histogram
- OpenCV Python - Color Spaces
- OpenCV Python - Transformations
- OpenCV Python - Image Contours
- OpenCV Python - Template Matching
- OpenCV Python - Image Pyramids
- OpenCV Python - Image Addition
- OpenCV Python - Image Blending
- OpenCV Python - Fourier Transform
- OpenCV Python - Capture Videos
- OpenCV Python - Play Videos
- OpenCV Python - Images From Video
- OpenCV Python - Video from Images
- OpenCV Python - Face Detection
- OpenCV Python - Meanshift/Camshift
- OpenCV Python - Feature Detection
- OpenCV Python - Feature Matching
- OpenCV Python - Digit Recognition
- OpenCV Python Resources
- OpenCV Python - Quick Guide
- OpenCV Python - Resources
- OpenCV Python - Discussion
OpenCV Python - Image Properties
OpenCV reads the image data in a NumPy array. The shape() method of this ndarray object reveals image properties such as dimensions and channels.
The command to use the shape() method is as follows −
>>> img = cv.imread("OpenCV_Logo.png", 1)
>>> img.shape
(222, 180, 3)
In the above command −
- The first two items shape[0] and shape[1] represent width and height of the image.
- Shape[2] stands for a number of channels.
- 3 indicates that the image has Red Green Blue (RGB) channels.
Similarly, the size property returns the size of the image. The command for the size of an image is as follows −
>>> img.size
119880
Each element in the ndarray represents one image pixel.
We can access and manipulate any pixels value, with the help of the command mentioned below.
>>> p=img[50,50]
>>> p
array([ 1, 1, 255], dtype=uint8)
Example
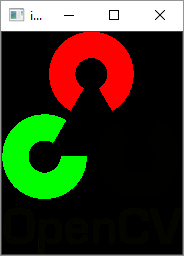
Following code changes the color value of the first 100X100 pixels to black. The imshow() function can verify the result.
>>> for i in range(100):
   for j in range(100):
      img[i,j]=[0,0,0]
Output
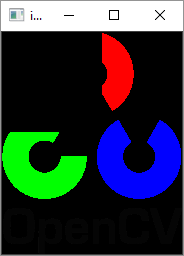
The image channels can be split in individual planes by using the split() function. The channels can be merged by using merge() function.
The split() function returns a multi-channel array.
We can use the following command to split the image channels −
>>> img = cv.imread("OpenCV_Logo.png", 1)
>>> b,g,r = cv.split(img)
You can now perform manipulation on each plane.
Suppose we set all pixels in blue channel to 0, the code will be as follows −
>>> img[:, :, 0]=0
>>> cv.imshow("image", img)
The resultant image will be shown as below −