- OpenCV Python - Home
- OpenCV Python - Overview
- OpenCV Python - Environment
- OpenCV Python - Reading Image
- OpenCV Python - Write Image
- OpenCV Python - Using Matplotlib
- OpenCV Python - Image Properties
- OpenCV Python - Bitwise Operations
- OpenCV Python - Shapes and Text
- OpenCV Python - Mouse Events
- OpenCV Python - Add Trackbar
- OpenCV Python - Resize and Rotate
- OpenCV Python - Image Threshold
- OpenCV Python - Image Filtering
- OpenCV Python - Edge Detection
- OpenCV Python - Histogram
- OpenCV Python - Color Spaces
- OpenCV Python - Transformations
- OpenCV Python - Image Contours
- OpenCV Python - Template Matching
- OpenCV Python - Image Pyramids
- OpenCV Python - Image Addition
- OpenCV Python - Image Blending
- OpenCV Python - Fourier Transform
- OpenCV Python - Capture Videos
- OpenCV Python - Play Videos
- OpenCV Python - Images From Video
- OpenCV Python - Video from Images
- OpenCV Python - Face Detection
- OpenCV Python - Meanshift/Camshift
- OpenCV Python - Feature Detection
- OpenCV Python - Feature Matching
- OpenCV Python - Digit Recognition
- OpenCV Python Resources
- OpenCV Python - Quick Guide
- OpenCV Python - Resources
- OpenCV Python - Discussion
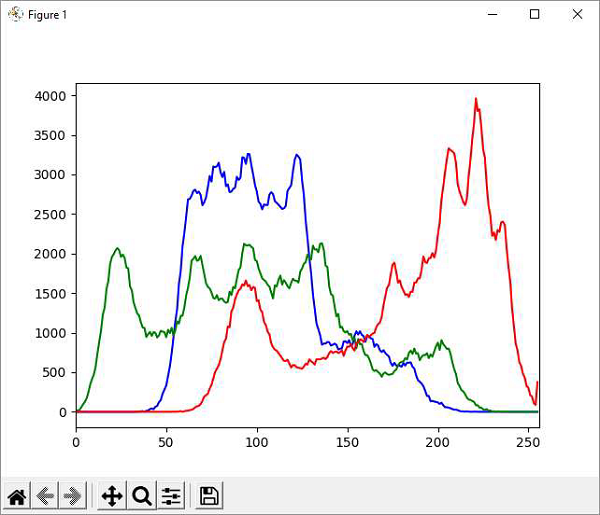
OpenCV Python - Histogram
Histogram shows the intensity distribution in an image. It plots the pixel values (0 to 255) on X axis and number of pixels on Y axis.
By using histogram, one can understand the contrast, brightness and intensity distribution of the specified image. The bins in a histogram represent incremental parts of the values on X axis.
In our case, it is the pixel value and the default bin size is one.
In OpenCV library, the function cv2.calcHist() function which computes the histogram from the input image. The command for the function is as follows −
cv.calcHist(images, channels, mask, histSize, ranges)
Parameters
The cv2.calcHist() functions parameters are as follows −
images − It is the source image of type uint8 or float32, in square brackets, i.e., "[img]".
channels − It is the index of the channel for which we calculate histogram. For a grayscale image, its value is [0]. For BGR images, you can pass [0], [1] or [2] to calculate the histogram of each channel.
mask − Mask image is given as "None" for full image. For a particular region of image, you have to create a mask image for that and give it as a mask.
histSize − This represents our BIN count.
ranges − Normally, it is [0,256].
Histogram using Matplotlib
A histogram plot can be obtained either with the help of Matplotlibs pyplot.plot() function or by calling Polylines() function from OpenCV library.
Example
Following program computes histogram for each channel in the image (lena.jpg) and plots the intensity distribution for each channel −
import numpy as np
import cv2 as cv
from matplotlib import pyplot as plt
img = cv.imread('lena.jpg')
color = ('b','g','r')
for i,col in enumerate(color):
   hist = cv.calcHist([img],[i],None,[256],[0,256])
   plt.plot(hist, color = col)
   plt.xlim([0,256])
plt.show()
Output