 Data Structure
 Networking
 RDBMS
RDBMS Operating System
 Java
Java MS Excel
 iOS
iOS HTML
HTML CSS
CSS Android
 Python
 C Programming
 C++
C++ C#
C# MongoDB
 MySQL
MySQL Javascript
 PHP
PHP
- Selected Reading
- UPSC IAS Exams Notes
- Developer's Best Practices
- Questions and Answers
- Effective Resume Writing
- HR Interview Questions
- Computer Glossary
- Who is Who
Interrupts in Arduino
What are interrupts?
As the name suggests, interrupts are routines that interrupt the normal code flow. An interrupt routine contains a piece of code that the microcontroller on your board should execute whenever an event occurs. Take the air-conditioner example. Suppose it has the following temperature control settings: Switch off cooling whenever temperature reaches 18 degrees C. Now, there will be a temperature sensor that keeps measuring the temperature. Whenever it reports a temperature of 18 degrees Celsius, the normal code running on the AC microcontroller is interrupted, it executes the code to turn off cooling, and then the normal code resumes.
When do interrupts get triggered?
There are various ways of triggering interrupts. You can have an interrupt triggered when a button is pressed (basically when there is change in state of a pin from HIGH to LOW or LOW to HIGH). You can have timer-based interrupts, which get triggered at regular intervals, you can have an interrupt when data is received via UART, or SPI, or Wire, and so on. The available list of interrupts can be found here: http://gammon.com.au/interrupts
Defining the Interrupt Service Routine
The code that gets executed whenever an interrupt even occurs, is stored inside a special kind of function called as the Interrupt Service Routine. They have the following limitations −
- They should not take in any parameters/ arguments
- They cannot return anything
If there are multiple interrupts in your code, each having its own Interrupt Service Routine (ISR), then only one ISR can run at a time. Also, note the following (sourced from Arduino documentation) −
- millis() will not increment inside an ISR, since it relies on interrupts for incrementing itself. Since two ISRs cannot run simultaneously, millis cannot increment within an ISR
- Similarly, delay() will not work within an interrupt because it requires interrupts to work
- delayMicroseconds() doesn't require interrupts to work, so it will work normally within an interrupt
- micros() works in the beginning, but the behaviour is unpredictable after 1-2 ms
Changing variables within an ISR
If you wish to change the value of a variable within an ISR, you need to declare the variable as volatile.
Thus,
int p1 = 1;
becomes
volatile int p1 = 1;
Example Implementation
We will consider button interrupts. More specifically, interrupts that are triggered when a rising or falling edge is detected on one of the pins. Now, not all pins of your board can be used for interrupting the code. Each board has some specific pins reserved for external interrupts. The list can be found here: https://www.arduino.cc/reference/en/language/functions/external-interrupts/attachinterrupt/
As you can see from the above link, pins 2 and 3 can be used for external interrupts on Arduino Uno.
Now, interrupts are supposed to be executed very fast. Therefore, all we will do inside the interrupt is set a flag. And in the loop, we will print a statement whenever the flag is set, and then set the flag back to 0.
The main function of importance is attachInterrupt().
The syntax is −
Syntax
attachInterrupt(digitalPinToInterrupt(pin), ISR, mode)
Here, pin is the pin number, ISR is the name of the ISR function, and the mode can be one of the following −
- RISING: Whenever a low to high transition is seen on the pin
- FALLING: Whenever a high to low transition is seen on the pin
- LOW: Whenever the pin is at low voltage
- CHANGE: Whenever the pin sees a change in voltage (high to low or low to high)
On some board (Due, MKR1000 and Zero), you can also have the HIGH mode: Whenever the pin is at high voltage.
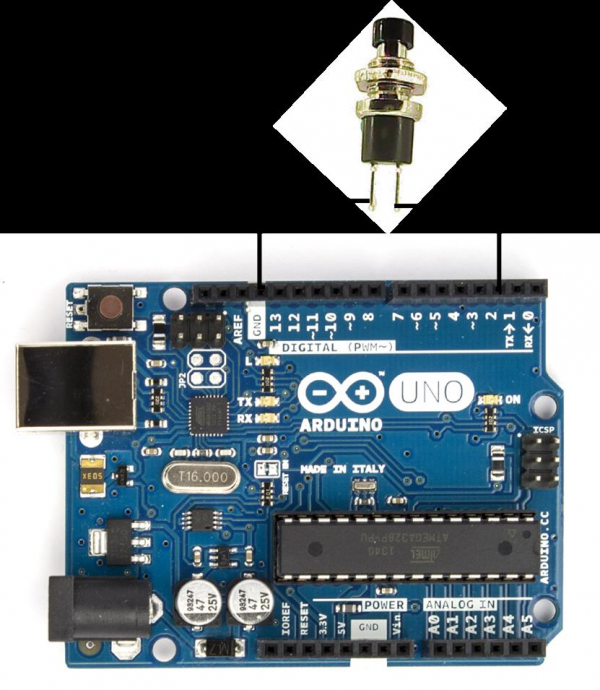
The circuit diagram and the example code is given below.
Circuit Diagram
As you can see from the circuit diagram below, whenever the button switch is pressed, pin 2 gets connected to GND, and a falling edge (HIGH to LOW) would be observed on that pin, because it is pulled up normally (mode INPUT_PULLUP). This falling edge will generate the interrupt.

Example
const int interruptPin = 2;
volatile bool isButtonPressed = false;
void setup() {
   Serial.begin(9600);
   pinMode(interruptPin, INPUT_PULLUP);
   attachInterrupt(digitalPinToInterrupt(interruptPin), button_pressed, FALLING);
}
void loop() {
   if(isButtonPressed){
      Serial.println("Button Pressed!");
      isButtonPressed = false;
   }
}
void button_pressed() {
   isButtonPressed = true;
}
