- Intellij Idea - Home
- Intellij Idea - Introduction
- Installation and Configuration
- Intellij Idea − Getting Familiar
- Create First Java Project
- Intellij Idea − Deep Dive
- Intellij Idea − Deep Dive into Editor
- Intellij Idea − Code Refactoring
- Intellij Idea − Running Projects
- Intellij Idea − Build Tools
- Intellij Idea − Unit Testing
- Intellij Idea − Debugging
- Intellij Idea − Profiling
- Intellij Idea − Version Control
- Intellij Idea − Databases
- Migrating from NetBeans
- Intellij Idea − Migrating from Eclipse
Intellij Idea - Quick Guide
Intellij Idea - Introduction
IntelliJ is one of the most powerful and popular Integrated Development Environments (IDE) for Java. It is developed and maintained by JetBrains and available as community and ultimate edition. This feature rich IDE enables rapid development and helps in improving code quality.
What is IDE and its benefits?
IDE stands for Integrated Development Environment. It is a combination of multiple tools, which make software development process easier, robust and less error-prone. It has following benefits over plain text editor −
Integration with useful tools like compiler, debugger, version control system, build tools, various frameworks, application profilers and so on.
Supports code navigation, code completion, code refactoring and code generation features which boosts development process.
Supports unit testing, integration testing and code coverage via plug-ins.
Provides rich set of plug-ins to enhance IDE functionality further.
Features of IntelliJ
IntelliJ IDEA has some top productive Java code completion features. Its predictive algorithm can accurately assume what a coder is attempting to type, and completes it for him, even if he doesnt know the exact name of a particular class, member or any other resource.
Deep Insight
IntelliJ IDEA really understands and has a deep insight into your code, as well as the context of the coder, which makes it so unique among other Java IDEs.
Smart code completion − It supports context based code completion. It gives a list of the most relevant symbols applicable in the current context.
Chain code completion − It is an advanced code completion feature which lists applicable symbols accessible via methods or getters in the current context.
Static member's completion − It allows you to use static methods or constants and automatically adds the required import statements to avoid compilation error.
Detecting duplicates − It finds the duplicate code fragments on the fly and gives notification/suggestion about it to user.
Inspections and quick-fixes − Whenever IntelliJ detects that you're about to make a mistake, a little light bulb notification pops up on same line. Clicking it shows the suggestion list.
Developer Ergonomics
IntelliJ IDEA is designed around the coding principle that developers should be allowed to write codes with as less distraction as possible. That is why in this case, the editor is the only thing visible on the screen, with dedicated shortcuts for all other coding-unrelated functions.
Editor-centric environment − Quick pop-ups help in checking additional information without leaving the current context.
Shortcuts for everything − IntelliJ IDEA has keyboard shortcuts for nearly everything, including rapid selection and switching between tool windows and many more.
Inline debugger − Inline debugger allows you to debug application in IDE itself. It makes the development and debugging process seamless.
Built-in Developer Tools
To help the developers organize their workflow, IntelliJ IDEA offers them an amazing toolset, which comprises of a decompiler, Docker support, bytecode viewer, FTP and many other tools −
Version control − IntelliJ supports most of the popular version control system like Git, Subversion, Mercurial, CVS, Perforce, and TFS.
Build tools − IntelliJ supports Java and other build tools like Maven, Gradle, Ant, Gant, SBT, NPM, Webpack, Grunt, and Gulp.
Test runner and code coverage − IntelliJ IDEA lets you perform unit testing with ease. The IDE includes test runners and coverage tools for major test frameworks, including JUnit, TestNG, Spock, Cucumber, ScalaTest, spec2, and Karma.
Decompiler − IntelliJ comes with a built-in decompiler for Java classes. When you want to take a look inside a library that you do not have the source code for, you can do it without using any third-party plug-ins.
Terminal − IntelliJ provides built-in terminal. Depending on your platform, you can work with the command line prompt, like PowerShell or Bash.
Database tools − IntelliJ provides database tools, which allow you to connect to live databases; run queries; browse and update data; and even manage your schemas in a visual interface from IDE itself.
Application server − IntelliJ supports major application servers: Tomcat, JBoss, WebSphere, WebLogic, Glassfish, and many others. You can deploy your artifacts onto application servers and debug the deployed applications in IDE itself.
Docker support − Via a separate plug-in, IntelliJ provides a dedicated tool window that lets you connect to locally running Docker machines.
Comparison between Ultimate and Community Edition
The Ultimate Edition is designed to assist in web and enterprise development, whereas the Community Edition is designed for JVM and Android Development. Let us consider a few important points that will help us understand the comparison between the two editions −
| Feature | Ultimate Edition | Community Edition |
|---|---|---|
| License | Commercial | Open-source, Apache 2.0. for commercial development. |
| Java, Kotlin, Groovy, Scala | Supported | Supported |
| Android development | Supported | Supported |
| Maven, Gradle, SBT | Supported | Supported |
| Git, SVN, Mercurial, CVS | Supported | Supported |
| Detecting Duplicates | Supported | Not supported |
| Perforce, TFS | Supported | Not supported |
| JavaScript, TypeScript | Supported | Not supported |
| Java EE, Spring, GWT, Vaadin, Play, Grails, Other Frameworks | Supported | Not supported |
| Database Tools, SQL | Supported | Not supported |
Intellij Idea - Installation and Configuration
In this chapter, we will understand how to install and configure IntelliJ IDEA. The first step of the process starts with choosing the edition. As per your requirements, you can download community or ultimate edition. As name suggests, community edition is absolutely free and we can use it for commercial development as well. However, ultimate edition is paid version and we can evaluate it freely for 30 days.
Installation on Windows
IntelliJ is compatible with almost all versions of Windows prior to 2003. A comprehensive list will be: Windows 10/8/7/Vista/2003/XP. It is recommended that you shut down all other applications before you install IntelliJ on Windows.
System Requirements
A minimum 2 GB of RAM capacity is recommended for seamless performance.
For better visualization, 1024x768 screen resolution is recommended.
Minimum 300 MB disk space for installation and additional 1 GB for cache.
Downloading and Installation
Downloading − You can download windows installer from their official website.
Installation − Let us begin with the installation followed by the configuration steps. Installation of IntelliJ is similar to other software packages. Just double-click on the installer and follow the on-screen instructions to complete the installation process.
Installation on Linux
For installation of IntelliJ on Linux platforms, you need to note that a 32-bit JDK is not bundled, so a 64-bit system is recommended.
System Requirements
GNOME, KDE or XFCE desktop environment
Minimum 2 GB of RAM is recommended for seamless usage
300 MB of disk space for installation and addition 1 GB for caches
For better visualization, 1024x768 screen resolution is recommended
Downloading and Installation
Downloading − You can download IntelliJ for Linux from their official website.
Installation − We have downloaded tar.gz bundle. Note that in our case bundles name was ideaIC-2017.2.5.tar.gz. It may change with the edition/version. Please use the appropriate bundle name.
First extract it using following command:
$ tar xvf ideaIC-2017.2.5.tar.gz
It will create new directory with idea-IC-172.4343.14 name.
Now change directory to idea-IC-172.4343.14/bin/ and execute idea.sh shell script as shown below:
$ cd idea-IC-172.4343.14/bin/
$ ./idea.sh
Follow on-screen instructions to complete installation procedure.
Configure IntelliJ
The configuration steps are similar on both platforms. To begin configuration, launch IntelliJ application. Optionally, you can import the existing configuration from this wizard. Click on the next button to continue.
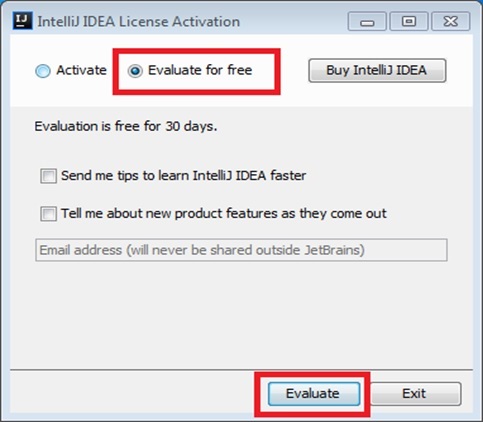
Step1 − If you are using the ultimate edition, then a license activation window will pop-up. Select evaluate for free option and click on the evaluate button as shown in the following image.
Step 2 − Accept the license agreement to proceed and follow on-screen instruction to start IntelliJ. You will see the Welcome screen of IntelliJ.
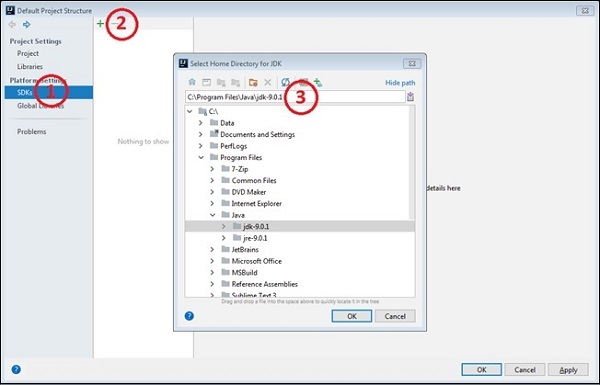
Step 3 − Now, it is time to configure the Java Development Kit (hereafter, we will refer to it as JDK) with IntelliJ. If JDK is not installed already then follow the instruction as in here.
On the Welcome screen, click on configure
Select project defaults from the drop-down list
Select the project structure option

Select the SDKs option from the platform settings menu.
Click on the plus icon and select the JDK option.
Select JDKs home directory and follow the on-screen instructions.
Intellij Idea - Getting Familiar
In this chapter, we will get more familiar with IntelliJ IDEA. To discuss the advantages and functionality of any tool, one must be familiar with that tool and IntelliJ is no exception to that.
This chapter gives you an overview of IntelliJ. The chapter begins with a discussion about IDEs visual elements, configuration settings and finally ends by discussing JVM and platform properties.
Visual Elements
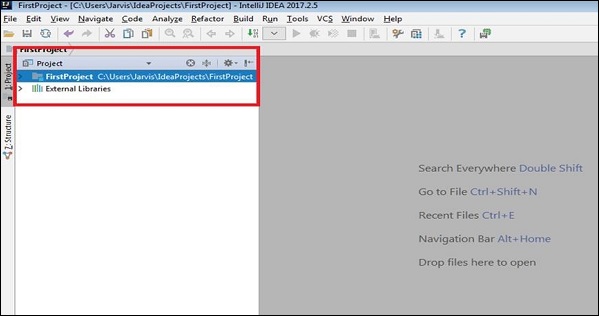
One of the important things about IDE is its visual elements. Identifying and understanding the visual elements enables to you do action in a quicker and easier manner. The following screenshot and the labels on it show the main interface of IntelliJ.
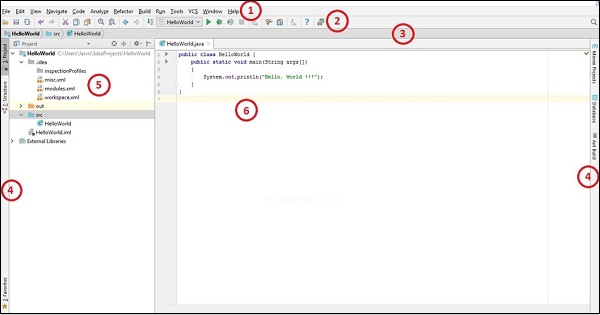
Menu bar − The Menu bar provides options to create new projects and other important actions related to projects like code refactoring, builds, run, debug, version-controlling options and so on.
Tool bar − The Tool bar provides shortcuts to compile, debug and run options. You can customize it according to your requirements.
Navigation bar − The Navigation bar enables easier navigation within a project. This feature comes handy as code base increases.
Tools tab − The Tools tab shows on either side of the main window. From here, you can access important tools like databases; Maven/Ant builds and so on.
Project perspective − Project perspective window shows various elements of projects like packages, modules, classes, external libraries and so on.
Editor window − This is a place where developer spends most of his/her time. Editor window allows you edit/write code with syntax highlighting and other useful features.
At the bottom of the main window, there is a status bar, which shows some additional attributes about the file - like its format and the encoding type. It also provides option to toggle the read-only attribute of the current file. You can also manage inspection level from here.
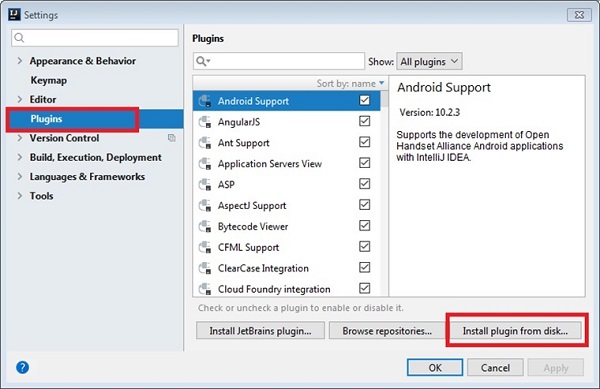
Working with Plug-ins
Plug-ins help to extend functionality of IntelliJ. It provides a large number of plug-ins ranging from databases, version controlling, profiling and this list goes on.
Steps to manage plug-ins
Follow these steps to manage plug-ins −
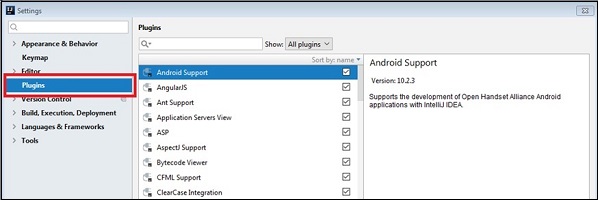
Go to the File → Settings menu.
Select the Plugins tab on the left pane.
This window lists all installed plug-ins. There is a checkbox on the right side of each plug-in name. Toggling that checkbox enables/disables the plug-ins.
IntelliJ online plug-in repository is available here. To add/remove plug-in repository, click on the browse repository button and it will provide a way to do needful.
In addition to this, it allows offline plug-in installation. For this, download plug-in and select install plug-in from the disk button and navigate to the download path.
To perform other actions on plug-ins like uninstalling, updating and sorting, right-click on any plug-in. It will show a dropdown menu from which you can select one of the actions.
Working with Settings
This section provides a few important tips to manage settings. It enables you to import, export and share IntelliJ settings.
Export Settings
It allows exporting the current settings as a jar file.
Go to File → Export Settings.
Export setting windows list the available settings related to UI, debugger, SDK along with others.
It provides a checkbox for selection. Once the selection is done, click on the OK button to save the settings on the local disk.
Import Settings
It allows importing the settings stored in the jar file.
- Go to File → Import settings.
- Select the Setting jar by navigating folder structure
- Click on the OK button.
Sharing Settings
IntelliJ IDEA allows you to share your IDE settings between different instances. This is particularly useful when you want to apply the same settings within a team or organization. The prerequisite for this is to enable the Settings Repository plug-in. It is installed and enabled by default.
To ensure its status −
- Go to File → Settings → Plugins
- Search settings repository plug-in
We can store the current setting on GitHub/Bitbucket and apply them on other instances. To store the current setting −
Go to the File → Settings Repository.
Type the Git repository URL in upstream URL dialog box.
Click on the Overwrite remote button.
To apply the same settings to other instances, click on the Overwrite local button.
Configuring JVM Options and Platform Properties
We can configure the JVM options by navigating to the Help → Edit Custom VM Options menu. Following are a few important JVM options we can set.
server − It allows the selection of the Java HotSpot Server VM
-Xms<size> − It sets the initial Java heap size. The default value is 128 MB.
-Xmx<size> − It sets the maximum Java heap size. The default value is 750 MB.
-Xss<size> − It sets the Java thread stack size.
XX − It allows setting GC algorithm and other properties.
Intellij Idea - Create First Java Project
It is time we got a hands-on experience with IntelliJ. In this chapter, we will create our first Java Project. We will write and execute the traditional Hello World program. This chapter explains the compilation and running of Java application.
Create Project
For anything related to development, a developer has to create a new project with IntelliJ. Let us follow these steps to create a project −
Launch IntelliJ.
Go to File → New → Project menu.
Select the Java project and appropriate SDK and click on the Next button.

If you want to create a Java class with the main method, then select Create Project from the template checkbox.
Select the command line app from the dialog box shown below and continue.
Enter the project name and the directory location.
Click on the Finish button.
Create Package
A package is created under Java project and can be created separately, or at the same time of creating a class. Let us follow these steps to create a package −
Go to the project perspective.
Right-click on Project, select the New->Module option.
The new module window will be similar to the new project. Select the Java option and appropriate SDK and click on the Next button.
Enter the module name.
Click on the Finish button.
Create Java Class
In this section, we will learn how to create a Java class. A Java class can be created under a Java module. Follow these steps to create a module −
Go to the Project perspective.
Expand Project and select the src directory from the module.
Right click on it; select the New->Java Class option.
Enter the class name in the dialog-box and click on the OK button.
It will open the Editor window with the class declaration.
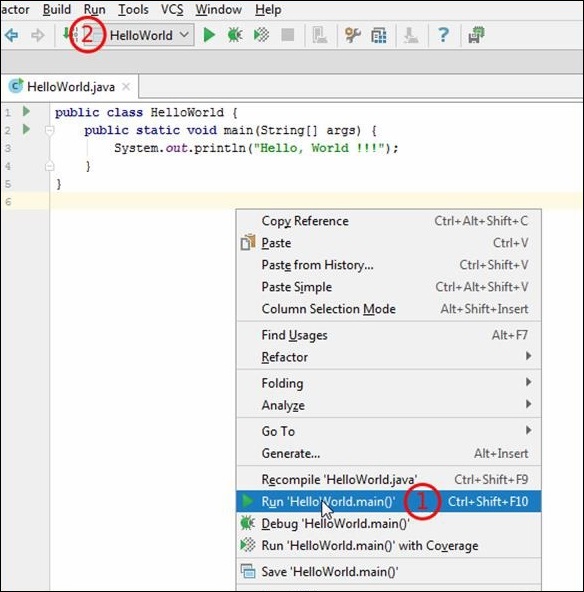
Run Java Application
We will now see how to run a Java application. Follow these steps and see how it runs −
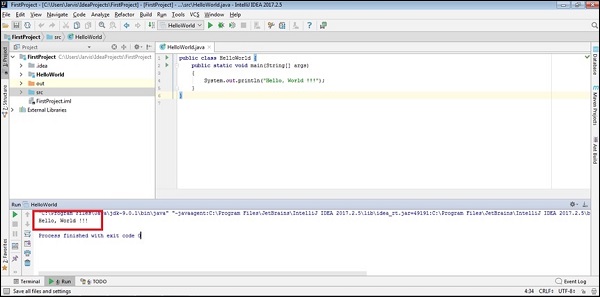
Let us write a simple code, which will print a message on the console. Enter the following code in the Editor window −
public class HelloWorld {
   public static void main(String[] args) {
      System.out.println("Hello, World !!!");
   }
}
Go to the Run menu and select the Run option.
Select the Class name and click on Run.
If there are no compilation errors, then it will show output at the bottom of the window.
Intellij Idea - Deep Dive
The first four chapters of this tutorial were designed to give beginners a basic-level overview of IntelliJ. This section dives deep into IntelliJ and discusses more about projects, its format along with other things.
Understanding Projects
A project is an application or software on which you are working. It can contain multiple modules, classes, libraries, configuration, and so on. It is the topmost element in the hierarchy.
Understanding Modules
Modules feature one rung below Project. A module is a separate entity that can be compiled, debugged and run independently of other modules. A single project can contain multiple modules. You may add or remove modules from a project any time.
In addition to this, we can also import the existing modules. Follow these steps to import the existing modules −
- Go to File → Project structure.
- Select modules and click on plus icon.
- It will show the option to import module.

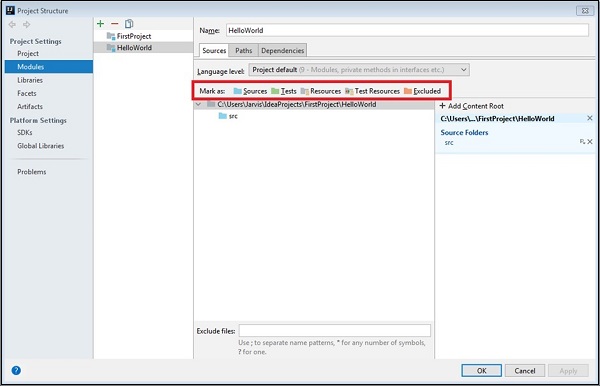
Understanding Folders
Content root is a folder that contains all the files that make up your module. A module can have more than one content folder. Folders are categorized into the following types −
Sources − By assigning this category to folder, we instruct IntelliJ that this and its subfolder contain java source code and it should be compiled as part of the compilation process.
Tests − By assigning this category to folder, we instruct IntelliJ that it is the location for unit tests. This folder can access classes from the Sources folder.
Resources − It represents various resource files used in project, for instance, images, XML and properties files. During the compilation process, contents of this folder is copied as is to the output folder.
Excluded − Contents from the excluded folder will not be indexed by IntelliJ. This means that IntelliJ will not provide the code completion suggestion and other hints. For example, the output directory and the target directory are excluded by default.
Test resources − This is similar to the resources and used for unit tests.
Understanding Libraries
Library is a compilation of different classes. Library enables code reusability. In Java, library can be enclosed in ZIP, Jar or simply folder. We can define libraries at three different levels. The levels are - global, project and module level.
Global level − Shared by all projects.
Project level − Shared by all the modules of project.
Module level − Shared by the classes of those modules.
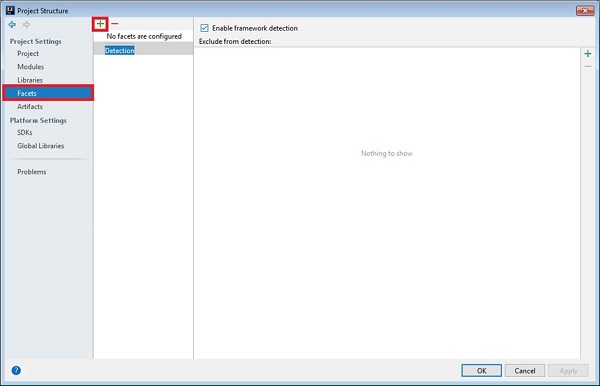
Understanding Facets
Facets are the extensions to the modules. They add support to the frameworks and technologies. When a facet is added to a module, IntelliJ identifies it adds support. For instance, hints and help in editor, new tools in window bar, dependency downloading and so on. You can add facets from the File → Project Structure window as shown below −
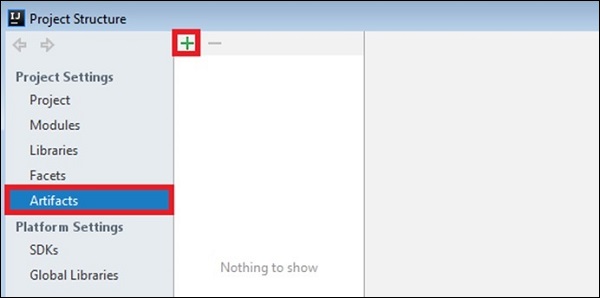
Artifacts
Artifacts are the output of a project. It can be a simple JAR file, Java EE application, or Java EJB application. If we are using external build tools like Gradle or Maven, then IntelliJ will add artifact for them automatically. Artifacts can be created by navigating to the File → Project Structure as shown below −
Importing Existing Project
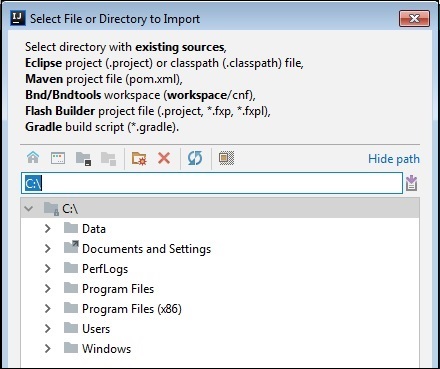
In this section, we will understand how to import an existing project. We can import a project in two ways −
- Import it from existing source
- Import it from the build model.
At present, it supports Gradle and Maven build tools. To import project −
- Navigating to File → New → Project from the existing source.
- Select directory of the existing project, Mavens pom.xml or Gradles build script.
- Click on the OK button.
Project Formats
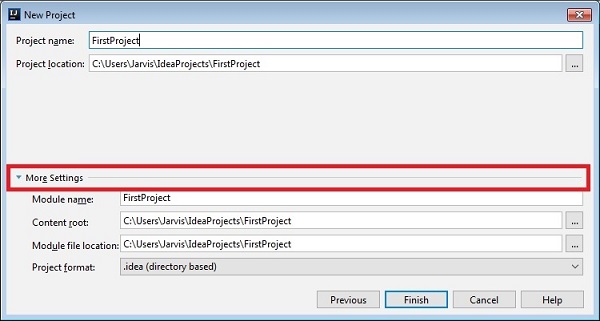
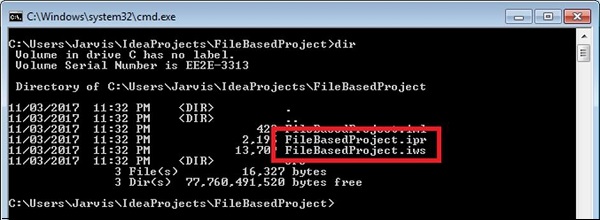
IntelliJ supports two types of project format one is directory-based and other is file-based. Directory based format is newer one it is recommended. By default, IntelliJ creates directory based project format. You can select project format while creating new project. On new project window just click on more settings as show in below image −
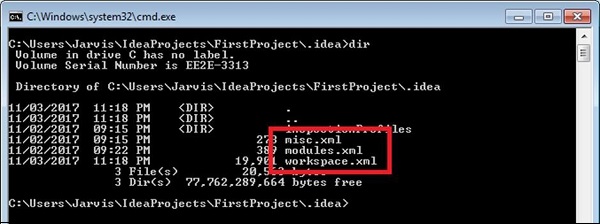
Directory-based Project Format
This format helps create an idea folder in your project and keep all configuration files inside that folder. Settings are grouped into the xml files. For instance, it will create misc.xml, modules.xml, workspace.xml and so on. The following screenshot will help you understand how this works −
File-based Project Format
It will create two project files with ..ipr and wpr extensions. The ipr file will contain project-specific settings and the wpr file will contain workspace-specific settings.
To convert a file-based project to a directory-based project, go to the File → Save as a Directory-Based format.
Directory-based vs File-based Project Format
Compared to the file-based project format, the directory-based project format stores settings in a separate folder with meaningful names. Other differences are −
Related settings getting stored in a single file makes it easier to manage in directory-based project format.
If folder contains the idea subfolder then IntelliJ recognizes that project. Because of this, you dont have select the ipr project explicitly.
Directory-based project format breaks settings into multiple files hence it is easier to select particular type of setting to store in version control system.
Intellij Idea - Deep Dive into Editor
Editor is that area where a developer spends most of his/her time. Mastering the editor is the first step at improving the productivity of any resource. This chapter discusses visual elements of editor, the most common editor actions and SonarLint plug-in, which provides lint checking.
Visual Elements of Editor
IntelliJ has many provisions that include visual elements designed to assist developers in navigating through and understanding the real status of their coding.
Let us now go through the different provision −
Gutter Area
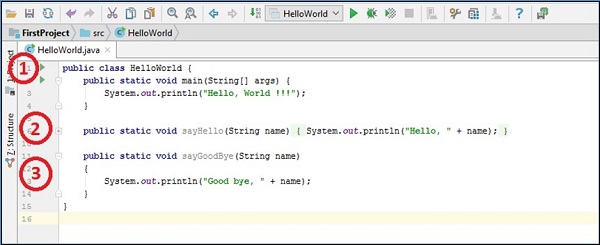
Editors gutter area is located on the left side of IDE as shown in the following image −
Labels
We will now understand how the labels work. The above screenshot is marked in numbers. We will now see what the numbers have to show −
Here we can see line numbers along with other useful options. If you observe carefully just before class name and main method there is a small green triangle. It provides option to run, debug and run application with coverage. Just click on the triangle icon and it will provide options.
You can see the small plus symbol at line number 6. This is the code folding functionality. If you click on that icon, then it will unfold it. Code folding can be done at class, method, loop and other block levels.
At line numbers 11 and 14, there are 2 arrows which point towards each other. The marker represents the methods start and end position. If you click on any arrow, then it will perform the fold action on that code block. The Gutter area will show various symbols when certain actions are taken; for instance, it will show symbols for breakpoints, Java annotations.
Status Bar
At the bottom of the Editor window, there is a status bar, which shows information about the current file and the project status.
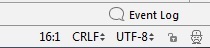

In the first image, 16:1 represents the current line number and the column number respectively.
Next is the line separator, for UNIX and mac OS its \n and for windows its \r.
UTF-8 represents the file encoding.
Next is the lock icon. We can toggle files read-only attribute by clicking on it.
At the end, there is a symbol with a mans face. It allows managing the code inspection level.
When we type code in Editor, IntelliJ inspects code on the fly and shows hints/suggestion. We can decide the inspection level from here. For instance, we can completely disable it or allow inspection only for syntax and so on.
We can also enable the Power Save mode from here, which will disable background code analysis and other background jobs.
The Status bar also shows information about project actions. For instance, second image show information about project compilation.
Scratches
IntelliJ provides a temporary Editor. You can create text or piece of code without modifying the current project structure. It provides two types of temporary files −
Scratch files
They are functional, run-able and debug-able. To create a scratch file −
Go to File → New → Scratch file.
Select the language of your choice.
It will create a file in the IntelliJ-Installation-Directory\ config \scratches folder.
Scratch buffers
This is used only for creating any text. To create a scratch buffer −
Press Ctrl + Shift + A or click on Search Everywhere icon
It will pop up dialog box.
Enter new scratch buffer text in that box and press enter.
Itll open scratch buffer in editor window.
Like the scratch files, scratch buffers are also stored in the IntelliJ-Installation-Directory\config\scratches folder.
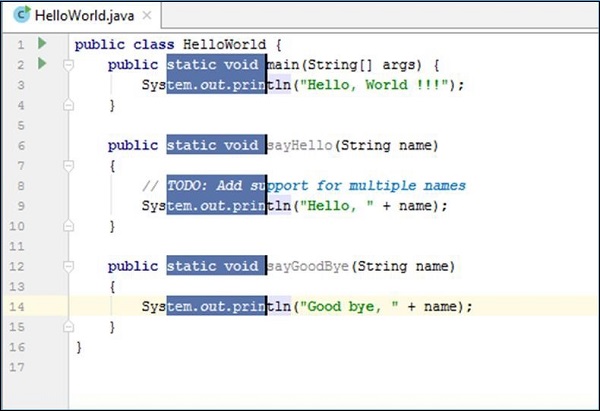
Scrollbar
Scrollbar highlights warnings/error messages/TODO markers from the code. For instance, the sayHello() and sayGoodBye() method is never used; hence, the scrollbar shows yellow marker for them.
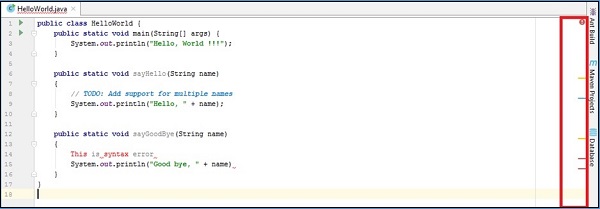
At line number 8, there is the TODO comment, scrollbar highlights it using the blue marker. Errors are highlighted using red marker.
Editor Actions
In this section, we will discuss the Editor actions in IntelliJ.
Search and Replace
To search text in the current file −
Navigate to the file in the Editor window and press Ctrl+F.
It will show text box, type text to be searched there.
You can provide various options here - case sensitive match, exact match, regular expression and so on.

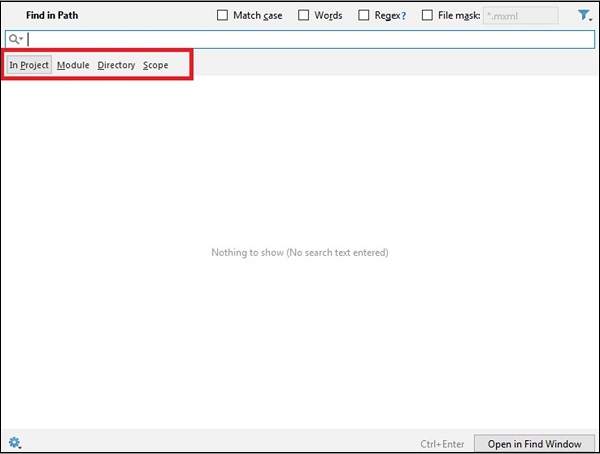
You can perform the search operation at a very granular level. For instance, search can be done at project, module or directory level −
Press the Ctrl+Shift+F key combination.
A new window will appear; from here, you can select the appropriate level.
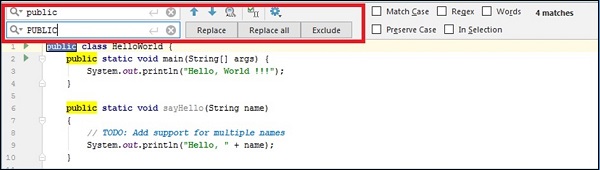
To perform a replace action in the current file −
Press the Ctrl+R key combination.
A dialog box will appear, enter the text to be replaced here.
This operation allows you to replace single match, all matches or skip current match.
To perform the replace action at a granular level −
Press the Shift+Ctrl+R key combination.
It will allow you replace text at project, module, directory and other scopes.
Column Selection Mode
To enable the column mode selection, hold the Alt key while selecting the text. To enable the column selection mode on a permanent basis, select Edit → Column selection mode.
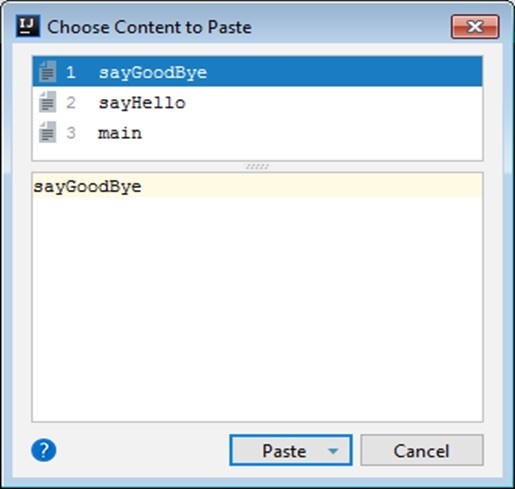
Clipboard History
When we copy any text, it goes to the clipboard history. IntelliJ maintains the clipboard history. To view this history, pressthe Ctrl+Shift+V key combination. You can select the content to paste from this window.
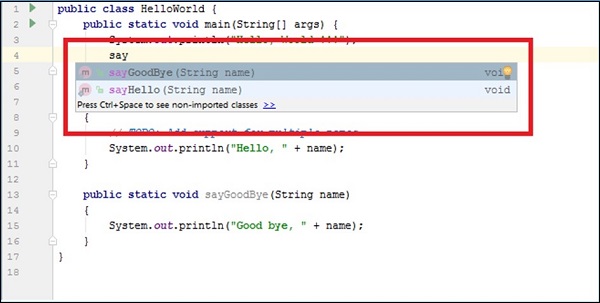
Code Completion
IntelliJ inspects the code on the fly and provides accurate code completion. For instance, when I type the word say - it suggests sayHello() and sayGoodBye() methods.
Code completion suggests class attributes and class methods while working with the class objects.
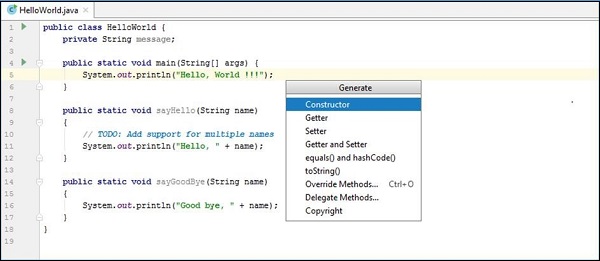
Generating Code
IntelliJ provides a way to generate useful code like constructor, getter, setter, toString() method, override methods and so on. Follow these steps to generate right-click in the Editor window.
Select the Generate option.
It will list the methods for which code can be can generated.
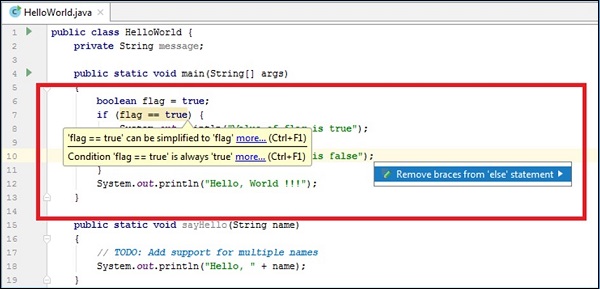
Code Inspection
We have already seen that IntelliJ identifies syntax errors, warning messages and TODO markers. In addition to this, it suggests code improvement, identifies dead code, code optimization. For instance, in the code given below, the value of flag is always true. Hence, the else part will never be executed.
boolean flag = true;
if (flag == true) {
   System.out.println("Value of flag is true");
} else {
   System.out.println("Value of flag is false");
}
IntelliJ identifies this and suggests removing this code block.
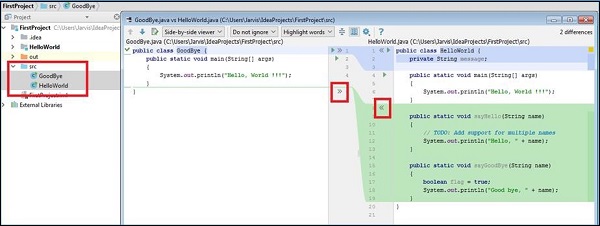
Comparing Files and Folders
Follow these steps to compare files and folders −
Hold the Ctrl key and select files to be compared from the project perspective.
Right-click on it and select the Compare Files option.
It will open the Compare window where the changes are highlighted.
You can also apply the changes from one file to another. If you observe, there are two arrow markers highlighted in red color. Click on them to apply changes from other file. Press Ctrl+Z to undo the changes.
Similarly, to compare the folders, select folders from project perspective instead of files.
Getting Help
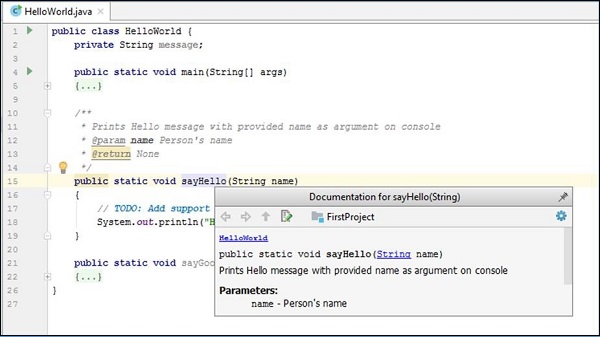
It is useful if you get details about code easily. Like the method description, its return type, arguments type and number of arguments - IntelliJ can provide these details in the Editor window itself.
Inline Documentation
As the name suggests, IntelliJ can access documentation by extracting it from the code. If you provide Java Docs for your code, then IntelliJ can show help about it. To access inline documentation, hover click on method name and press the Ctrl+Q key combination.
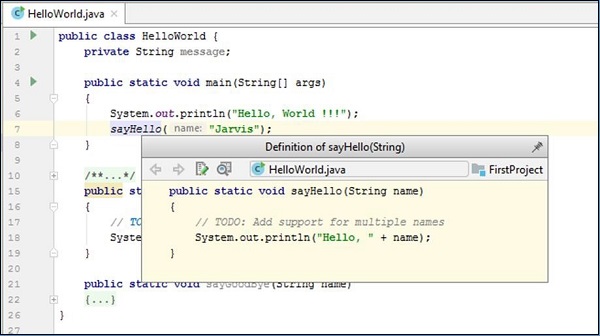
Viewing Definition
To view definition, hover the mouse over method name and press the Ctrl+Shift+I key combination.
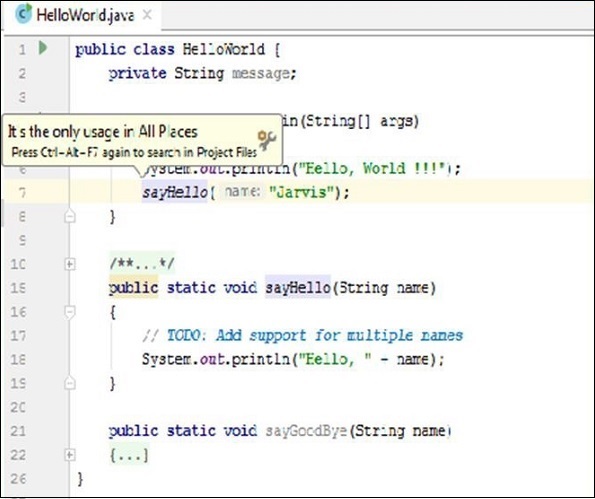
Show Usage
To view method usage, click on method declaration/definition and press the Alt+Ctrl+F7 key combination.
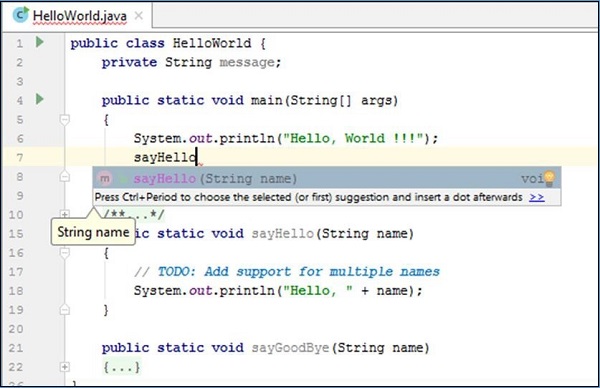
View Parameters
To view the method parameters, type method name and press the Ctrl+P key combination.
Linting Code
Linting is a process in which the lint tool analyzes the source codes and reports potential issues related to the coding standard. It helps in improving the code quality. IntelliJ supports SonarLint plug-in which lints the code.
About SonarLint
Once you install and enable the SonarLint plug-in, it will start analyzing the code automatically when you open a file in the Editor window. It will report issues in the SonarLint panel. We will discuss more about it in this section.
SonarLint supports popular programming languages like Java, JavaScript, PHP and Python.
Installation
Follow these steps to install SonarLint −
Download SonarLint from here.
Go to File → Settings → Select plugins.
Click on the Install plugin from disk button.
Follow on-screen installation to complete the installation procedure.
Code Analysis
Once the plug-in is installed and enabled, it will start analyzing code on the fly. It will report issues in the SonarLint panel. Follow these steps to view issues of the current file −
Click on the Current file tab.
It will report issues like unused local variables, unused class attributes, message logging and so on.
To know more about issue, click on issue from SolarLint panel.
In the right side of the window, it will show its severity as Major, Minor and so on.

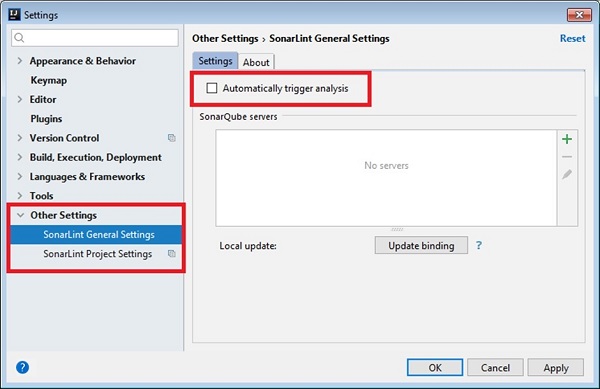
Do One Time Code Analysis
If you are not comfortable with on-the-fly code analysis, then you can disable it and perform one time code analysis once you are ready with code. Follow these steps to disable on-the-fly code analysis −
Go to File → Settings → Other Setting → SonarLint General Settings
Uncheck Automatically Trigger Analysis checkbox from the settings tab.
Click on Apply followed by Ok button.
Intellij Idea - Code Refactoring
In this chapter, we will learn about Code Refactoring and how it works in IntelliJ. Code refactoring is restructuring of code without changing its functionality and usability. Code refactoring can be done to improve code readability, performance or to remove unused/duplicate functionality. IntelliJ provides great support for code refactoring. This chapter discusses various code refactoring actions.
Rename
Rename actions can be used to rename methods, its parameters, class attributes, local variables and so on. Let us create the following class in IntelliJ.
public class Employee {
   private String name;
   private String address;
   private int age;
   public Employee() {
      this("Jarvis", "Palo Alto", 35);
   }
   public Employee(String name, String address, int age) {
      this.name = name;
      this.address = address;
      this.age = age;
   }
   public String getName() {
      return name;
   }
   public void setName(String name) {
      this.name = name;
   }
   public String getAddress() {
      return address;
   }
   public void setAddress(String address) {
      this.address = address;
   }
   public int getAge() {
      return age;
   }
   public void setAge(int age) {
      this.age = age;
   }

   @Override
   public String toString() {
      return "Employee{" +
      "name='" + name + '\'' +
      ", address='" + address + '\'' +
      ", age=" + age +
      '}';
   }
   public static void main(String args[]) {
      Employee e = new Employee();
      System.out.println(e);
   }
}
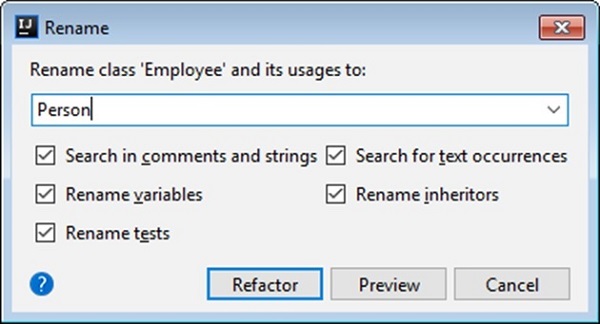
Now, let us rename Employee class to Person. This action will do modifications in constructors and the main() method −
Select Employee word
Go to Refactor → Rename and rename it with Person.
Replace Code Duplicates
This is one of the powerful refactoring actions. IntelliJ identifies code duplicates and replaces it with appropriate code. Let us introduce code duplication and refactor it. Type the following code in the Editor −
public class Employee {
   private String name;
   private String address;
   private int age;
   public Employee() {
      this("Jarvis", "Palo Alto", 35);
   }
   public Employee(String name, String address, int age) {
      this.name = name;
      this.address = address;
      this.age = age;
   }
   public void setData(String name, String address,  int age) {
      this.name = name;
      this.address = address;
      this.age = age;
   }
   public void showEmployeeDetail() {
      System.out.println("Name = " + name + ", Address = " + address + ", Age = " + age);
   }
   public static void main(String args[]) {
      Employee e = new Employee();
      e.showEmployeeDetail();
   }
}
In this example, Employee(String name, String address, int age) constructor and public void setData(String name, String address, int age) method are exactly identical. After refactoring, the Employee(String name, String address, int age) constructor gets modified as follows −
public Employee(String name, String address, int age) {
 setData(name, address, age);
}
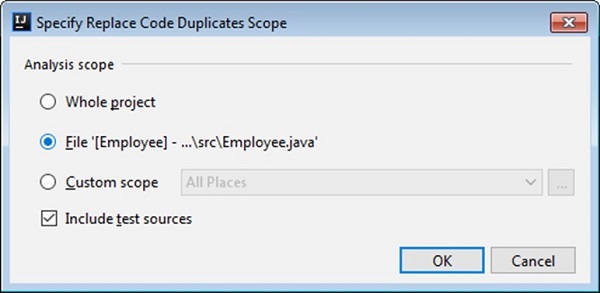
To replace the duplicates −
Go to Refactor → Find and Replace Code Duplicates.
Select refactor scope and follow on-screen steps to complete action.
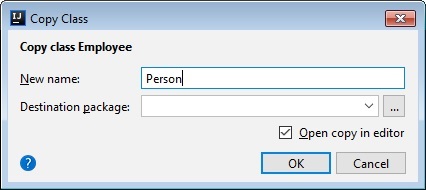
Copy Refactoring
In this section, we will understand how to copy one class to another. Let us copy Employee class to Person class. We can copy it to the existing module or a new one. IntelliJ will do the required changes depending on it. Follow these steps to perform copy refactoring −
Go to Refactor → Copy, it will open the dialog box.
Enter new name and destination package.
Click on the OK button and it will do the needful.
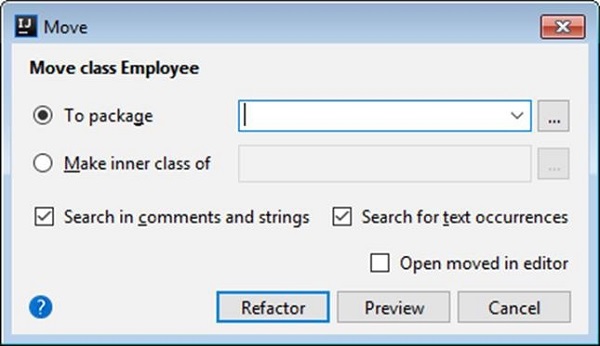
Move Refactoring
Move refactoring is similar to copy but instead of making another copy it moves the code to a different package or make it as inner class of another class.
Follow these steps to perform move refactoring −
Go to, Refactor → Move.
A new window will appear.
Select one of the options according to your choice and click on Refactor.
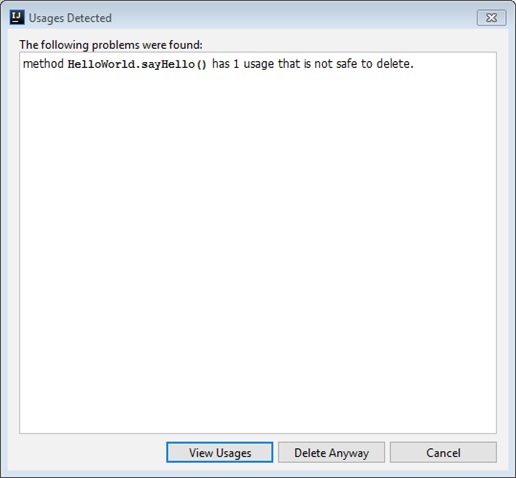
Safe Delete
The Safe Delete action will delete object only when it is not referenced anywhere in the project. The target for this option can be class, interface, method, field or parameter.
Let us see this in action. Type the following code in Editor −
public class HelloWorld {
   static void sayHello() {
      System.out.println("Hello, World !!!");
   }
   public static void main(String[] args) {
      sayHello();
   }
}
Follow these steps to perform the safe delete action −
Select the sayHello() method.
Right-click on it and select the Refactor → Safe Delete option.
As the sayHello() method is being used it will show an error as in the following screenshot −
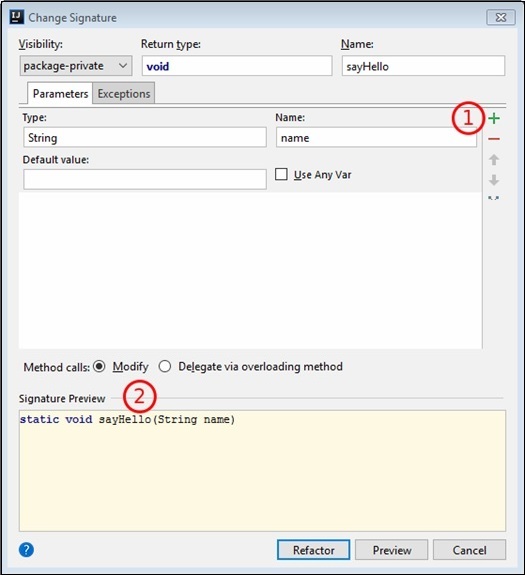
Change Signature
The action modifies method signature. It can change the method name, its parameters, types, return values and so on. Let us take a method from the above example and change its signature.
Follow these steps to perform the Change Signature action −
Select method.
Right-click on it and select the Refactor → Change signature action
A new window will appear wherein you can perform the above actions.
At the bottom of the window, it shows the preview of new signature.
Type Migration
The Type Migration changes the type of the symbol. This symbol can be a method parameter or class attribute. Let us consider the following method before performing the required action −
static void sayHello(String name) {
   System.out.println(name);
}
Follow these steps to perform type migration −
Select the String data type.
Right-click on it and select Refactor → Type migration.
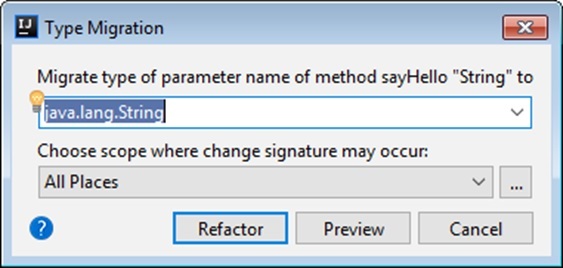
Enter the required data type in the given text box.
Choose scope and click on the Refactor button.
Intellij Idea - Running Projects
IntelliJ provides multiple ways to create configuration. This chapter discusses the options to create temporary, permanent configuration. It also discusses method to share configuration among other users.
Create Temporary Configuration
Temporary configuration is created when you run or debug Java class or test case. Consider the following steps to understand how this works −
- Create a Java class.
- Right-click on it and select the Run option.
- After the first Run, temporary configuration is added to the run menu.
Create Permanent Configuration
Temporary configuration can be converted to permanent configuration by saving it with IntelliJ. To save configuration, click on the Save Configuration option from the Run menu −
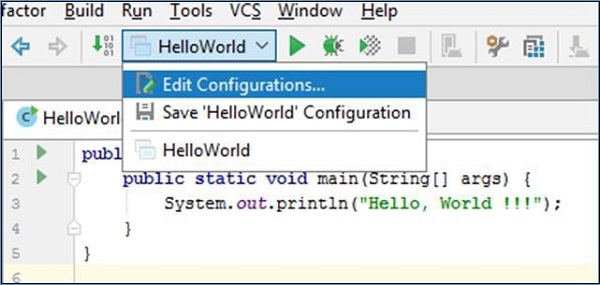
You can also modify the existing configuration by editing it.
Create New Configuration
In this section, we will understand how to create new configuration. Follow these steps to create new configuration −
Navigate to the Run → Edit Configuration.
Click on the Plus button to add new configuration.
Select Application from the dropdown list.
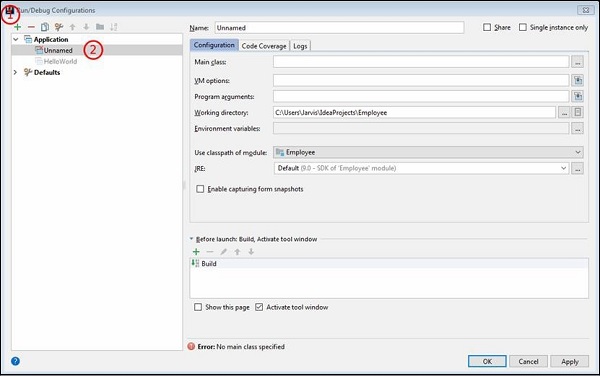
It will create un-named configuration.
Configure it according to your requirements and click on the OK button.
This saved configuration will be accessible from the Run menu along with other configurations.
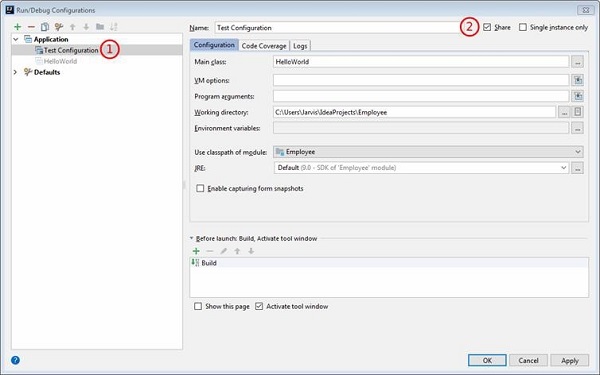
Sharing the Configuration
Follow these steps to share configuration with others −
Navigate to the Run → Edit Configuration.
Select configuration from the left pane and click on the Share checkbox.
It will store configuration on disk.
If directory based format is used, it will save configuration in separate file under runConfiguration folder. Otherwise, it will store configuration in the .ipr file.
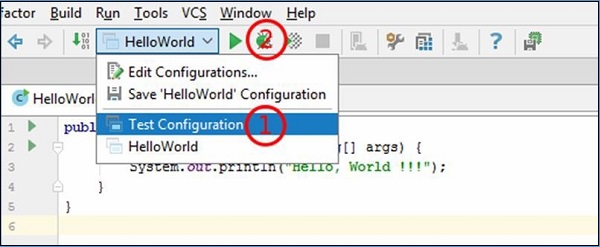
Run Configuration
To run project with specific configuration −
Select configuration from the Run menu.
Run the project as shown in the following screenshot −
Intellij Idea - Build Tools
IntelliJ provides a way to build and package Java package. It supports external build tools like Maven and Gradle. This chapter discusses about these build tools.
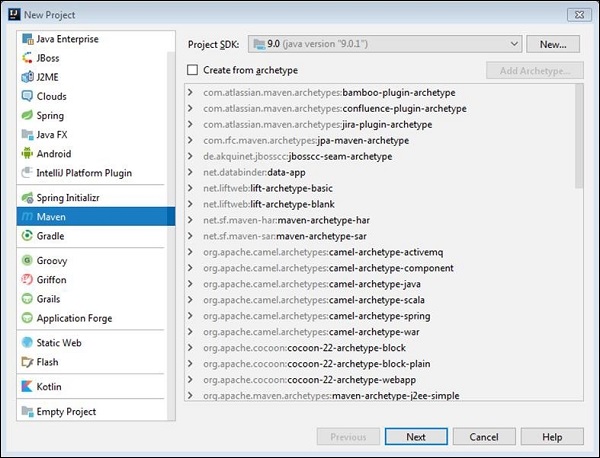
Creating Maven Project
Follow these steps to create a Maven project −
Navigate to File → Project.
Select Maven option and click on Next button.
In the new project window enter tutorialspoint.com as GroupId and HelloWorld as ArtifactId.
In the New window, it will open the pom.xml file.
We need to add properties to this file; the final pom.xml file should look like this −
<?xml version = "1.0" encoding = "UTF-8"?>
<project xmlns = "http://maven.apache.org/POM/4.0.0"
   xmlns:xsi = "http://www.w3.org/2001/XMLSchema-instance"
   xsi:schemaLocation = "http://maven.apache.org/POM/4.0.0
      http://maven.apache.org/xsd/maven-4.0.0.xsd">
   <modelVersion>4.0.0</modelVersion>
   <groupId>com.tutorialspoing</groupId>
   <artifactId>HelloWorld</artifactId>
   <version>1.0-SNAPSHOT</version>
   <properties>
      <maven.compiler.source>1.7</maven.compiler.source>
      <maven.compiler.target>1.7</maven.compiler.target>
   </properties>
</project>
Now, let us create a Java class inside the src/main/java directory of the Maven project. Follow these steps to create the class −
Navigate to the src/main/java directory.
Right click on it and select New → Java Class.
Follow these steps to compile this class using Maven −
Navigate to Run → Edit Configuration.
Click on the green plus icon and select the Maven option from the dropdown menu.
Enter the project name as Maven-Package.
Provide package as the command line.
Click on the OK button.
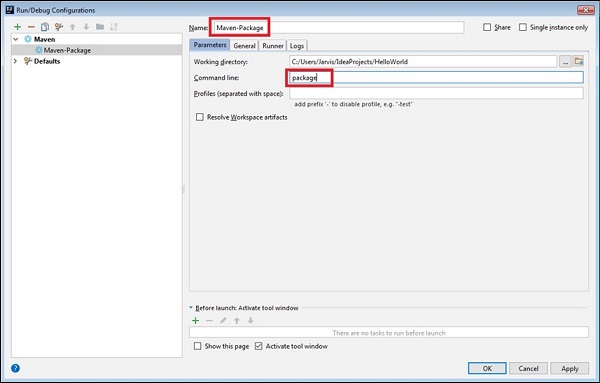
Navigate to Run and select the Maven-Package option.
It will start building package. Upon successful building of the package, you will see the following result −
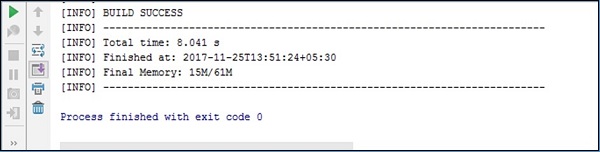
Create Gradle Project
In this section, we will learn how to create a Gradle project −
Navigate to File → Project and select Gradle.
Click on the Next button.
In the new project window, enter tutorialspoint as GroupId and HelloWorld as ArtifactId.
Click on the Next button, verify the project details and click on the Finish button.
Follow the on-screen instructions to complete the process.
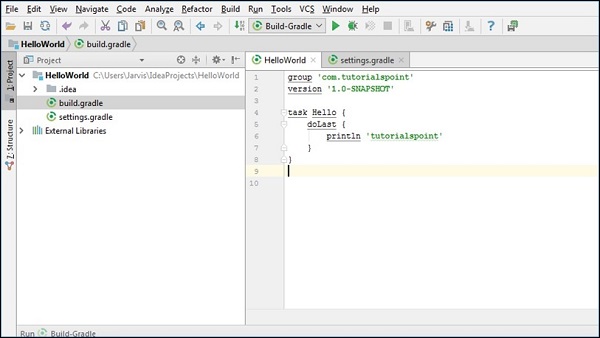
Open the buildl.gradle file and write Hello task as shown in the above screenshot.
To compile this task, navigate to the Run → Build-Gradle option.
Intellij Idea - Unit Testing
Unit testing plays an important role in software development. IntelliJ supports various unit testing frameworks like JUnit, TestNG, Spock and many more. In this chapter, we are going to use JUnit3.
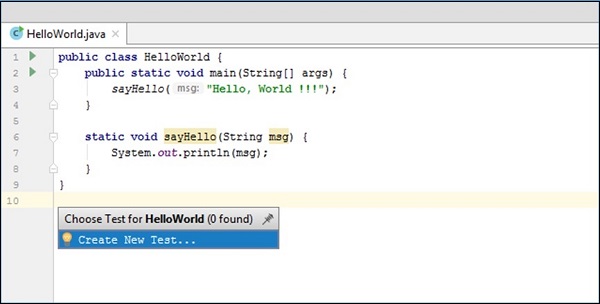
Create Unit test
In this section, we will learn how to create a Unit Test. Follow these steps to create the test −
Select the Navigate → Test option.
A dialog box will appear wherein, you have to select Create New Test.
Follow the on-screen instructions to continue −
Provide the details about the test like testing library, class details, setUp, tearDown methods and so on.
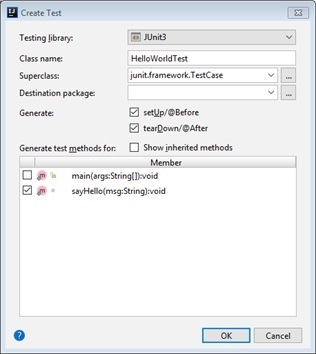
Click on the OK button to continue.
A test class will be created. Initially it may fail to resolve some symbols. Navigate the cursor to the error line, it will show the hint symbol.
Select the appropriate option from the dropdown menu. We have selected the Add library junit.jar! to classpath option −
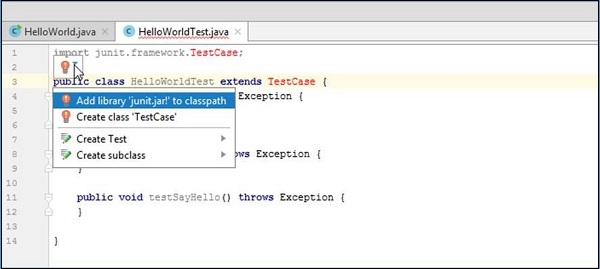
You can add logic inside each test according to your business requirement. I have kept it empty for simplicity.
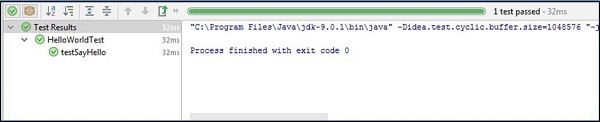
Run Unit Test
Follow these steps to run unit test −
Select unit test class from the Editor window.
Navigate to the Run menu and select the Run option.
The following result will be generated
Intellij Idea - Debugging
Debugger makes application debugging much easier. Using debugger, we can stop the execution of program at a certain point, inspect variables, step into function and do many things. IntelliJ provides inbuilt Java debugger.
Breakpoints
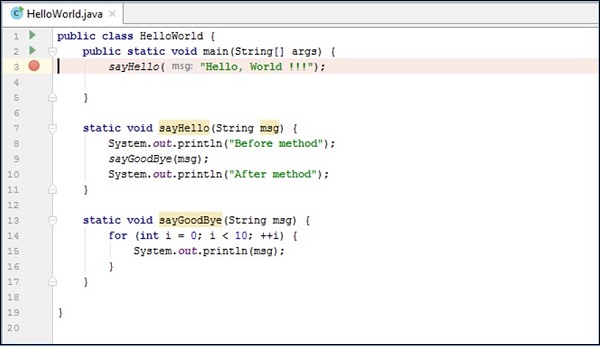
Breakpoint allows stopping program execution at certain point. Breakpoints can be set by hovering the mouse over the Editors gutter area and clicking on it.
Breakpoints are denoted using red circle symbols. Consider the breakpoint set at line 3.
Consider the following steps to understand more on how the breakpoints work −
Right-click on the red circle symbol.
Select the More options.
To remove breakpoint just click on same symbol.
Follow these steps to start the debugger −
- Navigate to the Run menu.
- Select the Debug option.
Step into
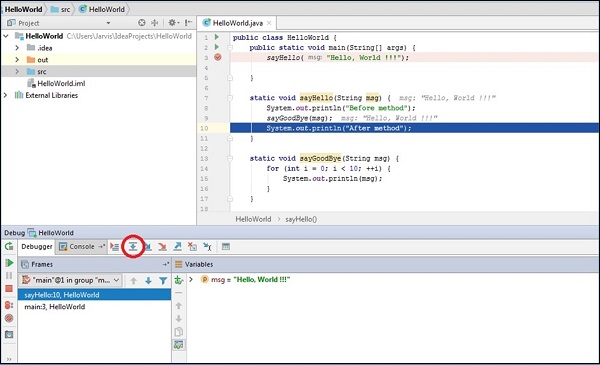
While debugging, if a function is encountered and a step into action is selected, then debugger will stop program execution at each point of that function as if debugging is enabled for that function.
For instance, when program execution reaches at line 9 and if we select the step into action then it stops the execution at each line in the sayGoodBye() function.

Step out
The Step out action is exactly the reverse of Step in action. For instance, if you perform the step out action with the above scenario then debugger will return from the sayGoodBye() method and start execution at line 10.
Step over
The Step over action does not enter into function instead, it will jump to the next line of code. For instance, if you are at line 9 and execute the step over action then it will move execution to line 10.
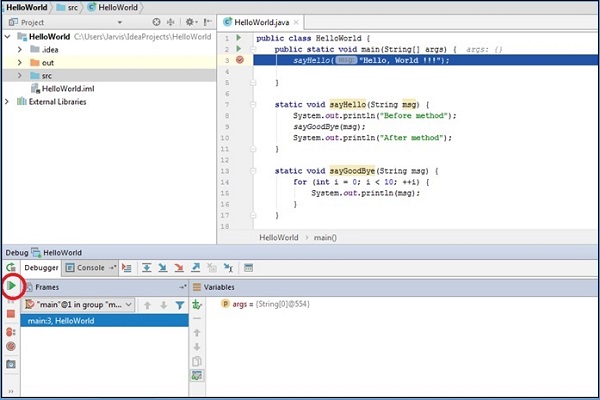
Resume Program
The Resume Program action will continue execution of program by ignoring all breakpoints.
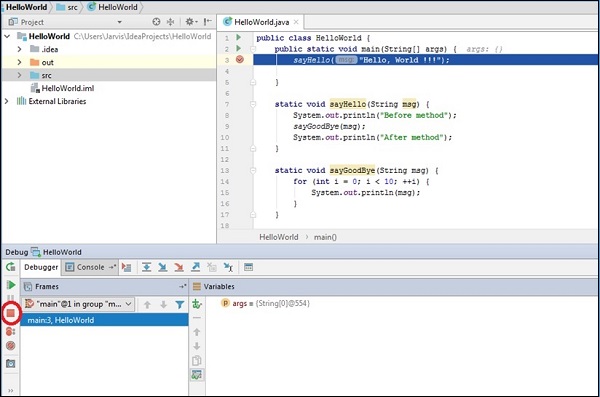
Stop action
The Stop action helps stop the debugger.
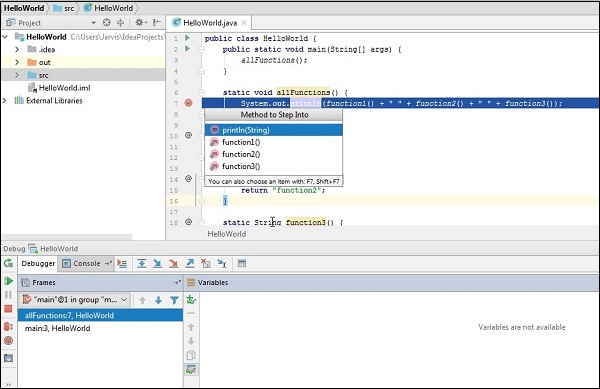
Smart step into
While debugging, we may sometimes reach a line of code that calls several methods. When debugging these lines of code, the debugger typically allows us to use step into and leads us through all child functions and then back to the parent function. However, what if we only wanted to step into one child function? With Smart step-into, it allows us to choose the function to step into.
Now, let us create a Java class with the following line of code −
public class HelloWorld {
   public static void main(String[] args) {
      allFunctions();
   }
   static void allFunctions() {
      System.out.println(function1() + " " + function2() + " " + function3());
   }
   static String function1() {
      return "function1";
   }
   static String function2() {
      return "function2";
   }
   static String function3() {
      return "function3";
   }
}
In the above code, allFunctions() calls 3 more functions. Let us set the breakpoint at this function. Follow these steps to perform smart step into −
- Go to run
- Select smart step into.
- Select the child function to go.
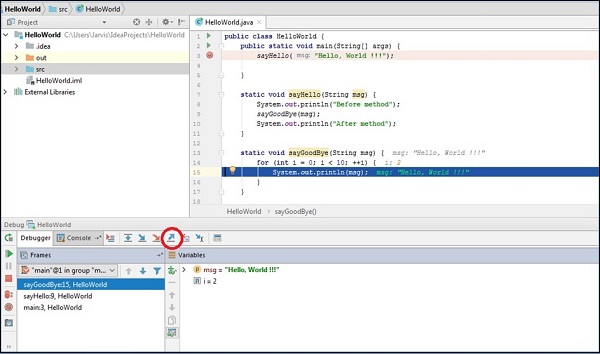
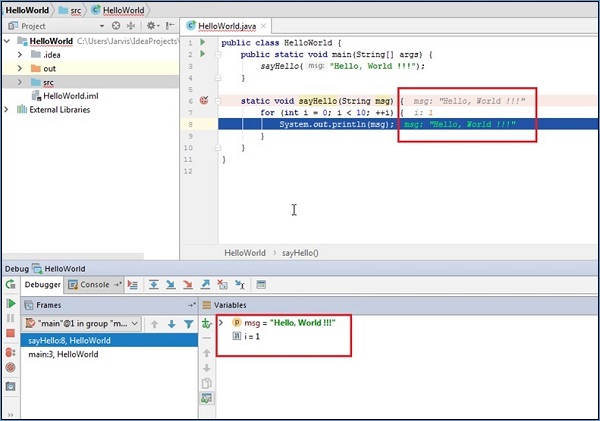
Inspecting variables
During debugging, IntelliJ shows value of variable in the Editor window itself. We can also view the same information in the Debug window.
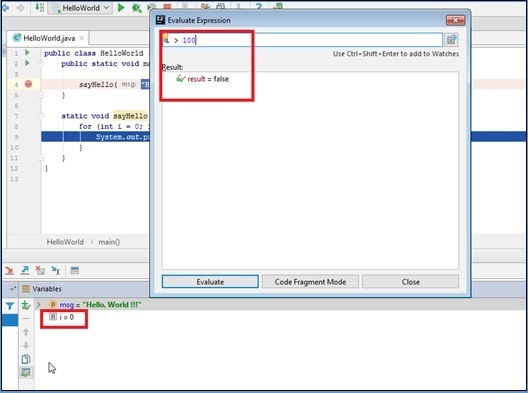
Evaluate expression
Evaluate expression allows to evaluate expression on the fly. Follow these steps to perform this action −
Start application in debugger
Navigate to Run->Evaluate expression.
Enter expression. In the example given below, the current value of variable i is 0; hence, expression i > 100 will evaluate to false
Intellij Idea - Profiling
Profiler gives insights about your application like its CPU, memory and heap usage. It also gives details about the application threads. This chapter discusses the usage of VisualVM tool for Java application profiling. It can profile entities such as CPU and heap.
It is recommended that the readers of this tutorial are familiar with the application profiler concepts.
Introduction
VisualVM is a visual tool that integrates JDK tools and gives you powerful profiling capabilities. It allows you to generate and analyze heap data, track down memory leaks,monitor the garbage collector and perform memory and CPU profiling.
Benefits
Visual interface for local and remote Java applications running on JVM.
Monitoring of applications memory usage and applications runtime behavior.
Monitoring of application threads
Analyzing the memory allocations to different applications.
Thread dumps − very handy in case of deadlocks and race conditions.
Heap dumps − very handy in analyzing the heap memory allocation.
Configuration
In this section, we will learn the steps performed to configure VisualVM. The steps are as follow −
Download it from here.
Extract the zip file.
Navigate to etc/visualvm.conf file and add the following line in this file −
visualvm_jdkhome=<path of JDK>
If your JDK is installed in the C:\Program Files\Java\jdk-9.0.1 directory then it should look like this −
visualvm_jdkhome="C:\Program Files\Java\jdk-9.0.1"
Monitoring application
Let us now see how to monitor the application. Consider the following steps to understand the same −
- Double-click on the visualvm.exe file.
- Select the application from left pane.
- Select the monitor tab.
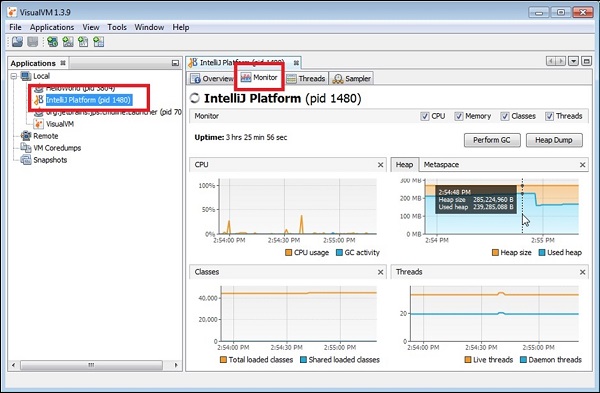
You will be directed to a window where you will get the details about CPU, Heap, Classes and threads. To be specific with the usage, hover the mouse over any graph. We can see the usage of Heap in the above screenshot.
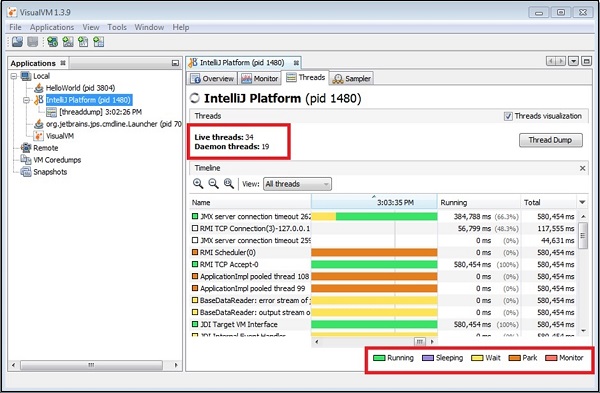
Insights about Threads
Java application can contain multiple threads of execution. To know more about threads, select the Threads tab of a particular application. It will give various statistics about threads like number of live threads and daemon threads. The different thread states are Running, Sleeping, Waiting, Park and Monitor.
Sampling Application
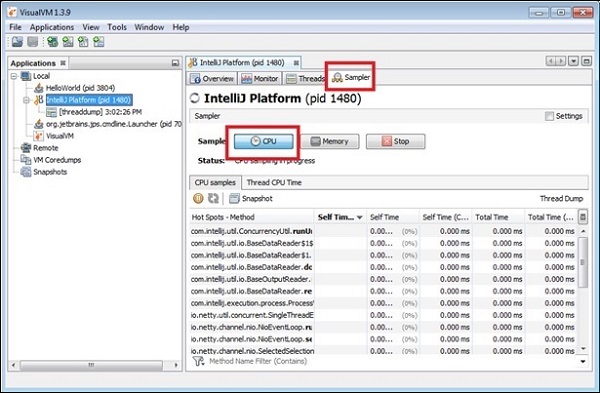
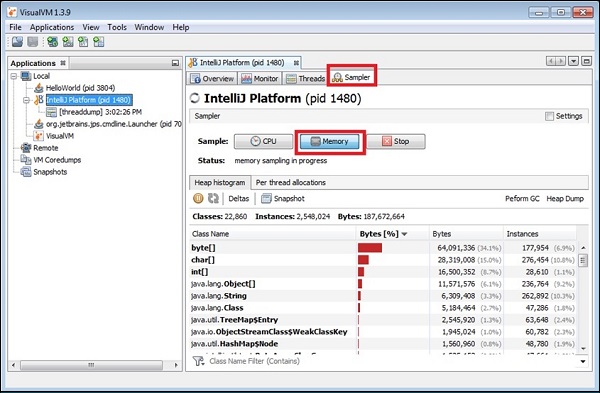
VisualVM supports CPU, memory sampling and memory leak detection. To sample application, select application and choose the sample tab −
CPU sampling
For CPU sampling, click on the CPU button as show in the following screenshot −
Memory profiling
For memory profiling, click on the Memory button as shown in the following screenshot −
Memory leaks
A memory leak occurs when an application, while running, slowly fills up the heap with objects that are not automatically deleted by the program.
If an object that is not used by the program is not deleted, then it remains in memory and the GC cannot reclaim its space. If the number of bytes and number of instances in your application were to increase constantly and significantly in your program to the point of using up all the space, this can be an indication of a memory leak.
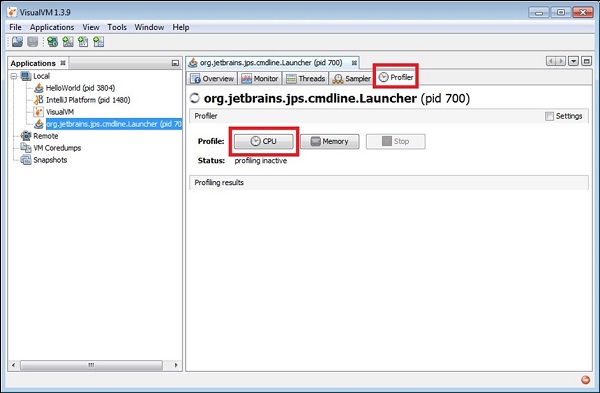
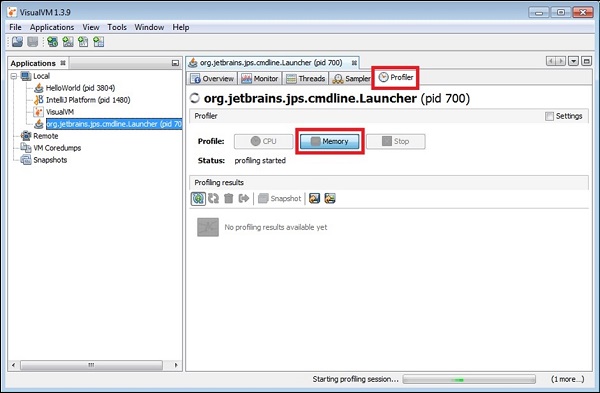
Profiling application
In this section, we will learn how to profile an application. To profile an application, select application from left pane and click the profile tab −
CPU profiling
To perform CPU profiling, click on the CPU button as shown in the screenshot below −
Memory profiling
To perform CPU profiling, click on the CPU button as shown in the screenshot below −
Intellij Idea - Version Control
IntelliJ supports various version control systems like Git, Subversion, Mercurial, CVS, GitHub and TFS. You can perform version control related action from the IDE itself.
In this chapter, we will discuss Git and Subversion (hereafter referred to as SVN). We assume that the reader is familiar with Git and SVN tool and its terminology.
Git
In this section, we will learn how to work with Git.
Clone
To clone an existing Git repository −
Navigate to File->New->Project from Version Control->Git.
Enter the repository URL, Parent directory and Directory name.
Click on the clone button to continue.
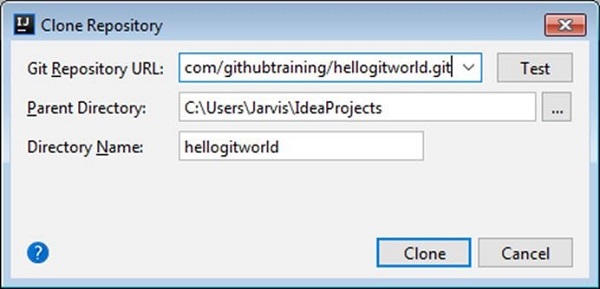
Upon successful running of the above steps, the repository will get cloned.
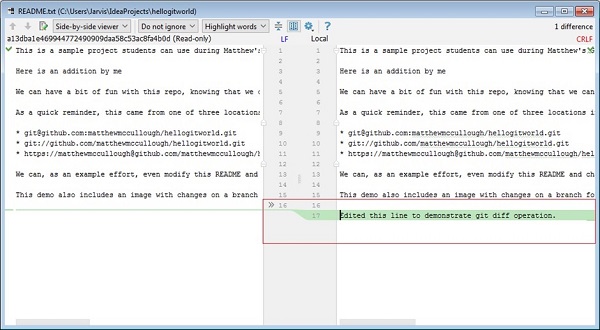
Track changes
Git will track the changes that you make in repository. Let us modify any file from the repository and compare it with the repository.
Navigate to VCS → Git → Compare with Latest Repository Version.
The above step will open the diff window.
You can see there is a new line on the right side with green background colour.
Git shows it in green as we have added new contents. If we remove any contents then itll be shown in red colour
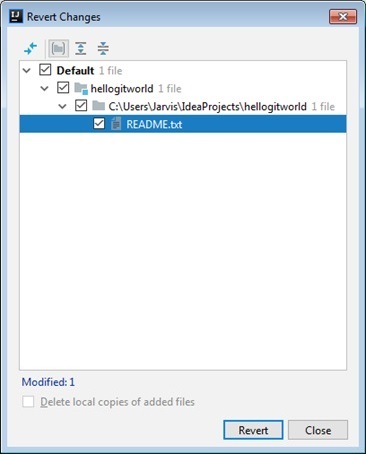
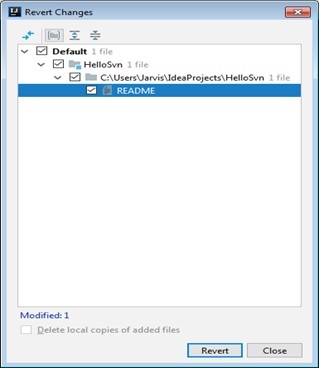
Revert local changes
Follow these steps to discard the local changes −
Navigate to the VCS → Git → Revert option.
It will ask for confirmation and remove your changes.
Add file to repository
To add file to repository navigate to VCS → Git → Add option. This action is similar to the git add action.
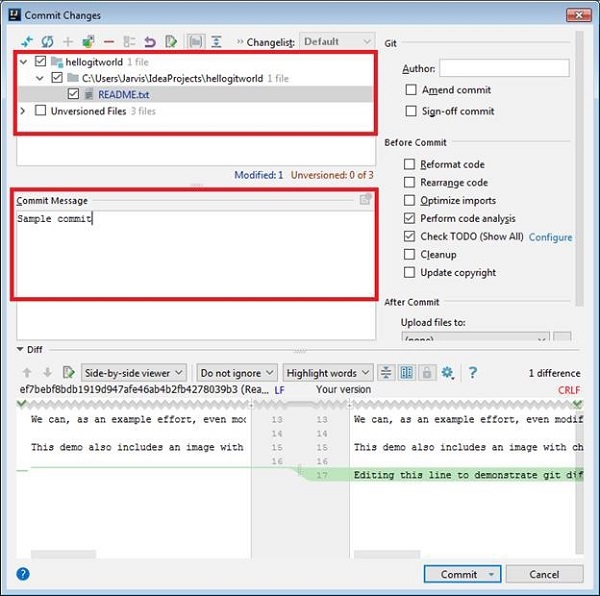
Commit changes
The Commit operation will create local commit. It is similar to the git commit action. To perform commit −
Navigate to the VCS → Git → Commit File option.
Select files to be committed.
Enter commit message and click on Commit button.
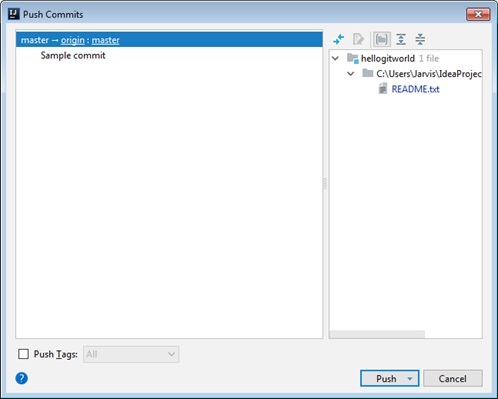
Push changes to the remote repository
The Push action will send local changes to the remote repository. To push changes −
Navigate to the VCS → Git → Push option.
A window will appear. Here, you can see the comitts to be pushed.
Verify commit and click on the Push button to publish your changes.
View history or logs
To show history, navigate to the VCS → Git → Show history option. This action is similar to the git log command. It will show history as follows −

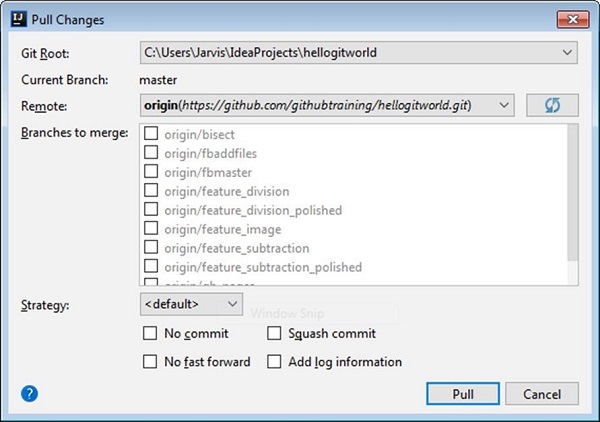
Get updates
Follow these steps to fetch updates from the repository −
Navigate to the VCS → Git → Pull option.
Select the option according to your requirements.
Click on the Pull button.
Add existing project to Git
To add existing project under Git −
Navigate to VCS → Import into Version Control → Create Git repository.
Select project by browsing directory.
Click on the OK button.

Subversion
In this section, we will understand how Subversion works in IntelliJ. Let us consider a few important actions to understand this.
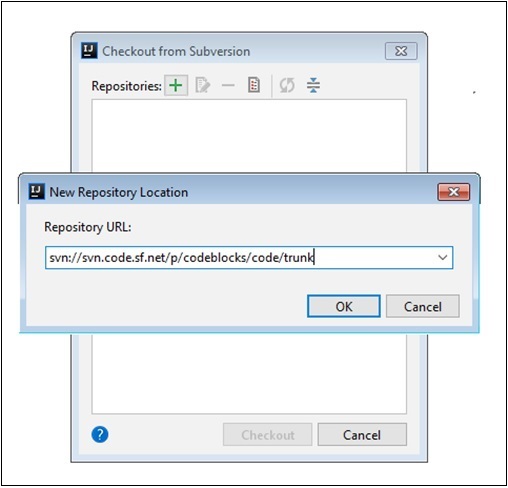
Checkout
To checkout SVN repository −
Navigate to File → New → Project from Version Control → Subversion.
Enter repository URL.
Click on the OK button.
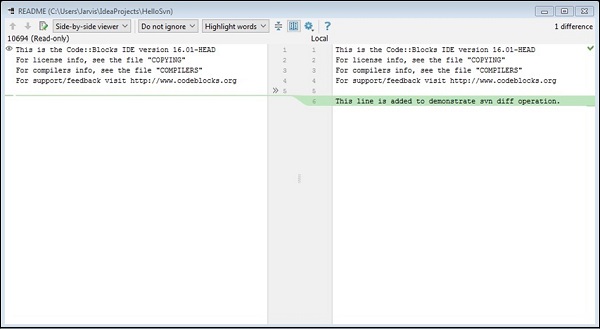
Track changes
SVN will track changes you made in the repository. Let us modify any file from repository and compare it with repository −
Navigate to VCS->Subversion->Compare with Latest Repository Version
You can see there is new line on right side with green background colour.
SVN shows it in with green background to indicated the addition of new content. If we remove any content then it will be shown in red colour.
Revert local changes
Follow these steps to revert the local changes you have made −
Navigate to the VCS → Subversion → Revert option.
It will ask for confirmation and remove your changes.
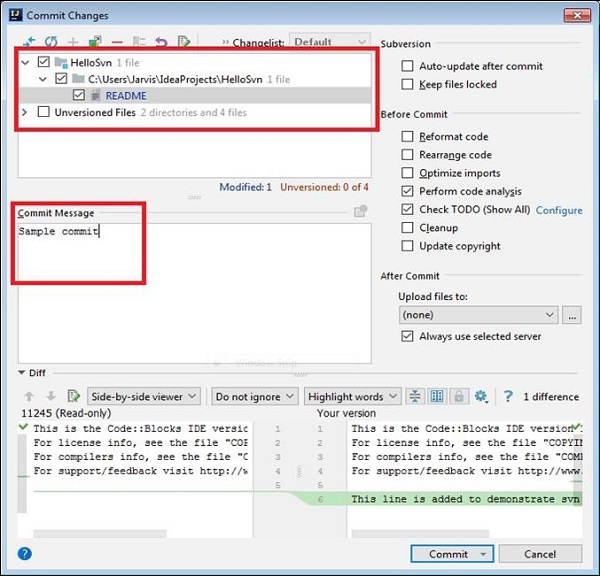
Commit changes to remote repository
Follow these steps to commit changes in the remote repository −
Navigate to VCS → Subversion → Commit Files option.
A new window will appear. Here, you can see the files to be committed to remote respository.
Verify the files and click on the Commit button to publish your changes.
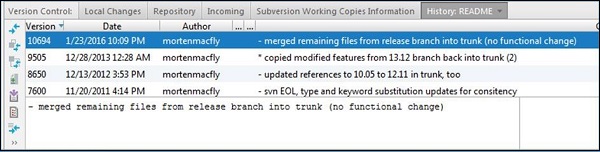
View history or logs
To show history, navigate to the VCS → Subverion → Show history option. This option is similar to the svn log command. It will show history as follows −
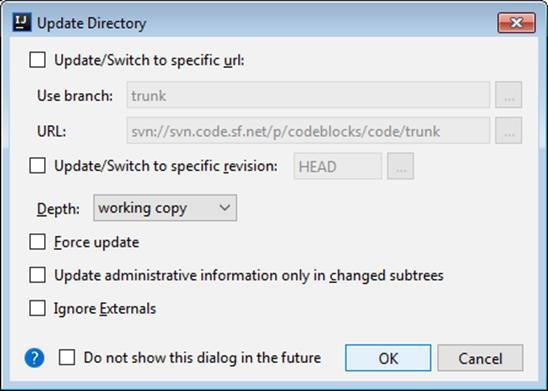
Update operation
To fetch latest changes navigate to VCS → Subversion → Update File/Update Folder option.
Add existing project to Subversion
Follow these steps to add existing project under SVN −
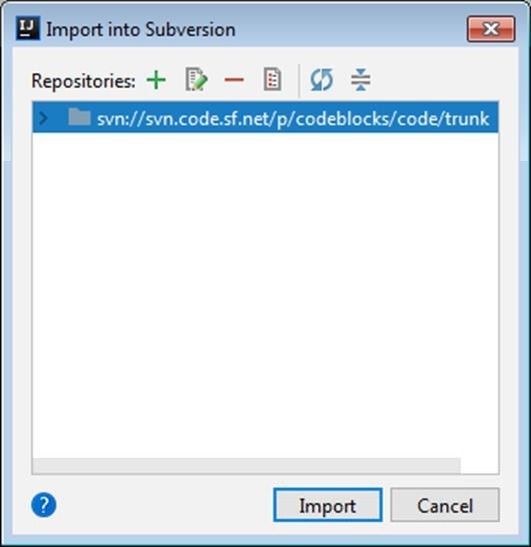
Navigate to VCS → Import into Version Control → Import into Subverion.
Enter the repository URL and click on the Import button −
Intellij Idea - Databases
IntelliJ provides database tool which allows you to perform database related operation from the IDE itself. It supports all major databases like MySQL, Oracle, Postgress, SQL server and many more. In this chapter, we will discuss how IntelliJ supports MySQL database.
We assume that the reader is familiar with the database concepts and the required databases tools are installed and configured on your system.
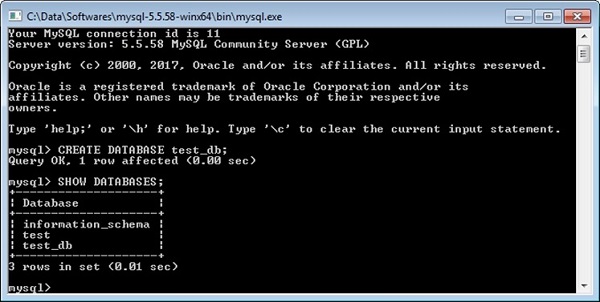
Create Database
To begin with, we will create a database - test_db. Execute the following command in the command prompt −
Connect to Database
Follow these steps to connect to a Database −
Navigate to View → Tool Windows → Database.
Click on the green plus icon and select Data Source → MySQL.
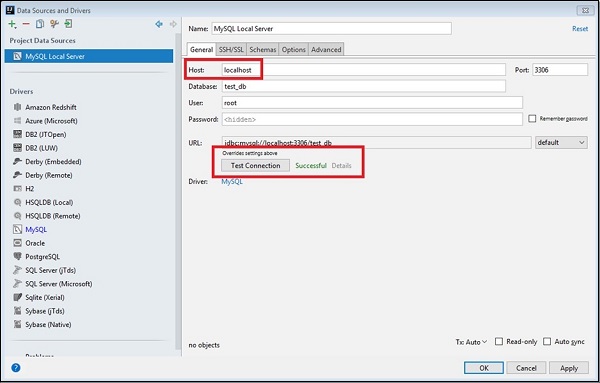
Enter the host address and click on the Test Connection button.
If everything goes well then itll show Successful as shown in above image.
Click on OK button to save connection.
Create table
Follow these steps to create a new table −
Right-click on the database pane and select schema.
Select the New → Table option
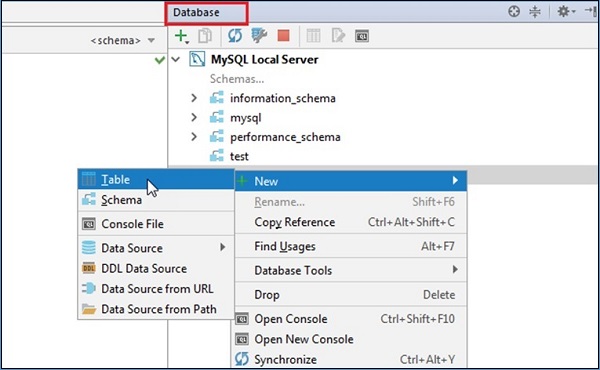
A new window will appear. Define the table with columns, types and so on.
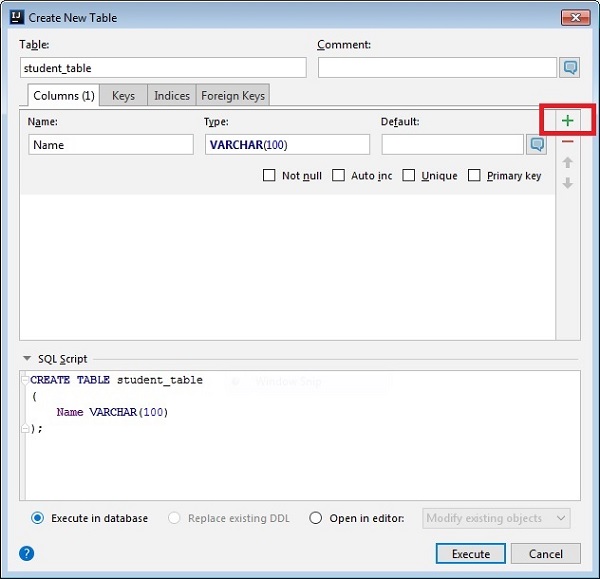
Click on the Execute button
Click on the Execute button
Insert Data
Follow these steps to insert data −
- Select table from the database pane.
- It will open table in the new window.
- Click on the plus icon to insert new row.
- Click on the Submit button to make the changes permanent.
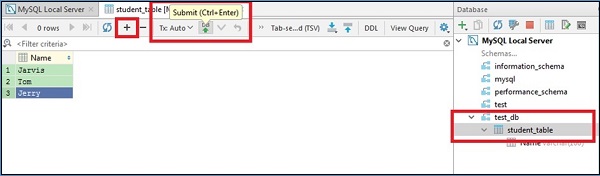
Retrieve Data
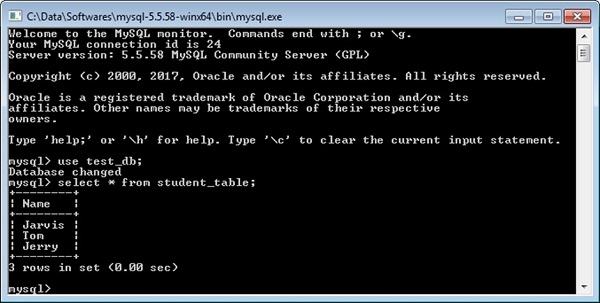
To retrieve data, double-click on student_table from the database pane. It will show table data in new window.
To ensure that the data is inserted into the table, open the command prompt and execute the following commands −
Intellij Idea - Migrating from NetBeans
NetBeans is another popular Java IDE. If you are a current user of NetBeans and want to migrate from it to IntelliJ then this will serve as a good starting point.
This chapter discusses the importing of NetBeans projects in IntelliJ, its terminologies equivalent to NetBeans, popular shortcuts and frequently asked questions.
Import NetBeans project
In this section, we will learn how to import NetBeans project. Follow these steps to import the project −
Navigate to File → New → Project from Existing Sources
Select your NetBeans project directory.
When the Import Project wizard opens, select the Create project from existing sources option.
Follow the on-screen instructions to continue.
IntelliJ vsNetBeans terminology
The following table compares IntelliJ and NetBeans terminology −
| IntelliJ | NetBeans |
|---|---|
| Module | Project |
| Global library | Global library |
| Module library | Project library |
| Module dependency | Project dependency |
| Module SDK | Project-specific SDK |
Popular shortcuts
IntelliJ is a keyboard-centric IDE. It provides shortcuts for most of the actions. The following table lists a few important shortcuts −
| Action | Shortcut |
|---|---|
| Run Java program | ctrl+shift+F10 |
| Organize imports | ctrl+alt+o |
| System.out.println() | Type sout and press ctrl+j |
| Delete current line | ctrl + y |
| Search | ctrl + shift + f |
| Generate getter and setter | alt + insert |
| Format code | ctrl + alt + l |
| Comment out code | ctrl + / |
| Go to line | ctrl + g |
| Go to declaration | ctrl + b |
| Rename | shift+F6 |
| Move lines | ctrl + shift + up/down |
Debugger shortcuts
The following table lists down a few important debugger shortcuts −
| Debug action | Shortcut |
|---|---|
| Debug a program | Shift + F9 |
| Choose configuration and debug | Shift+Alt+F9 |
| Step over | F8 |
| Step into | F7 |
| Smart step into | Shift + F7 |
| Step out | Shift + F8 |
| Force step over | Shift+Alt+F8 |
| Force step into | Shift+Alt+F7 |
| Resume program | F9 |
| Evaluate expression | Alt+F8 |
| Toggle breakpoints | Ctrl+F8 |
| View breakpoints | Ctrl+Shift+F8 |
FAQsand Tips
In this section, we will go through a few Frequently Answered Questions and Tips. The FAQs and tips are as follows −
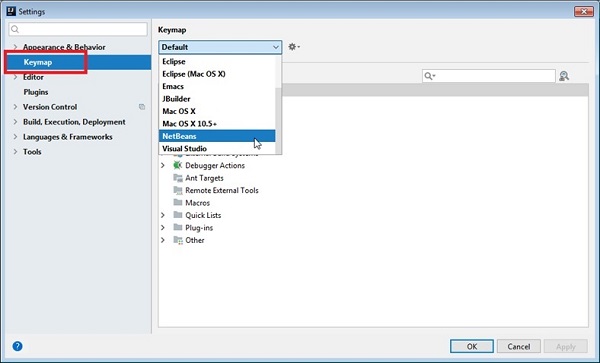
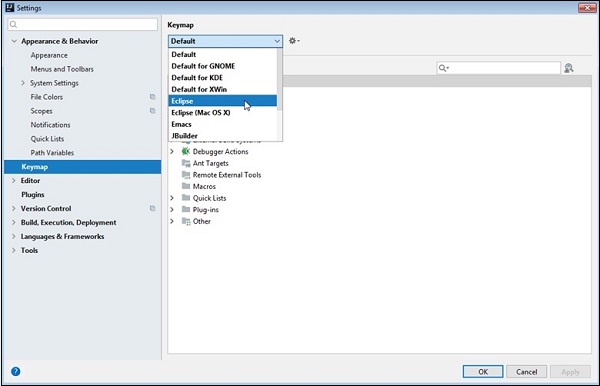
Can I use the NetBeans key bindings in IntelliJ IDEA?
Navigate to Files → Settings and select Keymap.
Select NetBeans from the drop down box
Is local history in IntelliJ IDEA different from that in NetBeans?
Local history in IntelliJ IDEA, generally, is more detailed. Whatever you do with a directory, file, class, method or field, or a code block is reflected in your local history. The local history also includes VCS operations.
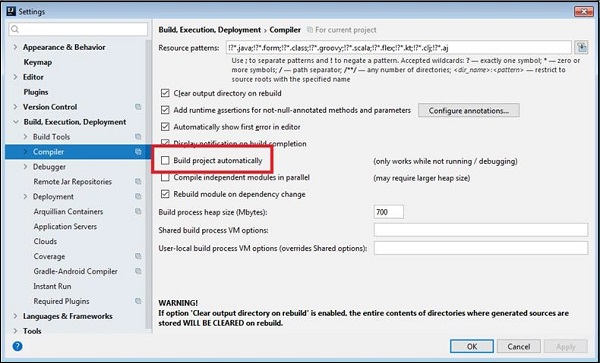
Can I enable compile on save' in IntelliJ IDEA?
- Navigate to File → Settings → Build, Execution, Deployment → Compiler
- Select Build Project Automatically option.
- Click on the OK button.
Can I use NetBeans plugins in IntelliJ IDEA?
No, you cannot.
Is it possible to build NetBeans RCP applications with IntelliJ IDEA?
It is possible; however, you will not get the same kind of support that you get with NetBeans (wizards, menu actions, etc.). For more details, visit this.
Intellij Idea - Migrating from Eclipse
Eclipse is yet another popular Java IDE. If you are a current user of Eclipse and want to migrate from it to IntelliJ, then this is a good starting point.
This chapter discusses how to import Eclipse projects in IntelliJ, its terminologies equivalent to Eclipse, popular shortcuts and frequently asked questions.
Import existing project
In this section, we will discuss how to import an existing project. Follow these steps to import the project −
Navigate to File → New → Project from Existing Sources.
Select your NetBeans project directory.
When the Import Project wizard opens, select the Create project from existing sources option.
Follow the on-screen instructions to continue.
IntelliJ vsEclipse terminology
The following table compares IntelliJ and NetBeans terminologies −
| IntelliJ | Eclipse |
|---|---|
| Project | Workspace |
| Module | Project |
| Facet | Facet |
| Library | Library |
| SDK | JRE |
| Path variable | Classpath variable |
Popular shortcuts
IntelliJ is a keyboard-centric IDE. It provides shortcuts for most of the actions. The following table lists a few popular shortcuts −
| Action | Shortcut |
|---|---|
| Run java program | ctrl+shift+F10 |
| Organize imports | ctrl+alt+o |
| System.out.println() | Type sout and Press ctrj+j |
| Delete current line | ctrl + y |
| Search | ctrl + shift + f |
| Generate getter and setter | alt + insert |
| Format code | ctrl + alt + l |
| Comment out code | ctrl + / |
| Go to line | ctrl + g |
| Go to declaration | ctrl + b |
| Rename | shift+F6 |
| Move lines | ctrl + shift + up/down |
Debugger shortcuts
The following table lists down commonly used debugger shortcuts −
| Debug action | Shortcut |
|---|---|
| Debug a program | Shift + F9 |
| Choose configuration and debug | Shift+Alt+F9 |
| Step over | F8 |
| Step into | F7 |
| Smart step into | Shift + F7 |
| Step out | Shift + F8 |
| Force step over | Shift+Alt+F8 |
| Force step into | Shift+Alt+F7 |
| Resume program | F9 |
| Evaluate expression | Alt+F8 |
| Toggle breakpoints | Ctrl+F8 |
| View breakpoints | Ctrl+Shift+F8 |
FAQsand Tips
In this section, we will see a few Frequently Answered Questions and tips. The FAQs and tips are as follows −
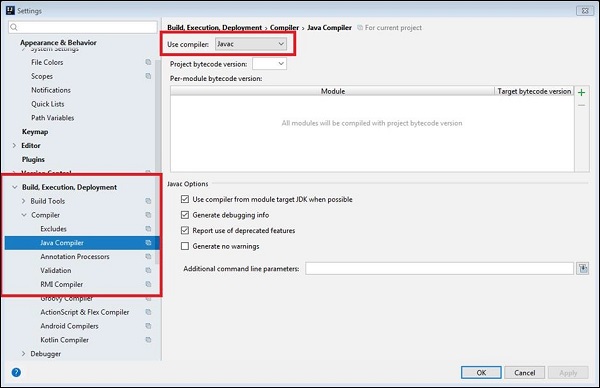
Use Eclipse Compiler
While Eclipse uses its own compiler, IntelliJ IDEA uses the javac compiler bundled with the project JDK. If you want to use the Eclipse compiler −
Navigate to File → Settings → Build, Execution, Deployment → Compiler → Java Compiler.
Select the required compiler from User compiler dropdown.
Eclipse Keymap
For Eclipse users who prefer not to learn new shortcuts, IntelliJ IDEA provides the Eclipse keymap that closely mimics its shortcuts −
- Navigate to File → Settings → Keymap option.
- Select Eclipse from Keymap dropdown.
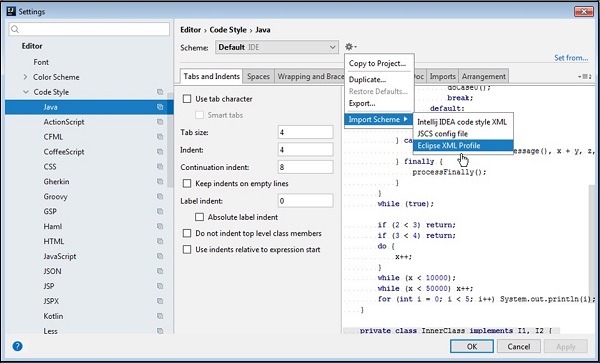
Code formatting
To import your Eclipse formatter settings −
Navigate to File → Settings → Editor → Code Style → Java.
Select the Eclipse XML profile.
Working with Build Tools
Like Eclipse, IntelliJ does not provide visual forms for editing Maven/Gradle configuration files.
Once you have imported/created your Maven/Gradle project, you are free to edit its pom.xml/build.gradle files directly in the text editor.
