- Intellij Idea - Home
- Intellij Idea - Introduction
- Installation and Configuration
- Intellij Idea − Getting Familiar
- Create First Java Project
- Intellij Idea − Deep Dive
- Intellij Idea − Deep Dive into Editor
- Intellij Idea − Code Refactoring
- Intellij Idea − Running Projects
- Intellij Idea − Build Tools
- Intellij Idea − Unit Testing
- Intellij Idea − Debugging
- Intellij Idea − Profiling
- Intellij Idea − Version Control
- Intellij Idea − Databases
- Migrating from NetBeans
- Intellij Idea − Migrating from Eclipse
Intellij Idea - Getting Familiar
In this chapter, we will get more familiar with IntelliJ IDEA. To discuss the advantages and functionality of any tool, one must be familiar with that tool and IntelliJ is no exception to that.
This chapter gives you an overview of IntelliJ. The chapter begins with a discussion about IDEs visual elements, configuration settings and finally ends by discussing JVM and platform properties.
Visual Elements
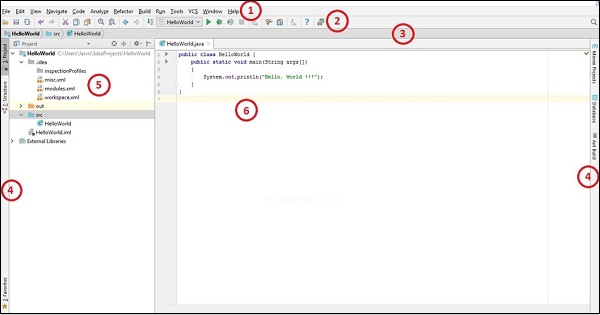
One of the important things about IDE is its visual elements. Identifying and understanding the visual elements enables to you do action in a quicker and easier manner. The following screenshot and the labels on it show the main interface of IntelliJ.

Menu bar − The Menu bar provides options to create new projects and other important actions related to projects like code refactoring, builds, run, debug, version-controlling options and so on.
Tool bar − The Tool bar provides shortcuts to compile, debug and run options. You can customize it according to your requirements.
Navigation bar − The Navigation bar enables easier navigation within a project. This feature comes handy as code base increases.
Tools tab − The Tools tab shows on either side of the main window. From here, you can access important tools like databases; Maven/Ant builds and so on.
Project perspective − Project perspective window shows various elements of projects like packages, modules, classes, external libraries and so on.
Editor window − This is a place where developer spends most of his/her time. Editor window allows you edit/write code with syntax highlighting and other useful features.
At the bottom of the main window, there is a status bar, which shows some additional attributes about the file - like its format and the encoding type. It also provides option to toggle the read-only attribute of the current file. You can also manage inspection level from here.
Working with Plug-ins
Plug-ins help to extend functionality of IntelliJ. It provides a large number of plug-ins ranging from databases, version controlling, profiling and this list goes on.

Steps to manage plug-ins
Follow these steps to manage plug-ins −
Go to the File → Settings menu.
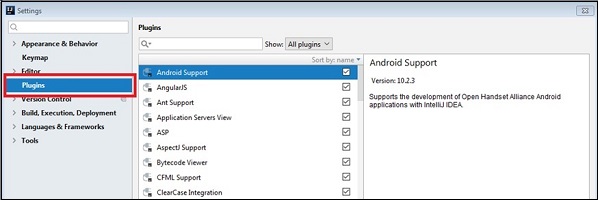
Select the Plugins tab on the left pane.
This window lists all installed plug-ins. There is a checkbox on the right side of each plug-in name. Toggling that checkbox enables/disables the plug-ins.
IntelliJ online plug-in repository is available here. To add/remove plug-in repository, click on the browse repository button and it will provide a way to do needful.
In addition to this, it allows offline plug-in installation. For this, download plug-in and select install plug-in from the disk button and navigate to the download path.
To perform other actions on plug-ins like uninstalling, updating and sorting, right-click on any plug-in. It will show a dropdown menu from which you can select one of the actions.
Working with Settings
This section provides a few important tips to manage settings. It enables you to import, export and share IntelliJ settings.
Export Settings
It allows exporting the current settings as a jar file.
Go to File → Export Settings.
Export setting windows list the available settings related to UI, debugger, SDK along with others.
It provides a checkbox for selection. Once the selection is done, click on the OK button to save the settings on the local disk.
Import Settings
It allows importing the settings stored in the jar file.
- Go to File → Import settings.
- Select the Setting jar by navigating folder structure
- Click on the OK button.
Sharing Settings
IntelliJ IDEA allows you to share your IDE settings between different instances. This is particularly useful when you want to apply the same settings within a team or organization. The prerequisite for this is to enable the Settings Repository plug-in. It is installed and enabled by default.
To ensure its status −
- Go to File → Settings → Plugins
- Search settings repository plug-in
We can store the current setting on GitHub/Bitbucket and apply them on other instances. To store the current setting −
Go to the File → Settings Repository.
Type the Git repository URL in upstream URL dialog box.
Click on the Overwrite remote button.
To apply the same settings to other instances, click on the Overwrite local button.
Configuring JVM Options and Platform Properties
We can configure the JVM options by navigating to the Help → Edit Custom VM Options menu. Following are a few important JVM options we can set.
server − It allows the selection of the Java HotSpot Server VM
-Xms<size> − It sets the initial Java heap size. The default value is 128 MB.
-Xmx<size> − It sets the maximum Java heap size. The default value is 750 MB.
-Xss<size> − It sets the Java thread stack size.
XX − It allows setting GC algorithm and other properties.