
Article Categories
- All Categories
-
 Data Structure
-
 Networking
-
 RDBMS
RDBMS
-
 Operating System
-
 Java
Java
-
 MS Excel
-
 iOS
iOS
-
 HTML
HTML
-
 CSS
CSS
-
 Android
-
 Python
-
 C Programming
-
 C++
C++
-
 C#
C#
-
 MongoDB
-
 MySQL
MySQL
-
 Javascript
-
 PHP
PHP
-
 Economics & Finance
How to Run Your First Spring Boot Application in IntelliJ?
IntelliJ is simple and very convenient to use in building reliable as well as scalable systems with Spring Boot, and it has become tremendously famous among Java developers. It also offers a convention-over-configuration approach by obviating the demand for bulky boilerplate code and enabling designers to concentrate on business logic.
This potent web tool aims in generating a basic project structure with the necessary dependencies. The second method focuses on importing a pre-existing Spring Boot project into IntelliJ IDEA so that one can work on an existing codebase.
To execute this code in IntelliJ one must ensure that they have the following prerequisites before we start ?
-
Your machine requires a Java Development Kit (JDK) installed.
-
Install and set up IntelliJ IDEA.
-
Java and Spring ideas at their most basic.
The Various Steps for Configuration Spring Boot Project in IntelliJ IDE
Step-1: Install After Downloading IntelliJ IDE
-
The official website of the IntelliJ IDEA at https://www.jetbrains.com/idea/ is visited.
-
Check for the "Download" button on the website and click it.
-
The edition of IntelliJ IDEA you want to download can be selected on the download page, which will be the next page you reach. A free Community Edition and a premium Ultimate Edition with a 30-day trial are both available.
-
Choose the preferred edition by selecting the relevant download button.
-
Once the download is finished, find the file and launch the installation.
-
Install IntelliJ IDEA on your system which can be done by following the instructions on the screen.
-
Utilizing the start menu on the system, one may start IntelliJ IDEA once the installation is finished.
-
When you first use IntelliJ IDEA, you will be prompted to set up a few preliminary options, such as selecting a theme and (if applicable) importing settings from a prior installation.
-
After the basic setup is finished, one may utilize IntelliJ IDEA for your Java development projects.
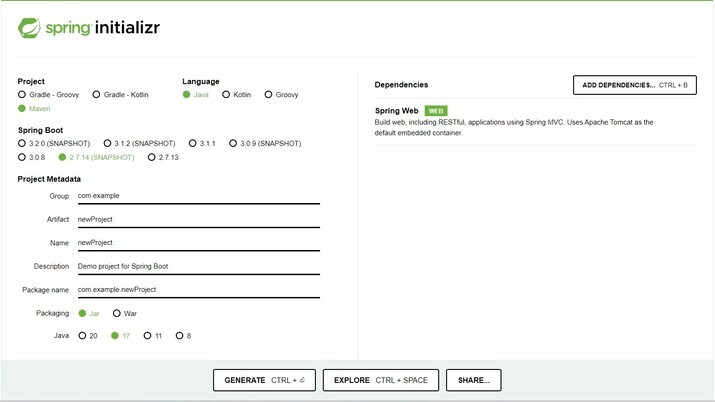
Step 2: Generate the Project From the Spring Initializr Website
-
Visit the website utilizing the given link https://start.spring.io/
-
Complete the project information ?
-
Choose the preferred Spring Boot edition.
-
For your project, type a Group name
-
Give your project an Artifact name, such as newProject.
-
Depending on the needs of your project, select the desired dependencies (such as Spring Web, Spring Data JPA, etc.).
-
By clicking on the Generate button, download the project structure as a ZIP file.
Step 3
Create or import the Spring boot project in IntelliJ IDEA and add a dependency. Add controller method and controller class.
Spring boot projects can be created using two approaches
-
With the help of spring initializr.
-
With the help of maven project in IntelliJ and adding dependencies as well as annotations.
Approach 1: With the Help of Spring Initialzr
-
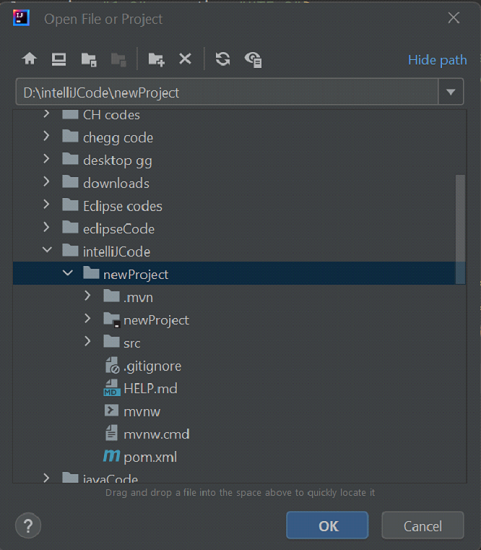
Open the project created from spring initializr.
-
Browse through the place where it is located and load into the intelliJ IDEA.
-
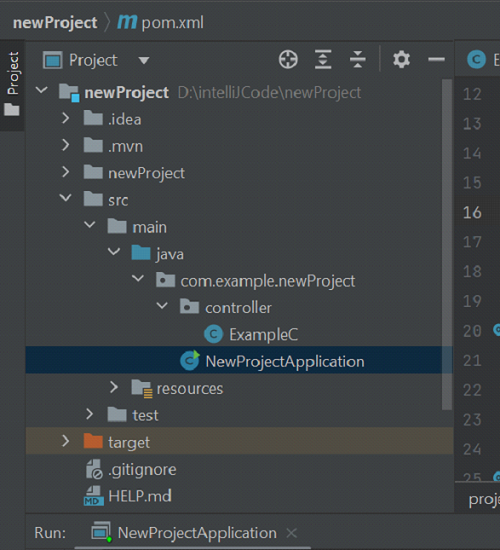
In the project create a controller package and create a class inside it as ExampleC. The package must be created inside the newProject -> src/main/java

-
Use annotation @Controller and import the required package for all annotations suggested by Eclipse. And add @RequestMapping to map the Spring MVC controller method. Utilize the @ResponseBody to bind the domain with the HTTP response body in the return type.
package org.example.controller;
import org.springframework.web.bind.annotation.RequestMapping;
import org.springframework.stereotype.Controller;
import org.springframework.web.bind.annotation.ResponseBody;

@Controller
public class ExampleC {
   @RequestMapping("/firstApp")
   @ResponseBody
   // Method
   public String firstSpringApp(){

      // Print statement
      return "Welcome!";
   }
}
Approach 2
With the help of the maven project in IntelliJ and adding dependencies as well as annotations.
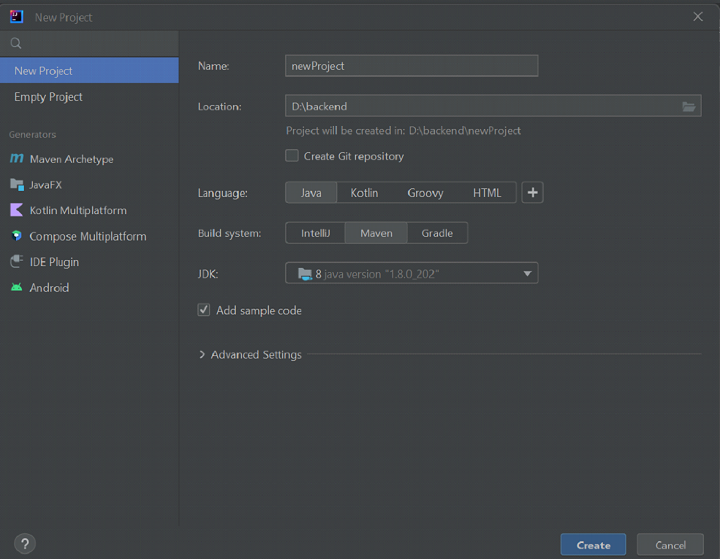
If you are creating a project with the help of a new project as maven in intelliJ then follow these steps.
-
Create a new project in IntelliJ
-
Create a maven project.
-
Add dependency in pom.xml inside project tag.
<dependencies>
   <dependency>
      <groupId>org.springframework.boot</groupId>
      <artifactId>spring-boot-starter</artifactId>
      <version>2.5.3</version>
   </dependency>
   <dependency>
      <groupId>org.springframework.boot</groupId>
      <artifactId>spring-boot-starter-web</artifactId>
      <version>2.5.3</version>
   </dependency>
</dependencies>
-
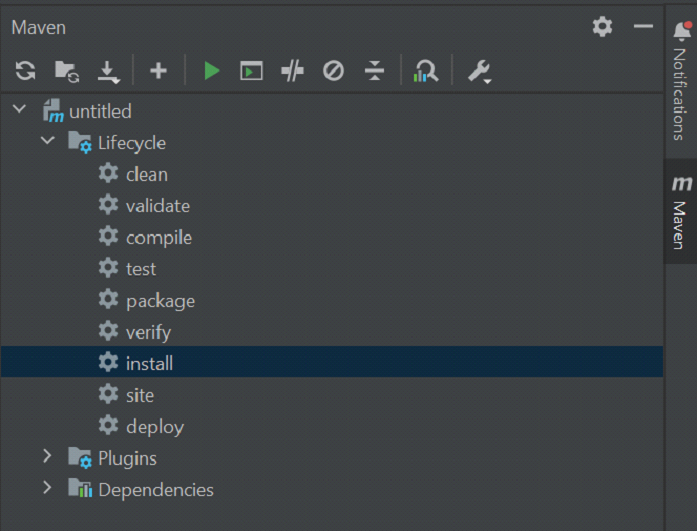
Update Maven Configuration, get the lifecycle section and double click on the install phase of the lifecycle.
-
Add the @SpringBootApplication annotation in the main class of the application.
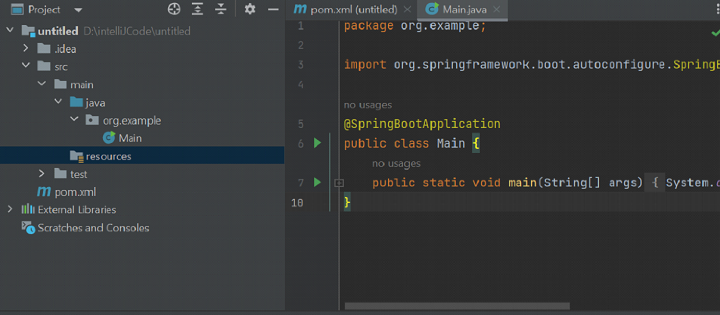
-
Add the SpringApplication.run(Main.class, args) statement in main to run spring application.
package org.example;
import org.springframework.boot.SpringApplication;
//import org.springframework.boot.autoconfigure.SpringBootApplication;
import org.springframework.boot.autoconfigure.SpringBootApplication;

@SpringBootApplication
public class Main {

   public static void main(String[] args) {
      SpringApplication.run(Main.class, args);
   }

}
-
Create a controller package and create a controller class inside it. In the project create a controller package and create a class inside it as ExampleC. The package must be created inside the newProject -> src/main/java.
-
Use annotation @Controller and import the required package for all annotations suggested by eclipse. And add @RequestMapping to map the Spring MVC controller method. Utilize the @ResponseBody to bind the domain with the HTTP response body in the return type.
package org.example.controller;
import org.springframework.web.bind.annotation.RequestMapping;
import org.springframework.stereotype.Controller;
import org.springframework.web.bind.annotation.ResponseBody;


@Controller
public class ExampleC {
   @RequestMapping("/firstApp")
   @ResponseBody
   // Method
   public String firstSpringApp(){

      // Print statement
      return "Welcome!";
   }
}
Step 4: Run the Application With the Help of the Green Button in the Toolbar.
The code will execute successfully and the console can be seen below ?
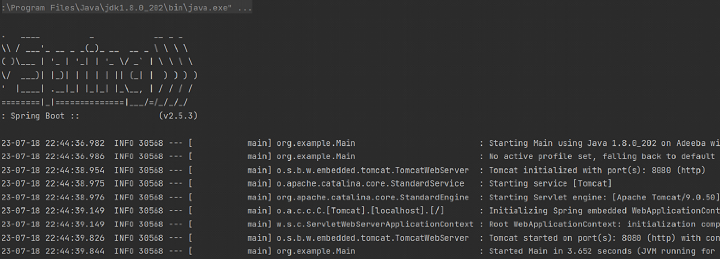
Note ? The Tomcat server started at 8080 as seen in the running console.
Step 5
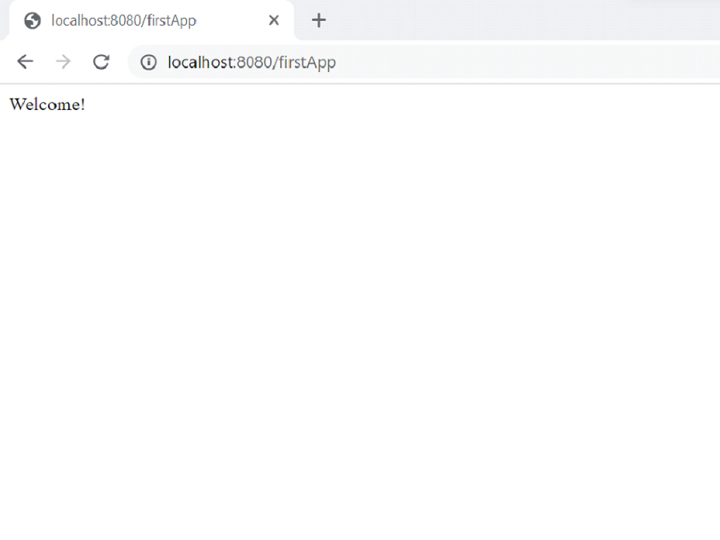
Display the result with the help of the localhost url http://localhost:8080/firstApp.
Conclusion
It is simple and quick to run the first Spring Boot application with IntelliJ IDEA. Users would rapidly begin working with Spring Boot by using Spring Initializr or creating a Maven project. Strong Spring Boot support in IntelliJ IDEA streamlines the procedure and boosts productivity. The simplicity of auto-configuration and the broad Spring ecosystem make it simple to create dependable and scalable apps. Use IntelliJ IDEA's robust tools with Spring Boot's convention-over-configuration methodology to build complex Java applications with ease.

811 Views
