
Article Categories
- All Categories
-
 Data Structure
-
 Networking
-
 RDBMS
RDBMS
-
 Operating System
-
 Java
Java
-
 MS Excel
-
 iOS
iOS
-
 HTML
HTML
-
 CSS
CSS
-
 Android
-
 Python
-
 C Programming
-
 C++
C++
-
 C#
C#
-
 MongoDB
-
 MySQL
MySQL
-
 Javascript
-
 PHP
PHP
-
 Economics & Finance
How to Create and Setup Spring Boot Project in Eclipse IDE?
The Spring Boot framework incorporates all of Spring's capabilities and features because it is built upon the basis of Spring. Developers are drawn to it because of its effective production-ready environment, which frees them up to focus on the logic of the application rather than on setup and configuration. Microservices-based applications that are suitable for deployment in a production environment may be created quickly thanks to Spring Boot.
Some of the key features of Spring Boot are
Auto-configuration Spring Boot's standout feature is its auto-configuration capability. It analyzes the project's classpath and automatically configures the necessary beans and components based on the dependencies present. This eliminates the need for manual configuration, reducing development time and effort.
Starter Dependencies Spring Boot offers a wide range of starter dependencies that simplify the inclusion of commonly used libraries and frameworks. These starters provide a curated set of dependencies, ensuring that developers have everything they need to get started quickly. Whether it's building a web application, connecting to a database, or implementing security features, Spring Boot starters have got you covered.
Embedded Server An additional noteworthy aspect of Spring Boot is the presence of an embedded server. Developers are no longer need to deploy their programmes to third-party servers such as Tomcat or Jetty. The embedded server in Spring Boot allows you to execute your application as a separate JAR file, simplifying deployment and distribution.
Spring Data Spring Boot works smoothly with Spring Data, a powerful module that streamlines database access and manipulation. Developers may conduct CRUD operations and complicated queries with minimum effort by utilising Spring Data. Spring Data supports a variety of database systems, making it very versatile and flexible.
Procedure
Firstly Install Eclipse IDE which is designed for "Enterprise Java and Web Developer".
We will create a Spring boot project using Spring Initializr.
Now import the downloaded Spring boot project into Eclipse IDE.
In the process of importing we need to for Maven under that choose the option "Existing Maven Project".
After that, click Next.
We need to select the project that is downloaded from Spring Initializr using the browse button.
Finally we came to an end by clicking Finish. We will successfully create a Spring Boot Project.
Below is a comprehensive guide accompanied by visual aids on how to create Spring Boot Project in Eclipse IDE which is designed for "Enterprise Java and Web Development", offering detailed explanations for each step
Step 1 Firstly Install Eclipse IDE which is designed for "Enterprise Java and Web Developer".
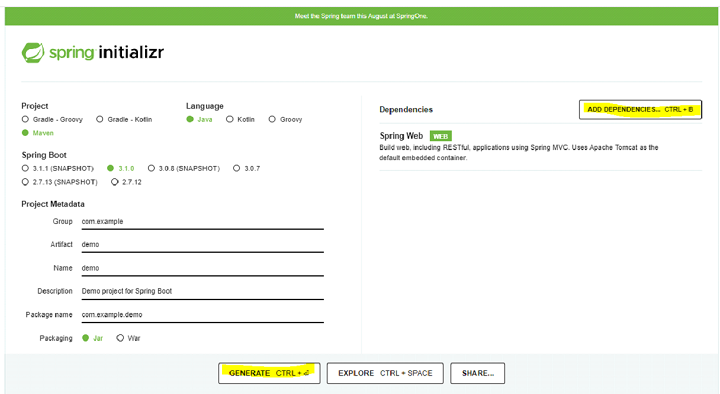
Step 2 We will create a Spring boot project with the help of Spring Initializr. To start creating a Spring Boot project, kindly click the link. Make sure you accurately complete all of the fields by entering the relevant data. Finally, press the button marked "GENERATE" that is placed below. As a result, a compressed zip file containing the Spring Boot project will be downloaded. On your system, extract the folder from the downloaded file.
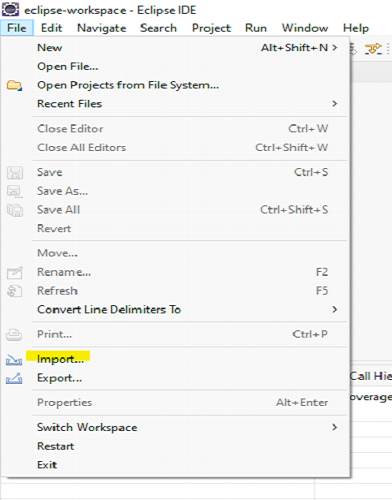
Step 3 Now import the downloaded Spring boot project into Eclipse IDE.
Open Eclipse IDE -> Go to File -> Select Import as shown in the image below.
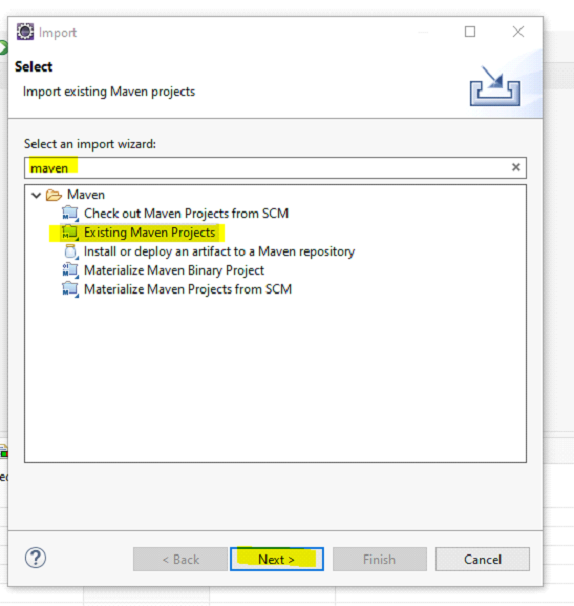
Step 4 Now you can search for maven in the search bar -> Under maven you can choose the option: Existing Maven Project -> and then we can proceed by clicking Next.
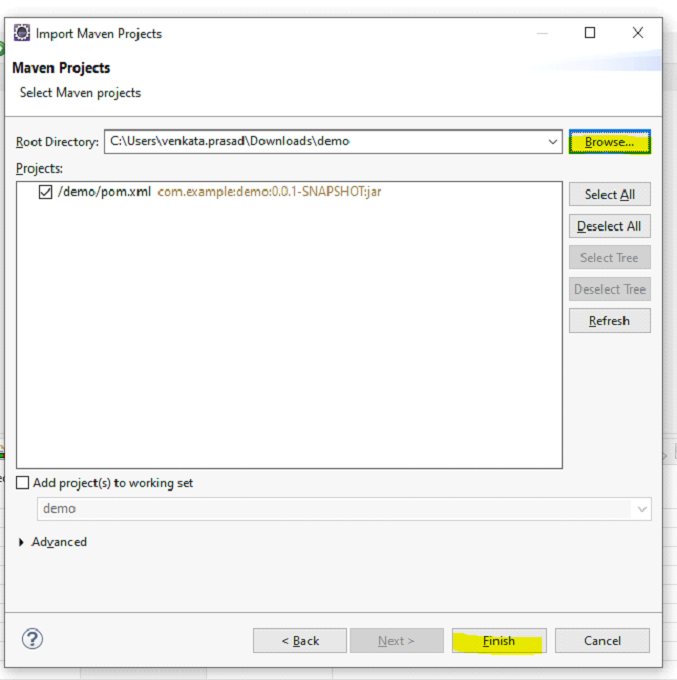
Step 5 It will now prompt you to select the maven project that you need to import and click the Browse button to select the extracted project that we have done in the previous steps -> click Finish.
Step 6 Finally, we have successfully created the spring boot project and let?s test it by running a sample java program.
Example
package com.example.demo;

import org.springframework.boot.SpringApplication;
import java.io.*;
import java.util.*;
import org.springframework.boot.autoconfigure.SpringBootApplication;

@SpringBootApplication
public class DemoApplication {

   public static void main(String[] args) {
      List<String> stu=new ArrayList<String>();
      stu.add("Hari");
      stu.add("Revanth");
      stu.add("Syam");
      System.out.println("List of Students");
      System.out.println("=================");
      for(String studentList : stu ) {
         System.out.println(studentList);
      }
   }

}
Output
List of Students
=================
Hari
Revanth
Syam
We will see one more example sample java program
Example
package com.example.demo;

import org.springframework.boot.SpringApplication;
import java.io.*;
import java.util.*;
import org.springframework.boot.autoconfigure.SpringBootApplication;

@SpringBootApplication
public class DemoApplication {

   public static void main(String[] args) {
      List<String> ld=new ArrayList<String>();
      ld.add("Welcome");
      ld.add("To");
      ld.add("Tutorials Point");
      System.out.println("List Data "+ld);
      //we will check whether particular element is present or not
      boolean res= ld.contains("Welcome");
      System.out.println("Welcome present or not ? "+res);
   }

}
Output
List Data [Welcome, To, Tutorials Point]
Welcome present or not ? true
Conclusion
In this article we have learnt about how to create a Spring Boot project in Eclipse IDE and we have also tested by running a few sample Java programs and we got the desired output.

2K+ Views
