
Article Categories
- All Categories
-
 Data Structure
-
 Networking
-
 RDBMS
RDBMS
-
 Operating System
-
 Java
Java
-
 MS Excel
-
 iOS
iOS
-
 HTML
HTML
-
 CSS
CSS
-
 Android
-
 Python
-
 C Programming
-
 C++
C++
-
 C#
C#
-
 MongoDB
-
 MySQL
MySQL
-
 Javascript
-
 PHP
PHP
-
 Economics & Finance
How to Run Your First Spring Boot Application in Spring Tool Suite?
Spring boot facilitate the simple way to create robust, scalable, as well as production-ready applications, by doing this they have revolutionized the development of Java applications. The "convention over configuration" philosophy, which is embraced by Spring Boot as a component of the larger Spring ecosystem, lessens the effort of manual setup and enables developers to concentrate on business logic rather than boilerplate code. The Spring Boot experience is considerably more effective when combined with Spring Tool Suite (STS), a specialized IDE created for Spring development.
To execute this code in Spring Tool Suite one must ensure that they have the following prerequisites before we start ?
-
Your machine requires Java Development Kit (JDK) to be installed.
-
Install and set up Spring Tool Suite which can be downloaded from the following link https://spring.io/tools.
-
Java and Spring ideas at their most basic.
The Steps for Creation and Configure Spring Boot Project in Spring Tool Suite
Step 1
-
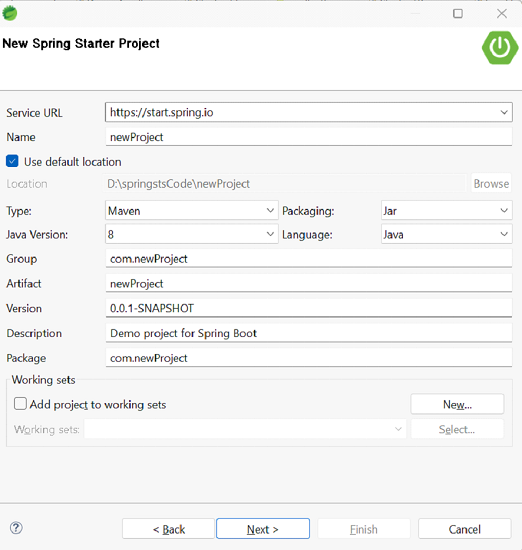
Select "File" > "New" > "Spring Starter Project" from the menu after starting Spring Tool Suite.

-
Give your project a name in the "New Spring Starter Project" dialogue and choose an appropriate build tool (often Maven or Gradle).
-
Select the correct Spring Boot framework version.
-
Choose the dependencies that are necessary for your project. You can select "Web" to build a simple web application for this example. Spring boot version can be edited in pom.xml as well.

-
To create the project, click "Finish".
Step 2: Understanding the Structure of Project
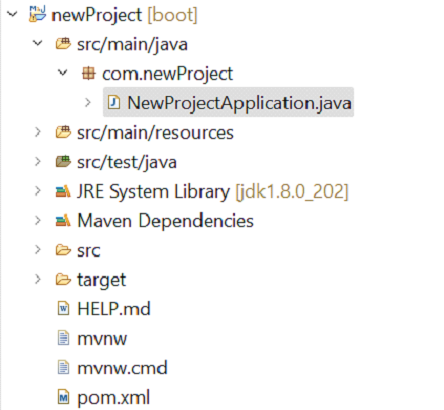
When the project is finished, it is some time getting acquainted with its layout. The Spring Boot project?s primary part are listed below ?
-
"src/main/java": Your Java source code is located in this directory.
-
Resources and configuration files can be found in the directory "src/main/resources".
-
Your test classes are located in the directory "src/test/java".
Step 3: Writing Your First Spring Boot Project
The default package and "Application.java" class are situated in the "src/main/java" folder. The primary Spring Boot application bootstrapping function is contained in this class.
The "Application.java" class are has the following content which has SpringApplication.run() method to execute the application
package com.newProject;

import org.springframework.boot.SpringApplication;
import org.springframework.boot.autoconfigure.SpringBootApplication;

@SpringBootApplication
public class NewProjectApplication {

   public static void main(String[] args) {
      SpringApplication.run(NewProjectApplication.class, args);
   }

}
Step 4: Executing the Application
-
In the Package Explorer, right-click on the "Application.java" class.
-
Go to "Run As" and choose "Spring Boot App."
-
The application will launch, and console logs detailing the application's setup procedure will appear.
-
Once the program has successfully launched, launch your web browser and go to "http://localhost:8080." A default welcome page must appear. The port 8080 depends upon the port you have specified in the application.properties.

Step 5: Adding Controller to the Project
-
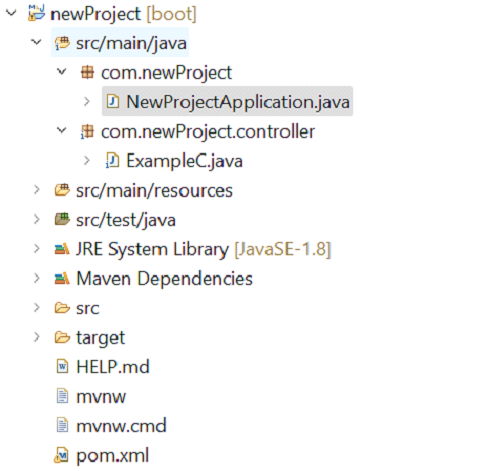
In the project create a controller package and create a class inside it as ExampleC. The package must be created inside the newProject -> src/main/java.
-
Use annotation @Controller and import the required package for all annotations suggested by eclipse. And add @RequestMapping to map the Spring MVC controller method. Utilize the @ResponseBody to bind the domain with the HTTP response body in the return type.
package com.newProject.controller;

import org.springframework.web.bind.annotation.RequestMapping;
import org.springframework.stereotype.Controller;
import org.springframework.web.bind.annotation.ResponseBody;

@Controller
public class ExampleC {
   @RequestMapping("/firstApp")
   @ResponseBody
   // Method
   public String firstSpringApp(){

      // Print statement
      return "Welcome!";
   }
}
-
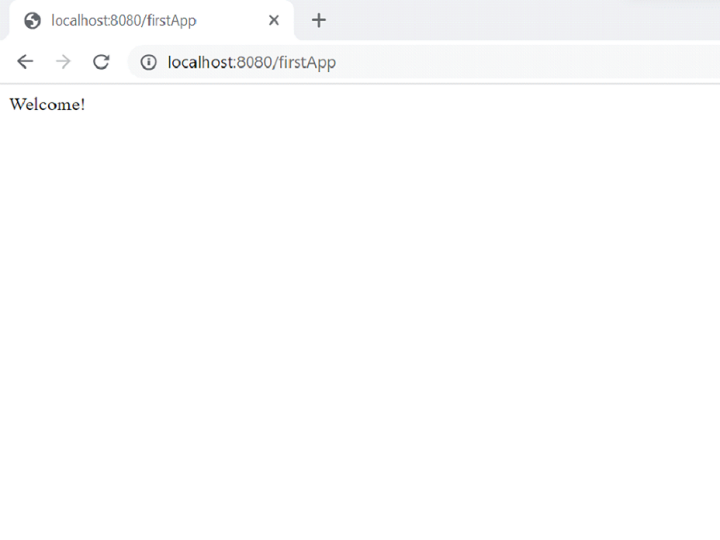
Finally, showcase the result with the help of the localhost url http://localhost:8080/firstApp.
Conclusion
This article has shown ONE how to build up and launch the first Spring Boot application with the Spring Tool Suite. After completing the prerequisites, we created a fresh Spring Boot project. We also created a little Spring Boot application, ran it, made a small change to see how it affected it, and then saw the results. A strong ecosystem for creating contemporary Java applications is offered by Spring Boot and the Spring Tool Suite. With this foundation in place, you can now investigate and create more intricate applications by utilizing the strength and practicality of the Spring framework.

2K+ Views
