 Data Structure
 Networking
 RDBMS
RDBMS Operating System
 Java
Java MS Excel
 iOS
iOS HTML
HTML CSS
CSS Android
 Python
 C Programming
 C++
C++ C#
C# MongoDB
 MySQL
MySQL Javascript
 PHP
PHP
- Selected Reading
- UPSC IAS Exams Notes
- Developer's Best Practices
- Questions and Answers
- Effective Resume Writing
- HR Interview Questions
- Computer Glossary
- Who is Who
How to Repeat First Column on Each Page When Printing in Excel?
Large Excel worksheets that cover several pages might occasionally make it difficult to navigate the printed document. Important information in the first column may be lost or difficult to find on successive pages in cases where the material is large. Excel offers a potent function called "Print Titles" that enables you to repeat particular rows or columns on every printed page in order to allay this worry and improve the readability of your printed Excel projects.
In this video, we'll walk you through each step of how to print Microsoft Excel such that the first column appears on every page. Both novice and expert users can complete the process because it is simple and doesn't call for specialised Excel knowledge. Let's get started with the tutorial and learn how to repeat the first column on each printed page to optimise the print layout of your Excel worksheets.
Repeat First Column on Each Page When Printing
Here we will make changes to the print setup to complete the task. So let us see a simple process to know how you can repeat the first column on each page when printing in Excel.
Step 1
Consider any Excel sheet where you have the required data.
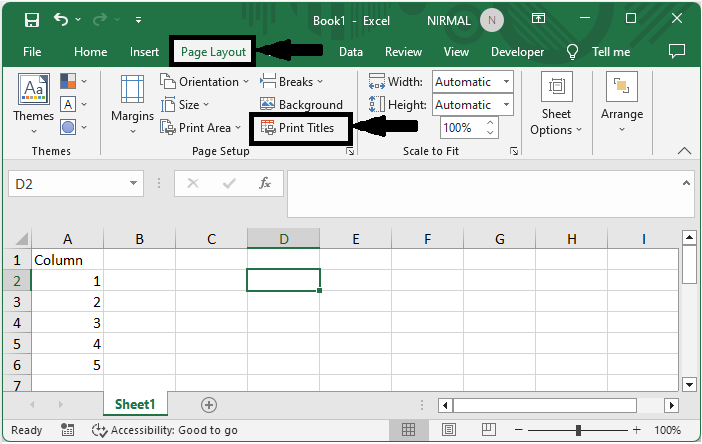
First, click on Page Layout and select Print Titles in the Page Setup group.
Page Layout > Print Titles.

Step 2
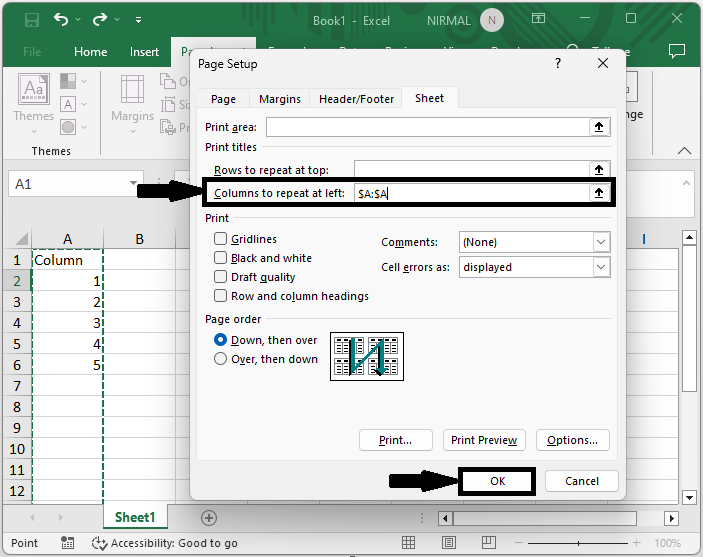
Then select the column you want to print in the box named Column to Repeat at Left and click OK to complete the task.
Column to Repeat at Left > OK

Step 3
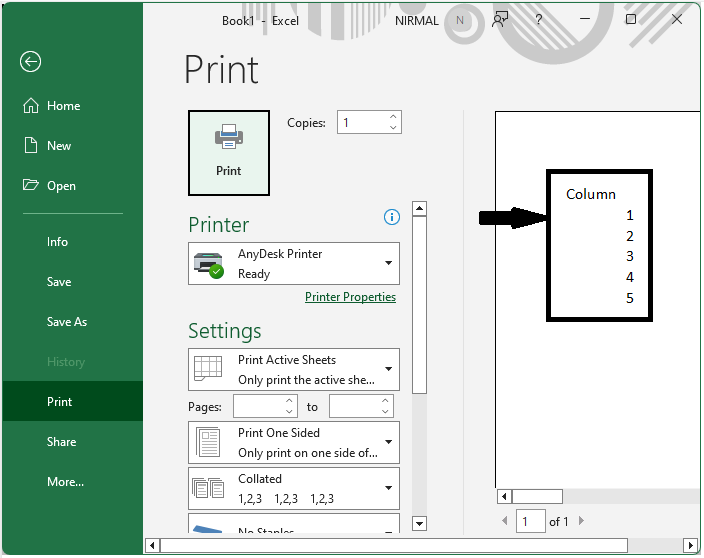
From now on, when you try to print the book, the column will be printed on each page.

This is how you can repeat the first column on each page when printing in Excel.
Conclusion
In this tutorial, we have used a simple process to show how you can repeat the first column on each page when printing in Excel to highlight a particular set of data.

