
Article Categories
- All Categories
-
 Data Structure
-
 Networking
-
 RDBMS
RDBMS
-
 Operating System
-
 Java
Java
-
 MS Excel
-
 iOS
iOS
-
 HTML
HTML
-
 CSS
CSS
-
 Android
-
 Python
-
 C Programming
-
 C++
C++
-
 C#
C#
-
 MongoDB
-
 MySQL
MySQL
-
 Javascript
-
 PHP
PHP
-
 Economics & Finance
How to Move a Certain Row into a New Sheet When Check Box is Checked in Excel?
Excel is an effective spreadsheet programme that enables users to efficiently organise and manage data. The capability to shift a row of data from one sheet to another based on a particular circumstance, such as when a checkbox is selected, is a helpful feature. You will be guided through the procedures needed to automate this process in this lesson, allowing you to streamline your data management responsibilities and increase productivity.
Please be aware that this tutorial was created exclusively for Microsoft Excel and might not work with other spreadsheet programmes. The instructions are also based on Excel's capabilities as of September 2021. The menu options and user interface of Excel may differ slightly depending on whatever version you are using. So let's get started and discover how to have Excel shift a certain row onto a new sheet when a checkbox is selected!
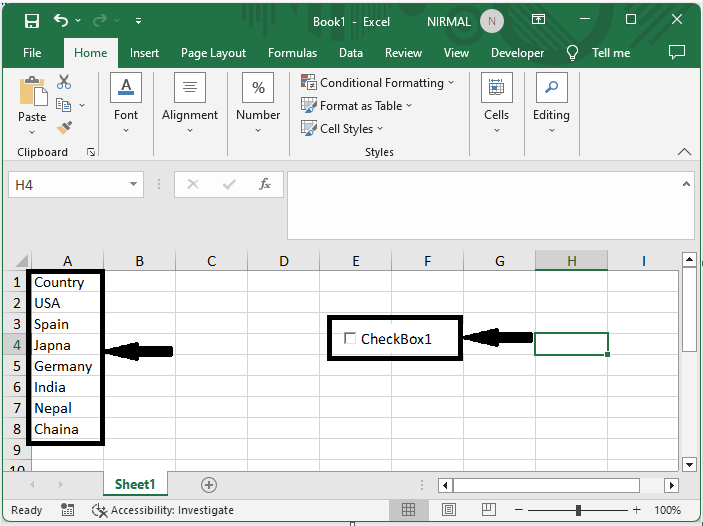
Move a Certain Row into a New Sheet When Check Box is Checked
Here we will first draw a check box, then add the VBA code to the sheet to complete the task. So let us see a simple process to know how you can move a certain row into a new sheet when a check box is checked in Excel.
Step 1
Consider an Excel sheet where the data in the sheet is similar to the below image.
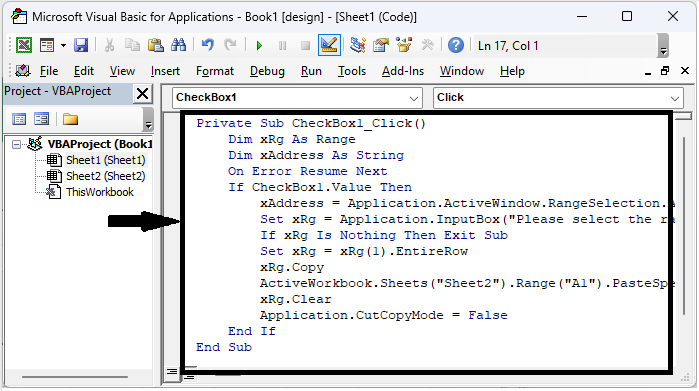
Right Click > View Code > Copy.
First, right-click on the sheet name and select View Code to open the VBA application, then copy the below code into the text box.
Code
Private Sub CheckBox1_Click()
   Dim xRg As Range
   Dim xAddress As String
   On Error Resume Next
   If CheckBox1.value Then
      xAddress = Application.ActiveWindow.RangeSelection.Address
      Set xRg = Application.InputBox("Please select the range row you will move(single cell)?", "Move Certain Row", xAddress, , , , , 8)
      If xRg Is Nothing Then Exit Sub
      Set xRg = xRg(1).EntireRow
      xRg.Copy
      ActiveWorkbook.Sheets("Sheet3").Range("A1").PasteSpecial xlPasteAllUsingSourceTheme
      xRg.Clear
      Application.CutCopyMode = False
   End If
End Sub
In the code, Sheet3 and A1 indicate that the specified row will be moved to the first row in Sheet3.
Step 2
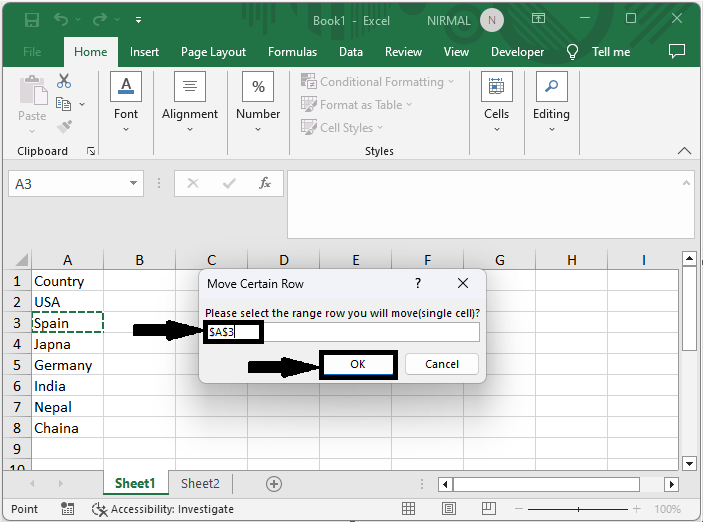
Then close the VBA using Alt + Q and exit the design mode. Then check the box, select the first cell of the row, and click OK.
Alt + Q > Design Mode > Check Box > Select Cell > Ok.
Then you will see that the whole row will be moved to a new sheet.
Conclusion
In this tutorial, we have used a simple example to demonstrate how you can move a certain row into a new sheet when a check box is checked in Excel to highlight a particular set of data.

4K+ Views
