
Article Categories
- All Categories
-
 Data Structure
-
 Networking
-
 RDBMS
RDBMS
-
 Operating System
-
 Java
Java
-
 MS Excel
-
 iOS
iOS
-
 HTML
HTML
-
 CSS
CSS
-
 Android
-
 Python
-
 C Programming
-
 C++
C++
-
 C#
C#
-
 MongoDB
-
 MySQL
MySQL
-
 Javascript
-
 PHP
PHP
-
 Economics & Finance
How to Move Entire Row to the Bottom of Active Sheet Based on Cell Value in Excel?
This tutorial will show you how to rearrange rows in an Excel spreadsheet depending on predetermined criteria using a straightforward yet powerful technique. There are many situations where Excel data needs to be sorted or rearranged. To prioritise or separate specific rows from the rest of the data, for example, you could wish to place them to the bottom of the sheet. This tutorial's main goal is to accomplish this by selecting which rows to relocate based on a cell value.
We'll assume you have a fundamental understanding of Excel and its features going into this course. By the conclusion, you will be able to effectively organise your data in Excel because you will learn exactly how to move entire rows to the bottom based on cell values. then let's get going!
Move Entire Row to the Bottom of Active Sheet Based on Cell Value
Here, we will first create a VBA module and then run it to complete the task. So let us see a simple process to know how you can move an entire row to the bottom of the active sheet based on a cell value in Excel.
Step 1
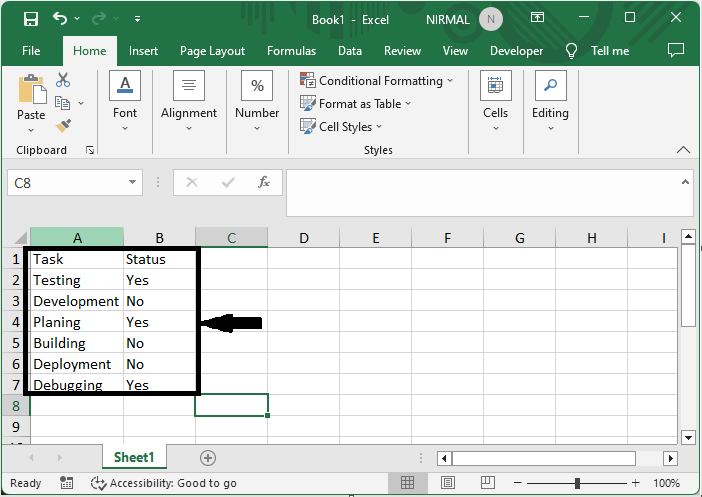
Consider an Excel sheet where the data in the sheet is similar to the below image.
First, right-click on the sheet name and select View code to open the VBA application.
Right Click > View Code.
Step 2
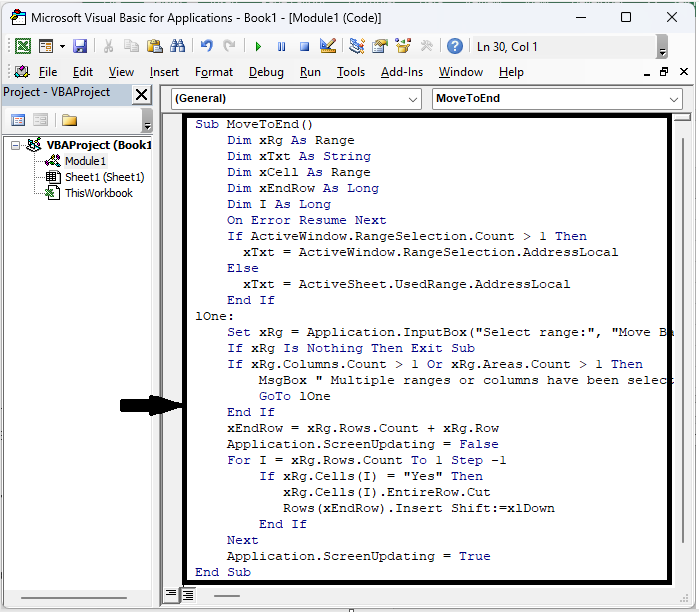
Then click on Insert and select Module, then copy the below code into the text box.
Insert > Module > Copy.
Code
Sub MoveToEnd()
   Dim xRg As Range
   Dim xTxt As String
   Dim xCell As Range
   Dim xEndRow As Long
   Dim I As Long
   On Error Resume Next
   If ActiveWindow.RangeSelection.Count > 1 Then
      xTxt = ActiveWindow.RangeSelection.AddressLocal
   Else
      xTxt = ActiveSheet.UsedRange.AddressLocal
   End If
lOne:
   Set xRg = Application.InputBox("Select range:", "Move Based Value", xTxt, , , , , 8)
   If xRg Is Nothing Then Exit Sub
   If xRg.Columns.Count > 1 Or xRg.Areas.Count > 1 Then
      MsgBox " Multiple ranges or columns have been selected ", vbInformation, "Move Based Value"
      GoTo lOne
   End If
   xEndRow = xRg.Rows.Count + xRg.Row
   Application.ScreenUpdating = False
   For I = xRg.Rows.Count To 1 Step -1
      If xRg.Cells(I) = "Yes" Then
         xRg.Cells(I).EntireRow.Cut
         Rows(xEndRow).Insert Shift:=xlDown
      End If
   Next
   Application.ScreenUpdating = True
End Sub
In the VBA code, "Done" is the cell value you will move the entire row based on. You can change it as you need.
Step 3
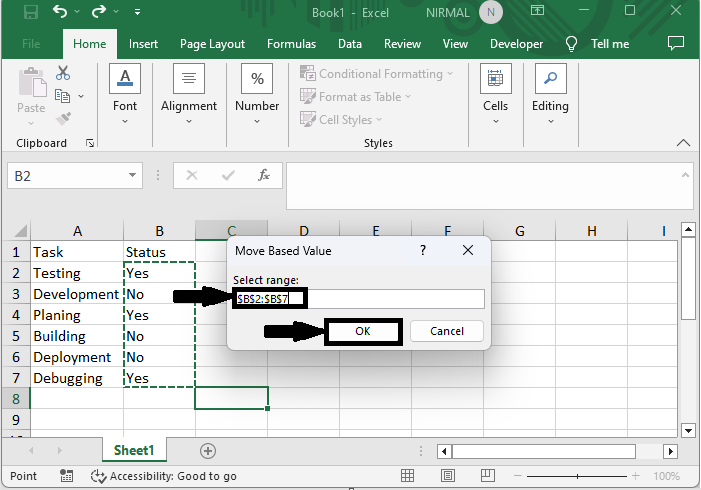
Then click F5 to run the module. Then select the range of cells and click OK to complete the task.
This is how you can move an entire row to the bottom of the active sheet based on a cell value in Excel.
Conclusion
In this tutorial, we have used a simple example to demonstrate how you can move an entire row to the bottom of the active sheet based on cell value in Excel to highlight a particular set of data.

2K+ Views
