 Data Structure
 Networking
 RDBMS
RDBMS Operating System
 Java
Java MS Excel
 iOS
iOS HTML
HTML CSS
CSS Android
 Python
 C Programming
 C++
C++ C#
C# MongoDB
 MySQL
MySQL Javascript
 PHP
PHP
- Selected Reading
- UPSC IAS Exams Notes
- Developer's Best Practices
- Questions and Answers
- Effective Resume Writing
- HR Interview Questions
- Computer Glossary
- Who is Who
How to modify tags in Tkinter Canvas by events?
The Tkinter library in Python provides a powerful Canvas widget for creating graphical user interfaces. The Canvas widget allows you to draw shapes, images, and text on a customizable surface. In addition to the visual elements, the Canvas also supports tags, which are used to group and manipulate objects as a whole.
In this article, we will explore how to modify tags in Tkinter Canvas by events. We will provide a step-by-step guide and a complete implementation example to demonstrate this process.
Understanding Tags in Tkinter Canvas
Tags in Tkinter Canvas are identifiers assigned to one or more objects on the canvas. They allow you to manipulate multiple objects simultaneously, making it easier to apply changes or perform actions on a group of items. Tags can be assigned to objects when they are created or added to the canvas, and they can also be modified or removed dynamically.
Step 1: Import the Necessary Modules
To begin, import the required modules for our implementation: tkinter.
import tkinter as tk
Tkinter provides the GUI framework for creating the Canvas widget and handling events.
Step 2: Create a Tkinter Window and Canvas
Next, create a new Tkinter window and a Canvas widget within it.
# Create a Tkinter window
window = tk.Tk()
window.geometry("720x250")
window.title("Modify Tags in Tkinter Canvas")
# Create a Canvas widget
canvas = tk.Canvas(window, width=400, height=400)
canvas.pack()
In this code snippet, we create a new Tkinter window with the title "Modify Tags in Tkinter Canvas". Then, we create a Canvas widget with a width of 400 pixels and a height of 400 pixels. The Canvas widget is packed to fit within the window.
Step 3: Add Objects to the Canvas
Now, let's add some objects to the Canvas and assign tags to them.
# Create rectangles with tags
rectangle = canvas.create_rectangle(50, 50, 150, 150, fill="red", tags="shape")
circle = canvas.create_oval(200, 50, 300, 150, fill="blue", tags="shape")
text = canvas.create_text(175, 200, text="Hello, Canvas!", font=("Arial", 16), tags="text")
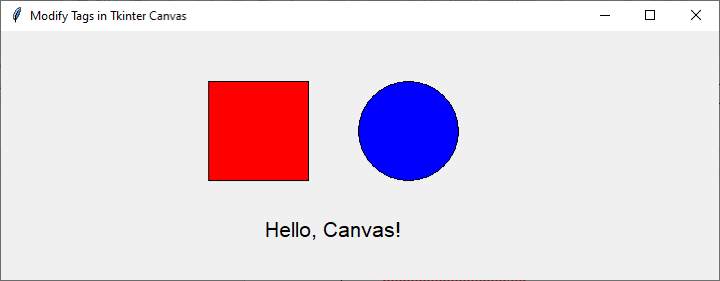
In this example, we create a red rectangle, a blue circle, and a text object on the Canvas. We assign the tag "shape" to both the rectangle and the circle, and the tag "text" to the text object. These tags will allow us to modify or manipulate these objects as a group.
Step 4: Modify Tags with Events
To modify tags based on events, we need to bind event handlers to the Canvas. These event handlers will be triggered when specific events occur.
# Define the function to modify tags
def change_color(event):
   canvas.itemconfig("shape", fill="green")
# Bind the left mouse button click event to the modify_tags function
canvas.bind("<Button-1>", change_color)
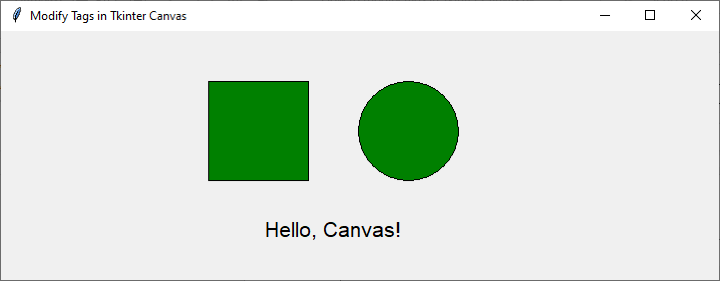
In this example, we define a function change_color() that will be executed when the left mouse button is clicked ("<Button-1>" event). Inside the function, we use the itemconfig() method of the Canvas to modify the fill color of all objects with the tag "shape" to green.
We then bind the "<Button-1>" event to the Canvas using the bind() method. When the left mouse button is clicked on the Canvas, the change_color() function will be invoked, and the objects with the "shape" tag will have their fill color changed to green.
Example
# Import the necessary module
import tkinter as tk
# Create a Tkinter window
window = tk.Tk()
window.geometry("720x250")
window.title("Modify Tags in Tkinter Canvas")
# Create a Canvas widget
canvas = tk.Canvas(window, width=400, height=400)
canvas.pack()
# Create rectangles with tags
rectangle = canvas.create_rectangle(50, 50, 150, 150, fill="red", tags="shape")
circle = canvas.create_oval(200, 50, 300, 150, fill="blue", tags="shape")
text = canvas.create_text(175, 200, text="Hello, Canvas!", font=("Arial", 16), tags="text")
# Define the function to modify tags
def change_color(event):
   canvas.itemconfig("shape", fill="green")
# Bind the left mouse button click event to the modify_tags function
canvas.bind("<Button-1>", change_color)
# Start the Tkinter event loop
window.mainloop()
In this complete implementation example, we have incorporated all the steps outlined in the article. We create a Tkinter window with a Canvas widget and add objects to the Canvas with assigned tags. We then define an event handler function to modify the fill color of objects with the "shape" tag when the left mouse button is clicked. Finally, we bind the event handler to the Canvas.
Output
By running this example, you can click on the Canvas, and all objects with the "shape" tag (the rectangle and the circle) will change their fill color to green. The text object remains unchanged since it has a different tag.

Let's click on the canvas and all objects will change their color to green

Conclusion
Modifying tags in Tkinter Canvas by events allows you to apply changes or perform actions on multiple objects simultaneously. This feature is useful when you want to manipulate a group of items on the Canvas. By following the step-by-step guide and utilizing the provided implementation example, you can easily modify tags in Tkinter Canvas based on events and enhance the interactivity and functionality of your Canvas-based applications.

