
Article Categories
- All Categories
-
 Data Structure
-
 Networking
-
 RDBMS
RDBMS
-
 Operating System
-
 Java
Java
-
 MS Excel
-
 iOS
iOS
-
 HTML
HTML
-
 CSS
CSS
-
 Android
-
 Python
-
 C Programming
-
 C++
C++
-
 C#
C#
-
 MongoDB
-
 MySQL
MySQL
-
 Javascript
-
 PHP
PHP
-
 Economics & Finance
How to Increment Date by 1 Month, 1 Year, or 7 Days in Excel?
The usefulness of Microsoft Excel is indisputable as it offers an extensive selection of tools for enhancing and tailoring data. When it comes to managing date related tasks in Excel adding a predetermined amount of time to pre existing dates often becomes necessary.. The great news is that Excel provides multiple methods for incrementing dates by set periods, whether it's weeks, years, or days. In the upcoming sections, we will explore and discuss various techniques that can be employed to achieve this objective effectively, thereby enhancing your proficiency in working with increased dates within Excel's environment.
By mastering these methods, you will gain the ability to effortlessly increase dates in Excel, opening up new possibilities for data analysis, planning, and scheduling. Whether you need to calculate future important dates or manage time-dependent processes, Excel's flexible and versatile approaches will enable you to handle such scenarios with ease. So, let's dive into the world of Excel date manipulation and discover the practical techniques that will empower you to excel at incrementing dates in your spreadsheets.
Approach 1: Using the DATE Function and EDATE Function to Increment Dates by Months
In this approach, you can use the EDATE function in Excel to increment dates by a specified number of months. By providing the initial date and the desired number of months to add, the function calculates the incremented date automatically. For example, by using =EDATE(A1, 1), where A1 contains the initial date, you can increment the date by 1 month.
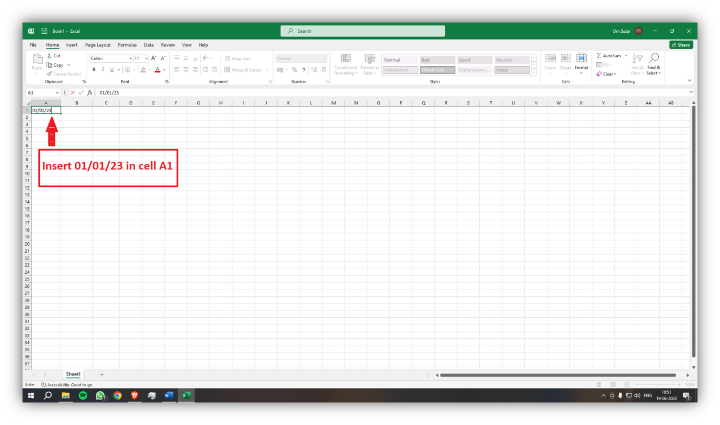
Step 1 ? Commence by selecting a specific cell to house your initial date and correctly entering it with your preferred format (e.g.. "01/01/2023" in A1).

Step 2 ? Afterwards proceed to another designated cell and implement this formula to increase the given date by one month ?
=EDATE(A1, 1)

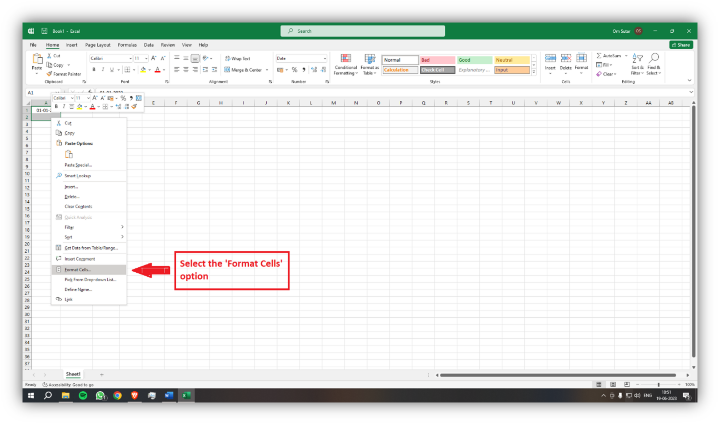
Step 3 ? The result should be a date value, but it appears to be displaying a numeric value instead.
Select the cell containing the incremented date.
Right-click on the cell and choose "Format Cells" from the context menu.
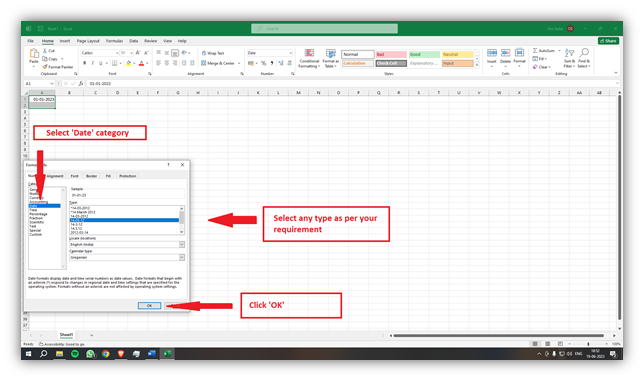
In the "Format Cells" dialog box, navigate to the "Number" tSelect "Date" from the category list.
Choose the desired date format or customize it according to your preference.
Click "OK" to apply the formatting.
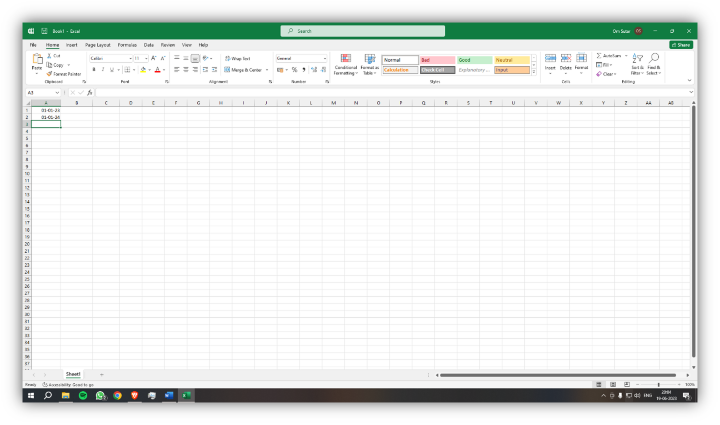
Step 4 ? Press Enter. The result cell will display the date incremented by 1 month. In this case, the result will be "01/02/2023".

Step 5 ? If you want to increment by more than 1 month, modify the formula accordingly. For example, to increment by 3 months, use the formula ?
=EDATE(A1, 3)


Approach 2: Using the DATE Function and EDATE Function to Increment Dates by Years
To increment dates by years, you can utilize the DATE function in Excel. You can determine an address of an incremented data set with ease through utilizing the DATE formula followed by insertion of years onto your original starting point inserted into a designated cell location. Adding just one extra year can be achieved through implementation =DATE(YEAR(A1)+ A single time addition is accomplished after entering your desired starting point which you simply need to put in its place such as "01/01/2023" where it belongs within a selected location like A- one-starting point .
Step 1 ? Enter the initial date in a cell, let's say A1, in the desired date format. For example, you can enter "01/01/2023" in cell A1.

Step 2 ? In another cell, enter the following formula to increment the date by 1 year ?
=EDATE(A1, 12)

Step 3 ? Press Enter. The result cell will display the date incremented by 1 year. In this case, the result will be "01/01/2024".
Step 4 ? If you want to increment by more than 1 year, modify the formula accordingly. For example, to increment by 5 years, use the formula ?
=EDATE(A1, 60)


Approach 3: Using the DATE Function and SUM Function to Increment Dates by Days
If you want to increment dates by a specific number of days, you can use the DATE function in combination with simple addition. By adding the desired number of days to the initial date using the DATE function, you can obtain the incremented date. For example, by using =A1+7, where A1 contains the initial date, you can increment the date by 7 days.
Step 1 ? Enter the initial date in a cell, let's say A1, in the desired date format. For example, you can enter "01/01/2023" in cell A1.

Step 2 ? In another cell, enter the following formula to increment the date by 7 days ?
=A1 + 7

Step 3 ? Press Enter. The result cell will display the date incremented by 7 days. In this case, the result will be "01/08/2023".

Step 4 ? If you want to increment by a different number of days, modify the formula accordingly. For example, to increment by 14 days, use the formula ?
=A1 + 14


Conclusion
This article explores different methods for easily increasing dates on Excel sheets. By utilizing appropriate functions and formulas, smooth date incrementation can be achieved for specific periods like months, years, or days. The first approach involves using the DATE and EDATE functions to increment dates by a specified number of months. The second approach focuses on annual date increments, using the same functions but converting years to months. The third approach utilizes the DATE and SUM functions to increment dates by days. Excel offers these versatile methods for handling various scenarios, such as date-dependent calculations and project timelines. Incorporate these techniques into your spreadsheets to take advantage of Excel's powerful date manipulation features.

22K+ Views
