
Article Categories
- All Categories
-
 Data Structure
-
 Networking
-
 RDBMS
RDBMS
-
 Operating System
-
 Java
Java
-
 MS Excel
-
 iOS
iOS
-
 HTML
HTML
-
 CSS
CSS
-
 Android
-
 Python
-
 C Programming
-
 C++
C++
-
 C#
C#
-
 MongoDB
-
 MySQL
MySQL
-
 Javascript
-
 PHP
PHP
-
 Economics & Finance
How to implement Android button Sheet widget?
This example demonstrates how do I implement android button sheet widget.
Step 1 − Create a new project in Android Studio, go to File ⇒ New Project and fill all required details to create a new project.
Step 2 − Add the following code to res/layout/activity_main.xml.
<?xml version="1.0" encoding="utf-8"?>
<android.support.design.widget.CoordinatorLayout
   xmlns:android="http://schemas.android.com/apk/res/android"
   xmlns:app="http://schemas.android.com/apk/res-auto"
   xmlns:tools="http://schemas.android.com/tools"
   android:layout_width="match_parent"
   android:layout_height="match_parent"
   tools:context="MainActivity">
   <android.support.design.widget.AppBarLayout
      android:layout_width="match_parent"
      android:layout_height="wrap_content">
      <android.support.v7.widget.Toolbar
         android:id="@+id/toolbar"
         android:layout_width="match_parent"
         android:layout_height="?attr/actionBarSize"
         android:background="?attr/colorPrimary"
         app:popupTheme="@style/Widget.Support.CoordinatorLayout" />
   </android.support.design.widget.AppBarLayout>
   <include layout="@layout/content" />
<!-- Adding bottom sheet after main content -->   <include layout="@layout/bottomsheet" />
</android.support.design.widget.CoordinatorLayout>
Step 3 − Open build.gradle (Module:app) and add the following dependency
implementation 'com.android.support:design:28.0.0'
implementation 'com.jakewharton:butterknife:8.8.1'
annotationProcessor 'com.jakewharton:butterknifecompiler:8.8.1'
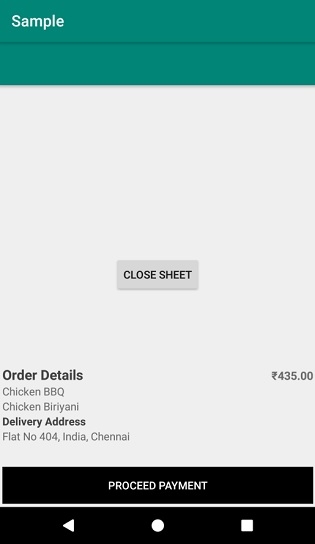
Step 4 − Create a layout (bottomsheet.xml) and the following code −
<?xml version="1.0" encoding="utf-8"?>
<LinearLayout
   xmlns:android="http://schemas.android.com/apk/res/android"
   xmlns:app="http://schemas.android.com/apk/res-auto"
   android:id="@+id/bottomSheet"
   android:layout_width="match_parent"
   android:layout_height="wrap_content"
   android:orientation="vertical"
   android:padding="4dp"
   app:behavior_hideable="true"
   app:behavior_peekHeight="10dp"
   app:layout_behavior="android.support.design.widget.BottomSheetBehavior">
   <LinearLayout
      android:layout_width="match_parent"
      android:layout_height="wrap_content"
      android:orientation="horizontal"
      android:layout_gravity="center_vertical"
      android:weightSum="3">
      <TextView
         android:layout_width="0dp"
         android:layout_height="wrap_content"
         android:layout_weight="2"
         android:text="Order Details"
         android:textColor="#444"
         android:textSize="18dp"
         android:textStyle="bold" />
      <TextView
         android:layout_width="0dp"
         android:gravity="right"
         android:layout_height="wrap_content"
         android:layout_weight="1"
         android:textStyle="bold"
         android:textSize="15dp"
         android:text="?435.00"></TextView>
   </LinearLayout>
   <TextView
      android:layout_width="wrap_content"
      android:layout_height="wrap_content"
      android:text="Chicken BBQ" />
   <TextView
      android:layout_width="wrap_content"
      android:layout_height="wrap_content"
      android:text="Chicken Biriyani" />
   <TextView
      android:layout_width="wrap_content"
      android:layout_height="wrap_content"
      android:text="Delivery Address"
      android:textColor="#444"
      android:textStyle="bold" />
   <TextView
      android:layout_width="wrap_content"
      android:layout_height="wrap_content"
      android:text="Flat No 404, India, Chennai" />
   <Button
      android:layout_width="match_parent"
      android:layout_height="wrap_content"
      android:layout_marginTop="30dp"
      android:background="#000"
      android:text="PROCEED PAYMENT"
      android:textColor="#fff" />
</LinearLayout>
Step 5 − Create a layout (content.xml) and add the following code −
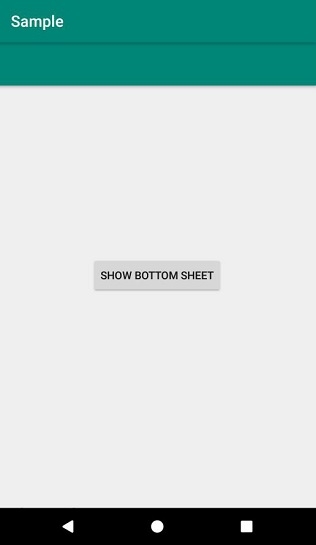
<?xml version="1.0" encoding="utf-8"?>
<RelativeLayout
   xmlns:android="http://schemas.android.com/apk/res/android"
   xmlns:tools="http://schemas.android.com/tools"
   android:layout_width="match_parent"
   android:layout_height="match_parent"
   android:orientation="vertical"
   tools:context="MainActivity"
   tools:showIn="@layout/activity_main">
   <Button
      android:id="@+id/btnBottomSheet"
      android:layout_width="wrap_content"
      android:layout_height="wrap_content"
      android:text="Show Bottom Sheet"
      android:layout_centerInParent="true"/>
</RelativeLayout>
Step 6 − Add the following code to src/MainActivity.java
import android.os.Bundle;
import android.support.annotation.NonNull;
import android.support.design.widget.BottomSheetBehavior;
import android.support.v7.app.AppCompatActivity;
import android.support.v7.widget.Toolbar;
import android.view.View;
import android.widget.Button;
import android.widget.LinearLayout;
import butterknife.BindView;
import butterknife.ButterKnife;
import butterknife.OnClick;
public class MainActivity extends AppCompatActivity {
   @BindView(R.id.btnBottomSheet)
   Button btnBottomSheet;
   @BindView(R.id.bottomSheet)
   LinearLayout layoutBottomSheet;
   BottomSheetBehavior sheetBehavior;
   @Override
   protected void onCreate(Bundle savedInstanceState) {
      super.onCreate(savedInstanceState);
      setContentView(R.layout.activity_main);
      ButterKnife.bind(this);
      Toolbar toolbar = findViewById(R.id.toolbar);
      //setSupportActionBar(toolbar);
      sheetBehavior = BottomSheetBehavior.from(layoutBottomSheet);
      sheetBehavior.setBottomSheetCallback(new BottomSheetBehavior.BottomSheetCallback() {
         @Override
         public void onStateChanged(@NonNull View bottomSheet, int newState) {
            switch (newState) {
               case BottomSheetBehavior.STATE_HIDDEN:
               break;
               case BottomSheetBehavior.STATE_EXPANDED: {
                  btnBottomSheet.setText("Close Sheet");
               }
               break;
               case BottomSheetBehavior.STATE_COLLAPSED: {
                  btnBottomSheet.setText("Expand Sheet");
               }
               break;
               case BottomSheetBehavior.STATE_DRAGGING:
               break;
               case BottomSheetBehavior.STATE_SETTLING:
               break;
            }
         }
         @Override
         public void onSlide(@NonNull View bottomSheet, float slideOffset) { }
      });
   }
   @OnClick(R.id.btnBottomSheet)
   public void toggleBottomSheet() {
      if (sheetBehavior.getState() !=
         BottomSheetBehavior.STATE_EXPANDED) {
            sheetBehavior.setState(BottomSheetBehavior.STATE_EXPANDED);
            btnBottomSheet.setText("Close sheet");
         } else {
         sheetBehavior.setState(BottomSheetBehavior.STATE_COLLAPSED);
         btnBottomSheet.setText("Expand sheet");
      }
   }
}
Step 7 − Add the following code to androidManifest.xml
<?xml version="1.0" encoding="utf-8"?>
<manifest
   xmlns:android="http://schemas.android.com/apk/res/android"
   package="app.com.sample">
   <application
      android:allowBackup="true"
      android:icon="@mipmap/ic_launcher"
      android:label="@string/app_name"
      android:roundIcon="@mipmap/ic_launcher_round"
      android:supportsRtl="true"
      android:theme="@style/AppTheme">
      <activity android:name=".MainActivity">
         <intent-filter>
            <action
               android:name="android.intent.action.MAIN" />
            <category
               android:name="android.intent.category.LAUNCHER" />
         </intent-filter>
      </activity>
   </application>
</manifest>
Let's try to run your application. I assume you have connected your actual Android Mobile device with your computer. To run the app from android studio, open one of your project's activity files and click Run ![]() icon from the toolbar. Select your mobile device as an option and then check your mobile device which will display your default screen −
icon from the toolbar. Select your mobile device as an option and then check your mobile device which will display your default screen −

465 Views
