
Article Categories
- All Categories
-
 Data Structure
-
 Networking
-
 RDBMS
RDBMS
-
 Operating System
-
 Java
Java
-
 MS Excel
-
 iOS
iOS
-
 HTML
HTML
-
 CSS
CSS
-
 Android
-
 Python
-
 C Programming
-
 C++
C++
-
 C#
C#
-
 MongoDB
-
 MySQL
MySQL
-
 Javascript
-
 PHP
PHP
-
 Economics & Finance
Selected Reading
How to programmatically set drawableLeft on Android button?
This example demonstrates how do I programmatically set drawableleft in android.
Step 1 − Create a new project in Android Studio, go to File ⇒ New Project and fill all required details to create a new project.
Step 2 − Add the following code to res/layout/activity_main.xml.
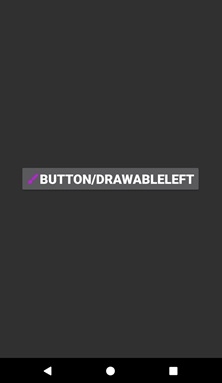
<?xml version="1.0" encoding="utf-8"?>
<RelativeLayout xmlns:android="http://schemas.android.com/apk/res/android"
   xmlns:tools="http://schemas.android.com/tools"
   android:layout_width="match_parent"
   android:layout_height="match_parent"
   tools:context=".MainActivity">

   <Button
      android:id="@+id/button"
      android:layout_width="wrap_content"
      android:layout_height="wrap_content"
      android:text="Button/DrawableLeft"
      android:layout_centerInParent="true"
      android:drawableStart="@drawable/ic_brush"
      android:textSize="24sp"
      android:textStyle="bold"/>
</RelativeLayout>
Step 3 − Add the following code to src/MainActivity.java
import android.graphics.drawable.Drawable;
import android.support.v7.app.AppCompatActivity;
import android.os.Bundle;
import android.widget.Button;

public class MainActivity extends AppCompatActivity {
   Button button;
   @Override
   protected void onCreate(Bundle savedInstanceState) {
      super.onCreate(savedInstanceState);
      setContentView(R.layout.activity_main);
      button = findViewById(R.id.button);
      Drawable img = button.getContext().getResources().getDrawable( R.drawable.ic_brush );
      button.setCompoundDrawablesWithIntrinsicBounds( img, null, null, null);
   }
}
Step 4 - Add the following code to androidManifest.xml
<?xml version="1.0" encoding="utf-8"?>
<manifest xmlns:android="http://schemas.android.com/apk/res/android"
   package="app.com.sample">

   <application
      android:allowBackup="true"
      android:icon="@mipmap/ic_launcher"
      android:label="@string/app_name"
      android:roundIcon="@mipmap/ic_launcher_round"
      android:supportsRtl="true"
      android:theme="@style/AppTheme">
      <activity android:name=".MainActivity">
         <intent-filter>
            <action android:name="android.intent.action.MAIN" />
            <category android:name="android.intent.category.LAUNCHER" />
         </intent-filter>
      </activity>
   </application>
</manifest>
Let's try to run your application. I assume you have connected your actual Android Mobile device with your computer. To run the app from android studio, open one of your project's activity files and click Run ![]() Icon from the toolbar. Select your mobile device as an option and then check your mobile device which will display your default screen –
Icon from the toolbar. Select your mobile device as an option and then check your mobile device which will display your default screen –

Updated on: 2020-07-01T07:48:12+05:30
7K+ Views

Advertisements