
Article Categories
- All Categories
-
 Data Structure
-
 Networking
-
 RDBMS
RDBMS
-
 Operating System
-
 Java
Java
-
 MS Excel
-
 iOS
iOS
-
 HTML
HTML
-
 CSS
CSS
-
 Android
-
 Python
-
 C Programming
-
 C++
C++
-
 C#
C#
-
 MongoDB
-
 MySQL
MySQL
-
 Javascript
-
 PHP
PHP
-
 Economics & Finance
How to implement Android TextInputLayout
Before getting into example, we should know what is TextInputLayout in android. TextInputLayout is extended by Linear Layout. It going to act as a wrapper for edit text and shows flatting hint animation for edit text.
This example demonstrate about how to implement Android TextInputLayout.
Step 1 − Create a new project in Android Studio, go to File ⇒ New Project and fill all required details to create a new project.
Step 2 − Add the following code to res/layout/activity_main.xml.
<?xml version = "1.0" encoding = "utf-8"?>
<LinearLayout xmlns:android = "http://schemas.android.com/apk/res/android"
   xmlns:tools = "http://schemas.android.com/tools"
   android:layout_width = "match_parent"
   android:layout_height = "match_parent"
   tools:context = ".MainActivity"
   android:background = "#dde4dd"
   android:orientation = "vertical">
   <android.support.design.widget.TextInputLayout
      android:layout_width = "match_parent"
      android:layout_height = "wrap_content"
      android:id = "@+id/layoutEmail"
      android:layout_marginTop = "8dp"
      android:layout_marginStart = "8dp"
      android:layout_marginEnd = "8dp"
      style = "@style/Widget.MaterialComponents.TextInputLayout.FilledBox">
      <android.support.design.widget.TextInputEditText
         android:layout_width = "match_parent"
         android:layout_height = "wrap_content"
         android:id = "@+id/email"
         android:hint = "Enter Email id"
         android:inputType = "textEmailAddress"/>
   </android.support.design.widget.TextInputLayout>
   <android.support.design.widget.TextInputLayout
      android:layout_width = "match_parent"
      android:layout_height = "wrap_content"
      android:id = "@+id/layoutPassword"
      android:layout_marginTop = "8dp"
      android:layout_marginStart = "8dp"
      android:layout_marginEnd = "8dp"
      style = "@style/Widget.MaterialComponents.TextInputLayout.FilledBox">
      <android.support.design.widget.TextInputEditText
         android:layout_width = "match_parent"
         android:layout_height = "wrap_content"
         android:id = "@+id/password"
         android:hint = "Password"
         android:inputType = "textPassword"/>
   </android.support.design.widget.TextInputLayout>
   <Button
      android:id = "@+id/click"
      android:layout_width = "wrap_content"
      android:layout_height = "wrap_content"
      android:layout_gravity = "center"
      android:text = "Click"></Button>
</LinearLayout>
In the above code we have given two TextInputEditText and one button. when you click on button it will take data from edit text and show on Toast.
Step 3 − Add the following code to src/MainActivity.java
package com.example.andy.myapplication;
import android.graphics.Point;
import android.support.v7.app.AppCompatActivity;
import android.os.Bundle;
import android.view.TextureView;
import android.view.View;
import android.widget.Button;
import android.widget.EditText;
import android.widget.TextView;
import android.widget.Toast;
public class MainActivity extends AppCompatActivity {
EditText email,password;
@Override
protected void onCreate(Bundle savedInstanceState) {
super.onCreate(savedInstanceState);
setContentView(R.layout.activity_main);
email = findViewById(R.id.email);
password = findViewById(R.id.password);
Button click = findViewById(R.id.click);
click.setOnClickListener(new View.OnClickListener() {
@Override
public void onClick(View v) {
if(!email.getText().toString().isEmpty()&&(!password.getText().toString().isEmpty())) {
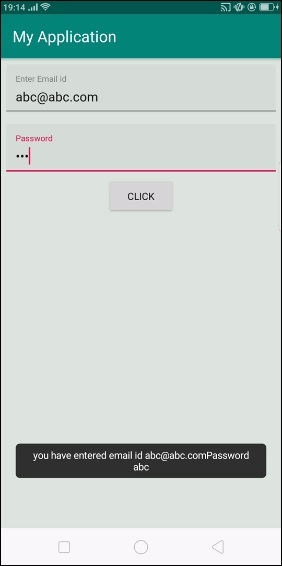
Toast.makeText(MainActivity.this, "you have entered email id " + email.getText().toString() + "Password " + password.getText().toString(), Toast.LENGTH_LONG).show();
} else {
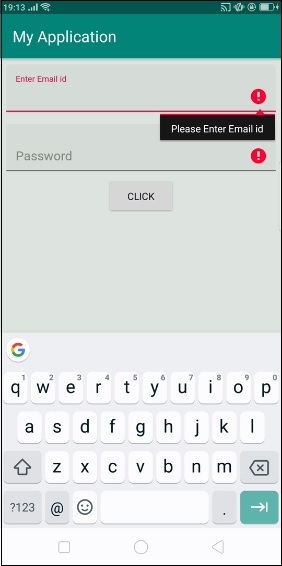
email.setError("Please Enter Email id");
password.setError("Please Enter Pass word");
}
}
});
}
}
Step 4 − Open build.gradle and add design support library dependency.
apply plugin: 'com.android.application'
android {
   compileSdkVersion 28
   defaultConfig {
      applicationId "com.example.andy.myapplication"
      minSdkVersion 15
      targetSdkVersion 28
      compileSdkVersion 28
      versionCode 1
      versionName "1.0"
      testInstrumentationRunner "android.support.test.runner.AndroidJUnitRunner"
   }
   buildTypes {
      release {
         minifyEnabled false
         proguardFiles getDefaultProguardFile('proguard-android.txt'), 'proguard-rules.pro'
      }
   }
}
dependencies {
   implementation fileTree(dir: 'libs', include: ['*.jar'])
   implementation 'com.android.support:appcompat-v7:28.0.0'
   implementation 'com.android.support:design:28.0.0'
   implementation 'com.android.support.constraint:constraint-layout:1.1.3'
   testImplementation 'junit:junit:4.12'
   androidTestImplementation 'com.android.support.test:runner:1.0.2'
   androidTestImplementation 'com.android.support.test.espresso:espresso-core:3.0.2'
}
Let's try to run your application. I assume you have connected your actual Android Mobile device with your computer. To run the app from android studio, open one of your project's activity files and click Run![]() icon from the toolbar. Select your mobile device as an option and then check your mobile device which will display your default screen −
icon from the toolbar. Select your mobile device as an option and then check your mobile device which will display your default screen −
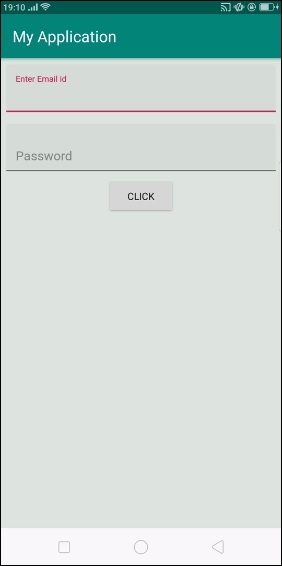
In the above result is initial screen. Now enter some data and click on button as shown below -
Now remove all edittext data and click on button. it will show result as shown below -

3K+ Views
