
Article Categories
- All Categories
-
 Data Structure
-
 Networking
-
 RDBMS
RDBMS
-
 Operating System
-
 Java
Java
-
 MS Excel
-
 iOS
iOS
-
 HTML
HTML
-
 CSS
CSS
-
 Android
-
 Python
-
 C Programming
-
 C++
C++
-
 C#
C#
-
 MongoDB
-
 MySQL
MySQL
-
 Javascript
-
 PHP
PHP
-
 Economics & Finance
How to enlarge or shrink a picture with one click in Excel?
Excel 2019 enables users to incorporate not just numerical data but also images and graphics. Including pictures and other images is a terrific way to make your spreadsheets look more appealing. You can generate your own photos to add to a workbook or copy and paste images into a spreadsheet, much like you can in Microsoft Word. You can even create your own images to add.
Excel gives you the ability to import graphics, shapes, symbols, and even 3D images and photos available on the web. Let's say that there are several pictures on a sheet, and they range in scale from small to large. You want to enlarge or reduce the size of these photographs with just one click. There is no built-in function that can solve the problem.
In this tutorial you are going to learn about a VBA code to enlarge orshrink the image in excel.
Enlarge or Shrink a Picture Using VBA Code
Follow the steps given below to write the VBA code.
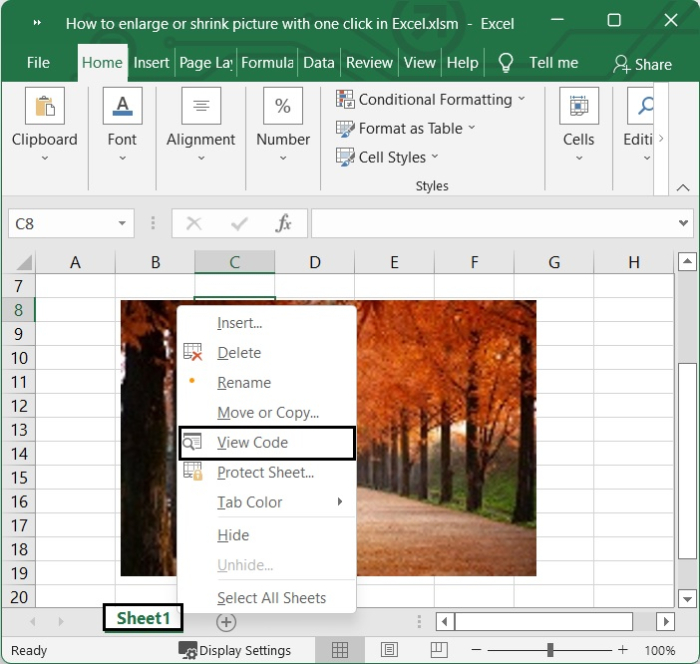
Step 1
We have the following image added in an Excel sheet.

Step 2
Open an Excel sheet and right click at the sheet tab where you wish to resize the images. Then Select View Code from the context menu that appears. Or you can press F11 to open the VBA window.
Step 3
The popping Microsoft Visual Basic for application window will be opened.
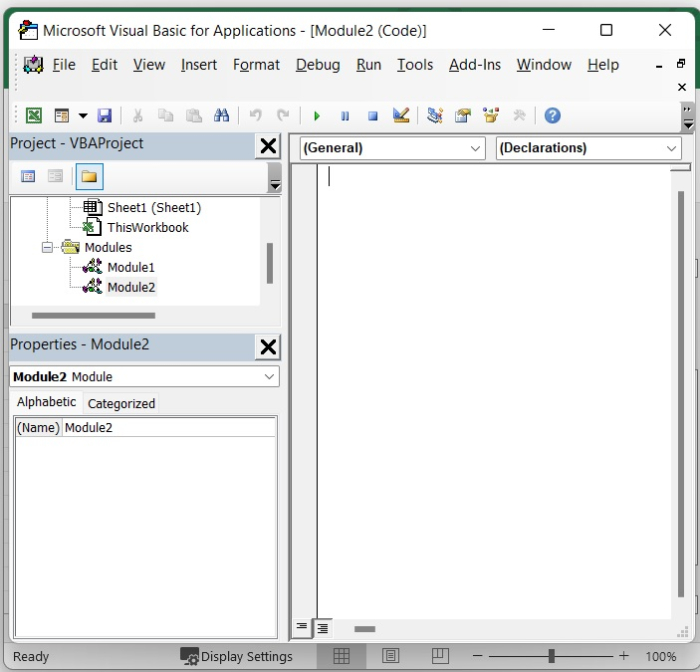
In the new window that has appeared for Microsoft Visual Basic for Applications, type the following code into the empty module.
<span class="typ">Private</span><span class="pln"> </span><span class="typ">Sub</span><span class="pln"> </span><span class="typ">Worksheet_SelectionChange</span><span class="pun">(</span><span class="typ">ByVal</span><span class="pln"> </span><span class="typ">Target</span><span class="pln"> </span><span class="typ">As</span><span class="pln"> </span><span class="typ">Range</span><span class="pun">)</span><span class="pln">
   </span><span class="typ">Application</span><span class="pun">.</span><span class="typ">ScreenUpdating</span><span class="pln"> </span><span class="pun">=</span><span class="pln"> </span><span class="kwd">False</span><span class="pln">
   </span><span class="typ">Dim</span><span class="pln"> xRg </span><span class="typ">As</span><span class="pln"> </span><span class="typ">Range</span><span class="pun">,</span><span class="pln"> sPic </span><span class="typ">As</span><span class="pln"> </span><span class="typ">Shape</span><span class="pln">
      </span><span class="typ">For</span><span class="pln"> </span><span class="typ">Each</span><span class="pln"> sPic </span><span class="typ">In</span><span class="pln"> </span><span class="typ">ActiveSheet</span><span class="pun">.</span><span class="typ">Shapes</span><span class="pln">
         </span><span class="typ">If</span><span class="pln"> </span><span class="typ">Target</span><span class="pun">.</span><span class="typ">Column</span><span class="pln"> </span><span class="pun">></span><span class="pln"> </span><span class="lit">1</span><span class="pln"> </span><span class="typ">Then</span><span class="pln">
            </span><span class="typ">Set</span><span class="pln"> xRg </span><span class="pun">=</span><span class="pln"> </span><span class="typ">Target</span><span class="pun">.</span><span class="typ">Offset</span><span class="pun">(,</span><span class="pln"> </span><span class="pun">-</span><span class="lit">1</span><span class="pun">)</span><span class="pln">
            </span><span class="typ">With</span><span class="pln"> sPic
               </span><span class="typ">If</span><span class="pln"> </span><span class="typ">TypeName</span><span class="pun">(.</span><span class="typ">OLEFormat</span><span class="pun">.</span><span class="typ">Object</span><span class="pun">)</span><span class="pln"> </span><span class="pun">=</span><span class="pln"> </span><span class="str">"Picture"</span><span class="pln"> </span><span class="typ">Then</span><span class="pln">
                  </span><span class="typ">If</span><span class="pln"> </span><span class="pun">.</span><span class="typ">TopLeftCell</span><span class="pun">.</span><span class="typ">Address</span><span class="pln"> </span><span class="pun">=</span><span class="pln"> xRg</span><span class="pun">.</span><span class="typ">Address</span><span class="pln"> </span><span class="typ">Then</span><span class="pln">
                     </span><span class="pun">.</span><span class="typ">Height</span><span class="pln"> </span><span class="pun">=</span><span class="pln"> </span><span class="lit">350</span><span class="pln">
                     </span><span class="pun">.</span><span class="typ">Width</span><span class="pln"> </span><span class="pun">=</span><span class="pln"> </span><span class="lit">250</span><span class="pln">
                  </span><span class="typ">End</span><span class="pln"> </span><span class="typ">If</span><span class="pln">
               </span><span class="typ">End</span><span class="pln"> </span><span class="typ">If</span><span class="pln">
            </span><span class="typ">End</span><span class="pln"> </span><span class="typ">With</span><span class="pln">
         </span><span class="typ">ElseIf</span><span class="pln"> </span><span class="typ">Target</span><span class="pun">.</span><span class="typ">Column</span><span class="pln"> </span><span class="pun">=</span><span class="pln"> </span><span class="lit">1</span><span class="pln"> </span><span class="typ">Then</span><span class="pln">
            </span><span class="typ">With</span><span class="pln"> sPic
               </span><span class="typ">If</span><span class="pln"> </span><span class="typ">TypeName</span><span class="pun">(.</span><span class="typ">OLEFormat</span><span class="pun">.</span><span class="typ">Object</span><span class="pun">)</span><span class="pln"> </span><span class="pun">=</span><span class="pln"> </span><span class="str">"Picture"</span><span class="pln"> </span><span class="typ">Then</span><span class="pln">
                  </span><span class="pun">.</span><span class="typ">Height</span><span class="pln"> </span><span class="pun">=</span><span class="pln"> </span><span class="lit">60</span><span class="pln">
                  </span><span class="pun">.</span><span class="typ">Width</span><span class="pln"> </span><span class="pun">=</span><span class="pln"> </span><span class="lit">60</span><span class="pln">
               </span><span class="typ">End</span><span class="pln"> </span><span class="typ">If</span><span class="pln">
            </span><span class="typ">End</span><span class="pln"> </span><span class="typ">With</span><span class="pln">
         </span><span class="typ">End</span><span class="pln"> </span><span class="typ">If</span><span class="pln">
      </span><span class="typ">Next</span><span class="pln"> sPic
   </span><span class="typ">Application</span><span class="pun">.</span><span class="typ">ScreenUpdating</span><span class="pln"> </span><span class="pun">=</span><span class="pln"> </span><span class="kwd">True</span><span class="pln">
</span><span class="typ">End</span><span class="pln"> </span><span class="typ">Sub</span>
Refer the following image.

Then, save the code and close the VBA window.
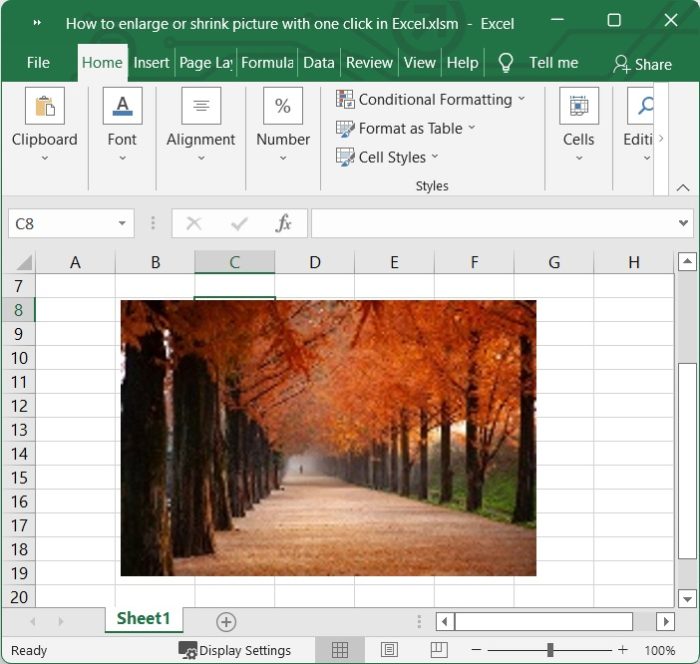
Step 4
If you click any of the cells in column A, all of the images will shrink. See the following image.

If you click on the cell that is located at the upper right of the image, the image that corresponds to that cell will become larger. See the below given image.
Conclusion
In this tutorial, we explained in detail how you can enlarge or shrink a picture in Excel with just one click.

4K+ Views
