
Article Categories
- All Categories
-
 Data Structure
-
 Networking
-
 RDBMS
RDBMS
-
 Operating System
-
 Java
Java
-
 MS Excel
-
 iOS
iOS
-
 HTML
HTML
-
 CSS
CSS
-
 Android
-
 Python
-
 C Programming
-
 C++
C++
-
 C#
C#
-
 MongoDB
-
 MySQL
MySQL
-
 Javascript
-
 PHP
PHP
How to build a simple GUI calculator using tkinter in Python
Introduction
In Python, we use the tkinter library to create GUI components and craft better user interface.
In this article you will learn methods to build a simple GUI based calculator application.
Getting started
Before we jump into it, there are a few things we need to get organised first.
Let us start by downloading Python’s imaging library that we will be using to get images from our local system. In order to install PIL(Pillow), launch you terminal and type the command below.
pip install Pillow
Now that you have the package installed. You will have to download icons needed for the calculator.
You can go on Google images and download the required icons. However, if you want the same set of icons I’ve used for this project, you can download it from −
https://www.dropbox.com/sh/0zqd6zd9b8asmor/AAC3d2iOvMRl8INkbCuMUo_ya?dl=0.
Make sure you download all the icons to a folder named “asset”.
Next up, we need to import the required modules.
from tkinter import *
from PIL import Image # pip install Pillow
from PIL import ImageTk
And that’s it. You must now have everything set up and ready to get started.
Creating the Functions
Firstly, we must create the functions the GUI components will use.
There are three main functions, one when the number or symbol is pressed, another when the equal to button is pressed and then finally when the clear button is pressed.
Let us first initialise few global variables −
txt = ""
res = False
ans = 0
Example
Function when number of key is pressed −
def press(num):
   global txt, ans, res
   if (res==True):
      txt = ans
      res = False
   txt = txt + str(num)
   equation.set(txt)
Example1
Function when the equal to button is pressed −
def equal():
   try:
      global txt, ans, res
      ans = str(eval(txt))
      equation.set(ans)
      res = True
   except:
      equation.set("ERROR : Invalid Equation")
      txt=""
Function when the clear button is pressed −
Example
def clear():
   global txt, ans, res
   txt = ""
   equation.set("")
   res = False
Now that we’ve defined the functions, we can start the main function and start working on the GUI components.
if __name__ == "__main__":
   window = Tk()
   window.configure(background="black")
   window.title("Calculator")
   window.iconbitmap("assets\Calculator\Logo.ico")
   window.geometry("343x417")
   window.resizable(0,0)
The above lines of code will structure a perfect calculator.
Note − In order to avoid getting errors, make sure you follow the exact file structure as the code above. Save the logo icon inside the Calculator folder which is within the assets folder.
Follow the below format −
+---Working Directory
   +---Calculator.py
   +---assets
      +---Calculator
         +---All the icons.
Next up, let us design the text field where we will see the numbers.
equation = StringVar()

txt_field = Entry(relief=RIDGE,textvariable=equation,bd=10,font=("Aerial",20),bg="powder blue")

txt_field.grid(columnspan=4,ipady=10,ipadx=10,sticky="nsew")
Now, we will follow a repetitive procedure of adding icons to the GUI window, one by one. Below is a single example of it, follow it for the rest or just copy it from the complete code at the end of this article.
Example
width=80
height=80
img1 = Image.open("assets/Calculator/one.PNG")
img1 = img1.resize((width,height))
oneImage = ImageTk.PhotoImage(img1)
button1 = Button(window, image=oneImage,bg="white",command = lambda:press(1),height=height,width=width)
button1.grid(row=2,column=0,sticky="nsew")
Similar to the above lines, follow for button2, button3 and on until you cover all the numbers and symbols.
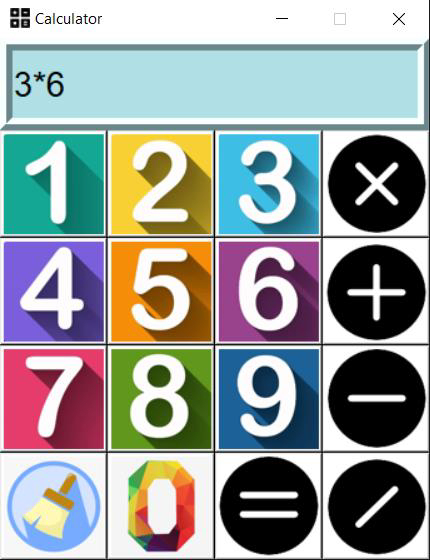
And that’s it. If you run the program now, you must see a very abstract looking calculator.
In case you are not able to follow up, you can take the complete code from below.
Example
from tkinter import *
from PIL import Image
from PIL import ImageTk

txt = ""
res = False
ans = 0

def press(num):
   global txt, ans, res
   if (res==True):
      txt = ans
      res = False
   txt = txt + str(num)
   equation.set(txt)
def equal():
   try:
      global txt, ans, res
      ans = str(eval(txt))
      equation.set(ans)
      res = True
   except:
      equation.set("ERROR : Invalid Equation")
      txt=""
def clear():
   global txt, ans, res
   txt = ""
   equation.set("")
   res = False
if __name__ == "__main__":
   window = Tk()
   window.configure(background="black")
   window.title("Calculator")
   window.iconbitmap("assets\Calculator\Logo.ico")
   window.geometry("343x417")
   window.resizable(0,0)
   equation = StringVar()
   txt_field = Entry(relief=RIDGE,textvariable=equation,bd=10,font=("Aerial",20),bg="powder blue")
   txt_field.grid(columnspan=4,ipady=10,ipadx=10,sticky="nsew")
   width=80
   height=80
   img1 = Image.open("assets/Calculator/one.PNG")
   img1 = img1.resize((width,height))
   oneImage = ImageTk.PhotoImage(img1)
   button1 = Button(window, image=oneImage,bg="white",command =          lambda:press(1),height=height,width=width)
   button1.grid(row=2,column=0,sticky="nsew")
   img2 = Image.open("assets/Calculator/two.PNG")
   img2 = img2.resize((width,height))
   twoImage = ImageTk.PhotoImage(img2)
   button2 = Button(window, image=twoImage,bg="white",command =    lambda:press(2),height=height,width=width)
   button2.grid(row=2,column=1,sticky="nsew")
   img3 = Image.open("assets/Calculator/three.PNG")
   img3 = img3.resize((width,height))
   threeImage = ImageTk.PhotoImage(img3)
   button3 = Button(window, image=threeImage,bg="white",command =    lambda:press(3),height=height,width=width)
   button3.grid(row=2,column=2,sticky="nsew")
   img4 = Image.open("assets/Calculator/four.PNG")
   img4 = img4.resize((width,height))
   fourImage = ImageTk.PhotoImage(img4)
   button4 = Button(window, image=fourImage,bg="white",command =    lambda:press(4),height=height,width=width)
   button4.grid(row=3,column=0,sticky="nsew")
   img5 = Image.open("assets/Calculator/five.PNG")
   img5 = img5.resize((width,height))
   fiveImage = ImageTk.PhotoImage(img5)
   button5 = Button(window, image=fiveImage,bg="white",command =    lambda:press(5),height=height,width=width)
   button5.grid(row=3,column=1,sticky="nsew")
   img6 = Image.open("assets/Calculator/six.PNG")
   img6 = img6.resize((width,height))
   sixImage = ImageTk.PhotoImage(img6)
   button6 = Button(window, image=sixImage,bg="white",command =    lambda:press(6),height=height,width=width)
   button6.grid(row=3,column=2,sticky="nsew")
   img7 = Image.open("assets/Calculator/seven.PNG")
   img7 = img7.resize((width,height))
   sevenImage = ImageTk.PhotoImage(img7)
   button7 = Button(window, image=sevenImage,bg="white",command =    lambda:press(7),height=height,width=width)
   button7.grid(row=4,column=0,sticky="nsew")
   img8 = Image.open("assets/Calculator/eight.PNG")
   img8 = img8.resize((width,height))
   eightImage = ImageTk.PhotoImage(img8)
   button8 = Button(window, image=eightImage,bg="white",command =    lambda:press(8),height=height,width=width)
   button8.grid(row=4,column=1,sticky="nsew")
   img9 = Image.open("assets/Calculator/nine.PNG")
   img9 = img9.resize((width,height))
   nineImage = ImageTk.PhotoImage(img9)
   button9 = Button(window, image=nineImage,bg="white",command =    lambda:press(9),height=height,width=width)
   button9.grid(row=4,column=2,sticky="nsew")
   img0 = Image.open("assets/Calculator/zero.PNG")
   img0 = img0.resize((width,height))
   zeroImage = ImageTk.PhotoImage(img0)
   button0 = Button(window, image=zeroImage,bg="white",command =    lambda:press(0),height=height,width=width)
   button0.grid(row=5,column=1,sticky="nsew")
   imgx = Image.open("assets/Calculator/multiply.PNG")
   imgx = imgx.resize((width,height))
   multiplyImage = ImageTk.PhotoImage(imgx)
   buttonx = Button(window, image=multiplyImage,bg="white",command =    lambda:press("*"),height=height,width=width)
   buttonx.grid(row=2,column=3,sticky="nsew")
   imgadd = Image.open("assets/Calculator/add.PNG")
   imgadd = imgadd.resize((width,height))
   addImage = ImageTk.PhotoImage(imgadd)
   buttonadd = Button(window, image=addImage,bg="white",command =    lambda:press("+"),height=height,width=width)
   buttonadd.grid(row=3,column=3,sticky="nsew")
   imgdiv = Image.open("assets/Calculator/divide.PNG")
   imgdiv = imgdiv.resize((width,height))
   divImage = ImageTk.PhotoImage(imgdiv)
   buttondiv = Button(window, image=divImage,bg="white",command =    lambda:press("/"),height=height,width=width)
   buttondiv.grid(row=5,column=3,sticky="nsew")
   imgsub = Image.open("assets/Calculator/subtract.PNG")
   imgsub = imgsub.resize((width,height))
   subImage = ImageTk.PhotoImage(imgsub)
   buttonsub = Button(window, image=subImage,bg="white",command = lambda:press("-   "),height=height,width=width)
   buttonsub.grid(row=4,column=3,sticky="nsew")
   imgeq = Image.open("assets/Calculator/equal.PNG")
   imgeq = imgeq.resize((width,height))
   eqImage = ImageTk.PhotoImage(imgeq)
   buttoneq = Button(window, image=eqImage,bg="white",command = equal,height=height,width=width)
   buttoneq.grid(row=5,column=2,sticky="nsew")
   imgclear = Image.open("assets/Calculator/clear.PNG")
   imgclear = imgclear.resize((width,height))
   clearImage = ImageTk.PhotoImage(imgclear)
   buttonclear = Button(window, image=clearImage,bg="white",command =    clear,height=height,width=width)
buttonclear.grid(row=5,column=0,sticky="nsew")

window.mainloop()
If you are having formatting issues with the above program, you can obtain it from https://github.com/SVijayB/PyHub/blob/master/Graphics/Simple%20Calculator.py as well.
Output

1K+ Views
