
Article Categories
- All Categories
-
 Data Structure
-
 Networking
-
 RDBMS
RDBMS
-
 Operating System
-
 Java
Java
-
 MS Excel
-
 iOS
iOS
-
 HTML
HTML
-
 CSS
CSS
-
 Android
-
 Python
-
 C Programming
-
 C++
C++
-
 C#
C#
-
 MongoDB
-
 MySQL
MySQL
-
 Javascript
-
 PHP
PHP
-
 Economics & Finance
How To Disable Or Stop Auto Fill Feature In Excel?
With the help of Microsoft Excel's useful Auto Fill feature, you can swiftly fill a number of cells with a particular pattern or set of information. When working with massive data sets, it can help you save time and effort. To avoid unintended modifications or errors in your spreadsheet, you might want to disable or suspend Excel's Auto Fill feature in several circumstances. This tutorial will walk you through the procedures to turn off or halt Excel's Auto Fill feature, giving you full control over your data.
Please be aware that the instructions in this article apply to Microsoft Excel versions 2010, 2013, 2016, 2019, and Microsoft 365 before we get started. Depending on the version you are using, the options' precise locations could differ slightly, but the overall procedure stays the same.
Disable Or Stop Auto Fill Feature
Here, we will first create a VBA module and then run it to complete the task. So let us see a simple process to know how you can disable or stop the auto?fill feature in Excel.
Step 1
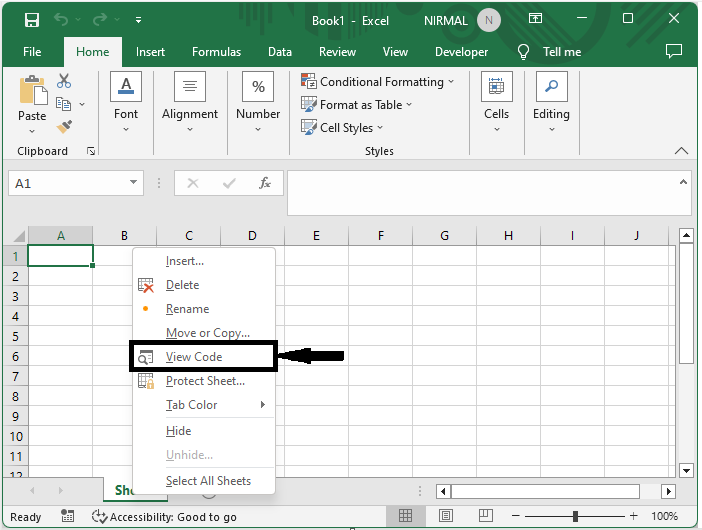
Consider any Excel sheet. First, right?click on the sheet name and click on View Code to open the VBA application, then click on Inset and select Module.
Right click > View code > Insert > Module.
Step 2
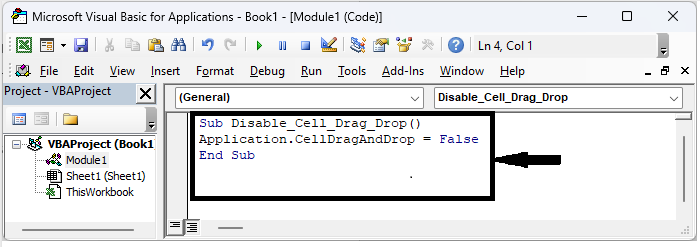
Then copy the below code into the text box, similar to the below image.
Code
Sub Disable_Cell_Drag_Drop()
Application.CellDragAndDrop = False
End Sub
Step 3
Then save the sheet as a macro?enabled template and click F5 to complete the task.
Note ?
To enable the autofill, use the below code.
Code
Sub Disable_Cell_Drag_Drop()
Application.CellDragAndDrop = True
End Sub
Conclusion
In this tutorial, we have used a simple example to demonstrate how you can disable or stop the auto?fill feature in Excel to highlight a particular set of data.

552 Views
