- wxPython - Home
- wxPython - Introduction
- wxPython - Environment
- wxPython - Hello World
- wxPython - GUI Builder Tools
- wxPython - Major Classes
- wxPython - Event Handling
- wxPython - Layout Management
- wxPython - Buttons
- wxPython - Dockable Windows
- Multiple Document Interface
- wxPython - Drawing API
- wxPython - Drag and Drop
wxPython - ToolBar Class
One or more horizontal strips of toolbars comprising of buttons with text caption or icons are normally placed just below the MenuBar in a top level frame.
If the style parameter of wx.Toolbar object is set to wx.TB_DOCKABLE, it becomes dockable. A floating toolbar can also be constructed using wxPythons AUIToolBar class.
Constructor without any arguments places a toolbar with default parameters. Additional parameters can be passed to wx.ToolBar class constructor as follows −
Wx.ToolBar(parent, id, pos, size, style)
Style parameters defined for wx.ToolBar include the following constants −
| S.N. | Parameters & Description |
|---|---|
| 1 | wx.TB_FLAT Gives the toolbar a flat look |
| 2 | wx.TB_HORIZONTAL Specifies the horizontal layout (default) |
| 3 | wxTB_VERTICAL Specifies the vertical layout |
| 4 | wx.TB_DEFAULT_STYLE Combines wxTB_FLAT and wxTB_HORIZONTAL |
| 5 | wx.TB_DOCKABLE Makes the toolbar floatable and dockable |
| 6 | wx.TB_NO_TOOLTIPS Doesn't show the short help tooltips for the tools, when the mouse hovers over them |
| 7 | wx.TB_NOICONS Specifies no icons in the toolbar buttons; by default they are shown |
| 8 | wx.TB_TEXT Shows the text in the toolbar buttons; by default only icons are shown |
Tool buttons of different features can be added into the toolbar. Wx.ToolBar class has the following useful methods −
| S.N. | Methods & Description |
|---|---|
| 1 | AddTool() Adds a tool button to the toolbar. The type of tool is specified by kind parameter |
| 2 | AddRadioTool() Adds a button belonging to a mutually exclusive group of buttons |
| 3 | AddCheckTool() Adds a toggle button to the toolbar |
| 4 | AddLabelTool() Adds a tool with icon and label |
| 5 | AddSeparator() Adds a separator to denote groups of tool buttons |
| 6 | AddControl() Adds any control to the toolbar. Eg. wx.Button, wx.Combobox, etc. |
| 7 | ClearTools() Removes all buttons from the toolbar |
| 8 | RemoveTool() Removes give tool button from the toolbar |
| 9 | Realize() Should be called after addition of tool buttons |
AddTool() method takes atleast three parameters −
AddTool(parent, id, bitmap)
The parent parameter is the toolbar in which the button is added. Image icon is specified by bitmap parameter.
The general tool buttons emit EVT_TOOL event. Other controls if added to the toolbar must be bound by respective CommandEvent binder to the event handler.
Example
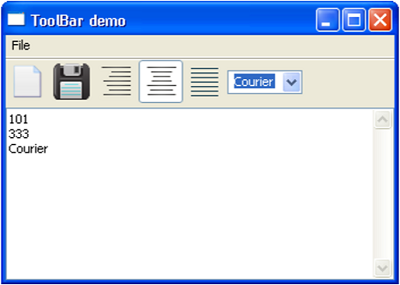
In the following example, the toolbar shows two normal tool buttons, three radio tool buttons and a combobox.
First of all, the toolbar object is activated.
tb = wx.ToolBar( self, -1 )
self.ToolBar = tb
Using AddTool() method, two tools with icons for New and Save are added.
tb.AddTool( 101, wx.Bitmap("new.png") )
tb.AddTool(102,wx.Bitmap("save.png"))
A group of RadioTools is then added to the toolbar, only one of which is selectable at a time.
right = tb.AddRadioTool(222,wx.Bitmap("right.png"))
center = tb.AddRadioTool(333,wx.Bitmap("center.png"))
justify = tb.AddRadioTool(444,wx.Bitmap("justify.png"))
A wx.ComboBox control is now added to the toolbar using AddControl() method. Combo box list contains the names of fonts.
self.combo = wx.ComboBox(tb, 555, value = "Times", choices = ["Arial","Times","Courier"])
Realize() method needs to be called in order to finalize the toolbar construction.
tb.Realize()
Finally, event binders for the toolbar and the combobox are registered.
tb.Bind(wx.EVT_TOOL, self.Onright)
tb.Bind(wx.EVT_COMBOBOX,self.OnCombo)
Respective event handlers append methods process the event source. While EVT_TOOL events ID is displayed in the text box below the toolbar, the selected font name is added to it when EVT_COMBOBOX event triggers.
def Onright(self, event):
   self.text.AppendText(str(event.GetId())+"\n")

def OnCombo(self,event):
   self.text.AppendText( self.combo.GetValue()+"\n")
The entire code is as follows −
import wx

class Mywin(wx.Frame):

   def __init__(self, parent, title):
      super(Mywin, self).__init__(parent, title = title)
      self.InitUI()

   def InitUI(self):
      menubar = wx.MenuBar()
      menu = wx.Menu()
      menubar.Append(menu,"File")
      self.SetMenuBar(menubar)

      tb = wx.ToolBar( self, -1 )
      self.ToolBar = tb

      tb.AddTool( 101, wx.Bitmap("new.png") )
      tb.AddTool(102,wx.Bitmap("save.png"))

      right = tb.AddRadioTool(222,wx.Bitmap("right.png"))
      center = tb.AddRadioTool(333,wx.Bitmap("center.png"))
      justify = tb.AddRadioTool(444,wx.Bitmap("justify.png"))

      tb.Bind(wx.EVT_TOOL, self.Onright)
      tb.Bind(wx.EVT_COMBOBOX,self.OnCombo)
      self.combo = wx.ComboBox( tb, 555, value = "Times", choices = ["Arial","Times","Courier"])

      tb.AddControl(self.combo )
      tb.Realize()
      self.SetSize((350, 250))

      self.text = wx.TextCtrl(self,-1, style = wx.EXPAND|wx.TE_MULTILINE)
      self.Centre()
      self.Show(True)

   def Onright(self, event):
      self.text.AppendText(str(event.GetId())+"\n")

   def OnCombo(self,event):
      self.text.AppendText( self.combo.GetValue()+"\n")

ex = wx.App()
Mywin(None,'ToolBar demo')
ex.MainLoop()
The above code produces the following output −