
Article Categories
- All Categories
-
 Data Structure
-
 Networking
-
 RDBMS
RDBMS
-
 Operating System
-
 Java
Java
-
 MS Excel
-
 iOS
iOS
-
 HTML
HTML
-
 CSS
CSS
-
 Android
-
 Python
-
 C Programming
-
 C++
C++
-
 C#
C#
-
 MongoDB
-
 MySQL
MySQL
-
 Javascript
-
 PHP
PHP
-
 Economics & Finance
How to create Menu Item Component in ReactJS?
The Menu item component shows users various menu options, and they can select any option from the menu item component. The menu item component in React Js is similar to the <select> element in HTML, or we can say it is a dropdown menu.
Also, menu components contain a submenu to show multiple options for any menu item. Developers should use the <select> HTML tag to implement menu item components from scratch. However, many React libraries available on the internet provide pre-designed Menu item components.
So, we will use different libraries to build the menu item components below.
Use Material UI library to create menu item component
Users can use the below command to use the Material UI?s components in the application after installing it.
npm install @mui/material @emotion/react @emotion/styled
Syntax
Users can follow the syntax below to use MenuItem and Menu components of Material UI.
<Menu onClose={handleCloseMenu}  >
   <MenuItem> Item 1</MenuItem>
   <MenuItem> Item 2</MenuItem>
   <MenuItem> Item 3</MenuItem>
</Menu>
In the above syntax, we have wrapped the MenuItem components inside the Menu components.
Example 1
We have imported the Menu and MenuItem components from the Material UI library in the example below. Also, we have created the ?open? variable, and based on its boolean value, we open and close the menu. When users click the div with the text ?open menu?, it invokes the handleOpenMenu() function, which opens the menu.
Also, we have added three menu items in the Menu components. Whenever a user clicks on any menu item, we invoke the handleClose() function, which sets the false value to the open variable and closes the menu.
#App.js
<div class="code-mirror language-java" contenteditable="plaintext-only" spellcheck="false" style="outline: none; overflow-wrap: break-word; overflow-y: auto; white-space: pre-wrap;">import * as React from "react";
import Menu from "@mui/material/Menu";
import MenuItem from "@mui/material/MenuItem";

export default function App() {
   const [selectedElement, setselectedElement] = React.useState(null);
   const [open, setOpen] = React.useState(false);
   function handleOpenMenu() {
      setOpen(true);
   }
   function handleCloseMenu(event) {
      setOpen(false);
      setselectedElement(event.target);
   }
   return (
      <div>
            <h2>
               {" "}
               Creating the menu component using the <i> Material UI </i> library.{" "}
            </h2>
         <div
            style={{
               height: "2rem",
               padding: "5px 10px",
               backgroundColor: "grey",
               width: "7rem",
               margin: "10px 10px 30px 10px",
               fontSize: "1.2rem",
               color: "white",
               borderRadius: "12px",
               cursor: "pointer",
            }}
            onClick={handleOpenMenu}
         >
            Open Menu
         </div>
         <Menu
            id="basic-menu"
            selectedElement={selectedElement}
            open={open}
            onClose={handleCloseMenu}
         >
            <MenuItem onClick={handleCloseMenu}> Item 1 </MenuItem>
            <MenuItem onClick={handleCloseMenu}> Item 2 </MenuItem>
            <MenuItem onClick={handleCloseMenu}> Item 3 </MenuItem>
         </Menu>
      </div>
   );
}
</div>
Output

Use the szhsin React library to create a menu item component
The szhsin is a React library; users can install the below command in the application.
npm install @szhsin/react-menu
The szhsin library contains various types of menu components, such as a menu with radio buttons, checkboxes, etc. Here, we will see some examples of the Menu component of the szhsin library.
Syntax
Users can follow the syntax below to use the szhsin library to create menu items in React JS.
<Menu menuButton={<MenuButton>Open menu</MenuButton>} >
   <MenuItem value="Item 1" onClick={handleChange}>
      Menu item 1
   </MenuItem>
   <SubMenu label="Languages">
      // menu items
   </SubMenu>
</Menu>
In the above syntax, we have added the MenuItem component inside the Menu component. Also, we have added an onClick event on the MenuItem component. Furthermore, we also used the SubMenu component to create a submenu.
Example 2
In the example below, we have imported the Menu, MenuItem, and MenuButton components from the szhsin library. After that, we created the menu using the Menu components. Also, we have passed the MenuButton as a prop of the Menu component.
We have added multiple MenuItems components with various values and HTML texts in the Menu component. Also, whenever the user clicks on any component, it invokes the handleClicked() function, which sets the value of the clicked element in the ?selected? variable.
#App.js
<div class="code-mirror language-java" contenteditable="plaintext-only" spellcheck="false" style="outline: none; overflow-wrap: break-word; overflow-y: auto; white-space: pre-wrap;">import { Menu, MenuItem, MenuButton } from "@szhsin/react-menu";
import "@szhsin/react-menu/dist/index.css";
import "@szhsin/react-menu/dist/transitions/slide.css";
import { useState } from "react";

export default function App() {
   const [selected, changeSelected] = useState(null);

   function handleClicked(event) {
      //changing the selected value
      changeSelected(event.value);
   }
   return (
      <div>
         <h2>
            {" "}
            Creating the menu component using the <i> Szhsin </i> library
            components.{" "}
         </h2>
         <Menu menuButton = {<MenuButton> Open menu </MenuButton>} transition>
            <MenuItem value = "Item 1" onClick = {handleClicked}>
               Menu item 1
            </MenuItem>
            <MenuItem value = "Item 2" onClick = {handleClicked}>
               Menu Item 2
            </MenuItem>
            <MenuItem value = "Item 3" onClick = {handleClicked}>
               Menu Item 3
            </MenuItem>
            <MenuItem value = "Item 4" onClick = {handleClicked}>
               Menu Item 4
            </MenuItem>
         </Menu>
         <div> Selected item from the menu component is {selected}.</div>
      </div>
   );
}
</div>
Output

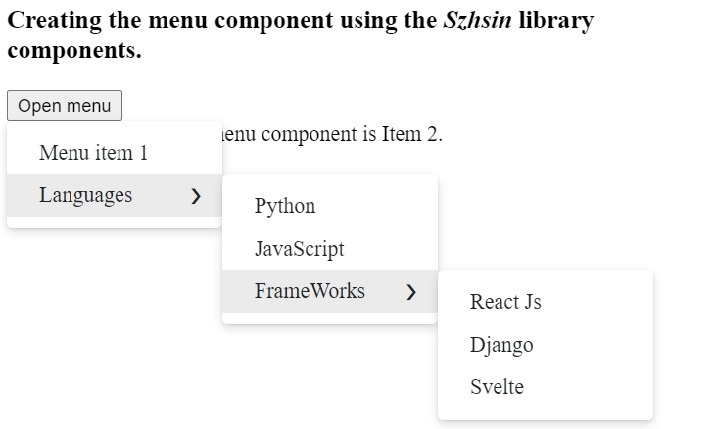
Example 3 (Creating the submenu)
In the below example, we have also used the szhsin library components to create the menu. We have also used the submenu component to create a submenu inside the menu. Also, users can observe how we can give labels to the submenu by passing value as a prop.
In the output, users can observe that they can open nested submenus for the ?languages? and ?frameworks? labels.
<div class="code-mirror language-java" contenteditable="plaintext-only" spellcheck="false" style="outline: none; overflow-wrap: break-word; overflow-y: auto; white-space: pre-wrap;">import { Menu, MenuItem, MenuButton, SubMenu } from "@szhsin/react-menu";
import "@szhsin/react-menu/dist/index.css";
import "@szhsin/react-menu/dist/transitions/slide.css";
import { useState } from "react";

export default function App() {
   const [selected, changeSelected] = useState(null);
   function handleChange(event) {
      changeSelected(event.value);
   }
   return (
      <div>
         <h2>
            {" "}
            Creating the menu component using the <i> Szhsin </i> library
            components.{" "}
         </h2>
         <Menu menuButton = {<MenuButton> Open menu </MenuButton>} transition>
            <MenuItem value = "Item 1" onClick = {handleChange}>
               Menu item 1
            </MenuItem>
            <SubMenu label = "Languages">
               <MenuItem value = "reactjs" onClick = {handleChange}>
                  reactjs
               </MenuItem>
               <MenuItem value = "JavaScript" onClick = {handleChange}>
                  JavaScript
               </MenuItem>
               <SubMenu label = "FrameWorks">
                  <MenuItem value = "React JS" onClick = {handleChange}>
                     React Js
                  </MenuItem>
                  <MenuItem value = "Django" onClick = {handleChange}>
                     Django
                  </MenuItem>
                  <MenuItem value = "Svelte" onClick = {handleChange}>
                     Svelt
                  </MenuItem>
               </SubMenu>
            </SubMenu>
         </Menu>
         <div> Selected item from the menu component is {selected}. </div>
      </div>
   );
}
</div>
Output
This tutorial taught us to use the Menu item components in React JS after importing them from different libraries. Also, we learned to customize the menu components in every example. Furthermore, we store the value of selected menu items in the ?selected? variable in each example.

8K+ Views
