
Article Categories
- All Categories
-
 Data Structure
-
 Networking
-
 RDBMS
RDBMS
-
 Operating System
-
 Java
Java
-
 MS Excel
-
 iOS
iOS
-
 HTML
HTML
-
 CSS
CSS
-
 Android
-
 Python
-
 C Programming
-
 C++
C++
-
 C#
C#
-
 MongoDB
-
 MySQL
MySQL
-
 Javascript
-
 PHP
PHP
-
 Economics & Finance
How to use Link Component in ReactJS?
The links are important for any application to navigate different web pages. We can use the <a> tag to create links in the HTML. However, the Material UI library provides the Link component to create a stylish link.
Users can execute the below command to install the Material UI library in the React project.
npm install @mui/material @emotion/react @emotion/styled
Syntax
Users should follow the syntax below to use the Link component of Material UI.
<Link href = "#"> Link </Link>
In the above syntax, href takes a link to the targeted web page.
Example 1 (Basic Link Component)
We will learn to use the Link component of Material UI in the React application via the example below. We have added the link to the home page of the tutorialspoint website as a value of the ?href? prop.
import React from "react";
import Link from '@mui/material/Link';
const App = () => {
   return (
      <div>
         <h3>
            {" "}
            Using the <i> Link </i> Component of the Material UI to add links {" "}
         </h3>
         <Link href = "https://www.tutorialspoint.com/index.htm"> Link </Link>
      </div>
   );
};
export default App;
Output
In the output, when users click on the link, it redirects them to the homepage of the TutorialsPoint website.

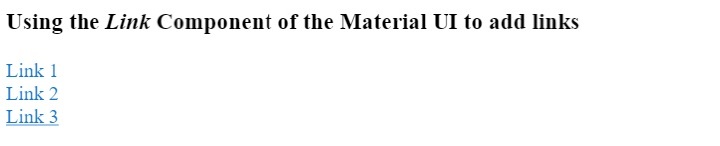
Example 2 (Adding Underline to the Link)
In the example below, we will customize the style of the Link component by using the underline prop. In the first Link component, we have set underline to none so it doesn?t contains any underline.
The second Link component shows underline when we hover on the link, and third Link component always shows the underline.
import React from "react";
import Link from "@mui/material/Link";
const App = () => {
   return (
      <div>
         <h3>
            {" "}
            Using the <i> Link </i> Component of the Material UI to add links {" "}
         </h3>
         <Link href = "#" underline = "none">
            Link 1
         </Link>
         <br></br>
         <Link href = "#" underline = "hover">
            Link 2
         </Link>
         <br></br>
         <Link href = "#" underline = "always">
            Link 3
         </Link>
      </div>
   );
};
export default App;
Output
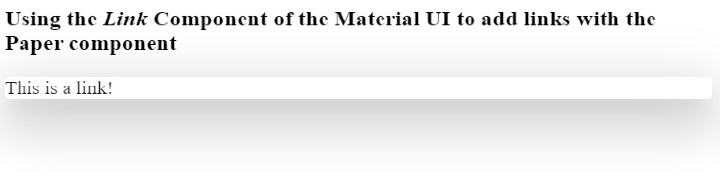
Example 3 (Link Component with Paper Component)
We can add links to other components such as Paper, cards, etc. Also, we can add a link to the particular div using the Link component. In the example below, we have imported the Paper component from the Material UI, and added between the Link component.
import React from "react";
import Link from "@mui/material/Link";
import Paper from "@mui/material/Paper";
import { Box } from "@mui/system";
const App = () => {
   return (
      <div>
         <h3>
            {" "}
            Using the <i> Link </i> Component of the Material UI to add links with the Paper component {" "}
         </h3>
         <Link href = "#" underline = "none">
            <Box
               Sx = {{
                  "& > :not(style)": {
                     m: 1,
                     width: 100,
                     height: 100,
                  },
               }}
               >
               <Paper elevation = {24}> This is a link! </Paper>
            </Box>
         </Link>
      </div>
   );
};
export default App;
Output
In the output, users can observe that whole Paper component is clickable.
Users learned to use the Link component in ReactJS via this tutorial. We learned the basic use of the Link component. Also, we learned to customize the Link component, and add Link to custom component such as card. Furthermore, users can set the event on the Link component such as onclick event.

816 Views
