
Article Categories
- All Categories
-
 Data Structure
-
 Networking
-
 RDBMS
RDBMS
-
 Operating System
-
 Java
Java
-
 MS Excel
-
 iOS
iOS
-
 HTML
HTML
-
 CSS
CSS
-
 Android
-
 Python
-
 C Programming
-
 C++
C++
-
 C#
C#
-
 MongoDB
-
 MySQL
MySQL
-
 Javascript
-
 PHP
PHP
-
 Economics & Finance
How to create a custom shaped bitmap marker with Android maps API?
Introduction
Many android applications nowadays use Google Maps within it to display the map to the users. For example we use many food delivery applications in which we can get to see our order status along with the location of the delivery boy on Google Maps. We can get to see different types of markers on each of the application depending on their use case. In this article we will take a look on How to create a custom shaped bitmap marker with android maps API?
Implementation
We will be creating a simple application in which we will be displaying a simple Google Map within our application and we will be adding a custom shaped marker on that map to the Delhi location. We will be following a step by step guide for building this application. Now let's move towards android studio for creating a new project.
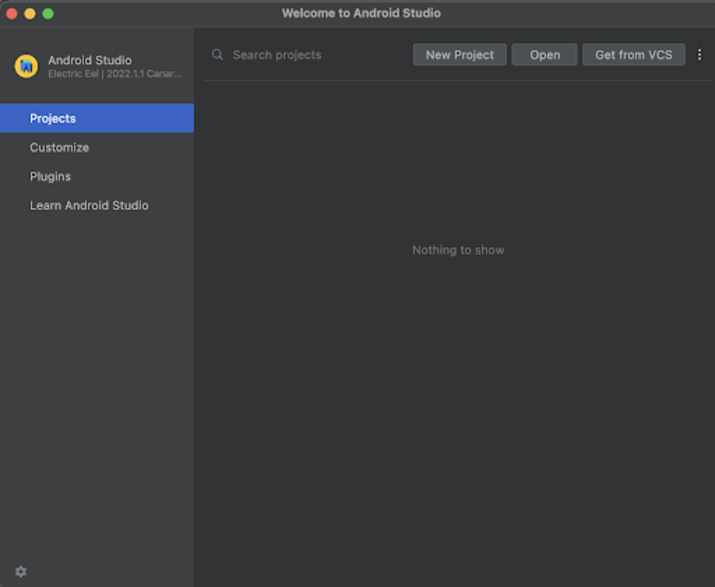
Step 1 : Creating a new project in Android Studio
Navigate to Android studio as shown in below screen. In the below screen click on New Project to create a new Android Studio Project.
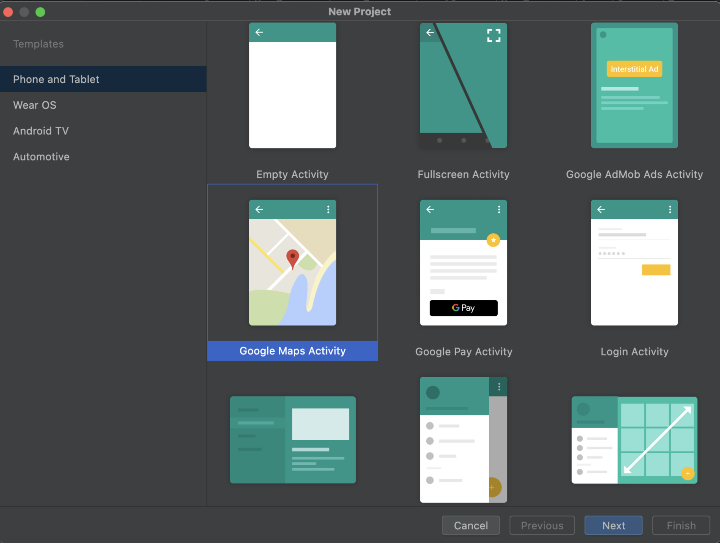
After clicking on New Project you will get to see the below screen.
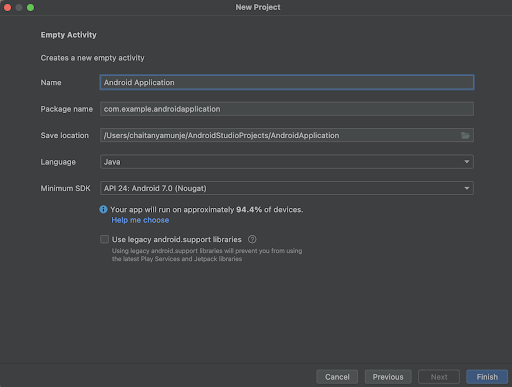
Inside this screen we have to simply select Google Maps Activity and click on Next. After clicking on next you will get to see the screen below.
Inside this screen we have to simply specify the project name. Then the package name will be generated automatically.
Note : Make sure to select the Language as Java.
After specifying all the details click on Finish to create a new Android studio project.
Once our project has been created we will get to see 2 files which are open i.e activity_maps.xml and MapsActivity.java file.
Step 2 : Creating an API key to display Google Maps
Go to this URL below in which you will find a detailed documentation on How to create a Google Maps API key which we have to add in our application to display Google Maps.
Step 3 : Working with AndroidManifest.xml file
Now as we have generated google maps api key we have to use this key in our project?s AndroidManifest.xml file. Navigate to app>AndroidManifest.xml file and add below code to it. Comments are added in the code to get to know in detail.
 <?xml version="1.0" encoding="utf-8"?>
<manifest xmlns:android="http://schemas.android.com/apk/res/android"
   xmlns:tools="http://schemas.android.com/tools">
   <application
       android:allowBackup="true"
       android:dataExtractionRules="@xml/data_extraction_rules"
       android:fullBackupContent="@xml/backup_rules"
       android:icon="@mipmap/ic_launcher"
       android:label="@string/app_name"
       android:roundIcon="@mipmap/ic_launcher_round"
       android:supportsRtl="true"
       android:theme="@style/Theme.GoogleMapsProject"
       tools:targetApi="31">
       <!--
            TODO: Before you run your application, you need a Google Maps API key.
            To get one, follow the directions here:
               https://developers.google.com/maps/documentation/android-sdk/get-api-key
            Once you have your API key (it starts with "AIza"), define a new property in your
            project's local.properties file (e.g. MAPS_API_KEY=Aiza...), and replace the
            "YOUR_API_KEY" string in this file with "${MAPS_API_KEY}".
       -->
       <meta-data
           android:name="com.google.android.geo.API_KEY"
           android:value="Enter your API key here" />
       <activity
           android:name=".MapsActivity"
           android:exported="true"
           android:label="@string/title_activity_maps">
           <intent-filter>
               <action android:name="android.intent.action.MAIN" />
               <category android:name="android.intent.category.LAUNCHER" />
           </intent-filter>
       </activity>
   </application>
</manifest>
Note ? Make sure to add your api key which you have generated in place of Enter your API key tag.
Step 4 : Working with activity_main.xml
Navigate to activity_maps.xml. If this file is not visible. To open this file. In the left pane navigate to app>res>layout>activity_maps.xml to open this file. After opening this file. Add the below code to it. Comments are added in the code to get to know in detail.
<?xml version="1.0" encoding="utf-8"?>
<!-- on below line creating a fragment for displaying maps-->
<fragment xmlns:android="http://schemas.android.com/apk/res/android"
   xmlns:map="http://schemas.android.com/apk/res-auto"
   xmlns:tools="http://schemas.android.com/tools"
   android:id="@+id/map"
   android:name="com.google.android.gms.maps.SupportMapFragment"
   android:layout_width="match_parent"
   android:layout_height="match_parent"
   tools:context=".MapsActivity" />
Explanation ? In the above code we are creating a fragment in which we will be displaying the Google Map inside our application. We are specifying the name for this fragment as Support Map Fragment.
Step 4 : Working with MapsActivity.java file
Navigate to MainActivity.java. If this file is not visible. To open this file. In the left pane navigate to app>res>layout>MainActivity.java to open this file. After opening this file. Add the below code to it. Comments are added in the code to get to know in detail.
package com.example.googlemapsproject;

import androidx.core.content.ContextCompat;
import androidx.fragment.app.FragmentActivity;
import android.content.Context;
import android.graphics.Bitmap;
import android.graphics.Canvas;
import android.graphics.drawable.Drawable;
import android.os.Bundle;
import com.google.android.gms.maps.CameraUpdateFactory;
import com.google.android.gms.maps.GoogleMap;
import com.google.android.gms.maps.OnMapReadyCallback;
import com.google.android.gms.maps.SupportMapFragment;
import com.google.android.gms.maps.model.BitmapDescriptor;
import com.google.android.gms.maps.model.BitmapDescriptorFactory;
import com.google.android.gms.maps.model.LatLng;
import com.google.android.gms.maps.model.MarkerOptions;
import com.example.googlemapsproject.databinding.ActivityMapsBinding;
public class MapsActivity extends FragmentActivity implements OnMapReadyCallback {
   // on below line creating a variable for google maps and binding.
   private GoogleMap mMap;
   private ActivityMapsBinding binding;
   @Override
   protected void onCreate(Bundle savedInstanceState) {
       super.onCreate(savedInstanceState);
       binding = ActivityMapsBinding.inflate(getLayoutInflater());
       setContentView(binding.getRoot());
       // Obtain the SupportMapFragment and get notified when the map is ready to be used.
       SupportMapFragment mapFragment = (SupportMapFragment) getSupportFragmentManager()
               .findFragmentById(R.id.map);
       mapFragment.getMapAsync(this);
   }
   /**
    * Manipulates the map once available.
    * This callback is triggered when the map is ready to be used.
    * This is where we can add markers or lines, add listeners or move the camera. In this case,
    * we just add a marker near Sydney, Australia.
    * If Google Play services is not installed on the device, the user will be prompted to install
    * it inside the SupportMapFragment. This method will only be triggered once the user has
    * installed Google Play services and returned to the app.
    */
   @Override
   public void onMapReady(GoogleMap googleMap) {
       mMap = googleMap;
       // on below line creating a lat lng for delhi location
       LatLng delhi = new LatLng(28.7041, 77.1025);
       // on below line adding marker.
       mMap.addMarker(new MarkerOptions()
               // on below line specifying the position where we have to add the marker.
               .position(delhi)
               // on below line specifying the title for our marker.
               .title("Marker in Delhi")
               // on below line specifying the icon for our marker.
               .icon(BitmapFromDrawable(this, R.drawable.ic_plane)));
       // on below line moving camera to our lat lng.
       mMap.moveCamera(CameraUpdateFactory.newLatLng(delhi));
   }
   private BitmapDescriptor BitmapFromDrawable(Context context, int imageID) {
       // on below line we are creating a drawable from its id.
       Drawable imageDrawable = ContextCompat.getDrawable(context, imageID);
       // below line is use to set bounds to our vector drawable.
       imageDrawable.setBounds(0, 0, imageDrawable.getIntrinsicWidth(), imageDrawable.getIntrinsicHeight());
       // on below line is use to create a bitmap for our drawable which we have added.
       Bitmap bitmap = Bitmap.createBitmap(imageDrawable.getIntrinsicWidth(), imageDrawable.getIntrinsicHeight(), Bitmap.Config.ARGB_8888);
       // on below line is use to add bitmap in our canvas.
       Canvas canvas = new Canvas(bitmap);
       // below line is use to draw our
       // vector drawable in canvas.
       imageDrawable.draw(canvas);
       // after generating our bitmap we are returning our bitmap.
       return BitmapDescriptorFactory.fromBitmap(bitmap);
   }
}
Explanation : In the above code firstly we are creating variables for Google Maps and activity binding. Now we will get to see the onCreate method. This is the default method of every android application. This method is called when the application view is created. Inside this method we are setting the content view i.e the layout file named activity_maps.xml to set the UI from that file. Inside the onCreate method we are initializing the binding variable Then we are creating a variable for support fragment and initializing that variable with the fragment id which we have given in our activity_maps.xml file. Then calling get map sync to sync our maps. After that we are overriding the onMapReady method. In this method we are creating a latitude and longitude for our marker which we will be displaying at the Delhi location. Then we are adding a custom shaped marker on our maps. We are creating a new method named as Bitmap From drawable which will provide a bitmap for an icon from a drawable file which we specify. This bitmap descriptor then we are using it to set on our Google Maps. Lastly, moving our camera to the location in which we are displaying the marker.
After adding the above code now we have to simply click on the green icon in the top bar to run our application on a mobile device.
Note : Make sure you are connected to your real device or emulator.
Output
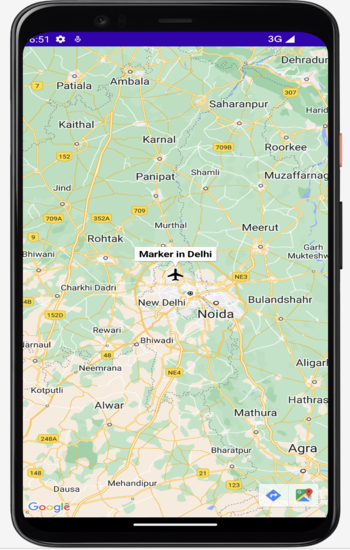
Conclusion
In the above article we have taken a look on How to create a custom shaped bitmap marker with Android maps API.

1K+ Views
