- Flutter - Home
- Flutter - Introduction
- Flutter - Installation
- Creating Simple Application in Android Studio
- Flutter - Architecture Application
- Introduction to Dart Programming
- Flutter - Introduction to Widgets
- Flutter - Introduction to Layouts
- Flutter - Introduction to Gestures
- Flutter - State Management
- Flutter - Animation
- Flutter - Writing Android Specific Code
- Flutter - Writing IOS Specific Code
- Flutter - Introduction to Package
- Flutter - Accessing REST API
- Flutter - Database Concepts
- Flutter - Internationalization
- Flutter - Testing
- Flutter - Deployment
- Flutter - Development Tools
- Flutter - Writting Advanced Applications
- Flutter - Conclusion
- Flutter Useful Resources
- Flutter - Quick Guide
- Flutter - Useful Resources
- Flutter - Discussion
Flutter - Quick Guide
Flutter - Introduction
In general, developing a mobile application is a complex and challenging task. There are many frameworks available to develop a mobile application. Android provides a native framework based on Java language and iOS provides a native framework based on Objective-C / Swift language.
However, to develop an application supporting both the OSs, we need to code in two different languages using two different frameworks. To help overcome this complexity, there exists mobile frameworks supporting both OS. These frameworks range from simple HTML based hybrid mobile application framework (which uses HTML for User Interface and JavaScript for application logic) to complex language specific framework (which do the heavy lifting of converting code to native code). Irrespective of their simplicity or complexity, these frameworks always have many disadvantages, one of the main drawback being their slow performance.
In this scenario, Flutter a simple and high performance framework based on Dart language, provides high performance by rendering the UI directly in the operating systems canvas rather than through native framework.
Flutter also offers many ready to use widgets (UI) to create a modern application. These widgets are optimized for mobile environment and designing the application using widgets is as simple as designing HTML.
To be specific, Flutter application is itself a widget. Flutter widgets also supports animations and gestures. The application logic is based on reactive programming. Widget may optionally have a state. By changing the state of the widget, Flutter will automatically (reactive programming) compare the widgets state (old and new) and render the widget with only the necessary changes instead of re-rendering the whole widget.
We shall discuss the complete architecture in the coming chapters.
Features of Flutter
Flutter framework offers the following features to developers −
Modern and reactive framework.
Uses Dart programming language and it is very easy to learn.
Fast development.
Beautiful and fluid user interfaces.
Huge widget catalog.
Runs same UI for multiple platforms.
High performance application.
Advantages of Flutter
Flutter comes with beautiful and customizable widgets for high performance and outstanding mobile application. It fulfills all the custom needs and requirements. Besides these, Flutter offers many more advantages as mentioned below −
Dart has a large repository of software packages which lets you to extend the capabilities of your application.
Developers need to write just a single code base for both applications (both Android and iOS platforms). Flutter may to be extended to other platform as well in the future.
Flutter needs lesser testing. Because of its single code base, it is sufficient if we write automated tests once for both the platforms.
Flutters simplicity makes it a good candidate for fast development. Its customization capability and extendibility makes it even more powerful.
With Flutter, developers has full control over the widgets and its layout.
Flutter offers great developer tools, with amazing hot reload.
Disadvantages of Flutter
Despite its many advantages, flutter has the following drawbacks in it −
Since it is coded in Dart language, a developer needs to learn new language (though it is easy to learn).
Modern framework tries to separate logic and UI as much as possible but, in Flutter, user interface and logic is intermixed. We can overcome this using smart coding and using high level module to separate user interface and logic.
Flutter is yet another framework to create mobile application. Developers are having a hard time in choosing the right development tools in hugely populated segment.
Flutter - Installation
This chapter will guide you through the installation of Flutter on your local computer in detail.
Installation in Windows
In this section, let us see how to install Flutter SDK and its requirement in a windows system.
Step 1 − Go to URL, https://flutter.dev/docs/get-started/install/windows and download the latest Flutter SDK. As of April 2019, the version is 1.2.1 and the file is flutter_windows_v1.2.1-stable.zip.
Step 2 − Unzip the zip archive in a folder, say C:\flutter\
Step 3 − Update the system path to include flutter bin directory.
Step 4 − Flutter provides a tool, flutter doctor to check that all the requirement of flutter development is met.
flutter doctor
Step 5 − Running the above command will analyze the system and show its report as shown below −
Doctor summary (to see all details, run flutter doctor -v):
[] Flutter (Channel stable, v1.2.1, on Microsoft Windows [Version
10.0.17134.706], locale en-US)
[] Android toolchain - develop for Android devices (Android SDK version
28.0.3)
[] Android Studio (version 3.2)
[] VS Code, 64-bit edition (version 1.29.1)
[!] Connected device
! No devices available
! Doctor found issues in 1 category.
The report says that all development tools are available but the device is not connected. We can fix this by connecting an android device through USB or starting an android emulator.
Step 6 − Install the latest Android SDK, if reported by flutter doctor
Step 7 − Install the latest Android Studio, if reported by flutter doctor
Step 8 − Start an android emulator or connect a real android device to the system.
Step 9 − Install Flutter and Dart plugin for Android Studio. It provides startup template to create new Flutter application, an option to run and debug Flutter application in the Android studio itself, etc.,
Open Android Studio.
Click File → Settings → Plugins.
Select the Flutter plugin and click Install.
Click Yes when prompted to install the Dart plugin.
Restart Android studio.
Installation in MacOS
To install Flutter on MacOS, you will have to follow the following steps −
Step 1 − Go to URL, https://flutter.dev/docs/get-started/install/macos and download latest Flutter SDK. As of April 2019, the version is 1.2.1 and the file is flutter_macos_v1.2.1- stable.zip.
Step 2 − Unzip the zip archive in a folder, say /path/to/flutter
Step 3 − Update the system path to include flutter bin directory (in ~/.bashrc file).
> export PATH = "$PATH:/path/to/flutter/bin"
Step 4 − Enable the updated path in the current session using below command and then verify it as well.
source ~/.bashrc
source $HOME/.bash_profile
echo $PATH
Flutter provides a tool, flutter doctor to check that all the requirement of flutter development is met. It is similar to the Windows counterpart.
Step 5 − Install latest XCode, if reported by flutter doctor
Step 6 − Install latest Android SDK, if reported by flutter doctor
Step 7 − Install latest Android Studio, if reported by flutter doctor
Step 8 − Start an android emulator or connect a real android device to the system to develop android application.
Step 9 − Open iOS simulator or connect a real iPhone device to the system to develop iOS application.
Step 10 − Install Flutter and Dart plugin for Android Studio. It provides the startup template to create a new Flutter application, option to run and debug Flutter application in the Android studio itself, etc.,
Open Android Studio
Click Preferences → Plugins
Select the Flutter plugin and click Install
Click Yes when prompted to install the Dart plugin.
Restart Android studio.
Creating Simple Application in Android Studio
In this chapter, let us create a simple Flutter application to understand the basics of creating a flutter application in the Android Studio.
Step 1 − Open Android Studio
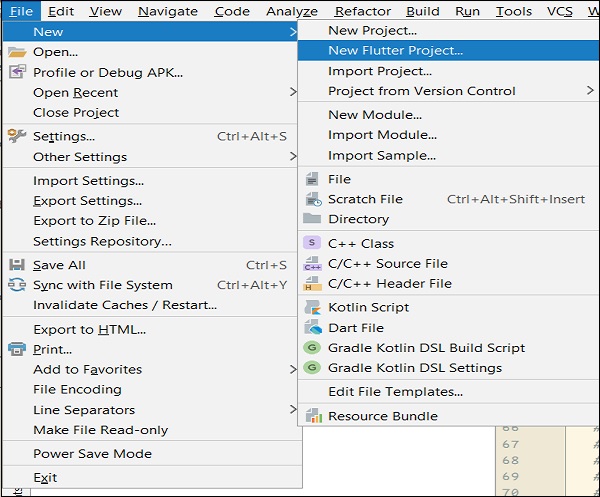
Step 2 − Create Flutter Project. For this, click File → New → New Flutter Project
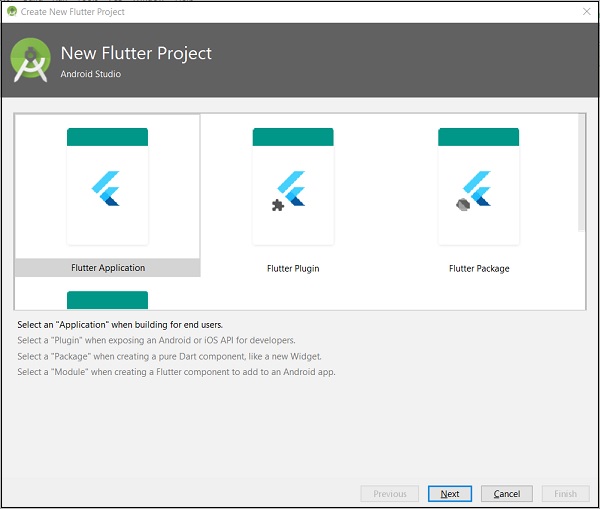
Step 3 − Select Flutter Application. For this, select Flutter Application and click Next.
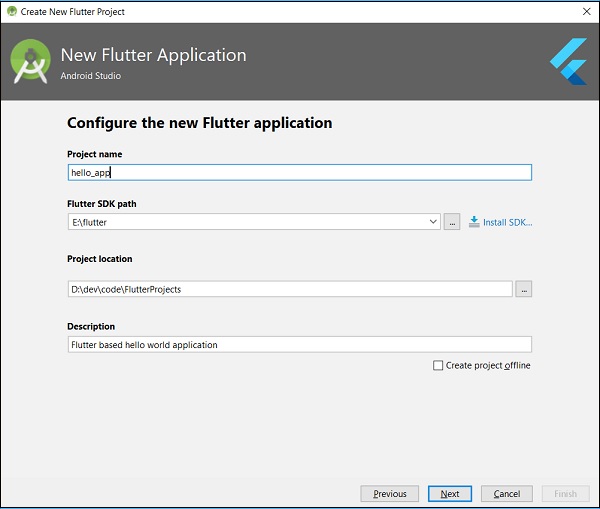
Step 4 − Configure the application as below and click Next.
Project name: hello_app
Flutter SDK Path: <path_to_flutter_sdk>
Project Location: <path_to_project_folder>
Description: Flutter based hello world application
Step 5 − Configure Project.
Set the company domain as flutterapp.tutorialspoint.com and click Finish.
Step 6 − Enter Company domain.
Android Studio creates a fully working flutter application with minimal functionality. Let us check the structure of the application and then, change the code to do our task.
The structure of the application and its purpose is as follows −
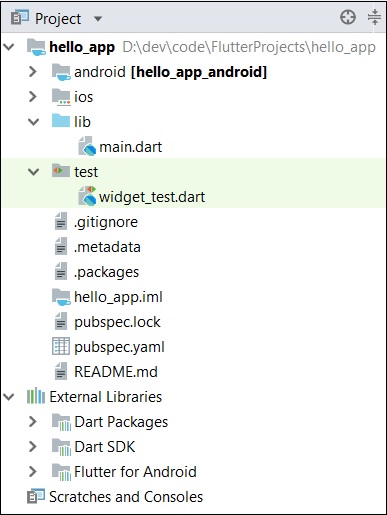
Various components of the structure of the application are explained here −
android − Auto generated source code to create android application
ios − Auto generated source code to create ios application
lib − Main folder containing Dart code written using flutter framework
ib/main.dart − Entry point of the Flutter application
test − Folder containing Dart code to test the flutter application
test/widget_test.dart − Sample code
.gitignore − Git version control file
.metadata − auto generated by the flutter tools
.packages − auto generated to track the flutter packages
.iml − project file used by Android studio
pubspec.yaml − Used by Pub, Flutter package manager
pubspec.lock − Auto generated by the Flutter package manager, Pub
README.md − Project description file written in Markdown format
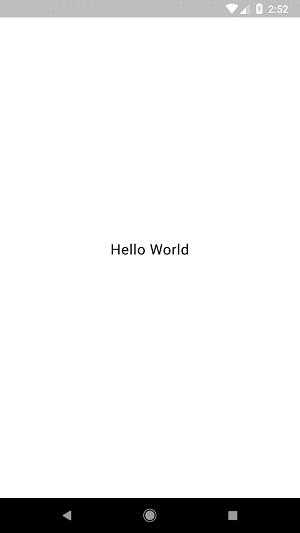
Step 7 − Replace the dart code in the lib/main.dart file with the below code −
import 'package:flutter/material.dart';

void main() => runApp(MyApp());

class MyApp extends StatelessWidget {
   // This widget is the root of your application.
   @override
   Widget build(BuildContext context) {
      return MaterialApp(
         title: 'Hello World Demo Application',
         theme: ThemeData(
            primarySwatch: Colors.blue,
         ),
         home: MyHomePage(title: 'Home page'),
      );
   }
}
class MyHomePage extends StatelessWidget {
   MyHomePage({Key key, this.title}) : super(key: key);
   final String title;

   @override
   Widget build(BuildContext context) {
      return Scaffold(
         appBar: AppBar(
            title: Text(this.title),
         ),
         body: Center(
            child:
            Text(
               'Hello World',
            )
         ),
      );
   }
}
Let us understand the dart code line by line.
Line 1 − imports the flutter package, material. The material is a flutter package to create user interface according to the Material design guidelines specified by Android.
Line 3 − This is the entry point of the Flutter application. Calls runApp function and pass it an object of MyApp class. The purpose of the runApp function is to attach the given widget to the screen.
Line 5-17 − Widget is used to create UI in flutter framework. StatelessWidget is a widget, which does not maintain any state of the widget. MyApp extends StatelessWidget and overrides its build method. The purpose of the build method is to create a part of the UI of the application. Here, build method uses MaterialApp, a widget to create the root level UI of the application. It has three properties - title, theme and home.
title is the title of the application
theme is the theme of the widget. Here, we set blue as the overall color of the application using ThemeData class and its property, primarySwatch.
home is the inner UI of the application, which we set another widget, MyHomePage
Line 19 - 38 − MyHomePage is same as MyApp except it returns Scaffold Widget. Scaffold is a top level widget next to MaterialApp widget used to create UI conforming material design. It has two important properties, appBar to show the header of the application and body to show the actual content of the application. AppBar is another widget to render the header of the application and we have used it in appBar property. In body property, we have used Center widget, which centers it child widget. Text is the final and inner most widget to show the text and it is displayed in the center of the screen.
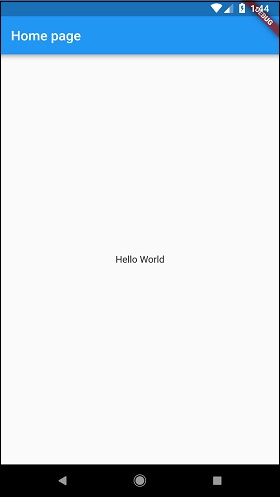
Step 8 − Now, run the application using, Run → Run main.dart
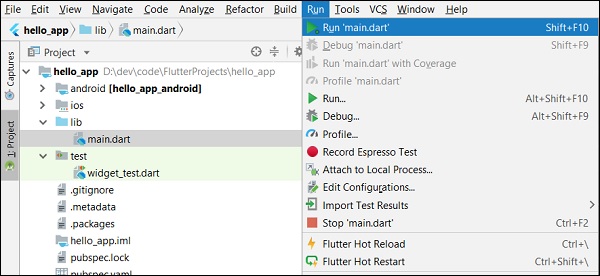
Step 9 − Finally, the output of the application is as follows −
Flutter - Architecture Application
In this chapter, let us discuss the architecture of the Flutter framework.
Widgets
The core concept of the Flutter framework is In Flutter, Everything is a widget. Widgets are basically user interface components used to create the user interface of the application.
In Flutter, the application is itself a widget. The application is the top- level widget and its UI is build using one or more children (widgets), which again build using its children widgets. This composability feature helps us to create a user interface of any complexity.
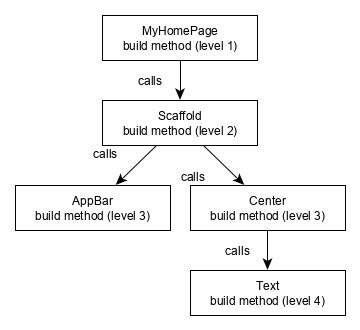
For example, the widget hierarchy of the hello world application (created in previous chapter) is as specified in the following diagram −
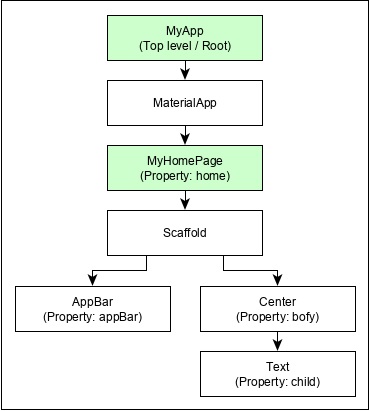
Here the following points are worth notable −
MyApp is the user created widget and it is build using the Flutter native widget, MaterialApp.
MaterialApp has a home property to specify the user interface of the home page, which is again a user created widget, MyHomePage.
MyHomePage is build using another flutter native widget, Scaffold
Scaffold has two properties body and appBar
body is used to specify its main user interface and appBar is used to specify its header user interface
Header UI is build using flutter native widget, AppBar and Body UI is build using Center widget.
The Center widget has a property, Child, which refers the actual content and it is build using Text widget
Gestures
Flutter widgets support interaction through a special widget, GestureDetector. GestureDetector is an invisible widget having the ability to capture user interactions such as tapping, dragging, etc., of its child widget. Many native widgets of Flutter support interaction through the use of GestureDetector. We can also incorporate interactive feature into the existing widget by composing it with the GestureDetector widget. We will learn the gestures separately in the upcoming chapters.
Concept of State
Flutter widgets support State maintenance by providing a special widget, StatefulWidget. Widget needs to be derived from StatefulWidget widget to support state maintenance and all other widget should be derived from StatefulWidget. Flutter widgets are reactive in native. This is similar to reactjs and StatefulWidget will be auto re- rendered whenever its internal state is changed. The re-rendering is optimized by finding the difference between old and new widget UI and rendering only the necessary changes
Layers
The most important concept of Flutter framework is that the framework is grouped into multiple category in terms of complexity and clearly arranged in layers of decreasing complexity. A layer is build using its immediate next level layer. The top most layer is widget specific to Android and iOS. The next layer has all flutter native widgets. The next layer is Rendering layer, which is low level renderer component and renders everything in the flutter app. Layers goes down to core platform specific code
The general overview of a layer in Flutter is specified in the below diagram −
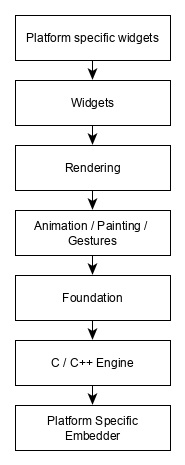
The following points summarize the architecture of Flutter −
In Flutter, everything is a widget and a complex widget is composed of already existing widgets.
Interactive features can be incorporated whenever necessary using GestureDetector widget.
The state of a widget can be maintained whenever necessary using StatefulWidget widget.
Flutter offers layered design so that any layer can be programmed depending on the complexity of the task.
We will discuss all these concepts in detail in the upcoming chapters.
Flutter - Introduction to Dart Programming
Dart is an open-source general-purpose programming language. It is originally developed by Google. Dart is an object-oriented language with C-style syntax. It supports programming concepts like interfaces, classes, unlike other programming languages Dart doesnt support arrays. Dart collections can be used to replicate data structures such as arrays, generics, and optional typing.
The following code shows a simple Dart program −
void main() {
   print("Dart language is easy to learn");
}
Variables and Data types
Variable is named storage location and Data types simply refers to the type and size of data associated with variables and functions.
Dart uses var keyword to declare the variable. The syntax of var is defined below,
var name = 'Dart';
The final and const keyword are used to declare constants. They are defined as below −
void main() {
   final a = 12;
   const pi = 3.14;
   print(a);
   print(pi);
}
Dart language supports the following data types −
Numbers − It is used to represent numeric literals Integer and Double.
Strings − It represents a sequence of characters. String values are specified in either single or double quotes.
Booleans − Dart uses the bool keyword to represent Boolean values true and false.
Lists and Maps − It is used to represent a collection of objects. A simple List can be defined as below −.
void main() {
   var list = [1,2,3,4,5];
   print(list);
}
The list shown above produces [1,2,3,4,5] list.
Map can be defined as shown here −
void main() {
   var mapping = {'id': 1,'name':'Dart'};
   print(mapping);
}
Dynamic − If the variable type is not defined, then its default type is dynamic. The following example illustrates the dynamic type variable −
void main() {
   dynamic name = "Dart";
   print(name);
}
Decision Making and Loops
A decision making block evaluates a condition before the instructions are executed. Dart supports If, If..else and switch statements.
Loops are used to repeat a block of code until a specific condition is met. Dart supports for, for..in , while and do..while loops.
Let us understand a simple example about the usage of control statements and loops −
void main() {
   for( var i = 1 ; i <= 10; i++ ) {
      if(i%2==0) {
         print(i);
      }
   }
}
The above code prints the even numbers from 1 to 10.
Functions
A function is a group of statements that together performs a specific task. Let us look into a simple function in Dart as shown here −
void main() {
   add(3,4);
}
void add(int a,int b) {
   int c;
   c = a+b;
   print(c);
}
The above function adds two values and produces 7 as the output.
Object Oriented Programming
Dart is an object-oriented language. It supports object-oriented programming features like classes, interfaces, etc.
A class is a blueprint for creating objects. A class definition includes the following −
- Fields
- Getters and setters
- Constructors
- Functions
Now, let us create a simple class using the above definitions −
class Employee {
   String name;

   //getter method
   String get emp_name {
      return name;
   }
   //setter method
   void set emp_name(String name) {
      this.name = name;
   }
   //function definition
   void result() {
      print(name);
   }
}
void main() {
   //object creation
   Employee emp = new Employee();
   emp.name = "employee1";
   emp.result(); //function call
}
Flutter - Introduction to Widgets
As we learned in the earlier chapter, widgets are everything in Flutter framework. We have already learned how to create new widgets in previous chapters.
In this chapter, let us understand the actual concept behind creating the widgets and the different type of widgets available in Flutter framework.
Let us check the Hello World applications MyHomePage widget. The code for this purpose is as given below −
class MyHomePage extends StatelessWidget {
   MyHomePage({Key key, this.title}) : super(key: key);

   final String title;
   @override
   Widget build(BuildContext context) {
      return Scaffold(
         appBar: AppBar(title: Text(this.title), ),
         body: Center(child: Text( 'Hello World',)),
      );
   }
}
Here, we have created a new widget by extending StatelessWidget.
Note that the StatelessWidget only requires a single method build to be implemented in its derived class. The build method gets the context environment necessary to build the widgets through BuildContext parameter and returns the widget it builds.
In the code, we have used title as one of the constructor argument and also used Key as another argument. The title is used to display the title and Key is used to identify the widget in the build environment.
Here, the build method calls the build method of Scaffold, which in turn calls the build method of AppBar and Center to build its user interface.
Finally, Center build method calls Text build method.
For a better understanding, the visual representation of the same is given below −
Widget Build Visualization
In Flutter, widgets can be grouped into multiple categories based on their features, as listed below −
- Platform specific widgets
- Layout widgets
- State maintenance widgets
- Platform independent / basic widgets
Let us discuss each of them in detail now.
Platform specific widgets
Flutter has widgets specific to a particular platform - Android or iOS.
Android specific widgets are designed in accordance with Material design guideline by Android OS. Android specific widgets are called as Material widgets.
iOS specific widgets are designed in accordance with Human Interface Guidelines by Apple and they are called as Cupertino widgets.
Some of the most used material widgets are as follows −
- Scaffold
- AppBar
- BottomNavigationBar
- TabBar
- TabBarView
- ListTile
- RaisedButton
- FloatingActionButton
- FlatButton
- IconButton
- DropdownButton
- PopupMenuButton
- ButtonBar
- TextField
- Checkbox
- Radio
- Switch
- Slider
- Date & Time Pickers
- SimpleDialog
- AlertDialog
Some of the most used Cupertino widgets are as follows −
- CupertinoButton
- CupertinoPicker
- CupertinoDatePicker
- CupertinoTimerPicker
- CupertinoNavigationBar
- CupertinoTabBar
- CupertinoTabScaffold
- CupertinoTabView
- CupertinoTextField
- CupertinoDialog
- CupertinoDialogAction
- CupertinoFullscreenDialogTransition
- CupertinoPageScaffold
- CupertinoPageTransition
- CupertinoActionSheet
- CupertinoActivityIndicator
- CupertinoAlertDialog
- CupertinoPopupSurface
- CupertinoSlider
Layout widgets
In Flutter, a widget can be created by composing one or more widgets. To compose multiple widgets into a single widget, Flutter provides large number of widgets with layout feature. For example, the child widget can be centered using Center widget.
Some of the popular layout widgets are as follows −
Container − A rectangular box decorated using BoxDecoration widgets with background, border and shadow.
Center − Center its child widget.
Row − Arrange its children in the horizontal direction.
Column − Arrange its children in the vertical direction.
Stack − Arrange one above the another.
We will check the layout widgets in detail in the upcoming Introduction to layout widgets chapter.
State maintenance widgets
In Flutter, all widgets are either derived from StatelessWidget or StatefulWidget.
Widget derived from StatelessWidget does not have any state information but it may contain widget derived from StatefulWidget. The dynamic nature of the application is through interactive behavior of the widgets and the state changes during interaction. For example, tapping a counter button will increase / decrease the internal state of the counter by one and reactive nature of the Flutter widget will auto re-render the widget using new state information.
We will learn the concept of StatefulWidget widgets in detail in the upcoming State management chapter.
Platform independent / basic widgets
Flutter provides large number of basic widgets to create simple as well as complex user interface in a platform independent manner. Let us see some of the basic widgets in this chapter.
Text
Text widget is used to display a piece of string. The style of the string can be set by using style property and TextStyle class. The sample code for this purpose is as follows −
Text('Hello World!', style: TextStyle(fontWeight: FontWeight.bold))
Text widget has a special constructor, Text.rich, which accepts the child of type TextSpan to specify the string with different style. TextSpan widget is recursive in nature and it accepts TextSpan as its children. The sample code for this purpose is as follows −
Text.rich(
   TextSpan(
      children: <TextSpan>[
         TextSpan(text: "Hello ", style:
         TextStyle(fontStyle: FontStyle.italic)),
         TextSpan(text: "World", style:
         TextStyle(fontWeight: FontWeight.bold)),
      ],
   ),
)
The most important properties of the Text widget are as follows −
maxLines, int − Maximum number of lines to show
overflow, TextOverFlow − Specify how visual overflow is handled using TextOverFlow class
style, TextStyle − Specify the style of the string using TextStyle class
textAlign, TextAlign − Alignment of the text like right, left, justify, etc., using TextAlign class
textDirection, TextDirection − Direction of text to flow, either left-to-right or right-to-left
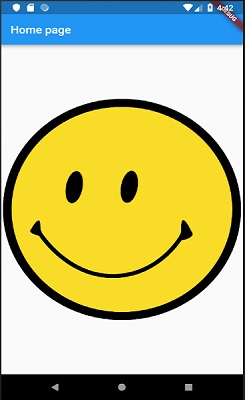
Image
Image widget is used to display an image in the application. Image widget provides different constructors to load images from multiple sources and they are as follows −
Image − Generic image loader using ImageProvider
Image.asset − Load image from flutter projects assets
Image.file − Load image from system folder
Image.memory − Load image from memory
Image.Network − Load image from network
The easiest option to load and display an image in Flutter is by including the image as assets of the application and load it into the widget on demand.
Create a folder, assets in the project folder and place the necessary images.
Specify the assets in the pubspec.yaml as shown below −
flutter:
   assets:
      - assets/smiley.png
Now, load and display the image in the application.
Image.asset('assets/smiley.png')
The complete source code of MyHomePage widget of the hello world application and the result is as shown below −.
class MyHomePage extends StatelessWidget {
   MyHomePage({Key key, this.title}) : super(key: key);
   final String title;

   @override
   Widget build(BuildContext context) {
      return Scaffold(
         appBar: AppBar( title: Text(this.title), ),
         body: Center( child: Image.asset("assets/smiley.png")),
      );
   }
}
The loaded image is as shown below −
The most important properties of the Image widget are as follows −
image, ImageProvider − Actual image to load
width, double − Width of the image
height, double − Height of the image
alignment, AlignmentGeometry − How to align the image within its bounds
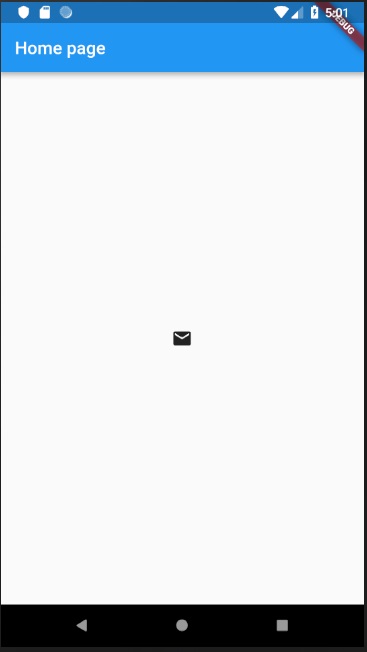
Icon
Icon widget is used to display a glyph from a font described in IconData class. The code to load a simple email icon is as follows −
Icon(Icons.email)
The complete source code to apply it in hello world application is as follows −
class MyHomePage extends StatelessWidget {
   MyHomePage({Key key, this.title}) : super(key: key);
   final String title;

   @override
   Widget build(BuildContext context) {
      return Scaffold(
         appBar: AppBar(title: Text(this.title),),
         body: Center( child: Icon(Icons.email)),
      );
   }
}
The loaded icon is as shown below −
Flutter - Introduction to Layouts
Since the core concept of Flutter is Everything is widget, Flutter incorporates a user interface layout functionality into the widgets itself. Flutter provides quite a lot of specially designed widgets like Container, Center, Align, etc., only for the purpose of laying out the user interface. Widgets build by composing other widgets normally use layout widgets. Let use learn the Flutter layout concept in this chapter.
Type of Layout Widgets
Layout widgets can be grouped into two distinct category based on its child −
- Widget supporting a single child
- Widget supporting multiple child
Let us learn both type of widgets and its functionality in the upcoming sections.
Single Child Widgets
In this category, widgets will have only one widget as its child and every widget will have a special layout functionality.
For example, Center widget just centers it child widget with respect to its parent widget and Container widget provides complete flexibility to place it child at any given place inside it using different option like padding, decoration, etc.,
Single child widgets are great options to create high quality widget having single functionality such as button, label, etc.,
The code to create a simple button using Container widget is as follows −
class MyButton extends StatelessWidget {
   MyButton({Key key}) : super(key: key);

   @override
   Widget build(BuildContext context) {
      return Container(
         decoration: const BoxDecoration(
            border: Border(
               top: BorderSide(width: 1.0, color: Color(0xFFFFFFFFFF)),
               left: BorderSide(width: 1.0, color: Color(0xFFFFFFFFFF)),
               right: BorderSide(width: 1.0, color: Color(0xFFFF000000)),
               bottom: BorderSide(width: 1.0, color: Color(0xFFFF000000)),
            ),
         ),
         child: Container(
            padding: const
            EdgeInsets.symmetric(horizontal: 20.0, vertical: 2.0),
            decoration: const BoxDecoration(
               border: Border(
                  top: BorderSide(width: 1.0, color: Color(0xFFFFDFDFDF)),
                  left: BorderSide(width: 1.0, color: Color(0xFFFFDFDFDF)),
                  right: BorderSide(width: 1.0, color: Color(0xFFFF7F7F7F)),
                  bottom: BorderSide(width: 1.0, color: Color(0xFFFF7F7F7F)),
               ),
               color: Colors.grey,
            ),
            child: const Text(
               'OK',textAlign: TextAlign.center, style: TextStyle(color: Colors.black)
            ),
         ),
      );
   }
}
Here, we have used two widgets a Container widget and a Text widget. The result of the widget is as a custom button as shown below −

Let us check some of the most important single child layout widgets provided by Flutter −
Padding − Used to arrange its child widget by the given padding. Here, padding can be provided by EdgeInsets class.
Align − Align its child widget within itself using the value of alignment property. The value for alignment property can be provided by FractionalOffset class. The FractionalOffset class specifies the offsets in terms of a distance from the top left.
Some of the possible values of offsets are as follows −
FractionalOffset(1.0, 0.0) represents the top right.
FractionalOffset(0.0, 1.0) represents the bottom left.
A sample code about offsets is shown below −
Center(
   child: Container(
      height: 100.0,
      width: 100.0,
      color: Colors.yellow, child: Align(
         alignment: FractionalOffset(0.2, 0.6),
         child: Container( height: 40.0, width:
            40.0, color: Colors.red,
         ),
      ),
   ),
)
FittedBox − It scales the child widget and then positions it according to the specified fit.
AspectRatio − It attempts to size the child widget to the specified aspect ratio
ConstrainedBox
Baseline
FractinallySizedBox
IntrinsicHeight
IntrinsicWidth
LiimitedBox
OffStage
OverflowBox
SizedBox
SizedOverflowBox
Transform
CustomSingleChildLayout
Our hello world application is using material based layout widgets to design the home page. Let us modify our hello world application to build the home page using basic layout widgets as specified below −
Container − Generic, single child, box based container widget with alignment, padding, border and margin along with rich styling features.
Center − Simple, Single child container widget, which centers its child widget.
The modified code of the MyHomePage and MyApp widget is as below −
class MyApp extends StatelessWidget {
   @override
   Widget build(BuildContext context) {
      return MyHomePage(title: "Hello World demo app");
   }
}
class MyHomePage extends StatelessWidget {
   MyHomePage({Key key, this.title}) : super(key: key);
   final String title;
   @override
   Widget build(BuildContext context) {
      return Container(
         decoration: BoxDecoration(color: Colors.white,),
         padding: EdgeInsets.all(25), child: Center(
            child:Text(
               'Hello World', style: TextStyle(
                  color: Colors.black, letterSpacing: 0.5, fontSize: 20,
               ),
               textDirection: TextDirection.ltr,
            ),
         )
      );
   }
}
Here,
Container widget is the top level or root widget. Container is configured using decoration and padding property to layout its content.
BoxDecoration has many properties like color, border, etc., to decorate the Container widget and here, color is used to set the color of the container.
padding of the Container widget is set by using dgeInsets class, which provides the option to specify the padding value.
Center is the child widget of the Container widget. Again, Text is the child of the Center widget. Text is used to show message and Center is used to center the text message with respect to the parent widget, Container.
The final result of the code given above is a layout sample as shown below −
Multiple Child Widgets
In this category, a given widget will have more than one child widgets and the layout of each widget is unique.
For example, Row widget allows the laying out of its children in horizontal direction, whereas Column widget allows laying out of its children in vertical direction. By composing Row and Column, widget with any level of complexity can be built.
Let us learn some of the frequently used widgets in this section.
Row − Allows to arrange its children in a horizontal manner.
Column − Allows to arrange its children in a vertical manner.
ListView − Allows to arrange its children as list.
GridView − Allows to arrange its children as gallery.
Expanded − Used to make the children of Row and Column widget to occupy the maximum possible area.
Table − Table based widget.
Flow − Flow based widget.
Stack − Stack based widget.
Advanced Layout Application
In this section, let us learn how to create a complex user interface of product listing with custom design using both single and multiple child layout widgets.
For this purpose, follow the sequence given below −
Create a new Flutter application in Android studio, product_layout_app.
Replace the main.dart code with folowing code −
import 'package:flutter/material.dart';
void main() => runApp(MyApp());

class MyApp extends StatelessWidget {
   // This widget is the root of your application.
   @override
   Widget build(BuildContext context) {
      return MaterialApp(
         title: 'Flutter Demo', theme: ThemeData(
         primarySwatch: Colors.blue,),
         home: MyHomePage(title: 'Product layout demo home page'),
      );
   }
}
class MyHomePage extends StatelessWidget {
   MyHomePage({Key key, this.title}) : super(key: key);
   final String title;

   @override
   Widget build(BuildContext context) {
      return Scaffold(
         appBar: AppBar(title: Text(this.title),),
         body: Center(child: Text( 'Hello World', )),
      );
   }
}
Here,
We have created MyHomePage widget by extending StatelessWidget instead of default StatefulWidget and then removed the relevant code.
Now, create a new widget, ProductBox according to the specified design as shown below −
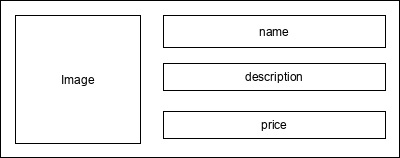
The code for the ProductBox is as follows.
class ProductBox extends StatelessWidget {
   ProductBox({Key key, this.name, this.description, this.price, this.image})
      : super(key: key);
   final String name;
   final String description;
   final int price;
   final String image;

   Widget build(BuildContext context) {
      return Container(
         padding: EdgeInsets.all(2), height: 120,  child: Card(
            child: Row(
               mainAxisAlignment: MainAxisAlignment.spaceEvenly, children: <Widget>[
                  Image.asset("assets/appimages/" +image), Expanded(
                     child: Container(
                        padding: EdgeInsets.all(5), child: Column(
                           mainAxisAlignment: MainAxisAlignment.spaceEvenly,
                              children: <Widget>[

                              Text(this.name, style: TextStyle(fontWeight:
                                 FontWeight.bold)), Text(this.description),
                              Text("Price: " + this.price.toString()),
                           ],
                        )
                     )
                  )
               ]
            )
         )
      );
   }
}
Please observe the following in the code −
ProductBox has used four arguments as specified below −
name - Product name
description - Product description
price - Price of the product
image - Image of the product
ProductBox uses seven build-in widgets as specified below −
- Container
- Expanded
- Row
- Column
- Card
- Text
- Image
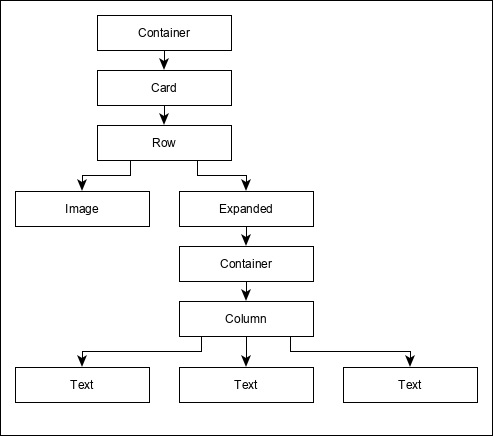
ProductBox is designed using the above mentioned widget. The arrangement or hierarchy of the widget is specified in the diagram shown below −
Now, place some dummy image (see below) for product information in the assets folder of the application and configure the assets folder in the pubspec.yaml file as shown below −
assets:
   - assets/appimages/floppy.png
   - assets/appimages/iphone.png
   - assets/appimages/laptop.png
   - assets/appimages/pendrive.png
   - assets/appimages/pixel.png
   - assets/appimages/tablet.png

iPhone.png
Pixel.png

Laptop.png
Tablet.png

Pendrive.png

Floppy.png
Finally, Use the ProductBox widget in the MyHomePage widget as specified below −
class MyHomePage extends StatelessWidget {
   MyHomePage({Key key, this.title}) : super(key: key);
   final String title;

   @override
   Widget build(BuildContext context) {
      return Scaffold(
         appBar: AppBar(title:Text("Product Listing")),
         body: ListView(
            shrinkWrap: true, padding: const EdgeInsets.fromLTRB(2.0, 10.0, 2.0, 10.0),
            children: <Widget> [
               ProductBox(
                  name: "iPhone",
                  description: "iPhone is the stylist phone ever",
                  price: 1000,
                  image: "iphone.png"
               ),
               ProductBox(
                  name: "Pixel",
                  description: "Pixel is the most featureful phone ever",
                  price: 800,
                  image: "pixel.png"
               ),
               ProductBox(
                  name: "Laptop",
                  description: "Laptop is most productive development tool",
                  price: 2000,
                  image: "laptop.png"
               ),
               ProductBox(
                  name: "Tablet",
                  description: "Tablet is the most useful device ever for meeting",
                  price: 1500,
                  image: "tablet.png"
               ),
               ProductBox(
                  name: "Pendrive",
                  description: "Pendrive is useful storage medium",
                  price: 100,
                  image: "pendrive.png"
               ),
               ProductBox(
                  name: "Floppy Drive",
                  description: "Floppy drive is useful rescue storage medium",
                  price: 20,
                  image: "floppy.png"
               ),
            ],
         )
      );
   }
}
Here,we have used ProductBox as children of ListView widget.
The complete code (main.dart) of the product layout application (product_layout_app) is as follows −
import 'package:flutter/material.dart';
void main() => runApp(MyApp());

class MyApp extends StatelessWidget {
   // This widget is the root of your application.
   @override
   Widget build(BuildContext context) {
      return MaterialApp(
         title: 'Flutter Demo', theme: ThemeData(
            primarySwatch: Colors.blue,
         ),
         home: MyHomePage(title: 'Product layout demo home page'),
      );
   }
}
class MyHomePage extends StatelessWidget {
   MyHomePage({Key key, this.title}) : super(key: key);
   final String title;

   @override
   Widget build(BuildContext context) {
      return Scaffold(
         appBar: AppBar(title: Text("Product Listing")),
         body: ListView(
            shrinkWrap: true,
            padding: const EdgeInsets.fromLTRB(2.0, 10.0, 2.0, 10.0),
            children: <Widget>[
               ProductBox(
                  name: "iPhone",
                  description: "iPhone is the stylist phone ever",
                  price: 1000,
                  image: "iphone.png"
               ),
               ProductBox(
                  name: "Pixel",
                  description: "Pixel is the most featureful phone ever",
                  price: 800,
                  image: "pixel.png"
               ),
               ProductBox(
                  name: "Laptop",
                  description: "Laptop is most productive development tool",
                  price: 2000,
                  image: "laptop.png"
               ),
               ProductBox(
                  name: "Tablet",
                  description: "Tablet is the most useful device ever for meeting",
                  price: 1500,
                  image: "tablet.png"
               ),
               ProductBox(
                  name: "Pendrive",
                  description: "Pendrive is useful storage medium",
                  price: 100,
                  image: "pendrive.png"
               ),
               ProductBox(
                  name: "Floppy Drive",
                  description: "Floppy drive is useful rescue storage medium",
                  price: 20,
                  image: "floppy.png"
               ),
            ],
         )
      );
   }
}
class ProductBox extends StatelessWidget {
   ProductBox({Key key, this.name, this.description, this.price, this.image}) :
      super(key: key);
   final String name;
   final String description;
   final int price;
   final String image;

   Widget build(BuildContext context) {
      return Container(
         padding: EdgeInsets.all(2),
         height: 120,
         child: Card(
            child: Row(
               mainAxisAlignment: MainAxisAlignment.spaceEvenly,
               children: <Widget>[
                  Image.asset("assets/appimages/" + image),
                  Expanded(
                     child: Container(
                        padding: EdgeInsets.all(5),
                        child: Column(
                           mainAxisAlignment: MainAxisAlignment.spaceEvenly,
                           children: <Widget>[
                              Text(
                                 this.name, style: TextStyle(
                                    fontWeight: FontWeight.bold
                                 )
                              ),
                              Text(this.description), Text(
                                 "Price: " + this.price.toString()
                              ),
                           ],
                        )
                     )
                  )
               ]
            )
         )
      );
   }
}
The final output of the application is as follows −

Flutter - Introduction to Gestures
Gestures are primarily a way for a user to interact with a mobile (or any touch based device) application. Gestures are generally defined as any physical action / movement of a user in the intention of activating a specific control of the mobile device. Gestures are as simple as tapping the screen of the mobile device to more complex actions used in gaming applications.
Some of the widely used gestures are mentioned here −
Tap − Touching the surface of the device with fingertip for a short period and then releasing the fingertip.
Double Tap − Tapping twice in a short time.
Drag − Touching the surface of the device with fingertip and then moving the fingertip in a steady manner and then finally releasing the fingertip.
Flick − Similar to dragging, but doing it in a speeder way.
Pinch − Pinching the surface of the device using two fingers.
Spread/Zoom − Opposite of pinching.
Panning − Touching the surface of the device with fingertip and moving it in any direction without releasing the fingertip.
Flutter provides an excellent support for all type of gestures through its exclusive widget, GestureDetector. GestureDetector is a non-visual widget primarily used for detecting the users gesture. To identify a gesture targeted on a widget, the widget can be placed inside GestureDetector widget. GestureDetector will capture the gesture and dispatch multiple events based on the gesture.
Some of the gestures and the corresponding events are given below −
- Tap
- onTapDown
- onTapUp
- onTap
- onTapCancel
- Double tap
- onDoubleTap
- Long press
- onLongPress
- Vertical drag
- onVerticalDragStart
- onVerticalDragUpdate
- onVerticalDragEnd
- Horizontal drag
- onHorizontalDragStart
- onHorizontalDragUpdate
- onHorizontalDragEnd
- Pan
- onPanStart
- onPanUpdate
- onPanEnd
Now, let us modify the hello world application to include gesture detection feature and try to understand the concept.
Change the body content of the MyHomePage widget as shown below −
body: Center(
   child: GestureDetector(
      onTap: () {
         _showDialog(context);
      },
      child: Text( 'Hello World', )
   )
),
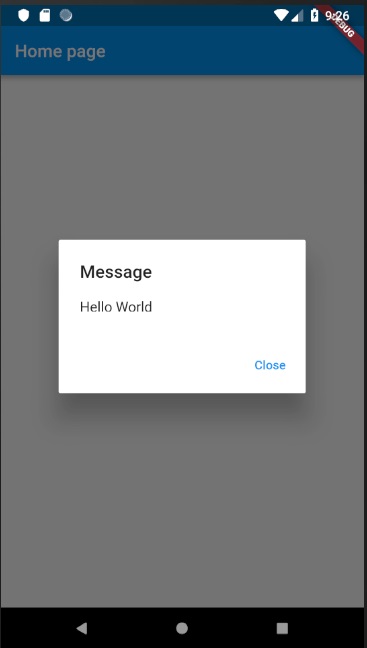
Observe that here we have placed the GestureDetector widget above the Text widget in the widget hierarchy, captured the onTap event and then finally shown a dialog window.
Implement the *_showDialog* function to present a dialog when user tabs the hello world message. It uses the generic showDialog and AlertDialog widget to create a new dialog widget. The code is shown below −
// user defined function void _showDialog(BuildContext context) {
   // flutter defined function
   showDialog(
      context: context, builder: (BuildContext context) {
         // return object of type Dialog
         return AlertDialog(
            title: new Text("Message"),
            content: new Text("Hello World"),
            actions: <Widget>[
               new FlatButton(
                  child: new Text("Close"),
                  onPressed: () {
                     Navigator.of(context).pop();
                  },
               ),
            ],
         );
      },
   );
}
The application will reload in the device using Hot Reload feature. Now, simply click the message, Hello World and it will show the dialog as below −
Now, close the dialog by clicking the close option in the dialog.
The complete code (main.dart) is as follows −
import 'package:flutter/material.dart';
void main() => runApp(MyApp());

class MyApp extends StatelessWidget {
   // This widget is the root of your application.
   @override
   Widget build(BuildContext context) {
      return MaterialApp(
         title: 'Hello World Demo Application',
         theme: ThemeData( primarySwatch: Colors.blue,),
         home: MyHomePage(title: 'Home page'),
      );
   }
}
class MyHomePage extends StatelessWidget {
   MyHomePage({Key key, this.title}) : super(key: key);
   final String title;

   // user defined function
   void _showDialog(BuildContext context) {
      // flutter defined function showDialog(
         context: context, builder: (BuildContext context) {
            // return object of type Dialog return AlertDialog(
               title: new Text("Message"),
               content: new Text("Hello World"),
               actions: <Widget>[
                  new FlatButton(
                     child: new Text("Close"),
                     onPressed: () {
                        Navigator.of(context).pop();
                     },
                  ),
               ],
            );
         },
      );
   }
   @override
   Widget build(BuildContext context) {
      return Scaffold(
         appBar: AppBar(title: Text(this.title),),
         body: Center(
            child: GestureDetector(
               onTap: () {
                  _showDialog(context);
               },
            child: Text( 'Hello World', )
            )
         ),
      );
   }
}
Finally, Flutter also provides a low-level gesture detection mechanism through Listener widget. It will detect all user interactions and then dispatches the following events −
- PointerDownEvent
- PointerMoveEvent
- PointerUpEvent
- PointerCancelEvent
Flutter also provides a small set of widgets to do specific as well as advanced gestures. The widgets are listed below −
Dismissible − Supports flick gesture to dismiss the widget.
Draggable − Supports drag gesture to move the widget.
LongPressDraggable − Supports drag gesture to move a widget, when its parent widget is also draggable.
DragTarget − Accepts any Draggable widget
IgnorePointer − Hides the widget and its children from the gesture detection process.
AbsorbPointer − Stops the gesture detection process itself and so any overlapping widget also can not able to participate in the gesture detection process and hence, no event is raised.
Scrollable − Support scrolling of the content available inside the widget.
Flutter - State Management
Managing state in an application is one of the most important and necessary process in the life cycle of an application.
Let us consider a simple shopping cart application.
User will login using their credentials into the application.
Once user is logged in, the application should persist the logged in user detail in all the screen.
Again, when the user selects a product and saved into a cart, the cart information should persist between the pages until the user checked out the cart.
User and their cart information at any instance is called the state of the application at that instance.
A state management can be divided into two categories based on the duration the particular state lasts in an application.
Ephemeral − Last for a few seconds like the current state of an animation or a single page like current rating of a product. Flutter supports its through StatefulWidget.
app state − Last for entire application like logged in user details, cart information, etc., Flutter supports its through scoped_model.
Navigation and Routing
In any application, navigating from one page / screen to another defines the work flow of the application. The way that the navigation of an application is handled is called Routing. Flutter provides a basic routing class MaterialPageRoute and two methods - Navigator.push and Navigator.pop, to define the work flow of an application.
MaterialPageRoute
MaterialPageRoute is a widget used to render its UI by replacing the entire screen with a platform specific animation.
MaterialPageRoute(builder: (context) => Widget())
Here, builder will accepts a function to build its content by suppling the current context of the application.
Navigation.push
Navigation.push is used to navigate to new screen using MaterialPageRoute widget.
Navigator.push( context, MaterialPageRoute(builder: (context) => Widget()), );
Navigation.pop
Navigation.pop is used to navigate to previous screen.
Navigator.pop(context);
Let us create a new application to better understand the navigation concept.
Create a new Flutter application in Android studio, product_nav_app
Copy the assets folder from product_nav_app to product_state_app and add assets inside the pubspec.yaml file.
flutter:
   assets:
   - assets/appimages/floppy.png
   - assets/appimages/iphone.png
   - assets/appimages/laptop.png
   - assets/appimages/pendrive.png
   - assets/appimages/pixel.png
   - assets/appimages/tablet.png
Replace the default startup code (main.dart) with our startup code.
import 'package:flutter/material.dart';
void main() => runApp(MyApp());

class MyApp extends StatelessWidget {
   // This widget is the root of your application.
   @override
   Widget build(BuildContext context) {
      return MaterialApp(
         title: 'Flutter Demo',
         theme: ThemeData(
            primarySwatch: Colors.blue,
         ),
         home: MyHomePage(
            title: 'Product state demo home page'
         ),
      );
   }
}
class MyHomePage extends StatelessWidget {
   MyHomePage({Key key, this.title}) : super(key: key);
   final String title;
   @override
   Widget build(BuildContext context) {
      return Scaffold(
         appBar: AppBar(
            title: Text(this.title),
         ),
         body: Center(
            child: Text('Hello World',)
         ),
      );
   }
}
Let us create a Product class to organize the product information.
class Product {
   final String name;
   final String description;
   final int price;
   final String image;
   Product(this.name, this.description, this.price, this.image);
}
Let us write a method getProducts in the Product class to generate our dummy product records.
static List<Product> getProducts() {
   List<Product> items = <Product>[];

   items.add(
      Product(
         "Pixel",
         "Pixel is the most feature-full phone ever", 800,
         "pixel.png"
      )
   );
   items.add(
      Product(
         "Laptop",
         "Laptop is most productive development tool",
         2000, "
         laptop.png"
      )
   );
   items.add(
      Product(
         "Tablet",
         "Tablet is the most useful device ever for meeting",
         1500,
         "tablet.png"
      )
   );
   items.add(
      Product(
         "Pendrive",
         "Pendrive is useful storage medium",
         100,
         "pendrive.png"
      )
   );
   items.add(
      Product(
         "Floppy Drive",
         "Floppy drive is useful rescue storage medium",
         20,
         "floppy.png"
      )
   );
   return items;
}
import product.dart in main.dart
import 'Product.dart';
Let us include our new widget, RatingBox.
class RatingBox extends StatefulWidget {
   @override
   _RatingBoxState createState() =>_RatingBoxState();
}
class _RatingBoxState extends State<RatingBox> {
   int _rating = 0;
   void _setRatingAsOne() {
      setState(() {
         _rating = 1;
      });
   }
   void _setRatingAsTwo() {
      setState(() {
         _rating = 2;
      });
   }
   void _setRatingAsThree() {
      setState(() {
         _rating = 3;
      });
   }
   Widget build(BuildContext context) {
      double _size = 20;
      print(_rating);
      return Row(
         mainAxisAlignment: MainAxisAlignment.end,
         crossAxisAlignment: CrossAxisAlignment.end,
         mainAxisSize: MainAxisSize.max,
         children: <Widget>[
            Container(
               padding: EdgeInsets.all(0),
               child: IconButton(
                  icon: (
                     _rating >= 1?
                     Icon(
                        Icons.star,
                        size: _size,
                     )
                     : Icon(
                        Icons.star_border,
                        size: _size,
                     )
                  ),
                  color: Colors.red[500],
                  onPressed: _setRatingAsOne,
                  iconSize: _size,
               ),
            ),
            Container(
               padding: EdgeInsets.all(0),
               child: IconButton(
                  icon: (
                     _rating >= 2?
                     Icon(
                        Icons.star,
                        size: _size,
                     )
                     : Icon(
                        Icons.star_border,
                        size: _size,
                     )
                  ),
                  color: Colors.red[500],
                  onPressed: _setRatingAsTwo,
                  iconSize: _size,
               ),
            ),
            Container(
               padding: EdgeInsets.all(0),
               child: IconButton(
                  icon: (
                     _rating >= 3 ?
                     Icon(
                        Icons.star,
                        size: _size,
                     )
                     : Icon(
                        Icons.star_border,
                        size: _size,
                     )
                  ),
                  color: Colors.red[500],
                  onPressed: _setRatingAsThree,
                  iconSize: _size,
               ),
            ),
         ],
      );
   }
}
Let us modify our ProductBox widget to work with our new Product class.
class ProductBox extends StatelessWidget {
   ProductBox({Key key, this.item}) : super(key: key);
   final Product item;

   Widget build(BuildContext context) {
      return Container(
         padding: EdgeInsets.all(2),
         height: 140,
         child: Card(
            child: Row(
               mainAxisAlignment: MainAxisAlignment.spaceEvenly,
               children: <Widget>[
                  Image.asset("assets/appimages/" + this.item.image),
                  Expanded(
                     child: Container(
                        padding: EdgeInsets.all(5),
                        child: Column(
                           mainAxisAlignment: MainAxisAlignment.spaceEvenly,
                           children: <Widget>[
                              Text(this.item.name,
                              style: TextStyle(fontWeight: FontWeight.bold)),
                              Text(this.item.description),
                              Text("Price: " + this.item.price.toString()),
                              RatingBox(),
                           ],
                        )
                     )
                  )
               ]
            ),
         )
      );
   }
}
Let us rewrite our MyHomePage widget to work with Product model and to list all products using ListView.
class MyHomePage extends StatelessWidget {
   MyHomePage({Key key, this.title}) : super(key: key);
   final String title;
   final items = Product.getProducts();

   @override
   Widget build(BuildContext context) {
      return Scaffold( appBar: AppBar(title: Text("Product Navigation")),
      body: ListView.builder(
         itemCount: items.length,
         itemBuilder: (context, index) {
            return GestureDetector(
               child: ProductBox(item: items[index]),
               onTap: () {
                  Navigator.push(
                     context, MaterialPageRoute(
                        builder: (context) => ProductPage(item: items[index]),
                     ),
                  );
               },
            );
         },
      ));
   }
}
Here, we have used MaterialPageRoute to navigate to product details page.
Now, let us add ProductPage to show the product details.
class ProductPage extends StatelessWidget {
   ProductPage({Key key, this.item}) : super(key: key);
   final Product item;

   @override
   Widget build(BuildContext context) {
      return Scaffold(
         appBar: AppBar(
            title: Text(this.item.name),
         ),
         body: Center(
            child: Container(
               padding: EdgeInsets.all(0),
               child: Column(
                  mainAxisAlignment: MainAxisAlignment.start,
                  crossAxisAlignment: CrossAxisAlignment.start,
                  children: <Widget>[
                     Image.asset("assets/appimages/" + this.item.image),
                     Expanded(
                        child: Container(
                           padding: EdgeInsets.all(5),
                           child: Column(
                              mainAxisAlignment: MainAxisAlignment.spaceEvenly,
                              children: <Widget>[
                                 Text(
                                    this.item.name, style: TextStyle(
                                       fontWeight: FontWeight.bold
                                    )
                                 ),
                                 Text(this.item.description),
                                 Text("Price: " + this.item.price.toString()),
                                 RatingBox(),
                              ],
                           )
                        )
                     )
                  ]
               ),
            ),
         ),
      );
   }
}
The complete code of the application is as follows −
import 'package:flutter/material.dart';
void main() => runApp(MyApp());

class Product {
   final String name;
   final String description;
   final int price;
   final String image;
   Product(this.name, this.description, this.price, this.image);

   static List<Product> getProducts() {
      List<Product> items = <Product>[];
      items.add(
         Product(
            "Pixel",
            "Pixel is the most featureful phone ever",
            800,
            "pixel.png"
         )
      );
      items.add(
         Product(
            "Laptop",
            "Laptop is most productive development tool",
            2000,
            "laptop.png"
         )
      );
      items.add(
         Product(
            "Tablet",
            "Tablet is the most useful device ever for meeting",
            1500,
            "tablet.png"
         )
      );
      items.add(
         Product(
            "Pendrive",
            "iPhone is the stylist phone ever",
            100,
            "pendrive.png"
         )
      );
      items.add(
         Product(
            "Floppy Drive",
            "iPhone is the stylist phone ever",
            20,
            "floppy.png"
         )
      );
      items.add(
         Product(
            "iPhone",
            "iPhone is the stylist phone ever",
            1000,
            "iphone.png"
         )
      );
      return items;
   }
}
class MyApp extends StatelessWidget {
   // This widget is the root of your application.
   @override
   Widget build(BuildContext context) {
      return MaterialApp(
         title: 'Flutter Demo',
         theme: ThemeData(
            primarySwatch: Colors.blue,
         ),
         home: MyHomePage(title: 'Product Navigation demo home page'),
      );
   }
}
class MyHomePage extends StatelessWidget {
   MyHomePage({Key key, this.title}) : super(key: key);
   final String title;
   final items = Product.getProducts();

   @override
   Widget build(BuildContext context) {
      return Scaffold(
         appBar: AppBar(title: Text("Product Navigation")),
         body: ListView.builder(
            itemCount: items.length,
            itemBuilder: (context, index) {
               return GestureDetector(
                  child: ProductBox(item: items[index]),
                  onTap: () {
                     Navigator.push(
                        context,
                        MaterialPageRoute(
                           builder: (context) => ProductPage(item: items[index]),
                        ),
                     );
                  },
               );
            },
         )
      );
   }
}
class ProductPage extends StatelessWidget {
   ProductPage({Key key, this.item}) : super(key: key);
   final Product item;

   @override
   Widget build(BuildContext context) {
      return Scaffold(
         appBar: AppBar(
            title: Text(this.item.name),
         ),
         body: Center(
            child: Container(
               padding: EdgeInsets.all(0),
               child: Column(
                  mainAxisAlignment: MainAxisAlignment.start,
                  crossAxisAlignment: CrossAxisAlignment.start,
                  children: <Widget>[
                     Image.asset("assets/appimages/" + this.item.image),
                     Expanded(
                        child: Container(
                           padding: EdgeInsets.all(5),
                           child: Column(
                              mainAxisAlignment: MainAxisAlignment.spaceEvenly,
                              children: <Widget>[
                                 Text(this.item.name, style: TextStyle(fontWeight: FontWeight.bold)),
                                 Text(this.item.description),
                                 Text("Price: " + this.item.price.toString()),
                                 RatingBox(),
                              ],
                           )
                        )
                     )
                  ]
               ),
            ),
         ),
      );
   }
}
class RatingBox extends StatefulWidget {
   @override
   _RatingBoxState createState() => _RatingBoxState();
}
class _RatingBoxState extends State<RatingBox> {
   int _rating = 0;
   void _setRatingAsOne() {
      setState(() {
         _rating = 1;
      });
   }
   void _setRatingAsTwo() {
      setState(() {
         _rating = 2;
      });
   }
   void _setRatingAsThree() {
      setState(() {
         _rating = 3;
      });
   }
   Widget build(BuildContext context) {
      double _size = 20;
      print(_rating);
      return Row(
         mainAxisAlignment: MainAxisAlignment.end,
         crossAxisAlignment: CrossAxisAlignment.end,
         mainAxisSize: MainAxisSize.max,
         children: <Widget>[
            Container(
               padding: EdgeInsets.all(0),
               child: IconButton(
                  icon: (
                     _rating >= 1 ? Icon(
                        Icons.star,
                        size: _size,
                     )
                     : Icon(
                        Icons.star_border,
                        size: _size,
                     )
                  ),
                  color: Colors.red[500],
                  onPressed: _setRatingAsOne,
                  iconSize: _size,
               ),
            ),
            Container(
               padding: EdgeInsets.all(0),
               child: IconButton(
                  icon: (
                     _rating >= 2 ?
                     Icon(
                        Icons.star,
                        size: _size,
                     )
                     : Icon(
                        Icons.star_border,
                        size: _size,
                     )
                  ),
                  color: Colors.red[500],
                  onPressed: _setRatingAsTwo,
                  iconSize: _size,
               ),
            ),
            Container(
               padding: EdgeInsets.all(0),
               child: IconButton(
                  icon: (
                     _rating >= 3 ?
                     Icon(
                        Icons.star,
                        size: _size,
                     )
                     : Icon(
                        Icons.star_border,
                        size: _size,
                     )
                  ),
                  color: Colors.red[500],
                  onPressed: _setRatingAsThree,
                  iconSize: _size,
               ),
            ),
         ],
      );
   }
}
class ProductBox extends StatelessWidget {
   ProductBox({Key key, this.item}) : super(key: key);
   final Product item;

   Widget build(BuildContext context) {
      return Container(
         padding: EdgeInsets.all(2),
         height: 140,
         child: Card(
            child: Row(
               mainAxisAlignment: MainAxisAlignment.spaceEvenly,
               children: <Widget>[
                  Image.asset("assets/appimages/" + this.item.image),
                  Expanded(
                     child: Container(
                        padding: EdgeInsets.all(5),
                        child: Column(
                           mainAxisAlignment: MainAxisAlignment.spaceEvenly,
                           children: <Widget>[
                              Text(this.item.name, style: TextStyle(fontWeight: FontWeight.bold)), Text(this.item.description),
                              Text("Price: " + this.item.price.toString()),
                              RatingBox(),
                           ],
                        )
                     )
                  )
               ]
            ),
         )
      );
   }
}
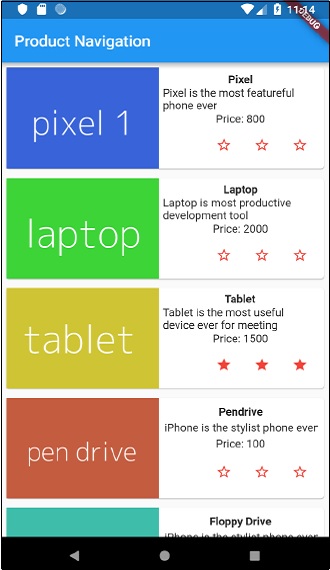
Run the application and click any one of the product item. It will show the relevant details page. We can move to home page by clicking back button. The product list page and product details page of the application are shown as follows −
Flutter - Animation
Animation is a complex procedure in any mobile application. In spite of its complexity, Animation enhances the user experience to a new level and provides a rich user interaction. Due to its richness, animation becomes an integral part of modern mobile application. Flutter framework recognizes the importance of Animation and provides a simple and intuitive framework to develop all types of animations.
Introduction
Animation is a process of showing a series of images / picture in a particular order within a specific duration to give an illusion of movement. The most important aspects of the animation are as follows −
Animation have two distinct values: Start value and End value. The animation starts from Start value and goes through a series of intermediate values and finally ends at End values. For example, to animate a widget to fade away, the initial value will be the full opacity and the final value will be the zero opacity.
The intermediate values may be linear or non-linear (curve) in nature and it can be configured. Understand that the animation works as it is configured. Each configuration provides a different feel to the animation. For example, fading a widget will be linear in nature whereas bouncing of a ball will be non-linear in nature.
The duration of the animation process affects the speed (slowness or fastness) of the animation.
The ability to control the animation process like starting the animation, stopping the animation, repeating the animation to set number of times, reversing the process of animation, etc.,
In Flutter, animation system does not do any real animation. Instead, it provides only the values required at every frame to render the images.
Animation Based Classes
Flutter animation system is based on Animation objects. The core animation classes and its usage are as follows −
Animation
Generates interpolated values between two numbers over a certain duration. The most common Animation classes are −
Animation<double> − interpolate values between two decimal number
Animation<Color> − interpolate colors between two color
Animation<Size> − interpolate sizes between two size
AnimationController − Special Animation object to control the animation itself. It generates new values whenever the application is ready for a new frame. It supports linear based animation and the value starts from 0.0 to 1.0
controller = AnimationController(duration: const Duration(seconds: 2), vsync: this);
Here, controller controls the animation and duration option controls the duration of the animation process. vsync is a special option used to optimize the resource used in the animation.
CurvedAnimation
Similar to AnimationController but supports non-linear animation. CurvedAnimation can be used along with Animation object as below −
controller = AnimationController(duration: const Duration(seconds: 2), vsync: this);
animation = CurvedAnimation(parent: controller, curve: Curves.easeIn)
Tween<T>
Derived from Animatable<T> and used to generate numbers between any two numbers other than 0 and 1. It can be used along with Animation object by using animate method and passing actual Animation object.
AnimationController controller = AnimationController(
   duration: const Duration(milliseconds: 1000),
vsync: this); Animation<int> customTween = IntTween(
   begin: 0, end: 255).animate(controller);
Tween can also used along with CurvedAnimation as below −
AnimationController controller = AnimationController(
   duration: const Duration(milliseconds: 500), vsync: this);
final Animation curve = CurvedAnimation(parent: controller, curve: Curves.easeOut);
Animation<int> customTween = IntTween(begin: 0, end: 255).animate(curve);
Here, controller is the actual animation controller. curve provides the type of non-linearity and the customTween provides custom range from 0 to 255.
Work flow of the Flutter Animation
The work flow of the animation is as follows −
Define and start the animation controller in the initState of the StatefulWidget.
AnimationController(duration: const Duration(seconds: 2), vsync: this);
animation = Tween<double>(begin: 0, end: 300).animate(controller);
controller.forward();
Add animation based listener, addListener to change the state of the widget.
animation = Tween<double>(begin: 0, end: 300).animate(controller) ..addListener(() {
   setState(() {
      // The state that has changed here is the animation objects value.
   });
});
Build-in widgets, AnimatedWidget and AnimatedBuilder can be used to skip this process. Both widget accepts Animation object and get current values required for the animation.
Get the animation values during the build process of the widget and then apply it for width, height or any relevant property instead of the original value.
child: Container(
   height: animation.value,
   width: animation.value,
   child: <Widget>,
)
Working Application
Let us write a simple animation based application to understand the concept of animation in Flutter framework.
Create a new Flutter application in Android studio, product_animation_app.
Copy the assets folder from product_nav_app to product_animation_app and add assets inside the pubspec.yaml file.
flutter:
   assets:
   - assets/appimages/floppy.png
   - assets/appimages/iphone.png
   - assets/appimages/laptop.png
   - assets/appimages/pendrive.png
   - assets/appimages/pixel.png
   - assets/appimages/tablet.png
Remove the default startup code (main.dart).
Add import and basic main function.
import 'package:flutter/material.dart';
void main() => runApp(MyApp());
Create the MyApp widget derived from StatefulWidgtet.
class MyApp extends StatefulWidget {
   _MyAppState createState() => _MyAppState();
}
Create _MyAppState widget and implement initState and dispose in addition to default build method.
class _MyAppState extends State<MyApp> with SingleTickerProviderStateMixin {
   Animation<double> animation;
   AnimationController controller;
   @override void initState() {
      super.initState();
      controller = AnimationController(
         duration: const Duration(seconds: 10), vsync: this
      );
      animation = Tween<double>(begin: 0.0, end: 1.0).animate(controller);
      controller.forward();
   }
   // This widget is the root of your application.
   @override
   Widget build(BuildContext context) {
      controller.forward();
      return MaterialApp(
         title: 'Flutter Demo',
         theme: ThemeData(primarySwatch: Colors.blue,),
         home: MyHomePage(title: 'Product layout demo home page', animation: animation,)
      );
   }
   @override
   void dispose() {
      controller.dispose();
      super.dispose();
   }
}
Here,
In initState method, we have created an animation controller object (controller), an animation object (animation) and started the animation using controller.forward.
In dispose method, we have disposed the animation controller object (controller).
In build method, send animation to MyHomePage widget through constructor. Now, MyHomePage widget can use the animation object to animate its content.
Now, add ProductBox widget
class ProductBox extends StatelessWidget {
   ProductBox({Key key, this.name, this.description, this.price, this.image})
      : super(key: key);
   final String name;
   final String description;
   final int price;
   final String image;

   Widget build(BuildContext context) {
      return Container(
         padding: EdgeInsets.all(2),
         height: 140,
         child: Card(
            child: Row(
               mainAxisAlignment: MainAxisAlignment.spaceEvenly,
               children: <Widget>[
                  Image.asset("assets/appimages/" + image),
                  Expanded(
                     child: Container(
                        padding: EdgeInsets.all(5),
                        child: Column(
                           mainAxisAlignment: MainAxisAlignment.spaceEvenly,
                           children: <Widget>[
                              Text(this.name, style:
                                 TextStyle(fontWeight: FontWeight.bold)),
                              Text(this.description),
                                 Text("Price: " + this.price.toString()),
                           ],
                        )
                     )
                  )
               ]
            )
         )
      );
   }
}
Create a new widget, MyAnimatedWidget to do simple fade animation using opacity.
class MyAnimatedWidget extends StatelessWidget {
   MyAnimatedWidget({this.child, this.animation});

   final Widget child;
   final Animation<double> animation;

   Widget build(BuildContext context) => Center(
   child: AnimatedBuilder(
      animation: animation,
      builder: (context, child) => Container(
         child: Opacity(opacity: animation.value, child: child),
      ),
      child: child),
   );
}
Here, we have used AniatedBuilder to do our animation. AnimatedBuilder is a widget which build its content while doing the animation at the same time. It accepts a animation object to get current animation value. We have used animation value, animation.value to set the opacity of the child widget. In effect, the widget will animate the child widget using opacity concept.
Finally, create the MyHomePage widget and use the animation object to animate any of its content.
class MyHomePage extends StatelessWidget {
   MyHomePage({Key key, this.title, this.animation}) : super(key: key);

   final String title;
   final Animation<double>
   animation;

   @override
   Widget build(BuildContext context) {
      return Scaffold(
         appBar: AppBar(title: Text("Product Listing")),body: ListView(
            shrinkWrap: true,
            padding: const EdgeInsets.fromLTRB(2.0, 10.0, 2.0, 10.0),
            children: <Widget>[
               FadeTransition(
                  child: ProductBox(
                     name: "iPhone",
                     description: "iPhone is the stylist phone ever",
                     price: 1000,
                     image: "iphone.png"
                  ), opacity: animation
               ),
               MyAnimatedWidget(child: ProductBox(
                  name: "Pixel",
                  description: "Pixel is the most featureful phone ever",
                  price: 800,
                  image: "pixel.png"
               ), animation: animation),
               ProductBox(
                  name: "Laptop",
                  description: "Laptop is most productive development tool",
                  price: 2000,
                  image: "laptop.png"
               ),
               ProductBox(
                  name: "Tablet",
                  description: "Tablet is the most useful device ever for meeting",
                  price: 1500,
                  image: "tablet.png"
               ),
               ProductBox(
                  name: "Pendrive",
                  description: "Pendrive is useful storage medium",
                  price: 100,
                  image: "pendrive.png"
               ),
               ProductBox(
                  name: "Floppy Drive",
                  description: "Floppy drive is useful rescue storage medium",
                  price: 20,
                  image: "floppy.png"
               ),
            ],
         )
      );
   }
}
Here, we have used FadeAnimation and MyAnimationWidget to animate the first two items in the list. FadeAnimation is a build-in animation class, which we used to animate its child using opacity concept.
The complete code is as follows −
import 'package:flutter/material.dart';
void main() => runApp(MyApp());

class MyApp extends StatefulWidget {
   _MyAppState createState() => _MyAppState();
}
class _MyAppState extends State<MyApp> with SingleTickerProviderStateMixin {
   Animation<double> animation;
   AnimationController controller;

   @override
   void initState() {
      super.initState();
      controller = AnimationController(
         duration: const Duration(seconds: 10), vsync: this);
      animation = Tween<double>(begin: 0.0, end: 1.0).animate(controller);
      controller.forward();
   }
   // This widget is the root of your application.
   @override
   Widget build(BuildContext context) {
      controller.forward();
      return MaterialApp(
         title: 'Flutter Demo', theme: ThemeData(primarySwatch: Colors.blue,),
         home: MyHomePage(title: 'Product layout demo home page', animation: animation,)
      );
   }
   @override
   void dispose() {
      controller.dispose();
      super.dispose();
   }
}
class MyHomePage extends StatelessWidget {
   MyHomePage({Key key, this.title, this.animation}): super(key: key);
   final String title;
   final Animation<double> animation;

   @override
   Widget build(BuildContext context) {
      return Scaffold(
         appBar: AppBar(title: Text("Product Listing")),
         body: ListView(
            shrinkWrap: true,
            padding: const EdgeInsets.fromLTRB(2.0, 10.0, 2.0, 10.0),
            children: <Widget>[
               FadeTransition(
                  child: ProductBox(
                     name: "iPhone",
                     description: "iPhone is the stylist phone ever",
                     price: 1000,
                     image: "iphone.png"
                  ),
                  opacity: animation
               ),
               MyAnimatedWidget(
                  child: ProductBox(
                     name: "Pixel",
                     description: "Pixel is the most featureful phone ever",
                     price: 800,
                     image: "pixel.png"
                  ),
                  animation: animation
               ),
               ProductBox(
                  name: "Laptop",
                  description: "Laptop is most productive development tool",
                  price: 2000,
                  image: "laptop.png"
               ),
               ProductBox(
                  name: "Tablet",
                  description: "Tablet is the most useful device ever for meeting",
                  price: 1500,
                  image: "tablet.png"
               ),
               ProductBox(
                  name: "Pendrive",
                  description: "Pendrive is useful storage medium",
                  price: 100,
                  image: "pendrive.png"
               ),
               ProductBox(
                  name: "Floppy Drive",
                  description: "Floppy drive is useful rescue storage medium",
                  price: 20,
                  image: "floppy.png"
               ),
            ],
         )
      );
   }
}
class ProductBox extends StatelessWidget {
   ProductBox({Key key, this.name, this.description, this.price, this.image}) :
      super(key: key);
   final String name;
   final String description;
   final int price;
   final String image;
   Widget build(BuildContext context) {
      return Container(
         padding: EdgeInsets.all(2),
         height: 140,
         child: Card(
            child: Row(
               mainAxisAlignment: MainAxisAlignment.spaceEvenly,
               children: <Widget>[
                  Image.asset("assets/appimages/" + image),
                  Expanded(
                     child: Container(
                        padding: EdgeInsets.all(5),
                        child: Column(
                           mainAxisAlignment: MainAxisAlignment.spaceEvenly,
                           children: <Widget>[
                              Text(
                                 this.name, style: TextStyle(
                                    fontWeight: FontWeight.bold
                                 )
                              ),
                              Text(this.description), Text(
                                 "Price: " + this.price.toString()
                              ),
                           ],
                        )
                     )
                  )
               ]
            )
         )
      );
   }
}
class MyAnimatedWidget extends StatelessWidget {
   MyAnimatedWidget({this.child, this.animation});
   final Widget child;
   final Animation<double> animation;

   Widget build(BuildContext context) => Center(
      child: AnimatedBuilder(
         animation: animation,
         builder: (context, child) => Container(
            child: Opacity(opacity: animation.value, child: child),
         ),
         child: child
      ),
   );
}
Compile and run the application to see the results. The initial and final version of the application is as follows −
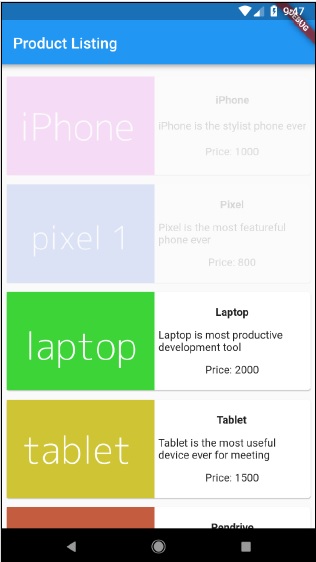
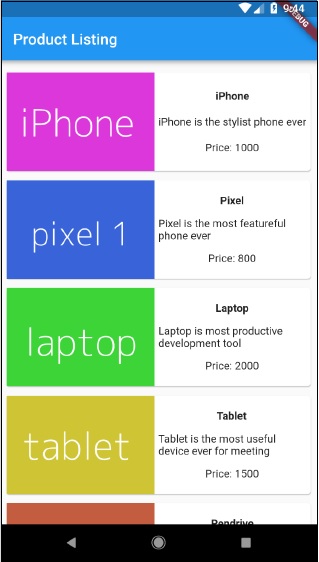
Flutter - Writing Android Specific Code
Flutter provides a general framework to access platform specific feature. This enables the developer to extend the functionality of the Flutter framework using platform specific code. Platform specific functionality like camera, battery level, browser, etc., can be accessed easily through the framework.
The general idea of accessing the platform specific code is through simple messaging protocol. Flutter code, Client and the platform code and Host binds to a common Message Channel. Client sends message to the Host through the Message Channel. Host listens on the Message Channel, receives the message and does the necessary functionality and finally, returns the result to the Client through Message Channel.
The platform specific code architecture is shown in the block diagram given below −
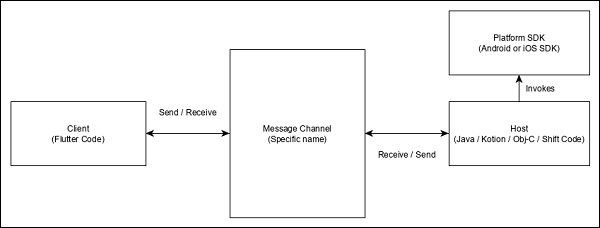
The messaging protocol uses a standard message codec (StandardMessageCodec class) that supports binary serialization of JSON-like values such as numbers, strings, boolean, etc., The serialization and de-serialization works transparently between the client and the host.
Let us write a simple application to open a browser using Android SDK and understand how
Create a new Flutter application in Android studio, flutter_browser_app
Replace main.dart code with below code −
import 'package:flutter/material.dart';
void main() => runApp(MyApp());
class MyApp extends StatelessWidget {
   @override
   Widget build(BuildContext context) {
      return MaterialApp(
         title: 'Flutter Demo',
         theme: ThemeData(
            primarySwatch: Colors.blue,
         ),
         home: MyHomePage(title: 'Flutter Demo Home Page'),
      );
   }
}
class MyHomePage extends StatelessWidget {
   MyHomePage({Key key, this.title}) : super(key: key);
   final String title;

   @override
   Widget build(BuildContext context) {
      return Scaffold(
         appBar: AppBar(
            title: Text(this.title),
         ),
         body: Center(
            child: RaisedButton(
               child: Text('Open Browser'),
               onPressed: null,
            ),
         ),
      );
   }
}
Here, we have created a new button to open the browser and set its onPressed method as null.
Now, import the following packages −
import 'dart:async';
import 'package:flutter/services.dart';
Here, services.dart include the functionality to invoke platform specific code.
Create a new message channel in the MyHomePage widget.
static const platform = const
MethodChannel('flutterapp.tutorialspoint.com/browser');
Write a method, _openBrowser to invoke platform specific method, openBrowser method through message channel.
Future<void> _openBrowser() async {
   try {
      final int result = await platform.invokeMethod(
         'openBrowser', <String, String>{
            'url': "https://flutter.dev"
         }
      );
   }
   on PlatformException catch (e) {
      // Unable to open the browser
      print(e);
   }
}
Here, we have used platform.invokeMethod to invoke openBrowser (explained in coming steps). openBrowser has an argument, url to open a specific url.
Change the value of onPressed property of the RaisedButton from null to _openBrowser.
onPressed: _openBrowser,
Open MainActivity.java (inside the android folder) and import the required library −
import android.app.Activity;
import android.content.Intent;
import android.net.Uri;
import android.os.Bundle;

import io.flutter.app.FlutterActivity;
import io.flutter.plugin.common.MethodCall;
import io.flutter.plugin.common.MethodChannel;
import io.flutter.plugin.common.MethodChannel.MethodCallHandler;
import io.flutter.plugin.common.MethodChannel.Result;
import io.flutter.plugins.GeneratedPluginRegistrant;
Write a method, openBrowser to open a browser
private void openBrowser(MethodCall call, Result result, String url) {
   Activity activity = this;
   if (activity == null) {
      result.error("ACTIVITY_NOT_AVAILABLE",
      "Browser cannot be opened without foreground
      activity", null);
      return;
   }
   Intent intent = new Intent(Intent.ACTION_VIEW);
   intent.setData(Uri.parse(url));

   activity.startActivity(intent);
   result.success((Object) true);
}
Now, set channel name in the MainActivity class −
private static final String CHANNEL = "flutterapp.tutorialspoint.com/browser";
Write android specific code to set message handling in the onCreate method −
new MethodChannel(getFlutterView(), CHANNEL).setMethodCallHandler(
   new MethodCallHandler() {
   @Override
   public void onMethodCall(MethodCall call, Result result) {
      String url = call.argument("url");
      if (call.method.equals("openBrowser")) {
         openBrowser(call, result, url);
      } else {
         result.notImplemented();
      }
   }
});
Here, we have created a message channel using MethodChannel class and used MethodCallHandler class to handle the message. onMethodCall is the actual method responsible for calling the correct platform specific code by the checking the message. onMethodCall method extracts the url from message and then invokes the openBrowser only when the method call is openBrowser. Otherwise, it returns notImplemented method.
The complete source code of the application is as follows −
main.dart
MainActivity.java
package com.tutorialspoint.flutterapp.flutter_browser_app;

import android.app.Activity;
import android.content.Intent;
import android.net.Uri;
import android.os.Bundle;
import io.flutter.app.FlutterActivity;
import io.flutter.plugin.common.MethodCall;
import io.flutter.plugin.common.MethodChannel.Result;
import io.flutter.plugins.GeneratedPluginRegistrant;

public class MainActivity extends FlutterActivity {
   private static final String CHANNEL = "flutterapp.tutorialspoint.com/browser";
   @Override
   protected void onCreate(Bundle savedInstanceState) {
      super.onCreate(savedInstanceState);
      GeneratedPluginRegistrant.registerWith(this);
      new MethodChannel(getFlutterView(), CHANNEL).setMethodCallHandler(
         new MethodCallHandler() {
            @Override
            public void onMethodCall(MethodCall call, Result result) {
               String url = call.argument("url");
               if (call.method.equals("openBrowser")) {
                  openBrowser(call, result, url);
               } else {
                  result.notImplemented();
               }
            }
         }
      );
   }
   private void openBrowser(MethodCall call, Result result, String url) {
      Activity activity = this; if (activity == null) {
         result.error(
            "ACTIVITY_NOT_AVAILABLE", "Browser cannot be opened without foreground activity", null
         );
         return;
      }
      Intent intent = new Intent(Intent.ACTION_VIEW);
      intent.setData(Uri.parse(url));
      activity.startActivity(intent);
      result.success((Object) true);
   }
}
main.dart
import 'package:flutter/material.dart';
import 'dart:async';
import 'package:flutter/services.dart';

void main() => runApp(MyApp());
class MyApp extends StatelessWidget {
   @override
   Widget build(BuildContext context) {
      return MaterialApp(
         title: 'Flutter Demo',
         theme: ThemeData(
            primarySwatch: Colors.blue,
         ),
         home: MyHomePage(
            title: 'Flutter Demo Home Page'
         ),
      );
   }
}
class MyHomePage extends StatelessWidget {
   MyHomePage({Key key, this.title}) : super(key: key);
   final String title;
   static const platform = const MethodChannel('flutterapp.tutorialspoint.com/browser');
   Future<void> _openBrowser() async {
      try {
         final int result = await platform.invokeMethod('openBrowser', <String, String>{
            'url': "https://flutter.dev"
         });
      }
      on PlatformException catch (e) {
         // Unable to open the browser print(e);
      }
   }
   @override
   Widget build(BuildContext context) {
      return Scaffold(
         appBar: AppBar(
            title: Text(this.title),
         ),
         body: Center(
            child: RaisedButton(
               child: Text('Open Browser'),
               onPressed: _openBrowser,
            ),
         ),
      );
   }
}
Run the application and click the Open Browser button and you can see that the browser is launched. The Browser app - Home page is as shown in the screenshot here −
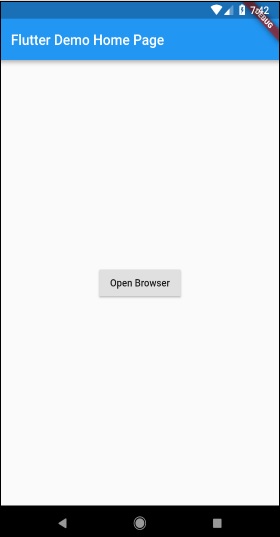
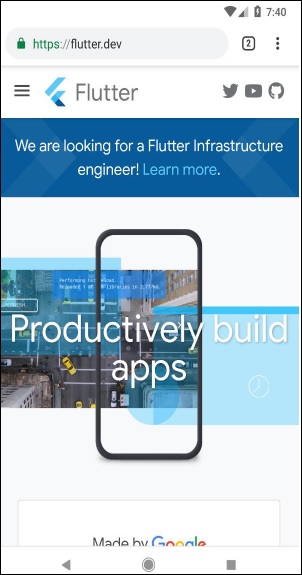
Flutter - Writing IOS Specific Code
Accessing iOS specific code is similar to that on Android platform except that it uses iOS specific languages - Objective-C or Swift and iOS SDK. Otherwise, the concept is same as that of the Android platform.
Let us write the same application as in the previous chapter for iOS platform as well.
Let us create a new application in Android Studio (macOS), flutter_browser_ios_app
Follow steps 2 - 6 as in previous chapter.
Start XCode and click File → Open
Choose the xcode project under ios directory of our flutter project.
Open AppDelegate.m under Runner → Runner path. It contains the following code −
#include "AppDelegate.h"
#include "GeneratedPluginRegistrant.h"
@implementation AppDelegate

- (BOOL)application:(UIApplication *)application
   didFinishLaunchingWithOptions:(NSDictionary *)launchOptions {
      // [GeneratedPluginRegistrant registerWithRegistry:self];
      // Override point for customization after application launch.
      return [super application:application didFinishLaunchingWithOptions:launchOptions];
   }
@end
We have added a method, openBrowser to open browser with specified url. It accepts single argument, url.
- (void)openBrowser:(NSString *)urlString {
   NSURL *url = [NSURL URLWithString:urlString];
   UIApplication *application = [UIApplication sharedApplication];
   [application openURL:url];
}
In didFinishLaunchingWithOptions method, find the controller and set it in controller variable.
FlutterViewController* controller = (FlutterViewController*)self.window.rootViewController;
In didFinishLaunchingWithOptions method, set the browser channel as flutterapp.tutorialspoint.com/browse −
FlutterMethodChannel* browserChannel = [
   FlutterMethodChannel methodChannelWithName:
   @"flutterapp.tutorialspoint.com/browser" binaryMessenger:controller];
Create a variable, weakSelf and set current class −
__weak typeof(self) weakSelf = self;
Now, implement setMethodCallHandler. Call openBrowser by matching call.method. Get url by invoking call.arguments and pass it while calling openBrowser.
[browserChannel setMethodCallHandler:^(FlutterMethodCall* call, FlutterResult result) {
   if ([@"openBrowser" isEqualToString:call.method]) {
      NSString *url = call.arguments[@"url"];
      [weakSelf openBrowser:url];
   } else { result(FlutterMethodNotImplemented); }
}];
The complete code is as follows −
#include "AppDelegate.h"
#include "GeneratedPluginRegistrant.h"
@implementation AppDelegate

- (BOOL)application:(UIApplication *)application
   didFinishLaunchingWithOptions:(NSDictionary *)launchOptions {

   // custom code starts
   FlutterViewController* controller = (FlutterViewController*)self.window.rootViewController;
   FlutterMethodChannel* browserChannel = [
      FlutterMethodChannel methodChannelWithName:
      @"flutterapp.tutorialspoint.com /browser" binaryMessenger:controller];

   __weak typeof(self) weakSelf = self;
   [browserChannel setMethodCallHandler:^(
      FlutterMethodCall* call, FlutterResult result) {

      if ([@"openBrowser" isEqualToString:call.method]) {
         NSString *url = call.arguments[@"url"];
         [weakSelf openBrowser:url];
      } else { result(FlutterMethodNotImplemented); }
   }];
   // custom code ends
   [GeneratedPluginRegistrant registerWithRegistry:self];

   // Override point for customization after application launch.
   return [super application:application didFinishLaunchingWithOptions:launchOptions];
}
- (void)openBrowser:(NSString *)urlString {
   NSURL *url = [NSURL URLWithString:urlString];
   UIApplication *application = [UIApplication sharedApplication];
   [application openURL:url];
}
@end
Open project setting.
Go to Capabilities and enable Background Modes.
Add *Background fetch and Remote Notification**.
Now, run the application. It works similar to Android version but the Safari browser will be opened instead of chrome.
Flutter - Introduction to Package
Darts way of organizing and sharing a set of functionality is through Package. Dart Package is simply sharable libraries or modules. In general, the Dart Package is same as that of Dart Application except Dart Package does not have application entry point, main.
The general structure of Package (consider a demo package, my_demo_package) is as below −
lib/src/* − Private Dart code files.
lib/my_demo_package.dart − Main Dart code file. It can be imported into an application as −
import 'package:my_demo_package/my_demo_package.dart'
Other private code file may be exported into the main code file (my_demo_package.dart), if necessary as shown below −
export src/my_private_code.dart
lib/* − Any number of Dart code files arranged in any custom folder structure. The code can be accessed as,
import 'package:my_demo_package/custom_folder/custom_file.dart'
pubspec.yaml − Project specification, same as that of application,
All Dart code files in the Package are simply Dart classes and it does not have any special requirement for a Dart code to include it in a Package.
Types of Packages
Since Dart Packages are basically a small collection of similar functionality, it can be categorized based on its functionality.
Dart Package
Generic Dart code, which can be used in both web and mobile environment. For example, english_words is one such package which contains around 5000 words and has basic utility functions like nouns (list nouns in the English), syllables (specify number of syllables in a word.
Flutter Package
Generic Dart code, which depends on Flutter framework and can be used only in mobile environment. For example, fluro is a custom router for flutter. It depends on the Flutter framework.
Flutter Plugin
Generic Dart code, which depends on Flutter framework as well as the underlying platform code (Android SDK or iOS SDK). For example, camera is a plugin to interact with device camera. It depends on the Flutter framework as well as the underlying framework to get access to camera.
Using a Dart Package
Dart Packages are hosted and published into the live server, https://pub.dartlang.org. Also, Flutter provides simple tool, pub to manage Dart Packages in the application. The steps needed to use as Package is as follows −
Include the package name and the version needed into the pubspec.yaml as shown below −
dependencies: english_words: ^3.1.5
The latest version number can be found by checking the online server.
Install the package into the application by using the following command −
flutter packages get
While developing in the Android studio, Android Studio detects any change in the pubspec.yaml and displays an Android studio package alert to the developer as shown below −

Dart Packages can be installed or updated in Android Studio using the menu options.
Import the necessary file using the command shown below and start working −
import 'package:english_words/english_words.dart';
Use any method available in the package,
nouns.take(50).forEach(print);
Here, we have used nouns function to get and print the top 50 words.
Develop a Flutter Plugin Package
Developing a Flutter Plugin is similar to developing a Dart application or Dart Package. The only exception is that the plugin is going to use System API (Android or iOS) to get the required platform specific functionality.
As we have already learned how to access platform code in the previous chapters, let us develop a simple plugin, my_browser to understand the plugin development process. The functionality of the my_browser plugin is to allow the application to open the given website in the platform specific browser.
Start Android Studio.
Click File → New Flutter Project and select Flutter Plugin option.
You can see a Flutter plugin selection window as shown here −
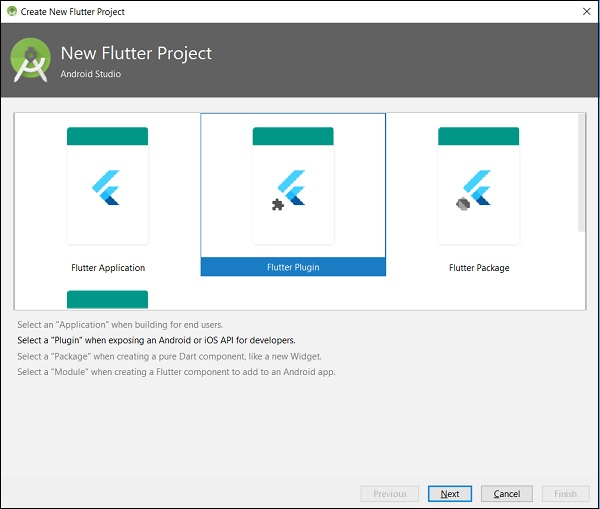
Enter my_browser as project name and click Next.
Enter the plugin name and other details in the window as shown here −
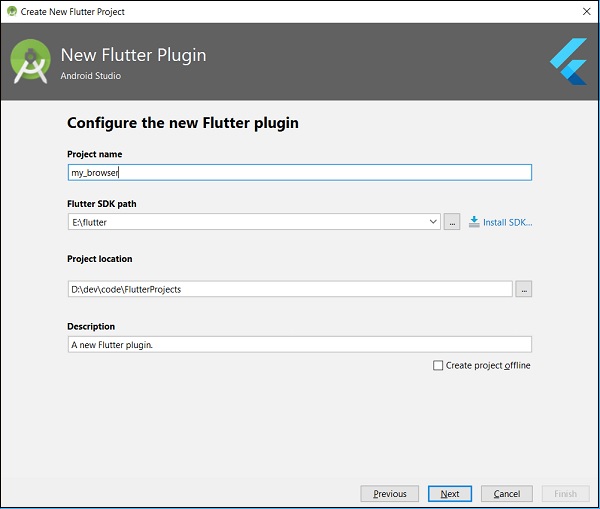
Enter company domain, flutterplugins.tutorialspoint.com in the window shown below and then click on Finish. It will generate a startup code to develop our new plugin.
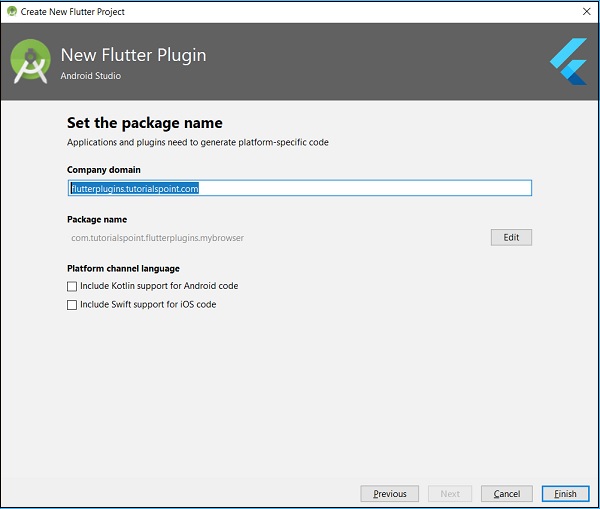
Open my_browser.dart file and write a method, openBrowser to invoke platform specific openBrowser method.
Future<void> openBrowser(String urlString) async {
   try {
      final int result = await _channel.invokeMethod(
         'openBrowser', <String, String>{ 'url': urlString }
      );
   }
   on PlatformException catch (e) {
      // Unable to open the browser print(e);
   }
}
Open MyBrowserPlugin.java file and import the following classes −
import android.app.Activity;
import android.content.Intent;
import android.net.Uri;
import android.os.Bundle;
Here, we have to import library required for opening a browser from Android.
Add new private variable mRegistrar of type Registrar in MyBrowserPlugin class.
private final Registrar mRegistrar;
Here, Registrar is used to get context information of the invoking code.
Add a constructor to set Registrar in MyBrowserPlugin class.
private MyBrowserPlugin(Registrar registrar) {
   this.mRegistrar = registrar;
}
Change registerWith to include our new constructor in MyBrowserPlugin class.
public static void registerWith(Registrar registrar) {
   final MethodChannel channel = new MethodChannel(registrar.messenger(), "my_browser");
   MyBrowserPlugin instance = new MyBrowserPlugin(registrar);
   channel.setMethodCallHandler(instance);
}
Change the onMethodCall to include openBrowser method in MyBrowserPlugin class.
@Override
public void onMethodCall(MethodCall call, Result result) {
   String url = call.argument("url");
   if (call.method.equals("getPlatformVersion")) {
      result.success("Android " + android.os.Build.VERSION.RELEASE);
   }
   else if (call.method.equals("openBrowser")) {
      openBrowser(call, result, url);
   } else {
      result.notImplemented();
   }
}
Write the platform specific openBrowser method to access browser in MyBrowserPlugin class.
private void openBrowser(MethodCall call, Result result, String url) {
   Activity activity = mRegistrar.activity();
   if (activity == null) {
      result.error("ACTIVITY_NOT_AVAILABLE",
      "Browser cannot be opened without foreground activity", null);
      return;
   }
   Intent intent = new Intent(Intent.ACTION_VIEW);
   intent.setData(Uri.parse(url));
   activity.startActivity(intent);
   result.success((Object) true);
}
The complete source code of the my_browser plugin is as follows −
my_browser.dart
import 'dart:async';
import 'package:flutter/services.dart';

class MyBrowser {
   static const MethodChannel _channel = const MethodChannel('my_browser');
   static Future<String> get platformVersion async {
      final String version = await _channel.invokeMethod('getPlatformVersion'); return version;
   }
   Future<void> openBrowser(String urlString) async {
      try {
         final int result = await _channel.invokeMethod(
            'openBrowser', <String, String>{'url': urlString});
      }
      on PlatformException catch (e) {
         // Unable to open the browser print(e);
      }
   }
}
MyBrowserPlugin.java
package com.tutorialspoint.flutterplugins.my_browser;

import io.flutter.plugin.common.MethodCall;
import io.flutter.plugin.common.MethodChannel;
import io.flutter.plugin.common.MethodChannel.MethodCallHandler;
import io.flutter.plugin.common.MethodChannel.Result;
import io.flutter.plugin.common.PluginRegistry.Registrar;
import android.app.Activity;
import android.content.Intent;
import android.net.Uri;
import android.os.Bundle;

/** MyBrowserPlugin */
public class MyBrowserPlugin implements MethodCallHandler {
   private final Registrar mRegistrar;
   private MyBrowserPlugin(Registrar registrar) {
      this.mRegistrar = registrar;
   }
   /** Plugin registration. */
   public static void registerWith(Registrar registrar) {
      final MethodChannel channel = new MethodChannel(
         registrar.messenger(), "my_browser");
      MyBrowserPlugin instance = new MyBrowserPlugin(registrar);
      channel.setMethodCallHandler(instance);
   }
   @Override
   public void onMethodCall(MethodCall call, Result result) {
      String url = call.argument("url");
      if (call.method.equals("getPlatformVersion")) {
         result.success("Android " + android.os.Build.VERSION.RELEASE);
      }
      else if (call.method.equals("openBrowser")) {
         openBrowser(call, result, url);
      } else {
         result.notImplemented();
      }
   }
   private void openBrowser(MethodCall call, Result result, String url) {
      Activity activity = mRegistrar.activity();
      if (activity == null) {
         result.error("ACTIVITY_NOT_AVAILABLE",
            "Browser cannot be opened without foreground activity", null);
         return;
      }
      Intent intent = new Intent(Intent.ACTION_VIEW);
      intent.setData(Uri.parse(url));
      activity.startActivity(intent);
      result.success((Object) true);
   }
}
Create a new project, my_browser_plugin_test to test our newly created plugin.
Open pubspec.yaml and set my_browser as a plugin dependency.
dependencies:
   flutter:
      sdk: flutter
   my_browser:
      path: ../my_browser
Android studio will alert that the pubspec.yaml is updated as shown in the Android studio package alert given below −

Click Get dependencies option. Android studio will get the package from Internet and properly configure it for the application.
Open main.dart and include my_browser plugin as below −
import 'package:my_browser/my_browser.dart';
Call the openBrowser function from my_browser plugin as shown below −
onPressed: () => MyBrowser().openBrowser("https://flutter.dev"),
The complete code of the main.dart is as follows −
import 'package:flutter/material.dart';
import 'package:my_browser/my_browser.dart';

void main() => runApp(MyApp());

class MyApp extends StatelessWidget {
   @override
   Widget build(BuildContext context) {
      return MaterialApp(
         title: 'Flutter Demo',
         theme: ThemeData(
            primarySwatch: Colors.blue,
         ),
         home: MyHomePage(
            title: 'Flutter Demo Home Page'
         ),
      );,
   }
}
class MyHomePage extends StatelessWidget {
   MyHomePage({Key key, this.title}) : super(key: key);
   final String title;
   @override
   Widget build(BuildContext context) {
      return Scaffold(
         appBar: AppBar(
            title: Text(this.title),
         ),
         body: Center(
            child: RaisedButton(
               child: Text('Open Browser'),
               onPressed: () => MyBrowser().openBrowser("https://flutter.dev"),
            ),
         ),
      );
   }
}
Run the application and click the Open Browser button and see that the browser is launched. You can see a Browser app - Home page as shown in the screenshot shown below −

You can see a Browser app Browser screen as shown in the screenshot shown below −
Flutter - Accessing REST API
Flutter provides http package to consume HTTP resources. http is a Future-based library and uses await and async features. It provides many high level methods and simplifies the development of REST based mobile applications.
Basic Concepts
http package provides a high level class and http to do web requests.
http class provides functionality to perform all types of HTTP requests.
http methods accept a url, and additional information through Dart Map (post data, additional headers, etc.,). It requests the server and collects the response back in async/await pattern. For example, the below code reads the data from the specified url and print it in the console.
print(await http.read('https://flutter.dev/'));
Some of the core methods are as follows −
read − Request the specified url through GET method and return back the response as Future<String>
get − Request the specified url through GET method and return back the response as Future<Response>. Response is a class holding the response information.
post − Request the specified url through POST method by posting the supplied data and return back the response as Future<Response>
put − Request the specified url through PUT method and return back the response as Future <Response>
head − Request the specified url through HEAD method and return back the response as Future<Response>
delete − Request the specified url through DELETE method and return back the response as Future<Response>
http also provides a more standard HTTP client class, client. client supports persistent connection. It will be useful when a lot of request to be made to a particular server. It needs to be closed properly using close method. Otherwise, it is similar to http class. The sample code is as follows −
var client = new http.Client();
try {
   print(await client.get('https://flutter.dev/'));
}
finally {
   client.close();
}
Accessing Product service API
Let us create a simple application to get product data from a web server and then show the products using ListView.
Create a new Flutter application in Android studio, product_rest_app.
Replace the default startup code (main.dart) with our product_nav_app code.
Copy the assets folder from product_nav_app to product_rest_app and add assets inside the pubspec.yaml file.
flutter:
   assets:
      - assets/appimages/floppy.png
      - assets/appimages/iphone.png
      - assets/appimages/laptop.png
      - assets/appimages/pendrive.png
      - assets/appimages/pixel.png
      - assets/appimages/tablet.png
Configure http package in the pubspec.yaml file as shown below −
dependencies:
   http: ^0.12.0+2
Here, we will use the latest version of the http package. Android studio will send a package alert that the pubspec.yaml is updated.

Click Get dependencies option. Android studio will get the package from Internet and properly configure it for the application.
Import http package in the main.dart file −
import 'dart:async';
import 'dart:convert';
import 'package:http/http.dart' as http;
Create a new JSON file, products.json with product information as shown below −
[
   {
      "name": "iPhone",
      "description": "iPhone is the stylist phone ever",
      "price": 1000,
      "image": "iphone.png"
   },
   {
      "name": "Pixel",
      "description": "Pixel is the most feature phone ever",
      "price": 800,
      "image": "pixel.png"
   },
   {
      "name": "Laptop",
      "description": "Laptop is most productive development tool",
      "price": 2000,
      "image": "laptop.png"
   },
   {
      "name": "Tablet",
      "description": "Tablet is the most useful device ever for meeting",
      "price": 1500,
      "image": "tablet.png"
   },
   {
      "name": "Pendrive",
      "description": "Pendrive is useful storage medium",
      "price": 100,
      "image": "pendrive.png"
   },
   {
      "name": "Floppy Drive",
      "description": "Floppy drive is useful rescue storage medium",
      "price": 20,
      "image": "floppy.png"
   }
]
Create a new folder, JSONWebServer and place the JSON file, products.json.
Run any web server with JSONWebServer as its root directory and get its web path. For example, http://192.168.184.1:8000/products.json. We can use any web server like apache, nginx etc.,
The easiest way is to install node based http-server application. Follow the steps given below to install and run http- server application
Install Nodejs application (nodejs.org)
Go to JSONWebServer folder.
cd /path/to/JSONWebServer
Install http-server package using npm.
npm install -g http-server
Now, run the server.
http-server . -p 8000

Starting up http-server, serving .
Available on:
   http://192.168.99.1:8000
   http://127.0.0.1:8000
   Hit CTRL-C to stop the server
Create a new file, Product.dart in the lib folder and move the Product class into it.
Write a factory constructor in the Product class, Product.fromMap to convert mapped data Map into the Product object. Normally, JSON file will be converted into Dart Map object and then, converted into relevant object (Product).
factory Product.fromJson(Map<String, dynamic> data) {
   return Product(
      data['name'],
      data['description'],
      data['price'],
      data['image'],
   );
}
The complete code of the Product.dart is as follows −
class Product {
   final String name;
   final String description;
   final int price;
   final String image;

   Product(this.name, this.description, this.price, this.image);
   factory Product.fromMap(Map<String, dynamic> json) {
      return Product(
         json['name'],
         json['description'],
         json['price'],
         json['image'],
      );
   }
}
Write two methods − parseProducts and fetchProducts - in the main class to fetch and load the product information from web server into the List<Product> object.
List<Product> parseProducts(String responseBody) {
   final parsed = json.decode(responseBody).cast<Map<String, dynamic>>();
   return parsed.map<Product>((json) =>Product.fromJson(json)).toList();
}
Future<List<Product>> fetchProducts() async {
   final response = await http.get('http://192.168.1.2:8000/products.json');
   if (response.statusCode == 200) {
      return parseProducts(response.body);
   } else {
      throw Exception('Unable to fetch products from the REST API');
   }
}
Note the following points here −
Future is used to lazy load the product information. Lazy loading is a concept to defer the execution of the code until it is necessary.
http.get is used to fetch the data from the Internet.
json.decode is used to decode the JSON data into the Dart Map object. Once JSON data is decoded, it will be converted into List<Product> using fromMap of the Product class.
In MyApp class, add new member variable, products of type Future<Product> and include it in constructor.
class MyApp extends StatelessWidget {
   final Future<List<Product>> products;
   MyApp({Key key, this.products}) : super(key: key);
   ...
In MyHomePage class, add new member variable products of type Future<Product> and include it in constructor. Also, remove items variable and its relevant method, getProducts method call. Placing the products variable in constructor. It will allow to fetch the products from Internet only once when the application is first started.
class MyHomePage extends StatelessWidget {
   final String title;
   final Future<ListList<Product>> products;
   MyHomePage({Key key, this.title, this.products}) : super(key: key);
   ...
Change the home option (MyHomePage) in the build method of MyApp widget to accommodate above changes −
home: MyHomePage(title: 'Product Navigation demo home page', products: products),
Change the main function to include Future<Product> arguments −
void main() => runApp(MyApp(fetchProduct()));
Create a new widget, ProductBoxList to build the product list in the home page.
class ProductBoxList extends StatelessWidget {
   final List<Product> items;
   ProductBoxList({Key key, this.items});

   @override
   Widget build(BuildContext context) {
      return ListView.builder(
         itemCount: items.length,
         itemBuilder: (context, index) {
            return GestureDetector(
               child: ProductBox(item: items[index]),
               onTap: () {
                  Navigator.push(
                     context, MaterialPageRoute(
                        builder: (context) =gt; ProductPage(item: items[index]),
                     ),
                  );
               },
            );
         },
      );
   }
}
Note that we used the same concept used in Navigation application to list the product except it is designed as a separate widget by passing products (object) of type List<Product>.
Finally, modify the MyHomePage widgets build method to get the product information using Future option instead of normal method call.
Widget build(BuildContext context) {
   return Scaffold(
      appBar: AppBar(title: Text("Product Navigation")),
      body: Center(
         child: FutureBuilder<List<Product>>(
            future: products, builder: (context, snapshot) {
               if (snapshot.hasError) print(snapshot.error);
               return snapshot.hasData ? ProductBoxList(items: snapshot.data)

               // return the ListView widget :
               Center(child: CircularProgressIndicator());
            },
         ),
      )
   );
}
Here note that we used FutureBuilder widget to render the widget. FutureBuilder will try to fetch the data from its future property (of type Future<List<Product>>). If future property returns data, it will render the widget using ProductBoxList, otherwise throws an error.
The complete code of the main.dart is as follows −
import 'package:flutter/material.dart';
import 'dart:async';
import 'dart:convert';
import 'package:http/http.dart' as http;
import 'Product.dart';

void main() => runApp(MyApp(products: fetchProducts()));

List<Product> parseProducts(String responseBody) {
   final parsed = json.decode(responseBody).cast<Map<String, dynamic>>();
   return parsed.map<Product>((json) => Product.fromMap(json)).toList();
}
Future<List<Product>> fetchProducts() async {
   final response = await http.get('http://192.168.1.2:8000/products.json');
   if (response.statusCode == 200) {
      return parseProducts(response.body);
   } else {
      throw Exception('Unable to fetch products from the REST API');
   }
}
class MyApp extends StatelessWidget {
   final Future<List<Product>> products;
   MyApp({Key key, this.products}) : super(key: key);

   // This widget is the root of your application.
   @override
   Widget build(BuildContext context) {
      return MaterialApp(
         title: 'Flutter Demo',
         theme: ThemeData(
            primarySwatch: Colors.blue,
         ),
         home: MyHomePage(title: 'Product Navigation demo home page', products: products),
      );
   }
}
class MyHomePage extends StatelessWidget {
   final String title;
   final Future<List<Product>> products;
   MyHomePage({Key key, this.title, this.products}) : super(key: key);

   // final items = Product.getProducts();
   @override
   Widget build(BuildContext context) {
      return Scaffold(
         appBar: AppBar(title: Text("Product Navigation")),
         body: Center(
            child: FutureBuilder<List<Product>>(
               future: products, builder: (context, snapshot) {
                  if (snapshot.hasError) print(snapshot.error);
                  return snapshot.hasData ? ProductBoxList(items: snapshot.data)

                  // return the ListView widget :
                  Center(child: CircularProgressIndicator());
               },
            ),
         )
      );
   }
}
class ProductBoxList extends StatelessWidget {
   final List<Product> items;
   ProductBoxList({Key key, this.items});

   @override
   Widget build(BuildContext context) {
      return ListView.builder(
         itemCount: items.length,
         itemBuilder: (context, index) {
            return GestureDetector(
               child: ProductBox(item: items[index]),
               onTap: () {
                  Navigator.push(
                     context, MaterialPageRoute(
                        builder: (context) => ProductPage(item: items[index]),
                     ),
                  );
               },
            );
         },
      );
   }
}
class ProductPage extends StatelessWidget {
   ProductPage({Key key, this.item}) : super(key: key);
   final Product item;
   @override
   Widget build(BuildContext context) {
      return Scaffold(
         appBar: AppBar(title: Text(this.item.name),),
         body: Center(
            child: Container(
               padding: EdgeInsets.all(0),
               child: Column(
                  mainAxisAlignment: MainAxisAlignment.start,
                  crossAxisAlignment: CrossAxisAlignment.start,
                  children: <Widget>[
                     Image.asset("assets/appimages/" + this.item.image),
                     Expanded(
                        child: Container(
                           padding: EdgeInsets.all(5),
                           child: Column(
                              mainAxisAlignment: MainAxisAlignment.spaceEvenly,
                              children: <Widget>[
                                 Text(this.item.name, style:
                                    TextStyle(fontWeight: FontWeight.bold)),
                                 Text(this.item.description),
                                 Text("Price: " + this.item.price.toString()),
                                 RatingBox(),
                              ],
                           )
                        )
                     )
                  ]
               ),
            ),
         ),
      );
   }
}
class RatingBox extends StatefulWidget {
   @override
   _RatingBoxState createState() =>_RatingBoxState();
}
class _RatingBoxState extends State<RatingBox> {
   int _rating = 0;
   void _setRatingAsOne() {
      setState(() {
         _rating = 1;
      });
   }
   void _setRatingAsTwo() {
      setState(() {
         _rating = 2;
      });
   }
   void _setRatingAsThree() {
      setState(() {
         _rating = 3;
      });
   }
   Widget build(BuildContext context) {
      double _size = 20;
      print(_rating);
      return Row(
         mainAxisAlignment: MainAxisAlignment.end,
         crossAxisAlignment: CrossAxisAlignment.end,
         mainAxisSize: MainAxisSize.max,

         children: <Widget>[
            Container(
               padding: EdgeInsets.all(0),
               child: IconButton(
                  icon: (
                     _rating >= 1
                     ? Icon(Icons.star, ize: _size,)
                     : Icon(Icons.star_border, size: _size,)
                  ),
                  color: Colors.red[500], onPressed: _setRatingAsOne, iconSize: _size,
               ),
            ),
            Container(
               padding: EdgeInsets.all(0),
               child: IconButton(
                  icon: (
                     _rating >= 2
                     ? Icon(Icons.star, size: _size,)
                     : Icon(Icons.star_border, size: _size, )
                  ),
                  color: Colors.red[500],
                  onPressed: _setRatingAsTwo,
                  iconSize: _size,
               ),
            ),
            Container(
               padding: EdgeInsets.all(0),
               child: IconButton(
                  icon: (
                     _rating >= 3 ?
                     Icon(Icons.star, size: _size,)
                     : Icon(Icons.star_border, size: _size,)
                  ),
                  color: Colors.red[500],
                  onPressed: _setRatingAsThree,
                  iconSize: _size,
               ),
            ),
         ],
      );
   }
}
class ProductBox extends StatelessWidget {
   ProductBox({Key key, this.item}) : super(key: key);
   final Product item;

   Widget build(BuildContext context) {
      return Container(
         padding: EdgeInsets.all(2), height: 140,
         child: Card(
            child: Row(
               mainAxisAlignment: MainAxisAlignment.spaceEvenly,
               children: <Widget>[
                  Image.asset("assets/appimages/" + this.item.image),
                  Expanded(
                     child: Container(
                        padding: EdgeInsets.all(5),
                        child: Column(
                           mainAxisAlignment: MainAxisAlignment.spaceEvenly,
                           children: <Widget>[
                              Text(this.item.name, style:TextStyle(fontWeight: FontWeight.bold)),
                              Text(this.item.description),
                              Text("Price: " + this.item.price.toString()),
                              RatingBox(),
                           ],
                        )
                     )
                  )
               ]
            ),
         )
      );
   }
}
Finally run the application to see the result. It will be same as our Navigation example except the data is from Internet instead of local, static data entered while coding the application.
Flutter - Database Concepts
Flutter provides many advanced packages to work with databases. The most important packages are −
sqflite − Used to access and manipulate SQLite database, and
firebase_database − Used to access and manipulate cloud hosted NoSQL database from Google.
In this chapter, let us discuss each of them in detail.
SQLite
SQLite database is the de-facto and standard SQL based embedded database engine. It is small and time-tested database engine. sqflite package provides a lot of functionality to work efficiently with SQLite database. It provides standard methods to manipulate SQLite database engine. The core functionality provided by sqflite package is as follows −
Create / Open (openDatabase method) a SQLite database.
Execute SQL statement (execute method) against SQLite database.
Advanced query methods (query method) to reduce to code required to query and get information from SQLite database.
Let us create a product application to store and fetch product information from a standard SQLite database engine using sqflite package and understand the concept behind the SQLite database and sqflite package.
Create a new Flutter application in Android studio, product_sqlite_app.
Replace the default startup code (main.dart) with our product_rest_app code.
Copy the assets folder from product_nav_app to product_rest_app and add assets inside the *pubspec.yaml` file.
flutter:
   assets:
      - assets/appimages/floppy.png
      - assets/appimages/iphone.png
      - assets/appimages/laptop.png
      - assets/appimages/pendrive.png
      - assets/appimages/pixel.png
      - assets/appimages/tablet.png
Configure sqflite package in the pubspec.yaml file as shown below −
dependencies: sqflite: any
Use the latest version number of sqflite in place of any
Configure path_provider package in the pubspec.yaml file as shown below −
dependencies: path_provider: any
Here, path_provider package is used to get temporary folder path of the system and path of the application. Use the latest version number of sqflite in place of any.
Android studio will alert that the pubspec.yaml is updated.

Click Get dependencies option. Android studio will get the package from Internet and properly configure it for the application.
In database, we need primary key, id as additional field along with Product properties like name, price, etc., So, add id property in the Product class. Also, add a new method, toMap to convert product object into Map object. fromMap and toMap are used to serialize and de- serialize the Product object and it is used in database manipulation methods.
class Product {
   final int id;
   final String name;
   final String description;
   final int price;
   final String image;
   static final columns = ["id", "name", "description", "price", "image"];
   Product(this.id, this.name, this.description, this.price, this.image);
   factory Product.fromMap(Map<String, dynamic> data) {
      return Product(
         data['id'],
         data['name'],
         data['description'],
         data['price'],
         data['image'],
      );
   }
   Map<String, dynamic> toMap() => {
      "id": id,
      "name": name,
      "description": description,
      "price": price,
      "image": image
   };
}
Create a new file, Database.dart in the lib folder to write SQLite related functionality.
Import necessary import statement in Database.dart.
import 'dart:async';
import 'dart:io';
import 'package:path/path.dart';
import 'package:path_provider/path_provider.dart';
import 'package:sqflite/sqflite.dart';
import 'Product.dart';
Note the following points here −
async is used to write asynchronous methods.
io is used to access files and directories.
path is used to access dart core utility function related to file paths.
path_provider is used to get temporary and application path.
sqflite is used to manipulate SQLite database.
Create a new class SQLiteDbProvider
Declare a singleton based, static SQLiteDbProvider object as specified below −
class SQLiteDbProvider {
   SQLiteDbProvider._();
   static final SQLiteDbProvider db = SQLiteDbProvider._();
   static Database _database;
}
SQLiteDBProvoider object and its method can be accessed through the static db variable.
SQLiteDBProvoider.db.<emthod>
Create a method to get database (Future option) of type Future<Database>. Create product table and load initial data during the creation of the database itself.
Future<Database> get database async {
   if (_database != null)
   return _database;
   _database = await initDB();
   return _database;
}
initDB() async {
   Directory documentsDirectory = await getApplicationDocumentsDirectory();
   String path = join(documentsDirectory.path, "ProductDB.db");
   return await openDatabase(
      path,
      version: 1,
      onOpen: (db) {},
      onCreate: (Database db, int version) async {
         await db.execute(
            "CREATE TABLE Product ("
            "id INTEGER PRIMARY KEY,"
            "name TEXT,"
            "description TEXT,"
            "price INTEGER,"
            "image TEXT" ")"
         );
         await db.execute(
            "INSERT INTO Product ('id', 'name', 'description', 'price', 'image')
            values (?, ?, ?, ?, ?)",
            [1, "iPhone", "iPhone is the stylist phone ever", 1000, "iphone.png"]
         );
         await db.execute(
            "INSERT INTO Product ('id', 'name', 'description', 'price', 'image')
            values (?, ?, ?, ?, ?)",
            [2, "Pixel", "Pixel is the most feature phone ever", 800, "pixel.png"]
         );
         await db.execute(
            "INSERT INTO Product ('id', 'name', 'description', 'price', 'image')
            values (?, ?, ?, ?, ?)",
            [3, "Laptop", "Laptop is most productive development tool", 2000, "laptop.png"]\
         );
         await db.execute(
            "INSERT INTO Product ('id', 'name', 'description', 'price', 'image')
            values (?, ?, ?, ?, ?)",
            [4, "Tablet", "Laptop is most productive development tool", 1500, "tablet.png"]
         );
         await db.execute(
            "INSERT INTO Product
            ('id', 'name', 'description', 'price', 'image')
            values (?, ?, ?, ?, ?)",
            [5, "Pendrive", "Pendrive is useful storage medium", 100, "pendrive.png"]
         );
         await db.execute(
            "INSERT INTO Product
            ('id', 'name', 'description', 'price', 'image')
            values (?, ?, ?, ?, ?)",
            [6, "Floppy Drive", "Floppy drive is useful rescue storage medium", 20, "floppy.png"]
         );
      }
   );
}
Here, we have used the following methods −
getApplicationDocumentsDirectory − Returns application directory path
join − Used to create system specific path. We have used it to create database path.
openDatabase − Used to open a SQLite database
onOpen − Used to write code while opening a database
onCreate − Used to write code while a database is created for the first time
db.execute − Used to execute SQL queries. It accepts a query. If the query has placeholder (?), then it accepts values as list in the second argument.
Write a method to get all products in the database −
Future<List<Product>> getAllProducts() async {
   final db = await database;
   List<Map>
   results = await db.query("Product", columns: Product.columns, orderBy: "id ASC");

   List<Product> products = new List();
   results.forEach((result) {
      Product product = Product.fromMap(result);
      products.add(product);
   });
   return products;
}
Here, we have done the following −
Used query method to fetch all the product information. query provides shortcut to query a table information without writing the entire query. query method will generate the proper query itself by using our input like columns, orderBy, etc.,
Used Products fromMap method to get product details by looping the results object, which holds all the rows in the table.
Write a method to get product specific to id
Future<Product> getProductById(int id) async {
   final db = await database;
   var result = await db.query("Product", where: "id = ", whereArgs: [id]);
   return result.isNotEmpty ? Product.fromMap(result.first) : Null;
}
Here, we have used where and whereArgs to apply filters.
Create three methods - insert, update and delete method to insert, update and delete product from the database.
insert(Product product) async {
   final db = await database;
   var maxIdResult = await db.rawQuery(
      "SELECT MAX(id)+1 as last_inserted_id FROM Product");

   var id = maxIdResult.first["last_inserted_id"];
   var result = await db.rawInsert(
      "INSERT Into Product (id, name, description, price, image)"
      " VALUES (?, ?, ?, ?, ?)",
      [id, product.name, product.description, product.price, product.image]
   );
   return result;
}
update(Product product) async {
   final db = await database;
   var result = await db.update("Product", product.toMap(),
   where: "id = ?", whereArgs: [product.id]); return result;
}
delete(int id) async {
   final db = await database;
   db.delete("Product", where: "id = ?", whereArgs: [id]);
}
The final code of the Database.dart is as follows −
import 'dart:async';
import 'dart:io';
import 'package:path/path.dart';
import 'package:path_provider/path_provider.dart';
import 'package:sqflite/sqflite.dart';
import 'Product.dart';

class SQLiteDbProvider {
   SQLiteDbProvider._();
   static final SQLiteDbProvider db = SQLiteDbProvider._();
   static Database _database;

   Future<Database> get database async {
      if (_database != null)
      return _database;
      _database = await initDB();
      return _database;
   }
   initDB() async {
      Directory documentsDirectory = await
      getApplicationDocumentsDirectory();
      String path = join(documentsDirectory.path, "ProductDB.db");
      return await openDatabase(
         path, version: 1,
         onOpen: (db) {},
         onCreate: (Database db, int version) async {
            await db.execute(
               "CREATE TABLE Product ("
               "id INTEGER PRIMARY KEY,"
               "name TEXT,"
               "description TEXT,"
               "price INTEGER,"
               "image TEXT"")"
            );
            await db.execute(
               "INSERT INTO Product ('id', 'name', 'description', 'price', 'image')
               values (?, ?, ?, ?, ?)",
               [1, "iPhone", "iPhone is the stylist phone ever", 1000, "iphone.png"]
            );
            await db.execute(
               "INSERT INTO Product ('id', 'name', 'description', 'price', 'image')
               values (?, ?, ?, ?, ?)",
               [2, "Pixel", "Pixel is the most feature phone ever", 800, "pixel.png"]
            );
            await db.execute(
               "INSERT INTO Product ('id', 'name', 'description', 'price', 'image')
               values (?, ?, ?, ?, ?)",
               [3, "Laptop", "Laptop is most productive development tool", 2000, "laptop.png"]
            );
            await db.execute(
               "INSERT INTO Product ('id', 'name', 'description', 'price', 'image')
               values (?, ?, ?, ?, ?)",
               [4, "Tablet", "Laptop is most productive development tool", 1500, "tablet.png"]
            );
            await db.execute(
               "INSERT INTO Product ('id', 'name', 'description', 'price', 'image')
               values (?, ?, ?, ?, ?)",
               [5, "Pendrive", "Pendrive is useful storage medium", 100, "pendrive.png"]
            );
            await db.execute(
               "INSERT INTO Product ('id', 'name', 'description', 'price', 'image')
               values (?, ?, ?, ?, ?)",
               [6, "Floppy Drive", "Floppy drive is useful rescue storage medium", 20, "floppy.png"]
            );
         }
      );
   }
   Future<List<Product>> getAllProducts() async {
      final db = await database;
      List<Map> results = await db.query(
         "Product", columns: Product.columns, orderBy: "id ASC"
      );
      List<Product> products = new List();
      results.forEach((result) {
         Product product = Product.fromMap(result);
         products.add(product);
      });
      return products;
   }
   Future<Product> getProductById(int id) async {
      final db = await database;
      var result = await db.query("Product", where: "id = ", whereArgs: [id]);
      return result.isNotEmpty ? Product.fromMap(result.first) : Null;
   }
   insert(Product product) async {
      final db = await database;
      var maxIdResult = await db.rawQuery("SELECT MAX(id)+1 as last_inserted_id FROM Product");
      var id = maxIdResult.first["last_inserted_id"];
      var result = await db.rawInsert(
         "INSERT Into Product (id, name, description, price, image)"
         " VALUES (?, ?, ?, ?, ?)",
         [id, product.name, product.description, product.price, product.image]
      );
      return result;
   }
   update(Product product) async {
      final db = await database;
      var result = await db.update(
         "Product", product.toMap(), where: "id = ?", whereArgs: [product.id]
      );
      return result;
   }
   delete(int id) async {
      final db = await database;
      db.delete("Product", where: "id = ?", whereArgs: [id]);
   }
}
Change the main method to get the product information.
void main() {
   runApp(MyApp(products: SQLiteDbProvider.db.getAllProducts()));
}
Here, we have used the getAllProducts method to fetch all products from the database.
Run the application and see the results. It will be similar to previous example, Accessing Product service API, except the product information is stored and fetched from the local SQLite database.
Cloud Firestore
Firebase is a BaaS app development platform. It provides many feature to speed up the mobile application development like authentication service, cloud storage, etc., One of the main feature of Firebase is Cloud Firestore, a cloud based real time NoSQL database.
Flutter provides a special package, cloud_firestore to program with Cloud Firestore. Let us create an online product store in the Cloud Firestore and create a application to access the product store.
Create a new Flutter application in Android studio, product_firebase_app.
Replace the default startup code (main.dart) with our product_rest_app code.
Copy Product.dart file from product_rest_app into the lib folder.
class Product {
   final String name;
   final String description;
   final int price;
   final String image;

   Product(this.name, this.description, this.price, this.image);
   factory Product.fromMap(Map<String, dynamic> json) {
      return Product(
         json['name'],
         json['description'],
         json['price'],
         json['image'],
      );
   }
}
Copy the assets folder from product_rest_app to product_firebase_app and add assets inside the pubspec.yaml file.
flutter:
   assets:
   - assets/appimages/floppy.png
   - assets/appimages/iphone.png
   - assets/appimages/laptop.png
   - assets/appimages/pendrive.png
   - assets/appimages/pixel.png
   - assets/appimages/tablet.png
Configure cloud_firestore package in the pubspec.yaml file as shown below −
dependencies: cloud_firestore: ^0.9.13+1
Here, use the latest version of the cloud_firestore package.
Android studio will alert that the pubspec.yaml is updated as shown here −

Click Get dependencies option. Android studio will get the package from Internet and properly configure it for the application.
Create a project in the Firebase using the following steps −
Create a Firebase account by selecting Free plan at https://firebase.google.com/pricing/.
Once Firebase account is created, it will redirect to the project overview page. It list all the Firebase based project and provides an option to create a new project.
Click Add project and it will open a project creation page.
Enter products app db as project name and click Create project option.
Go to *Firebase console.
Click Project overview. It opens the project overview page.
Click android icon. It will open project setting specific to Android development.
Enter Android Package name, com.tutorialspoint.flutterapp.product_firebase_app.
Click Register App. It generates a project configuration file, google_service.json.
Download google_service.json and then move it into the projects android/app directory. This file is the connection between our application and Firebase.
Open android/app/build.gradle and include the following code −
apply plugin: 'com.google.gms.google-services'
Open android/build.gradle and include the following configuration −
buildscript {
   repositories {
      // ...
   }
   dependencies {
      // ...
      classpath 'com.google.gms:google-services:3.2.1' // new
   }
}
Open android/app/build.gradle and include the following code as well.
Here, the plugin and class path are used for the purpose of reading google_service.json file.
android {
   defaultConfig {
      ...
      multiDexEnabled true
   }
   ...
}
dependencies {
   ...
   compile 'com.android.support: multidex:1.0.3'
}
Follow the remaining steps in the Firebase Console or just skip it.
Create a product store in the newly created project using the following steps −
Go to Firebase console.
Open the newly created project.
Click the Database option in the left menu.
Click Create database option.
Click Start in test mode and then Enable.
Click Add collection. Enter product as collection name and then click Next.
Enter the sample product information as shown in the image here −
This dependency enables the android application to use multiple dex functionality.

Add addition product information using Add document options.
Open main.dart file and import Cloud Firestore plugin file and remove http package.
import 'package:cloud_firestore/cloud_firestore.dart';
Remove parseProducts and update fetchProducts to fetch products from Cloud Firestore instead of Product service API.
Stream<QuerySnapshot> fetchProducts() {
   return Firestore.instance.collection('product').snapshots(); }
Here, Firestore.instance.collection method is used to access product collection available in the cloud store. Firestore.instance.collection provides many option to filter the collection to get the necessary documents. But, we have not applied any filter to get all product information.
Cloud Firestore provides the collection through Dart Stream concept and so modify the products type in MyApp and MyHomePage widget from Future<list<Product>> to Stream<QuerySnapshot>.
Change the build method of MyHomePage widget to use StreamBuilder instead of FutureBuilder.
@override
Widget build(BuildContext context) {
   return Scaffold(
      appBar: AppBar(title: Text("Product Navigation")),
      body: Center(
         child: StreamBuilder<QuerySnapshot>(
            stream: products, builder: (context, snapshot) {
               if (snapshot.hasError) print(snapshot.error);
               if(snapshot.hasData) {
                  List<DocumentSnapshot>
                  documents = snapshot.data.documents;

                  List<Product>
                  items = List<Product>();

                  for(var i = 0; i < documents.length; i++) {
                     DocumentSnapshot document = documents[i];
                     items.add(Product.fromMap(document.data));
                  }
                  return ProductBoxList(items: items);
               } else {
                  return Center(child: CircularProgressIndicator());
               }
            },
         ),
      )
   );
}
Here, we have fetched the product information as List<DocumentSnapshot> type. Since, our widget, ProductBoxList is not compatible with documents, we have converted the documents into List<Product> type and further used it.
Finally, run the application and see the result. Since, we have used the same product information as that of SQLite application and changed the storage medium only, the resulting application looks identical to SQLite application application.
Flutter - Internationalization
Nowadays, mobile applications are used by customers from different countries and as a result, applications are required to display the content in different languages. Enabling an application to work in multiple languages is called Internationalizing the application.
For an application to work in different languages, it should first find the current locale of the system in which the application is running and then need to show its content in that particular locale, and this process is called Localization.
Flutter framework provides three base classes for localization and extensive utility classes derived from base classes to localize an application.
The base classes are as follows −
Locale − Locale is a class used to identify the users language. For example, en-us identifies the American English and it can be created as.
Locale en_locale = Locale('en', 'US')
Here, the first argument is language code and the second argument is country code. Another example of creating Argentina Spanish (es-ar) locale is as follows −
Locale es_locale = Locale('es', 'AR')
Localizations − Localizations is a generic widget used to set the Locale and the localized resources of its child.
class CustomLocalizations {
   CustomLocalizations(this.locale);
   final Locale locale;
   static CustomLocalizations of(BuildContext context) {
      return Localizations.of<CustomLocalizations>(context, CustomLocalizations);
   }
   static Map<String, Map<String, String>> _resources = {
      'en': {
         'title': 'Demo',
         'message': 'Hello World'
      },
      'es': {
         'title': 'Manifestacin',
         'message': 'Hola Mundo',
      },
   };
   String get title {
      return _resources[locale.languageCode]['title'];
   }
   String get message {
      return _resources[locale.languageCode]['message'];
   }
}
Here, CustomLocalizations is a new custom class created specifically to get certain localized content (title and message) for the widget. of method uses the Localizations class to return new CustomLocalizations class.
LocalizationsDelegate<T> − LocalizationsDelegate<T> is a factory class through which Localizations widget is loaded. It has three over-ridable methods −
isSupported − Accepts a locale and return whether the specified locale is supported or not.
@override
bool isSupported(Locale locale) => ['en', 'es'].contains(locale.languageCode);
load − Accepts a locale and start loading the resources for the specified locale.
Here, the delegate works for en and es locale only.
@override
Future<CustomLocalizations> load(Locale locale) {
   return SynchronousFuture<CustomLocalizations>(CustomLocalizations(locale));
}
shouldReload − Specifies whether reloading of CustomLocalizations is necessary when its Localizations widget is rebuild.
Here, load method returns CustomLocalizations. The returned CustomLocalizations can be used to get values of title and message in both English and Spanish
@override
bool shouldReload(CustomLocalizationsDelegate old) => false;
The complete code of CustomLocalizationDelegate is as follows −
class CustomLocalizationsDelegate extends
LocalizationsDelegate<CustomLocalizations> {
   const CustomLocalizationsDelegate();
   @override
   bool isSupported(Locale locale) => ['en', 'es'].contains(locale.languageCode);
   @override
   Future<CustomLocalizations> load(Locale locale) {
      return SynchronousFuture<CustomLocalizations>(CustomLocalizations(locale));
   }
   @override bool shouldReload(CustomLocalizationsDelegate old) => false;
}
In general, Flutter applications are based on two root level widgets, MaterialApp or WidgetsApp. Flutter provides ready made localization for both widgets and they are MaterialLocalizations and WidgetsLocaliations. Further, Flutter also provides delegates to load MaterialLocalizations and WidgetsLocaliations and they are GlobalMaterialLocalizations.delegate and GlobalWidgetsLocalizations.delegate respectively.
Let us create a simple internationalization enabled application to test and understand the concept.
Create a new flutter application, flutter_localization_app.
Flutter supports the internationalization using exclusive flutter package, flutter_localizations. The idea is to separate the localized content from the main SDK. Open the pubspec.yaml and add below code to enable the internationalization package −
dependencies:
   flutter:
      sdk: flutter
   flutter_localizations:
      sdk: flutter
Android studio will display the following alert that the pubspec.yaml is updated.

Click Get dependencies option. Android studio will get the package from Internet and properly configure it for the application.
Import flutter_localizations package in the main.dart as follows −
import 'package:flutter_localizations/flutter_localizations.dart';
import 'package:flutter/foundation.dart' show SynchronousFuture;
Here, the purpose of SynchronousFuture is to load the custom localizations synchronously.
Create a custom localizations and its corresponding delegate as specified below −
class CustomLocalizations {
   CustomLocalizations(this.locale);
   final Locale locale;
   static CustomLocalizations of(BuildContext context) {
      return Localizations.of<CustomLocalizations>(context, CustomLocalizations);
   }
   static Map<String, Map<String, String>> _resources = {
      'en': {
         'title': 'Demo',
         'message': 'Hello World'
      },
      'es': {
         'title': 'Manifestacin',
         'message': 'Hola Mundo',
      },
   };
   String get title {
      return _resources[locale.languageCode]['title'];
   }
   String get message {
      return _resources[locale.languageCode]['message'];
   }
}
class CustomLocalizationsDelegate extends
LocalizationsDelegate<CustomLocalizations> {
   const CustomLocalizationsDelegate();

   @override
   bool isSupported(Locale locale) => ['en', 'es'].contains(locale.languageCode);

   @override
   Future<CustomLocalizations> load(Locale locale) {
      return SynchronousFuture<CustomLocalizations>(CustomLocalizations(locale));
   }
   @override bool shouldReload(CustomLocalizationsDelegate old) => false;
}
Here, CustomLocalizations is created to support localization for title and message in the application and CustomLocalizationsDelegate is used to load CustomLocalizations.
Add delegates for MaterialApp, WidgetsApp and CustomLocalization using MaterialApp properties, localizationsDelegates and supportedLocales as specified below −
localizationsDelegates: [
   const CustomLocalizationsDelegate(),
   GlobalMaterialLocalizations.delegate,
   GlobalWidgetsLocalizations.delegate,
],
supportedLocales: [
   const Locale('en', ''),
   const Locale('es', ''),
],
Use CustomLocalizations method, of to get the localized value of title and message and use it in appropriate place as specified below −
class MyHomePage extends StatelessWidget {
   MyHomePage({Key key, this.title}) : super(key: key);
   final String title;
   @override
   Widget build(BuildContext context) {
      return Scaffold(
         appBar: AppBar(title: Text(CustomLocalizations .of(context) .title), ),
         body: Center(
            child: Column(
               mainAxisAlignment: MainAxisAlignment.center,
               children: <Widget>[
                  Text( CustomLocalizations .of(context) .message, ),
               ],
            ),
         ),
      );
   }
}
Here, we have modified the MyHomePage class from StatefulWidget to StatelessWidget for simplicity reason and used the CustomLocalizations to get title and message.
Compile and run the application. The application will show its content in English.
Close the application. Go to Settings → System → Languages and Input → Languages*.
Click Add a language option and select Spanish. This will install Spanish language and then list it as one of the option.
Select Spanish and move it above English. This will set as Spanish as first language and everything will be changed to Spanish text.
Now relaunch the internationalization application and you will see the title and message in Spanish language.
We can revert the language to English by move the English option above Spanish option in the setting.
The result of the application (in Spanish) is shown in the screenshot given below −
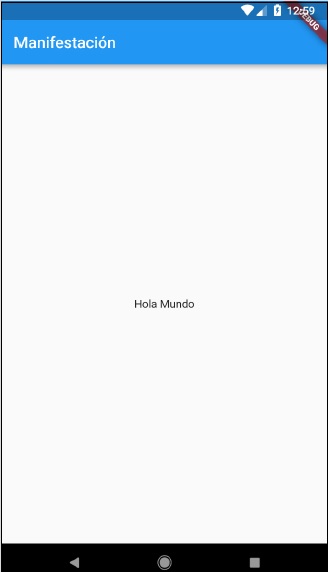
Using intl Package
Flutter provides intl package to further simplify the development of localized mobile application. intl package provides special methods and tools to semi-auto generate language specific messages.
Let us create a new localized application by using intl package and understand the concept.
Create a new flutter application, flutter_intl_app.
Open pubspec.yaml and add the package details.
dependencies:
   flutter:
      sdk: flutter
   flutter_localizations:
      sdk: flutter
   intl: ^0.15.7
   intl_translation: ^0.17.3
Android studio will display the alert as shown below informing that the pubspec.yaml is updated.

Click Get dependencies option. Android studio will get the package from Internet and properly configure it for the application.
Copy the main.dart from previous sample, flutter_internationalization_app.
Import the intl pacakge as shown below −
import 'package:intl/intl.dart';
Update the CustomLocalization class as shown in the code given below −
class CustomLocalizations {
   static Future<CustomLocalizations> load(Locale locale) {
      final String name = locale.countryCode.isEmpty ? locale.languageCode : locale.toString();
      final String localeName = Intl.canonicalizedLocale(name);

      return initializeMessages(localeName).then((_) {
         Intl.defaultLocale = localeName;
         return CustomLocalizations();
      });
   }
   static CustomLocalizations of(BuildContext context) {
      return Localizations.of<CustomLocalizations>(context, CustomLocalizations);
   }
   String get title {
      return Intl.message(
         'Demo',
         name: 'title',
         desc: 'Title for the Demo application',
      );
   }
   String get message{
      return Intl.message(
         'Hello World',
         name: 'message',
         desc: 'Message for the Demo application',
      );
   }
}
class CustomLocalizationsDelegate extends
LocalizationsDelegate<CustomLocalizations> {
   const CustomLocalizationsDelegate();

   @override
   bool isSupported(Locale locale) => ['en', 'es'].contains(locale.languageCode);
   @override
   Future<CustomLocalizations> load(Locale locale) {
      return CustomLocalizations.load(locale);
   }
   @override
   bool shouldReload(CustomLocalizationsDelegate old) => false;
}
Here, we have used three methods from the intl package instead of custom methods. Otherwise, the concepts are same.
Intl.canonicalizedLocale − Used to get correct locale name.
Intl.defaultLocale − Used to set current locale
Intl.message − Used to define new messages.
import l10n/messages_all.dart file. We will generate this file shortly
import 'l10n/messages_all.dart';
Now, create a folder, lib/l10n
Open a command prompt and go to application root directory (where pubspec.yaml is available) and run the following command −
flutter packages pub run intl_translation:extract_to_arb --output-
   dir=lib/l10n lib/main.dart
Here, the command will generate, intl_message.arb file, a template to create message in different locale. The content of the file is as follows −
{
   "@@last_modified": "2019-04-19T02:04:09.627551",
   "title": "Demo",
   "@title": {
      "description": "Title for the Demo application",
      "type": "text",
      "placeholders": {}
   },
   "message": "Hello World",
   "@message": {
      "description": "Message for the Demo
      application",
      "type": "text",
      "placeholders": {}
   }
}
Copy intl_message.arb and create new file, intl_en.arb.
Copy intl_message.arb and create new file, intl_es.arb and change the content to Spanish language as shown below −
{
   "@@last_modified": "2019-04-19T02:04:09.627551",
   "title": "Manifestacin",
   "@title": {
      "description": "Title for the Demo application",
      "type": "text",
      "placeholders": {}
   },
   "message": "Hola Mundo",
   "@message": {
      "description": "Message for the Demo application",
      "type": "text",
      "placeholders": {}
   }
}
Now, run the following command to create final message file, messages_all.dart.
flutter packages pub run intl_translation:generate_from_arb
--output-dir=lib\l10n --no-use-deferred-loading
lib\main.dart lib\l10n\intl_en.arb lib\l10n\intl_es.arb
Compile and run the application. It will work similar to above application, flutter_localization_app.
Flutter - Testing
Testing is very important phase in the development life cycle of an application. It ensures that the application is of high quality. Testing requires careful planning and execution. It is also the most time consuming phase of the development.
Dart language and Flutter framework provides extensive support for the automated testing of an application.
Types of Testing
Generally, three types of testing processes are available to completely test an application. They are as follows −
Unit Testing
Unit testing is the easiest method to test an application. It is based on ensuring the correctness of a piece of code (a function, in general) o a method of a class. But, it does not reflect the real environment and subsequently, is the least option to find the bugs.
Widget Testing
Widget testing is based on ensuring the correctness of the widget creation, rendering and interaction with other widgets as expected. It goes one step further and provides near real-time environment to find more bugs.
Integration Testing
Integration testing involves both unit testing and widget testing along with external component of the application like database, web service, etc., It simulates or mocks the real environment to find nearly all bugs, but it is the most complicated process.
Flutter provides support for all types of testing. It provides extensive and exclusive support for Widget testing. In this chapter, we will discuss widget testing in detail.
Widget Testing
Flutter testing framework provides testWidgets method to test widgets. It accepts two arguments −
- Test description
- Test code
testWidgets('test description: find a widget', '<test code>');
Steps Involved
Widget Testing involves three distinct steps −
Render the widget in the testing environment.
WidgetTester is the class provided by Flutter testing framework to build and renders the widget. pumpWidget method of the WidgetTester class accepts any widget and renders it in the testing environment.
testWidgets('finds a specific instance', (WidgetTester tester) async {
   await tester.pumpWidget(MaterialApp(
      home: Scaffold(
         body: Text('Hello'),
      ),
   ));
});
Finding the widget, which we need to test.
Flutter framework provides many options to find the widgets rendered in the testing environment and they are generally called Finders. The most frequently used finders are find.text, find.byKey and find.byWidget.
find.text finds the widget that contains the specified text.
find.text('Hello')
find.byKey find the widget by its specific key.
find.byKey('home')
find.byWidget find the widget by its instance variable.
find.byWidget(homeWidget)
Ensuring the widget works as expected.
Flutter framework provides many options to match the widget with the expected widget and they are normally called Matchers. We can use the expect method provided by the testing framework to match the widget, which we found in the second step with our our expected widget by choosing any of the matchers. Some of the important matchers are as follows.
findsOneWidget − verifies a single widget is found.
expect(find.text('Hello'), findsOneWidget);
findsNothing − verifies no widgets are found
expect(find.text('Hello World'), findsNothing);
findsWidgets − verifies more than a single widget is found.
expect(find.text('Save'), findsWidgets);
findsNWidgets − verifies N number of widgets are found.
expect(find.text('Save'), findsNWidgets(2));
The complete test code is as follows −
testWidgets('finds hello widget', (WidgetTester tester) async {
   await tester.pumpWidget(MaterialApp(
      home: Scaffold(
         body: Text('Hello'),
      ),
   ));
   expect(find.text('Hello'), findsOneWidget);
});
Here, we rendered a MaterialApp widget with text Hello using Text widget in its body. Then, we used find.text to find the widget and then matched it using findsOneWidget.
Working Example
Let us create a simple flutter application and write a widget test to understand better the steps involved and the concept.
Create a new flutter application, flutter_test_app in Android studio.
Open widget_test.dart in test folder. It has a sample testing code as given below −
testWidgets('Counter increments smoke test', (WidgetTester tester) async {
   // Build our app and trigger a frame.
   await tester.pumpWidget(MyApp());

   // Verify that our counter starts at 0.
   expect(find.text('0'), findsOneWidget);
   expect(find.text('1'), findsNothing);

   // Tap the '+' icon and trigger a frame.
   await tester.tap(find.byIcon(Icons.add));
   await tester.pump();

   // Verify that our counter has incremented.
   expect(find.text('0'), findsNothing);
   expect(find.text('1'), findsOneWidget);
});
Here, the test code does the following functionalities −
Renders MyApp widget using tester.pumpWidget.
Ensures that the counter is initially zero using findsOneWidget and findsNothing matchers.
Finds the counter increment button using find.byIcon method.
Taps the counter increment button using tester.tap method.
Ensures that the counter is increased using findsOneWidget and findsNothing matchers.
Let us again tap the counter increment button and then check whether the counter is increased to two.
await tester.tap(find.byIcon(Icons.add));
await tester.pump();

expect(find.text('2'), findsOneWidget);
Click Run menu.
Click tests in widget_test.dart option. This will run the test and report the result in the result window.
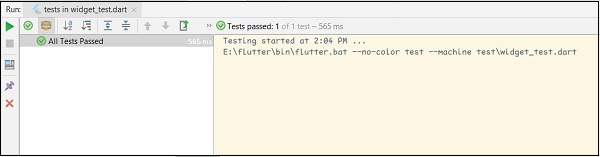
Flutter - Deployment
This chapter explains how to deploy Flutter application in both Android and iOS platforms.
Android Application
Change the application name using android:label entry in android manifest file. Android app manifest file, AndroidManifest.xml is located in <app dir>/android/app/src/main. It contains entire details about an android application. We can set the application name using android:label entry.
Change launcher icon using android:icon entry in manifest file.
Sign the app using standard option as necessary.
Enable Proguard and Obfuscation using standard option, if necessary.
Create a release APK file by running below command −
cd /path/to/my/application
flutter build apk
You can see an output as shown below −
Initializing gradle...                                            8.6s
Resolving dependencies...                                        19.9s
Calling mockable JAR artifact transform to create file:
/Users/.gradle/caches/transforms-1/files-1.1/android.jar/
c30932f130afbf3fd90c131ef9069a0b/android.jar with input
/Users/Library/Android/sdk/platforms/android-28/android.jar
Running Gradle task 'assembleRelease'...
Running Gradle task 'assembleRelease'...
Done                                                             85.7s
Built build/app/outputs/apk/release/app-release.apk (4.8MB).
Install the APK on a device using the following command −
flutter install
Publish the application into Google Playstore by creating an appbundle and push it into playstore using standard methods.
flutter build appbundle
iOS Application
Register the iOS application in App Store Connect using standard method. Save the =Bundle ID used while registering the application.
Update Display name in the XCode project setting to set the application name.
Update Bundle Identifier in the XCode project setting to set the bundle id, which we used in step 1.
Code sign as necessary using standard method.
Add a new app icon as necessary using standard method.
Generate IPA file using the following command −
flutter build ios
Now, you can see the following output −
Building com.example.MyApp for device (ios-release)...
Automatically signing iOS for device deployment
using specified development team in Xcode project:
Running Xcode build...                                   23.5s
......................
Test the application by pushing the application, IPA file into TestFlight using standard method.
Finally, push the application into App Store using standard method.
Flutter - Development Tools
This chapter explains about Flutter development tools in detail. The first stable release of the cross-platform development toolkit was released on December 4th, 2018, Flutter 1.0. Well, Google is continuously working on the improvements and strengthening the Flutter framework with different development tools.
Widget Sets
Google updated for Material and Cupertino widget sets to provide pixel-perfect quality in the components design. The upcoming version of flutter 1.2 will be designed to support desktop keyboard events and mouse hover support.
Flutter Development with Visual Studio Code
Visual Studio Code supports flutter development and provides extensive shortcuts for fast and efficient development. Some of the key features provided by Visual Studio Code for flutter development are listed below −
Code assist - When you want to check for options, you can use Ctrl+Space to get a list of code completion options.
Quick fix - Ctrl+. is quick fix tool to help in fixing the code.
Shortcuts while Coding.
Provides detailed documentation in comments.
Debugging shortcuts.
Hot restarts.
Dart DevTools
We can use Android Studio or Visual Studio Code, or any other IDE to write our code and install plugins. Googles development team has been working on yet another development tool called Dart DevTools It is a web-based programming suite. It supports both Android and iOS platforms. It is based on time line view so developers can easily analyze their applications.
Install DevTools
To install DevTools run the following command in your console −
flutter packages pub global activate devtools
Now you can see the following output −
Resolving dependencies...
+ args 1.5.1
+ async 2.2.0
+ charcode 1.1.2
+ codemirror 0.5.3+5.44.0
+ collection 1.14.11
+ convert 2.1.1
+ devtools 0.0.16
+ devtools_server 0.0.2
+ http 0.12.0+2
+ http_parser 3.1.3
+ intl 0.15.8
+ js 0.6.1+1
+ meta 1.1.7
+ mime 0.9.6+2
..................
..................
Installed executable devtools.
Activated devtools 0.0.16.
Run Server
You can run the DevTools server using the following command −
flutter packages pub global run devtools
Now, you will get a response similar to this,
Serving DevTools at http://127.0.0.1:9100
Start Your Application
Go to your application, open simulator and run using the following command −
flutter run --observatory-port=9200
Now, you are connected to DevTools.
Start DevTools in Browser
Now access the below url in the browser, to start DevTools −
http://localhost:9100/?port=9200
You will get a response as shown below −
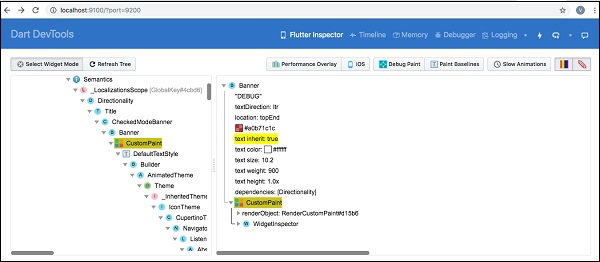
Flutter SDK
To update Flutter SDK, use the following command −
flutter upgrade
You can see an output as shown below −
To upgrade Flutter packages, use the following command −
flutter packages upgrade
You could see the following response,
Running "flutter packages upgrade" in my_app... 7.4s
Flutter Inspector
It is used to explore flutter widget trees. To achieve this, run the below command in your console,
flutter run --track-widget-creation
You can see an output as shown below −
Launching lib/main.dart on iPhone X in debug mode...
Assembling Flutter resources...                       3.6s
Compiling, linking and signing...                      6.8s
Xcode build done.                                     14.2s
2,904ms (!)
To hot reload changes while running, press "r". To hot restart (and rebuild state), press "R".
An Observatory debugger and profiler on iPhone X is available at: http://127.0.0.1:50399/
For a more detailed help message, press "h". To detach, press "d"; to quit, press "q".
Now go to the url, http://127.0.0.1:50399/ you could see the following result −
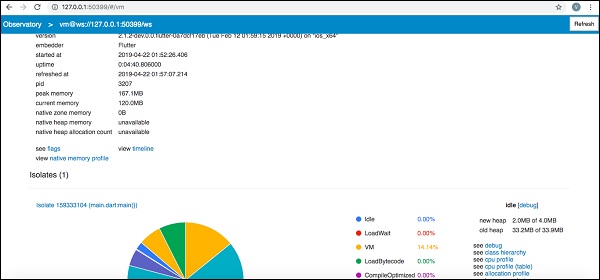
Flutter - Writting Advanced Applications
In this chapter, we are going to learn how to write a full fledged mobile application, expense_calculator. The purpose of the expense_calculator is to store our expense information. The complete feature of the application is as follows −
Expense list.
Form to enter new expenses.
Option to edit / delete the existing expenses.
Total expenses at any instance.
We are going to program the expense_calculator application using below mentioned advanced features of Flutter framework.
Advanced use of ListView to show the expense list.
Form programming.
SQLite database programming to store our expenses.
scoped_model state management to simplify our programming.
Let us start programming the expense_calculator application.
Create a new Flutter application, expense_calculator in Android studio.
Open pubspec.yaml and add package dependencies.
dependencies:
   flutter:
      sdk: flutter
   sqflite: ^1.1.0
   path_provider: ^0.5.0+1
   scoped_model: ^1.0.1
   intl: any
Observe these points here −
sqflite is used for SQLite database programming.
path_provider is used to get system specific application path.
scoped_model is used for state management.
intl is used for date formatting.
Android studio will display the following alert that the pubspec.yaml is updated.

Click Get dependencies option. Android studio will get the package from Internet and properly configure it for the application.
Remove the existing code in main.dart.
Add new file, Expense.dart to create Expense class. Expense class will have the below properties and methods.
property: id − Unique id to represent an expense entry in SQLite database.
property: amount − Amount spent.
property: date − Date when the amount is spent.
property: category − Category represents the area in which the amount is spent. e.g Food, Travel, etc.,
formattedDate − Used to format the date property
fromMap − Used to map the field from database table to the property in the expense object and to create a new expense object.
factory Expense.fromMap(Map<String, dynamic> data) {
   return Expense(
      data['id'],
      data['amount'],
      DateTime.parse(data['date']),
      data['category']
   );
}
toMap − Used to convert the expense object to Dart Map, which can be further used in database programming
Map<String, dynamic> toMap() => {
   "id" : id,
   "amount" : amount,
   "date" : date.toString(),
   "category" : category,
};
columns − Static variable used to represent the database field.
Enter and save the following code into the Expense.dart file.
import 'package:intl/intl.dart'; class Expense {
   final int id;
   final double amount;
   final DateTime date;
   final String category;
   String get formattedDate {
      var formatter = new DateFormat('yyyy-MM-dd');
      return formatter.format(this.date);
   }
   static final columns = ['id', 'amount', 'date', 'category'];
   Expense(this.id, this.amount, this.date, this.category);
   factory Expense.fromMap(Map<String, dynamic> data) {
      return Expense(
         data['id'],
         data['amount'],
         DateTime.parse(data['date']), data['category']
      );
   }
   Map<String, dynamic> toMap() => {
      "id" : id,
      "amount" : amount,
      "date" : date.toString(),
      "category" : category,
   };
}
The above code is simple and self explanatory.
Add new file, Database.dart to create SQLiteDbProvider class. The purpose of the SQLiteDbProvider class is as follows −
Get all expenses available in the database using getAllExpenses method. It will be used to list all the users expense information.
Future<List<Expense>> getAllExpenses() async {
   final db = await database;

   List<Map> results = await db.query(
      "Expense", columns: Expense.columns, orderBy: "date DESC"
   );
   List<Expense> expenses = new List();
   results.forEach((result) {
      Expense expense = Expense.fromMap(result);
      expenses.add(expense);
   });
   return expenses;
}
Get a specific expense information based on expense identity available in the database using getExpenseById method. It will be used to show the particular expense information to the user.
Future<Expense> getExpenseById(int id) async {
   final db = await database;
   var result = await db.query("Expense", where: "id = ", whereArgs: [id]);

   return result.isNotEmpty ?
   Expense.fromMap(result.first) : Null;
}
Get the total expenses of the user using getTotalExpense method. It will be used to show the current total expense to the user.
Future<double> getTotalExpense() async {
   final db = await database;
   List<Map> list = await db.rawQuery(
      "Select SUM(amount) as amount from expense"
   );
   return list.isNotEmpty ? list[0]["amount"] : Null;
}
Add new expense information into the database using insert method. It will be used to add new expense entry into the application by the user.
Future<Expense> insert(Expense expense) async {
   final db = await database;
   var maxIdResult = await db.rawQuery(
      "SELECT MAX(id)+1 as last_inserted_id FROM Expense"
   );
   var id = maxIdResult.first["last_inserted_id"];
   var result = await db.rawInsert(
      "INSERT Into Expense (id, amount, date, category)"
      " VALUES (?, ?, ?, ?)", [
         id, expense.amount, expense.date.toString(), expense.category
      ]
   );
   return Expense(id, expense.amount, expense.date, expense.category);
}
Update existing expense information using update method. It will be used to edit and update existing expense entry available in the system by the user.
update(Expense product) async {
   final db = await database;

   var result = await db.update("Expense", product.toMap(),
   where: "id = ?", whereArgs: [product.id]);
   return result;
}
Delete existing expense information using delete method. It will be used remove the existing expense entry available in the system by the user.
delete(int id) async {
   final db = await database;
   db.delete("Expense", where: "id = ?", whereArgs: [id]);
}
The complete code of the SQLiteDbProvider class is as follows −
import 'dart:async';
import 'dart:io';
import 'package:path/path.dart';
import 'package:path_provider/path_provider.dart';
import 'package:sqflite/sqflite.dart';
import 'Expense.dart';

class SQLiteDbProvider {
   SQLiteDbProvider._();
   static final SQLiteDbProvider db = SQLiteDbProvider._();

   static Database _database; Future<Database> get database async {
      if (_database != null)
         return _database;
      _database = await initDB();
      return _database;
   }
   initDB() async {
      Directory documentsDirectory = await getApplicationDocumentsDirectory();
      String path = join(documentsDirectory.path, "ExpenseDB2.db");
      return await openDatabase(
         path, version: 1, onOpen:(db){}, onCreate: (Database db, int version) async {
            await db.execute(
               "CREATE TABLE Expense (
                  ""id INTEGER PRIMARY KEY," "amount REAL," "date TEXT," "category TEXT""
               )
            ");
            await db.execute(
               "INSERT INTO Expense ('id', 'amount', 'date', 'category')
               values (?, ?, ?, ?)",[1, 1000, '2019-04-01 10:00:00', "Food"]
            );
            /*await db.execute(
               "INSERT INTO Product ('id', 'name', 'description', 'price', 'image')
               values (?, ?, ?, ?, ?)", [
                  2, "Pixel", "Pixel is the most feature phone ever", 800, "pixel.png"
               ]
            );
            await db.execute(
               "INSERT INTO Product ('id', 'name', 'description', 'price', 'image')
               values (?, ?, ?, ?, ?)", [
                  3, "Laptop", "Laptop is most productive development tool", 2000, "laptop.png"
               ]
            );
            await db.execute(
               "INSERT INTO Product ('id', 'name', 'description', 'price', 'image')
               values (?, ?, ?, ?, ?)", [
                  4, "Tablet", "Laptop is most productive development tool", 1500, "tablet.png"
               ]
            );
            await db.execute(
               "INSERT INTO Product ('id', 'name', 'description', 'price', 'image')
               values (?, ?, ?, ?, ?)", [
                  5, "Pendrive", "iPhone is the stylist phone ever", 100, "pendrive.png"
               ]
            );
            await db.execute(
               "INSERT INTO Product ('id', 'name', 'description', 'price', 'image')
               values (?, ?, ?, ?, ?)", [
                  6, "Floppy Drive", "iPhone is the stylist phone ever", 20, "floppy.png"
               ]
            ); */
         }
      );
   }
   Future<List<Expense>> getAllExpenses() async {
      final db = await database;
      List<Map>
      results = await db.query(
         "Expense", columns: Expense.columns, orderBy: "date DESC"
      );
      List<Expense> expenses = new List();
      results.forEach((result) {
         Expense expense = Expense.fromMap(result);
         expenses.add(expense);
      });
      return expenses;
   }
   Future<Expense> getExpenseById(int id) async {
      final db = await database;
      var result = await db.query("Expense", where: "id = ", whereArgs: [id]);
      return result.isNotEmpty ? Expense.fromMap(result.first) : Null;
   }
   Future<double> getTotalExpense() async {
      final db = await database;
      List<Map> list = await db.rawQuery(
         "Select SUM(amount) as amount from expense"
      );
      return list.isNotEmpty ? list[0]["amount"] : Null;
   }
   Future<Expense> insert(Expense expense) async {
      final db = await database;
      var maxIdResult = await db.rawQuery(
         "SELECT MAX(id)+1 as last_inserted_id FROM Expense"
      );
      var id = maxIdResult.first["last_inserted_id"];
      var result = await db.rawInsert(
         "INSERT Into Expense (id, amount, date, category)"
         " VALUES (?, ?, ?, ?)", [
            id, expense.amount, expense.date.toString(), expense.category
         ]
      );
      return Expense(id, expense.amount, expense.date, expense.category);
   }
   update(Expense product) async {
      final db = await database;
      var result = await db.update(
         "Expense", product.toMap(), where: "id = ?", whereArgs: [product.id]
      );
      return result;
   }
   delete(int id) async {
      final db = await database;
      db.delete("Expense", where: "id = ?", whereArgs: [id]);
   }
}
Here,
database is the property to get the SQLiteDbProvider object.
initDB is a method used to select and open the SQLite database.
Create a new file, ExpenseListModel.dart to create ExpenseListModel. The purpose of the model is to hold the complete information of the user expenses in the memory and updating the user interface of the application whenever users expense changes in the memory. It is based on Model class from scoped_model package. It has the following properties and methods −
_items − private list of expenses.
items − getter for _items as UnmodifiableListView<Expense> to prevent unexpected or accidental changes to the list.
totalExpense − getter for Total expenses based on the items variable.
double get totalExpense {
   double amount = 0.0;
   for(var i = 0; i < _items.length; i++) {
      amount = amount + _items[i].amount;
   }
   return amount;
}
load − Used to load the complete expenses from database and into the _items variable. It also calls notifyListeners to update the UI.
void load() {
   Future<List<Expense>>
   list = SQLiteDbProvider.db.getAllExpenses();
   list.then( (dbItems) {
      for(var i = 0; i < dbItems.length; i++) {
         _items.add(dbItems[i]);
      } notifyListeners();
   });
}
byId − Used to get a particular expenses from _items variable.
Expense byId(int id) {
   for(var i = 0; i < _items.length; i++) {
      if(_items[i].id == id) {
         return _items[i];
      }
   }
   return null;
}
add − Used to add a new expense item into the _items variable as well as into the database. It also calls notifyListeners to update the UI.
void add(Expense item) {
   SQLiteDbProvider.db.insert(item).then((val) {
      _items.add(val); notifyListeners();
   });
}
Update − Used to Update expense item into the _items variable as well as into the database. It also calls notifyListeners to update the UI.
void update(Expense item) {
   bool found = false;
   for(var i = 0; i < _items.length; i++) {
      if(_items[i].id == item.id) {
         _items[i] = item;
         found = true;
         SQLiteDbProvider.db.update(item); break;
      }
   }
   if(found) notifyListeners();
}
delete − Used to remove an existing expense item in the _items variable as well as from the database. It also calls notifyListeners to update the UI.
void delete(Expense item) {
   bool found = false;
   for(var i = 0; i < _items.length; i++) {
      if(_items[i].id == item.id) {
         found = true;
         SQLiteDbProvider.db.delete(item.id);
         _items.removeAt(i); break;
      }
   }
   if(found) notifyListeners();
}
The complete code of the ExpenseListModel class is as follows −
import 'dart:collection';
import 'package:scoped_model/scoped_model.dart';
import 'Expense.dart';
import 'Database.dart';

class ExpenseListModel extends Model {
   ExpenseListModel() {
      this.load();
   }
   final List<Expense> _items = [];
   UnmodifiableListView<Expense> get items =>
   UnmodifiableListView(_items);

   /*Future<double> get totalExpense {
      return SQLiteDbProvider.db.getTotalExpense();
   }*/

   double get totalExpense {
      double amount = 0.0;
      for(var i = 0; i < _items.length; i++) {
         amount = amount + _items[i].amount;
      }
      return amount;
   }
   void load() {
      Future<List<Expense>> list = SQLiteDbProvider.db.getAllExpenses();
      list.then( (dbItems) {
         for(var i = 0; i < dbItems.length; i++) {
            _items.add(dbItems[i]);
         }
         notifyListeners();
      });
   }
   Expense byId(int id) {
      for(var i = 0; i < _items.length; i++) {
         if(_items[i].id == id) {
            return _items[i];
         }
      }
      return null;
   }
   void add(Expense item) {
      SQLiteDbProvider.db.insert(item).then((val) {
         _items.add(val);
         notifyListeners();
      });
   }
   void update(Expense item) {
      bool found = false;
      for(var i = 0; i < _items.length; i++) {
         if(_items[i].id == item.id) {
            _items[i] = item;
            found = true;
            SQLiteDbProvider.db.update(item);
            break;
         }
      }
      if(found) notifyListeners();
   }
   void delete(Expense item) {
      bool found = false;
      for(var i = 0; i < _items.length; i++) {
         if(_items[i].id == item.id) {
            found = true;
            SQLiteDbProvider.db.delete(item.id);
            _items.removeAt(i); break;
         }
      }
      if(found) notifyListeners();
   }
}
Open main.dart file. Import the classes as specified below −
import 'package:flutter/material.dart';
import 'package:scoped_model/scoped_model.dart';
import 'ExpenseListModel.dart';
import 'Expense.dart';
Add main function and call runApp by passing ScopedModel<ExpenseListModel> widget.
void main() {
   final expenses = ExpenseListModel();
   runApp(
      ScopedModel<ExpenseListModel>(model: expenses, child: MyApp(),)
   );
}
Here,
expenses object loads all the user expenses information from the database. Also, when the application is opened for the first time, it will create the required database with proper tables.
ScopedModel provides the expense information during the whole life cycle of the application and ensures the maintenance of state of the application at any instance. It enables us to use StatelessWidget instead of StatefulWidget.
Create a simple MyApp using MaterialApp widget.
class MyApp extends StatelessWidget {
   // This widget is the root of your application.
   @override
   Widget build(BuildContext context) {
      return MaterialApp(
         title: 'Expense',
         theme: ThemeData(
            primarySwatch: Colors.blue,
         ),
         home: MyHomePage(title: 'Expense calculator'),
      );
   }
}
Create MyHomePage widget to display all the users expense information along with total expenses at the top. Floating button at the bottom right corner will be used to add new expenses.
class MyHomePage extends StatelessWidget {
   MyHomePage({Key key, this.title}) : super(key: key);
   final String title;
   @override
   Widget build(BuildContext context) {
      return Scaffold(
         appBar: AppBar(
            title: Text(this.title),
         ),
         body: ScopedModelDescendant<ExpenseListModel>(
            builder: (context, child, expenses) {
               return ListView.separated(
                  itemCount: expenses.items == null ? 1
                  : expenses.items.length + 1,
                  itemBuilder: (context, index) {
                     if (index == 0) {
                        return ListTile(
                           title: Text("Total expenses: "
                           + expenses.totalExpense.toString(),
                           style: TextStyle(fontSize: 24,
                           fontWeight: FontWeight.bold),)
                        );
                     } else {
                        index = index - 1;
                        return Dismissible(
                           key: Key(expenses.items[index].id.toString()),
                              onDismissed: (direction) {
                              expenses.delete(expenses.items[index]);
                              Scaffold.of(context).showSnackBar(
                                 SnackBar(
                                    content: Text(
                                       "Item with id, "
                                       + expenses.items[index].id.toString() +
                                       " is dismissed"
                                    )
                                 )
                              );
                           },
                           child: ListTile( onTap: () {
                              Navigator.push(
                                 context, MaterialPageRoute(
                                    builder: (context) => FormPage(
                                       id: expenses.items[index].id,
                                       expenses: expenses,
                                    )
                                 )
                              );
                           },
                           leading: Icon(Icons.monetization_on),
                           trailing: Icon(Icons.keyboard_arrow_right),
                           title: Text(expenses.items[index].category + ": " +
                           expenses.items[index].amount.toString() +
                           " \nspent on " + expenses.items[index].formattedDate,
                           style: TextStyle(fontSize: 18, fontStyle: FontStyle.italic),))
                        );
                     }
                  },
                  separatorBuilder: (context, index) {
                     return Divider();
                  },
               );
            },
         ),
         floatingActionButton: ScopedModelDescendant<ExpenseListModel>(
            builder: (context, child, expenses) {
               return FloatingActionButton( onPressed: () {
                  Navigator.push(
                     context, MaterialPageRoute(
                        builder: (context) => ScopedModelDescendant<ExpenseListModel>(
                           builder: (context, child, expenses) {
                              return FormPage( id: 0, expenses: expenses, );
                           }
                        )
                     )
                  );
                  // expenses.add(new Expense(
                     // 2, 1000, DateTime.parse('2019-04-01 11:00:00'), 'Food')
                  );
                  // print(expenses.items.length);
               },
               tooltip: 'Increment', child: Icon(Icons.add), );
            }
         )
      );
   }
}
Here,
ScopedModelDescendant is used to pass the expense model into the ListView and FloatingActionButton widget.
ListView.separated and ListTile widget is used to list the expense information.
Dismissible widget is used to delete the expense entry using swipe gesture.
Navigator is used to open edit interface of an expense entry. It can be activated by tapping an expense entry.
Create a FormPage widget. The purpose of the FormPage widget is to add or update an expense entry. It handles expense entry validation as well.
class FormPage extends StatefulWidget {
   FormPage({Key key, this.id, this.expenses}) : super(key: key);
   final int id;
   final ExpenseListModel expenses;

   @override _FormPageState createState() => _FormPageState(id: id, expenses: expenses);
}
class _FormPageState extends State<FormPage> {
   _FormPageState({Key key, this.id, this.expenses});

   final int id;
   final ExpenseListModel expenses;
   final scaffoldKey = GlobalKey<ScaffoldState>();
   final formKey = GlobalKey<FormState>();

   double _amount;
   DateTime _date;
   String _category;

   void _submit() {
      final form = formKey.currentState;
      if (form.validate()) {
         form.save();
         if (this.id == 0) expenses.add(Expense(0, _amount, _date, _category));
            else expenses.update(Expense(this.id, _amount, _date, _category));
         Navigator.pop(context);
      }
   }
   @override
   Widget build(BuildContext context) {
      return Scaffold(
         key: scaffoldKey, appBar: AppBar(
            title: Text('Enter expense details'),
         ),
         body: Padding(
            padding: const EdgeInsets.all(16.0),
            child: Form(
               key: formKey, child: Column(
                  children: [
                     TextFormField(
                        style: TextStyle(fontSize: 22),
                        decoration: const InputDecoration(
                           icon: const Icon(Icons.monetization_on),
                           labelText: 'Amount',
                           labelStyle: TextStyle(fontSize: 18)
                        ),
                        validator: (val) {
                           Pattern pattern = r'^[1-9]\d*(\.\d+)?$';
                           RegExp regex = new RegExp(pattern);
                           if (!regex.hasMatch(val))
                           return 'Enter a valid number'; else return null;
                        },
                        initialValue: id == 0
                        ? '' : expenses.byId(id).amount.toString(),
                        onSaved: (val) => _amount = double.parse(val),
                     ),
                     TextFormField(
                        style: TextStyle(fontSize: 22),
                        decoration: const InputDecoration(
                           icon: const Icon(Icons.calendar_today),
                           hintText: 'Enter date',
                           labelText: 'Date',
                           labelStyle: TextStyle(fontSize: 18),
                        ),
                        validator: (val) {
                           Pattern pattern = r'^((?:19|20)\d\d)[- /.]
                              (0[1-9]|1[012])[- /.](0[1-9]|[12][0-9]|3[01])$';
                           RegExp regex = new RegExp(pattern);
                           if (!regex.hasMatch(val))
                              return 'Enter a valid date';
                           else return null;
                        },
                        onSaved: (val) => _date = DateTime.parse(val),
                        initialValue: id == 0
                        ? '' : expenses.byId(id).formattedDate,
                        keyboardType: TextInputType.datetime,
                     ),
                     TextFormField(
                        style: TextStyle(fontSize: 22),
                        decoration: const InputDecoration(
                           icon: const Icon(Icons.category),
                           labelText: 'Category',
                           labelStyle: TextStyle(fontSize: 18)
                        ),
                        onSaved: (val) => _category = val,
                        initialValue: id == 0 ? ''
                        : expenses.byId(id).category.toString(),
                     ),
                     RaisedButton(
                        onPressed: _submit,
                        child: new Text('Submit'),
                     ),
                  ],
               ),
            ),
         ),
      );
   }
}
Here,
TextFormField is used to create form entry.
validator property of TextFormField is used to validate the form element along with RegEx patterns.
_submit function is used along with expenses object to add or update the expenses into the database.
The complete code of the main.dart file is as follows −
import 'package:flutter/material.dart';
import 'package:scoped_model/scoped_model.dart';
import 'ExpenseListModel.dart';
import 'Expense.dart';

void main() {
   final expenses = ExpenseListModel();
   runApp(
      ScopedModel<ExpenseListModel>(
         model: expenses, child: MyApp(),
      )
   );
}
class MyApp extends StatelessWidget {
   // This widget is the root of your application.
   @override
   Widget build(BuildContext context) {
      return MaterialApp(
         title: 'Expense',
         theme: ThemeData(
            primarySwatch: Colors.blue,
         ),
         home: MyHomePage(title: 'Expense calculator'),
      );
   }
}
class MyHomePage extends StatelessWidget {
   MyHomePage({Key key, this.title}) : super(key: key);
   final String title;

   @override
   Widget build(BuildContext context) {
      return Scaffold(
         appBar: AppBar(
            title: Text(this.title),
         ),
         body: ScopedModelDescendant<ExpenseListModel>(
            builder: (context, child, expenses) {
               return ListView.separated(
                  itemCount: expenses.items == null ? 1
                  : expenses.items.length + 1, itemBuilder: (context, index) {
                     if (index == 0) {
                        return ListTile( title: Text("Total expenses: "
                        + expenses.totalExpense.toString(),
                        style: TextStyle(fontSize: 24,fontWeight:
                        FontWeight.bold),) );
                     } else {
                        index = index - 1; return Dismissible(
                           key: Key(expenses.items[index].id.toString()),
                           onDismissed: (direction) {
                              expenses.delete(expenses.items[index]);
                              Scaffold.of(context).showSnackBar(
                                 SnackBar(
                                    content: Text(
                                       "Item with id, " +
                                       expenses.items[index].id.toString()
                                       + " is dismissed"
                                    )
                                 )
                              );
                           },
                           child: ListTile( onTap: () {
                              Navigator.push( context, MaterialPageRoute(
                                 builder: (context) => FormPage(
                                    id: expenses.items[index].id, expenses: expenses,
                                 )
                              ));
                           },
                           leading: Icon(Icons.monetization_on),
                           trailing: Icon(Icons.keyboard_arrow_right),
                           title: Text(expenses.items[index].category + ": " +
                           expenses.items[index].amount.toString() + " \nspent on " +
                           expenses.items[index].formattedDate,
                           style: TextStyle(fontSize: 18, fontStyle: FontStyle.italic),))
                        );
                     }
                  },
                  separatorBuilder: (context, index) {
                     return Divider();
                  },
               );
            },
         ),
         floatingActionButton: ScopedModelDescendant<ExpenseListModel>(
            builder: (context, child, expenses) {
               return FloatingActionButton(
                  onPressed: () {
                     Navigator.push(
                        context, MaterialPageRoute(
                           builder: (context)
                           => ScopedModelDescendant<ExpenseListModel>(
                              builder: (context, child, expenses) {
                                 return FormPage( id: 0, expenses: expenses, );
                              }
                           )
                        )
                     );
                     // expenses.add(
                        new Expense(
                           // 2, 1000, DateTime.parse('2019-04-01 11:00:00'), 'Food'
                        )
                     );
                     // print(expenses.items.length);
                  },
                  tooltip: 'Increment', child: Icon(Icons.add),
               );
            }
         )
      );
   }
}
class FormPage extends StatefulWidget {
   FormPage({Key key, this.id, this.expenses}) : super(key: key);
   final int id;
   final ExpenseListModel expenses;

   @override
   _FormPageState createState() => _FormPageState(id: id, expenses: expenses);
}
class _FormPageState extends State<FormPage> {
   _FormPageState({Key key, this.id, this.expenses});
   final int id;
   final ExpenseListModel expenses;
   final scaffoldKey = GlobalKey<ScaffoldState>();
   final formKey = GlobalKey<FormState>();
   double _amount; DateTime _date;
   String _category;
   void _submit() {
      final form = formKey.currentState;
      if (form.validate()) {
         form.save();
         if (this.id == 0) expenses.add(Expense(0, _amount, _date, _category));
         else expenses.update(Expense(this.id, _amount, _date, _category));
         Navigator.pop(context);
      }
   }
   @override
   Widget build(BuildContext context) {
      return Scaffold(
         key: scaffoldKey, appBar: AppBar(
            title: Text('Enter expense details'),
         ),
         body: Padding(
            padding: const EdgeInsets.all(16.0),
            child: Form(
               key: formKey, child: Column(
                  children: [
                     TextFormField(
                        style: TextStyle(fontSize: 22),
                        decoration: const InputDecoration(
                           icon: const Icon(Icons.monetization_on),
                           labelText: 'Amount',
                           labelStyle: TextStyle(fontSize: 18)
                        ),
                        validator: (val) {
                           Pattern pattern = r'^[1-9]\d*(\.\d+)?$';
                           RegExp regex = new RegExp(pattern);
                           if (!regex.hasMatch(val)) return 'Enter a valid number';
                           else return null;
                        },
                        initialValue: id == 0 ? ''
                        : expenses.byId(id).amount.toString(),
                        onSaved: (val) => _amount = double.parse(val),
                     ),
                     TextFormField(
                        style: TextStyle(fontSize: 22),
                        decoration: const InputDecoration(
                           icon: const Icon(Icons.calendar_today),
                           hintText: 'Enter date',
                           labelText: 'Date',
                           labelStyle: TextStyle(fontSize: 18),
                        ),
                        validator: (val) {
                           Pattern pattern = r'^((?:19|20)\d\d)[- /.]
                           (0[1-9]|1[012])[- /.](0[1-9]|[12][0-9]|3[01])$';
                           RegExp regex = new RegExp(pattern);
                           if (!regex.hasMatch(val)) return 'Enter a valid date';
                           else return null;
                        },
                        onSaved: (val) => _date = DateTime.parse(val),
                        initialValue: id == 0 ? '' : expenses.byId(id).formattedDate,
                        keyboardType: TextInputType.datetime,
                     ),
                     TextFormField(
                        style: TextStyle(fontSize: 22),
                        decoration: const InputDecoration(
                           icon: const Icon(Icons.category),
                           labelText: 'Category',
                           labelStyle: TextStyle(fontSize: 18)
                        ),
                        onSaved: (val) => _category = val,
                        initialValue: id == 0 ? '' : expenses.byId(id).category.toString(),
                     ),
                     RaisedButton(
                        onPressed: _submit,
                        child: new Text('Submit'),
                     ),
                  ],
               ),
            ),
         ),
      );
   }
}
Now, run the application.
Add new expenses using floating button.
Edit existing expenses by tapping the expense entry.
Delete the existing expenses by swiping the expense entry in either direction.
Some of the screen shots of the application are as follows −
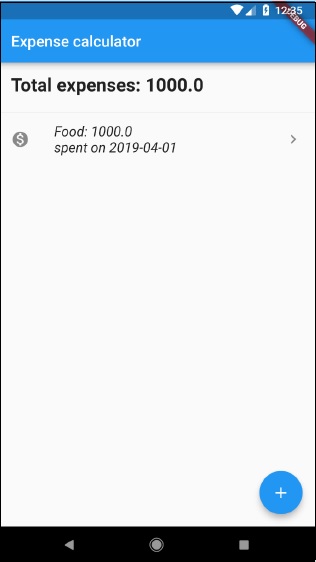
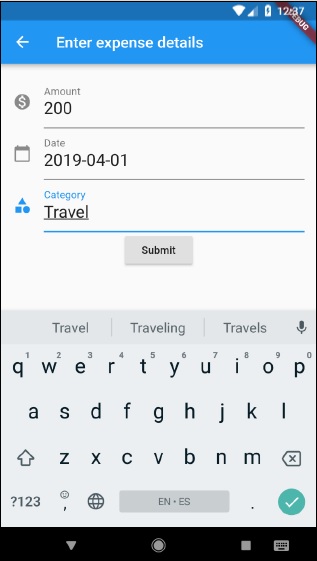
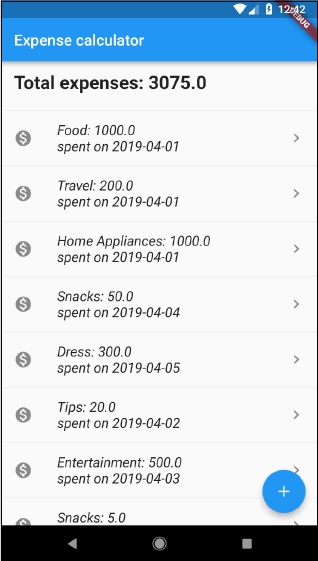
Flutter - Conclusion
Flutter framework does a great job by providing an excellent framework to build mobile applications in a truly platform independent way. By providing simplicity in the development process, high performance in the resulting mobile application, rich and relevant user interface for both Android and iOS platform, Flutter framework will surely enable a lot of new developers to develop high performance and feature-full mobile application in the near future.
