- Flutter - Home
- Flutter - Introduction
- Flutter - Installation
- Creating Simple Application in Android Studio
- Flutter - Architecture Application
- Introduction to Dart Programming
- Flutter - Introduction to Widgets
- Flutter - Introduction to Layouts
- Flutter - Introduction to Gestures
- Flutter - State Management
- Flutter - Animation
- Flutter - Writing Android Specific Code
- Flutter - Writing IOS Specific Code
- Flutter - Introduction to Package
- Flutter - Accessing REST API
- Flutter - Database Concepts
- Flutter - Internationalization
- Flutter - Testing
- Flutter - Deployment
- Flutter - Development Tools
- Flutter - Writting Advanced Applications
- Flutter - Conclusion
- Flutter Useful Resources
- Flutter - Quick Guide
- Flutter - Useful Resources
- Flutter - Discussion
Flutter - Animation
Animation is a complex procedure in any mobile application. In spite of its complexity, Animation enhances the user experience to a new level and provides a rich user interaction. Due to its richness, animation becomes an integral part of modern mobile application. Flutter framework recognizes the importance of Animation and provides a simple and intuitive framework to develop all types of animations.
Introduction
Animation is a process of showing a series of images / picture in a particular order within a specific duration to give an illusion of movement. The most important aspects of the animation are as follows −
Animation have two distinct values: Start value and End value. The animation starts from Start value and goes through a series of intermediate values and finally ends at End values. For example, to animate a widget to fade away, the initial value will be the full opacity and the final value will be the zero opacity.
The intermediate values may be linear or non-linear (curve) in nature and it can be configured. Understand that the animation works as it is configured. Each configuration provides a different feel to the animation. For example, fading a widget will be linear in nature whereas bouncing of a ball will be non-linear in nature.
The duration of the animation process affects the speed (slowness or fastness) of the animation.
The ability to control the animation process like starting the animation, stopping the animation, repeating the animation to set number of times, reversing the process of animation, etc.,
In Flutter, animation system does not do any real animation. Instead, it provides only the values required at every frame to render the images.
Animation Based Classes
Flutter animation system is based on Animation objects. The core animation classes and its usage are as follows −
Animation
Generates interpolated values between two numbers over a certain duration. The most common Animation classes are −
Animation<double> − interpolate values between two decimal number
Animation<Color> − interpolate colors between two color
Animation<Size> − interpolate sizes between two size
AnimationController − Special Animation object to control the animation itself. It generates new values whenever the application is ready for a new frame. It supports linear based animation and the value starts from 0.0 to 1.0
controller = AnimationController(duration: const Duration(seconds: 2), vsync: this);
Here, controller controls the animation and duration option controls the duration of the animation process. vsync is a special option used to optimize the resource used in the animation.
CurvedAnimation
Similar to AnimationController but supports non-linear animation. CurvedAnimation can be used along with Animation object as below −
controller = AnimationController(duration: const Duration(seconds: 2), vsync: this);
animation = CurvedAnimation(parent: controller, curve: Curves.easeIn)
Tween<T>
Derived from Animatable<T> and used to generate numbers between any two numbers other than 0 and 1. It can be used along with Animation object by using animate method and passing actual Animation object.
AnimationController controller = AnimationController(
   duration: const Duration(milliseconds: 1000),
vsync: this); Animation<int> customTween = IntTween(
   begin: 0, end: 255).animate(controller);
Tween can also used along with CurvedAnimation as below −
AnimationController controller = AnimationController(
   duration: const Duration(milliseconds: 500), vsync: this);
final Animation curve = CurvedAnimation(parent: controller, curve: Curves.easeOut);
Animation<int> customTween = IntTween(begin: 0, end: 255).animate(curve);
Here, controller is the actual animation controller. curve provides the type of non-linearity and the customTween provides custom range from 0 to 255.
Work flow of the Flutter Animation
The work flow of the animation is as follows −
Define and start the animation controller in the initState of the StatefulWidget.
AnimationController(duration: const Duration(seconds: 2), vsync: this);
animation = Tween<double>(begin: 0, end: 300).animate(controller);
controller.forward();
Add animation based listener, addListener to change the state of the widget.
animation = Tween<double>(begin: 0, end: 300).animate(controller) ..addListener(() {
   setState(() {
      // The state that has changed here is the animation objects value.
   });
});
Build-in widgets, AnimatedWidget and AnimatedBuilder can be used to skip this process. Both widget accepts Animation object and get current values required for the animation.
Get the animation values during the build process of the widget and then apply it for width, height or any relevant property instead of the original value.
child: Container(
   height: animation.value,
   width: animation.value,
   child: <Widget>,
)
Working Application
Let us write a simple animation based application to understand the concept of animation in Flutter framework.
Create a new Flutter application in Android studio, product_animation_app.
Copy the assets folder from product_nav_app to product_animation_app and add assets inside the pubspec.yaml file.
flutter:
   assets:
   - assets/appimages/floppy.png
   - assets/appimages/iphone.png
   - assets/appimages/laptop.png
   - assets/appimages/pendrive.png
   - assets/appimages/pixel.png
   - assets/appimages/tablet.png
Remove the default startup code (main.dart).
Add import and basic main function.
import 'package:flutter/material.dart';
void main() => runApp(MyApp());
Create the MyApp widget derived from StatefulWidgtet.
class MyApp extends StatefulWidget {
   _MyAppState createState() => _MyAppState();
}
Create _MyAppState widget and implement initState and dispose in addition to default build method.
class _MyAppState extends State<MyApp> with SingleTickerProviderStateMixin {
   Animation<double> animation;
   AnimationController controller;
   @override void initState() {
      super.initState();
      controller = AnimationController(
         duration: const Duration(seconds: 10), vsync: this
      );
      animation = Tween<double>(begin: 0.0, end: 1.0).animate(controller);
      controller.forward();
   }
   // This widget is the root of your application.
   @override
   Widget build(BuildContext context) {
      controller.forward();
      return MaterialApp(
         title: 'Flutter Demo',
         theme: ThemeData(primarySwatch: Colors.blue,),
         home: MyHomePage(title: 'Product layout demo home page', animation: animation,)
      );
   }
   @override
   void dispose() {
      controller.dispose();
      super.dispose();
   }
}
Here,
In initState method, we have created an animation controller object (controller), an animation object (animation) and started the animation using controller.forward.
In dispose method, we have disposed the animation controller object (controller).
In build method, send animation to MyHomePage widget through constructor. Now, MyHomePage widget can use the animation object to animate its content.
Now, add ProductBox widget
class ProductBox extends StatelessWidget {
   ProductBox({Key key, this.name, this.description, this.price, this.image})
      : super(key: key);
   final String name;
   final String description;
   final int price;
   final String image;

   Widget build(BuildContext context) {
      return Container(
         padding: EdgeInsets.all(2),
         height: 140,
         child: Card(
            child: Row(
               mainAxisAlignment: MainAxisAlignment.spaceEvenly,
               children: <Widget>[
                  Image.asset("assets/appimages/" + image),
                  Expanded(
                     child: Container(
                        padding: EdgeInsets.all(5),
                        child: Column(
                           mainAxisAlignment: MainAxisAlignment.spaceEvenly,
                           children: <Widget>[
                              Text(this.name, style:
                                 TextStyle(fontWeight: FontWeight.bold)),
                              Text(this.description),
                                 Text("Price: " + this.price.toString()),
                           ],
                        )
                     )
                  )
               ]
            )
         )
      );
   }
}
Create a new widget, MyAnimatedWidget to do simple fade animation using opacity.
class MyAnimatedWidget extends StatelessWidget {
   MyAnimatedWidget({this.child, this.animation});

   final Widget child;
   final Animation<double> animation;

   Widget build(BuildContext context) => Center(
   child: AnimatedBuilder(
      animation: animation,
      builder: (context, child) => Container(
         child: Opacity(opacity: animation.value, child: child),
      ),
      child: child),
   );
}
Here, we have used AniatedBuilder to do our animation. AnimatedBuilder is a widget which build its content while doing the animation at the same time. It accepts a animation object to get current animation value. We have used animation value, animation.value to set the opacity of the child widget. In effect, the widget will animate the child widget using opacity concept.
Finally, create the MyHomePage widget and use the animation object to animate any of its content.
class MyHomePage extends StatelessWidget {
   MyHomePage({Key key, this.title, this.animation}) : super(key: key);

   final String title;
   final Animation<double>
   animation;

   @override
   Widget build(BuildContext context) {
      return Scaffold(
         appBar: AppBar(title: Text("Product Listing")),body: ListView(
            shrinkWrap: true,
            padding: const EdgeInsets.fromLTRB(2.0, 10.0, 2.0, 10.0),
            children: <Widget>[
               FadeTransition(
                  child: ProductBox(
                     name: "iPhone",
                     description: "iPhone is the stylist phone ever",
                     price: 1000,
                     image: "iphone.png"
                  ), opacity: animation
               ),
               MyAnimatedWidget(child: ProductBox(
                  name: "Pixel",
                  description: "Pixel is the most featureful phone ever",
                  price: 800,
                  image: "pixel.png"
               ), animation: animation),
               ProductBox(
                  name: "Laptop",
                  description: "Laptop is most productive development tool",
                  price: 2000,
                  image: "laptop.png"
               ),
               ProductBox(
                  name: "Tablet",
                  description: "Tablet is the most useful device ever for meeting",
                  price: 1500,
                  image: "tablet.png"
               ),
               ProductBox(
                  name: "Pendrive",
                  description: "Pendrive is useful storage medium",
                  price: 100,
                  image: "pendrive.png"
               ),
               ProductBox(
                  name: "Floppy Drive",
                  description: "Floppy drive is useful rescue storage medium",
                  price: 20,
                  image: "floppy.png"
               ),
            ],
         )
      );
   }
}
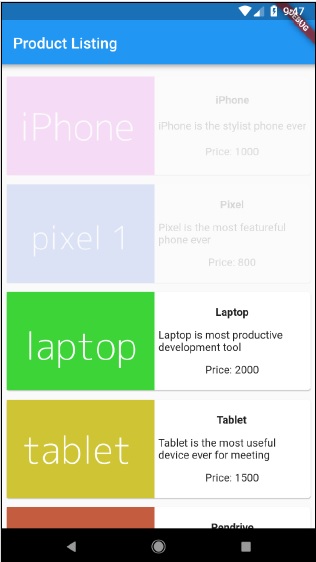
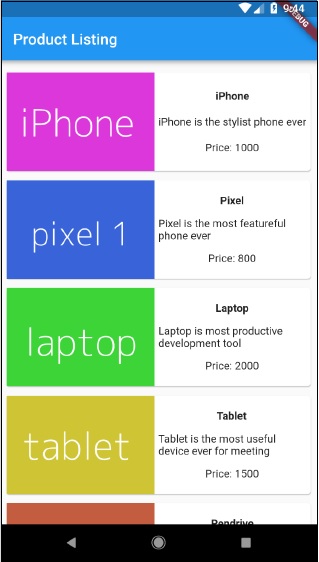
Here, we have used FadeAnimation and MyAnimationWidget to animate the first two items in the list. FadeAnimation is a build-in animation class, which we used to animate its child using opacity concept.
The complete code is as follows −
import 'package:flutter/material.dart';
void main() => runApp(MyApp());

class MyApp extends StatefulWidget {
   _MyAppState createState() => _MyAppState();
}
class _MyAppState extends State<MyApp> with SingleTickerProviderStateMixin {
   Animation<double> animation;
   AnimationController controller;

   @override
   void initState() {
      super.initState();
      controller = AnimationController(
         duration: const Duration(seconds: 10), vsync: this);
      animation = Tween<double>(begin: 0.0, end: 1.0).animate(controller);
      controller.forward();
   }
   // This widget is the root of your application.
   @override
   Widget build(BuildContext context) {
      controller.forward();
      return MaterialApp(
         title: 'Flutter Demo', theme: ThemeData(primarySwatch: Colors.blue,),
         home: MyHomePage(title: 'Product layout demo home page', animation: animation,)
      );
   }
   @override
   void dispose() {
      controller.dispose();
      super.dispose();
   }
}
class MyHomePage extends StatelessWidget {
   MyHomePage({Key key, this.title, this.animation}): super(key: key);
   final String title;
   final Animation<double> animation;

   @override
   Widget build(BuildContext context) {
      return Scaffold(
         appBar: AppBar(title: Text("Product Listing")),
         body: ListView(
            shrinkWrap: true,
            padding: const EdgeInsets.fromLTRB(2.0, 10.0, 2.0, 10.0),
            children: <Widget>[
               FadeTransition(
                  child: ProductBox(
                     name: "iPhone",
                     description: "iPhone is the stylist phone ever",
                     price: 1000,
                     image: "iphone.png"
                  ),
                  opacity: animation
               ),
               MyAnimatedWidget(
                  child: ProductBox(
                     name: "Pixel",
                     description: "Pixel is the most featureful phone ever",
                     price: 800,
                     image: "pixel.png"
                  ),
                  animation: animation
               ),
               ProductBox(
                  name: "Laptop",
                  description: "Laptop is most productive development tool",
                  price: 2000,
                  image: "laptop.png"
               ),
               ProductBox(
                  name: "Tablet",
                  description: "Tablet is the most useful device ever for meeting",
                  price: 1500,
                  image: "tablet.png"
               ),
               ProductBox(
                  name: "Pendrive",
                  description: "Pendrive is useful storage medium",
                  price: 100,
                  image: "pendrive.png"
               ),
               ProductBox(
                  name: "Floppy Drive",
                  description: "Floppy drive is useful rescue storage medium",
                  price: 20,
                  image: "floppy.png"
               ),
            ],
         )
      );
   }
}
class ProductBox extends StatelessWidget {
   ProductBox({Key key, this.name, this.description, this.price, this.image}) :
      super(key: key);
   final String name;
   final String description;
   final int price;
   final String image;
   Widget build(BuildContext context) {
      return Container(
         padding: EdgeInsets.all(2),
         height: 140,
         child: Card(
            child: Row(
               mainAxisAlignment: MainAxisAlignment.spaceEvenly,
               children: <Widget>[
                  Image.asset("assets/appimages/" + image),
                  Expanded(
                     child: Container(
                        padding: EdgeInsets.all(5),
                        child: Column(
                           mainAxisAlignment: MainAxisAlignment.spaceEvenly,
                           children: <Widget>[
                              Text(
                                 this.name, style: TextStyle(
                                    fontWeight: FontWeight.bold
                                 )
                              ),
                              Text(this.description), Text(
                                 "Price: " + this.price.toString()
                              ),
                           ],
                        )
                     )
                  )
               ]
            )
         )
      );
   }
}
class MyAnimatedWidget extends StatelessWidget {
   MyAnimatedWidget({this.child, this.animation});
   final Widget child;
   final Animation<double> animation;

   Widget build(BuildContext context) => Center(
      child: AnimatedBuilder(
         animation: animation,
         builder: (context, child) => Container(
            child: Opacity(opacity: animation.value, child: child),
         ),
         child: child
      ),
   );
}
Compile and run the application to see the results. The initial and final version of the application is as follows −