- Flutter - Home
- Flutter - Introduction
- Flutter - Installation
- Creating Simple Application in Android Studio
- Flutter - Architecture Application
- Introduction to Dart Programming
- Flutter - Introduction to Widgets
- Flutter - Introduction to Layouts
- Flutter - Introduction to Gestures
- Flutter - State Management
- Flutter - Animation
- Flutter - Writing Android Specific Code
- Flutter - Writing IOS Specific Code
- Flutter - Introduction to Package
- Flutter - Accessing REST API
- Flutter - Database Concepts
- Flutter - Internationalization
- Flutter - Testing
- Flutter - Deployment
- Flutter - Development Tools
- Flutter - Writting Advanced Applications
- Flutter - Conclusion
- Flutter Useful Resources
- Flutter - Quick Guide
- Flutter - Useful Resources
- Flutter - Discussion
Flutter - Ephemeral State Management
Since Flutter application is composed of widgets, the state management is also done by widgets. The entry point of the state management is Statefulwidget. Widget can be inherited from Statefulwidget to maintain its state and its children state. Statefulwidget provides an option for a widget to create a state, State
Let us create a widget, RatingBox with state maintenance. The purpose of the widget is to show the current rating of a specific product. The step by step process for creating a RatingBox widget with state maintenance is as follows −
Create the widget, RatingBox by inheriting StatefulWidget.
class RatingBox extends StatefulWidget { }
Create a state for RatingBox, _RatingBoxState by inheriting State<T>
class _RatingBoxState extends State<RatingBox> { }
Override the createState of StatefulWidget method to create the state, _RatingBoxState.
class RatingBox extends StatefulWidget {
   @override
   _RatingBoxState createState() => _RatingBoxState();
}
Create the user interface of the RatingBox widget in build method of _RatingBoxState. Usually, the user interface will be done in the build method of RatingBox widget itself. But, when state maintenance is needed, we need to build the user interface in _RatingBoxState widget. This ensures the re-rendering of user interface whenever the state of the widget is changed.
Widget build(BuildContext context) {
   double _size = 20;
   print(_rating);

   return Row(
      mainAxisAlignment: MainAxisAlignment.end,
      crossAxisAlignment: CrossAxisAlignment.end,
      mainAxisSize: MainAxisSize.max,
      children: <Widget>[
         Container(
            padding: EdgeInsets.all(0),
            child: IconButton(
               icon: (_rating >= 1 ? Icon(Icons.star, size: _size,) :
               Icon(Icons.star_border, size: _size,)),
               color: Colors.red[500],
               iconSize: _size,
            ),
         ), Container(
            padding: EdgeInsets.all(0),
            child: IconButton(
               icon: (_rating >= 2 ? Icon(Icons.star, size: _size,) :
               Icon(Icons.star_border, size: _size,)),
               color: Colors.red[500],
               iconSize: _size,
            ),
         ), Container(
            padding: EdgeInsets.all(0),
            child: IconButton(
               icon: (_rating >= 3 ? Icon(Icons.star, size: _size,) :
               Icon(Icons.star_border, size: _size,)),
               color: Colors.red[500],
               iconSize: _size,
            ),
         ),
      ],
   );
}
Here, we have used three star, created using IconButton widget and arranged it using Row widget in a single row. The idea is to show the rating through the sequence of red stars. For example, if the rating is two star, then first two star will be red and the last one is in white.
Write methods in _RatingBoxState to change / set the state of the widget.
void _setRatingAsOne() {
   setState( () {
      _rating = 1;
   });
}
void _setRatingAsTwo() {
   setState( () {
      _rating = 2;
   });
}
void _setRatingAsThree() {
   setState( () {
      _rating = 3;
   });
}
Here, each method sets the current rating of the widget through setState.
Wire the user gesture (tapping the star) to the proper state changing method.
Widget build(BuildContext context) {
   double _size = 20;
   print(_rating);

   return Row(
      mainAxisAlignment: MainAxisAlignment.end,
      crossAxisAlignment: CrossAxisAlignment.end,
      mainAxisSize: MainAxisSize.max,
      children: <Widget>[
         Container(
            padding: EdgeInsets.all(0),
            child: IconButton(
               icon: (_rating >= 1 ? Icon(Icons.star, size: _size,) :
               Icon(Icons.star_border, size: _size,)),
               color: Colors.red[500],
               onPressed: _setRatingAsOne,
               iconSize: _size,
            ),
         ),
         Container(
            padding: EdgeInsets.all(0),
            child: IconButton(
               icon: (_rating >= 2 ? Icon(Icons.star, size: _size,) :
               Icon(Icons.star_border, size: _size,)),
               color: Colors.red[500],
               onPressed: _setRatingAsTwo,
               iconSize: _size,
            ),
         ),
         Container(
            padding: EdgeInsets.all(0),
            child: IconButton(
               icon: (_rating >= 3 ? Icon(Icons.star, size: _size,) :
               Icon(Icons.star_border, size: _size,)),
               color: Colors.red[500],
               onPressed: _setRatingAsThree,
               iconSize: _size,
            ),
         ),
      ],
   );
}
Here, the onPressed event calls the relevant function to change the state and subsequently change the user interface. For example, if a user clicks the third star, then _setRatingAsThree will be called and it will change the _rating to 3. Since the state is changed, the build method will be called again and the user interface will be build and rendered again.
The complete code of the widget, RatingBox is as follows −
class RatingBox extends StatefulWidget {
   @override
   _RatingBoxState createState() => _RatingBoxState();
}
class _RatingBoxState extends State<RatingBox> {
   int _rating = 0;
   void _setRatingAsOne() {
      setState( () {
         _rating = 1;
      });
   }
   void _setRatingAsTwo() {
      setState( () {
         _rating = 2;
      });
   }
   void _setRatingAsThree() {
      setState( () {
         _rating = 3;
      });
   }
   Widget build(BuildContext context) {
      double _size = 20;
      print(_rating);
      return Row(
         mainAxisAlignment: MainAxisAlignment.end,
         crossAxisAlignment: CrossAxisAlignment.end,
         mainAxisSize: MainAxisSize.max,
         children: <Widget>[
            Container(
               padding: EdgeInsets.all(0),
               child: IconButton(
                  icon: (_rating >= 1 ? Icon(Icons.star, size: _size,) :
                  Icon(Icons.star_border, size: _size,)),
                  color: Colors.red[500],
                  onPressed: _setRatingAsOne,
                  iconSize: _size,
               ),
            ),
            Container(
               padding: EdgeInsets.all(0),
               child: IconButton(
                  icon: (_rating >= 2 ? Icon(Icons.star, size: _size,) :
                  Icon(Icons.star_border, size: _size,)),
                  color: Colors.red[500],
                  onPressed: _setRatingAsTwo,
                  iconSize: _size,
               ),
            ),
            Container(
               padding: EdgeInsets.all(0),
               child: IconButton(
                  icon: (_rating >= 3 ? Icon(Icons.star, size: _size,) :
                  Icon(Icons.star_border, size: _size,)),
                  color: Colors.red[500],
                  onPressed: _setRatingAsThree,
                  iconSize: _size,
               ),
            ),
         ],
      );
   }
}
Let us create a new application and use our newly created RatingBox widget to show the rating of the product.
Create a new Flutter application in Android studio, product_state_app.
Replace main.dart code with below code −
import 'package:flutter/material.dart';
void main() => runApp(MyApp());

class MyApp extends StatelessWidget {
   // This widget is the root of your application.
   @override
   Widget build(BuildContext context) {
      return MaterialApp(
         title: 'Flutter Demo',
         theme: ThemeData(
            primarySwatch: Colors.blue,
         ), home: MyHomePage(title: 'Product state demo home page'),
      );
   }
}
class MyHomePage extends StatelessWidget {
   MyHomePage({Key key, this.title}) : super(key: key);

   final String title;
   @override
   Widget build(BuildContext context) {
      return Scaffold(
         appBar: AppBar(
            title: Text(this.title),
         ),
         body: Center(
            child: Text( 'Hello World', )
         ),
      );
   }
}
Here,
We have created MyHomePage widget by extending StatelessWidget instead of default StatefulWidget and then removed relevant code.
Include our newly created RatingBox widget.
Create a ProductBox widget to list the product along with rating as specified below −
class ProductBox extends StatelessWidget {
   ProductBox({Key key, this.name, this.description, this.price, this.image})
   : super(key: key);

   final String name;
   final String description;
   final int price;
   final String image;

   Widget build(BuildContext context) {
      return Container(
         padding: EdgeInsets.all(2),
         height: 120,
         child: Card(
            child: Row(
               mainAxisAlignment: MainAxisAlignment.spaceEvenly,
               children: <Widget>[
                  Image.asset("assets/appimages/" + image),
                  Expanded(
                     child: Container(
                        padding: EdgeInsets.all(5),
                        child: Column(
                           mainAxisAlignment: MainAxisAlignment.spaceEvenly,
                           children: <Widget>[
                              Text(this.name, style: TextStyle(
                              fontWeight: FontWeight.bold)),
                              Text(this.description),
                              Text("Price: " + this.price.toString()),
                              RatingBox(),
                           ],
                        )
                     )
                  )
               ]
            )
         )
      );
   }
}
Update the MyHomePage widget to include the ProductBox widget as specified below −
class MyHomePage extends StatelessWidget {
   MyHomePage({Key key, this.title}) : super(key: key);
   final String title;

   @override
   Widget build(BuildContext context) {
      return Scaffold(
         appBar: AppBar(title: Text("Product Listing")),
         body: ListView(
            shrinkWrap: true, padding: const EdgeInsets.fromLTRB(2.0, 10.0, 2.0, 10.0),
            children: <Widget>[
               ProductBox(
                  name: "iPhone",
                  description: "iPhone is the stylist phone ever",
                  price: 1000,
                  image: "iphone.png"
               ),
               ProductBox(
                  name: "Pixel",
                  description: "Pixel is the most feature phone ever",
                  price: 800,
                  image: "pixel.png"
               ),
               ProductBox(
                  name: "Laptop",
                  description: "Laptop is most productive development tool",
                  price: 2000,
                  image: "laptop.png"
               ),
               ProductBox(
                  name: "Tablet",
                  description: "Tablet is the most useful device ever for meeting",
                  price: 1500,
                  image: "tablet.png"
               ),
               ProductBox(
                  name: "Pendrive",
                  description: "Pendrive is useful storage medium",
                  price: 100,
                  image: "pendrive.png"
               ),
               ProductBox(
                  name: "Floppy Drive",
                  description: "Floppy drive is useful rescue storage medium",
                  price: 20,
                  image: "floppy.png"
               ),
            ],
         )
      );
   }
}
The complete code of the application is as follows −
import 'package:flutter/material.dart';
void main() => runApp(MyApp());

class MyApp extends StatelessWidget {
   // This widget is the root of your application.
   @override
   Widget build(BuildContext context) {
      return MaterialApp(
         title: 'Flutter Demo',
         theme: ThemeData(
            primarySwatch: Colors.blue,
         ),
         home: MyHomePage( title: 'Product layout demo home page'),
      );
   }
}
class MyHomePage extends StatelessWidget {
   MyHomePage({Key key, this.title}) : super(key: key);

   final String title;
   @override
   Widget build(BuildContext context) {
      return Scaffold(
         appBar: AppBar(title: Text("Product Listing")),
         body: ListView(
            shrinkWrap: true,
            padding: const EdgeInsets.fromLTRB(2.0, 10.0, 2.0, 10.0),
            children: <Widget>[
               ProductBox(
                  name: "iPhone",
                  description: "iPhone is the stylist phone ever",
                  price: 1000,
                  image: "iphone.png"
               ),
               ProductBox(
                  name: "Pixel",
                  description: "Pixel is the most featureful phone ever",
                  price: 800,
                  image: "pixel.png"
               ),
               ProductBox(
                  name: "Laptop",
                  description: "Laptop is most productive development tool",
                  price: 2000,
                  image: "laptop.png"
               ),
               ProductBox(
                  name: "Tablet",
                  description: "Tablet is the most useful device ever for meeting",
                  price: 1500,
                  image: "tablet.png"
               ),
               ProductBox(
                  name: "Pendrive",
                  description: "iPhone is the stylist phone ever",
                  price: 100,
                  image: "pendrive.png"
               ),
               ProductBox(
                  name: "Floppy Drive",
                  description: "iPhone is the stylist phone ever",
                  price: 20,
                  image: "floppy.png"
               ),
               ProductBox(
                  name: "iPhone",
                  description: "iPhone is the stylist phone ever",
                  price: 1000,
                  image: "iphone.png"
               ),
               ProductBox(
                  name: "iPhone",
                  description: "iPhone is the stylist phone ever",
                  price: 1000,
                  image: "iphone.png"
               ),
            ],
         )
      );
   }
}
class RatingBox extends StatefulWidget {
   @override
   _RatingBoxState createState() =>
   _RatingBoxState();
}
class _RatingBoxState extends State<RatingBox> {
   int _rating = 0;
   void _setRatingAsOne() {
      setState( () {
         _rating = 1;
      });
   }
   void _setRatingAsTwo() {
      setState( () {
         _rating = 2;
      });
   }
   void _setRatingAsThree() {
      setState( () {
         _rating = 3;
      });
   }
   Widget build(BuildContext context) {
      double _size = 20;
      print(_rating);
      return Row(
         mainAxisAlignment: MainAxisAlignment.end,
         crossAxisAlignment: CrossAxisAlignment.end,
         mainAxisSize: MainAxisSize.max,
         children: <Widget>[
            Container(
               padding: EdgeInsets.all(0),
               child: IconButton(
                  icon: (_rating >= 1 ? Icon(Icons.star, size: _size,) :
                  Icon(Icons.star_border, size: _size,)),
                  color: Colors.red[500],
                  onPressed: _setRatingAsOne,
                  iconSize: _size,
               ),
            ),
            Container(
               padding: EdgeInsets.all(0),
               child: IconButton(
                  icon: (_rating >= 2 ? Icon(Icons.star, size: _size,) :
                  Icon(Icons.star_border, size: _size,)),
                  color: Colors.red[500],
                  onPressed: _setRatingAsTwo,
                  iconSize: _size,
               ),
            ),
            Container(
               padding: EdgeInsets.all(0),
               child: IconButton(
                  icon: (_rating >= 3 ? Icon(Icons.star, size: _size,) :
                  Icon(Icons.star_border, size: _size,)),
                  Colors.red[500],
                  onPressed: _setRatingAsThree,
                  iconSize: _size,
               ),
            ),
         ],
      );
   }
}
class ProductBox extends StatelessWidget {
   ProductBox({Key key, this.name, this.description, this.price, this.image}) :
   super(key: key);
   final String name;
   final String description;
   final int price;
   final String image;
   Widget build(BuildContext context) {
      return Container(
         padding: EdgeInsets.all(2),
         height: 140,
         child: Card(
            child: Row(
               mainAxisAlignment: MainAxisAlignment.spaceEvenly,
               children: <Widget>[
                  Image.asset("assets/appimages/" + image),
                  Expanded(
                     child: Container(
                        padding: EdgeInsets.all(5),
                        child: Column(
                           mainAxisAlignment: MainAxisAlignment.spaceEvenly,
                           children: <Widget>[
                              Text(this.name, style: TextStyle(fontWeight: FontWeight.bold)),
                              Text(this.description),
                              Text("Price: " + this.price.toString()),
                              RatingBox(),
                           ],
                        )
                     )
                  )
               ]
            )
         )
      );
   }
}
-
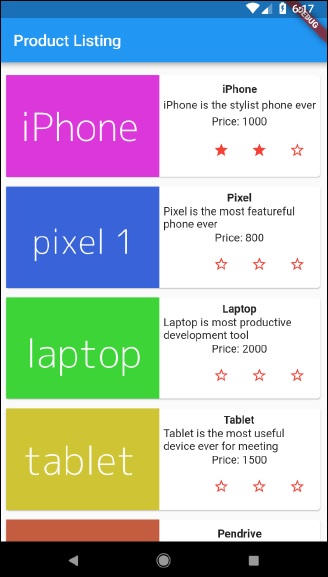
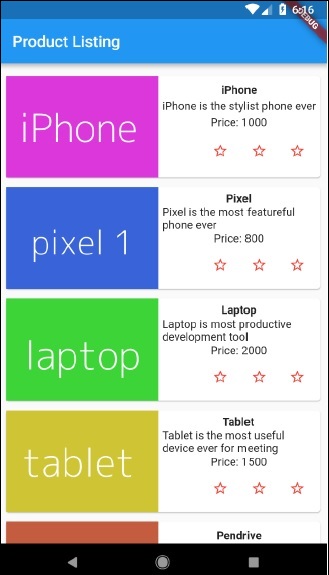
Finally, run the application and see the State management - Product list page Results as shown here −
Clicking the rating star will update the rating of the product. For example, setting 2-star rating for iPhone will display the rating as below −